Page 1342 of 1784
(7) Set sun gear/clutch assembly aside for final as-
sembly.
Fig. 6 Removing/Installing Sun Gear
Fig. 7 Removing/Installing Second Snap Ring
Fig. 8 Checking Sun Gear Bushings
Fig. 9 Installing Clutch And Hub Assembly On Sun
Gear
JAW-4 TRANSMISSION OVERHAUL 21 - 231
Page 1345 of 1784
REAR PLANETARY, NO. 2 ONE-WAY CLUTCH AND
OUTPUT SHAFT OVERHAUL
PLANETARY/BRAKE PACK/OUTPUT SHAFT
DISASSEMBLY
(1) Remove output shaft from gear assembly (Fig.
2).
(2) Remove and discard shaft seal ring (Fig. 4).
(3) Remove brake pack from planetary gear (Fig.
4).
(4) Measure thickness of each brake pack disc.
Minimum thickness is 1.51 mm (0.0594 in.). Replace
all discs if any disc is thinner than specified.
(5) Remove planetary gear from ring gear (Fig. 5).
(6) Check No. 2 one-way clutch. Hold planetary
gear and turn clutch inner race in both directions.Race should turn freely counterclockwise, but lock
when turned clockwise. Replace one-way clutch if
necessary.
Fig. 1 Rear Planetary, Brake Pack, Clutch And Output Shaft Components
Fig. 2 Removing/Installing Output Shaft
21 - 234 AW-4 TRANSMISSION OVERHAULJ
Page 1346 of 1784
(7) Remove clutch inner race from planetary gear
(Fig. 7).
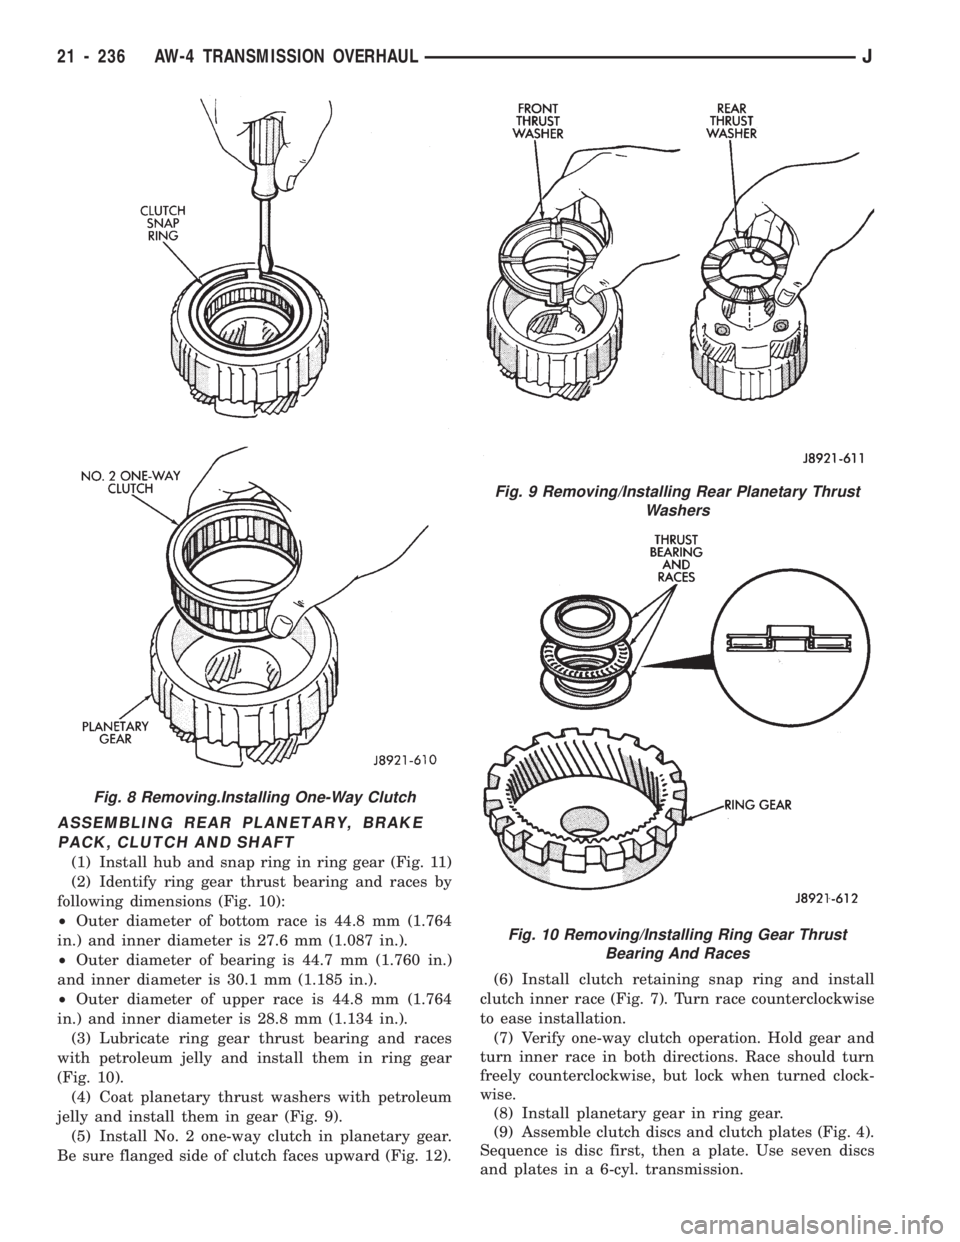
(8) Remove clutch snap ring and remove No. 2 one-
way clutch from planetary (Fig. 8).
(9) Remove front and rear thrust washers from
planetary gear (Fig. 9).
(10) Remove thrust bearing and washers from ring
gear (Fig. 10).
(11) Remove ring gear snap ring and remove ring
gear hub (Fig. 11).
(12) Inspect and replace any worn or damaged
planetary gear components.
Fig. 7 Removing/Installing Clutch Inner Race
Fig. 5 Removing/Installing Rear Planetary
Fig. 3 Removing/Installing Shaft Seal Ring
Fig. 4 Removing/Installing First-Reverse Brake Pack
Fig. 6 Checking No. 2 One-Way Clutch Operation
JAW-4 TRANSMISSION OVERHAUL 21 - 235
Page 1347 of 1784

ASSEMBLING REAR PLANETARY, BRAKE
PACK, CLUTCH AND SHAFT
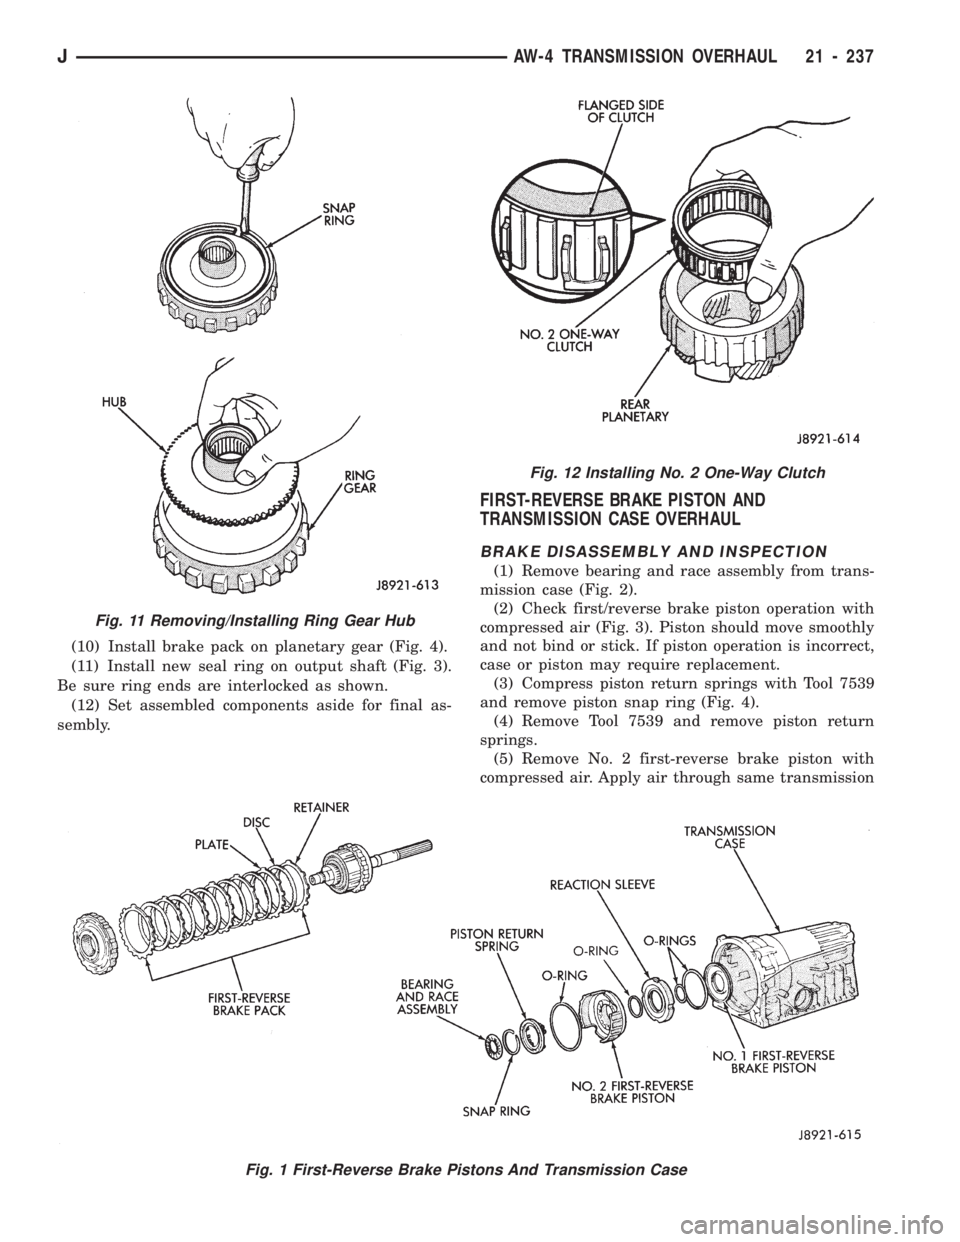
(1) Install hub and snap ring in ring gear (Fig. 11)
(2) Identify ring gear thrust bearing and races by
following dimensions (Fig. 10):
²Outer diameter of bottom race is 44.8 mm (1.764
in.) and inner diameter is 27.6 mm (1.087 in.).
²Outer diameter of bearing is 44.7 mm (1.760 in.)
and inner diameter is 30.1 mm (1.185 in.).
²Outer diameter of upper race is 44.8 mm (1.764
in.) and inner diameter is 28.8 mm (1.134 in.).
(3) Lubricate ring gear thrust bearing and races
with petroleum jelly and install them in ring gear
(Fig. 10).
(4) Coat planetary thrust washers with petroleum
jelly and install them in gear (Fig. 9).
(5) Install No. 2 one-way clutch in planetary gear.
Be sure flanged side of clutch faces upward (Fig. 12).(6) Install clutch retaining snap ring and install
clutch inner race (Fig. 7). Turn race counterclockwise
to ease installation.
(7) Verify one-way clutch operation. Hold gear and
turn inner race in both directions. Race should turn
freely counterclockwise, but lock when turned clock-
wise.
(8) Install planetary gear in ring gear.
(9) Assemble clutch discs and clutch plates (Fig. 4).
Sequence is disc first, then a plate. Use seven discs
and plates in a 6-cyl. transmission.
Fig. 8 Removing.Installing One-Way Clutch
Fig. 9 Removing/Installing Rear Planetary Thrust
Washers
Fig. 10 Removing/Installing Ring Gear Thrust
Bearing And Races
21 - 236 AW-4 TRANSMISSION OVERHAULJ
Page 1348 of 1784

(10) Install brake pack on planetary gear (Fig. 4).
(11) Install new seal ring on output shaft (Fig. 3).
Be sure ring ends are interlocked as shown.
(12) Set assembled components aside for final as-
sembly.
FIRST-REVERSE BRAKE PISTON AND
TRANSMISSION CASE OVERHAUL
BRAKE DISASSEMBLY AND INSPECTION
(1) Remove bearing and race assembly from trans-
mission case (Fig. 2).
(2) Check first/reverse brake piston operation with
compressed air (Fig. 3). Piston should move smoothly
and not bind or stick. If piston operation is incorrect,
case or piston may require replacement.
(3) Compress piston return springs with Tool 7539
and remove piston snap ring (Fig. 4).
(4) Remove Tool 7539 and remove piston return
springs.
(5) Remove No. 2 first-reverse brake piston with
compressed air. Apply air through same transmission
Fig. 1 First-Reverse Brake Pistons And Transmission Case
Fig. 11 Removing/Installing Ring Gear Hub
Fig. 12 Installing No. 2 One-Way Clutch
JAW-4 TRANSMISSION OVERHAUL 21 - 237
Page 1359 of 1784
Fig. 6 Removing/Installing 3-4 Shift Valve
Fig. 7 Removing/Installing Second Coast Modulator
Valve
Fig. 8 Removing/Installing Converter Clutch Relay
Valve
Fig. 9 Relay Valve Components
21 - 248 AW-4 TRANSMISSION OVERHAULJ
Page 1367 of 1784

(4) Install rear planetary gear, second brake drum
and output shaft as outlined in following steps:
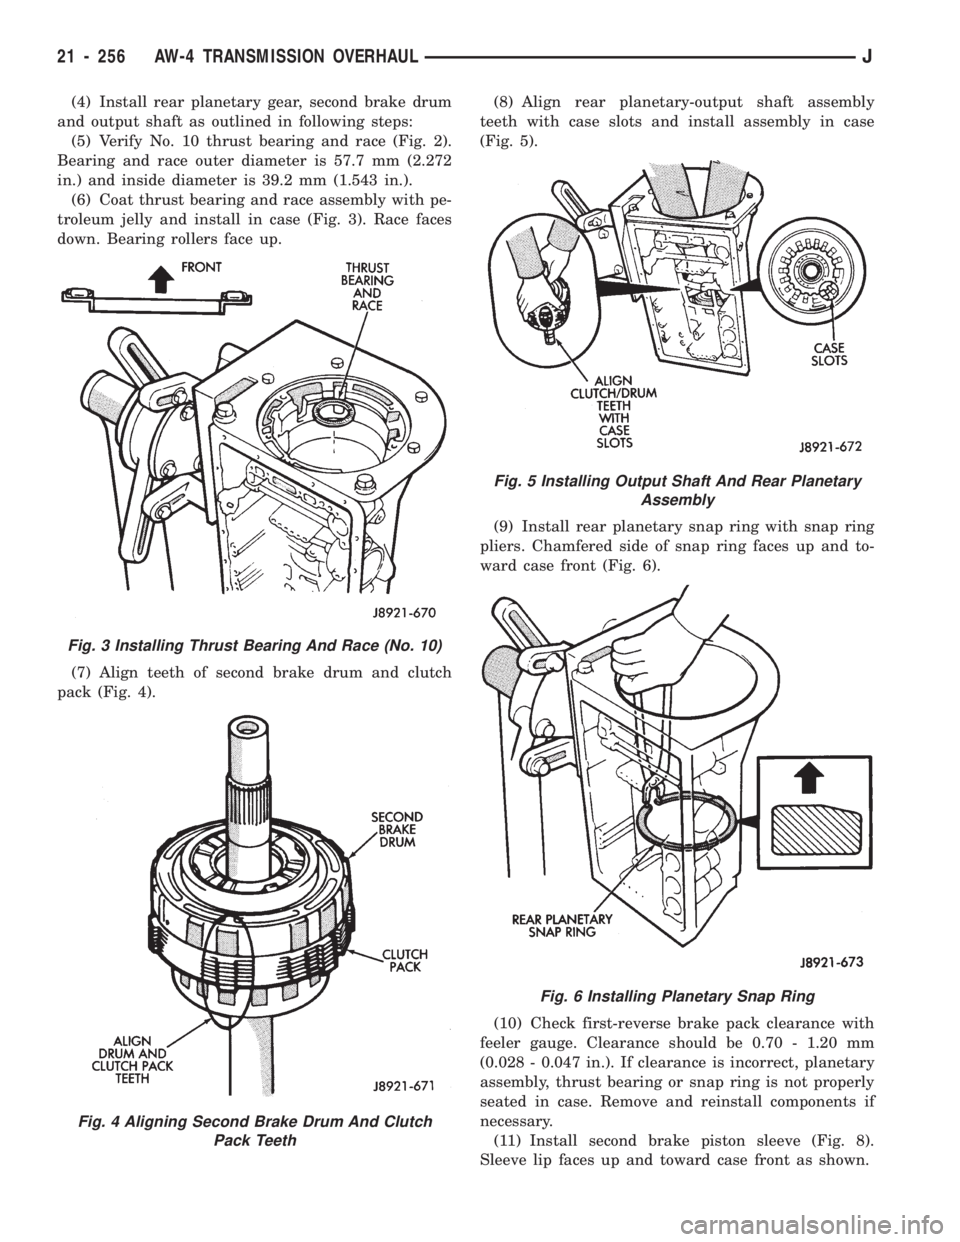
(5) Verify No. 10 thrust bearing and race (Fig. 2).
Bearing and race outer diameter is 57.7 mm (2.272
in.) and inside diameter is 39.2 mm (1.543 in.).
(6) Coat thrust bearing and race assembly with pe-
troleum jelly and install in case (Fig. 3). Race faces
down. Bearing rollers face up.
(7) Align teeth of second brake drum and clutch
pack (Fig. 4).(8) Align rear planetary-output shaft assembly
teeth with case slots and install assembly in case
(Fig. 5).
(9) Install rear planetary snap ring with snap ring
pliers. Chamfered side of snap ring faces up and to-
ward case front (Fig. 6).
(10) Check first-reverse brake pack clearance with
feeler gauge. Clearance should be 0.70 - 1.20 mm
(0.028 - 0.047 in.). If clearance is incorrect, planetary
assembly, thrust bearing or snap ring is not properly
seated in case. Remove and reinstall components if
necessary.
(11) Install second brake piston sleeve (Fig. 8).
Sleeve lip faces up and toward case front as shown.
Fig. 3 Installing Thrust Bearing And Race (No. 10)
Fig. 4 Aligning Second Brake Drum And Clutch
Pack Teeth
Fig. 5 Installing Output Shaft And Rear Planetary
Assembly
Fig. 6 Installing Planetary Snap Ring
21 - 256 AW-4 TRANSMISSION OVERHAULJ
Page 1369 of 1784
(17) Install No. 1 one-way clutch (Fig. 14). Short
flanged side of clutch faces up and toward case front.
(18) Install second brake pack (Fig. 15). Install
disc then plate. Continue installation sequence until
correct number of discs-plates are installed. Use five
discs and five plates.
(19) Install second brake pack retainer with
rounded edge of retainer facing disc.
(20) Install second brake pack snap ring.
(21) Check brake pack clearance with feeler gauge
(Fig. 16). Clearance should be 0.062 - 1.98 mm (0.024
- 0.078 in.). If brake pack clearance is not correct,
brake pack components are not seated. Reassemble
brake pack if necessary.
Fig. 14 Installing No. 1 One-Way Clutch
Fig. 12 Installing Park Rod Bracket
Fig. 13 Checking Park Pawl Engagement
Fig. 15 Installing Second Brake Pack
Fig. 16 Checking Second Brake Pack Clearance
21 - 258 AW-4 TRANSMISSION OVERHAULJ