Page 1367 of 1413
Windshield Wiper Motor Replacement
Open the hood and remove the cap nuts and wipel
atms.
NOTE: Remove th€ wiper arms carefully without
damaging the hood.
Remove the hood seal and air scoop by prying out
their trim clios.
Disconnect the 5-P connector trom the windshield
wiDer motor.
Remove the four mounting bolts and wiper linkage
assembly.
Remove the wiper harn€ss from the wipe. linkage.
o.Separate the wiper linkage and crank arm at thejoint.
Remove the three mounting bolts and wipet motor.
MOUNTII{GBOLTS9.8 N.m(1.0 kgm.l, 7.2 lbI.ftl
8. Install in the reverse order of removal.
Irflnfi]
23-261
Page 1368 of 1413
Wipers/Washers
Rear Window Wiper Motor Test-Keal wlnqow wlper |Yloror I esr
1. Disconnect the 4-P connector from the wiper motor.lf the moto. does not run or fails to tun smoothly,
replace it.
Reconnect the 4-P connector to the wipet motor as-
sembly.
Connect an analog voltmeter between the D (LT
GRN/BLKI and B (BLK) terminals. Run the motor by
turning the wiper switch ON.
The voltmeter should slternately indicate O V and
more than 4 V.
NOT€: Use an analog tester.
4.
4-PCONNECTOR
A (GBN/BLK)
C IGRNI
View trom terminal side
2. Test the motor by connecting battery power to the
A (GRN/BLK) and ground to the C (GRN) terminals.
The motor should run smoothly.
C (GRI{}
23-262
Page 1369 of 1413

l.
2.
1.
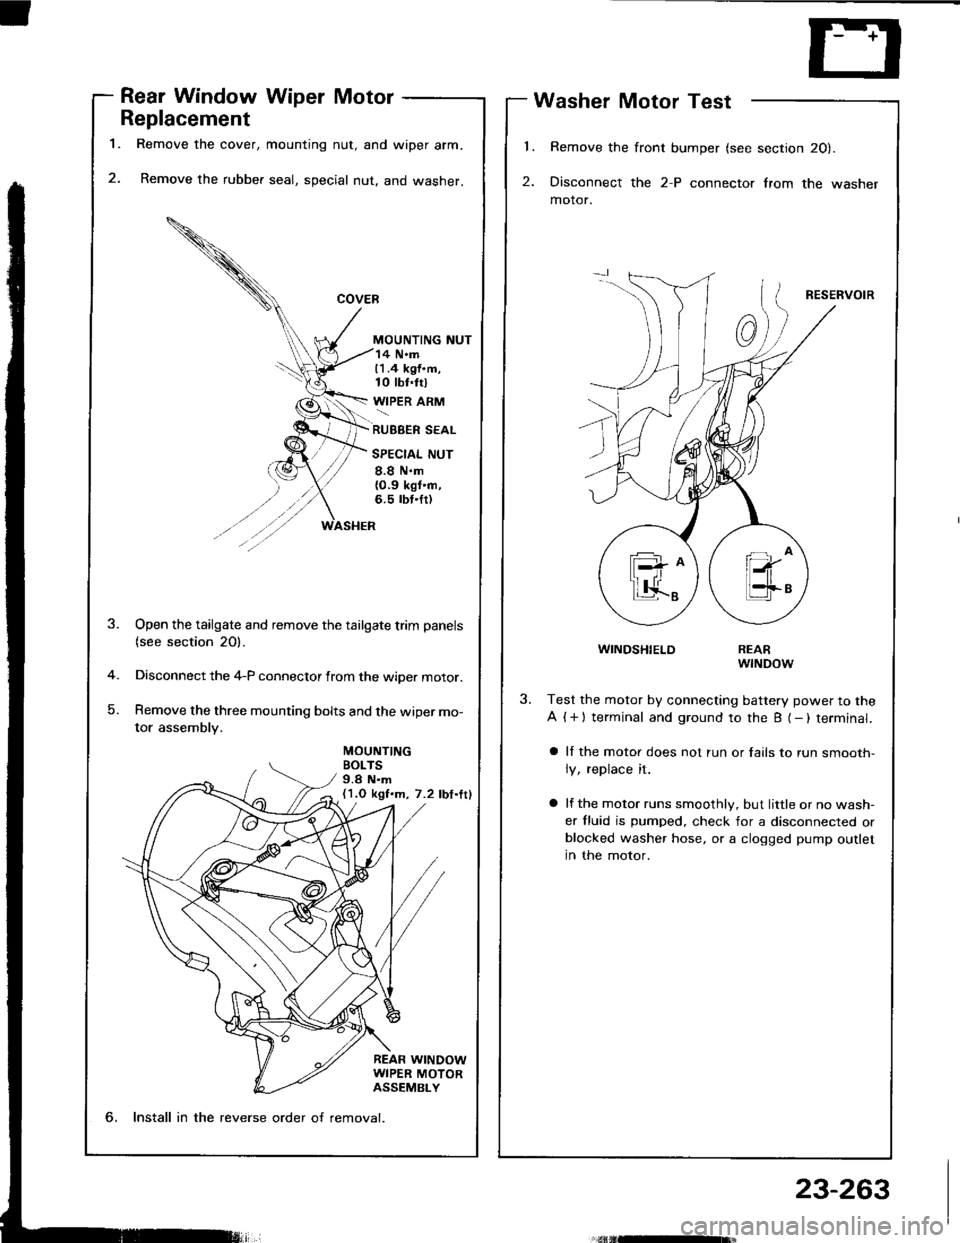
Rear Window Wiper Motor
Replacement
Remove the cover, mounting nut, and wiper arm.
Remove the rubber seal, special nut, and washer.
MOUNTING NUT
Washer Motor Test
Remove the front bumper (see section 20).
Disconnect the 2-P connector lrom the washer
motor.
RESERVOIR
WINDSHIELD
14 N.m11.4 kgf.m,10 tbt.trl
WIPER ARM
RUBBER SEAL
SPECIAL NUT
8.8 N.m{0.9 kgt'n,6.5 rbt.fr)
MOUNTINGBOLTS9.8 N.m(1.O kgf.m, 7.2 lbf.ttl
-4
)
Open the tailgate and remove the tailgate trim panels(see section 20).
Disconnect the 4-P connector from the wiper motor.
Remove the three mounting bolts and the wiper mo-
tor assembly.
REARwrNDow
Test the motor by connecting battery power to the
A ( + ) terminal and ground to the B (- ) terminal.
a ll the motor does not run or fails to run smooth-
ly, replace it.
a lf the motor runs smoothly, but little or no wash-
er fluid is pumped. check for a disconnected orblocked washer hose, or a clogged pump outlet
in the motor.
6, Install in the reverse order o{ removal.
23-263
Page 1370 of 1413
Wipers/Washers
Washer Replacement
1.
5.
6.
Bemove the Jront bumper (see section 2Ol.
Remove the left lront inner fender.
Disconnect the 2-P connector and hose from the
washer motor.
Remove the three mounting bohs and the washer
reservorr.
Remove the washer motor from the reservoir.
Remove the windshield wiper arms and air scoop
(see page 23-261). Then remove the washer noz-
zles and hoses.
lnstall in the reverse order of removal.
NOTE:
a Take care not to pinch the hoses during instal-
lation.
a Install the clips tirmly.
a After installing, adjust the aim of the washer
nozztes.
7.
REARwtt{DowWASHERt{ozzLEWINDSHIELDWASHERNOZZLE
n
V..,.,,@
l(H
n
MOUNTINGBOLTS9.8 N.m{1.O kgf.m, 7.2 lbf.ftl
23-264
Page 1375 of 1413
Supplemental Restraint System (SRSI
Wiring Locations
CAUnON: Make sure all SRS ground locrtion3 lrc clrln rnd ground3 tra |.curalv rltachad.
NOTE:
o Alt SRS electricsl wiring harnesses are covered with ysllow insulation.
. RsDlace the entire affected SRS harness assembly if it has an open circuit or damaged wiring.
CABIE REEL to DdrrEFS AnaAC3+ OOI{iECTOR
DASHBOARD WIRE HARNEi9to INDICATOB UGHT in GAUGE ASSEMBLY
5-P CONNECTOBaFs irA[t H^RiEssto FROiIT PASSEMIEFS Ana G3t coftf'Eclon
SRS MAIN HARNESS tO
MAIN WIRE HARNESS+P OONNECTOR
C. b Ra nod.ll
SnS Alt{ ll^ntc8s too sH SErson2+ OOt{tlEcT()R
SRS MAIN HARNESSto UNDER-DASHFUSE/RELAY BOX2"P @NNECTOR
MAIN WIRE HARNESSto DASHBOARD WIREHARNESSlGP CONNECTOR
SBS MAIN HARNESS toLEFT DASH SENSOR2.P CONNECTOA
23-270
Page 1377 of 1413

Supplemental Restraint System (SRSI
Wiring Precautions
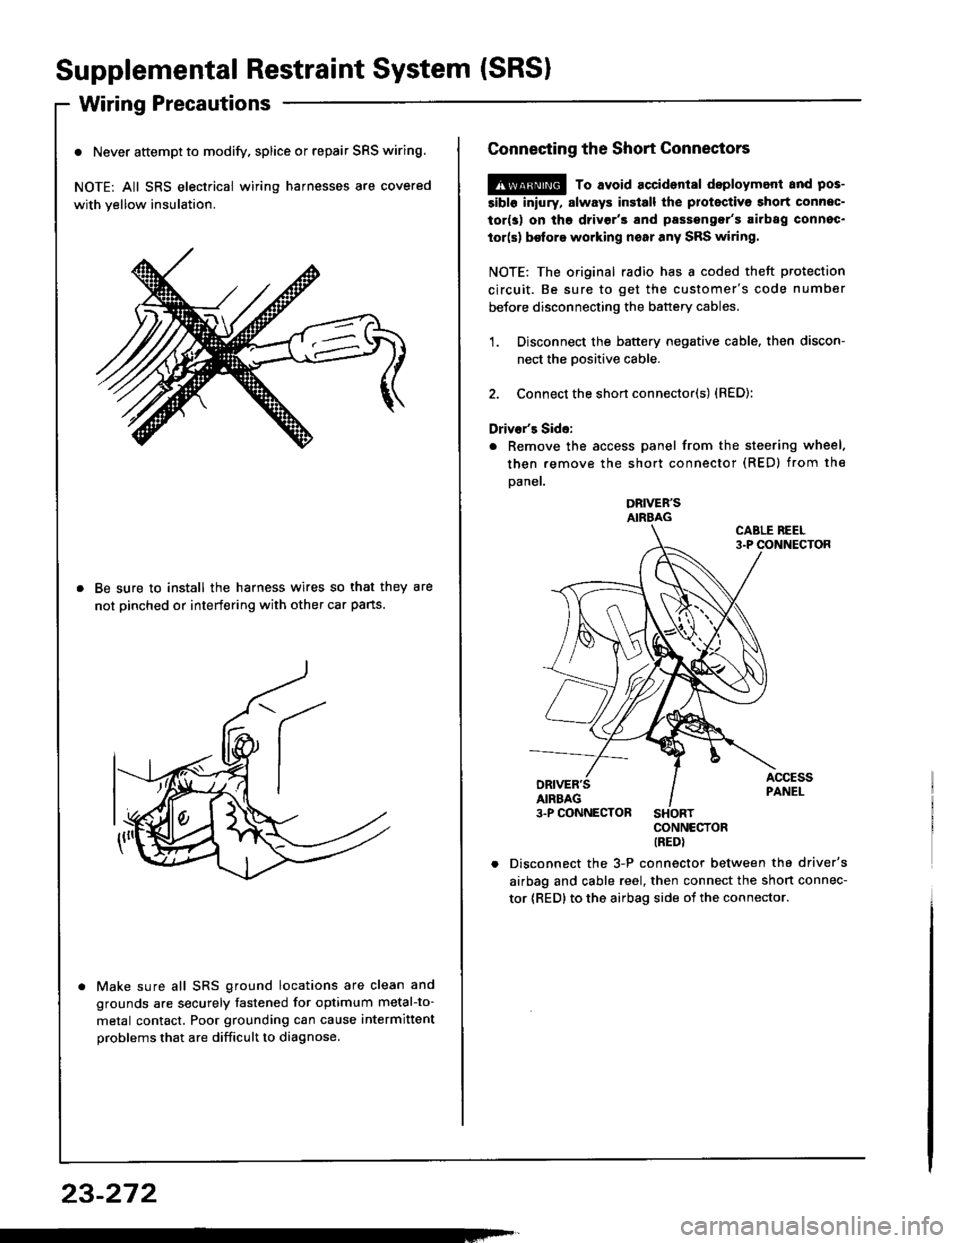
o Never attempt to modify. splice or repair SRS wiring.
NOTE: All SRS electrical wiring harnesses are covered
with yellow insulation.
Be sure to install the harness wires so that they are
not pinched or interfering with other car pans.
Make sure all SRS ground locations are clean and
grounds are securely fastened for optimum metal-to-
metal contact. Poor grounding can cause intermittent
problems that are difficult to diagnose.
23-272
Connecting the Short Connectors
@ To avoid accident8l deploymont and pos-
5ibl6 iniury, slways insiall the protectiva short connec-
tor(s) on tho drivgr'3 and passengor's airbag connec.
tor(s) be{ore working noar any SRS wiring.
NOTE: The original radio has I coded theft protection
circuit. Be sure to get the customer's code number
before disconnecting the battery cables.
1. Disconnect the battery negative cable. then discon-
nect the Dositive cable.
2. Connect the short connector(s) {RED):
Driver's Side:
. Remove the access panel from the steering wheel.
then remove the short connector (RED) from the
Daner.
DRIVER'SAIRBAG
CONNECTORIREDI
Disconnect the 3-P connector between the driver's
airbag and cable reel, then connect the short connec-
tor {RED} to the airbag side oi the connector.
Page 1378 of 1413
Front Pas3enger's Side:
. Remove the glove box damper (see section 20), and
then remove the glove box.
. Disconnect the 3-P connector between the front oas-
senger's airbag and the SRS main harness, then con-
nect the short connector (RED) to the airbag side of
the connector.
SHORT CONNECTOR(REDI
SRS MAIN HARNESS
b,
Disconnecting the SRS Connector at the
Under-dash Fuse/relay Box:
CAUTION: Avoid br.aking the connoctor; it's doubte-
locksd.
1. First lift the connector lid with a thin screwdriver,
then press the connector tab down and pull the con-neclor out.
CONNECTORt_tD
To reinstall the connector. push it into position untilit clicks, then close its lid.
23-273
Page 1379 of 1413

Supplemental Restraint System (SRS)
Steerin g-related Precautions
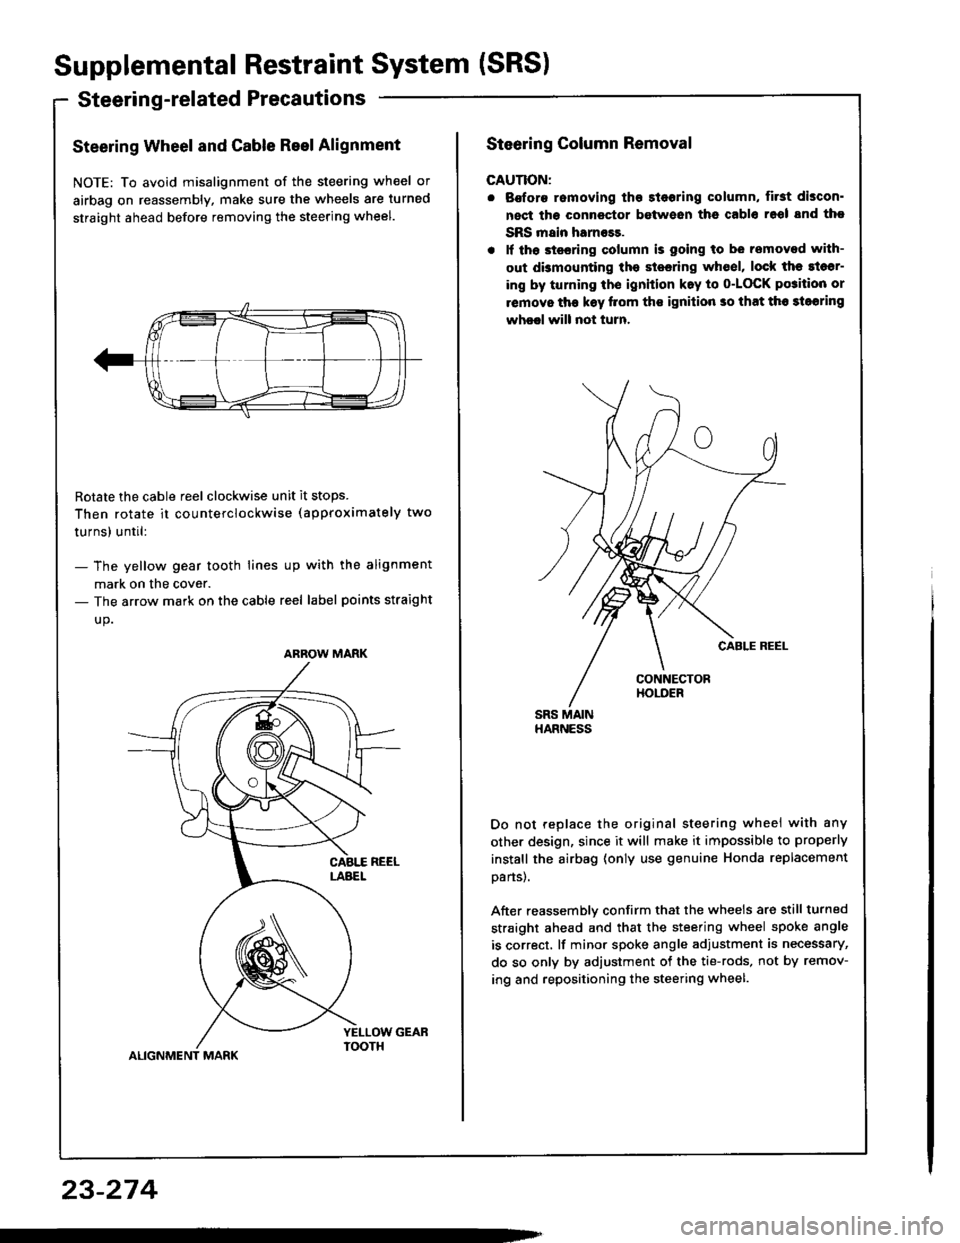
Steering Wheel and Cable Reel Alignment
NOTE: To avoid misalignment of the steering wheel or
airbag on reassembly, make sure the wheels are turned
straight ahead before removing the steering wheel.
Rotate the cable reel clockwise unit it stops.
Then rotate it co u nterclockwise (approximately two
turnsl until:
- The yellow gear tooth lines up with the alignment
mark on the cover.- The arrow mark on the cable reel label points straight
up.
ALIGNMENT MARK
ARROW MARK
23-274
Steering Column Removal
CAUTION:
. Bofore romoving tho 3l6oring column, first discon'
nect tha connector between ths cablo 16ol snd tho
SRS main harness.
. lf th6 stssring column is going to be removed with-
out dbmounting the stesring wh6el, lock the sl6sr-
ing by turning th€ ignition k.y to o-LOCK po3ition or
removo tha k€y llom ths ignilion so that th6 3loaring
wheel will not turn.
Do not replace the original steering wheei with any
other design, since it will make it impossible to properly
instsll the airbag (only use genuine Honda replacement
oans).
After reassemblv confirm that the wheels are still turned
straight ahead and that the steering wheel spoke angle
is correct, lf minor spoke angle adjustment is necessary,
do so only by adjustment of the tie-rods, not by remov-
ing and repositioning the steering wheel.