Page 353 of 1413

Reverse Change Holder,
Reverse ldler Gear
Clearance Inspection
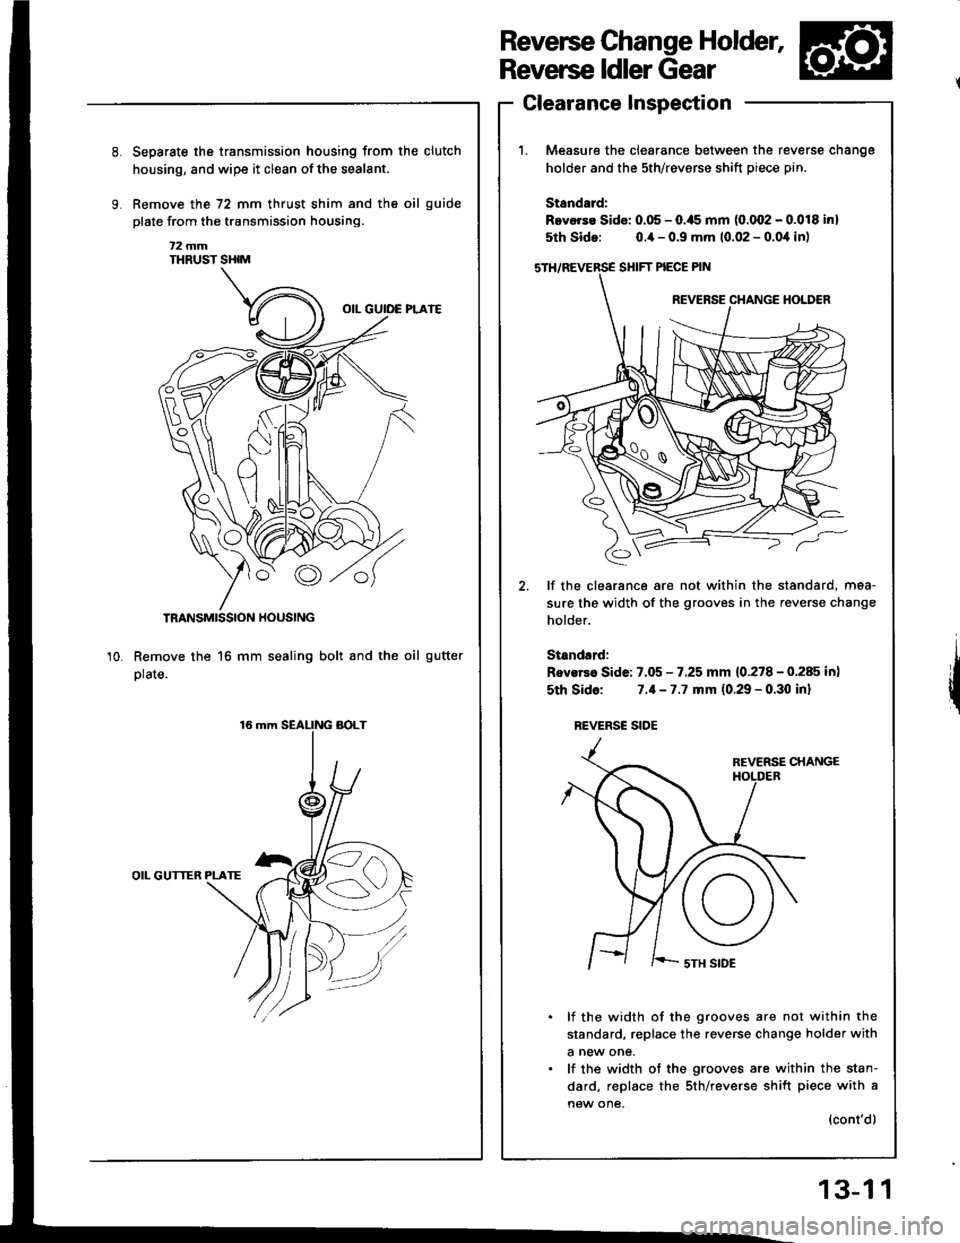
Measure the clearance between the re
holder and the sth/revsrse shift piece p
Standard:
Bevorse Sido: 0.05 - O.ils mm (0.002 - (
5th Sido: o.ia - 0.9 mm 10.02 - 0.0,1
SHIFT PIECE PIN
REVERSE CHANGE
€,
lf the clearance are not within the sti
sure the width of the grooves in the re
holder.
Standsrd:
Rovsrea Side: 7.05 - 7.25 mm {0.278 - (
sth Sido: 7.1-7.7 mm (0.29 - 0.30
REVERSC SIOE
REVERSE
I ' '-- sTH SIDE
lf the width of the grooves are n
standard, replace the reverse chan€
a new one.
lf the width of the grooves are wi
dard, replace the sth/reverse shift
new one,
Separste the transmission housing from the clutch
housing, and wipe it clean of the sealant.
Remove the 72 mm thrust shim and the oil guide
plate from the transmission housing.
t2 mmTHRUST SHIM
TRANSMISSION HOUSING
Remove the 16 mm sealing bolt and the oil gutter
plate.
OIL GUTTER PLATE
10.
reverse cnange
ptn.
.0.018 inl
),1in)
standard, mea-
reverse change
0.285 in)
I inl
not within the
Inge holder with
within the stan-
rift piece with a
(cont'd)
13-1 1
Page 354 of 1413
Measure the clearance between the reverss idler
gear and the reverse change holder.
Standard: 0.5 - 1.1 mm (0.02 - 0.04 inl
Sorvico Limit: 1.8 mm (0.07 inl
4.lf the clearance is more than the service limit, mea-
sure the width ofthe reverse change hold6r.
St.ndrrd: 13.0 - 13.3 mm (0.512 - 0.52/t inl
lf the width is not within the standard, replace
the reverse change holder with a new one.
lf the width is within the standard, reolaco the
reversa idler gear with a new one.
REVERSE CHA'{GE HOLDER
REVERSE CHANGE HOTI'ER
Reverse Change Holder, Reverse ldler Gear
Clearance Inspection lcont'd)Removal
1. Removo the reverse change holder.
2. Remove the revorss idler g€ar, th€ rev6rs6 idlsrgear shaft, and the washor {B18Cl engine}.
REVERSE IDI.TRGEAF SHAFT
13-12
REVERSE CHAMiE HOII'ER
Page 355 of 1413

Change Holder Assembly
Clearance Inspection
Measure the clearance between the shift piece and
the shift arm holder.
Silndrd: 0.1 - 0.3 mm (0.004 - 0.012 inl
Scwic. Limit: 0.6 mm (0.02 inl
It the cloarance is more than the service limit, mea-
sure th€ width of the groove in the shift piece.
Stlndffd: 8.1 - 8.2 mm (0.319 - 0.323 inl
ll the width of the groove is not within the stan-
dard, replsce the shift piecs with a new one.
lf the width of the groove is within the standard.
roolace the shift arm holder with a new one.
SHIFT PIECE
SHIFT ARM HOI.I'ER
SHIFT PIECE
INTERLOCK
{
3. Measure the clearance between the select 8rm and
the interlock.
Standlrd: 0.05 - 0'25 (0.002 - 0.010 in)
Scrvica Limit 0.5 mm (0.02 in)
4. lf the clearance is more than the service limit, mea-
sure the width ot the interlock.
Stlndrrd: 9.9 - 10.0 mm (0.391t - 0.39a in)
lf the width is not within the standard. replace
the interlock with a new one.
lf the width is within the standard, replace the
select arm with a new one.(cont'd)
13-13
Page 357 of 1413
11.Moasure th€ clsarance between the s6l6ct arm 8nd
tho change piece.
Sundrrd: 0.05 - 0.35 mm (0'002 - 0'014 in)
S.rvic. Limit 0.5 mm 10.02 Inl
lf the clesrance is more than the service limit, mea-
sure the width ofthe change Piece.
Strndrrd: 12.05 - 12.15 mm {0./17,11 - o.'U&l in)
CHANGE PIECE
lf ths width is not within the standard, replace
the change piec€ with a n€w one.
lf the width is within the standard, replaco th€
select arm with a new one.
Removal
Removs the shift piece shaft, then remove the shift
pieca and the interlock.
SHIFT PIECE SHAFT
2. Remove the change holder assembly.
12.
SEI.ECT ARl,l
CHANGE HOLDER ASSEMBLY
13-15
Page 362 of 1413

Shift Fork Assembly
Clearance Inspection
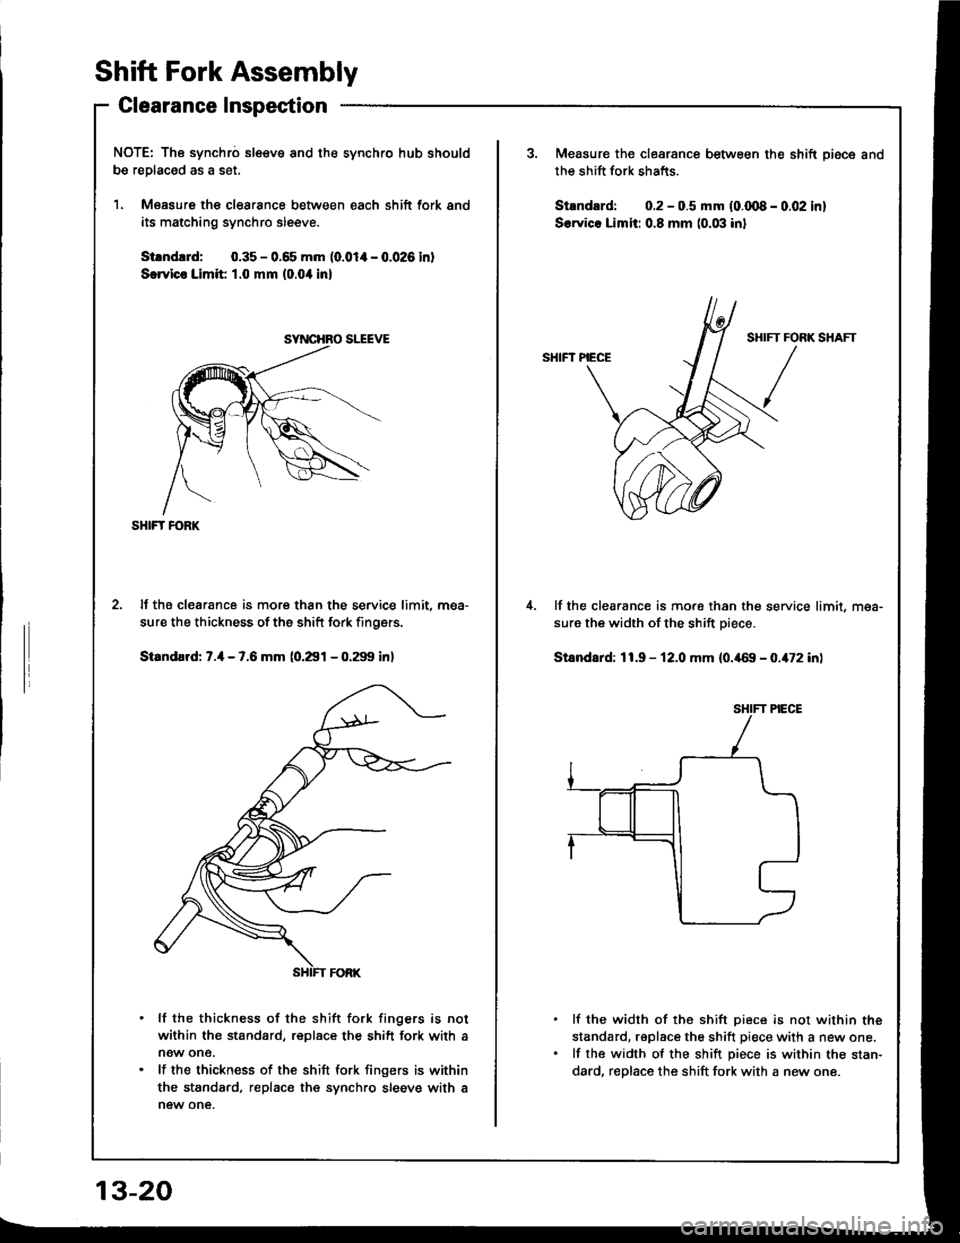
NOTE: The synchro sl€€v€ and the synchro hub should
be replac€d as a set,
1. Measure th€ clearance between each shift fork and
its matching synchro sleeve.
Strndud: 0.35 - 0.65 mm (0.014 - 0.026 in)
S€rvico Limit 1.0 mm (0.0'l in)
SHIFT FORK
lf the clearance is more than the service limit. mea-
sure the thickness of the shift fork finoers.
Standard: 7.4 - 7.6 mm (0.291 - 0.299 inl
lf the thickness of the shift fork fingers is not
within the standard, replace the shift fork with a
now one.
lf the thickness of the shift lork fingers is within
the standard, replace the synchro sleeve with a
new one.
SYNCHRO SLEEVE
13-20
Measure the clearance between the shift Diece and
the shift fork shafts.
Strndard: 0.2 - 0.5 mm {0.qt8 - 0.02 in]
S.rvico Limit: 0.8 mm (0.03 inl
SHIFT PIECE
lf the clearance is more than the service limit, mea-
sure the width of the shift piece.
Stsndard: 11.9 - 12.0 mm (0.469 - 0.472 in)
lf the width of the shift piece is not within the
standard, rsplace the shift piece with a new one.
lf the width of the shift piece is within the stan-
dard, replace the shift fork with a new one.
IFT FORK
/
Page 527 of 1413
Countershaft
Inspection (cont'dl
5. lf the clearance is out of tolerance, remove the dis-
tance collaf, 28 mm and measure the width,
6. Select and install a new distance collar, then
recheck.
DISTANCE COLLAR, 28 mm
7, Altet selecting a new distance collar, recheck the
clearance and make sure it is within tolerance.
No.Part NumberWidth
190503-PC9-OOO39.O0 mm (1 .535 in)
,90504-PC9-OOO39.10 mm (1.539 in)
90sos,Pc9-ooo39.20 mm (1.543 inl
90507-PC9-00039.30 mm (1.547 in)
590508-PC9-00039.05 mm (1 .537 inl
690509-PC9-00039.1 5 mm {1.541 in)
790510 PCg*00039.25 mm (1.545 in)
I9051 I -PCg-OOO38.90 mm {1.531 in)
90512 PCg 00038.95 mm {1.533 in)
14-136