1993 FORD MONDEO CD player
[x] Cancel search: CD playerPage 96 of 279
duct is lowered from the air distributor and
secured with its screw.
16Refill the cooling system with the proper
mixture of antifreeze and water (see Chapter
1). Start the engine and allow it to reach
normal operating temperature, indicated by
the radiator top hose becoming hot. Recheck
the coolant level and add more if required,
then check for leaks. Check the operation of
the heater.
Pollen filter
17Refer to Chapter 1.
Blower/air conditioning control
Removal
1Disconnect the battery negative (earth) lead
(see Chapter 5, Section 1).
2Remove the ashtray. Referring to the
relevant Sections of Chapter 11, undo the two
upper screws from the centre console and
pull out the cassette storage compartment,
then remove the radio/cassette player.
3Pull the heater control/radio bezel out of the
three clips securing its top edge, pull it
forwards and unplug the switch electrical
connector (where fitted).
4Pull off the heater control knobs, and
remove the screw securing each end of the
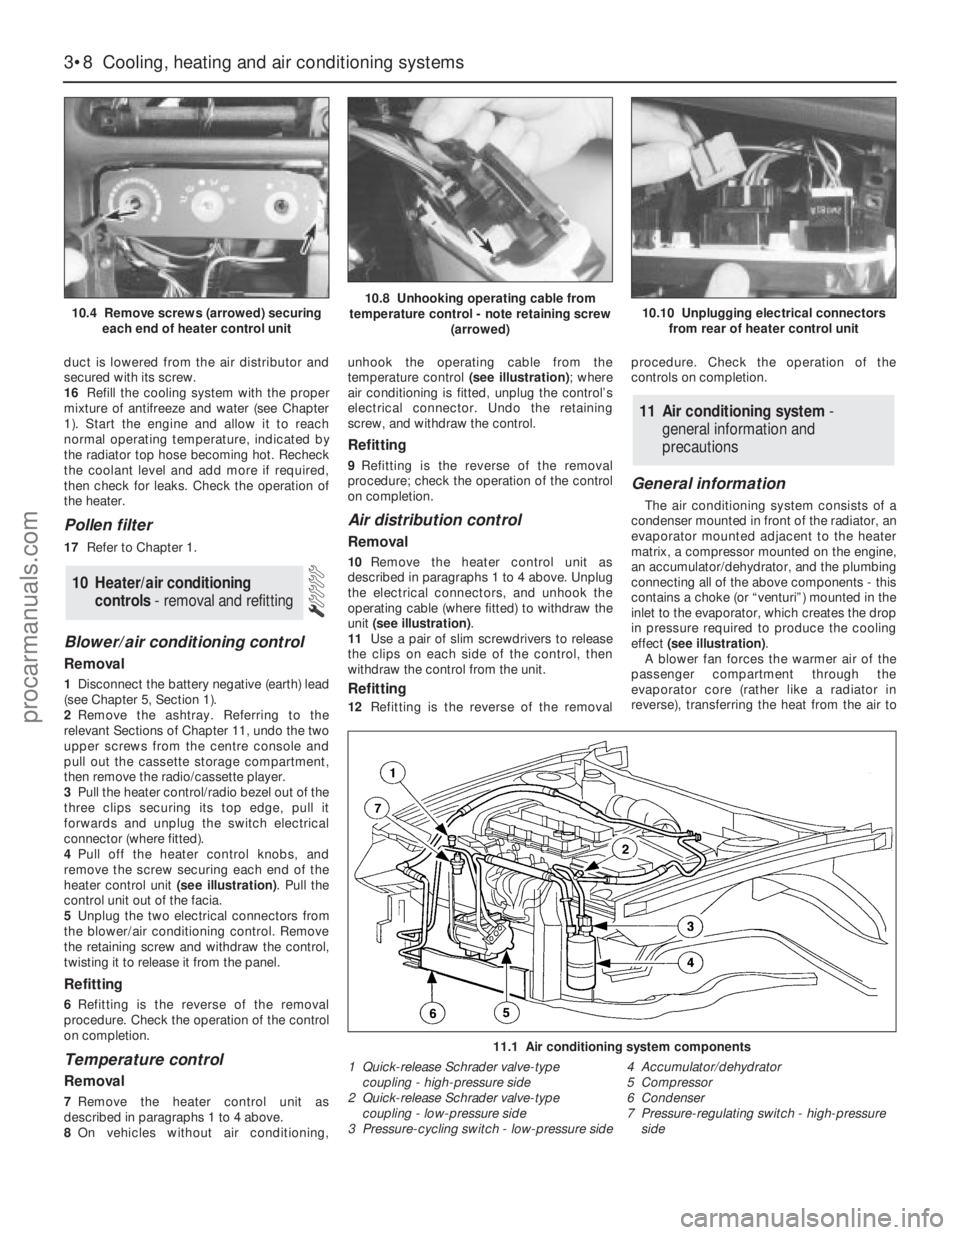
heater control unit (see illustration). Pull the
control unit out of the facia.
5Unplug the two electrical connectors from
the blower/air conditioning control. Remove
the retaining screw and withdraw the control,
twisting it to release it from the panel.
Refitting
6Refitting is the reverse of the removal
procedure. Check the operation of the control
on completion.
Temperature control
Removal
7Remove the heater control unit as
described in paragraphs 1 to 4 above.
8On vehicles without air conditioning,unhook the operating cable from the
temperature control (see illustration); where
air conditioning is fitted, unplug the control’s
electrical connector. Undo the retaining
screw, and withdraw the control.
Refitting
9Refitting is the reverse of the removal
procedure; check the operation of the control
on completion.
Air distribution control
Removal
10Remove the heater control unit as
described in paragraphs 1 to 4 above. Unplug
the electrical connectors, and unhook the
operating cable (where fitted) to withdraw the
unit (see illustration).
11Use a pair of slim screwdrivers to release
the clips on each side of the control, then
withdraw the control from the unit.
Refitting
12Refitting is the reverse of the removalprocedure. Check the operation of the
controls on completion.
General information
The air conditioning system consists of a
condenser mounted in front of the radiator, an
evaporator mounted adjacent to the heater
matrix, a compressor mounted on the engine,
an accumulator/dehydrator, and the plumbing
connecting all of the above components - this
contains a choke (or “venturi”) mounted in the
inlet to the evaporator, which creates the drop
in pressure required to produce the cooling
effect (see illustration).
A blower fan forces the warmer air of the
passenger compartment through the
evaporator core (rather like a radiator in
reverse), transferring the heat from the air to
11 Air conditioning system -
general information and
precautions
10 Heater/air conditioning
controls- removal and refitting
3•8 Cooling, heating and air conditioning systems
10.4 Remove screws (arrowed) securing
each end of heater control unit10.8 Unhooking operating cable from
temperature control - note retaining screw
(arrowed)10.10 Unplugging electrical connectors
from rear of heater control unit
11.1 Air conditioning system components
1 Quick-release Schrader valve-type
coupling - high-pressure side
2 Quick-release Schrader valve-type
coupling - low-pressure side
3 Pressure-cycling switch - low-pressure side4 Accumulator/dehydrator
5 Compressor
6 Condenser
7 Pressure-regulating switch - high-pressure
side
procarmanuals.com
Page 200 of 279
Removal
1Disconnect the battery negative (earth) lead
(Chapter 5, Section 1).
2Remove the windscreen wiper arms
(Chapter 12), then remove the cowl from just
in front of the windscreen. The cowl is in two
sections, with retaining screws located along
its front edge. With the cowl removed,
disconnect the speedometer cable by pulling
it from the intermediate inner cable extension.
3Remove the centre console (Section 30),
then unscrew the screws and remove the
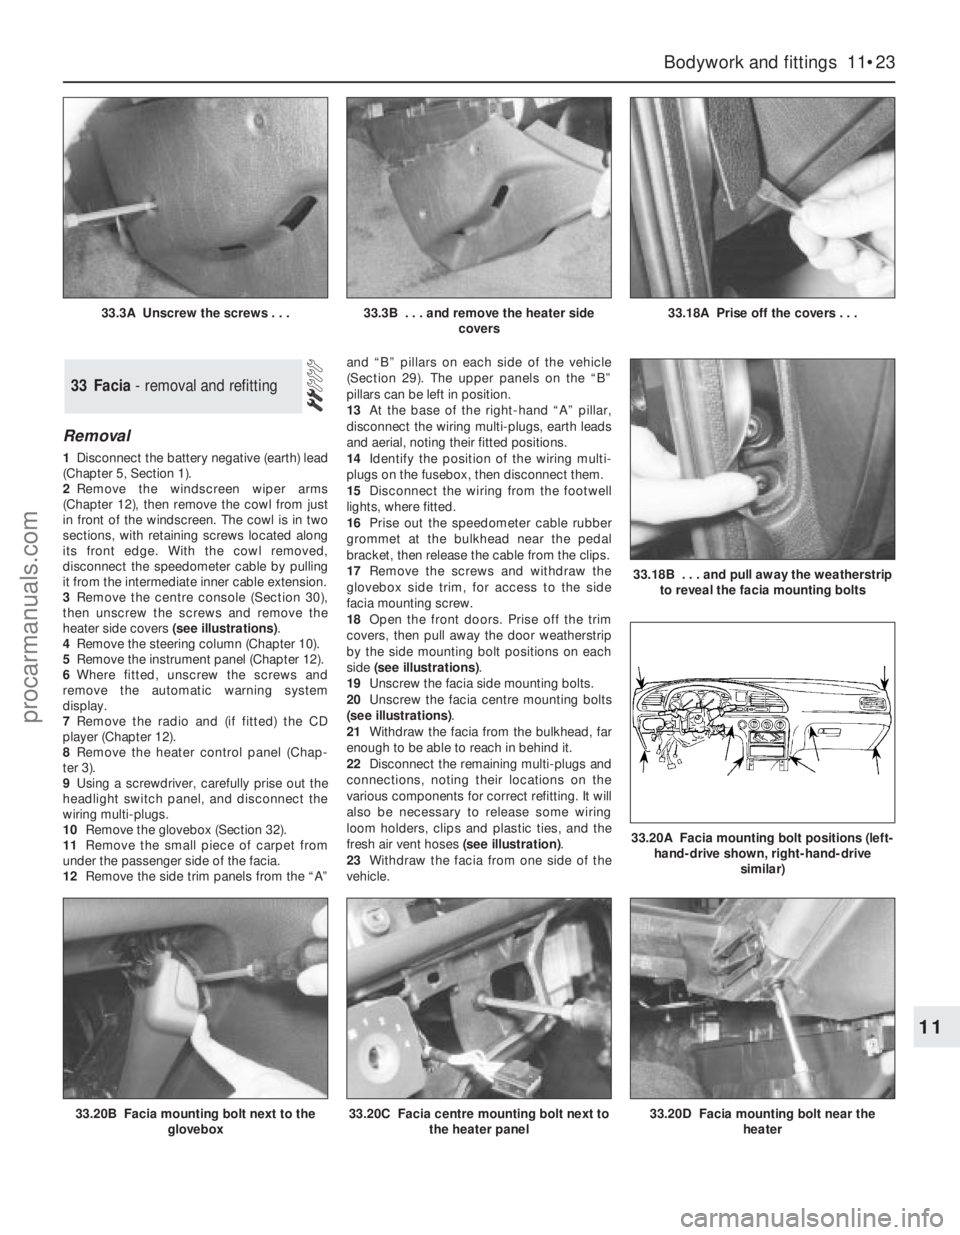
heater side covers (see illustrations).
4Remove the steering column (Chapter 10).
5Remove the instrument panel (Chapter 12).
6Where fitted, unscrew the screws and
remove the automatic warning system
display.
7Remove the radio and (if fitted) the CD
player (Chapter 12).
8Remove the heater control panel (Chap-
ter 3).
9Using a screwdriver, carefully prise out the
headlight switch panel, and disconnect the
wiring multi-plugs.
10Remove the glovebox (Section 32).
11Remove the small piece of carpet from
under the passenger side of the facia.
12Remove the side trim panels from the “A”and “B” pillars on each side of the vehicle
(Section 29). The upper panels on the “B”
pillars can be left in position.
13At the base of the right-hand “A” pillar,
disconnect the wiring multi-plugs, earth leads
and aerial, noting their fitted positions.
14Identify the position of the wiring multi-
plugs on the fusebox, then disconnect them.
15Disconnect the wiring from the footwell
lights, where fitted.
16Prise out the speedometer cable rubber
grommet at the bulkhead near the pedal
bracket, then release the cable from the clips.
17Remove the screws and withdraw the
glovebox side trim, for access to the side
facia mounting screw.
18Open the front doors. Prise off the trim
covers, then pull away the door weatherstrip
by the side mounting bolt positions on each
side (see illustrations).
19Unscrew the facia side mounting bolts.
20Unscrew the facia centre mounting bolts
(see illustrations).
21Withdraw the facia from the bulkhead, far
enough to be able to reach in behind it.
22Disconnect the remaining multi-plugs and
connections, noting their locations on the
various components for correct refitting. It will
also be necessary to release some wiring
loom holders, clips and plastic ties, and the
fresh air vent hoses (see illustration).
23Withdraw the facia from one side of the
vehicle.
33 Facia - removal and refitting
Bodywork and fittings 11•23
11
33.20B Facia mounting bolt next to the
glovebox33.20C Facia centre mounting bolt next to
the heater panel33.20D Facia mounting bolt near the
heater
33.3A Unscrew the screws . . .33.3B . . . and remove the heater side
covers33.18A Prise off the covers . . .
33.18B . . . and pull away the weatherstrip
to reveal the facia mounting bolts
33.20A Facia mounting bolt positions (left-
hand-drive shown, right-hand-drive
similar)
procarmanuals.com
Page 202 of 279
Chapter 12 Body electrical system
Air bag clock spring - removal and refitting . . . . . . . . . . . . . . . . . . . 30
Air bag control module - removal and refitting . . . . . . . . . . . . . . . . . 29
Air bag unit (driver’s side) - removal and refitting . . . . . . . . . . . . . . . 28
Anti-theft alarm system - general information . . . . . . . . . . . . . . . . . . 20
Auxiliary warning system - general information and
component renewal . . . . . . . . . . . . . . . . . . . . . . . . . . . . . . . . . . . . 19
Battery - check, maintenance and charging . . . . . . . . See Chapter 1
Battery - removal and refitting . . . . . . . . . . . . . . . . . . . See Chapter 5
Bulbs (exterior lights) - renewal . . . . . . . . . . . . . . . . . . . . . . . . . . . . . 5
Bulbs (interior lights) - renewal . . . . . . . . . . . . . . . . . . . . . . . . . . . . . 6
Clock - removal and refitting . . . . . . . . . . . . . . . . . . . . . . . . . . . . . . . 13
Compact disc player - removal and refitting . . . . . . . . . . . . . . . . . . . 25
Cruise control system - general information . . . . . . . . . . . . . . . . . . . 21
Electrical fault finding - general information . . . . . . . . . . . . . . . . . . . 2
Electrical system check . . . . . . . . . . . . . . . . . . . . . . . . See Chapter 1
Exterior light units - removal and refitting . . . . . . . . . . . . . . . . . . . . . 7
Fuses, relays and timer module - testing and renewal . . . . . . . . . . . 3
General information . . . . . . . . . . . . . . . . . . . . . . . . . . . . . . . . . . . . . . 1
Headlight beam alignment - checking and adjustment . . . . . . . . . . 8
Headlight levelling motor - removal and refitting . . . . . . . . . . . . . . . 9Horn - removal and refitting . . . . . . . . . . . . . . . . . . . . . . . . . . . . . . . 14
Instrument panel - removal and refitting . . . . . . . . . . . . . . . . . . . . . . 10
Instrument panel components - removal and refitting . . . . . . . . . . . 11
Radio aerial - removal and refitting . . . . . . . . . . . . . . . . . . . . . . . . . . 27
Radio/cassette player - coding, removal and refitting . . . . . . . . . . . 23
Radio/cassette player power amplifier - removal and refitting . . . . . 24
Speakers - removal and refitting . . . . . . . . . . . . . . . . . . . . . . . . . . . . 26
Speedometer drive cable - removal and refitting . . . . . . . . . . . . . . . 12
Stop-light switch - removal and refitting . . . . . . . . . . . See Chapter 9
Switches - removal and refitting . . . . . . . . . . . . . . . . . . . . . . . . . . . . 4
Tailgate wiper motor assembly - removal and refitting . . . . . . . . . . . 17
TCS inhibition switch - removal and refitting . . . . . . . . See Chapter 9
Trip computer module - removal and refitting . . . . . . . . . . . . . . . . . 18
Windscreen/tailgate washer system and wiper blade
check . . . . . . . . . . . . . . . . . . . . . . . . . . . . . . . . . . . . See Chapter 1
Windscreen/tailgate washer system components - removal
and refitting . . . . . . . . . . . . . . . . . . . . . . . . . . . . . . . . . . . . . . . . . . 22
Windscreen wiper motor and linkage - removal and refitting . . . . . . 16
Wiper arms - removal and refitting . . . . . . . . . . . . . . . . . . . . . . . . . . 15
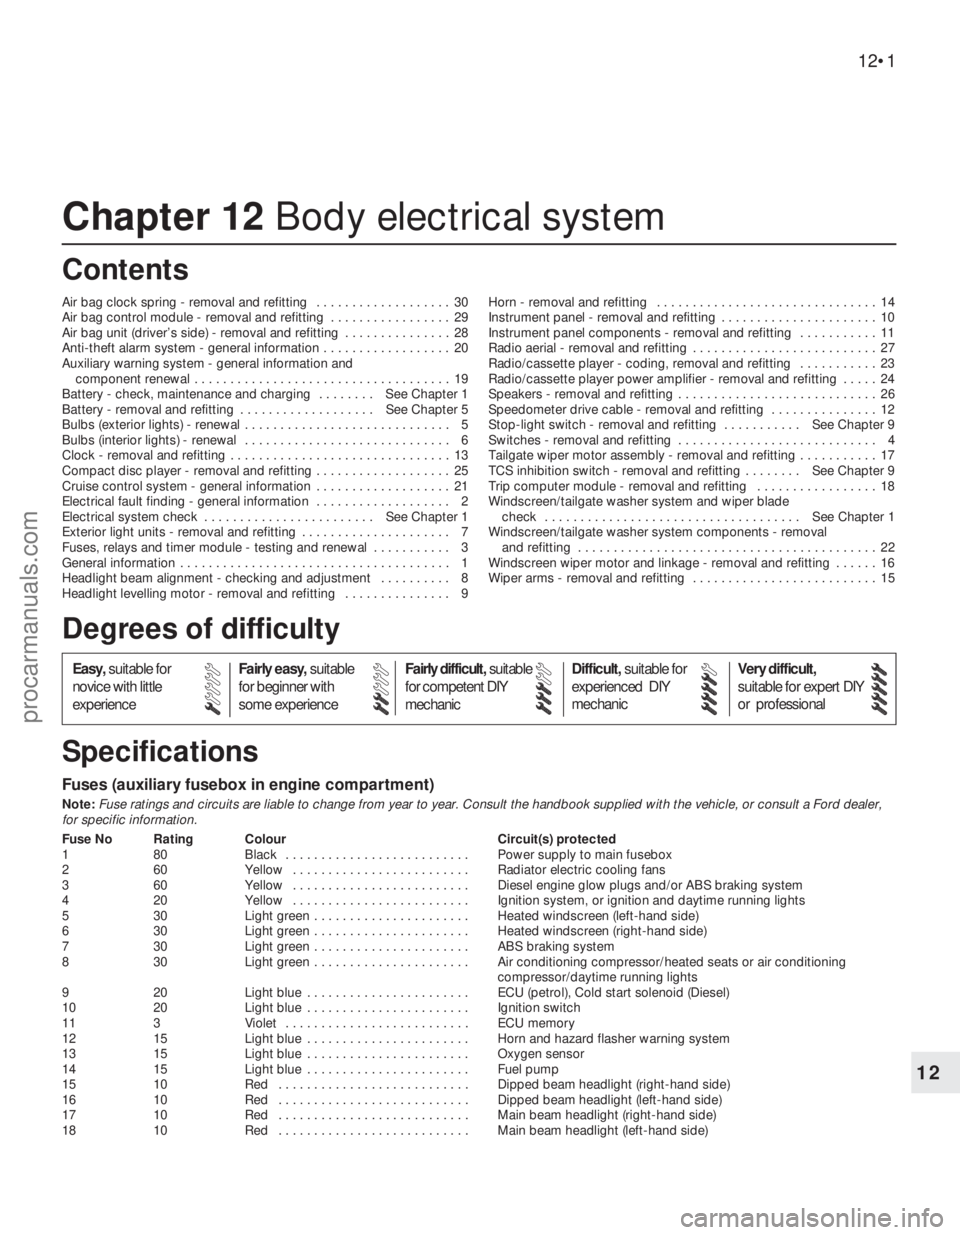
Fuses (auxiliary fusebox in engine compartment)
Note:Fuse ratings and circuits are liable to change from year to year. Consult the handbook supplied with the vehicle, or consult a Ford dealer,
for specific information.
Fuse No Rating Colour Circuit(s) protected
1 80 Black . . . . . . . . . . . . . . . . . . . . . . . . . . Power supply to main fusebox
2 60 Yellow . . . . . . . . . . . . . . . . . . . . . . . . . Radiator electric cooling fans
3 60 Yellow . . . . . . . . . . . . . . . . . . . . . . . . . Diesel engine glow plugs and/or ABS braking system
4 20 Yellow . . . . . . . . . . . . . . . . . . . . . . . . . Ignition system, or ignition and daytime running lights
5 30 Light green . . . . . . . . . . . . . . . . . . . . . . Heated windscreen (left-hand side)
6 30 Light green . . . . . . . . . . . . . . . . . . . . . . Heated windscreen (right-hand side)
7 30 Light green . . . . . . . . . . . . . . . . . . . . . . ABS braking system
8 30 Light green . . . . . . . . . . . . . . . . . . . . . . Air conditioning compressor/heated seats or air conditioning
compressor/daytime running lights
9 20 Light blue . . . . . . . . . . . . . . . . . . . . . . . ECU (petrol), Cold start solenoid (Diesel)
10 20 Light blue . . . . . . . . . . . . . . . . . . . . . . . Ignition switch
11 3 Violet . . . . . . . . . . . . . . . . . . . . . . . . . . ECU memory
12 15 Light blue . . . . . . . . . . . . . . . . . . . . . . . Horn and hazard flasher warning system
13 15 Light blue . . . . . . . . . . . . . . . . . . . . . . . Oxygen sensor
14 15 Light blue . . . . . . . . . . . . . . . . . . . . . . . Fuel pump
15 10 Red . . . . . . . . . . . . . . . . . . . . . . . . . . . Dipped beam headlight (right-hand side)
16 10 Red . . . . . . . . . . . . . . . . . . . . . . . . . . . Dipped beam headlight (left-hand side)
17 10 Red . . . . . . . . . . . . . . . . . . . . . . . . . . . Main beam headlight (right-hand side)
18 10 Red . . . . . . . . . . . . . . . . . . . . . . . . . . . Main beam headlight (left-hand side)
12•1
Easy,suitable for
novice with little
experienceFairly easy,suitable
for beginner with
some experienceFairly difficult,suitable
for competent DIY
mechanicDifficult,suitable for
experienced DIY
mechanicVery difficult,
suitable for expert DIY
or professional
Degrees of difficulty
Specifications Contents
12
procarmanuals.com
Page 222 of 279
headlamp washer pump, from the reservoir
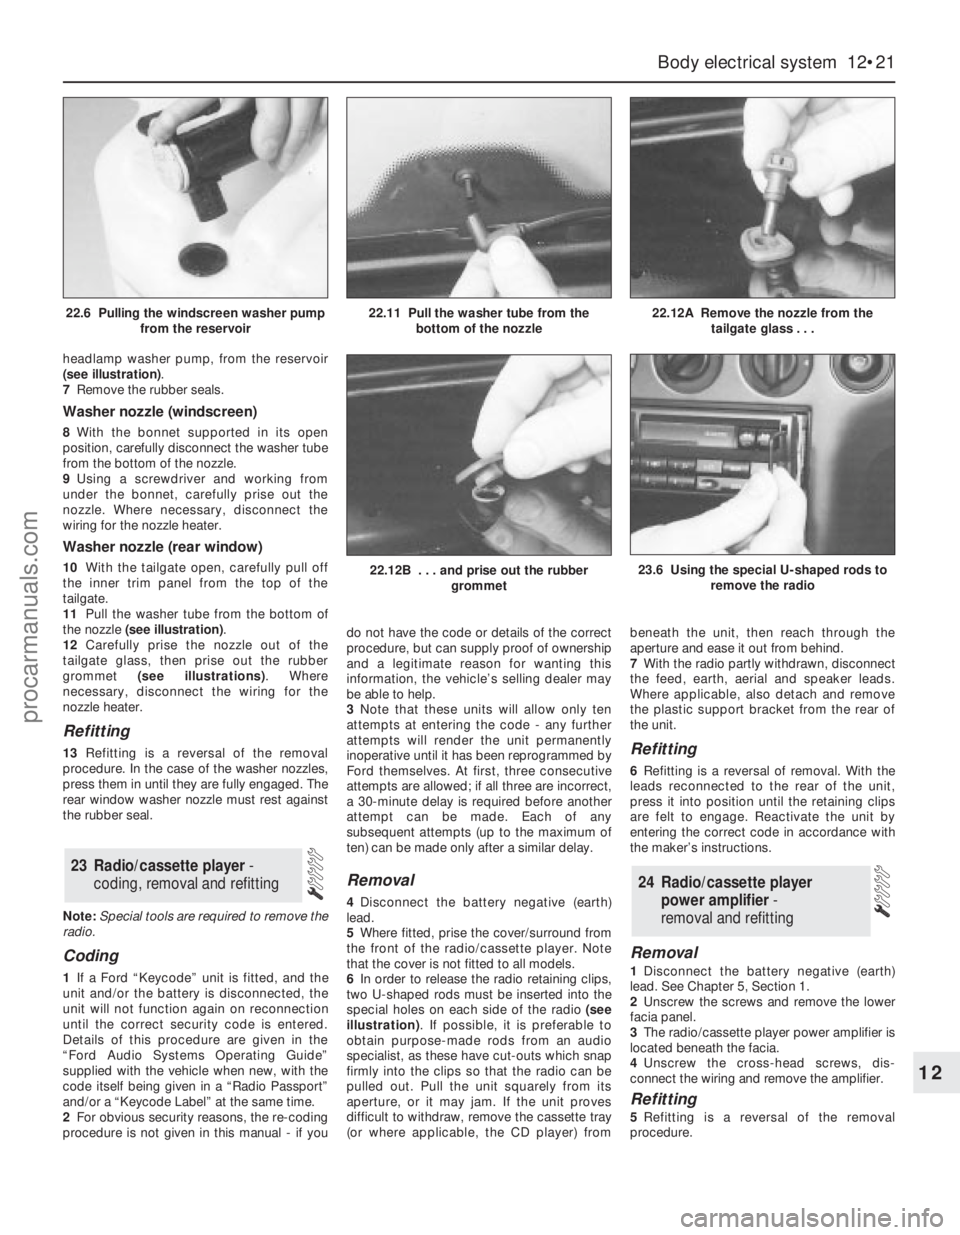
(see illustration).
7Remove the rubber seals.
Washer nozzle (windscreen)
8With the bonnet supported in its open
position, carefully disconnect the washer tube
from the bottom of the nozzle.
9Using a screwdriver and working from
under the bonnet, carefully prise out the
nozzle. Where necessary, disconnect the
wiring for the nozzle heater.
Washer nozzle (rear window)
10With the tailgate open, carefully pull off
the inner trim panel from the top of the
tailgate.
11Pull the washer tube from the bottom of
the nozzle (see illustration).
12Carefully prise the nozzle out of the
tailgate glass, then prise out the rubber
grommet (see illustrations). Where
necessary, disconnect the wiring for the
nozzle heater.
Refitting
13Refitting is a reversal of the removal
procedure. In the case of the washer nozzles,
press them in until they are fully engaged. The
rear window washer nozzle must rest against
the rubber seal.
Note:Special tools are required to remove the
radio.
Coding
1If a Ford “Keycode” unit is fitted, and the
unit and/or the battery is disconnected, the
unit will not function again on reconnection
until the correct security code is entered.
Details of this procedure are given in the
“Ford Audio Systems Operating Guide”
supplied with the vehicle when new, with the
code itself being given in a “Radio Passport”
and/or a “Keycode Label” at the same time.
2For obvious security reasons, the re-coding
procedure is not given in this manual - if youdo not have the code or details of the correct
procedure, but can supply proof of ownership
and a legitimate reason for wanting this
information, the vehicle’s selling dealer may
be able to help.
3Note that these units will allow only ten
attempts at entering the code - any further
attempts will render the unit permanently
inoperative until it has been reprogrammed by
Ford themselves. At first, three consecutive
attempts are allowed; if all three are incorrect,
a 30-minute delay is required before another
attempt can be made. Each of any
subsequent attempts (up to the maximum of
ten) can be made only after a similar delay.
Removal
4Disconnect the battery negative (earth)
lead.
5Where fitted, prise the cover/surround from
the front of the radio/cassette player. Note
that the cover is not fitted to all models.
6In order to release the radio retaining clips,
two U-shaped rods must be inserted into the
special holes on each side of the radio (see
illustration). If possible, it is preferable to
obtain purpose-made rods from an audio
specialist, as these have cut-outs which snap
firmly into the clips so that the radio can be
pulled out. Pull the unit squarely from its
aperture, or it may jam. If the unit proves
difficult to withdraw, remove the cassette tray
(or where applicable, the CD player) frombeneath the unit, then reach through the
aperture and ease it out from behind.
7With the radio partly withdrawn, disconnect
the feed, earth, aerial and speaker leads.
Where applicable, also detach and remove
the plastic support bracket from the rear of
the unit.
Refitting
6Refitting is a reversal of removal. With the
leads reconnected to the rear of the unit,
press it into position until the retaining clips
are felt to engage. Reactivate the unit by
entering the correct code in accordance with
the maker’s instructions.
Removal
1Disconnect the battery negative (earth)
lead. See Chapter 5, Section 1.
2Unscrew the screws and remove the lower
facia panel.
3The radio/cassette player power amplifier is
located beneath the facia.
4Unscrew the cross-head screws, dis-
connect the wiring and remove the amplifier.
Refitting
5Refitting is a reversal of the removal
procedure.
24 Radio/cassette player
power amplifier -
removal and refitting
23 Radio/cassette player -
coding, removal and refitting
Body electrical system 12•21
12
22.12B . . . and prise out the rubber
grommet23.6 Using the special U-shaped rods to
remove the radio
22.6 Pulling the windscreen washer pump
from the reservoir22.11 Pull the washer tube from the
bottom of the nozzle22.12A Remove the nozzle from the
tailgate glass . . .
procarmanuals.com
Page 223 of 279
1A compact disc (CD) player is available as
an optional extra on most models. On some
models, an autochanger version is available,
which can hold a number of discs at a time.
Removal
2The battery negative (earth) lead should be
disconnected before commencing work.
CD player, or autochanger control
unit
3The procedure is identical to that for the
radio/cassette player described in Section 23.
CD player autochanger
4The CD player autochanger unit is mounted
on the right-hand side of the luggage
compartment. The wiring loom passes up the
“C” pillar, across to the left-hand side “A”
pillar, then to the centre console area.
5Remove the trim cover from the
autochanger unit.
6Unscrew the mounting screws, and remove
the autochanger unit from its mounting
bracket.
7Disconnect the multi-plug and remove the
unit from inside the vehicle.
Refitting
8Refitting is a reversal of the removal
procedure.
Removal
1Remove the door trim panel as described in
Chapter 11.
2Unscrew the cross-head screws, and
withdraw the speaker from the door inner
panel.
3Disconnect the wiring and remove the
speaker.
Refitting
4Refitting is a reversal of the removal
procedure.
Removal
1Prise out the trim cover from the headlining
immediately below the base of the aerial.
2Unscrew the cross-head screw from the
base of the aerial, and remove the aerial mast.
Refitting
3Refitting is a reversal of the removal
procedure.
Warning: Handle the air bag unit
with extreme care, as a
precaution against personal
injury, and always hold it with the
cover facing away from the body. If in
doubt concerning any proposed work
involving the air bag unit or its control
circuitry, consult a Ford dealer or other
qualified specialist.
Removal
1Disconnect the battery negative (earth) lead
(refer to Chapter 5, Section 1).
Warning: Before proceeding, wait
a minimum of 15 minutes, as a
precaution against accidental
firing of the air bag unit. This
period ensures that any stored energy in
the back-up capacitor is dissipated.
2Rotate the steering wheel so that one of the
mounting bolt holes is visible above the
steering column upper shroud.
3Unscrew and remove the first mounting
bolt, then turn the steering wheel as
necessary and remove the remaining
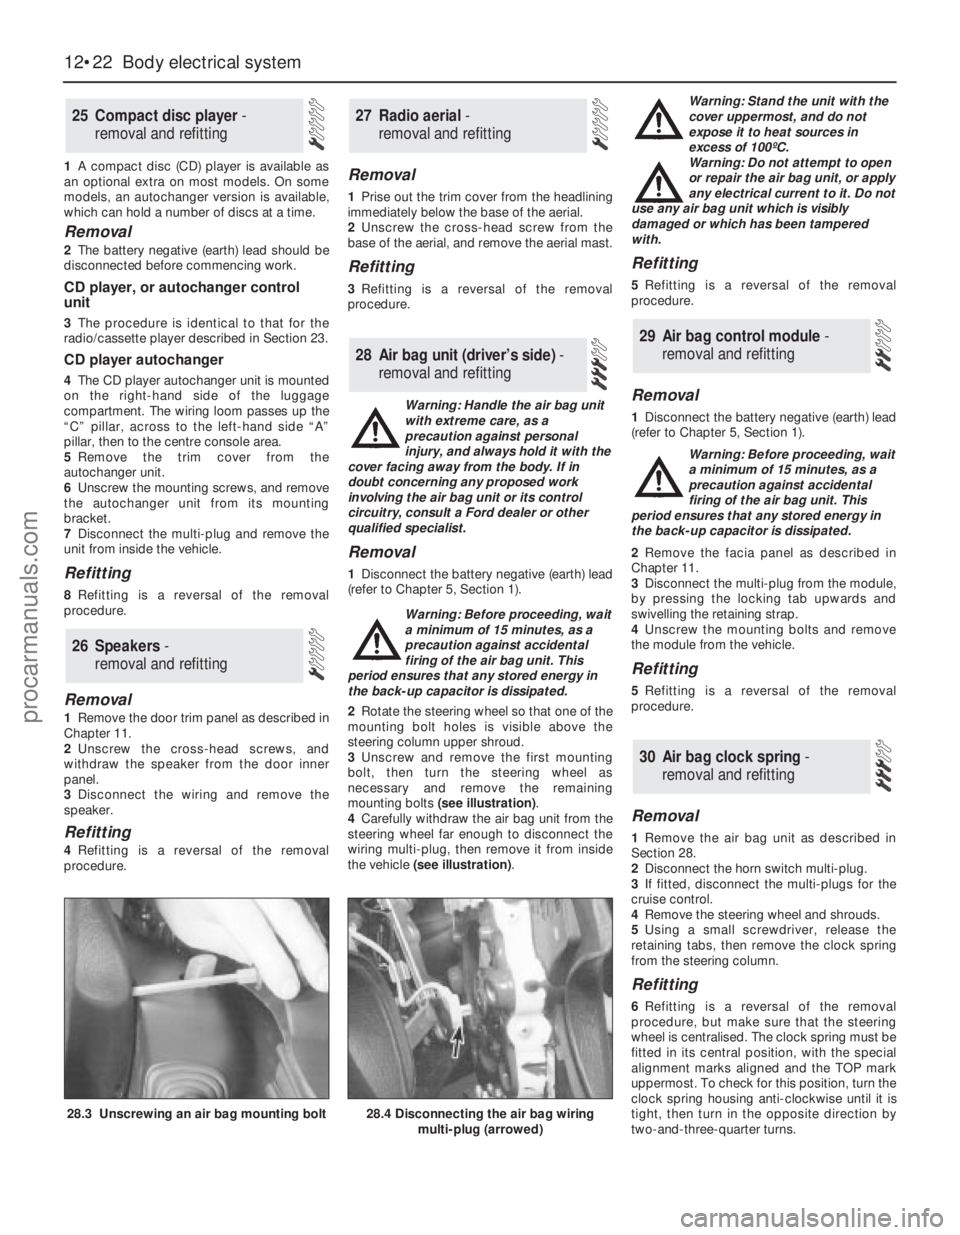
mounting bolts (see illustration).
4Carefully withdraw the air bag unit from the
steering wheel far enough to disconnect the
wiring multi-plug, then remove it from inside
the vehicle (see illustration). Warning: Stand the unit with the
cover uppermost, and do not
expose it to heat sources in
excess of 100ºC.
Warning: Do not attempt to open
or repair the air bag unit, or apply
any electrical current to it. Do not
use any air bag unit which is visibly
damaged or which has been tampered
with.
Refitting
5Refitting is a reversal of the removal
procedure.
Removal
1Disconnect the battery negative (earth) lead
(refer to Chapter 5, Section 1).
Warning: Before proceeding, wait
a minimum of 15 minutes, as a
precaution against accidental
firing of the air bag unit. This
period ensures that any stored energy in
the back-up capacitor is dissipated.
2Remove the facia panel as described in
Chapter 11.
3Disconnect the multi-plug from the module,
by pressing the locking tab upwards and
swivelling the retaining strap.
4Unscrew the mounting bolts and remove
the module from the vehicle.
Refitting
5Refitting is a reversal of the removal
procedure.
Removal
1Remove the air bag unit as described in
Section 28.
2Disconnect the horn switch multi-plug.
3If fitted, disconnect the multi-plugs for the
cruise control.
4Remove the steering wheel and shrouds.
5Using a small screwdriver, release the
retaining tabs, then remove the clock spring
from the steering column.
Refitting
6Refitting is a reversal of the removal
procedure, but make sure that the steering
wheel is centralised. The clock spring must be
fitted in its central position, with the special
alignment marks aligned and the TOP mark
uppermost. To check for this position, turn the
clock spring housing anti-clockwise until it is
tight, then turn in the opposite direction by
two-and-three-quarter turns.
30 Air bag clock spring-
removal and refitting
29 Air bag control module -
removal and refitting
28 Air bag unit (driver’s side) -
removal and refitting
27 Radio aerial -
removal and refitting
26 Speakers -
removal and refitting
25 Compact disc player -
removal and refitting
12•22 Body electrical system
28.3 Unscrewing an air bag mounting bolt28.4 Disconnecting the air bag wiring
multi-plug (arrowed)
procarmanuals.com
Page 259 of 279
12•58 Wiring diagrams
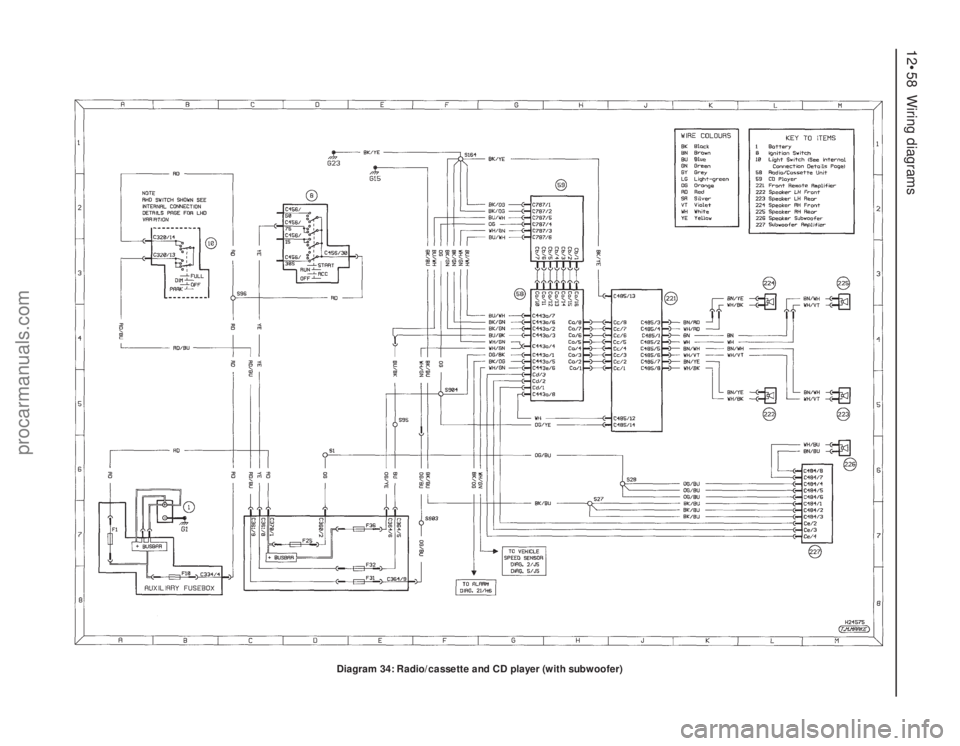
Diagram 34: Radio/cassette and CD player (with subwoofer)
procarmanuals.com
Page 276 of 279
REF•17Index
A
A pillar trim - 11•20
ABS - 9•14
Accelerator cable - 4•4
Accelerator pedal - 4•5
Accumulator - 3•9
Acknowledgements - 0•4
Adaptive damping switch - 12•8
Aerial - 12•22
Air bag - 0•5, 1•22, 12•22
Air cleaner - 4•3, 6•19
Air conditioning - 1•15, 3•2, 3•8, 3•9, 6•11
Air distribution control - 3•8
Air induction system - 4•9
Air intake components - 4•3
Air mass meter - 4•3, 6•10, 6•11, 6•12
Air temperature warning sender unit -
12•18
Alarm - 11•17, 12•18
Alternator - 5•5, 5•6
Amplifier - 12•21
Anti-lock Braking System - 9•14
Anti-roll bar - 10•8, 10•12, 10•15
Anti-theft alarm system - 12•18
Antifreeze - 1•2, 1•22, 3•2
Asbestos - 0•5
ATF - 1•2
Automatic transmission- 1•11, 1•17,
2A•24, 2B•3, 2B•4, 6•11, 7B•1et seq,
12•11
Automatic transmission fault finding -
REF•10
Automatic transmission fluid - 1•2
Auxiliary drivebelt - 1•13
Auxiliary warning system - 12•17
B
B pillar trim - 11•20
Backfire - REF•8
Backrest - 11•18
Battery - 0•5, 1•8, 1•11, 5•2, 5•3
Battery fault - REF•12
Big-end bearings - 2B•18, 2B•21
Bleeding brakes - 9•12
Bleeding power steering - 10•21
Blower/air conditioning control - 3•8Body corrosion - 0•10
Body electrical system- 12•1et seq
Bodywork and fittings- 11•1et seq
Bonnet - 1•20, 11•5, 11•6
Booster battery (jump) starting - 0•12
Boot - 11•14, 11•15
Brake check - 1•19
Brake fluid - 1•2, 1•8, 1•26
Brake line check - 1•19
Braking system- 0•7, 0•8, 0•9, 1•20, 9•1et
seq
Braking system fault finding - REF•10
Brush renewal - 5•8
Bulb failure module - 12•18
Bulbs - 12•8, 12•11, 12•18
Bumpers - 11•4, 11•5
Burning - 0•5
C
C pillar trim - 11•20, 11•21
Cables - 4•4, 7B•2, 8•2, 9•16, 11•6, 12•15
Calipers - 9•4, 9•9
Camshaft - 2A•13, 2A•14, 6•11, 6•12
Cassette player - 12•21
Catalytic converter - 6•19
CD player - 12•22
Central locking system - 11•17
Central locking system fault - REF•12
Centre console - 11•21
Charcoal canister - 6•14
Charging - 1•12, 5•5
Check strap - 11•13
Clock - 12•11, 12•15
Clutch and driveshafts- 1•17, 1•20, 8•1et
seq
Clutch fault finding - REF•9
CO emissions (mixture) - 0•10
Coil spring - 10•15
Compact disc player - 12•22
Compression test - 2A•5
Compressor - 3•9
Condenser - 3•9
Connecting rods - 2B•12, 2B•17, 2B•21,
2B•22
Console - 11•21, 11•22
Contents - 0•2
Conversion factors - 0•14Coolant - 1•2, 1•6, 1•7, 1•21
Coolant leakage - REF•9
Coolant low level switch - 3•5
Coolant temperature gauge sender - 3•4
Coolant temperature sensor - 3•5, 6•11,
6•13
Coolant warning switch - 12•18
Cooling, heating, and air conditioning
systems- 1•22, 3•1et seq
Cooling, heating, and air conditioning
systems fault finding - REF•8
Corrosion - REF•9
Courtesy light - 12•8
Crankcase - 2B•13
Crankshaft - 2A•9, 2A•13, 2A•22, 2B•13,
2B•18, 2B•20, 5•4, 6•10, 6•11, 6•12
Crossmember - 10•13, 10•17
Cruise control system - 12•19
Crushing - 0•5
Cushion - 11•18
CV joints - 1•18, 8•7, 8•9
Cylinder block - 2B•13
Cylinder head - 2A•6, 2A•17, 2B•9, 2B•10,
2B•11, 6•19
D
D pillar trim - 11•21
Damping switch - 12•8
Dehydrator - 3•9
Dents in bodywork - 11•3
Depressurisation - 4•2
Diagnosis system - 6•4
Differential - 7A•2, 7B•3
Dimensions - 0•6
Dipped beam switch - 12•7
Direction indicators - 12•7, 12•9, 12•12
Discs - 1•19, 9•5, 9•10
Display warning bulb - 12•18
Doors - 0•8, 1•20, 11•6, 11•7, 11•8, 11•9,
11•10, 11•11, 11•13, 12•7, 12•8, 12•11,
12•18
Drivebelts - 1•13
Driveplate - 2A•24
Driveshafts - 0•9, 1•18, 8•5, 8•6, 8•7, 8•9,
8•10
Driveshafts fault finding - REF•10
Drivetrain - 1•20
Drums - 1•19, 9•6 Note: References throughout this index relate to Chapter•page number
procarmanuals.com