Page 229 of 386
Downloaded from www.Manualslib.com manuals search engine - Maintenance when Trailer Towing
Your vehicle will need service more often when you’re pulling a trailer.
See the Maintenance Schedule for more on this. Things that are
(don’t overfill), engine oil, axle lubricant, belt, cooling system, and brake
adjustment. Each
of these is covered in this manual, and the Index will
__- help you find them quickly. If you’re trailering, it’s a good idea to review
these sections before you start your trip.
Check periodically to see that all hitch nuts and bolts are tight.
rc-.- especially important in trailer operation are automatic transmission fluid
215
Page 279 of 386
Downloaded from www.Manualslib.com manuals search engine AIR CLEAlVER
Refer to the
Maintenance Schedule
to determine when to
replace the air filter.
.- See “Scheduled Maintenance Services” in the Index.
c- A CAUTION:
Operating the engine with the air cleaner off can cause you or
others to be burned. The
air cleaner not only cleans the air, it
engine backfires, you could be burned. Don’t drive with it off,
and be careful working on the engine with the air cleaner
off.
~ stops flame if the engine backfires. If it isn’t there, and the
265
Page 280 of 386

Downloaded from www.Manualslib.com manuals search engine AUTOMATIC TMSMISSION FLUID
When to Check and Change:
A good time to check your automatic transmission fluid level is when the
engine oil is changed. Refer to the Maintenance Schedule to determine
cpr
when to change your fluid. See “Scheduled Maintenance Services’’ in the
Index. -I
How to Check
BeC’%’uSe this operation can be a little difficult, you may choose to have
this done at a Cadillac dealership Service Department.
r IYI
”I If you do it yourself, be sure to follow all the instructions here, or you
could get a false reading on the dipstick.
p_
NOTICE:
I
Too much or too little fluid can damage your transmission.
much can mean that some of the fluid could come out and fall
on hot engine parts, starting
a fire. Be sure to get an accurate
reading if you check
your transmission fluid. I
l-
Wait at least 30 minutes before checking the transmission fluid level if
you have been driving:
0 When outside temperatures are above 90” F (32” C).
n !‘ b
0 At high speed for quite a while.
0 In heavy traffic -- especially in hot weather.
0 While pulling a trailer.
To get the right reading, the fluid should be at normal operating
temperature, which is
180°F to 200°F (82°C to 93OC).
To check transmission fluid hot: Get the vehicle warmed up by driving
about
15 miles (24 km) when outside temperatures are above 50°F
(10°C). If it’s colder than 50°F (lO°C), drive the vehicle in “D” (3rd
Gear) until the engine temperature gage moves and then remains steady
-
for ten minutes. Then follow the hot check procedures. t3
_L-
1 <- 1
266
Page 282 of 386

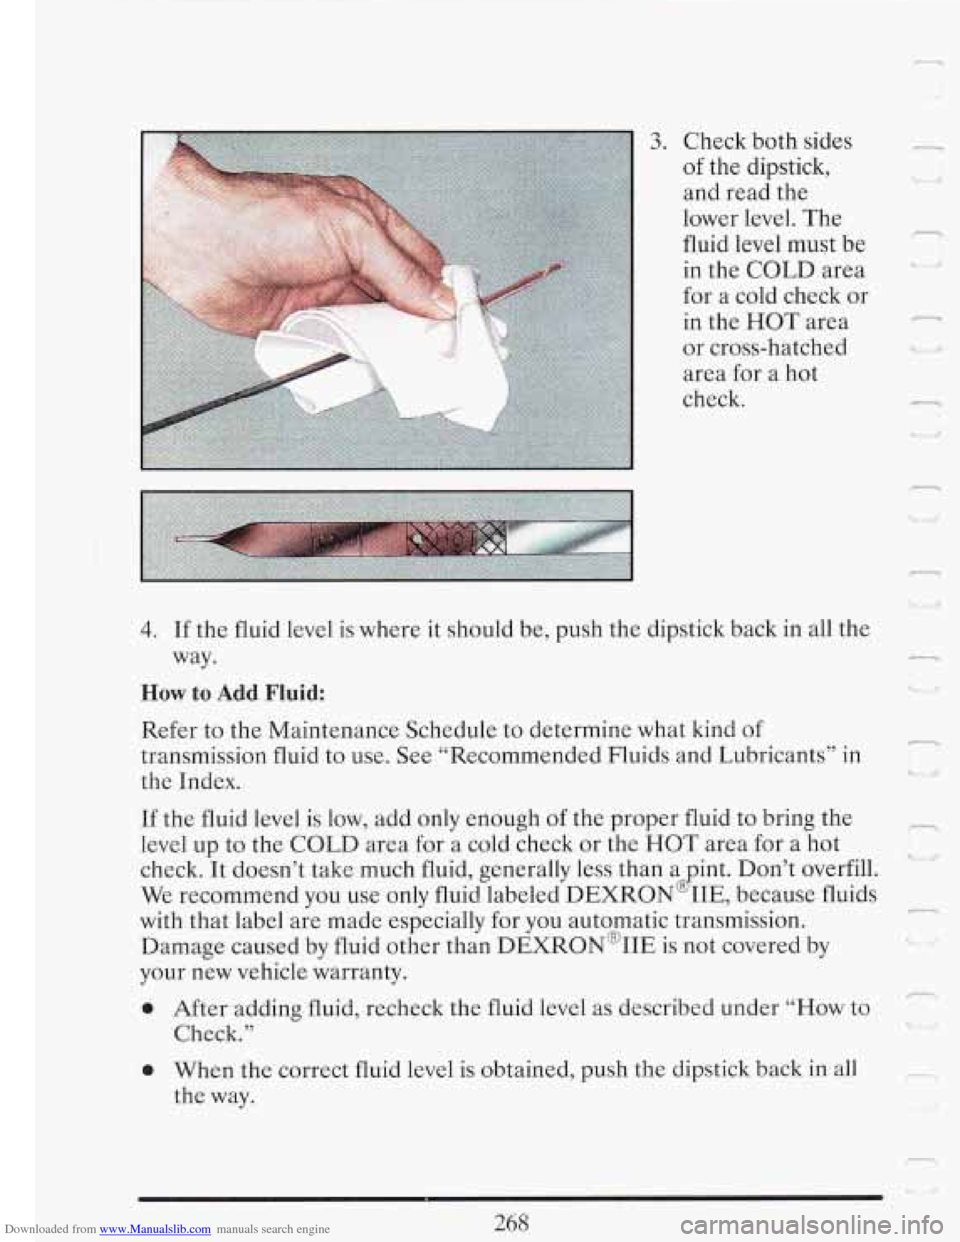
Downloaded from www.Manualslib.com manuals search engine 3. Check both sides
of the dipstick,
and read the
lower level. The
fluid level must be
in the COLD area
for a cold check or
in the HOT area
or cross-hatched area for a hot
check.
r
i4
I’
n i; U
4. If the fluid level is where it should be, push the dipstick back in all the
way.
How to Add Fluid:
Refer to the Maintenance Schedule to determine what kind of
transmission fluid to use. See “Recommended Fluids and Lubricants” in
the Index.
If the fluid level is low, add only enough of the proper fluid to bring the
level
up to the COLD area for a cold check or the HOT area for a hot
check. It doesn’t take much fluid, generally less than a
int. Don’t overfill.
We recommend you use only fluid labeled
DEXRON IIE, because fluids
with that label are made especially for you automatic transmission.
Damage caused
by fluid other than DEXRON@IIE is not covered by
your new vehicle warranty.
8
0 After adding fluid, recheck the fluid level as described under “How to
Check.”
0 When the correct fluid level is obtained, push the dipstick back in all
the way.
n I L> Y
r
Ll
I
r.
- I ‘1
Page 283 of 386

Downloaded from www.Manualslib.com manuals search engine r REARAXLE
1
When to Check and Change Lubricant:
Refer to the Maintenance Schedule to determine how often to check the
lubricant and when to change it. See “Periodic Maintenance Inspections”
in the Index.
How to Check Lubricant:
If the level is below the bottom of the filler plug hole, you’ll need to add
some lubricant. Add enough lubricant to raise the level to the bottom of
What to Use:
~ the filler plug hole.
Standard Differential
Use Axle Lubricant (GM Part
No. 1052271) or SAE 8OW-90 GL-5 gear
lubricant.
Limited-Slip Differential
To add lubricant when the level is low, use Axle Lubricant (GM Part No.
1052271) or SAE 8OW-90 GL-5 gear lubricant. To completely refill after
draining, add
4 ounces (1 18 ml) of Limited-Slip Differential Lubricant
Additive (GM Part
No. 1052358). Then fill to the bottom of the filler plug
hole with Axle Lubricant (GM Part
No. 1052271) or SAE 8OW-90 GL-5
~ gear lubricant.
ENGINE COOLANT
The proper coolant for your Cadillac will:
Give freezing protection down to -34°F (-37’ C) .
_- Give boiling protection up to 262°F (128°C) .
0 Protect against rust and corrosion.
__ 0 Help keep the proper engine temperature.
Let the warning lights work as they should.
What to Use:
Use a mixture of one-half clean water (preferably distilled) and one-half
antifreeze that meets
“GM Specification 1825-M,” which won’t damage
269
Page 287 of 386
Downloaded from www.Manualslib.com manuals search engine - How To Check Power Steering Fluid:
Unscrew the cap and wipe the dipstick with a clean rag. Replace the cap
and completely tighten it. Then remove the cap again and look at the
_q fluid level on the dipstick.
0
0 When the engine
compartment is
hot, the level
should be at the
“HOT” mark.
When the engine
compartment is
cool, the level
should be at the
“FULL COLD”
mark.
- What to Add:
Refer to the Maintenance Schedule to determine what kind of fluid to
- use. See “Recommended Fluids and Lubricants” in the Index.
273
Page 290 of 386
Downloaded from www.Manualslib.com manuals search engine -
L.. i
Refer to the Maintenance Schedule to determine when to check your
brake fluid. See “Periodic Maintenance Inspections” in the Index.
To Check Brake Fluid:
I
You can check the brake fluid without taking off the cap. Just look at the
windows on the brake fluid reservoir. The fluid levels should be above
“MIN.” If they aren’t, have your brake system checked to see if there is a %
leak.
7-
After work is done on the brake hydraulic system, make sure the levels
are above “MIN” and below the top
of each window.
What to Add:
When you do need brake fluid, use only DOT-3 brake fluid -- such as
Delco Supreme
11 @ (GM Part No. 1052535). Use new brake fluid from a
sealed container only.
276
L1
Page 309 of 386

Downloaded from www.Manualslib.com manuals search engine P Tire Inspection and Rotation
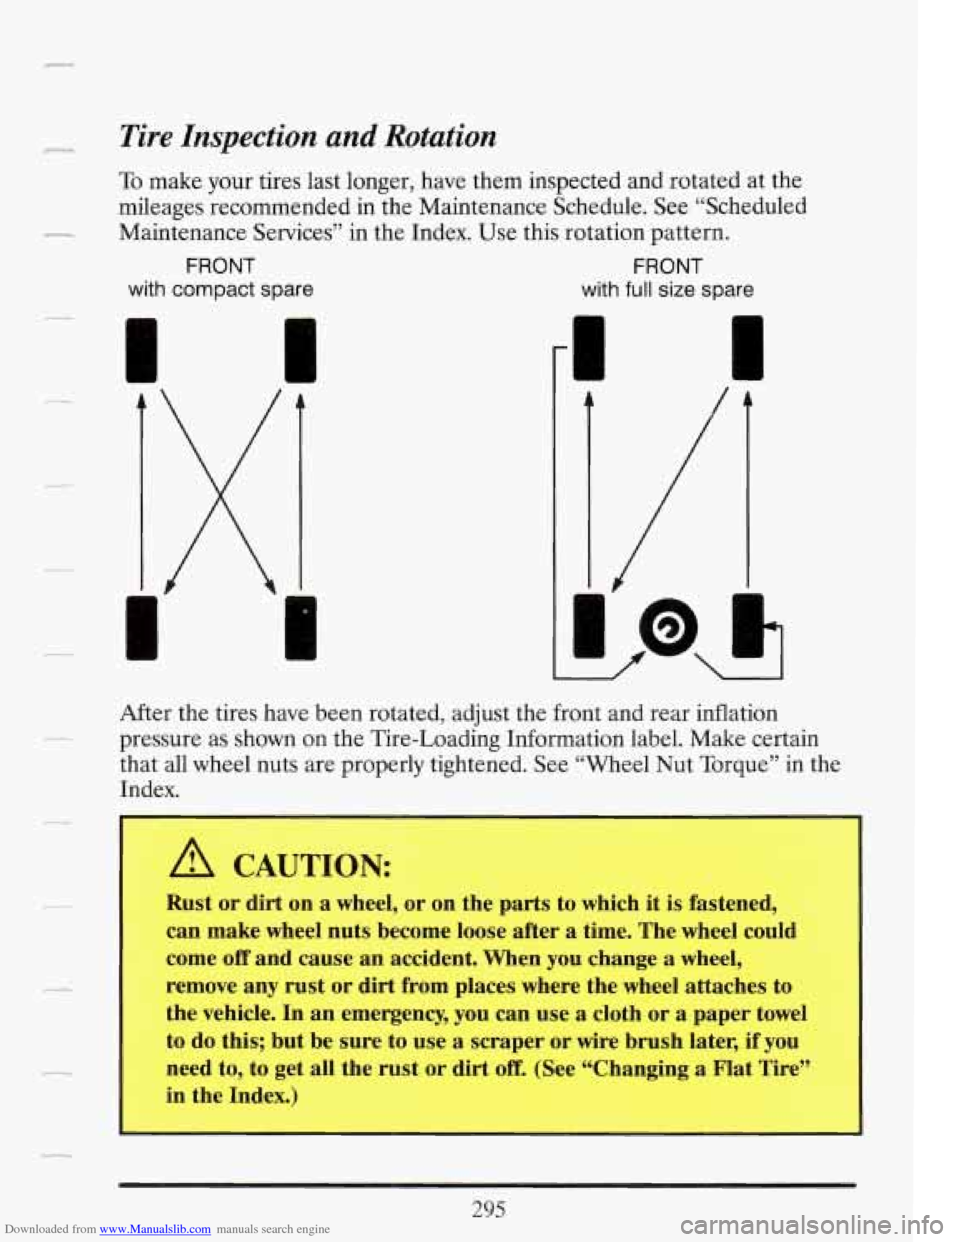
To make your tires last longer, have them inspected and rotated at the
mileages recommended in the Maintenance Schedule. See “Scheduled
- Maintenance Services” in the Index. Use this rotation pattern.
FRONT FRONT
with compact spare
with full size spare
cs
r
A
I
After the tires have been rotated, adjust the front and rear inflation
pressure as shown on the Tire-Loading Information label. Make certain
that all wheel nuts are properly tightened. See “Wheel Nut Torque” in the
Index.
A CAUTION:
Rust or dirt on a wheel, or on the parts to which it is fastened,
can make wheel nuts become loose after a time. The wheel could
come
off and cause an accident. When you change a wheel,
remove any rust
or dirt from places where the wheel attaches to
the vehicle. In an emergency, you can use
a cloth or a paper towel
to do this; but be sure to use a scraper
or wire brush later, if you
need to, to get all the rust
or dirt off. (See “Changing a Flat Tire”
in the Index.)
295