Page 1045 of 4087

DIAGNOSIS SYSTEM
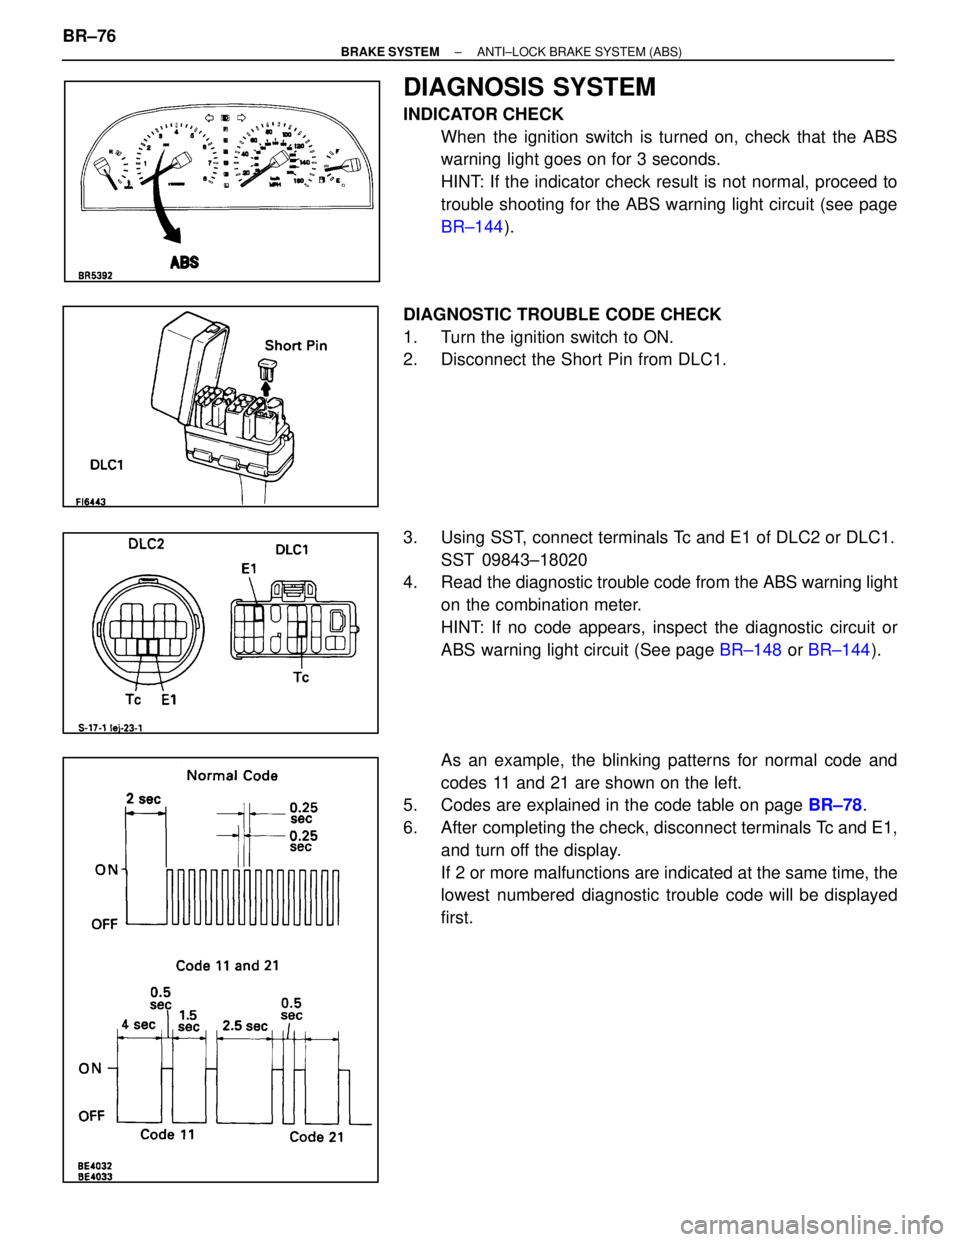
INDICATOR CHECKWhen the ignition switch is turned on, check that the ABS
warning light goes on for 3 seconds.
HINT: If the indicator check result is not normal, proceed to
trouble shooting for the ABS warning light circuit (see page
BR±144 ).
DIAGNOSTIC TROUBLE CODE CHECK
1. Turn the ignition switch to ON.
2. Disconnect the Short Pin from DLC1.
3. Using SST, connect terminals Tc and E1 of DLC2 or DLC1. SST 09843±18020
4. Read the diagnostic trouble code from the ABS warning light
on the combination meter.
HINT: If no code appears, inspect the diagnostic circuit or
ABS warning light circuit (See page BR±148 or BR±144 ).
As an example, the blinking patterns for normal code and
codes 11 and 21 are shown on the left.
5. Codes are explained in the code table on page BR±78.
6. After completing the check, disconnect terminals Tc and E1, and turn off the display.
If 2 or more malfunctions are indicated at the same time, the
lowest numbered diagnostic trouble code will be displayed
first.
BR±76
±
BRAKE SYSTEM ANTI±LOCK BRAKE SYSTEM (ABS)
WhereEverybodyKnowsYourName
Page 1046 of 4087

ECU DATA MONITOR USING LEXUS HAND±HELD TESTER
1. Hook up the LEXUS hand±held tester to the DLC2.
2. Monitor the ECU data by following the prompts on the testerscreen.
HINT: LEXUS hand±held tester has a ªSnapshotº function
which records the monitored data.
Please refer to the LEXUS hand±held tester operator's
manual for further details.
DIAGNOSTIC TROUBLE CODE CLEARANCE
1. Using SST, connect terminals Tc and E1 of DLC2 or DLC1. SST 09843±18020
2. IG switch ON.
3. Clear the diagnostic trouble codes stored in ECU by depressing the brake pedal 8 or more times within 3 seconds.
4. Check that the warning light shows the normal code.
5. Remove the SST from the terminals of DLC2 or DLC1.
6. Connect the Short Pin to DLC1.
HINT: Cancellation can also be done by removing the DOME
fuse, but in this case, other memory systems will also be can-
celled out.
ECU TERMINAL VALUES MEASUREMENT USING LEXUS BREAK±OUT±BOX AND LEXUS HANDHELD TESTER
1. Hook up the LEXUS hand±held tester and LEXUS
break±out±box to the vehicle.
2. Read the ECU input/output values by following the prompts on the scan tool screen.
HINT: LEXUS hand±held tester has a ªSnapshotº function.
This records the measured values and is effective in the diag-
nosis of intermittent problems.
Please refer to the LEXUS hand±held tester/LEXUS break±
out±box operator's manual for further details.
±
BRAKE SYSTEM ANTI±LOCK BRAKE SYSTEM (ABS)BR±77
WhereEverybodyKnowsYourName
Page 1049 of 4087

SPEED SENSOR SIGNAL CHECK
1. Turn the ignition switch to OFF.
2. Using SST, connect terminals Ts and E1 of DLC1.SST 09843±18020
3. Start the engine.
4. Check that the ABS warning light blinks. HINT: If the ABS warning light does not blink, inspect the ABS
warning light circuit (see page BR±144).
5. Drive vehicle straight forward. HINT: Drive vehicle faster than 45 km/h (28 mph) for several
seconds.
6. Stop the vehicle.
7. Using SST, connect terminals Tc and E1 of DLC1.
SST 09843±18020
8. Read the number of blinks of the ABS warning light. HINT: See the list of diagnosis trouble codes shown on the
next page.
If every sensor is normal, a normal code is output (A cycle of
0.25 sec. on and 0.25 sec. OFF is repeated).
If 2 or more malfunction are indicated at the same time, the
lowest numbered code will be displayed 1st.
9. After performing the check, disconnect terminals Ts and E1,Tc and E1 of DLC1, and ignition switch turned off.
BR±80
±
BRAKE SYSTEM ANTI±LOCK BRAKE SYSTEM (ABS)
WhereEverybodyKnowsYourName
Page 1051 of 4087

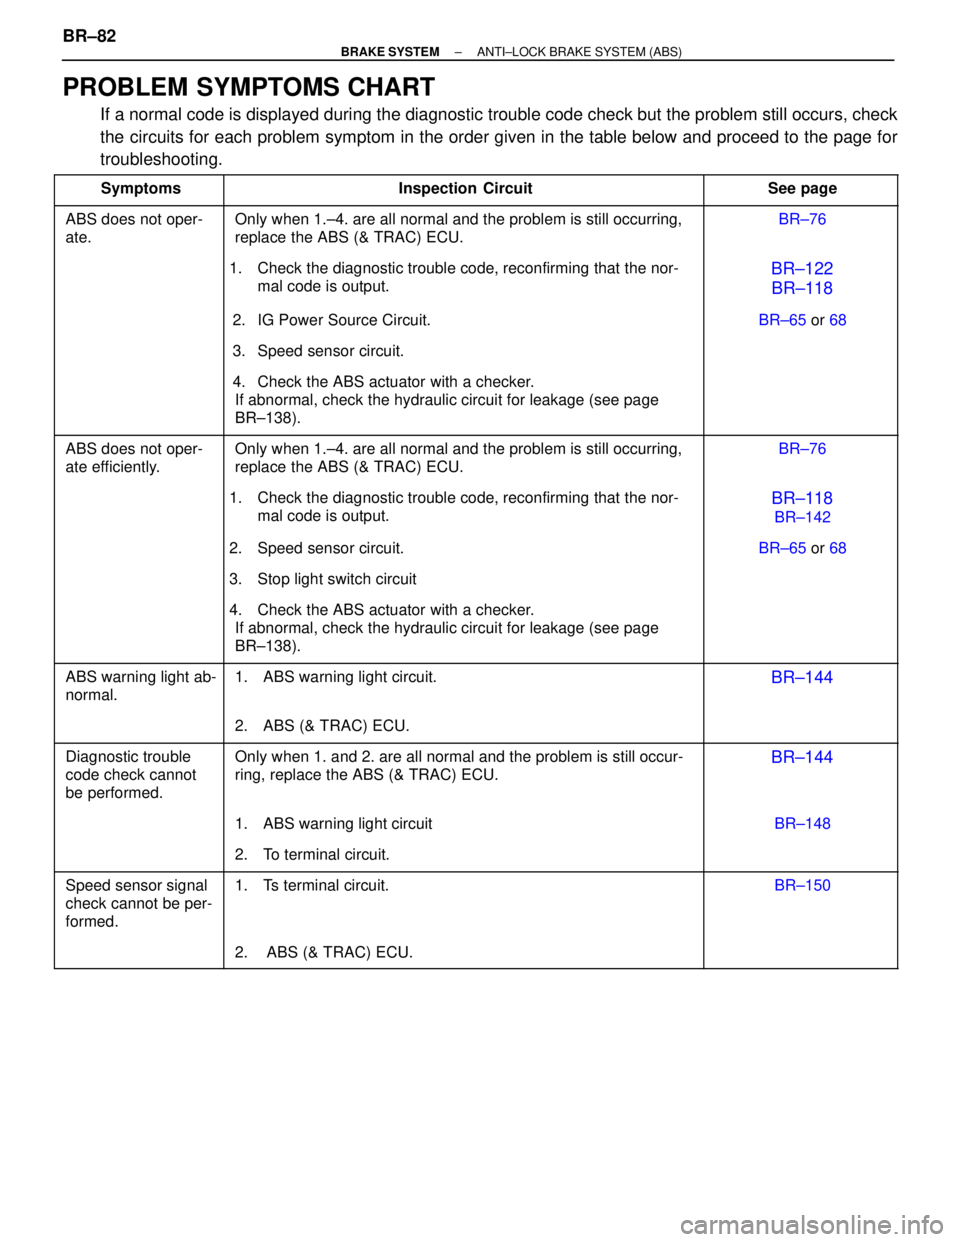
PROBLEM SYMPTOMS CHART
If a normal code is displayed during the diagnostic trouble code check but\
the problem still occurs, check
the circuits for each problem symptom in the order given in the table below\
and proceed to the page for
troubleshooting.
�������� ��������Symptoms������������������\
��� ������������������\
���Inspection Circuit��������� ���������See page
�������� �
�������
��������
ABS does not oper-
ate.������������������\
��� �
������������������\
��
������������������\
���
Only when 1.±4. are all normal and the problem is still occurring,
replace the ABS (& TRAC) ECU.��������� �
��������
���������
BR±76
�������� �
�������
��������
������������������\
��� �
������������������\
��
������������������\
���
1. Check the diagnostic trouble code, reconfirming that the nor-
mal code is output.��������� �
��������
���������BR±122
BR±118
�������� ��������������������������\
��� ������������������\
���2. IG Power Source Circuit.��������� ���������BR±65 or 68�������� �
�������
��������
������������������\
��� �
������������������\
��
������������������\
���3. Speed sensor circuit.
��������� �
��������
���������
�������� �
�������
�
�������
��������
������������������\
��� �
������������������\
��
�
������������������\
��
������������������\
���
4. Check the ABS actuator with a checker.
If abnormal, check the hydraulic circuit for leakage (see page
BR±138).��������� �
��������
�
��������
���������
�������� �
�������
��������
ABS does not oper-
ate efficiently.������������������\
��� �
������������������\
��
������������������\
���
Only when 1.±4. are all normal and the problem is still occurring,
replace the ABS (& TRAC) ECU.��������� �
��������
���������
BR±76
�������� �
�������
��������
������������������\
��� �
������������������\
��
������������������\
���
1. Check the diagnostic trouble code, reconfirming that the nor-
mal code is output.��������� �
��������
���������
BR±118
BR±142
�������� ��������������������������\
��� ������������������\
���2. Speed sensor circuit.��������� ���������BR±65
or 68
�������� ��������������������������\
��� ������������������\
���3. Stop light switch circuit��������� ���������
�������� �
�������
�
�������
��������
������������������\
��� �
������������������\
��
�
������������������\
��
������������������\
���
4. Check the ABS actuator with a checker.
If abnormal, check the hydraulic circuit for leakage (see page
BR±138).��������� �
��������
�
��������
���������
�������� �
�������
��������
ABS warning light ab-
normal.������������������\
��� �
������������������\
��
������������������\
���
1. ABS warning light circuit.��������� �
��������
���������BR±144
�������� ��������������������������\
��� ������������������\
���2. ABS (& TRAC) ECU.��������� ���������
�������� �
�������
�
�������
��������
Diagnostic trouble
code check cannot
be performed.������������������\
��� �
������������������\
��
�
������������������\
��
������������������\
���
Only when 1. and 2. are all normal and the problem is still occur-
ring, replace the ABS (& TRAC) ECU.��������� �
��������
�
��������
���������
BR±144
�������� ��������������������������\
��� ������������������\
���1. ABS warning light circuit��������� ���������BR±148�������� �
�������
��������
������������������\
��� �
������������������\
��
������������������\
���2. To terminal circuit.
��������� �
��������
���������
�������� �
�������
��������
Speed sensor signal
check cannot be per-
formed.������������������\
��� �
������������������\
��
������������������\
���
1. Ts terminal circuit.��������� �
��������
���������
BR±150
�������� �
�������
��������
������������������\
��� �
������������������\
��
������������������\
���2. ABS (& TRAC) ECU.
��������� �
��������
���������
BR±82±
BRAKE SYSTEM ANTI±LOCK BRAKE SYSTEM (ABS)
WhereEverybodyKnowsYourName
Page 1102 of 4087
OKNG
OKNG
OKNG
INSPECTION PROCEDURE
1Check brake fluid level.
Check the amount of fluid in the bake reservoir.C
Check and repair brake fluid leakage and add fluid.
2Check brake fluid level warning switch.
See page BE±142.
Replace brake fluid level warning switch.
3Check for short in all the harness and components connected to brake fluid le\
vel warning light
(See page IN±33).
Repair or replace harness or connector.
Check and replace ABS & TRAC ECU.
±
BRAKE SYSTEM ANTI±LOCK BRAKE SYSTEM (ABS)BR±133
WhereEverybodyKnowsYourName
Page 1111 of 4087
BE±78).
BR±74 ).
IN±33 ).
WIRING DIAGRAM
Stop Light Switch Circuit
CIRCUIT DESCRIPTION
The stop light switch senses whether the brake pedal is depressed or releas\
ed, and sends a signal to the ECU.
DIAGNOSTIC CHARTDIAGNOSTIC CHART
BR±142±
BRAKE SYSTEM ANTI±LOCK BRAKE SYSTEM (ABS)
WhereEverybodyKnowsYourName
Page 1112 of 4087
OKNG
NGOK
OKNG
INSPECTION PROCEDURE
1Check operation of stop light.
Check that stop light lights up when brake pedal is depressed and turns off when brake pedal is re-
leased.C
Repair stop light circuit (See page BE±78).
2Check voltage between terminal STP of ABS (& TRAC) ECU and body ground\
.
C
OK
PRemove ABS (& TRAC) ECU with connectors still con-
nected.
Measure voltage between terminal STP of ABS (&
TRAC) ECU and body ground when brake pedal is de-
pressed.
Voltage: 8 ± 14 V
Proceed to next circuit inspection shown on problem
symptoms chart (See page BR±74).
3Check for open in harness and connector between ABS (& TRAC) ECU and s\
top light switch
(See page IN±33).
Repair or replace harness or connector.
Check and replace ABS (& TRAC) ECU.
±
BRAKE SYSTEM ANTI±LOCK BRAKE SYSTEM (ABS)BR±143
WhereEverybodyKnowsYourName
Page 1113 of 4087
WIRING DIAGRAM
ABS Warning Light Circuit
CIRCUIT DESCRIPTION
If the ECU detects trouble, it lights the ABS warning light while at the s\
ame time prohibiting ABS control.
At this time, the ECU records a diagnostic trouble code in memory.After removing the short pin of the DLC1,
connect a DLC1 or connect terminals Tc and E1 of the DLC2 to make the ABS warning light to blink and
output the diagnostic trouble code.DIAGNOSTIC CHARTPerform troubleshooting in accordance with the
chart below for each trouble symptom.
DIAGNOSTIC CHARTDIAGNOSTIC CHART
Perform troubleshooting in accordance with the chart below for each trouble sym\
ptom.
�������������� �
�������������
��������������
ABS warning light does not light up������� �
������
�������
Go to step
�������������� �
�������������
��������������ABS warning light remains on������� �
������
�������Go to step
BR±144±
BRAKE SYSTEM ANTI±LOCK BRAKE SYSTEM (ABS)
WhereEverybodyKnowsYourName