Page 876 of 4087
Interior Light and Front
WIRING AND CONNECTOR DIAGRAMS ±
INTERIOR LIGHT SYSTEM
±
BODY ELECTRICAL SYSTEM Lighting SystemBE±77
WhereEverybodyKnowsYourName
Page 877 of 4087

Parts Inspection ± Interior Lights
(Integration Relay)
REMOVAL AND INSTALLATION OF
INTEGRATION RELAY
(See page BE±49 )
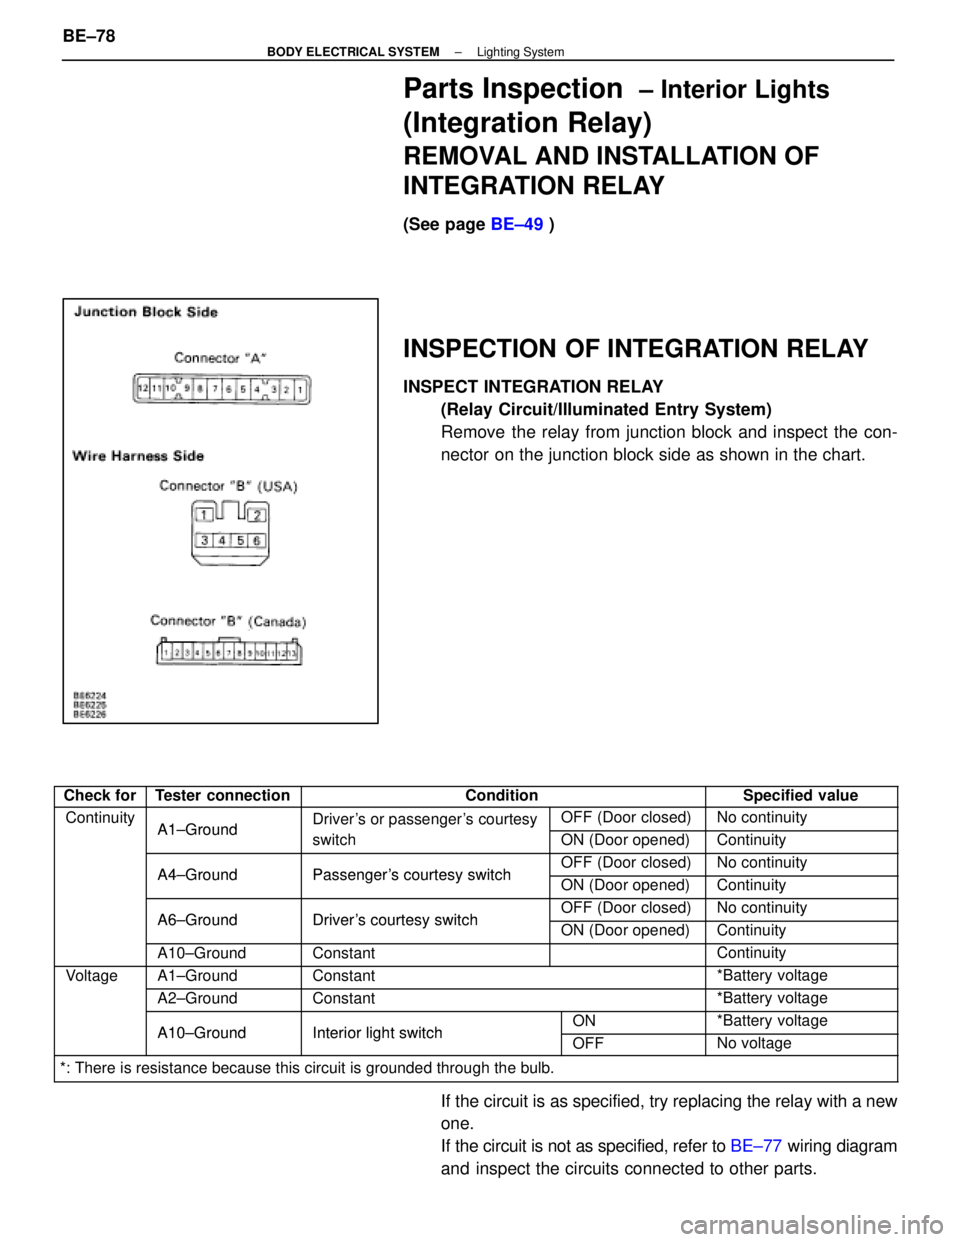
INSPECTION OF INTEGRATION RELAY
INSPECT INTEGRATION RELAY
(Relay Circuit/Illuminated Entry System)
Remove the relay from junction block and inspect the con-
nector on the junction block side as shown in the chart.
Check forTester connectionConditionSpecified value
ContinuityA1±GroundDriver's or passenger's courtesyOFF (Door closed)No continuityyA1±Groundgy
switchON (Door opened)Continuity
A4±GroundPassenger's courtesy switchOFF (Door closed)No continuityA4±GroundPassenger's courtesy switchON (Door opened)Continuity
A6±GroundDriver's courtesy switchOFF (Door closed)No continuityA6±GroundDriver's courtesy switchON (Door opened)Continuity
A10±GroundConstantContinuity
VoltageA1±GroundConstant*Battery voltageg
A2±GroundConstant*Battery voltage
A10±GroundInterior light switchON*Battery voltageA10±GroundInterior light switchOFFNo voltage
*: There is resistance because this circuit is grounded through the bulb\
.
If the circuit is as specified, try replacing the relay with a new
one.
If the circuit is not as specified, refer to BE±77 wiring diagram
and inspect the circuits connected to other parts.
BE±78
±
BODY ELECTRICAL SYSTEM Lighting System
WhereEverybodyKnowsYourName
Page 878 of 4087
(Courtesy Switch)
REMOVAL AND INSTALLATION OF
COURTESY SWITCH
1. REMOVE COURTESY SWITCH(a) Remove door lock assembly.
(See page BO±36)
(b) Remove a screw.
(c) Remove courtesy switch from door lock assembly.
2. INSTALL COURTESY SWITCH For installation, follow the removal procedure in reverse.
INSPECTION OF COURTESY SWITCH
INSPECT COURTESY SWITCH(Continuity)
Inspect the switch continuity between terminals.
If continuity is not as specified, replace the switch.
(Switch Circuit)
Disconnect the connector from the switch and inspect the
connector on the wire harness side as shown.
Check forTester connectionConditionSpecified value
Continuity6±GroundConstantContinuity
Voltage3±GroundConstantBattery voltage
If circuit is not as specified, inspect power source or wire
harness.
±
BODY ELECTRICAL SYSTEM Lighting SystemBE±79
WhereEverybodyKnowsYourName
Page 879 of 4087
(Front Personal Light Switch)
REMOVAL AND INSTALLATION OF
FRONT PERSONAL LIGHT
1. REMOVE FRONT PERSONAL LIGHT(a) Release eight tabs and remove the lens.
(b) Remove three screws and separate front personal light.
(c) Disconnect connector and remove front personal light.
2. INSTALL FRONT PERSONAL LIGHT For installation, follow the removal procedure in reverse.
INSPECTION OF FRONT PERSONAL
LIGHT
INSPECT FRONT PERSONAL LIGHT SWITCH(Continuity)
Inspect the light switch continuity between terminals.
If continuity is not as specified, replace the light assembly or
bulb.
(Switch Circuit)
Disconnect the connector from the switch and inspect the
connector on the wire harness side as shown.
Check forTester connectionConditionSpecified value
Voltage3±GroundConstantBattery voltage
Continuity1±GroundConstantContinuity
If circuit is not as specified, inspect power source or wire
harness.
BE±80
±
BODY ELECTRICAL SYSTEM Lighting System
WhereEverybodyKnowsYourName
Page 880 of 4087
(Vanity Light Switch)
REMOVAL AND INSTALLATION OF
VANITY LIGHT SWITCH
1. REMOVE VANITY LIGHT(a) Release two tabs and remove the lens.
(b) Remove two screws and separate the vanity light from sun visor.
(c) Disconnect connector and remove vanity light.
2. INSTALL VANITY LIGHT For installation follow the removal procedure in reverse.
INSPECTION OF VANITY LIGHT
INSPECT VANITY LIGHT SWITCH
(Continuity)
Inspect the vanity light continuity between terminals.
If continuity is not as specified, replace bulb or vanity light.
(Switch Circuit)
Disconnect the connector from the switch and inspect the
connector on the wire harness side as shown.
Check forTester connectionConditionSpecified value
Voltage1±GroundConstantBattery positive voltage
Continuity2±GroundConstantContinuity
If circuit is not as specified, inspect power source or wire har-
ness.
±
BODY ELECTRICAL SYSTEM Lighting SystemBE±81
WhereEverybodyKnowsYourName
Page 881 of 4087
(Luggage Compartment Door
Courtesy Switch)
REPLACEMENT OF LUGGAGE
COMPARTMENT DOOR COURTESY
SWITCH
1. REMOVE COURTESY SWITCH(a) Remove the opening trim.
(b) Remove a bolt and disconnect connector.
(c) Remove the switch.
2. INSTALL COURTESY SWITCH For installation follow the removal procedure in reverse.
INSPECTION OF LUGGAGE COURTESY
SWITCH
INSPECT LUGGAGE DOOR COURTESY SWITCH(Continuity)
Inspect the switch continuity between terminal and switch
body.
If operation is not as specified, replace the switch.
(Switch Circuit)
Disconnect the connector from the switch and inspect the
connector on the wire harness as shown.
Check forTester connectionConditionSpecified value
Voltage1±GroundConstantBattery positive voltage
If circuit is not as specified, inspect power source or wire har-
ness.
BE±82
±
BODY ELECTRICAL SYSTEM Lighting System
WhereEverybodyKnowsYourName
Page 882 of 4087
TROUBLESHOOTING
Interior Light System
You will find the cause of trouble more easily using the table shown below. In this table, the numbers indicate
the order priority of the causes in the trouble. Check each part in the ord\
er shown. If necessary, replace the parts.
See pageB±4,21BE±79BE±49BE±80BE±81BE±82
±
BE±6
Trouble
Part Name
DOME FuseDoor Courtesy SwitchIntegration RelayFront Personal LightVanity LightLuggage Compartment Door
Courtesy SwitchWire HarnessBulb
Only one interior light does not light up.21
Interior light does not light up. (All)12
ºIlluminated Entry Systemº does not oper-
ate.213
Interior light does not light up.
(in front personal light)231
Front personal light does not light up.231
Rear personal light does not light up.21
Vanity light does not light up.231
Luggage compartment light does not light
up.231
Courtesy light does not light up.231
±
BODY ELECTRICAL SYSTEM Lighting SystemBE±83
WhereEverybodyKnowsYourName
Page 884 of 4087
Parts Location (Cont'd)
±
BODY ELECTRICAL SYSTEM Lighting SystemBE±85
WhereEverybodyKnowsYourName