Page 868 of 4087

INSPECTION OF HAZARD WARNING
SWITCH
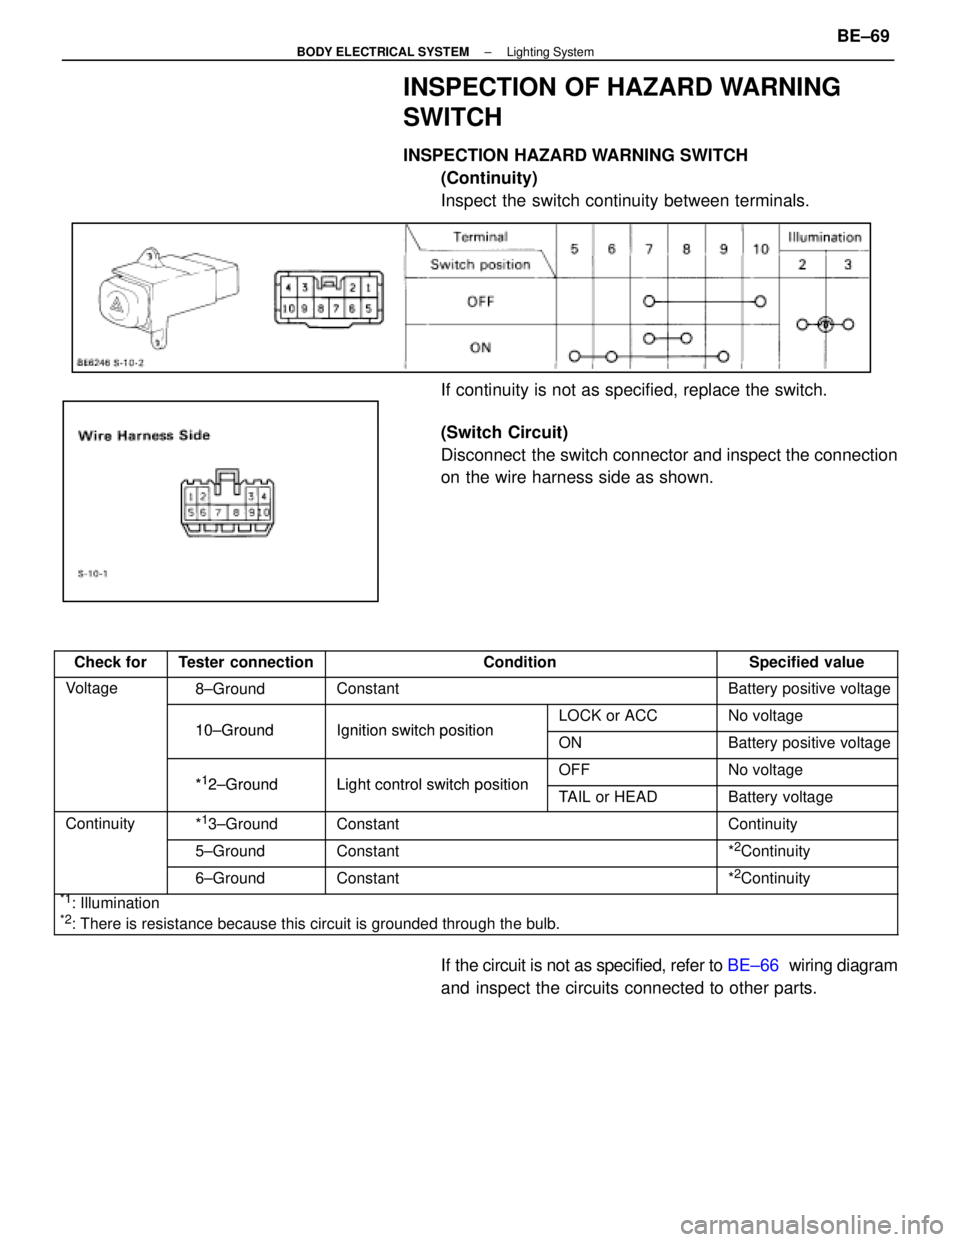
INSPECTION HAZARD WARNING SWITCH(Continuity)
Inspect the switch continuity between terminals.
If continuity is not as specified, replace the switch.
(Switch Circuit)
Disconnect the switch connector and inspect the connection
on the wire harness side as shown.
Check forTester connectionConditionSpecified value
Voltage8±GroundConstantBattery positive voltage
10±GroundIgnition switchpositionLOCK or ACCNo voltage10±GroundIgnition switch positionONBattery positive voltage
*12±GroundLight control switchpositionOFFNo voltage*12±GroundLight control switch positionTAIL or HEADBattery voltage
Continuity*13±GroundConstantContinuity
5±GroundConstant*2Continuity
6±GroundConstant*2Continuity
*1: Illumination*2: There is resistance because this circuit is grounded through the bulb.\
If the circuit is not as specified, refer to BE±66 wiring diagram
and inspect the circuits connected to other parts.
±
BODY ELECTRICAL SYSTEM Lighting SystemBE±69
WhereEverybodyKnowsYourName
Page 869 of 4087

TROUBLESHOOTING
Turn Signal and Hazard Warning Light
System
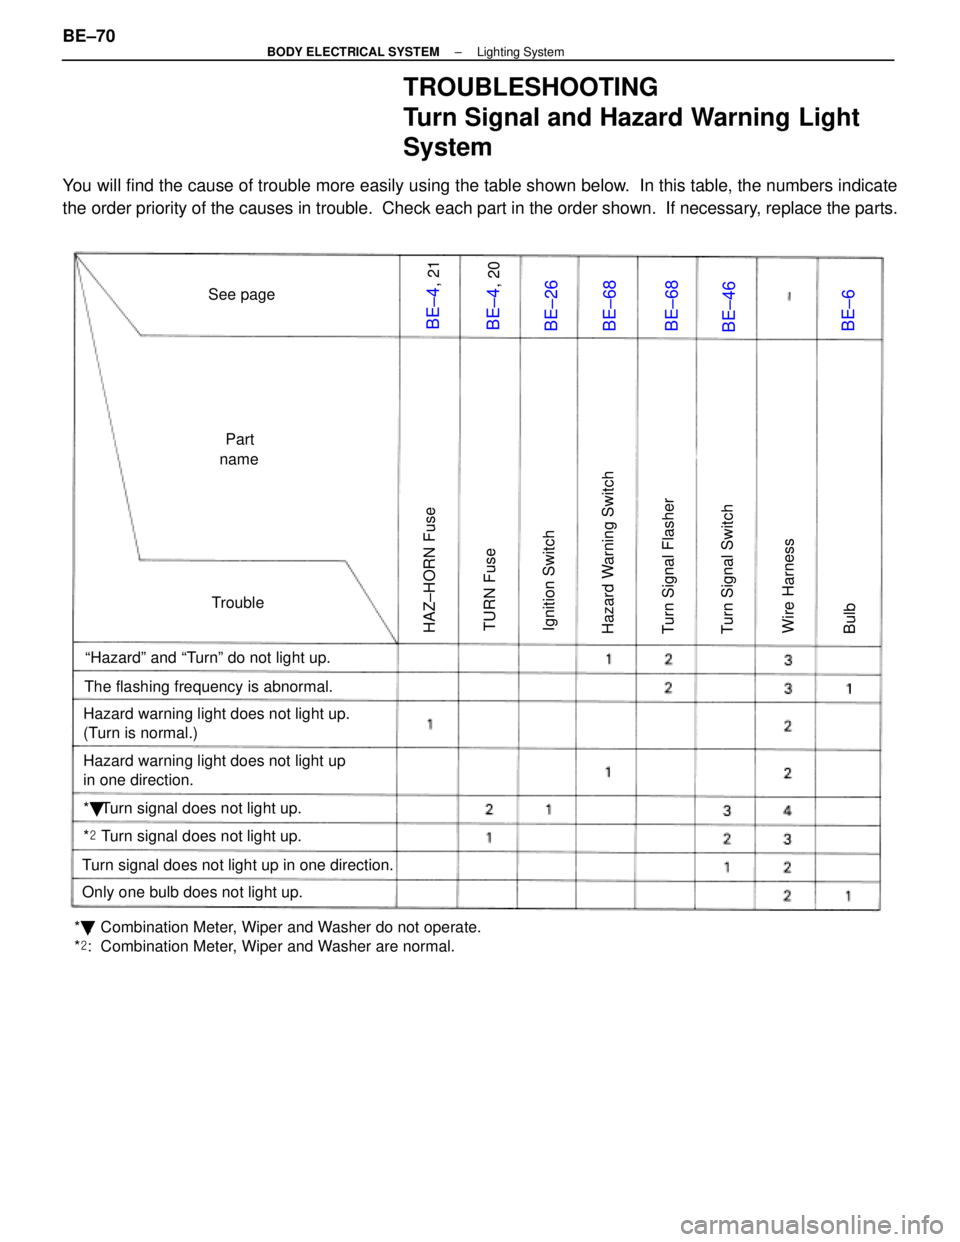
You will find the cause of trouble more easily using the table shown below. In this table, the numbers indicate
the order priority of the causes in trouble. Check each part in the order \
shown. If necessary, replace the parts.
See pagePart
name
Trouble
ªHazardº and ªTurnº do not light up.
The flashing frequency is abnormal.
Hazard warning light does not light up.
(Turn is normal.)
Hazard warning light does not light up
in one direction.
* � Turn signal does not light up.
*
� Turn signal does not light up.
Turn signal does not light up in one direction.
Only one bulb does not light up.
* � : Combination Meter, Wiper and Washer do not operate.
* � : Combination Meter, Wiper and Washer are normal.
HAZ±HORN Fuse
TURN Fuse
Ignition Switch
Hazard Warning Switch
Turn Signal Flasher
Turn Signal Switch
Wire Harness
Bulb
BE±4
, 21
BE±4
, 20
BE±26
BE±68
BE±68
BE±46
BE±6
BE±70±
BODY ELECTRICAL SYSTEM Lighting System
WhereEverybodyKnowsYourName
Page 870 of 4087
(ILLUMINATION LIGHT SYSTEM)
DESCRIPTION ± ILLUMINATION LIGHT
SYSTEM
The component parts of this system and their function are described in the \
following table.
Parts NameFunction
Rheostat LightIn order to adjust the degree of illumination light, the resistance valu\
e of the built±in variableg
Control Volume
jg g,
resistor is sent to the combination meter and rheostat light control.
Integration RelayDuring daytime running light operation this prevents current flow to the\
rheostat light controlgy
(Daytime Running
gy gg g
to stop each illumination from lighting up. When the light control switc\
h is at TAIL or HEAD,(y g
Light Relay: Canada)
gg g
current is sent to the rheostat light control.
PARTS LOCATION
±
BODY ELECTRICAL SYSTEM Lighting SystemBE±71
WhereEverybodyKnowsYourName
Page 871 of 4087
WIRING AND CONNECTOR DIAGRAMS
BE±72±
BODY ELECTRICAL SYSTEM Lighting System
WhereEverybodyKnowsYourName
Page 872 of 4087
Parts Inspection ± ILLUMINATION
LIGHT SYSTEM
(Rheostat Light Control Volume)
REMOVAL AND INSTALLATION OF
RHEOSTAT LIGHT CONTROL VOLUME
(See page BE±103 )
INSPECTION OF RHEOSTAT LIGHT
CONTROL VOLUME
1. INSPECT RHEOSTAT LIGHT CONTROL VOLUME
(Resistance)
Inspection resistance between terminals.
Tester
ConnectionConditionSpecified value
3±4ConstantApprox. 10 k �
1±3Rheostat knobA�1±3turned clockwiseBApprox. 10 k� " 0 �
If resistance is not as specified, replace the rheostat light con-
trol volume.
(Taillight Switch/Continuity)
Inspect continuity between terminals.
If operation is not as specified, replace the rheostat light con-
trol volume.
±
BODY ELECTRICAL SYSTEM Lighting SystemBE±73
WhereEverybodyKnowsYourName
Page 873 of 4087

(GLOVE BOX LIGHT SWITCH)
REMOVAL AND INSTALLATION OF
GLOVE BOX LIGHT SWITCH
1. REMOVE GLOVE BOX LIGHT SWITCH(a) Remove glove compartment.
(See page BO±112)
(b) Release two tabs and remove switch.
2. INSTALL GLOVE BOX LIGHT SWITCH For installation, follow the removal procedure in reverse.
INSPECTION OF GLOVE BOX LIGHT
SWITCH
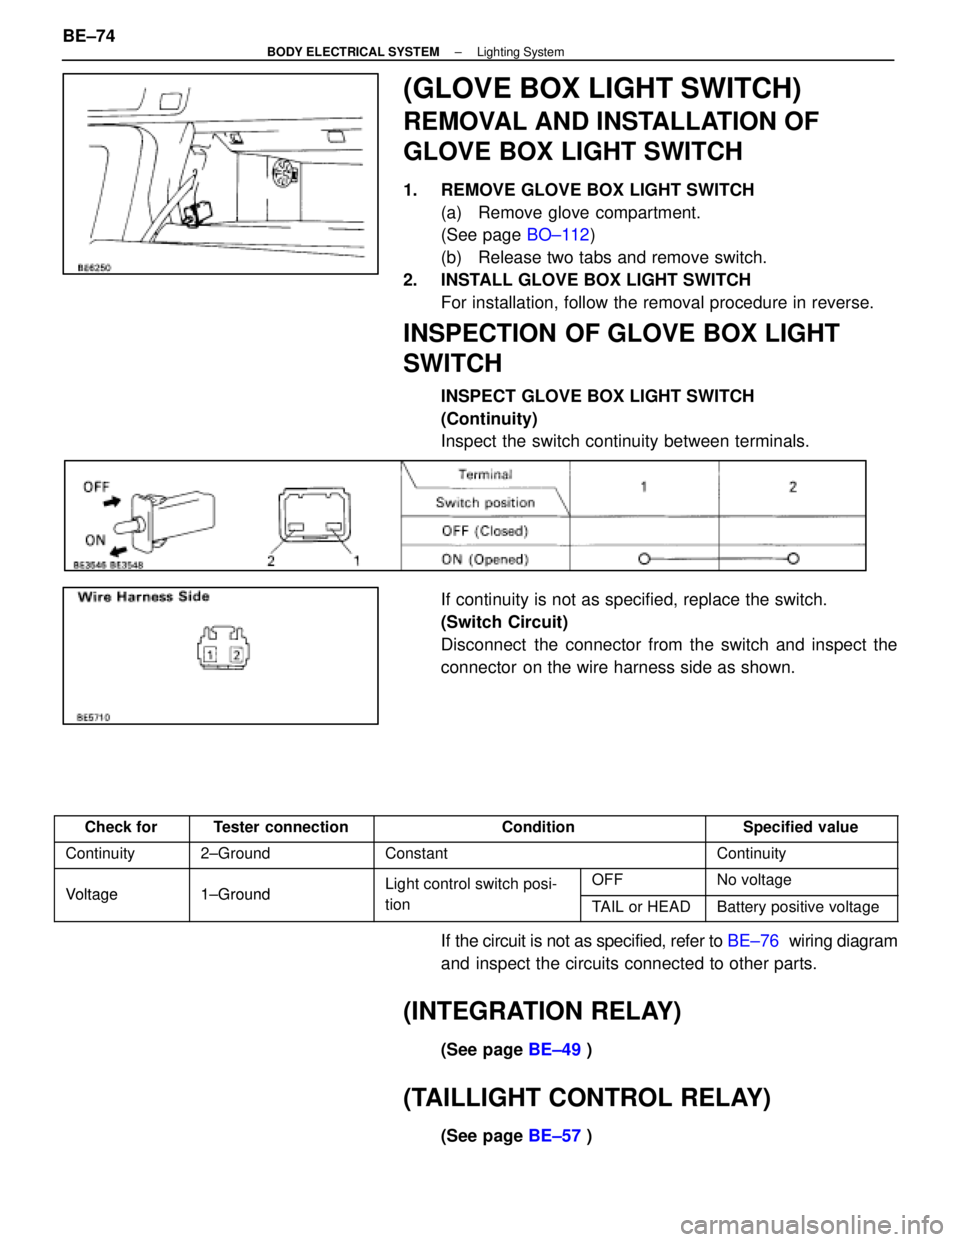
INSPECT GLOVE BOX LIGHT SWITCH
(Continuity)
Inspect the switch continuity between terminals.
If continuity is not as specified, replace the switch.
(Switch Circuit)
Disconnect the connector from the switch and inspect the
connector on the wire harness side as shown.
Check forTester connectionConditionSpecified value
Continuity2±GroundConstantContinuity
Voltage1±GroundLight control switch posi-OFFNo voltageVoltage1±Groundg
tionTAIL or HEADBattery positive voltage
If the circuit is not as specified, refer to BE±76 wiring diagram
and inspect the circuits connected to other parts.
(INTEGRATION RELAY)
(See page BE±49 )
(TAILLIGHT CONTROL RELAY)
(See page BE±57 )
BE±74
±
BODY ELECTRICAL SYSTEM Lighting System
WhereEverybodyKnowsYourName
Page 874 of 4087
Interior Light and Front
WIRING AND CONNECTOR DIAGRAMS ±
INTERIOR LIGHT SYSTEM
±
BODY ELECTRICAL SYSTEM Lighting SystemBE±77
WhereEverybodyKnowsYourName
Page 875 of 4087
(INTERIOR LIGHT SYSTEM)
Description ± INTERIOR LIGHT SYSTEM
The component parts of this system and their function are as shown in the f\
ollowing table.
Parts NameFunction
Integration RelayFades out some of the interior lights in accordance with signals from th\
e door courtesy
switch and outside handle switch. (Illuminated Entry System)
Door Courtesy SwitchCreates a closed circuit when the doors are opened lighting each courtes\
y light, etc. Also
detects when the door is open and sends the appropriate signals to the i\
ntegration relay.
PARTS LOCATION ± INTERIOR LIGHT
BE±76±
BODY ELECTRICAL SYSTEM Lighting System
WhereEverybodyKnowsYourName