Page 479 of 4087
13. (w/ Sliding Roof)REMOVE SUN SHADE TRIM
(See steps 1 to 10 on pages BO±85 to 86)
INSTALLATION OF TRIM, ASSIST GRIP
AND VISOR
(See page BO±121)
1. (w/ Sliding Roof) INSTALL SUN SHADE TRIM
2. INSTALL OUTSIDE SCUFF PLATE Place the plate on the body and install it by tapping.
3. INSTALL FRONT SCUFF PLATE Place the plate on the body and install it by tapping.
4. INSTALL ROOM PARTITION TRIM Install the trim as shown.
5. INSTALL PACKAGE TRAY TRIM (a) Align the six retainers with the holes of the panel, thenpush the trim backward.
(b) Install two clips.
(c) Install the belt guide to the trim.
BO±124
±
BODY Trim, Assist Grip and Visor
WhereEverybodyKnowsYourName
Page 480 of 4087
6. INSTALL ROOF SIDE INNER GARNISH(a) Place the inner garnish on the quarter panel and installit by tapping it in.
(b) Install four screws.
7. INSTALL QUARTER TRIM AND ASSIST GRIP (a) Place the trim on the quarter panel and install it bytapping it in.
(b) Install the belt guide with the clip.
(c) Install the front seat belt anchor with the bolt.
Torque: 43 N Vm (440 kgf Vcm, 32 ft Vlbf)
(d) Install the assist grip with two screws and two caps.
8. INSTALL REAR SEAT CUSHION AND BACK (See page BO±67)
Torque: 18 N Vm (185 kgf Vcm, 13 ft Vlbf)
9. INSTALL CENTER VISOR
(a) Connect the connector.
(b) Install the visor with two screws and the cover.
10. INSTALL SUN VISOR (a) Install the holder with the screw.
(b) Install the sun visor with two screws and the cover.
±
BODY Trim, Assist Grip and VisorBO±125
WhereEverybodyKnowsYourName
Page 562 of 4087

SLIDING ROOF SYSTEM
Description
Standby Operation
� Current flows from the DOME fuse to terminal A1 of the sliding roof control rel\
ay (hereafter called
relay).
� When the ignition switch is ON, the current flows from the power window relay to terminal A3 of the
relay.
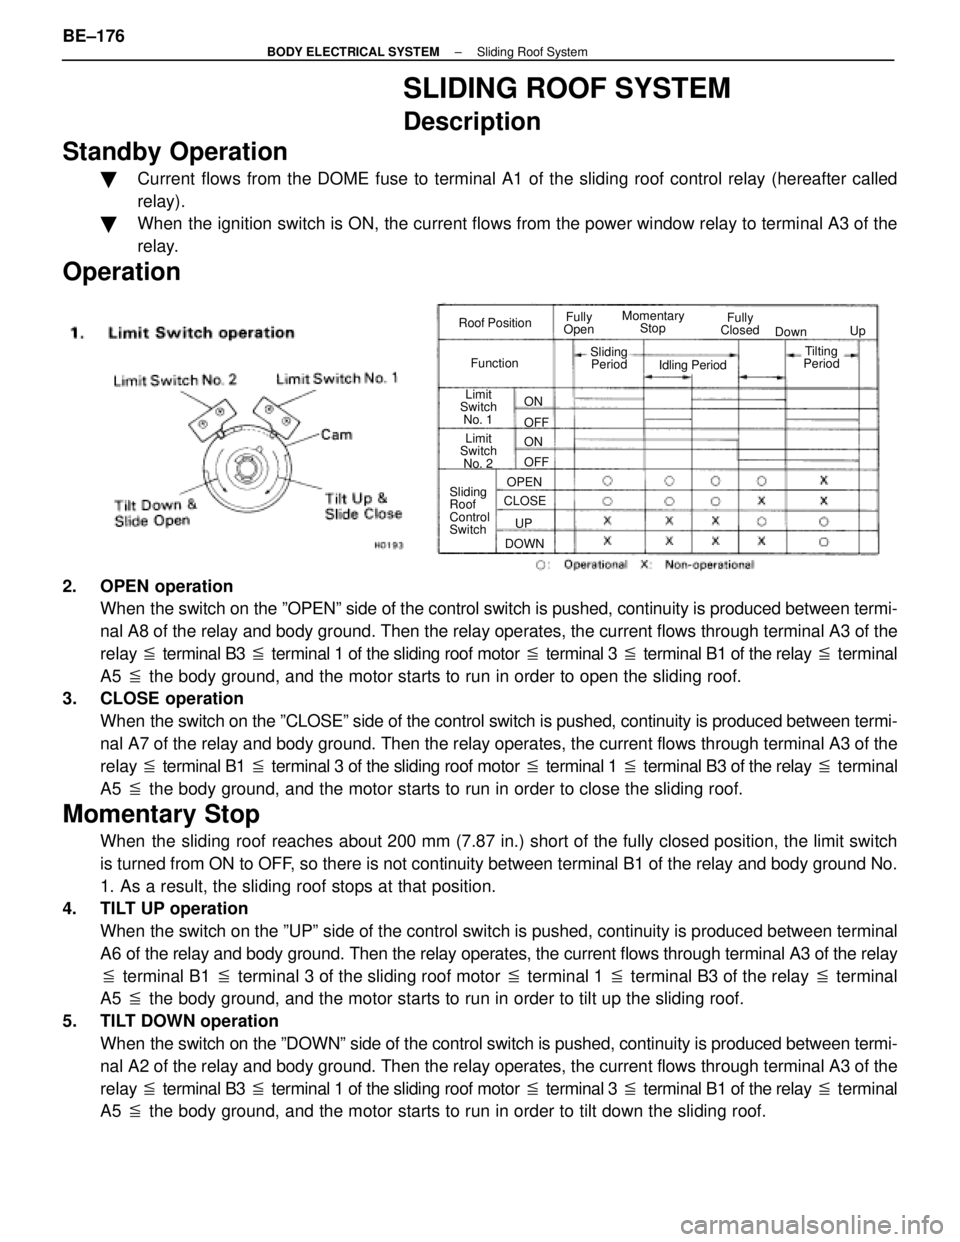
Operation
Roof Position
Function Fully
Open Fully
Closed
Momentary
Stop
Limit
Switch
No. 1
Limit
Switch
No. 2
Sliding
Roof
Control
Switch Down
Up
Sliding Period Idling Period
CLOSE DOWN OPEN
UP ON
ON OFF
OFF
Tilting
Period
2. OPEN operation
When the switch on the ºOPENº side of the control switch is pushed, co\
ntinuity is produced between termi-
nal A8 of the relay and body ground. Then the relay operates, the curren\
t flows through terminal A3 of the
relay � terminal B3 � terminal 1 of the sliding roof motor � terminal 3 � terminal B1 of the relay � terminal
A5 � the body ground, and the motor starts to run in order to open the slidi\
ng roof.
3. CLOSE operation
When the switch on the ºCLOSEº side of the control switch is pushed, c\
ontinuity is produced between termi-
nal A7 of the relay and body ground. Then the relay operates, the current f\
lows through terminal A3 of the
relay � terminal B1 � terminal 3 of the sliding roof motor � terminal 1 � terminal B3 of the relay � terminal
A5 � the body ground, and the motor starts to run in order to close the slid\
ing roof.
Momentary Stop
When the sliding roof reaches about 200 mm (7.87 in.) short of the fully closed position, the limit \
switch
is turned from ON to OFF, so there is not continuity between terminal B1 of the relay and body g\
round No.
1. As a result, the sliding roof stops at that position.
4. TILT UP operation
When the switch on the ºUPº side of the control switch is pushed, cont\
inuity is produced between terminal
A6 of the relay and body ground. Then the relay operates, the current flow\
s through terminal A3 of the relay
� terminal B1 � terminal 3 of the sliding roof motor � terminal 1 � terminal B3 of the relay � terminal
A5 � the body ground, and the motor starts to run in order to tilt up the sl\
iding roof.
5. TILT DOWN operation When the switch on the ºDOWNº side of the control switch is pushed, co\
ntinuity is produced between termi-
nal A2 of the relay and body ground. Then the relay operates, the current f\
lows through terminal A3 of the
relay � terminal B3 � terminal 1 of the sliding roof motor � terminal 3 � terminal B1 of the relay � terminal
A5 � the body ground, and the motor starts to run in order to tilt down the \
sliding roof.
BE±176
±
BODY ELECTRICAL SYSTEM Sliding Roof System
WhereEverybodyKnowsYourName
Page 563 of 4087
6. TILT UP REMINDER SYSTEMIf the ignition switch is turned from ON to OFF or ACC and the sliding roof rem\
ains tilted up, after 60 seconds
have elapsed or either the driver or passenger door is opened, a buzzer will\
sound for approx. 8 seconds
as a reminder that the sliding roof is tilted up.
Parts Location
±
BODY ELECTRICAL SYSTEM Sliding Roof SystemBE±177
WhereEverybodyKnowsYourName
Page 564 of 4087
Wiring and Connector Diagrams
BE±178±
BODY ELECTRICAL SYSTEM Sliding Roof System
WhereEverybodyKnowsYourName
Page 565 of 4087

Parts Inspection
(Power Window Main Relay)
INSPECTION OF POWER WINDOW MAIN
RELAY
(See Power Window Main Relay on page BE±152)
(Sliding Roof Switch)
REMOVAL AND INSTALLATION OF
SLIDING ROOF SWITCH
(See Sliding Roof on page BO±85)
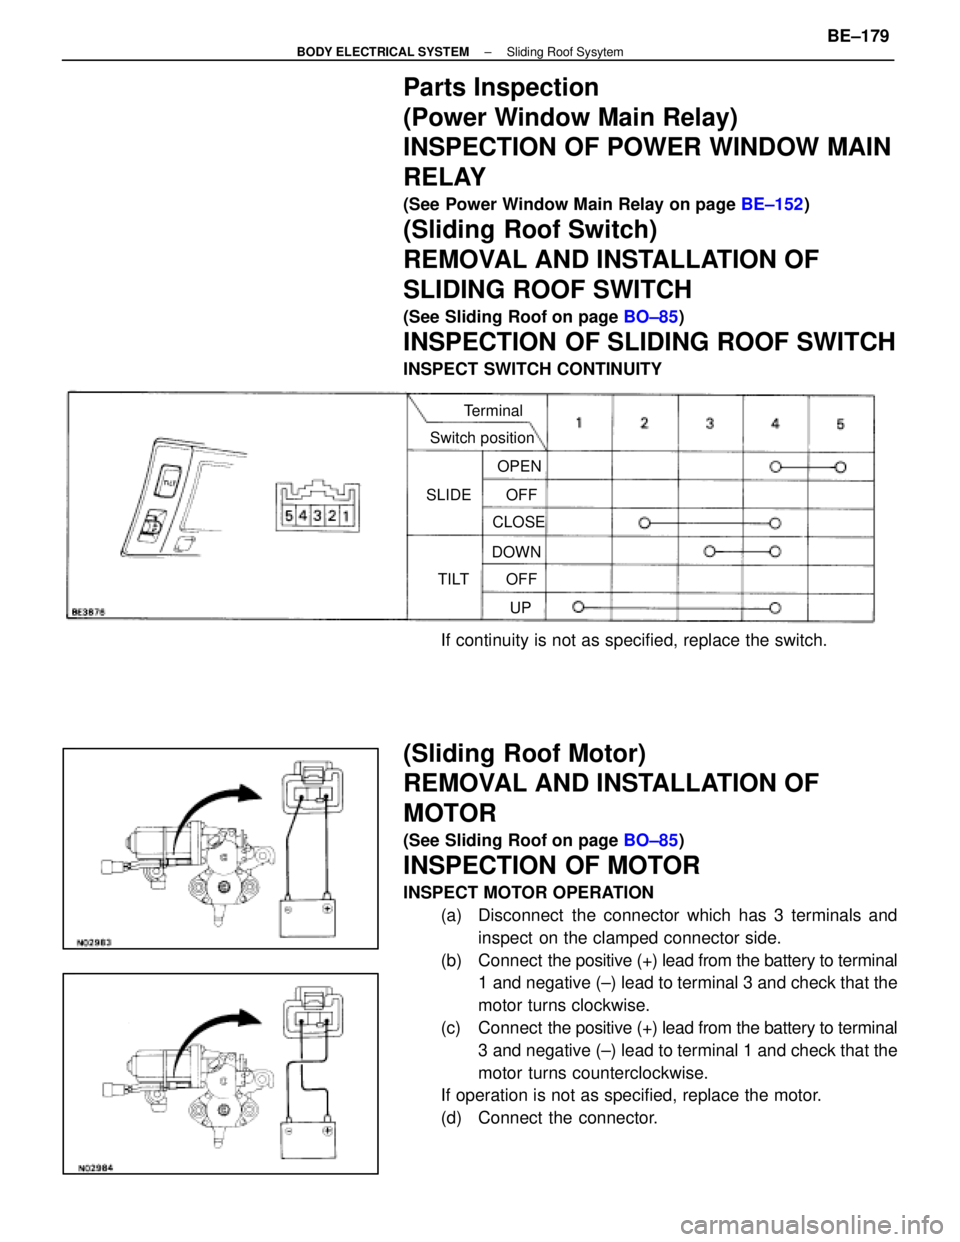
INSPECTION OF SLIDING ROOF SWITCH
INSPECT SWITCH CONTINUITY
Terminal
Switch position
SLIDE
TILT OFF
OPEN
CLOSE
OFFUP
DOWN
If continuity is not as specified, replace the switch.
(Sliding Roof Motor)
REMOVAL AND INSTALLATION OF
MOTOR
(See Sliding Roof on page
BO±85)
INSPECTION OF MOTOR
INSPECT MOTOR OPERATION
(a) Disconnect the connector which has 3 terminals andinspect on the clamped connector side.
(b) Connect the positive (+) lead from the battery to terminal
1 and negative (±) lead to terminal 3 and check that the
motor turns clockwise.
(c) Connect the positive (+) lead from the battery to terminal
3 and negative (±) lead to terminal 1 and check that the
motor turns counterclockwise.
If operation is not as specified, replace the motor.
(d) Connect the connector.
±
BODY ELECTRICAL SYSTEM Sliding Roof SysytemBE±179
WhereEverybodyKnowsYourName
Page 566 of 4087

(Sliding Roof Control Relay)
REMOVAL AND INSTALLATION OF
SLIDING ROOF CONTROL RELAY
(See Sliding Roof on page BO±85)
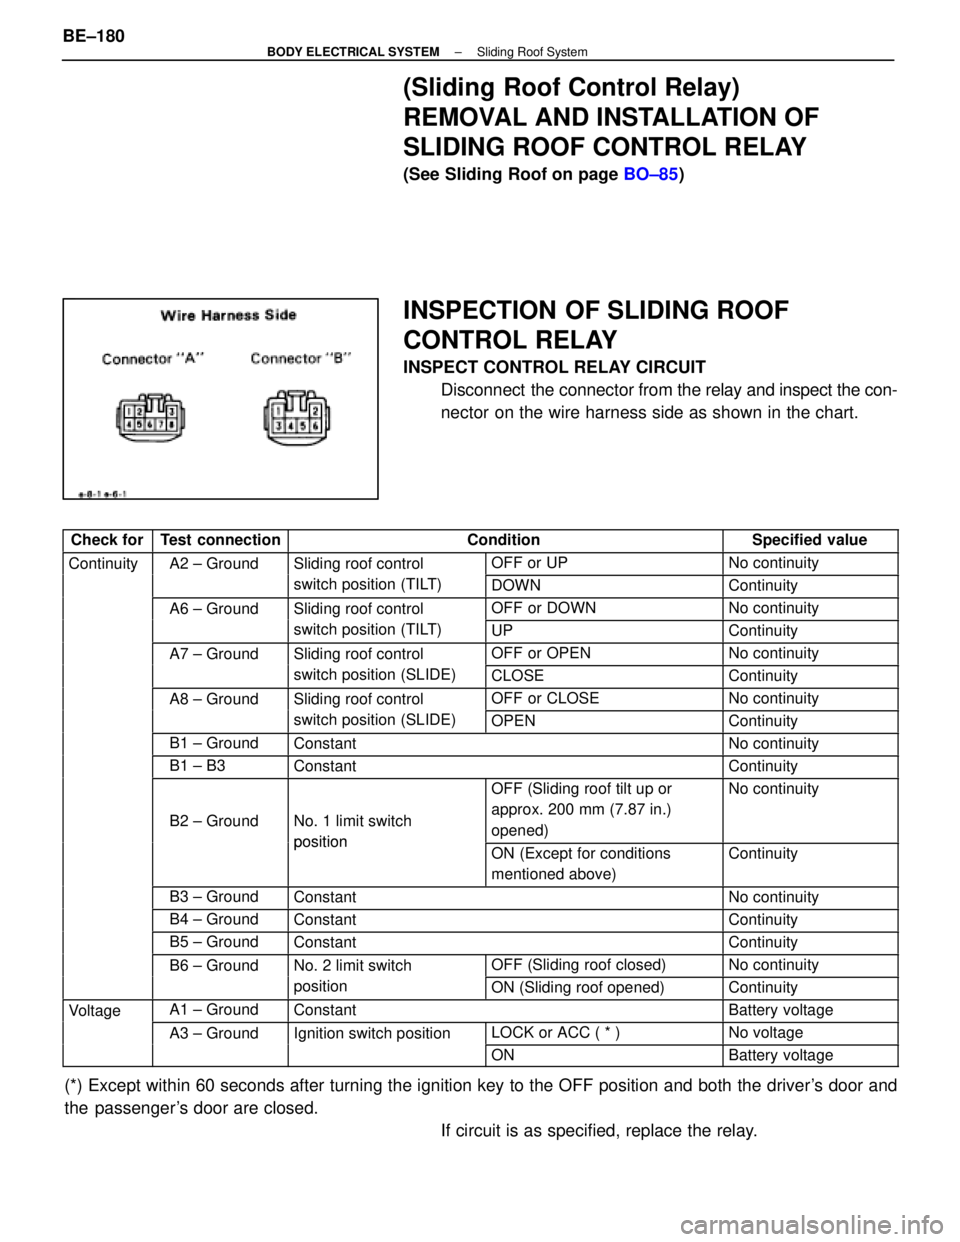
INSPECTION OF SLIDING ROOF
CONTROL RELAY
INSPECT CONTROL RELAY CIRCUIT
Disconnect the connector from the relay and inspect the con-
nector on the wire harness side as shown in the chart.
Check forTest connectionConditionSpecified value
ContinuityA2 ± GroundSliding roof control OFF or UPNo continuityyg
switch position (TILT)DOWNContinuity
A6 ± GroundSliding roof control OFF or DOWNNo continuityg
switch position (TILT)UPContinuity
A7 ± GroundSliding roof control OFF or OPENNo continuityg
switch position (SLIDE)CLOSEContinuity
A8 ± GroundSliding roof control OFF or CLOSENo continuityg
switch position (SLIDE)OPENContinuity
B1 ± GroundConstantNo continuity
B1 ± B3ConstantContinuity
B2 ± GroundNo. 1 limit switch
p
osition
OFF (Sliding roof tilt up or
approx. 200 mm (7.87 in.)
opened)No continuity
positionON (Except for conditions
mentioned above)Continuity
B3 ± GroundConstantNo continuity
B4 ± GroundConstantContinuity
B5 ± GroundConstantContinuity
B6 ± GroundNo. 2 limit switch OFF (Sliding roof closed)No continuity
positionON (Sliding roof opened)Continuity
VoltageA1 ± GroundConstantBattery voltageg
A3 ± GroundIgnition switch positionLOCK or ACC ( * )No voltageg
ONBattery voltage
(*) Except within 60 seconds after turning the ignition key to the OFF\
position and both the driver's door and
the passenger's door are closed. If circuit is as specified, replace the relay.
BE±180
±
BODY ELECTRICAL SYSTEM Sliding Roof System
WhereEverybodyKnowsYourName
Page 567 of 4087
(Sliding Roof Limit Switch)
REMOVAL AND INSTALLATION OF LIMIT
SWITCH
(See Sliding Roof on page BO±85)
INSPECTION OF LIMIT SWITCH
1. INSPECT LIMIT SWITCH CIRCUIT
Terminal
Switch position
OFF (SW pin released)
OFF (SW pin released) ON (SW pin pushed in)
ON (SW pin pushed in)
No. 1 limit
switch
No. 2 limit
switch
If continuity is not as specified, replace the switch.
2. INSPECT MOTOR WIRE CIRCUIT (a) Check that there is continuity between terminals A1 andB3.
(b) Check that there is continuity between terminals A2 and B4.
(c) Check that there is continuity between terminals A3 and B1.
If continuity is not as specified, replace the switch.
(Theft Deterrent and Door Lock Control
ECU)
(See page BE±155)
(Door Courtesy Switch)
(See page BE±79)
±
BODY ELECTRICAL SYSTEM Sliding Roof SystemBE±181
WhereEverybodyKnowsYourName