Page 2172 of 4087

SERVICE SPECIFICATIONS
SERVICE DATA
PR036±03����������� �����������Shaft runout������ ������Limit������������������\
��� ������������������\
���0.8 mm (0.031 in.)
����������� �����������Joint angle������ ������No.2 joint������������������\
��� ������������������\
���±15 01 ' + 36 '
����������� ����������������� ������No.3 joint������������������\
��� ������������������\
���54' + 36 '
TORQUE SPECIFICATIONS
PR037±04
������������������\
���� ������������������\
����Part tightened����� �����NVm������ ������kgf Vcm������ ������ft Vlbf
������������������\
���� ������������������\
����Propeller shaft x Differential����� �����79������ ������805������ ������58
������������������\
���� ������������������\
����Propeller shaft x Intermediate shaft����� �����74������ ������750������ ������54
������������������\
���� ������������������\
����Intermediate shaft x Center bearing x Universal joint flange����� ����������� ������������ ������
������������������\
���� ������������������\
����1st����� �����181������ ������1,850������ ������134
������������������\
���� ������������������\
����2nd����� �����Loosen nut������ ������Loosen nut������ ������Loosen nut
������������������\
���� ������������������\
����3rd����� �����69������ ������700������ ������51
������������������\
���� ������������������\
����Center support bearing x Body����� �����49������ ������500������ ������36
������������������\
���� ������������������\
����Oxygen senser x Exhaust front pipe����� �����44������ ������450������ ������33
������������������\
���� ������������������\
����Exhaust front pipe x Exhaust manifold����� �����43������ ������440������ ������32
������������������\
���� ������������������\
����Exhaust center pipe x Exhaust front pipe����� �����43������ ������440������ ������32
������������������\
���� ������������������\
����Exhaust center pipe x Exhaust rear pipe����� �����19������ ������195������ ������14
������������������\
���� ������������������\
����Crossmember x Body����� �����13������ ������130������ ������8
������������������\
���� ������������������\
����Heat insulator x Body����� �����5.4������ ������55������ ������48 in. Vlbf
PR±36±
PROPELLER SHAFT SERVICE SPECIFICATIONS
WhereEverybodyKnowsYourName
Page 2174 of 4087
DESCRIPTION
(SC400)
PR02N±04
The propeller shaft is a 2±part type, each part consisting of a strong, \
compact precisely balanced tube. The
propeller shaft is connected to the transmission and the differential via 3 joints. No.1 and No.3 joints are
made of flexible rubber couplings. No.2 joint is a Hooke's universal joint. All 3 joints are carefully arranged
in such a way that their shaft angles rest on a straight line. This design\
ensures a precise drive line linearity
from the engine through the differential to minimize noise and vibration.
A shaft length adjusting mechanism is incorporated in order to make prope\
ller shaft removal and reinstalla-
tion easier.
PR±2±
PROPELLER SHAFT DESCRIPTION (SC400)
WhereEverybodyKnowsYourName
Page 2179 of 4087
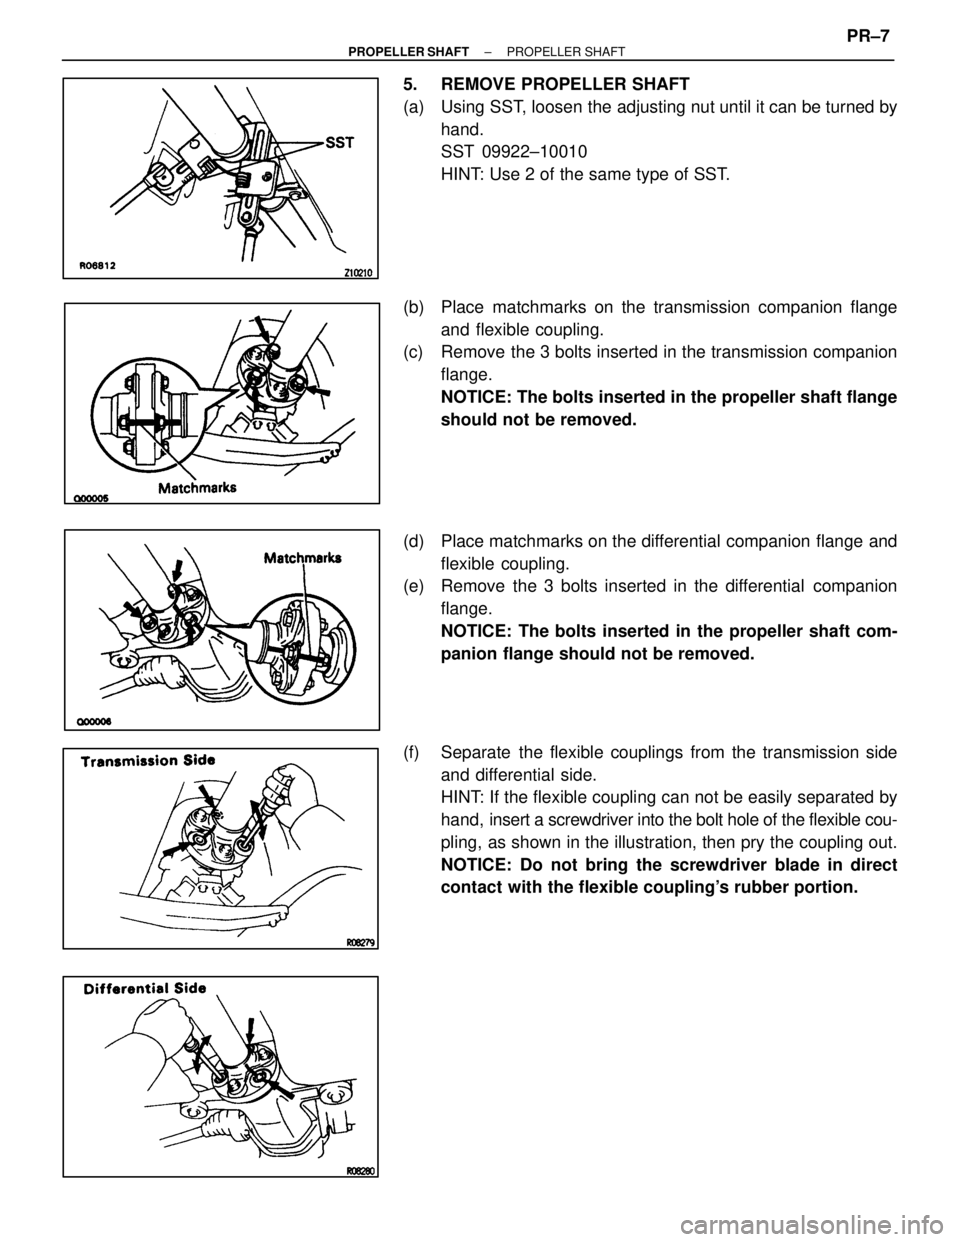
5. REMOVE PROPELLER SHAFT
(a) Using SST, loosen the adjusting nut until it can be turned byhand.
SST 09922±10010
HINT: Use 2 of the same type of SST.
(b) Place matchmarks on the transmission companion flange and flexible coupling.
(c) Remove the 3 bolts inserted in the transmission companion
flange.
NOTICE: The bolts inserted in the propeller shaft flange
should not be removed.
(d) Place matchmarks on the differential companion flange and flexible coupling.
(e) Remove the 3 bolts inserted in the differential companion
flange.
NOTICE: The bolts inserted in the propeller shaft com-
panion flange should not be removed.
(f) Separate the flexible couplings from the transmission side and differential side.
HINT: If the flexible coupling can not be easily separated by
hand, insert a screwdriver into the bolt hole of the flexible cou-
pling, as shown in the illustration, then pry the coupling out.
NOTICE: Do not bring the screwdriver blade in direct
contact with the flexible coupling's rubber portion.
±
PROPELLER SHAFT PROPELLER SHAFTPR±7
WhereEverybodyKnowsYourName
Page 2180 of 4087
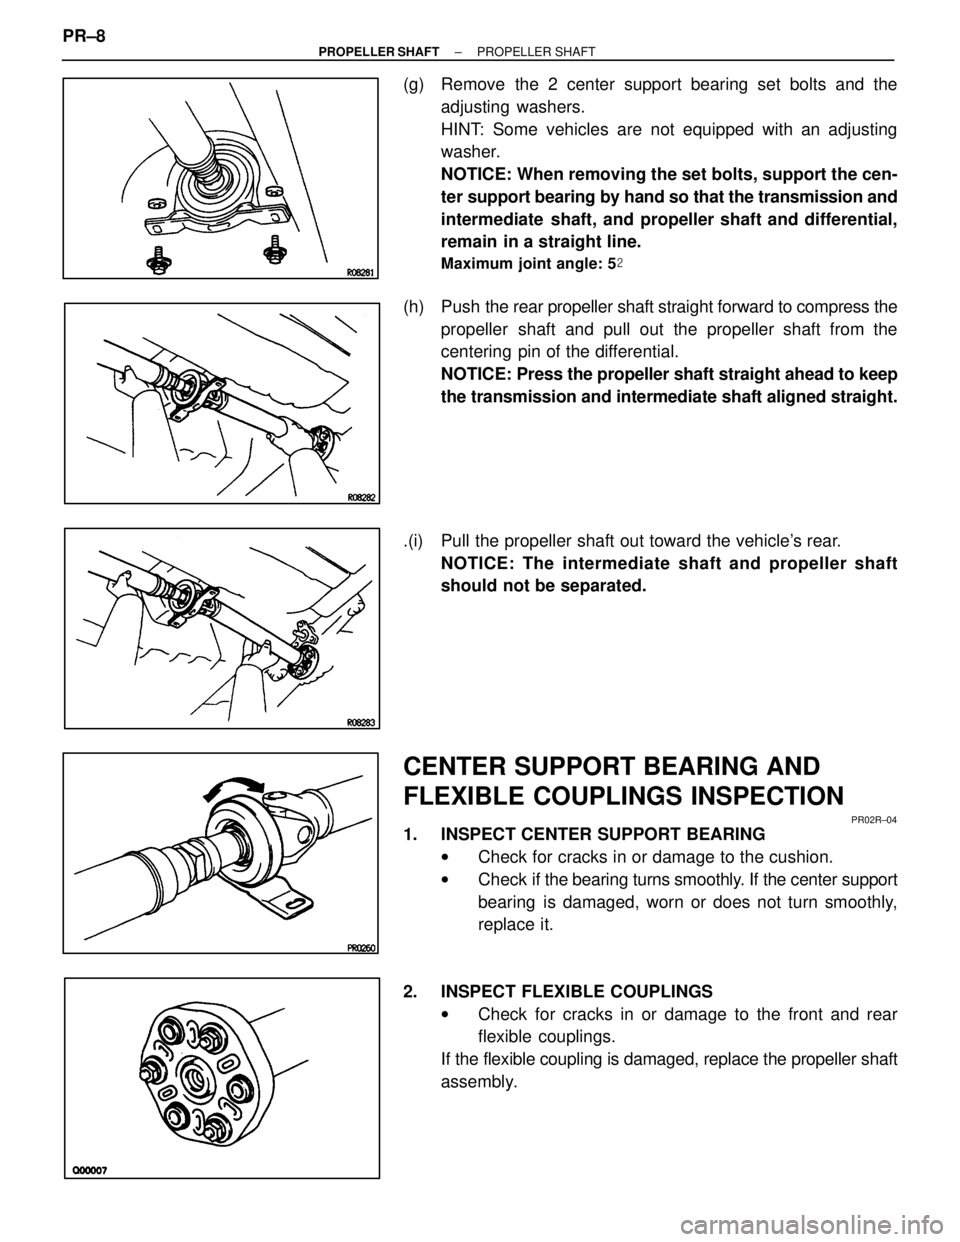
(g) Remove the 2 center support bearing set bolts and theadjusting washers.
HINT: Some vehicles are not equipped with an adjusting
washer.
NOTICE: When removing the set bolts, support the cen-
ter support bearing by hand so that the transmission and
intermediate shaft, and propeller shaft and differential,
remain in a straight line.
Maximum joint angle: 5 �
(h) Push the rear propeller shaft straight forward to compress the
propeller shaft and pull out the propeller shaft from the
centering pin of the differential.
NOTICE: Press the propeller shaft straight ahead to keep
the transmission and intermediate shaft aligned straight.
.(i) Pull the propeller shaft out toward the vehicle's rear. NOTICE: The intermediate shaft and propeller shaft
should not be separated.
CENTER SUPPORT BEARING AND
FLEXIBLE COUPLINGS INSPECTION
PR02R±04
1. INSPECT CENTER SUPPORT BEARINGwCheck for cracks in or damage to the cushion.
w Check if the bearing turns smoothly. If the center support
bearing is damaged, worn or does not turn smoothly,
replace it.
2. INSPECT FLEXIBLE COUPLINGS wCheck for cracks in or damage to the front and rear
flexible couplings.
If the flexible coupling is damaged, replace the propeller shaft
assembly.
PR±8
±
PROPELLER SHAFT PROPELLER SHAFT
WhereEverybodyKnowsYourName
Page 2184 of 4087
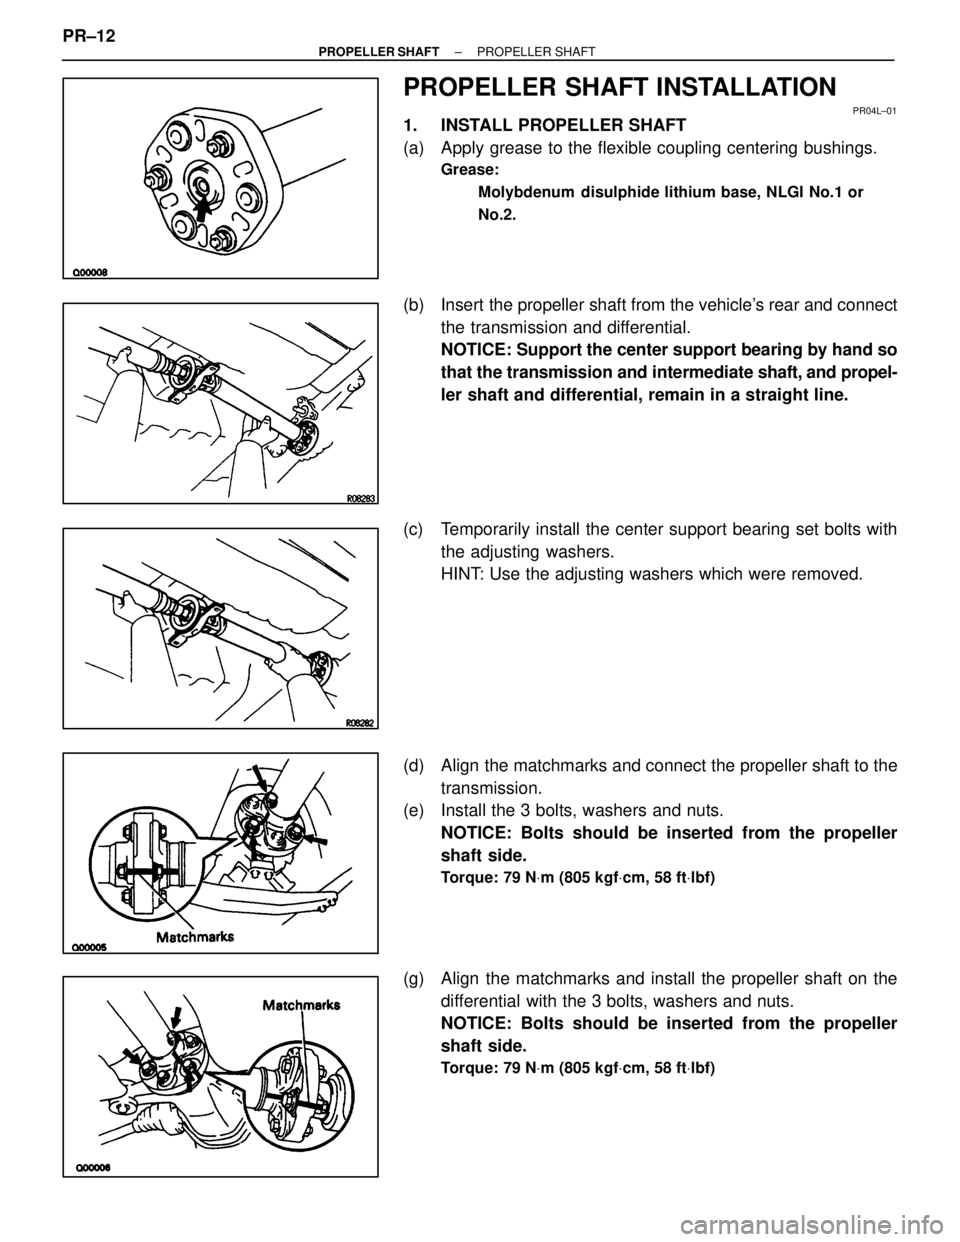
PROPELLER SHAFT INSTALLATION
PR04L±01
1. INSTALL PROPELLER SHAFT
(a) Apply grease to the flexible coupling centering bushings.
Grease:Molybdenum disulphide lithium base, NLGI No.1 or
No.2.
(b) Insert the propeller shaft from the vehicle's rear and connectthe transmission and differential.
NOTICE: Support the center support bearing by hand so
that the transmission and intermediate shaft, and propel-
ler shaft and differential, remain in a straight line.
(c) Temporarily install the center support bearing set bolts with the adjusting washers.
HINT: Use the adjusting washers which were removed.
(d) Align the matchmarks and connect the propeller shaft to the transmission.
(e) Install the 3 bolts, washers and nuts.
NOTICE: Bolts should be inserted from the propeller
shaft side.
Torque: 79 N Vm (805 kgf Vcm, 58 ft Vlbf)
(g) Align the matchmarks and install the propeller shaft on the
differential with the 3 bolts, washers and nuts.
NOTICE: Bolts should be inserted from the propeller
shaft side.
Torque: 79 N Vm (805 kgf Vcm, 58 ft Vlbf)
PR±12±
PROPELLER SHAFT PROPELLER SHAFT
WhereEverybodyKnowsYourName
Page 2185 of 4087
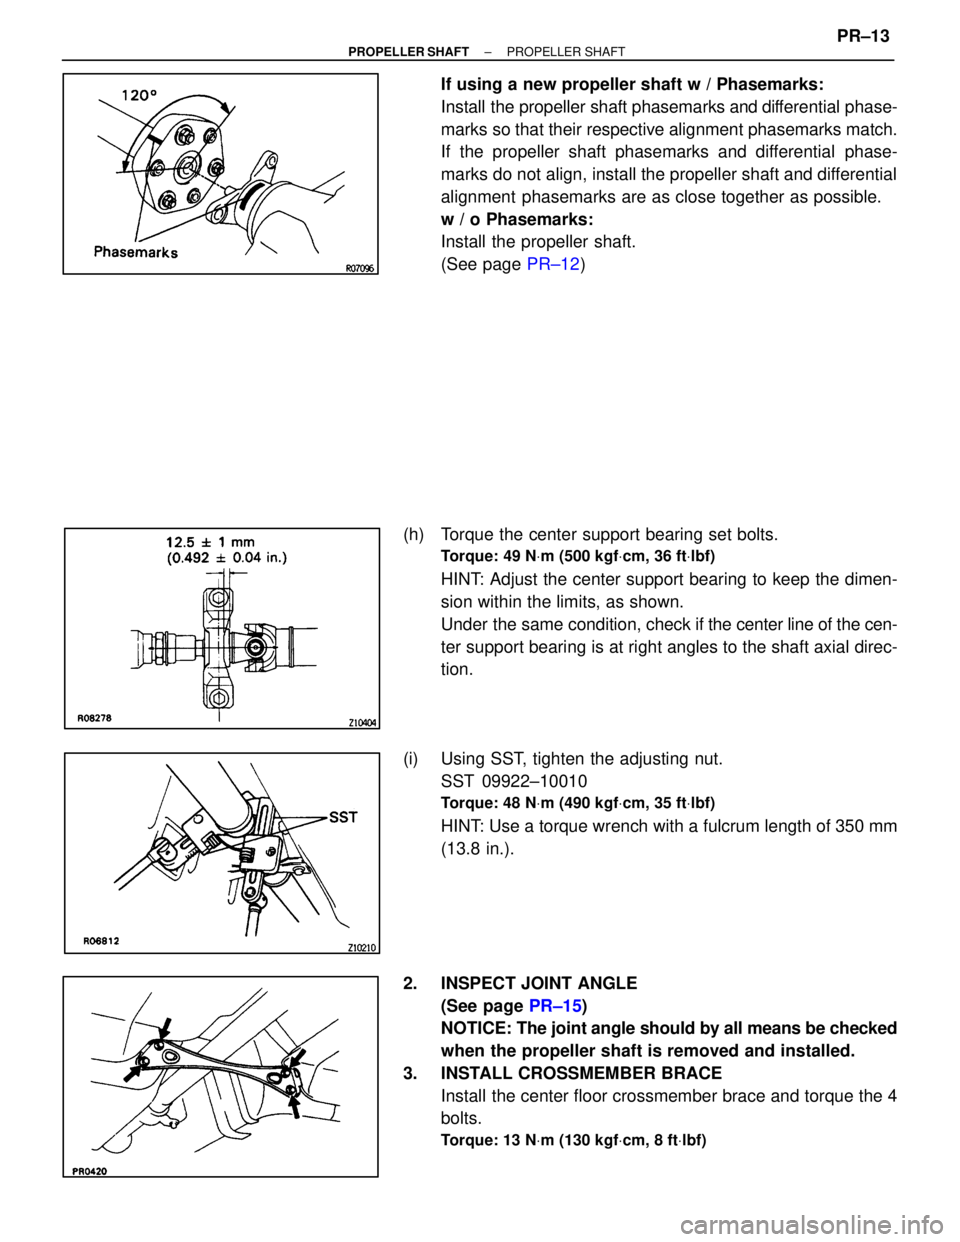
If using a new propeller shaft w / Phasemarks:
Install the propeller shaft phasemarks and differential phase-
marks so that their respective alignment phasemarks match.
If the propeller shaft phasemarks and differential phase-
marks do not align, install the propeller shaft and differential
alignment phasemarks are as close together as possible.
w / o Phasemarks:
Install the propeller shaft.
(See page PR±12)
(h) Torque the center support bearing set bolts.
Torque: 49 N Vm (500 kgf Vcm, 36 ft Vlbf)
HINT: Adjust the center support bearing to keep the dimen-
sion within the limits, as shown.
Under the same condition, check if the center line of the cen-
ter support bearing is at right angles to the shaft axial direc-
tion.
(i) Using SST, tighten the adjusting nut. SST 09922±10010
Torque: 48 N Vm (490 kgf Vcm, 35 ft Vlbf)
HINT: Use a torque wrench with a fulcrum length of 350 mm
(13.8 in.).
2. INSPECT JOINT ANGLE (See page PR±15)
NOTICE: The joint angle should by all means be checked
when the propeller shaft is removed and installed.
3. INSTALL CROSSMEMBER BRACE Install the center floor crossmember brace and torque the 4
bolts.
Torque: 13 N Vm (130 kgf Vcm, 8 ft Vlbf)
±
PROPELLER SHAFT PROPELLER SHAFTPR±13
WhereEverybodyKnowsYourName
Page 2187 of 4087
JOINT ANGLE INSPECTION AND
ADJUSTMENT
PR02U±08
NOTICE: When performing operations which involve the
removal and installation of the propeller shaft, always
check the joint. Make adjustments if necessary.
1. STABILIZE PROPELLER SHAFT AND DIFFERENTIAL
(a) Turn the propeller shaft several times by hand to stabilize the center support bearing and flexible couplings.
(b) Using a jack, raise and lower the differential to stabilize the differential mounting cushion.
2. CHECK JOINT ANGLE OF NO.2 JOINT AND NO.3 JOINT
(a) Using SST, measure the installation angle of the intermediate
shaft and propeller shaft.
SST 09370±50010
HINT: The SST should be directly underneath the tube.
(b) Using SST, measure the installation angle of the differential. SST 09370±50010
HINT: Measure the installation angle by placing the SST in
the position, as shown in the illustration.
(c) Calculate the No.2 joint angle.
±
PROPELLER SHAFT PROPELLER SHAFTPR±15
WhereEverybodyKnowsYourName
Page 2188 of 4087
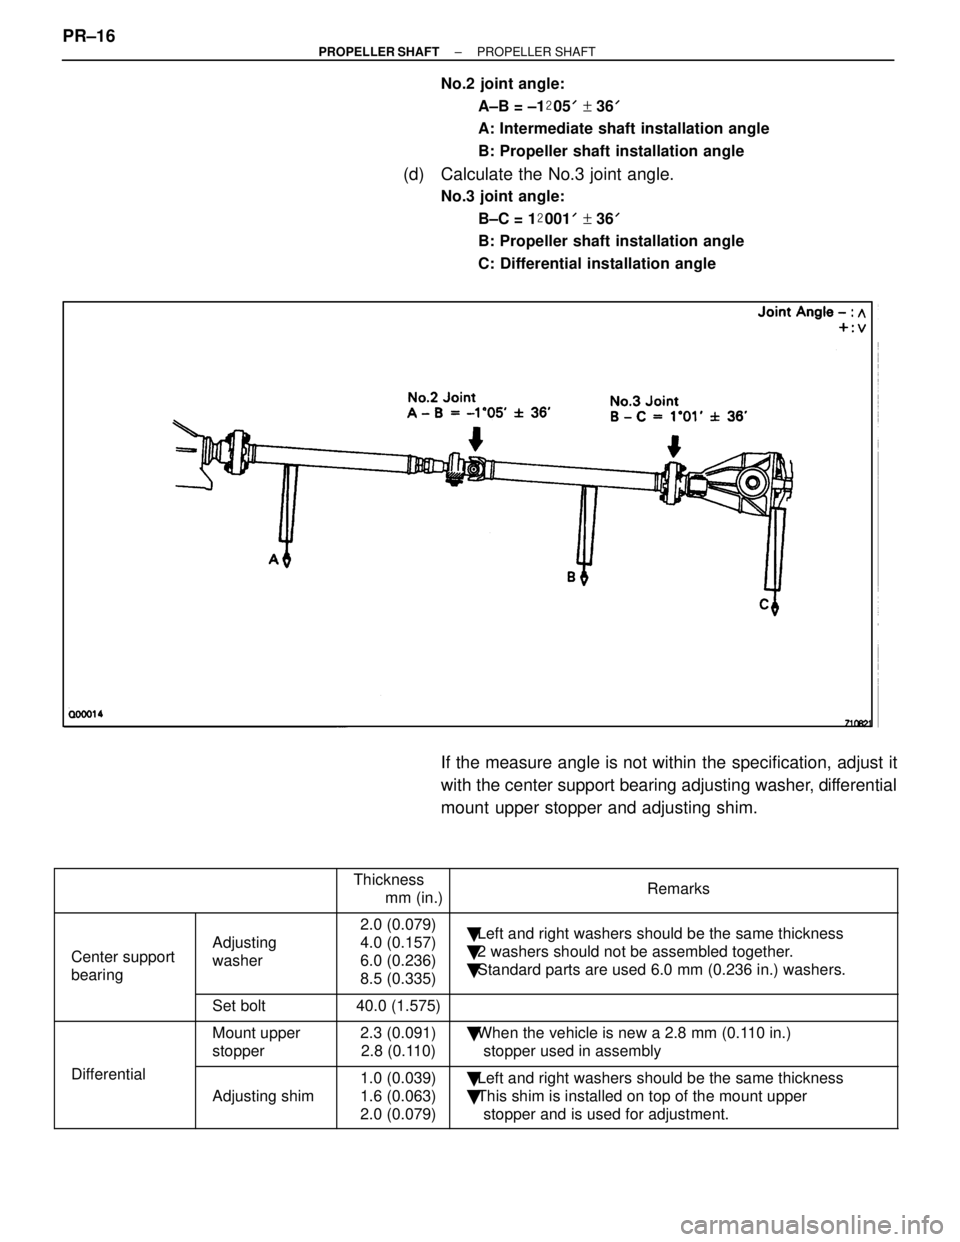
No.2 joint angle:A±B = ±1 �05 ' + 36 '
A: Intermediate shaft installation angle
B: Propeller shaft installation angle
(d) Calculate the No.3 joint angle.
No.3 joint angle:
B±C = 1 �001 ' + 36 '
B: Propeller shaft installation angle
C: Differential installation angle
If the measure angle is not within the specification, adjust it
with the center support bearing adjusting washer, differential
mount upper stopper and adjusting shim.
������������ ������������������ ������Thickness mm (in.)������������������\
�� ������������������\
��Remarks
������� �
������
�
������
�
������
�������
Center support
bearing
������ �
�����
�
�����
�
�����
������
Adjusting
washer
������ �
�����
�
�����
�
�����
������
2.0 (0.079)
4.0 (0.157)
6.0 (0.236)
8.5 (0.335)������������������\
�� �
������������������\
�
�
������������������\
�
�
������������������\
�
������������������\
��
�
Left and right washers should be the same thickness
� 2 washers should not be assembled together.
� Standard parts are used 6.0 mm (0.236 in.) washers.
������� ������������� ������Set bolt������ ������40.0 (1.575)������������������\
�� ������������������\
��
������� �
������
�������
������ �
�����
������
Mount upper
stopper������ �
�����
������
2.3 (0.091)
2.8 (0.110)������������������\
�� �
������������������\
�
������������������\
��
�
When the vehicle is new a 2.8 mm (0.110 in.)
stopper used in assembly
������� �
������
�������
Differential������ �
�����
������Adjusting shim
������ �
�����
������
1.0 (0.039)
1.6 (0.063)
2.0 (0.079)������������������\
�� �
������������������\
�
������������������\
��
�
Left and right washers should be the same thickness
� This shim is installed on top of the mount upper
stopper and is used for adjustment.
PR±16±
PROPELLER SHAFT PROPELLER SHAFT
WhereEverybodyKnowsYourName