Page 378 of 4087
6. INSTALL EXTENSION HOUSING REAR OIL SEAL
(a) Coat the lip of oil seal with MP grease.
(b) Using SST and a hammer, drive in a new oil seal with the lipfacing downward.
SST 09309±37010
Oil seal depth from flat end:
0±0.3 mm (0±0.012 in.)
7. INSTALL TRANSMISSION OUTPUT FLANGE
(a) Using SST and a hammer, drive in a new oil seal.SST 09517±36010
(b) Install the output flange and 2 washers.
(c) Using SST, install and torque a new nut. SST 09060±20010
Torque: 123 N Vm (1,250 kgf Vcm, 90 ft Vlbf)
HINT: Shift the shift lever to the P position.
(d) Using a hammer and chisel, stake the nut.
8. INSTALL PROPELLER SHAFT (See pages PR±12)
9. INSTALL FRONT EXHAUST PIPE AND HEAT INSULATOR (See page EG±204)
10. FILL WITH ATF
11. CHECK FLUID LEVEL (See page AT±47)
±
A304E (1UZ±FE) AUTOMATIC TRANSMISSION EXTENSION HOUSINGAT±15
WhereEverybodyKnowsYourName
Page 883 of 4087

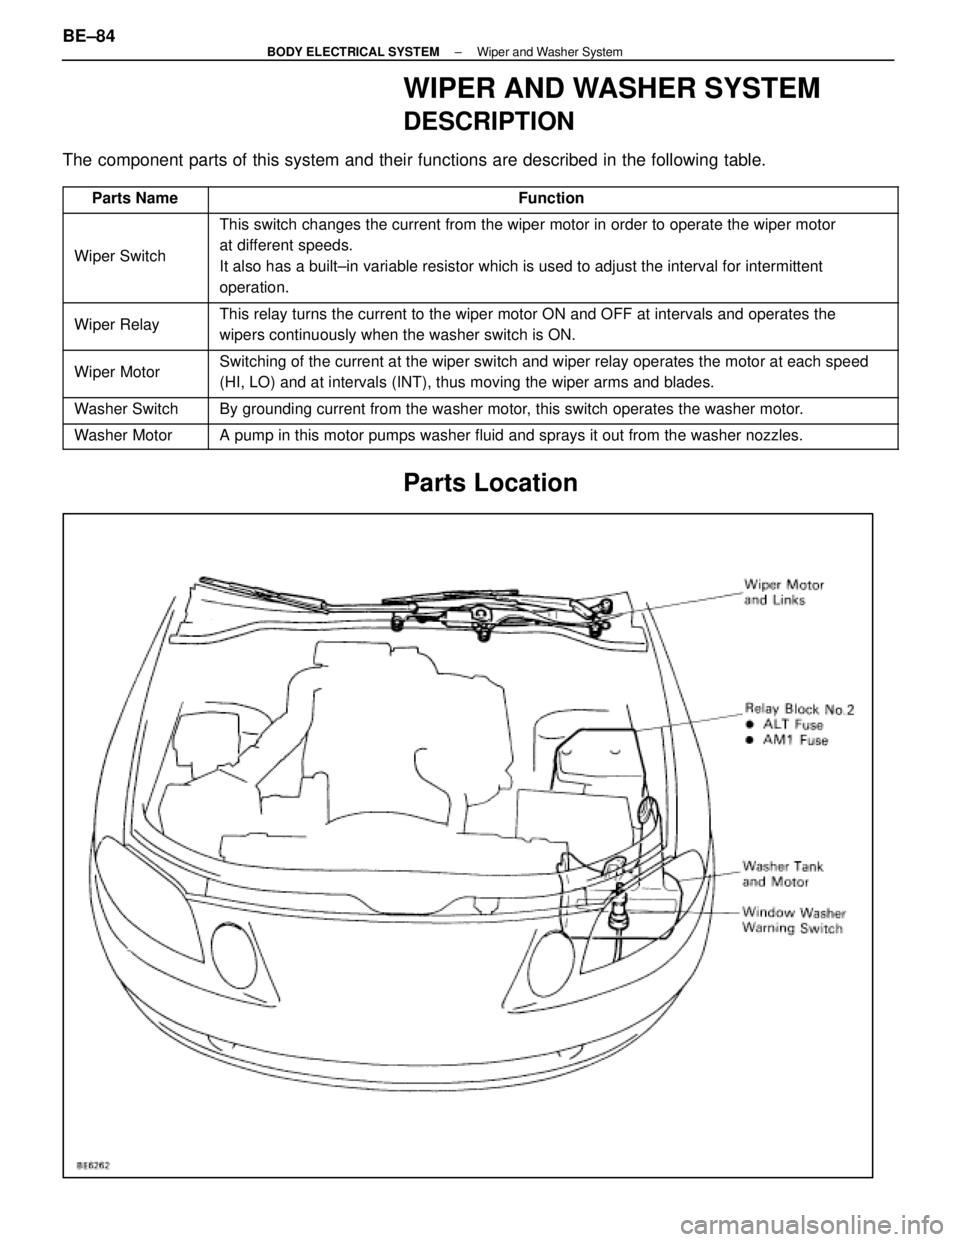
WIPER AND WASHER SYSTEM
DESCRIPTION
The component parts of this system and their functions are described in the\
following table.
Parts NameFunction
Wiper Switch
This switch changes the current from the wiper motor in order to operate\
the wiper motor
at different speeds.
It also has a built±in variable resistor which is used to adjust the \
interval for intermittent
operation.
Wiper RelayThis relay turns the current to the wiper motor ON and OFF at intervals \
and operates the
wipers continuously when the washer switch is ON.
Wiper MotorSwitching of the current at the wiper switch and wiper relay operates th\
e motor at each speed
(HI, LO) and at intervals (INT), thus moving the wiper arms and blad\
es.
Washer SwitchBy grounding current from the washer motor, this switch operates the washer motor.
Washer MotorA pump in this motor pumps washer fluid and sprays it out from the washe\
r nozzles.
Parts Location
BE±84±
BODY ELECTRICAL SYSTEM Wiper and Washer System
WhereEverybodyKnowsYourName
Page 892 of 4087

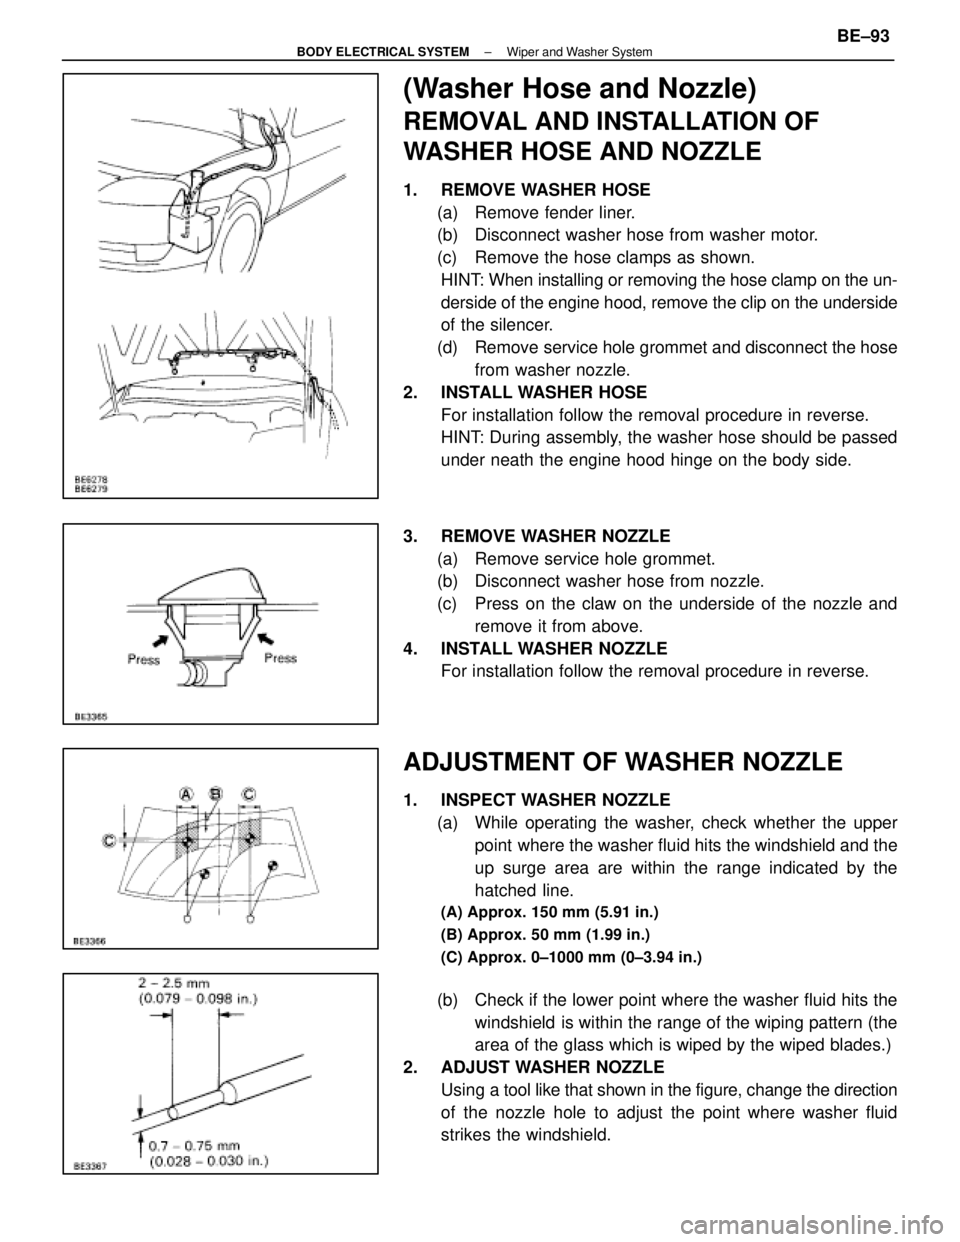
(Washer Hose and Nozzle)
REMOVAL AND INSTALLATION OF
WASHER HOSE AND NOZZLE
1. REMOVE WASHER HOSE(a) Remove fender liner.
(b) Disconnect washer hose from washer motor.
(c) Remove the hose clamps as shown.HINT: When installing or removing the hose clamp on the un-
derside of the engine hood, remove the clip on the underside
of the silencer.
(d) Remove service hole grommet and disconnect the hose from washer nozzle.
2. INSTALL WASHER HOSE For installation follow the removal procedure in reverse.
HINT: During assembly, the washer hose should be passed
under neath the engine hood hinge on the body side.
3. REMOVE WASHER NOZZLE (a) Remove service hole grommet.
(b) Disconnect washer hose from nozzle.
(c) Press on the claw on the underside of the nozzle and remove it from above.
4. INSTALL WASHER NOZZLE For installation follow the removal procedure in reverse.
ADJUSTMENT OF WASHER NOZZLE
1. INSPECT WASHER NOZZLE
(a) While operating the washer, check whether the upper point where the washer fluid hits the windshield and the
up surge area are within the range indicated by the
hatched line.
(A) Approx. 150 mm (5.91 in.)
(B) Approx. 50 mm (1.99 in.)
(C) Approx. 0±1000 mm (0±3.94 in.)
(b) Check if the lower point where the washer fluid hits thewindshield is within the range of the wiping pattern (the
area of the glass which is wiped by the wiped blades.)
2. ADJUST WASHER NOZZLE Using a tool like that shown in the figure, change the direction
of the nozzle hole to adjust the point where washer fluid
strikes the windshield.
±
BODY ELECTRICAL SYSTEM Wiper and Washer SystemBE±93
WhereEverybodyKnowsYourName
Page 893 of 4087

TROUBLESHOOTING
You will find the cause of trouble more easily by properly using the table \
shown below. In this table, the num-
bers indicate the order priority of causes of trouble. Check each part in th\
e order shown. If necessary, re-
place the parts.
See pageB±4,21BE±26BE±4,20BE±91BE±90BE±92BE±91BE±93±
Trouble
Part Name
AM1 FuseIgnition SwitchWIPER FuseWiper SwitchWiper MotorWasher MotorWasher SwitchWasher Hose and NozzleWire Harness
Wipers and washers do not operate.*1132456
Wipers and washers do not operate.*221345
Wipers and washers do not operate.*31234
Wipers do not operate in LO, HI or MIST.123
Wipers do not operate in INT.123
Washer motor does not operate.213
Wipers do not operate when washer switch
is ON.12
Washer fluid does not spray.1
*1: Door Lock and Power Windows do not operate
*
2: Door Lock and Power Window are normal. Combination Meter and Turn Signal do not operate.
*
3: Combination Meter and Turn Signal are normal.
BE±94
±
BODY ELECTRICAL SYSTEM Wiper and Washer System
WhereEverybodyKnowsYourName
Page 896 of 4087

Parts NameFunction
Coolant Level
Warning SwitchThis switch is installed in the radiator reservoir tank. It lights up a \
warning light when the
coolant level becomes low.
Engine Oil Level
Warning SwitchThis switch is mounted in the engine oil pan. It lights a warning light \
when the engine oil
level is low.
Brake Fluid Level
Warning SwitchThis switch is mounted in the brake master cylinder reservoir tank. It l\
ights up a warning
light when the brake fluid level is low.
Parking Brake SwitchThis switch is on the parking brake lever bracket. Continuity in this sw\
itch is established
when the lever is released, causing a warning light to light up.
Door Courtesy SwitchContinuity is established in this switch when a door is opened, causing \
a warning light to
light up.
Warning LightsWhen an abnormality is detected in the vehicle, current is sent to these\
lights, or they are
grounded, causing them to light up.
Indicator LightsCurrent is sent to these lights, or they are grounded, causing them to l\
ight up and indicate
the vehicle's condition to the driver.
Window Washer Level
Warning SwitchThis switch is mounted in the window washer tank. It lights a warning li\
ght when the
window washer level becomes low.
±
BODY ELECTRICAL SYSTEM Cominbation MeterBE±97
WhereEverybodyKnowsYourName
Page 906 of 4087

ConnectionCheck forTester connectionConditionSpecified value
A19 A15Trip switch A/BPushContinuity
Trip switchContinuity
A19±A15Trip switch A/BFreeNo continuityTrip switchContinuity
A20 A15Trip switch RESETPushContinuityA20±A15Trip switch RESETFreeNo continuity
DOME
FuseVoltageA11±GroundConstantBattery positive voltage
Speed
SVoltageA13 A15
Ignition
switch
*3 Revolve propeller shaft0V � 11 V
SensorVoltageA13±A15switch
ON*3 Stop propeller shaft0V or 11V
C1±GroundPBattery positive voltage
C2±GroundIgnitionRBattery positive voltage
Neutral start
it hVoltageC3±Ground
Ignition
switch
ON andNBattery positive voltageswitchVoltageC4±GroundON and
shift leverDBattery positive voltage
C5±Ground
shift lever
position2Battery positive voltage
C16±Ground
osition
LBattery positive voltage
O/D OFFContinuityC18 GroundO/D OFF switchONContinuity
SwitchContinuityC18±GroundO/D OFF switchOFFNo continuity
AlternatorContinuityC15±GroundEngine stopContinuity
ºLº terminalVoltageC14±GroundEngine runningBattery positive voltage
FuelContinuityA7 GroundFuel remainderFullNo continuity
SenderContinuityA7±GroundFuel remainderEmptyContinuity
GaugeFull, Approx. 79.3 mm
(3.12 in.)Approx. 6 �
ResistanceA8±C8Float
position1/2, Approx. 193.1 mm
(76.0 in.)Approx. 32.5 �
Empty, Approx. 308.1 mm
(12.13 in.)Approx. 97 �
*Window
washer level
ContinuityB9±GroundON (float down)Continuitywasher level
warning
switchContinuityB9 Ground
(Canada)OFF (float up)No continuity
Brake fluidBrake fluid levelON (float down)Continuity
Level warning
Brake fluid level
warning SWOFF (float up)No continuity
SW and
Parking brake
SW
ContinuityC13±GroundParking brake
ON (Depress the Ped-
al))Continuity
SWParking brake
SWOFF (Release the Ped-
al)No continuity
Low oil
PressureContinuityC19 GroundEngine condition
RunningNo continuity
Pressure
Warning SWContinuityC19±GroundEngine conditionStopContinuity
Door courtesyContinuityC12 GroundDriver's andOpen (ON)Continuityy
SwitchContinuityC12±GroundDriver s and
passenger's doorClosed (OFF)No continuity
IGN fuseVoltageC14 GroundIgnition switchONBattery positive voltageVoltageC14±GroundIgnition switchLOCK or ACCNo voltage
CIG fuseVoltageA6 GroundIgnition switchACC or ONBattery positive voltageVoltageA6±GroundIgnition switchLOCK or STARTNo voltage
BE±107±
BODY ELECTRICAL SYSTEM Combination Meter
WhereEverybodyKnowsYourName
Page 1315 of 4087
REPLACEMENT OF OIL SEAL
1. REMOVE OIL SEAL(a) Using snap ring pliers, remove the snap ring and platewasher.
(b) Using a screwdriver, pry out the oil seal.
NOTICE: Be careful not to damage the housing.
2. INSTALL OIL SEAL (a) Using SST and a hammer, tap in a new oil seal to a depth
of 4.5±5.5 mm (0.177±0.217 in.) from the housing edge.
(b) Using snap ring pliers, install the plate washer and snap ring.
(c) Apply fluid to the oil seal lip.
±
COOLIING SYSTEM Electronically Controlled Hydraulic Cooling Fan
(Hydraulic Motor)CO±53
WhereEverybodyKnowsYourName
Page 1316 of 4087
ASSEMBLY OF HYDRAULIC MOTOR
(See Components on page CO±50)
HINT:
w Thoroughly clean all parts to be assembled.
w Before installing the parts, apply new fluid to all sliding
and rotating surfaces.
1. MOUNT MOTOR HOUSING Slightly mount the motor housing in a vise.
NOTICE: Be careful not to damage the motor housing.
2. INSTALL FRONT THRUST WASHER
3. INSTALL DRIVEN AND DRIVE ROTORS Install the d rive and driven rotors with the dot mark facing up-
ward.
4. INSTALL DRIVE SHAFT
5. INSTALL REAR THRUST WASHER
6. INSTALL MOTOR COVER (a) Install a new O±ring to the motor housing groove.
(b) Install the motor cover with the four bolts.
Torque: 28 N Vm (290 kgf Vcm, 21 ft Vlbf)
CO±54±
COOLIING SYSTEM Electronically Controlled Hydraulic Cooling Fan
(Hydraulic Motor)
WhereEverybodyKnowsYourName