Page 2189 of 4087
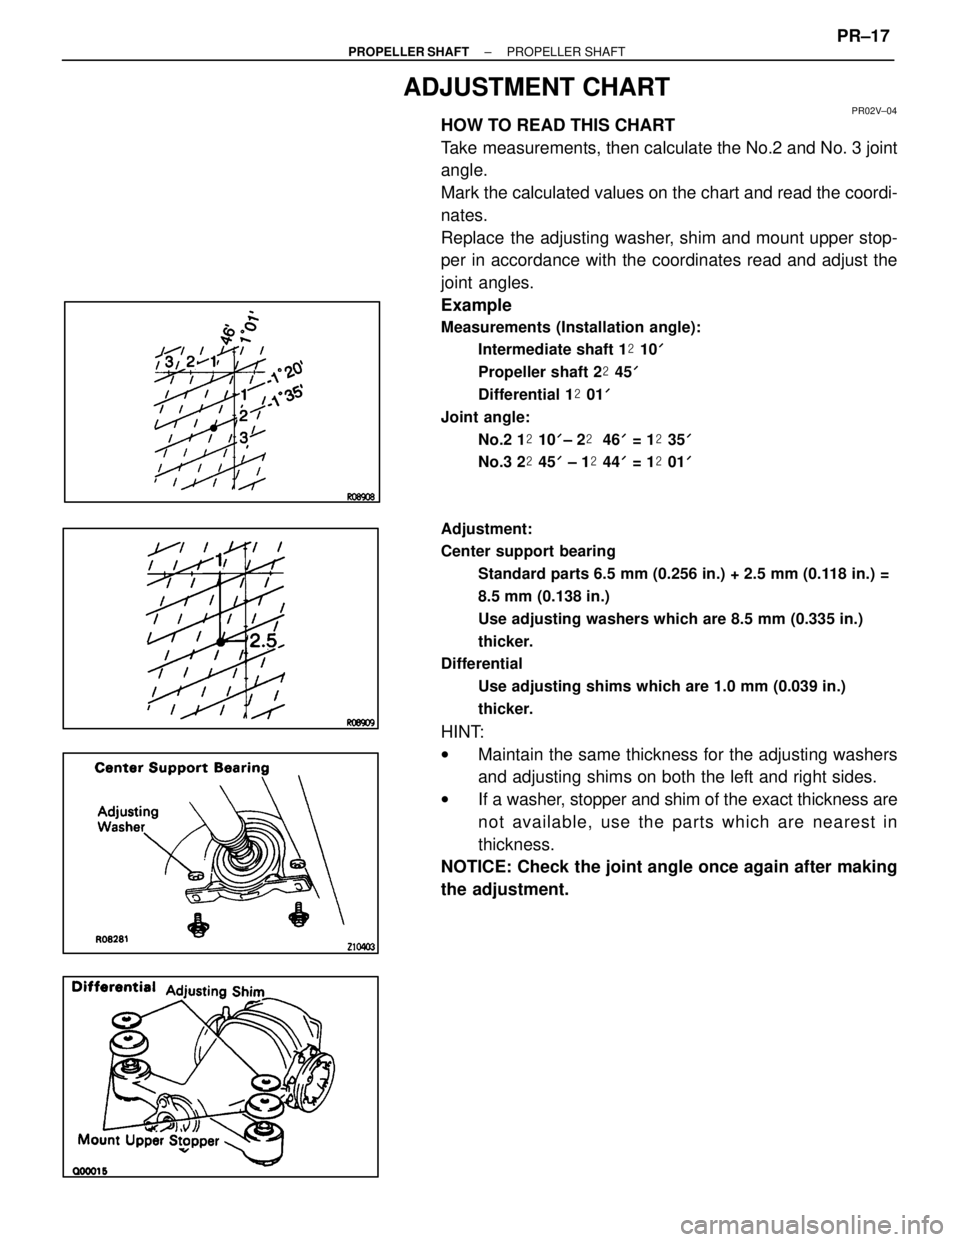
ADJUSTMENT CHART
PR02V±04
HOW TO READ THIS CHART
Take measurements, then calculate the No.2 and No. 3 joint
angle.
Mark the calculated values on the chart and read the coordi-
nates.
Replace the adjusting washer, shim and mount upper stop-
per in accordance with the coordinates read and adjust the
joint angles.
Example
Measurements (Installation angle):Intermediate shaft 1 � 10 '
Propeller shaft 2 � 45 '
Differential 1 � 01 '
Joint angle: No.2 1 � 10 '± 2 � 46 ' = 1 � 35 '
No.3 2 � 45 ' ± 1 � 44 ' = 1 � 01 '
Adjustment:
Center support bearing Standard parts 6.5 mm (0.256 in.) + 2.5 mm (0.118 in.) =
8.5 mm (0.138 in.)
Use adjusting washers which are 8.5 mm (0.335 in.)
thicker.
Differential
Use adjusting shims which are 1.0 mm (0.039 in.)
thicker.
HINT:
wMaintain the same thickness for the adjusting washers
and adjusting shims on both the left and right sides.
w If a washer, stopper and shim of the exact thickness are
not available, use the parts which are nearest in
thickness.
NOTICE: Check the joint angle once again after making
the adjustment.
±
PROPELLER SHAFT PROPELLER SHAFTPR±17
WhereEverybodyKnowsYourName
Page 2191 of 4087
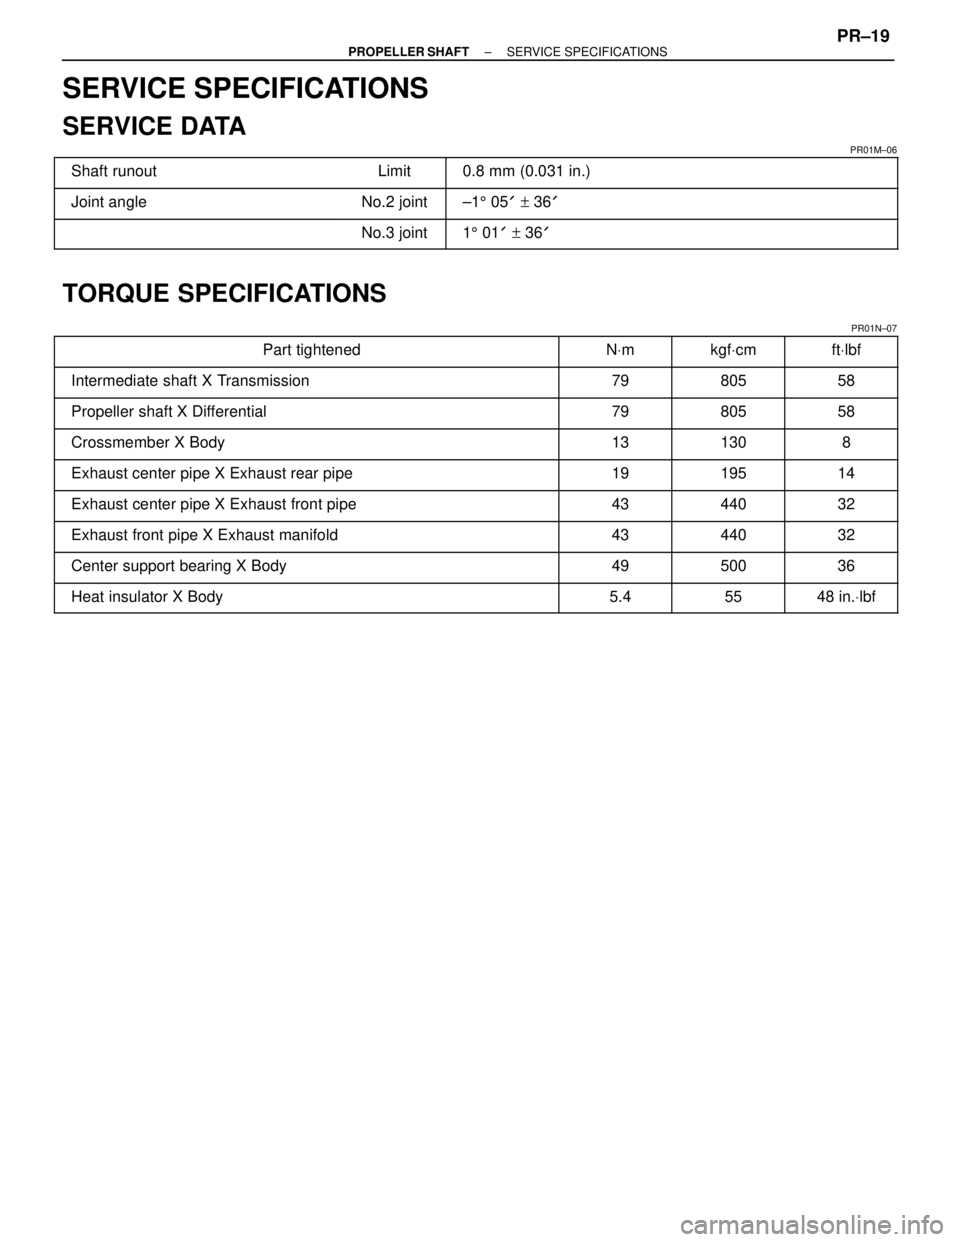
SERVICE SPECIFICATIONS
SERVICE DATA
PR01M±06������������ ������������Shaft runout������ ������Limit������������������\
�� ������������������\
��0.8 mm (0.031 in.)
������������ �
�����������
������������Joint angleNo.2 joint±1
5 05 ' + 36 '
������������ ������������������ ������No.3 joint������������������\
�� ������������������\
��15 01 ' + 36 '
TORQUE SPECIFICATIONS
PR01N±07������������������\
���� �
������������������\
���
������������������\
����Part tightened
����� �
����
�����N
Vm
������ �
�����
������kgf
Vcm
������ �
�����
������ft
Vlbf
������������������\
���� ������������������\
����Intermediate shaft X Transmission����� �����79������ ������805������ ������58
������������������\
���� ������������������\
����Propeller shaft X Differential����� �����79������ ������805������ ������58
������������������\
���� �
������������������\
���
������������������\
����Crossmember X Body����� �
����
�����13������ �
�����
������130������ �
�����
������8
������������������\
���� ������������������\
����Exhaust center pipe X Exhaust rear pipe����� �����19������ ������195������ ������14
������������������\
���� ������������������\
����Exhaust center pipe X Exhaust front pipe����� �����43������ ������440������ ������32
������������������\
���� ������������������\
����Exhaust front pipe X Exhaust manifold����� �����43������ ������440������ ������32������������������\
���� �
������������������\
���
������������������\
����Center support bearing X Body
����� �
����
�����49
������ �
�����
������500
������ �
�����
������36
������������������\
���� ������������������\
����Heat insulator X Body����� �����5.4������ ������55������ ������48 in.
Vlbf
±
PROPELLER SHAFT SERVICE SPECIFICATIONSPR±19
WhereEverybodyKnowsYourName
Page 2192 of 4087
DESCRIPTION
(SC300)
PR038±02
The propeller shaft is a 2±part type, each part consisting of a strong tube having a high centering and di-
mensional precision and a small diameter. The propeller shaft is connected to the transmission and the
differential via 3 joints. No.1 and No.2 joints are hooke universal joint.
NO.3 joint are made of flexible rubber couplings.
PR±20±
PROPELLER SHAFT DESCRIPTION (SC300)
WhereEverybodyKnowsYourName
Page 2197 of 4087
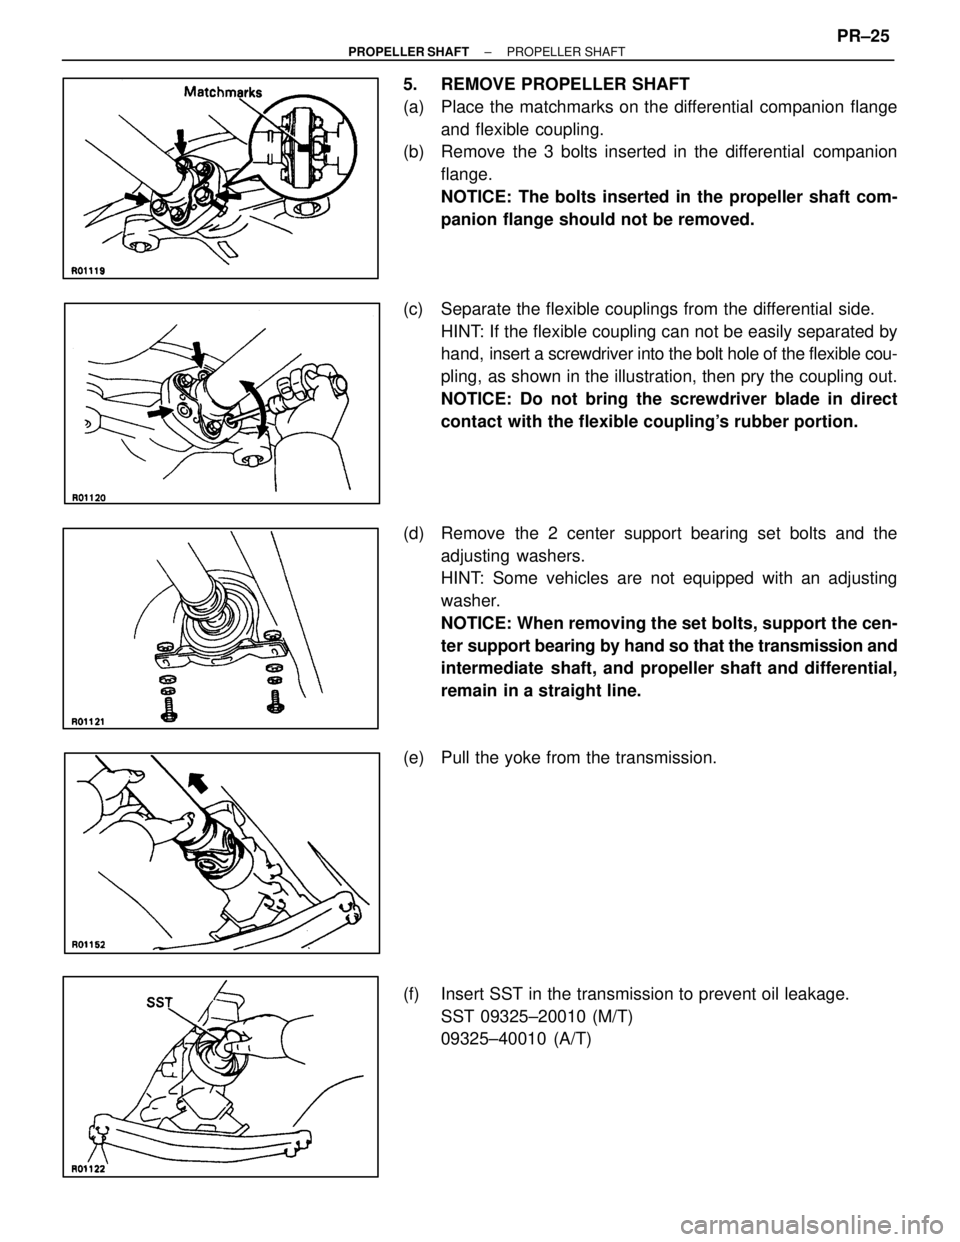
5. REMOVE PROPELLER SHAFT
(a) Place the matchmarks on the differential companion flangeand flexible coupling.
(b) Remove the 3 bolts inserted in the differential companion
flange.
NOTICE: The bolts inserted in the propeller shaft com-
panion flange should not be removed.
(c) Separate the flexible couplings from the differential side. HINT: If the flexible coupling can not be easily separated by
hand, insert a screwdriver into the bolt hole of the flexible cou-
pling, as shown in the illustration, then pry the coupling out.
NOTICE: Do not bring the screwdriver blade in direct
contact with the flexible coupling's rubber portion.
(d) Remove the 2 center support bearing set bolts and the adjusting washers.
HINT: Some vehicles are not equipped with an adjusting
washer.
NOTICE: When removing the set bolts, support the cen-
ter support bearing by hand so that the transmission and
intermediate shaft, and propeller shaft and differential,
remain in a straight line.
(e) Pull the yoke from the transmission.
(f) Insert SST in the transmission to prevent oil leakage. SST 09325±20010 (M/T)
09325±40010 (A/T)
±
PROPELLER SHAFT PROPELLER SHAFTPR±25
WhereEverybodyKnowsYourName
Page 2201 of 4087
(b) Remove SST.
(c) Insert the yoke into the transmission.
(d) Align the matchmarks and install the propeller shaft on thedifferential with the 3 bolts, washers and nuts.
NOTICE: Bolts should be inserted from the propeller
shaft side.
Torque: 79 N Vm (805 kgf Vcm, 58 ft Vlbf)
If using a new propeller shaft (w/ Phasemarks)
Install the propeller shaft phasemarks and differential phase-
marks so that their respective alignment phasemarks match.
If the propeller shaft phasemarks and differential phase-
marks do not align, install the propeller shaft and differential
alignment phasemarks are as close together as possible.
(w/o Phasemarks)
Install the propeller shaft.
(See page PR±28)
±
PROPELLER SHAFT PROPELLER SHAFTPR±29
WhereEverybodyKnowsYourName
Page 2204 of 4087
JOINT ANGLE INSPECTION AND
ADJUSTMENT
PR034±02
NOTICE: When performing operations which involve the
removal and installation of the propeller shaft, always
check the joint.
Make adjustments if necessary.
1. STABILIZE PROPELLER SHAFT AND DIFFERENTIAL
(a) Turn the propeller shaft several times by hand to stabilize the center support bearing and flexible couplings.
(b) Using a jack, raise and lower the differential to stabilize the differential mounting cushion.
2. CHECK JOINT ANGLE OF NO.2 JOINT AND NO.3 JOINT
(a) Using SST, measure the installation angle of the intermediate
shaft and propeller shaft.
SST 09370±50010
HINT: The SST should be directly underneath the tube.
(b) Using SST, measure the installation angle of the differential. SST 09370±50010
HINT: Measure the installation angle by placing the SST in
the position, as shown in the illustration.
(c) Calculate the No.2 joint angle.
PR±32
±
PROPELLER SHAFT PROPELLER SHAFT
WhereEverybodyKnowsYourName
Page 2205 of 4087
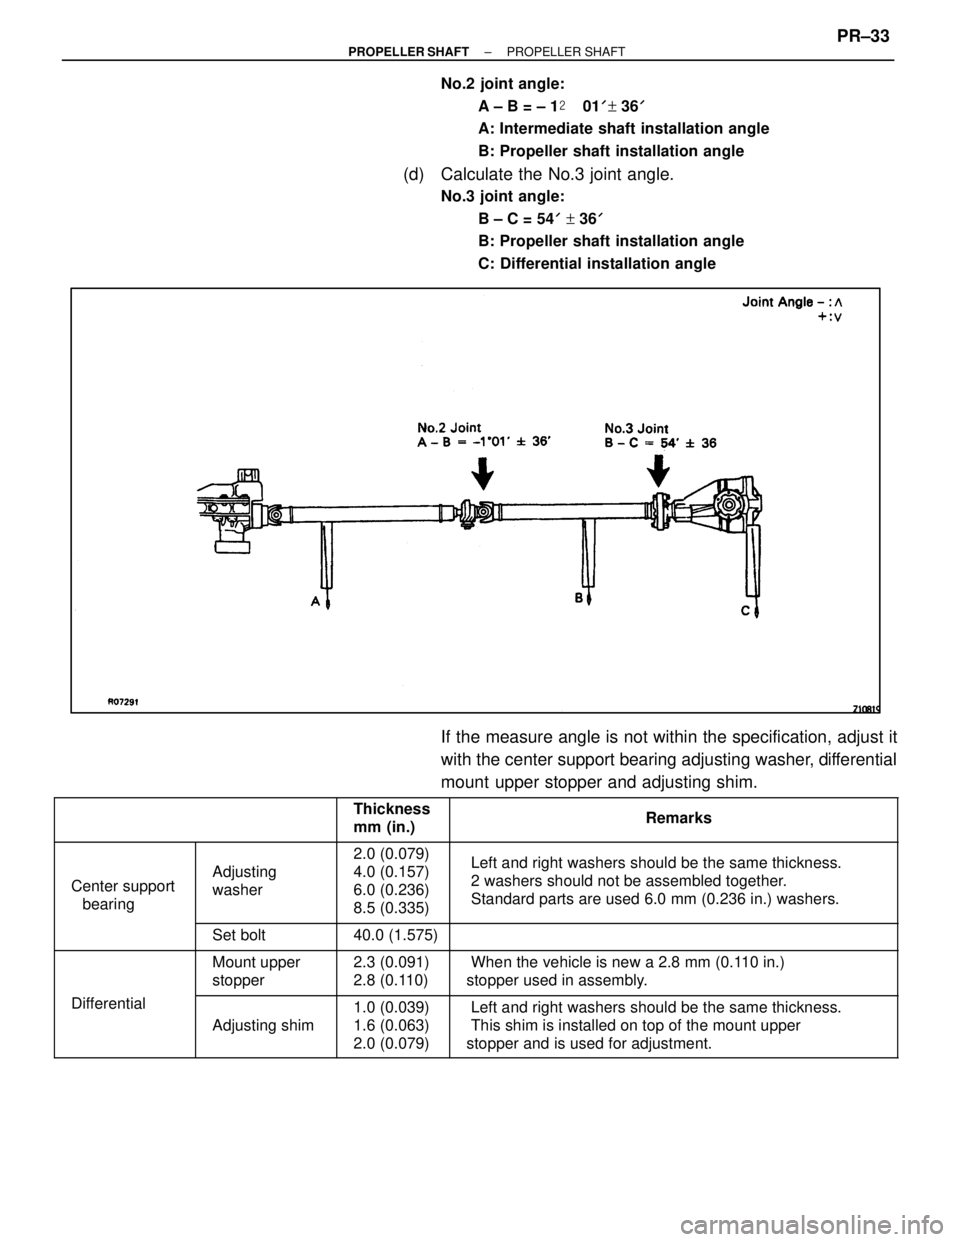
No.2 joint angle:A ± B = ± 1 ��01'+ 36 '
A: Intermediate shaft installation angle
B: Propeller shaft installation angle
(d) Calculate the No.3 joint angle.
No.3 joint angle:
B ± C = 54 '+ 36 '
B: Propeller shaft installation angle
C: Differential installation angle
If the measure angle is not within the specification, adjust it
with the center support bearing adjusting washer, differential
mount upper stopper and adjusting shim.
������������ ������������������ ������Thickness
mm (in.)������������������\
�� ������������������\
��Remarks
������� �
������
�
������
�
������
�������
Center support
bearing
������ �
�����
�
�����
�
�����
������
Adjusting
washer
������ �
�����
�
�����
�
�����
������
2.0 (0.079)
4.0 (0.157)
6.0 (0.236)
8.5 (0.335)
������������������\
�� �
������������������\
�
�
������������������\
�
�
������������������\
�
������������������\
��
Left and right washers should be the same thickness.
2 washers should not be assembled together.
Standard parts are used 6.0 mm (0.236 in.) washers.
������� ������������� ������Set bolt������ ������40.0 (1.575)������������������\
�� ������������������\
��
������� �
������
�������
������ �
�����
������
Mount upper
stopper������ �
�����
������
2.3 (0.091)
2.8 (0.110)������������������\
�� �
������������������\
�
������������������\
��
When the vehicle is new a 2.8 mm (0.110 in.)
stopper used in assembly.
������� �
������
�������
Differential������ �
�����
������Adjusting shim
������ �
�����
������
1.0 (0.039)
1.6 (0.063)
2.0 (0.079)������������������\
�� �
������������������\
�
������������������\
��
Left and right washers should be the same thickness.
This shim is installed on top of the mount upper
stopper and is used for adjustment.
±
PROPELLER SHAFT PROPELLER SHAFTPR±33
WhereEverybodyKnowsYourName
Page 2206 of 4087
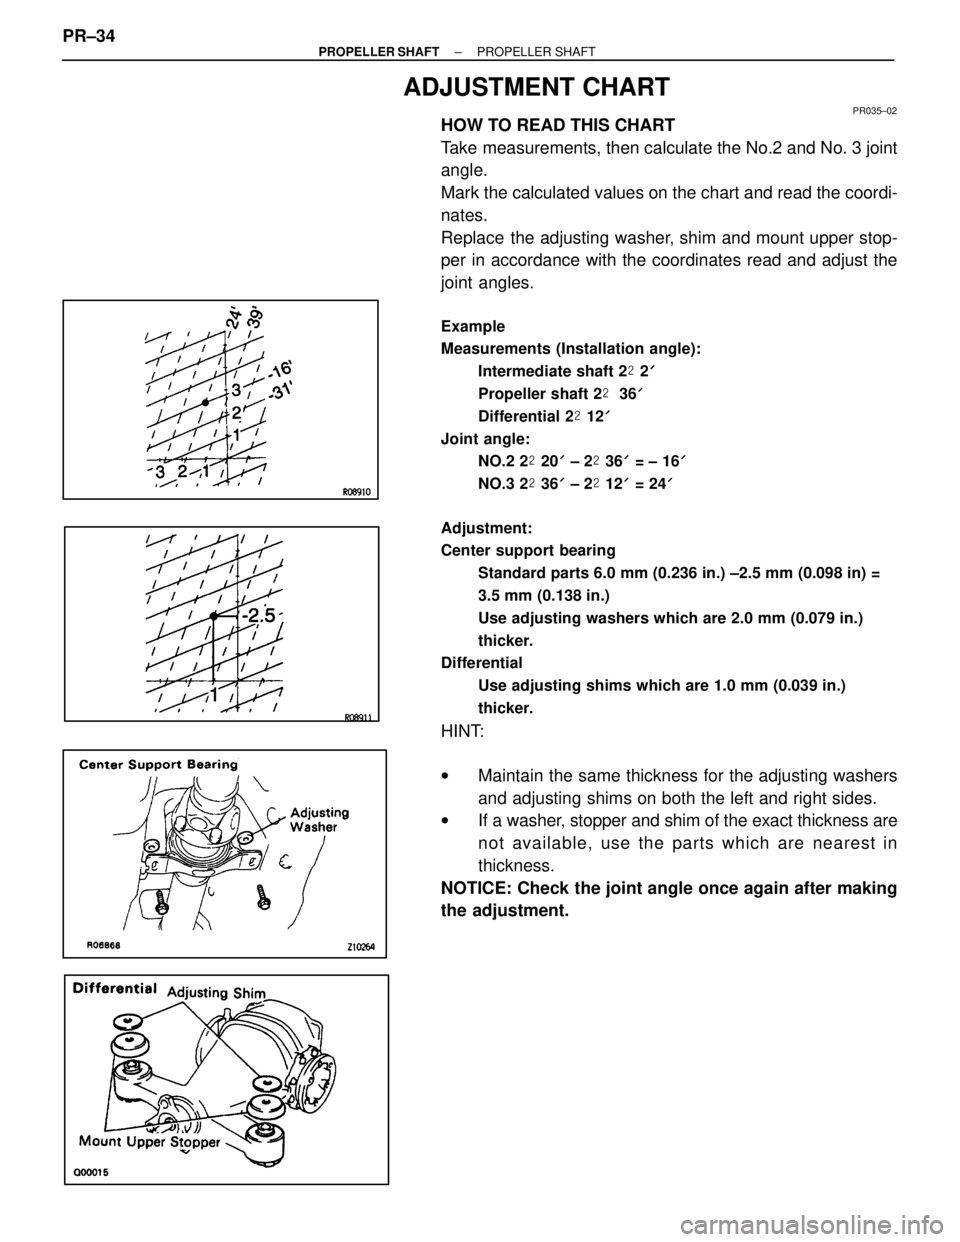
ADJUSTMENT CHART
PR035±02
HOW TO READ THIS CHART
Take measurements, then calculate the No.2 and No. 3 joint
angle.
Mark the calculated values on the chart and read the coordi-
nates.
Replace the adjusting washer, shim and mount upper stop-
per in accordance with the coordinates read and adjust the
joint angles.
Example
Measurements (Installation angle):Intermediate shaft 2 � 2 '
Propeller shaft 2 � 36 '
Differential 2 � 12 '
Joint angle: NO.2 2 � 20 ' ± 2 � 36 ' = ± 16 '
NO.3 2 � 36 ' ± 2 � 12 ' = 24 '
Adjustment:
Center support bearing Standard parts 6.0 mm (0.236 in.) ±2.5 mm (0.098 in) =
3.5 mm (0.138 in.)
Use adjusting washers which are 2.0 mm (0.079 in.)
thicker.
Differential
Use adjusting shims which are 1.0 mm (0.039 in.)
thicker.
HINT:
wMaintain the same thickness for the adjusting washers
and adjusting shims on both the left and right sides.
w If a washer, stopper and shim of the exact thickness are
not available, use the parts which are nearest in
thickness.
NOTICE: Check the joint angle once again after making
the adjustment.
PR±34
±
PROPELLER SHAFT PROPELLER SHAFT
WhereEverybodyKnowsYourName