1990 VOLKSWAGEN TRANSPORTER windshield wipers
[x] Cancel search: windshield wipersPage 4 of 165

Downloaded from www.Manualslib.com manuals search engine
1
INSTRUMENT PANEL
Illustration instruments and controls
Warning and indicator light symbols
CONTROLS AND EQUIPMENT
Keys,
central locking system .... 7, 8
Doors 9
Rear lid 11
Windows, mirrors 12, 13 Safety belts, head restraints . . . .14,19
Seats 20 Luggage compartment, pedals . 28,29
Brakes, Transmission 29, 32 Differential lock 33
Automatic-transmission 35 Steering lock/ignition/starter switch . 38
Starting procedures 39 Instrument cluster 40
Warning/indicator lights 43 Switches 46 Emergency flasher 46
Light switch, turn signals .... 46,48
Cruise control 49
Windshield wipers 50 Ventilation/Heating 51
Air conditioning 54
Heater 57
Sliding roof 62
Roof-rack 68 VEHICLE OPERATION
Break-in period - and afterwards . . 69
Operate your vehicle safety 70
Operate your vehicle economically
and minimize pollution 72
Trailer towing 73 Driving with the all-wheel drive ... 75
VEHICLE CARE
Fuel tank, fuel supply 85,86
Vehicle care (exterior/interior) . . 90, 93 Maintenance, inspection intervals . . 95 Engine compartment lid,
engine compartment 97 Lubricants, engine oil 98,99
Engine oil filter 101
Transmission oil 102
Power steering 103
Cooling system 104 Brake fluid 108
Battery 109
Windshield washers/wipers . . . 112,113
Tires/wheels 114 Difficult operating conditions .... 120
Winter driving 121
Accessories 122
DO-IT-YOURSELF SERVICE
Jack and tools 123 Spare wheel 124
Changing a wheel 125 Fuses, bulbs 128, 130 Adjusting headlights
134
Installing,
replacing the radio . . . . 135
Emergency starting 136
Emergency towing 138
Lifting vehicle . . 140
TECHNICAL DESCRIPTION
Engine, transmission 142
Steering,
suspension, brakes,
body, chassis 143 Emission-control-system 144
TECHNICAL DATA
Engine, spark plugs .
V-belts capacities . . Dimensions
Weights
Vehicle identification 146
147
148
150 151
CONSUMER INFORMATION
Service manuals 152
GAS STATION INFORMATION
Location of servicing points 156
ALPHABETICAL INDEX 158
www.westfaliaT3.info - a useful website for owners and enthusiasts of VW Westfalia T25 / T3 Campervans
Page 39 of 165

Downloaded from www.Manualslib.com manuals search engine
CONTROLS AND EQUIPMENT
STEERING LOCK/IGNITION/STARTER
SWITCH
The
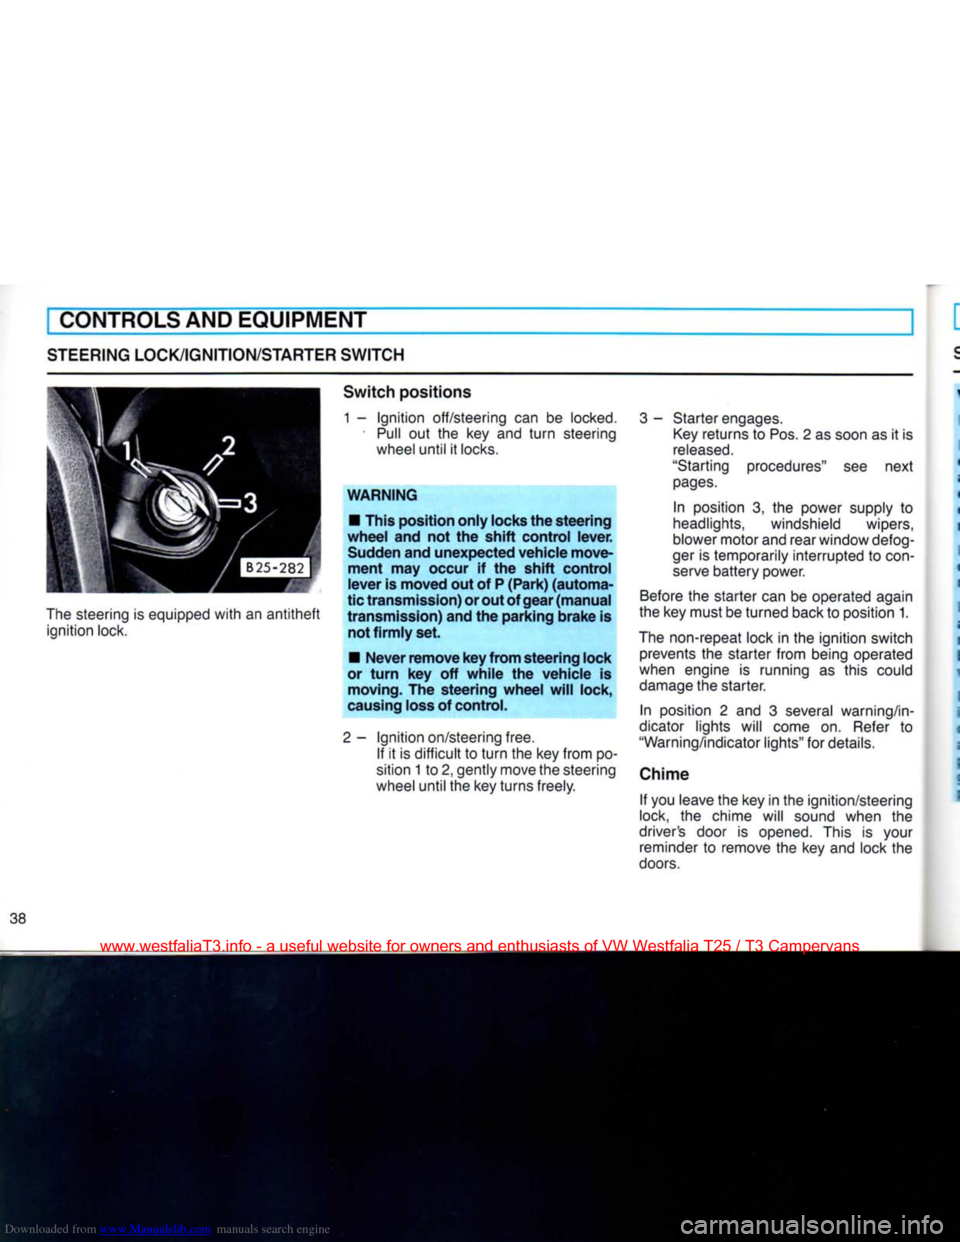
steering is equipped
with
an
antitheft
ignition lock.
Switch
positions
1 -
Ignition
off/steering can be
locked.
•
Pull
out the key and
turn
steering wheel until it
locks.
WARNING
• This position
only
locks the
steering
wheel
and not the
shift
control
lever.
Sudden and
unexpected
vehicle
move
ment
may occur if the
shift
control
lever
is
moved
out of P
(Park)
(automa
tic
transmission)
or out of
gear
(manual
transmission)
and the
parking
brake
is not
firmly
set.
•
Never
remove
key
from
steering
lock
or
turn
key off
while
the
vehicle
is moving. The
steering
wheel
will
lock,
causing loss of control.
2-
Ignition
on/steering free. If it is difficult to
turn
the key from po
sition 1 to 2, gently move the steering
wheel until the key turns freely.
3
- Starter engages.
Key
returns to Pos. 2 as soon as it is
released.
"Starting procedures" see next
pages.
In position 3, the power supply to
headlights, windshield wipers,
blower motor and rear window defog-
ger
is temporarily interrupted to
con
serve
battery power.
Before
the starter can be operated again
the key must be turned back to position 1.
The
non-repeat lock in the ignition switch prevents the starter from being operated
when engine is running as this could
damage
the starter.
In position 2 and 3 several warning/in
dicator lights will come on.
Refer
to
"Warning/indicator lights" for details.
Chime If you leave the key in the ignition/steering
lock, the chime will sound when the
driver's door is opened. This is your reminder to remove the key and lock the
doors.
www.westfaliaT3.info - a useful website for owners and enthusiasts of VW Westfalia T25 / T3 Campervans
Page 51 of 165

Downloaded from www.Manualslib.com manuals search engine
CONTROLS AND EQUIPMENT
WIPER
AND WASHER SYSTEM
The
wiper and washer systems only work when the ignition is on.
Always
loosen blades
frozen
to glass be
fore
operating
wipers
to
prevent
damage
to the
wiping
system.
Windshield
Brief
wiping
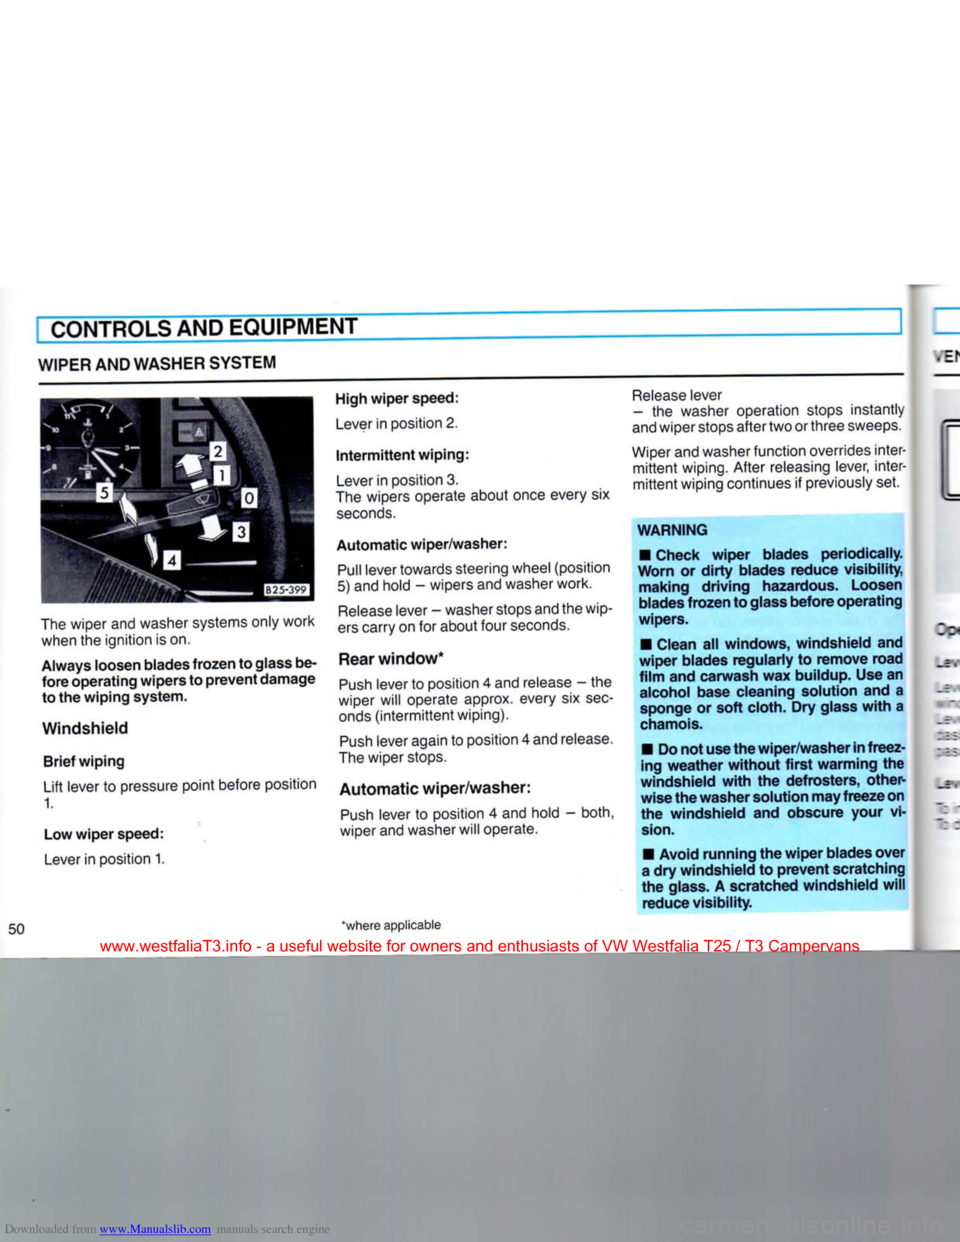
Lift lever to pressure point before position 1.
Low
wiper
speed:
Lever
in position 1.
High
wiper
speed:
Lever
in position 2.
Intermittent
wiping:
Lever
in position 3.
The
wipers operate about once every six
seconds.
Automatic
wiper/washer:
Pull
lever towards steering wheel (position
5) and hold - wipers and washer work.
Release
lever - washer stops and the wip
ers
carry on for about four
seconds.
Rear
window*
Push
lever to position 4 and release - the
wiper will operate approx. every six
sec
onds
(intermittent
wiping).
Push
lever again to position 4 and release.
The
wiper stops.
Automatic
wiper/washer:
Push
lever to position 4 and hold - both,
wiper and washer will operate.
*where applicable
Release
lever
- the washer operation stops instantly
and
wiper stops after two or three sweeps.
Wiper
and washer function overrides inter
mittent
wiping. After releasing lever, inter
mittent
wiping continues if previously set.
WARNING
• Check
wiper
blades
periodically.
Worn
or
dirty
blades
reduce
visibility,
making
driving
hazardous. Loosen
blades
frozen
to glass
before
operating
wipers.
• Clean all
windows,
windshield
and
wiper
blades
regularly
to
remove
road
film
and
carwash
wax buildup. Use an alcohol base cleaning solution and a sponge or
soft
cloth. Dry glass
with
a
chamois.
• Do not use the
wiper/washer
in
freez
ing
weather
without
first
warming
the
windshield
with
the
defrosters,
other
wise
the
washer
solution may
freeze
on
the
windshield
and obscure your vi
sion.
• Avoid
running
the
wiper
blades
over
a dry
windshield
to
prevent
scratching
the glass. A scratched
windshield
will
reduce
visibility.
www.westfaliaT3.info - a useful website for owners and enthusiasts of VW Westfalia T25 / T3 Campervans
Page 118 of 165

Downloaded from www.Manualslib.com manuals search engine
VEHICLE CARE
REPLACING
WIPER
BLADES
•Viper
blades must be in good condition to
:rovide clear vision.
3lean
your wiper blades regularly
with
a vindshield washer solution to prevent
streaking.
If the blades are very dirty, for
example
with
insects, carefully clean the
:lades
with
a sponge or a soft brush.
Replace
your wiper blades once or twice a
/ear.
See your Volkswagen dealer for re-
Dlacement
blades.
Notes
• Commercial hot
waxes
applied
by
auto
matic
car
washes
have
been
known
to
affect
the
cleanability
of the windshield.
• To
prevent
damage
to
wiper
blades,
do not use gasoline, kerosene,
paint
thinner,
or
other
solvents on or
near
the
wiper
blades.
• To
prevent
damage
to the
wiper
arms
or
other
components, do not
attempt
to
move
the
wipers
manually.
Removing
wiper
blades
•
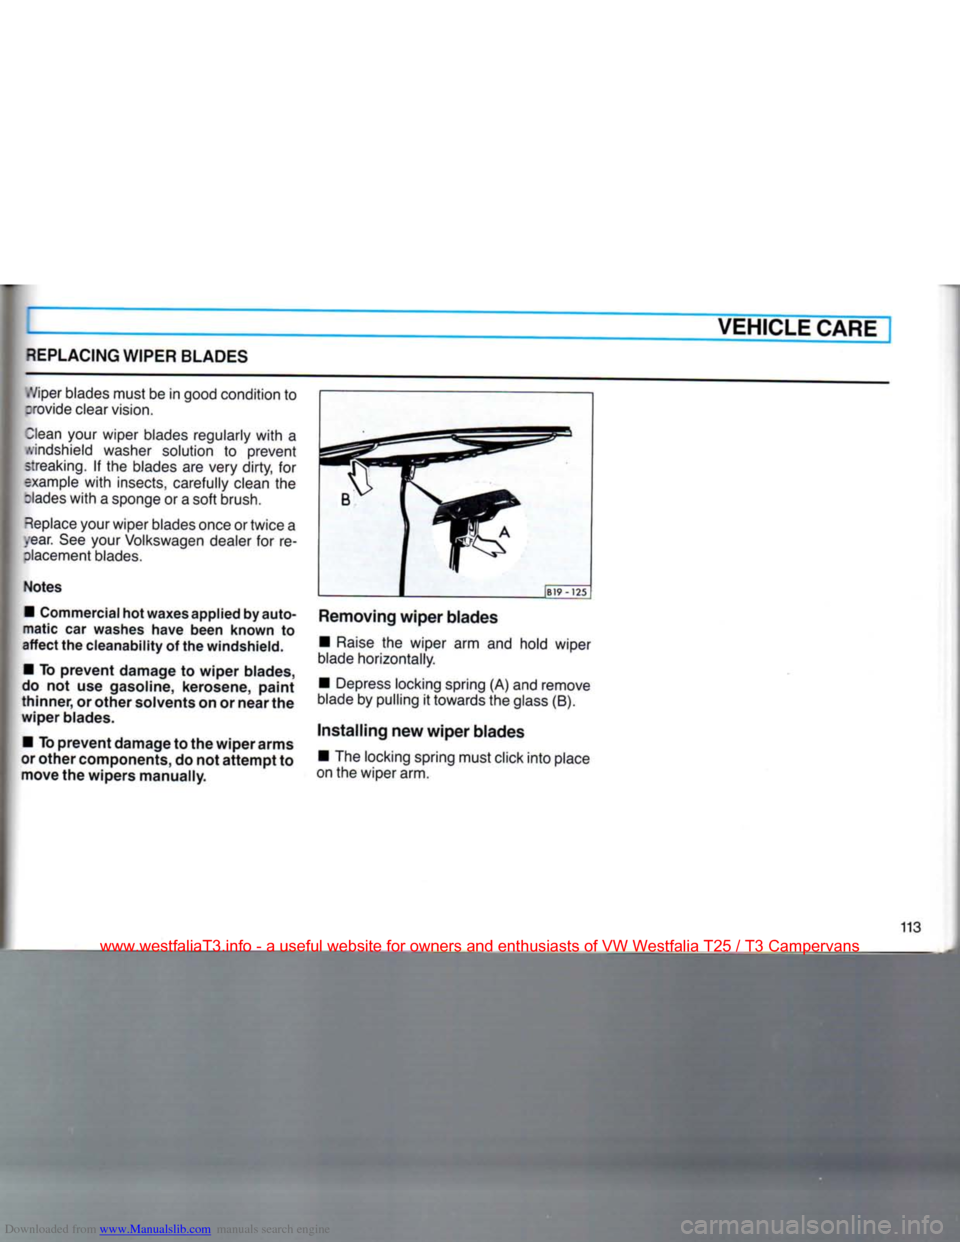
Raise
the wiper arm and hold wiper
blade
horizontally.
• Depress locking spring (A) and remove
blade
by pulling it towards the glass (B).
Installing
new
wiper
blades • The locking spring must click into place
on the wiper arm.
113
www.westfaliaT3.info - a useful website for owners and enthusiasts of VW Westfalia T25 / T3 Campervans
Page 134 of 165

Downloaded from www.Manualslib.com manuals search engine
DO-IT-YOURSELF-SERVICE
Fuse arrangement No. Component Amp. No. Component Amp.
From left to right: 1
Radiator fan 30 17 Windshield wiperengine 10
2 Brake lights 10
18 Brake warning light,
3 Interior lights, illuminated heated driver's seat,
Make-up mirror, clock,
ciga
cruise control system 10
rette lighter, radio 15 19 Turn signals 10
4 Emergency flasher system 15 20 Number plate light,
5 Vacant headlight washer
10
6 Vacant 21 Low beam left
10
7 Tail and side light left 10
22 Low beam right 10
8 Tail and side light right
10
9 High beam right 10
10 High beam left
10 Additional fuses
11 Windshield wipers and washer
15 (in separate holders)
12 Cruise control system
Air conditioner, power above the fuse box:
windows, auxiliary heater, Instrument lightning
10
electric outside mirrors, Overheating fuse for auxiliary heater
10
auxiliary heat exchanger, Main fuse for auxiliary heater
20
rear window wiper 20 Central locking 20
13 Fresh air fan
20 Automatic fuse for window lifter
20
14 Rear window heating, heated
rear view mirror, light for Color codes
15
16 lighting switch
Back-up lights
Double tone horn 20
10
15 10 Amp. fuses - red
15 Amp. fuses - blue
15
16 lighting switch
Back-up lights
Double tone horn 20
10
15 20 Amp. fuses - yellow
30 Amp. fuses - green
The number on the face of the fuse is the amperage rating.
www.westfaliaT3.info - a useful website for owners and enthusiasts of VW Westfalia T25 / T3 Campervans