1990 VOLKSWAGEN TRANSPORTER fuel cap
[x] Cancel search: fuel capPage 4 of 165

Downloaded from www.Manualslib.com manuals search engine
1
INSTRUMENT PANEL
Illustration instruments and controls
Warning and indicator light symbols
CONTROLS AND EQUIPMENT
Keys,
central locking system .... 7, 8
Doors 9
Rear lid 11
Windows, mirrors 12, 13 Safety belts, head restraints . . . .14,19
Seats 20 Luggage compartment, pedals . 28,29
Brakes, Transmission 29, 32 Differential lock 33
Automatic-transmission 35 Steering lock/ignition/starter switch . 38
Starting procedures 39 Instrument cluster 40
Warning/indicator lights 43 Switches 46 Emergency flasher 46
Light switch, turn signals .... 46,48
Cruise control 49
Windshield wipers 50 Ventilation/Heating 51
Air conditioning 54
Heater 57
Sliding roof 62
Roof-rack 68 VEHICLE OPERATION
Break-in period - and afterwards . . 69
Operate your vehicle safety 70
Operate your vehicle economically
and minimize pollution 72
Trailer towing 73 Driving with the all-wheel drive ... 75
VEHICLE CARE
Fuel tank, fuel supply 85,86
Vehicle care (exterior/interior) . . 90, 93 Maintenance, inspection intervals . . 95 Engine compartment lid,
engine compartment 97 Lubricants, engine oil 98,99
Engine oil filter 101
Transmission oil 102
Power steering 103
Cooling system 104 Brake fluid 108
Battery 109
Windshield washers/wipers . . . 112,113
Tires/wheels 114 Difficult operating conditions .... 120
Winter driving 121
Accessories 122
DO-IT-YOURSELF SERVICE
Jack and tools 123 Spare wheel 124
Changing a wheel 125 Fuses, bulbs 128, 130 Adjusting headlights
134
Installing,
replacing the radio . . . . 135
Emergency starting 136
Emergency towing 138
Lifting vehicle . . 140
TECHNICAL DESCRIPTION
Engine, transmission 142
Steering,
suspension, brakes,
body, chassis 143 Emission-control-system 144
TECHNICAL DATA
Engine, spark plugs .
V-belts capacities . . Dimensions
Weights
Vehicle identification 146
147
148
150 151
CONSUMER INFORMATION
Service manuals 152
GAS STATION INFORMATION
Location of servicing points 156
ALPHABETICAL INDEX 158
www.westfaliaT3.info - a useful website for owners and enthusiasts of VW Westfalia T25 / T3 Campervans
Page 42 of 165
Downloaded from www.Manualslib.com manuals search engine
CONTROLS AND EQUIPMENT
I - Tachometer*
"he red shaded area at the end of the scale indicates the maximum permissible
engine rpm (revolutions per minute) for all gears after the break-in period. Before
'eaching this area, the next higher gear
snould be selected or the foot eased off
the accelerator pedal. Earlier shifting saves fuel and reduces noise.
Sniff to the next lower gear when the en-
; ne rpm drops below 1500 rpm.
~ne green shaded area on the scale snows the speed at which the engine is de-
•
eloping its most favourable torque.
3 - Normal clock*
~J
set the clock, depress the knob in the : al center and
turn.
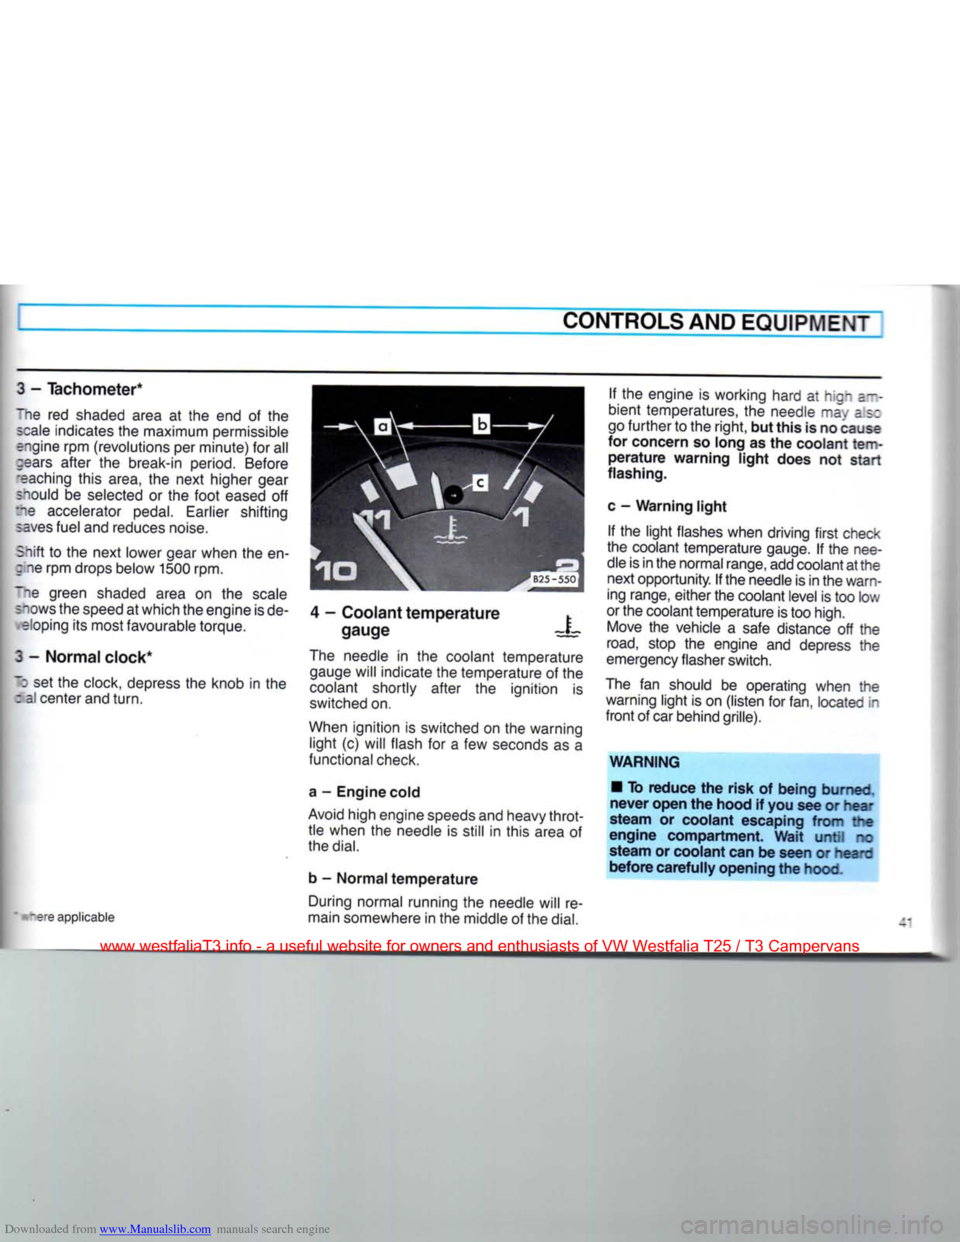
4 - Coolant temperature
gauge X
tare applicable The needle in the coolant temperature
gauge will indicate the temperature of the
coolant shortly after the ignition is
switched on.
When ignition is switched on the warning light (c) will flash for a few seconds as a
functional check.
a - Engine cold
Avoid high engine speeds and heavy throt tle when the needle is still in this area of
the
dial.
b - Normal temperature During normal running the needle will re
main somewhere in the middle of the
dial.
If the engine is working hard at hign a--
bient temperatures, the needle may as:
go further to the right, but this is no cause
for concern so long as the coolant
tem
perature warning light does not start
flashing.
c - Warning light If the light flashes when driving first check
the coolant temperature gauge. If the nee
dle is in the normal range, add coolant at the next opportunity. If the needle is in the warn
ing range, either the coolant level is too low
or the coolant temperature is too high. Move the vehicle a safe distance off the
road,
stop the engine and depress the
emergency flasher switch.
The fan should be operating when the warning light is on (listen for fan, located in
front of car behind grille).
WARNING • To reduce the risk of being burned,
never open the hood if you see or hear
steam or coolant escaping from the
engine compartment. Wait until no
steam or coolant can be seen or heard
before carefully opening the hood.
www.westfaliaT3.info - a useful website for owners and enthusiasts of VW Westfalia T25 / T3 Campervans
Page 43 of 165
Downloaded from www.Manualslib.com manuals search engine
CONTROLS
AND
EQUIPMENT
WARNING continned •
The
engine compartment
of any
motor vehicle
is a
potentially hazard
ous
area.
Before you check anything in the engine compartment, stop
the
engine and
let it
cool down. Always
exercise extreme caution when work
ing
one the
engine. Heed
all of the
WARNINGS on page
97.
Reduce the risk
of
scalding from
hot
coolant by following these steps.
• If the coolant reservoir cap must be
removed, wait until
the
engine
has
cooled down.
• Protect face, hands
and
arms
by
covering
the cap
with
a
large, thick
rag
to
protect against escaping fluid
and
steam.
• Carefully and slowly
turn
cap
one
turn
to
allow excess pressure
to es
cape before completely removing
cap.
•
To
help avoid being burned,
do not
spill
antifreeze
or
coolant
on the ex
haust system
or hot
engine parts.
Under
some conditions, the ethylene
glycol
in
engine coolant
is
combusti
ble.
If a
visual check shows that coolant level
and V-belt
are
normal,
but the
warning light continues to
flash,
contact
your
near
est dealer
to
have
the
cause located
and
corrected.
For more details see "Cooling system"
on
page 104.
If the
coolant gauge needle nears
the
upper end
of
the scale and the engine ap
pears
to be
overheating,
turn
off the air
conditioner.
Do
not
install accessories
(fog
lights
or
in
sect screens,
for
example)
on top of the
front
bumper.
They
may
restrict engine
cooling.
5
-
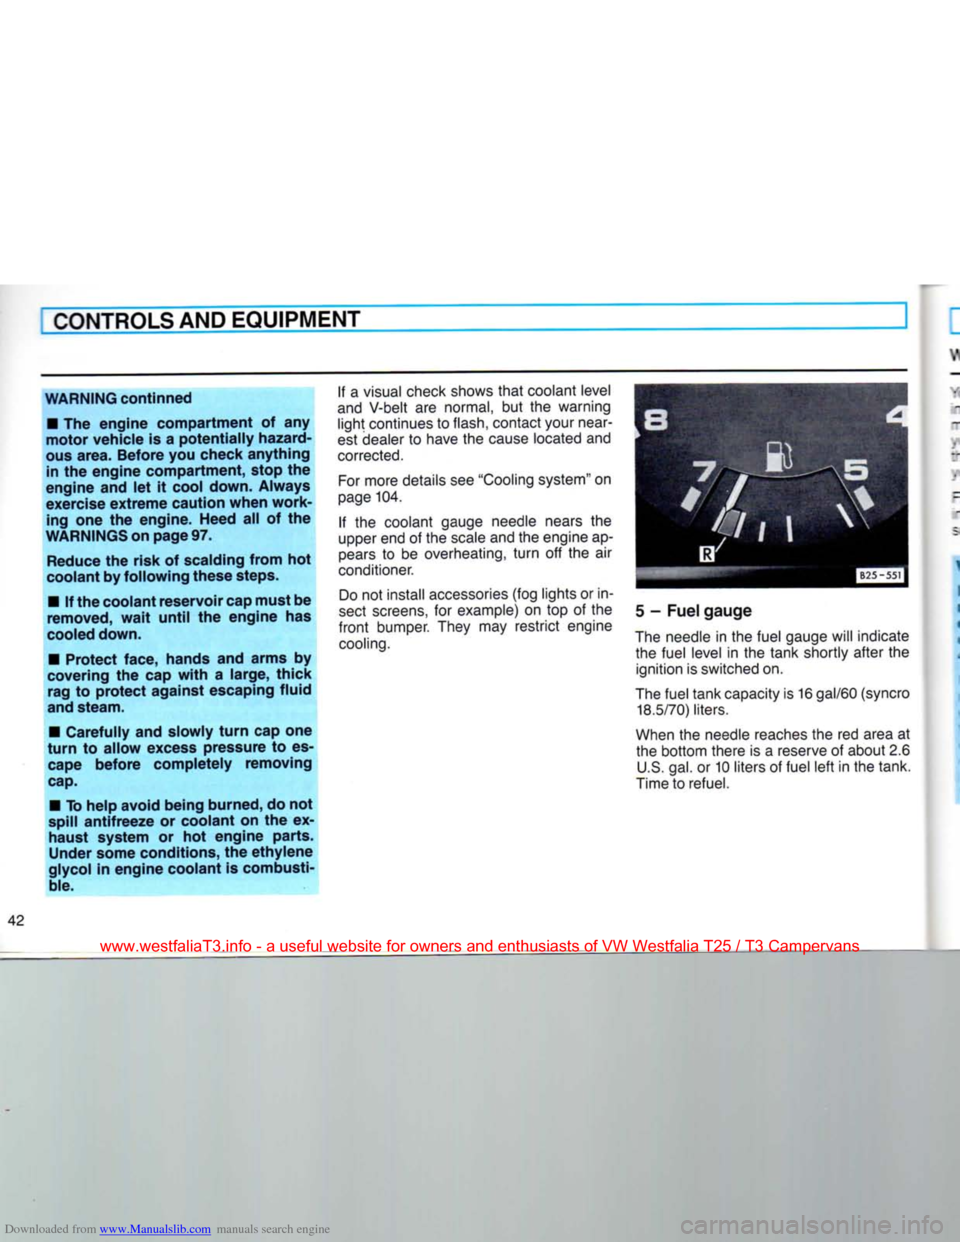
Fuel gauge
The needle
in
the fuel gauge will indicate the fuel level
in the
tank shortly after
the
ignition is switched on.
The fuel tank capacity is
16
gal/60
(syncro
18.5/70)
liters.
When
the
needle reaches the
red
area
at
the bottom there
is a
reserve
of
about 2.6 U.S. gal.
or
10 liters
of
fuel left in the tank.
Time to refuel.
www.westfaliaT3.info - a useful website for owners and enthusiasts of VW Westfalia T25 / T3 Campervans
Page 69 of 165
Downloaded from www.Manualslib.com manuals search engine
CONTROLS
AND
EQUIPMENT
ROOF RACK 3REAK-
If a roof rack should be installed, note the
following:
• Use only roof racks which attach to the
rain gutters.
• Always distribute loads evenly.
• Never exceed the vehicle's
total
load
carrying capacity. See page 150 for de
tails.
• When transporting maximum permis
sible
loads, large or bulky items, or long,
flat
shaped objects, bear in mind
that
they
will
influence the vehicle's aerodynamics,
center of gravity and overall handling. To
counterbalance these influences, adjust steering habits and driving speed accord
ingly.
• When the roof rack is not in use,
remove the roof rack to reduce wind
noise,
improve on fuel consumption and
to guard against
theft.
68
www.westfaliaT3.info - a useful website for owners and enthusiasts of VW Westfalia T25 / T3 Campervans
Page 90 of 165
Downloaded from www.Manualslib.com manuals search engine
VEHICLE CARE
=UELTANK
|he fuel filler neck is located above the -gnt
front
wheel. Syncro model: above the
-;nt rear wheel.
mm key A (see page 7) is used for the lock-
acle
tank cap. The syncro model has a separate key for the lockable tank cap.
capacity of the tank is 16.0 gal/60
:ers
(Reserve is 2.5 gal/10 liters of
total
rapacity).
5/ncro model: 18.5 gal/70 liters (Reserve
2
5 gal/10 liters of
total
capacity). Trouble-free refueling depends on the cor
rect use of the filler nozzle.
Always
insert the nozzle fully
into
the fuel filler neck, to completely open the spring-loaded flap located
just
below the filler
neck opening. Make sure the filler nozzle
is
not tilted.
Do
not
fill
the fuel tank too quickly, other
wise the fuel may foam up and cause the
nozzle
to switch off too
soon.
As
soon as the nozzle switches off auto matically for the
first
time, the tank is full.
Do
not try to add more fuel, because the
expansion
space in the fuel tank will be
filled - the fuel can then overflow when it
becomes
warm.
WARNING
Never
carry
additional
fuel
containers
in
your
vehicle.
Such
containers,
full
or
empty,
may
leak,
cause an explosion,
or
result
in
fire
in case of a collision.
85
www.westfaliaT3.info - a useful website for owners and enthusiasts of VW Westfalia T25 / T3 Campervans
Page 103 of 165
Downloaded from www.Manualslib.com manuals search engine
[
VEHICLE
CARE
LUBRICANTS I
Climate Tropical
40'
30-
20- 10-
0-
10'
20
30'
Single grade oil
Multi grade oil
Gasoline Engines
|B25-565/21
Engine
Your engine was factory filled with an all- season high quality engine oil. If you need
to add oil between oil changes use any high quality petroleum or synthetic based
oil with correct specifications.
The following term must appear on the oil container singly or in combination with
other designations: "API Service SF or
SG".
Engine oils are graded according to their
viscosity. The proper grade to be used in your engine depends on existing climatic
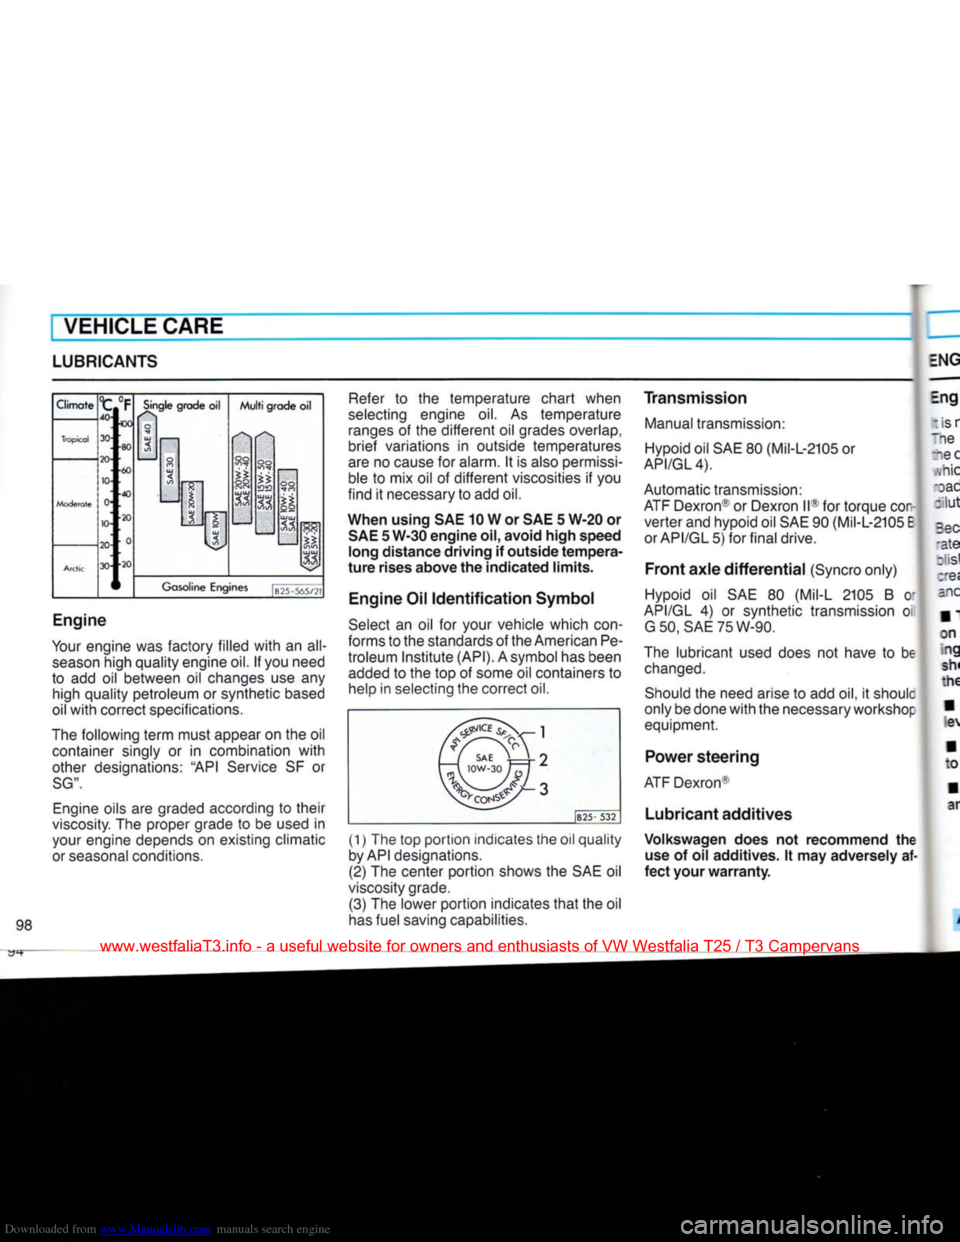
or seasonal conditions. Refer to the temperature chart when
selecting engine oil. As temperature ranges of the different oil grades overlap,
brief variations in outside temperatures
are no cause for alarm. It is also permissi ble to mix oil of different viscosities if you
find it necessary to add oil.
When using SAE 10 W or SAE 5 W-20 or SAE 5 W-30 engine oil, avoid high speed
long distance driving if outside tempera
ture rises above the indicated limits.
Engine Oil Identification Symbol
Select an oil for your vehicle which
con
forms to the standards of the American Pe
troleum Institute (API). A symbol has been added to the top of some oil containers to help in selecting the correct oil.
-l -l
/ / SAE '. j -2
t—i iow-3o jji -3
1B25-
532
98 (1) The top portion indicates the oil quality
by API designations.
(2) The center portion shows the SAE oil
viscosity grade.
(3) The lower portion indicates that the oil
has fuel saving capabilities. Transmission
Manual transmission: Hypoid oil SAE 80 (Mil-L-2105 or
API/GL4).
Automatic transmission:
ATF Dexron® or Dexron II® for torque cor
verter and hypoid oil SAE 90 (Mil-L-2105
E
orAPI/GL5) for final drive.
Front axle differential (Syncro only)
Hypoid oil SAE 80 (Mil-L 2105 B M
API/GL 4) or synthetic transmission oi
G50,
SAE75W-90.
The lubricant used does not have to be
changed.
Should the need arise to add oil, it shoulc
only be done with the necessary workshop equipment.
Power steering
ATF Dexron®
Lubricant additives
Volkswagen does not recommend the use of oil additives. It may adversely af
fect your warranty.
www.westfaliaT3.info - a useful website for owners and enthusiasts of VW Westfalia T25 / T3 Campervans
Page 104 of 165
Downloaded from www.Manualslib.com manuals search engine
VEHICLE CARE
ENGINE OIL
Engine oil consumption t 3 normal for your engine to consume oil.
T-Q
rate of oil consumption depends on
re quality and viscosity of
oil,
the speed at
Mich
the engine is operated, the climate,
read
conditions as well as the amount of : ution and oxidation of the lubricant.
Because
of these variables, no standard
•e:e
of oil consumption can be esta-
:
shed,
but drivers should expect an in
creased
oil consumption at high speeds
s.nd when the engine is new.
• The
engine
in your
vehicle
depends
on oil to
lubricate
and cool all of its
mov
ing
parts.
Therefore
the
engine
oil
should be checked
regularly
and
kept
at
the
required
level.
•
Make
it a
habit
to
have
the
engine
oil
level
checked
with
every
fuel
filling.
• Lack of
sufficient
engine
oil may
lead
to
severe
engine
damage.
• The oil pressure
warning
light
is not
an oil
level
indicator.
Always
heed
WARNINGS
on
page
97.
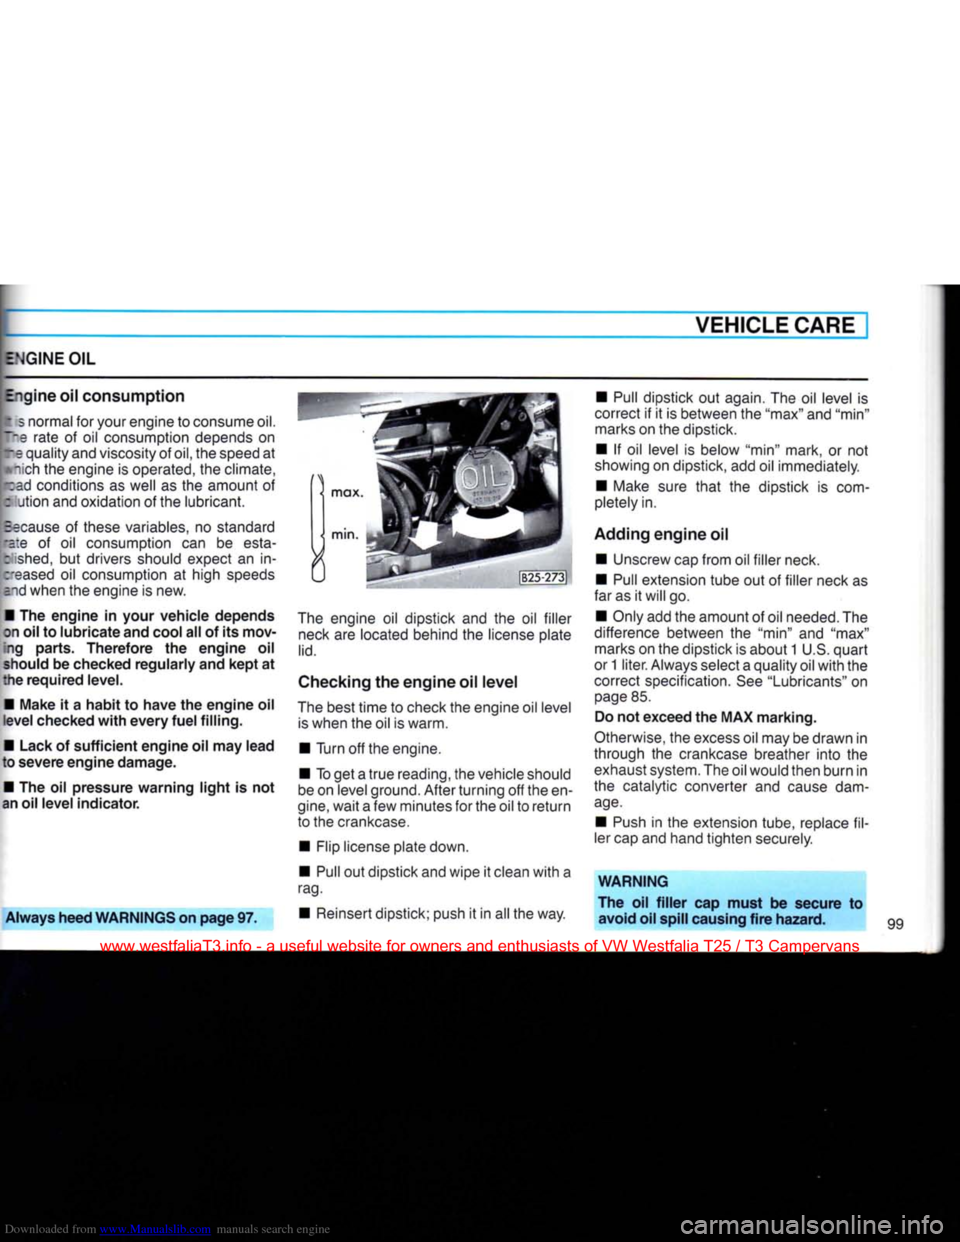
The
engine oil dipstick and the oil filler
neck
are located behind the license plate
lid.
Checking the
engine
oil
level
The
best time to check the engine oil level
is
when the oil is warm.
• Turn off the engine.
• To get a true reading, the vehicle should
be
on level ground. After turning off the en
gine,
wait a few minutes for the oil to return
to the crankcase.
• Flip license plate down.
• Pull out dipstick and wipe it clean
with
a
rag.
• Reinsert dipstick; push it in all the way. • Pull dipstick out again. The oil level is
correct if it is between the "max" and "min" marks on the dipstick.
• If oil level is below "min" mark, or not
showing on dipstick, add oil immediately.
• Make sure
that
the dipstick is com
pletely in.
Adding
engine
oil • Unscrew cap from oil filler neck.
• Pull extension tube out of filler neck as
far as it will go.
• Only add the amount of oil needed. The
difference between the "min" and "max" marks on the dipstick is about
1
U.S. quart
or
1
liter. Always select a quality oil
with
the
correct specification. See "Lubricants" on
page
85.
Do not exceed the MAX
marking.
Otherwise,
the excess oil may be drawn in
through the crankcase breather into the exhaust system. The oil would then burn in
the catalytic converter and cause dam
age.
•
Push
in the extension tube, replace fil
ler cap and hand tighten securely.
WARNING
The oil
filler
cap
must
be secure to avoid oil spill causing
fire
hazard.
www.westfaliaT3.info - a useful website for owners and enthusiasts of VW Westfalia T25 / T3 Campervans
Page 121 of 165
Downloaded from www.Manualslib.com manuals search engine
VEHICLE CARE
Tire
care
Inspect your tires at least every 2,000
miles (3,000 km) for wear and damage.
WARNING
• Avoid
damaging
tires
and
wheel
rims.
If you
must
drive
over
a
curb
or
other
obstacle,
drive
slowly
and at an
angle.
Frequently
check
tires
for un
even
wear
and
damage.
•
Remove
imbedded
material.
•
Replace
worn
or
damaged
tires
immediately.
•
Replace
missing
valve
dust
caps.
• Keep oil,
fuel,
brake
fluid,
etc.
away
from
tires.
• Keep
tires
inflated
correctly.
• Mark tires before removing them.
Remount tires on the same vehicle side
because
the rotation direction should stay
the same.
• Store removed tires in a
cool,
dry and
preferably dark place. Tires which are not
on wheels should be stored standing up.
Tires
age even if they are not being
used.
Tires
which are older than 6 years should only be used cautiously in an emergency.
Wheels
and
tire
replacement
Wheels
and tires approved by the manu
facturer have been specially matched to
your vehicle and contribute largely to the road-holding and driving characteristics of
the vehicle.
• Fitting and repairing tires requires
expert knowledge and special tools. This
work should only be performed by a
spe
cialist.
• For safety reasons, tires should be
replaced
in pairs and not individually. The
tires
with
the deepest tread should always be mounted on the
front
wheels.
• In the interest of maximum safety and
best all-around vehicle handling, always
buy replacement radial tires
that
have the
same
specifications
with
regard to
tire
size,
design, load carrying capacity, tread pattern, tread depth etc. This also applies
to Volkswagen recommended alternate replacement tires.
• Never mount used tires if you are not
sure of their previous history.
• Whenever replacing a tubeless tire,
always install a new valve stem. Tire repair
should only be performed by a specialist.
WARNING
•
Never
mix
tires
of
different
design
such as
steel
belted
radials
with
radial
bias
belted
or
bias
ply
tires
etc.
Mixing
tire
types
will
adversely
affect
road
holding
and can
lead
to loss of
vehicle
control
and
personal
injury.
• New
tires
do not possess
maximum
traction.
They
tend
to be
slippery.
Break
new
tires
in by
driving
cautiously
at
moderate
speed for the
first
100
miles
(160
kilometers).
Applies
additionally
to the Syncro:
All
four wheels on the vehicle must always have tires of the same
size,
construction
and tread type so
that
the viscous coupling
does
not abnormally activate the
front
wheel drive. Different tires on the
front
or rear wheels exert additional stress on the
drive
train
components, causing increa
sed
tire
wear and impair vehicle control.
www.westfaliaT3.info - a useful website for owners and enthusiasts of VW Westfalia T25 / T3 Campervans