1990 VOLKSWAGEN TRANSPORTER AUX
[x] Cancel search: AUXPage 6 of 165
Downloaded from www.Manualslib.com manuals search engine
INSTRUMENT PANEL AND CONTROLS
page
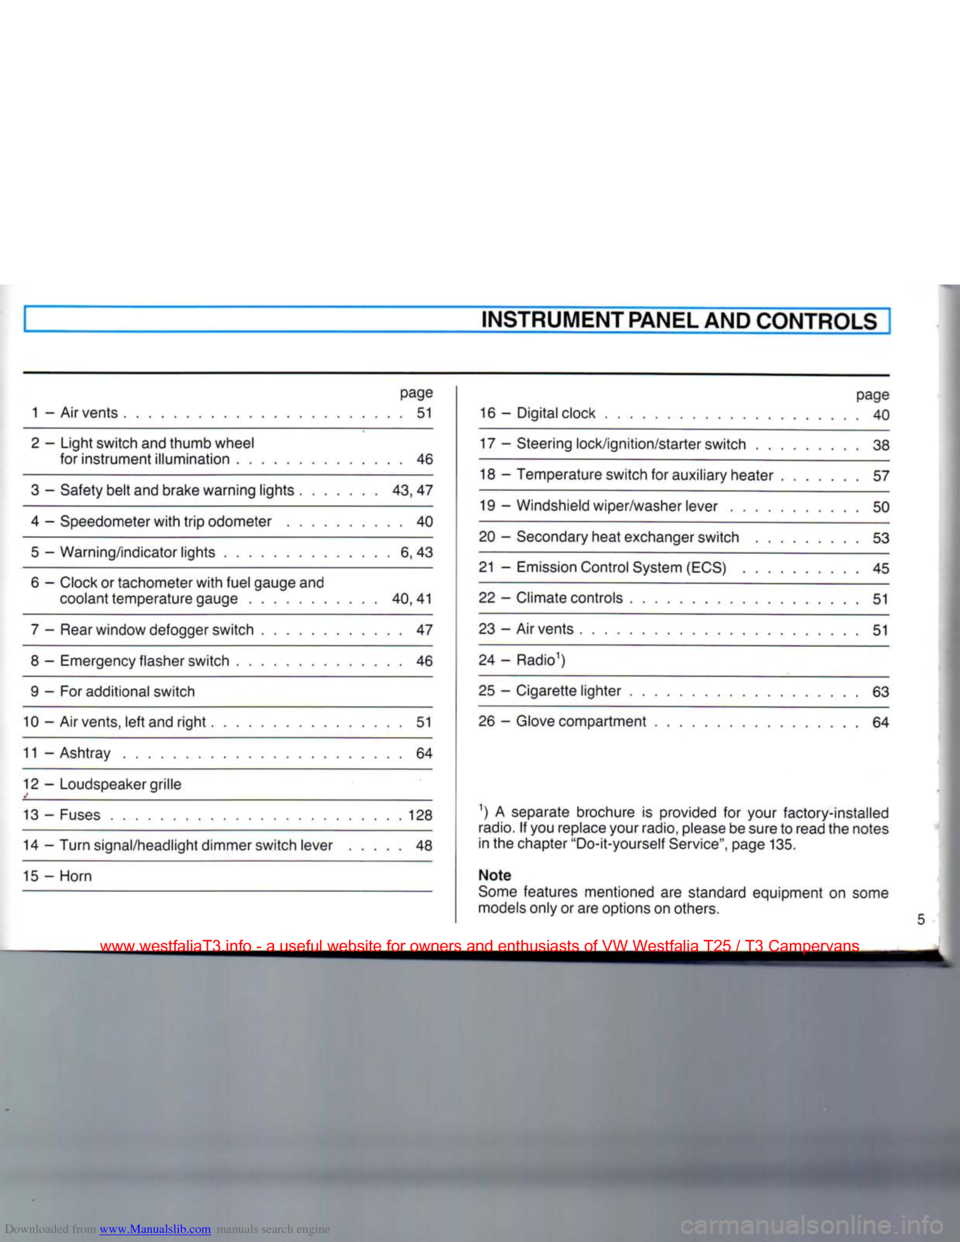
1 - Air vents 51
2 - Light switch and thumb wheel for instrument illumination 46
3 - Safety belt and brake warning lights 43, 47
4 - Speedometer with trip odometer 40 5 — Warning/indicator lights 6, 43
6 - Clock or tachometer with fuel gauge and coolant temperature gauge 40,41
7 - Rear window defogger switch 47
8 - Emergency flasher switch 46 9 - For additional switch
10 - Air vents, left and right 51
11 - Ashtray 64
12 - Loudspeaker grille
13 - Fuses 128 14 - Turn signal/headlight dimmer switch lever 48
15 - Horn page
16 - Digital clock 40
17 - Steering lock/ignition/starter switch 38
18 - Temperature switch for auxiliary heater 57
19 - Windshield wiper/washer lever 50
20 - Secondary heat exchanger switch 53
21 - Emission Control System (ECS) 45
22 - Climate controls 51
23 - Air vents 51
24 - Radio1)
25 - Cigarette lighter 63 26 - Glove compartment 64
1) A separate brochure is provided for your factory-installed
radio.
If you replace your radio, please be sure to read the notes
in the chapter "Do-it-yourself Service", page 135.
Note
Some features mentioned are standard equipment on some
models only or are options on others.
www.westfaliaT3.info - a useful website for owners and enthusiasts of VW Westfalia T25 / T3 Campervans
Page 58 of 165
Downloaded from www.Manualslib.com manuals search engine
AUXILIARY HEATER*
CONTROLS AND EQUIPMENT
~jrn the auxiliary heater on and off with the :amperature switch, located on the right of
fee steering column. Use the same switch
ID
regulate the heat.
depending on vehicle model, the warm air
lows from the footwell vents for the pas senger compartment and/or from a con-
tollable vent under the driving seat. The a r distribution cannot be controlled.
While driving, the heater can be operated rontinuously. When the engine is not run-
-:ng,
the heater will shut off automatically
after 10 minutes to save battery power.
"he auxiliary heater is running on fuel from our fuel tank. Fuel consumption varies
according to operating conditions and
-eat output (approx. 1 US qt or one liter
zer hour). 0
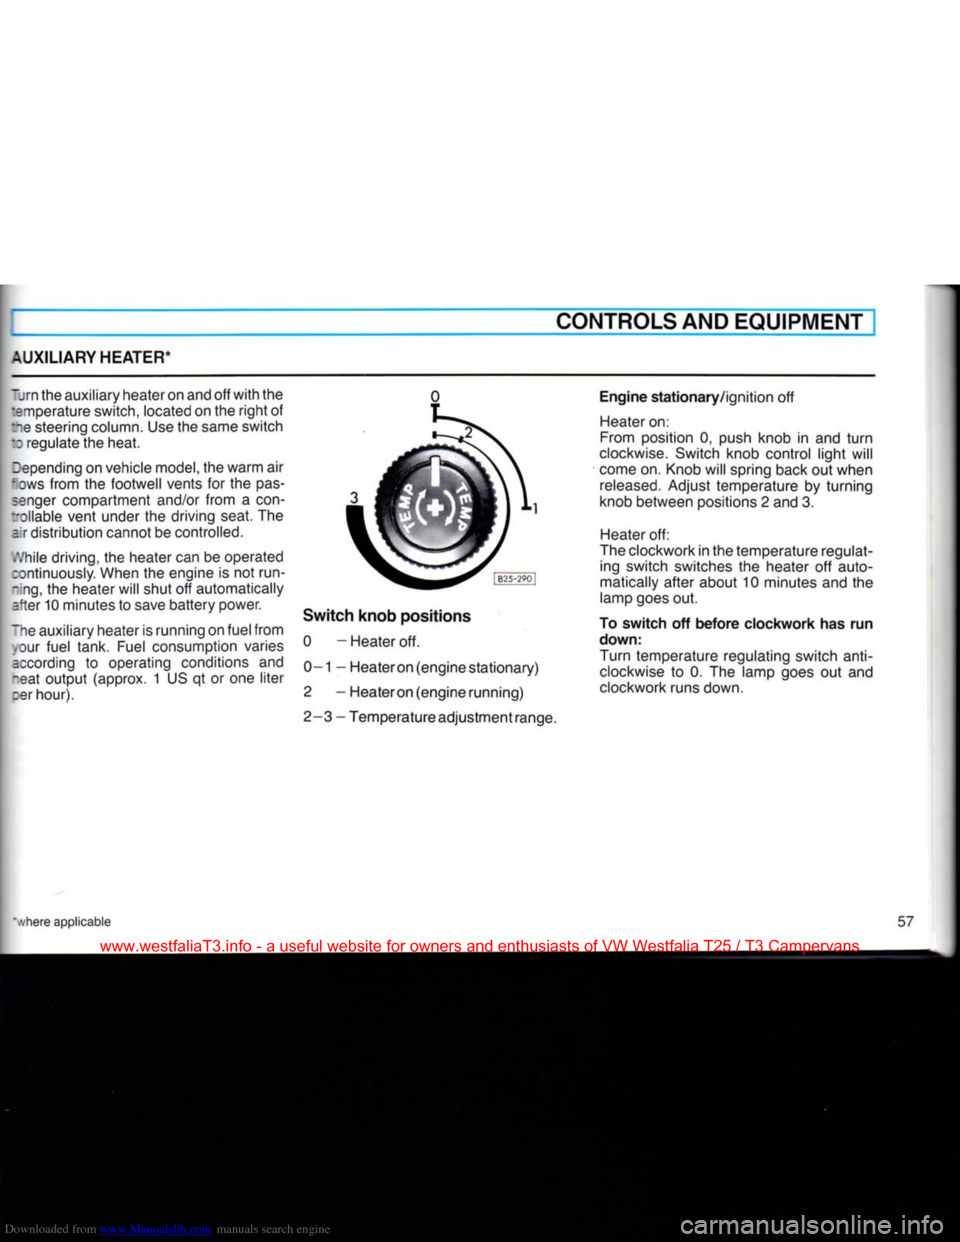
Switch knob positions 0 - Heater off.
0—1 — Heateron (engine stationary)
2 - Heateron (engine running)
2-3 - Temperature adjustment range. Engine stationary/ignition off
Heater on:
From position 0, push knob in and turn
clockwise. Switch knob control light will
come on. Knob will spring back out when
released.
Adjust temperature by turning
knob between positions 2 and 3.
Heater off:
The clockwork in the temperature regulat ing switch switches the heater off auto
matically after about 10 minutes and the
lamp goes out.
To switch off before clockwork has run
down:
Turn temperature regulating switch
anti
clockwise to 0. The lamp goes out and
clockwork runs down.
www.westfaliaT3.info - a useful website for owners and enthusiasts of VW Westfalia T25 / T3 Campervans
Page 60 of 165
Downloaded from www.Manualslib.com manuals search engine
CONTROLS AND EQUIPMENT
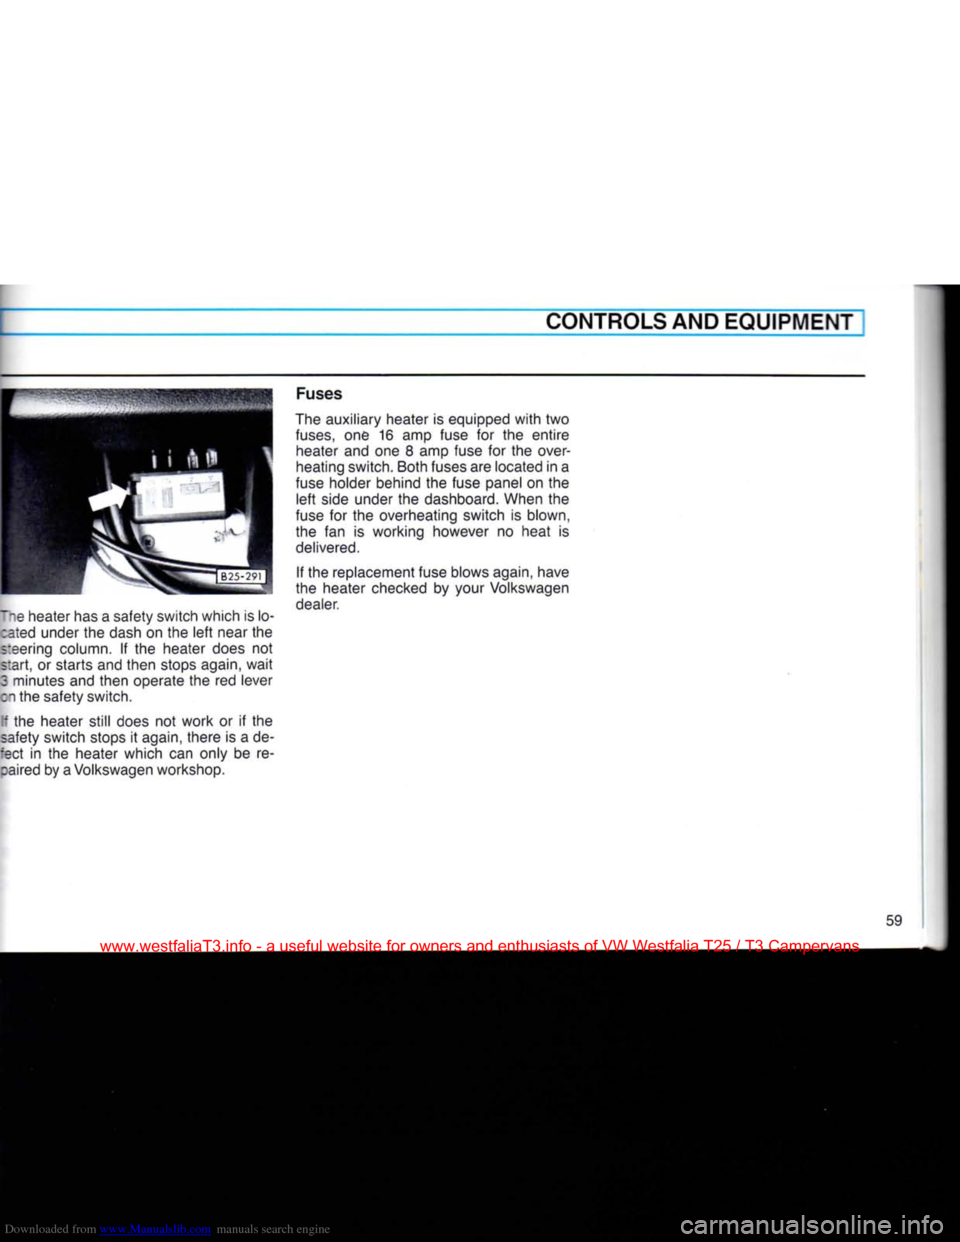
lie heater has a safety switch which is lo- :ated under the dash on the left near the
steering column. If the heater does not
start, or starts and then stops again, wait
3 minutes and then operate the red lever
on the safety switch.
[f the heater still does not work or if the
safety switch stops it again, there is a de-
:ect in the heater which can only be re- :aired by a Volkswagen workshop. Fuses
The auxiliary heater is equipped with two
fuses,
one 16 amp fuse for the entire heater and one 8 amp fuse for the over
heating switch. Both fuses are located in a
fuse holder behind the fuse panel on the left side under the dashboard. When the
fuse for the overheating switch is blown,
the fan is working however no heat is
delivered.
If the replacement fuse blows again, have
the heater checked by your Volkswagen dealer.
59
www.westfaliaT3.info - a useful website for owners and enthusiasts of VW Westfalia T25 / T3 Campervans
Page 61 of 165
Downloaded from www.Manualslib.com manuals search engine
I
CONTROLS AND EQUIPMENT
AUXILIARY HEATER* (Syncro models only)
The auxiliary heater* heats the coolant in the heating circuit and supplies the heat exchanger in the normal heating system
and the additional heat exchanger* for the
passenger compartment heating with heated coolant.
The system is switched off and on or the
switch-
on time preselected by means of a
switch and indicator unit located on the left under the instrument panel.
Air distribution and regulation is done with the controls of the normal heating and
ven
tilation system (see "Ventilation/Heating"
on page 51).
The auxiliary heater can be used with vehicle stationary or when it is moving.
When vehicle is stationary, the heater only runs for a maximum of 30 minutes in order
to avoid draining the battery. It also switches off automatically when a coolant
temperature of 80° C (175° F) is reached.
When the coolant temperature drops below 70° C (158° F) the heater is automatically switched on again. The heater runs on fuel from the vehicle
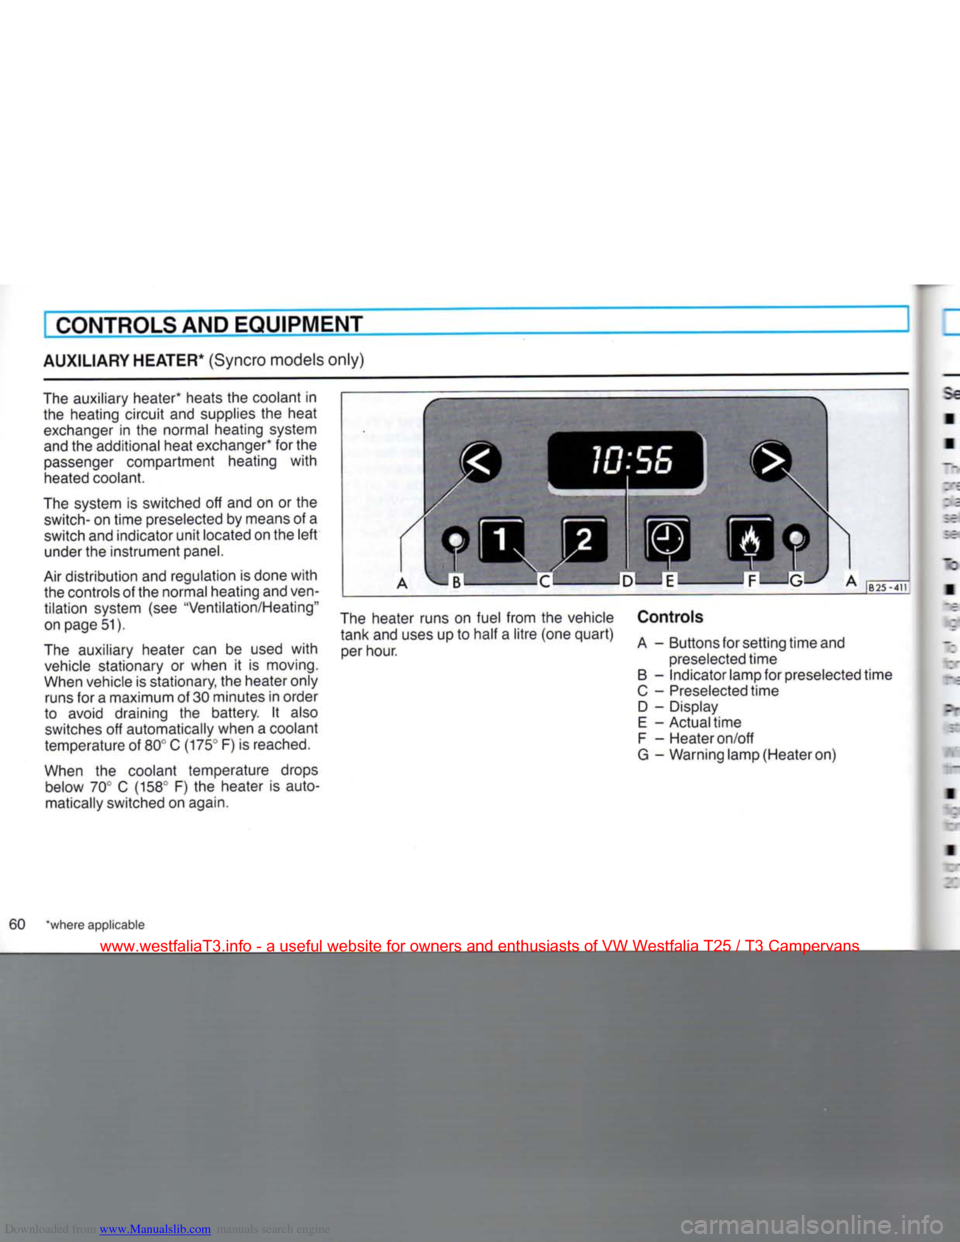
tank and uses up to half a litre (one quart) per hour. Controls
A - Buttons for setting time and
preselected time
B - Indicator lamp for preselected time
C - Preselected time D - Display
E - Actual time
F - Heater on/off
G - Warning lamp (Heater on)
60 "where applicable
www.westfaliaT3.info - a useful website for owners and enthusiasts of VW Westfalia T25 / T3 Campervans
Page 62 of 165

Downloaded from www.Manualslib.com manuals search engine
CONTROLS AND EQUIPMENT
Setting
the
time
•
Press
and hold clock button E.
• Set clock
with
buttons A.
The
display lights up as long as button is
oressed.
When button is released the dis
play goes out or, if a time has been pre
selected,
the selected time lights up for 2
sees.
To
switch
heater
on or off • This is done by pressing button
F.
When
-eater is switched on the warning lamp G ghts up.
To
ensure
that
the heater starts the lever ;or the heat output must be pushed fully to
:ie
right.
This
closes
an electrical contact.
Preselecting
starting
time
for
heater
stationary operation, ignition off)
With buttons C two different switch-on
:imes
can be selected within 24 hours.
•
Press
and hold button. The appropriate
*:gure 1 or 2 appears in display. The ready- •or-action lamp lights up.
• Set required switch-on time
with
but
tons A. The display remains on for about 20 seconds after releasing button C.
To
ensure
that
the heater starts up at the
selected
time, the lever for the heat output must be pushed fully over to the
right.
In
addition to this the blower must be
switched to Stage 1. On account of the higher current consumption, a higher
stage
should only be selected in isolated
cases.
Switching
preselected
time
off • The preselected time can be switched
off by briefly pressing the appropriate but
ton C. The ready-for-action lamp and the figure in display then go out.
Fuses
The
fuses for the auxiliary heater are in an additional holder behind the main fuse
box.
Notes
• Every time the heater is switched off,
the warm air and combustion air blowers
continue running briefly to cool the heater
down quicker.
• To avoid draining the battery, do not run
the heater repeatedly when the engine is not running.
• When driving through mud and snow,
the exhaust pipe may tend to get blocked.
Have
a look at it occasionally to see
that
it
is
clear.
WARNING
Never
start
the
heater
or let the
engine
or the
heater
run in an enclosed,
unventilated
area.
Exhaust
fumes
from
the
engine
or the
heater
contain
carbon monoxide,
which
is colorless and odor
less.
Carbon monoxide,
however
is a
very
harmful
gas, and may be
fatal
if in haled.
Due to the
risk
of
fire
the
heater
must
not be used
when
vehicle
is
parked
on
dry grass, brush or leaves.
www.westfaliaT3.info - a useful website for owners and enthusiasts of VW Westfalia T25 / T3 Campervans
Page 114 of 165
Downloaded from www.Manualslib.com manuals search engine
VEHICLE CARE
3ATTERY
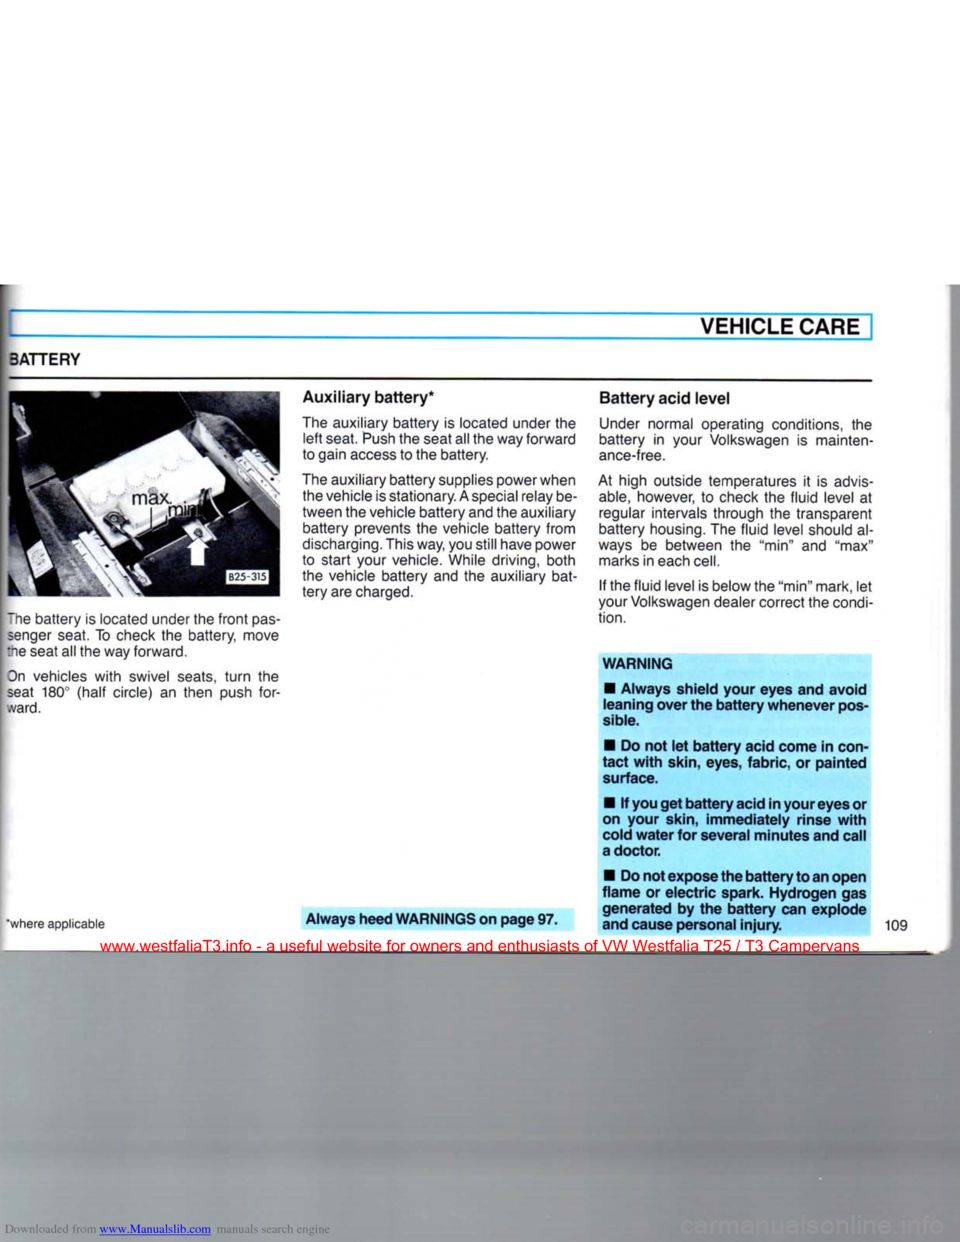
~he battery
is
located under the
front
pas
senger
seat.
To
check
the
battery, move
lie
seat all the way forward.
On
vehicles
with
swivel seats,
turn
the
seat
180°
(half circle)
an
then push
for
ward.
Auxiliary
battery*
The
auxiliary battery
is
located under
the
left
seat.
Push
the
seat all the way forward
to gain
access
to
the battery.
The
auxiliary battery supplies power when the vehicle is stationary.
A
special relay be
tween the vehicle battery and
the
auxiliary battery prevents
the
vehicle battery from
discharging.
This way, you still have power
to start your vehicle. While driving, both
the vehicle battery
and the
auxiliary bat
tery are charged.
'where applicable
Always heed WARNINGS on page 97. Battery acid level
Under
normal operating conditions,
the
battery
in
your Volkswagen
is
mainten
ance-free.
At high outside temperatures
it is
advis
able,
however,
to
check
the
fluid level
at
regular intervals through
the
transparent
battery housing. The fluid level should
al
ways
be
between
the "min" and "max"
marks
in
each
cell.
If
the fluid level
is
below the "min" mark,
let
your Volkswagen dealer correct
the
condi
tion.
WARNING
•
Always shield your eyes and avoid
leaning over the
battery
whenever
pos
sible.
•
Do not let
battery
acid come in
con
tact
with
skin,
eyes, fabric, or painted
surface.
•
If
you
get
battery
acid
in
your eyes or
on
your
skin,
immediately rinse
with
cold
water
for several minutes and call a doctor.
•
Do not expose the
battery
to an open
flame
or electric spark. Hydrogen gas generated by the
battery
can explode
and cause personal injury.
109
www.westfaliaT3.info - a useful website for owners and enthusiasts of VW Westfalia T25 / T3 Campervans
Page 134 of 165

Downloaded from www.Manualslib.com manuals search engine
DO-IT-YOURSELF-SERVICE
Fuse arrangement No. Component Amp. No. Component Amp.
From left to right: 1
Radiator fan 30 17 Windshield wiperengine 10
2 Brake lights 10
18 Brake warning light,
3 Interior lights, illuminated heated driver's seat,
Make-up mirror, clock,
ciga
cruise control system 10
rette lighter, radio 15 19 Turn signals 10
4 Emergency flasher system 15 20 Number plate light,
5 Vacant headlight washer
10
6 Vacant 21 Low beam left
10
7 Tail and side light left 10
22 Low beam right 10
8 Tail and side light right
10
9 High beam right 10
10 High beam left
10 Additional fuses
11 Windshield wipers and washer
15 (in separate holders)
12 Cruise control system
Air conditioner, power above the fuse box:
windows, auxiliary heater, Instrument lightning
10
electric outside mirrors, Overheating fuse for auxiliary heater
10
auxiliary heat exchanger, Main fuse for auxiliary heater
20
rear window wiper 20 Central locking 20
13 Fresh air fan
20 Automatic fuse for window lifter
20
14 Rear window heating, heated
rear view mirror, light for Color codes
15
16 lighting switch
Back-up lights
Double tone horn 20
10
15 10 Amp. fuses - red
15 Amp. fuses - blue
15
16 lighting switch
Back-up lights
Double tone horn 20
10
15 20 Amp. fuses - yellow
30 Amp. fuses - green
The number on the face of the fuse is the amperage rating.
www.westfaliaT3.info - a useful website for owners and enthusiasts of VW Westfalia T25 / T3 Campervans
Page 135 of 165
Downloaded from www.Manualslib.com manuals search engine
DO-IT-YOURSELF-SERVICE
REPLACING BULBS
Before starting to replace a bulb, switch off
the respective circuit.
Do not touch the glass part of the new bulb
with bare fingers. Finger prints left on the
glass evaporate when the bulb gets hot,
the vapor settles on the reflector surface and dims it.
Always use the same
type
of bulb. The designation is marked on the bulb.
It is advisable to always
carry
a box of
spare bulbs in the vehicle. Bulbs can be
obtained from any VW dealer.
It should contain, at least, the following
bulbs which are important for traffic safety:
12V/70/50W
- Headlight
12V/21
/5W -
Front
turn
signal and
front
side marker light
12V/21W
- Rear
turn
signal
12V/3W
- Rear side marker light
12V/21/5W
- Brake and tail lights
12V/4W
- Licence plate light Headlights
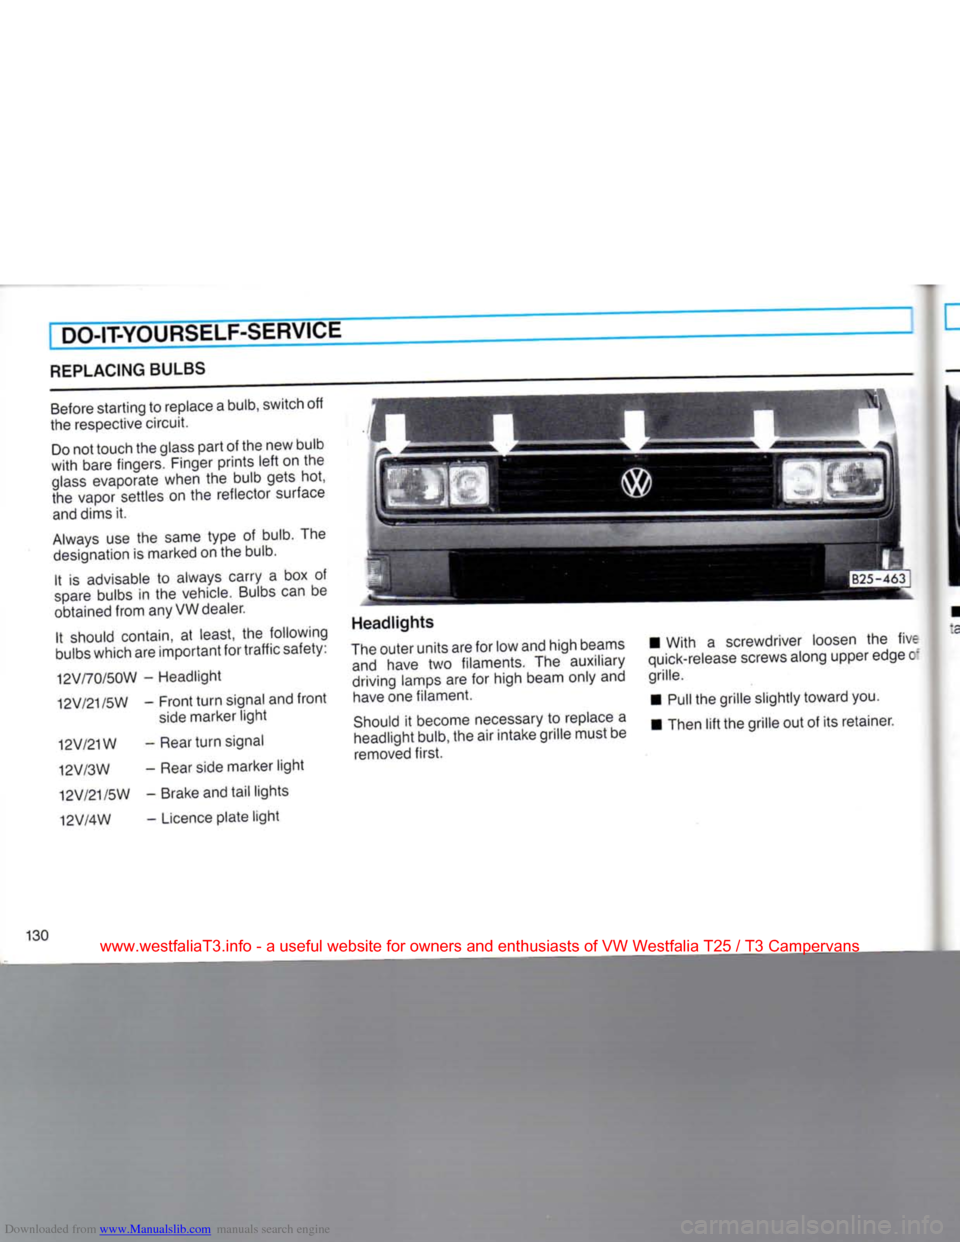
The outer units are for low and high beams and have two filaments. The auxiliary
driving lamps are for high beam only and have one filament.
Should it become necessary to replace a
headlight bulb, the air intake grille must be
removed first. • With a screwdriver loosen the five
quick-release screws along upper edge c
grille.
•
Pull
the grille slightly toward you.
•
Then
lift the grille out of its retainer.
130
www.westfaliaT3.info - a useful website for owners and enthusiasts of VW Westfalia T25 / T3 Campervans