1990 VOLKSWAGEN CORRADO heater
[x] Cancel search: heaterPage 587 of 906

HEATER SYSTEM
Article Text (p. 7)
1990 Volkswagen Corrado
For Volkswagen Technical Site: http://vw.belcom.ru
Copyright © 1998 Mitchell Repair Information Company, LLC
Thursday, March 23, 2000 09:45PM
END OF ARTICLE
Page 670 of 906

MIRRORS - POWER
Article Text (p. 4)
1990 Volkswagen Corrado
For Volkswagen Technical Site: http://vw.belcom.ru
Copyright © 1998 Mitchell Repair Information Company, LLC
Thursday, March 23, 2000 09:49PM
Removal & Installation
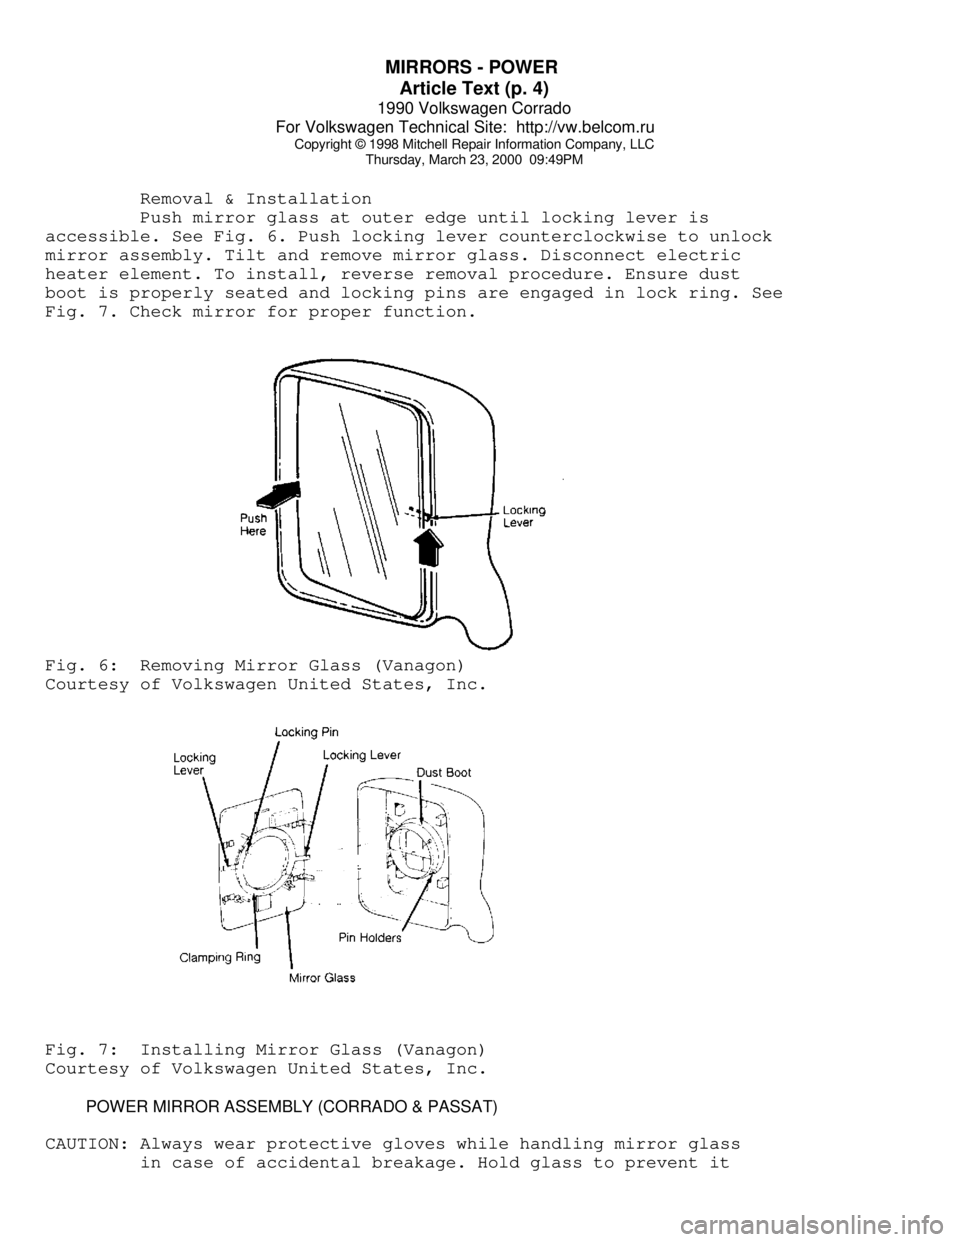
Push mirror glass at outer edge until locking lever is
accessible. See Fig. 6. Push locking lever counterclockwise to unlock
mirror assembly. Tilt and remove mirror glass. Disconnect electric
heater element. To install, reverse removal procedure. Ensure dust
boot is properly seated and locking pins are engaged in lock ring. See
Fig. 7. Check mirror for proper function.Fig. 6: Removing Mirror Glass (Vanagon)
Courtesy of Volkswagen United States, Inc.Fig. 7: Installing Mirror Glass (Vanagon)
Courtesy of Volkswagen United States, Inc.
POWER MIRROR ASSEMBLY (CORRADO & PASSAT)
CAUTION: Always wear protective gloves while handling mirror glass
in case of accidental breakage. Hold glass to prevent it
Page 776 of 906

TRANSMISSION SERVICING - M/T
Article Text (p. 7)
1990 Volkswagen Corrado
For Volkswagen Technical Site: http://vw.belcom.ru
Copyright © 1998 Mitchell Repair Information Company, LLC
Thursday, March 23, 2000 09:52PM
VANAGON (4-SPEED)
1) Place gearshift lever in Neutral position. Align round
centering holes of upper gearshift lever housing plate with holes in
lower lever bearing plate.
2) Loosen nut on clamp that connects front and rear shift
rods. Ensure joints of shift rods slide freely. Remove spare tire. Set
shift lever on transaxle in vertical Neutral position.
3) At gearshift lever end of front shift rod, ensure stop
finger of front shift rod is in center of shift mechanism housing.
4) Adjust front shift rod end so there is 29/32" (23 mm)
clearance between front shift rod end and stop plate. Tighten shift
rod clamp.
5) Check for proper operation. Ensure shift lever does not
rub against heater pipe insulation.
VANAGON (5-SPEED SYNCRO)
1) Place gearshift lever in Neutral position. Align round
centering holes of upper gearshift lever housing plate with holes in
lower lever bearing plate.
2) Loosen nut on clamp that connects front and rear shift
rods. Ensure joints of shift rods slide freely. Remove skid plate.
Place shift lever on transaxle in vertical Neutral position.
3) Measure distance between reverse gear lock and stop shift
rod. Clearance should be 29/32" (23 mm). Tighten clamp in this
position. Ensure all gears engage without jamming. Check reverse
lockout operation. With transmission in 1st gear, measure distance
between gear shift lever and heater covering. Clearance should be
19/32" (15 mm).
END OF ARTICLE
Page 777 of 906

TROUBLE SHOOTING - BASIC PROCEDURES
Article Text
1990 Volkswagen Corrado
For Volkswagen Technical Site: http://vw.belcom.ru
Copyright © 1998 Mitchell Repair Information Company, LLC
Thursday, March 23, 2000 09:52PM
ARTICLE BEGINNING
GENERAL TROUBLE SHOOTING
AIR CONDITIONING TROUBLE SHOOTING
WARNING: This is GENERAL information. This article is not intended
to be specific to any unique situation or individual vehicle
configuration. The purpose of this Trouble Shooting
information is to provide a list of common causes to
problem symptoms. For model-specific Trouble Shooting,
refer to SUBJECT, DIAGNOSTIC, or TESTING articles available
in the section(s) you are accessing.
BASIC AIR CONDITIONING TROUBLE SHOOTING CHARTÄÄÄÄÄÄÄÄÄÄÄÄÄÄÄÄÄÄÄÄÄÄÄÄÄÄÄÄÄÄÄÄÄÄÄÄÄÄÄÄÄÄÄÄÄÄÄÄÄÄÄÄÄÄÄÄÄÄÄÄÄÄÄÄÄÄÄÄÄÄCONDITION POSSIBLE CAUSE
ÄÄÄÄÄÄÄÄÄÄÄÄÄÄÄÄÄÄÄÄÄÄÄÄÄÄÄÄÄÄÄÄÄÄÄÄÄÄÄÄÄÄÄÄÄÄÄÄÄÄÄÄÄÄÄÄÄÄÄÄÄÄÄÄÄÄÄÄÄÄCompressor Not Working
ù Compressor clutch circuit open.
ù Compressor clutch coil inoperative.
ù Poor clutch ground connection.
ù Fan belts loose.
ù Thermostatic switch inoperative.
ù Thermostatic switch not adjusted.
ù Ambient temperature switch open.
ù Superheat fuse blown.
ÄÄÄÄÄÄÄÄÄÄÄÄÄÄÄÄÄÄÄÄÄÄÄÄÄÄÄÄÄÄÄÄÄÄÄÄÄÄÄÄÄÄÄÄÄÄÄÄÄÄÄÄÄÄÄÄÄÄÄÄÄÄÄÄÄÄÄÄÄÄExcessive Noise or Vibration
ù Missing or loose mounting bolts.
ù Bad idler pulley bearings.
ù Fan belts not tightened correctly.
ù Compressor clutch contacting body.
ù Excessive system pressure.
ù Compressor oil level low.
ù Damaged clutch bearings.
ù Damaged reed valves.
ù Damaged compressor.
ÄÄÄÄÄÄÄÄÄÄÄÄÄÄÄÄÄÄÄÄÄÄÄÄÄÄÄÄÄÄÄÄÄÄÄÄÄÄÄÄÄÄÄÄÄÄÄÄÄÄÄÄÄÄÄÄÄÄÄÄÄÄÄÄÄÄÄÄÄÄInsufficient or No Cooling;
Compressor Working
ù Expansion valve inoperative.
ù Heater control valve stuck open.
ù Low system pressure.
ù Blocked condenser fins.
ù Blocked evaporator fins.
ù Vacuum system leak.
ù Vacuum motors inoperative.
ù Control cables improperly adjusted.
ù Restricted air inlet.
ù Mode doors binding.
ù Blower motor inoperative.
ù Temperature above system capacity.
ÄÄÄÄÄÄÄÄÄÄÄÄÄÄÄÄÄÄÄÄÄÄÄÄÄÄÄÄÄÄÄÄÄÄÄÄÄÄÄÄÄÄÄÄÄÄÄÄÄÄÄÄÄÄÄÄÄÄÄÄÄÄÄÄÄÄÄÄÄÄ
Page 792 of 906

TROUBLE SHOOTING - BASIC PROCEDURES
Article Text (p. 16)
1990 Volkswagen Corrado
For Volkswagen Technical Site: http://vw.belcom.ru
Copyright © 1998 Mitchell Repair Information Company, LLC
Thursday, March 23, 2000 09:52PM
Leaky Thermostat Cover Replace Thermostat
Cover
Cylinder Head Problem Check Head/Head Gasket
Leaky Freeze Plugs Replace Freeze PlugsÄÄÄÄÄÄÄÄÄÄÄÄÄÄÄÄÄÄÄÄÄÄÄÄÄÄÄÄÄÄÄÄÄÄÄÄÄÄÄÄÄÄÄÄÄÄÄÄÄÄÄÄÄÄÄÄÄÄÄÄÄÄÄÄÄÄÄÄÄÄRecovery System Inoperative
Loose and/or Defective
Radiator Cap Replace Radiator Cap
Overflow Tube Clogged
and/or Leaking Repair Tube
Recovery Bottle Vent
Restricted Clean Vent
ÄÄÄÄÄÄÄÄÄÄÄÄÄÄÄÄÄÄÄÄÄÄÄÄÄÄÄÄÄÄÄÄÄÄÄÄÄÄÄÄÄÄÄÄÄÄÄÄÄÄÄÄÄÄÄÄÄÄÄÄÄÄÄÄÄÄÄÄÄÄNo Heater Core Flow
Collapsed Heater Hose Replace Heater Hose
Plugged Heater Core Clean/Replace Heater
Core
Faulty Heater Valve Replace Heater Valve
ÄÄÄÄÄÄÄÄÄÄÄÄÄÄÄÄÄÄÄÄÄÄÄÄÄÄÄÄÄÄÄÄÄÄÄÄÄÄÄÄÄÄÄÄÄÄÄÄÄÄÄÄÄÄÄÄÄÄÄÄÄÄÄÄÄÄÄÄÄÄ DIESEL ENGINE TROUBLE SHOOTING
WARNING: This is GENERAL information. This article is not intended
to be specific to any unique situation or individual vehicle
configuration. The purpose of this Trouble Shooting
information is to provide a list of common causes to
problem symptoms. For model-specific Trouble Shooting,
refer to SUBJECT, DIAGNOSTIC, or TESTING articles available
in the section(s) you are accessing.
NOTE: Diesel engines mechanical diagnosis is the same as gasoline
engines for items such as noisy valves, bearings, pistons,
etc. The following trouble shooting covers only items
pertaining to diesel engines.
BASIC DIESEL ENGINE TROUBLE SHOOTING CHART
ÄÄÄÄÄÄÄÄÄÄÄÄÄÄÄÄÄÄÄÄÄÄÄÄÄÄÄÄÄÄÄÄÄÄÄÄÄÄÄÄÄÄÄÄÄÄÄÄÄÄÄÄÄÄÄÄÄÄÄÄÄÄÄÄÄÄÄÄÄÄCONDITION POSSIBLE CAUSE CORRECTION
ÄÄÄÄÄÄÄÄÄÄÄÄÄÄÄÄÄÄÄÄÄÄÄÄÄÄÄÄÄÄÄÄÄÄÄÄÄÄÄÄÄÄÄÄÄÄÄÄÄÄÄÄÄÄÄÄÄÄÄÄÄÄÄÄÄÄÄÄÄÄEngine Won't Bad battery connections Check connections
Crank or dead batteries and/or replace
batteries
Bad starter connections Check connections
or bad starter and/or replace
batteries
Page 809 of 906

TROUBLE SHOOTING - BASIC PROCEDURES
Article Text (p. 33)
1990 Volkswagen Corrado
For Volkswagen Technical Site: http://vw.belcom.ru
Copyright © 1998 Mitchell Repair Information Company, LLC
Thursday, March 23, 2000 09:52PM
Improper connecting rod Remove and realign
alignment connecting rods
Excessively worn ring Replace pistons, See
grooves ENGINES
Improperly assembled Re-assemble pin-to
piston pins -piston, See ENGINES
Insufficient ring gap Install new rings, See
clearance ENGINES
Engine overheating Check cooling system
Incorrect ignition timing Re-adjust ignition
timing, See TUNE-UPÄÄÄÄÄÄÄÄÄÄÄÄÄÄÄÄÄÄÄÄÄÄÄÄÄÄÄÄÄÄÄÄÄÄÄÄÄÄÄÄÄÄÄÄÄÄÄÄÄÄÄÄÄÄÄÄÄÄÄÄÄÄÄÄÄÄÄÄÄÄExcessive Leaks at manifold to Replace manifold or
Exhaust Noise head, or to pipe pipe gasket
Exhaust manifold Replace exhaust
cracked or broken manifold, See ENGINES
ÄÄÄÄÄÄÄÄÄÄÄÄÄÄÄÄÄÄÄÄÄÄÄÄÄÄÄÄÄÄÄÄÄÄÄÄÄÄÄÄÄÄÄÄÄÄÄÄÄÄÄÄÄÄÄÄÄÄÄÄÄÄÄÄÄÄÄÄÄÄ HEATER SYSTEM TROUBLE SHOOTING
WARNING: This is GENERAL information. This article is not intended
to be specific to any unique situation or individual vehicle
configuration. The purpose of this Trouble Shooting
information is to provide a list of common causes to
problem symptoms. For model-specific Trouble Shooting,
refer to DIAGNOSTIC, or TESTING articles available in the
section(s) you are accessing.
BASIC HEATER SYSTEM TROUBLE SHOOTING CHART
ÄÄÄÄÄÄÄÄÄÄÄÄÄÄÄÄÄÄÄÄÄÄÄÄÄÄÄÄÄÄÄÄÄÄÄÄÄÄÄÄÄÄÄÄÄÄÄÄÄÄÄÄÄÄÄÄÄÄÄÄÄÄÄÄÄÄÄÄÄÄCONDITION POSSIBLE CAUSE
ÄÄÄÄÄÄÄÄÄÄÄÄÄÄÄÄÄÄÄÄÄÄÄÄÄÄÄÄÄÄÄÄÄÄÄÄÄÄÄÄÄÄÄÄÄÄÄÄÄÄÄÄÄÄÄÄÄÄÄÄÄÄÄÄÄÄÄÄÄÄInsufficient, Erratic,
or No Heat
ù Low Coolant Level
ù Incorrect thermostat.
ù Restricted coolant flow through
heater core.
ù Heater hoses plugged.
ù Misadjusted control cable.
ù Sticking heater control valve.
ù Vacuum hose leaking.
ù Vacuum hose blocked.
ù Vacuum motors inoperative.
ù Blocked air inlet.
ù Inoperative heater blower motor.
ù Oil residue on heater core fins.
ù Dirt on heater core fins.
ÄÄÄÄÄÄÄÄÄÄÄÄÄÄÄÄÄÄÄÄÄÄÄÄÄÄÄÄÄÄÄÄÄÄÄÄÄÄÄÄÄÄÄÄÄÄÄÄÄÄÄÄÄÄÄÄÄÄÄÄÄÄÄÄÄÄÄÄÄÄToo Much Heat
ù Improperly adjusted cables.
ù Sticking heater control valve.
ù No vacuum to heater control valve.
ù Temperature door stuck open.
Page 894 of 906

WIRING DIAGRAM SYMBOLS
Article Text (p. 4)
1990 Volkswagen Corrado
For Volkswagen Technical Site: http://vw.belcom.ru
Copyright © 1998 Mitchell Repair Information Company, LLC
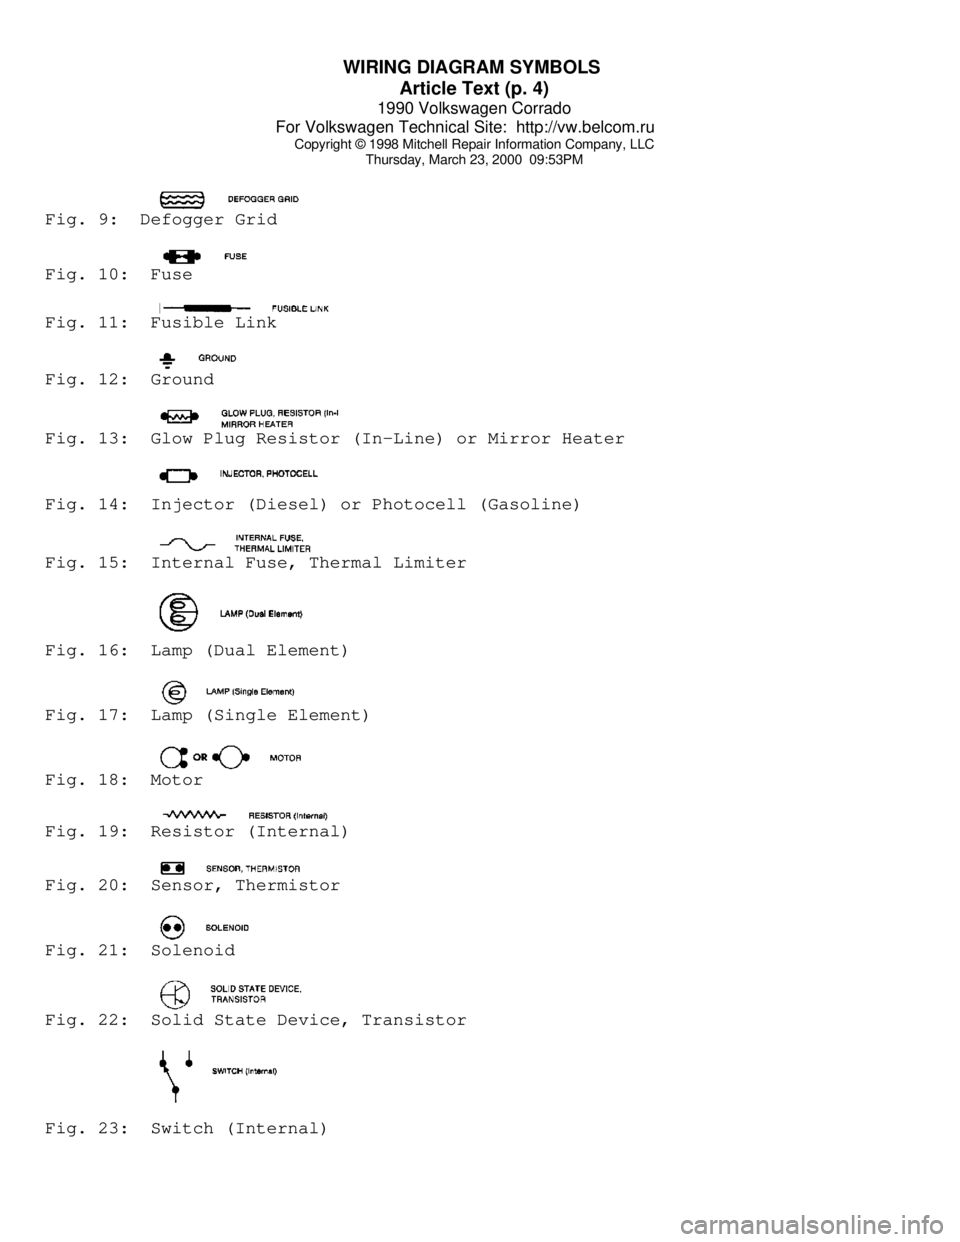
Thursday, March 23, 2000 09:53PMFig. 9: Defogger GridFig. 10: FuseFig. 11: Fusible LinkFig. 12: GroundFig. 13: Glow Plug Resistor (In-Line) or Mirror HeaterFig. 14: Injector (Diesel) or Photocell (Gasoline)Fig. 15: Internal Fuse, Thermal LimiterFig. 16: Lamp (Dual Element)Fig. 17: Lamp (Single Element)Fig. 18: MotorFig. 19: Resistor (Internal)Fig. 20: Sensor, ThermistorFig. 21: SolenoidFig. 22: Solid State Device, TransistorFig. 23: Switch (Internal)
Page 897 of 906

WIRING DIAGRAMS
Article Text (p. 2)
1990 Volkswagen Corrado
For Volkswagen Technical Site: http://vw.belcom.ru
Copyright © 1998 Mitchell Repair Information Company, LLC
Thursday, March 23, 2000 09:53PM
MAKEUP MIRROR ................................ 9 (E 33-34)
MIRROR HEATERS .................................. 9 (B 33)
MULTI-FUNCTION MEMORY & IND RECALL SWITCH ....... 5 (A 19)
O2 SENSOR ........................................ 1 (D 1)
PARK BRAKE SWITCH ............................... 6 (A 23)
POWER MIRROR ............................... 9 (A-B 32-33)
POWER WINDOW ............................... 8 (B-D 28-31)
RADIATOR COOLING FAN ............................. 2 (A 6)
RADIATOR COOLING FAN AFTER RUN CTRL UNIT ......... 2 (A 7)
RADIO (PARTIAL) .............................. 9 (A 33-34)
REAR SPOILER ................................. 6 (A 20-22)
RIGHT SEAT BELT CONTROL UNIT .................... 7 (C 27)
STARTER .......................................... 1 (A 3)
STOP LIGHT SWITCH ............................... 6 (B 21)
SUNROOF SWITCH ............................... 8 (E 28-29)
WIPER SYSTEM ............................... 5 (D-E 16-19)
WASHER NOZZLE HEATER ............................ 5 (E 19)ÄÄÄÄÄÄÄÄÄÄÄÄÄÄÄÄÄÄÄÄÄÄÄÄÄÄÄÄÄÄÄÄÄÄÄÄÄÄÄÄÄÄÄÄÄÄÄÄÄÄÄÄÄÄÄÄÄÄÄÄ WIRING DIAGRAMS