Page 89 of 143

If the level is between the MIN and MAX marks on the dipstick
add a 50/50 solution of antifreeze and water to bring it up to MAX. If there is no coolant visible on the dipstick, the cooling system
should be checked for leaks and repaired if necessary. Coolantmust then be added to the radiator.
CAUTION:
Radiator coolant will damage paint. Quickly rinse any spilled
coolant from painted surfaces.
Wait until the engine is cool, then turn the radiator cap counterclock-wise until it stops. DO NOT PRESS DOWN WHILE TURNING THECAP. After any remaining pressure has been relieved, remove the
cap by pressing down and again turning it counterclockwise. Add
enough coolant to fill the radiator, and reinstall the cap. Be sure to
tighten it securely. Fill the reserve tank up to the MAX mark with
the engine cold.
Maintenance
1. Check the freeze protection level of the coolant with a hydrometer.
2. Keep the front of the radiator free of dirt and debris.
3. Check hoses and hose clamps regularly.
(cont'd)
MAX
MIN
RESERVE TANKProCarManuals.comMain Menu t s
Page 90 of 143

Cooling System (cont'd)
Thermostat The thermostat in the cooling system does not need to be changedfor summer or winter operation. However, for extremely cold
climates, an optional thermostat is available from your Honda dealer.
Replacing CoolantReplace coolant at 36 months or 45,000 miles (72,000 km),
whichever comes first. Thereafter, replace every 2 years or 30,000
miles (48,000 km), whichever comes first.
RADIATOR COOLANT
REFILL CAPACITY:
including reserve tank 0.75 l (0.198 US gal, 0.165 Imp gal)
Manual transmission 2.0 S: 5.15 l (1.361 US gal, 1.133 Imp gal)
2.0 Si,Si: 6.15 l (1.625 US gal, 1.353 Imp gal)
Automatic transmission 2.0S:5.85 l (1.546 US gal, 1.287 Imp gal)
2.0 Si,Si: 6.15 l (1.625 US gal, 1.353 Imp gal)
1. Set the heater temperature lever to maximum heat.
2. Remove the radiator cap and loosen the drain plug when the radiator is cool, and drain the radiator.
RADIATOR
CAP BLEED BOLT
DRAIN BOLT
3. Remove the drain bolt from the front side of the cylinder block, and drain the engine and heater.
4. Apply non-hardening sealant to the drain bolt threads, then reinstall the bolt and tighten it securely.
5. Tighten the radiator drain plug securely.
DRAIN
PLUGProCarManuals.comMain Menu t s
Page 91 of 143
6. Mix the recommended antifreeze with an equal amount of low-
mineral or distilled water and fill the reservoir to maximum, as
illustrated.
7. Loosen the air bleed bolt in the thermostat housing, then fill the radiator to the filler neck with the coolant mixture. Tighten thebleed bolt as soon as coolant starts to run out in a steady stream
without bubbles.
8. With the radiator cap off, start the engine and let it run until warmed up (fan goes on at least twice). Then, if necessary, addmore coolant mixture to bring the level back up to the filter neck.
9. Put the radiator cap on, then run the engine again and check for
leaks.
Fill to
here
Fill to here
FILLER
NECKProCarManuals.comMain Menu t s
Page 92 of 143
Spark Plugs
Spark plugs should be replaced every 24 months or 30,000 miles
(48,000 km), whichever comes first.
Recommended spark plugs: (2.0S)
For all normal driving
BCPR5EY-N11 (NGK) BCPR5E-11 (NGK)
Q16PR-U11 (ND)
For hot climates or continuous high speed driving
BCPR6EY-N11 (NGK) BCPR6E-11 (NGK)
BCPR7EY-N11 (NGK) BCPR7E-11 (NGK)
Q20PR-U11 (ND) Q22PR-U11 (ND)
(2.0Si,Si)
For all normal driving
ZFR5F-11 (NGK) KJ16CR-L11 (ND)
For hot climates or continuous high speed driving ZFR6F-11 (NGK) KJ20CR-L11 (ND)
Keep hands away from the radiator fan. The fan may start
automatically without warning and run for up to 15 minutes, even
after the engine is turned off.
CAUTION:
Never use spark plugs with an improper heat range; they will
adversely affect engine performance and durability.ProCarManuals.comMain Menu t s
Page 93 of 143
Spark Plug Replacement
Replace plugs one at a time, so you don't get the wires mixed up. 1. Clean any dirt from around the spark plug base.
2. Disconnect the spark plug cap, then remove and discard the old
plug.
3. Check the gap of the new spark plugs before installation.
Plug gap should be:
1.1 mm (0.04 in)
4. Thread the new spark plug in by hand to prevent cross-threading.
5. After the plug seats against the cylinder head, tighten 1/2 turn with a spark plug wrench to compress the washer.
6. Reinstall the spark plug cap.
CAUTION:
The spark plugs must be securely tightened, but not overtightened.A plug that's too loose can get very hot and possibly damage the
engine; one that's too tight could damage the threads in thecylinder head.
PLUG CAPProCarManuals.comMain Menu t s
Page 94 of 143
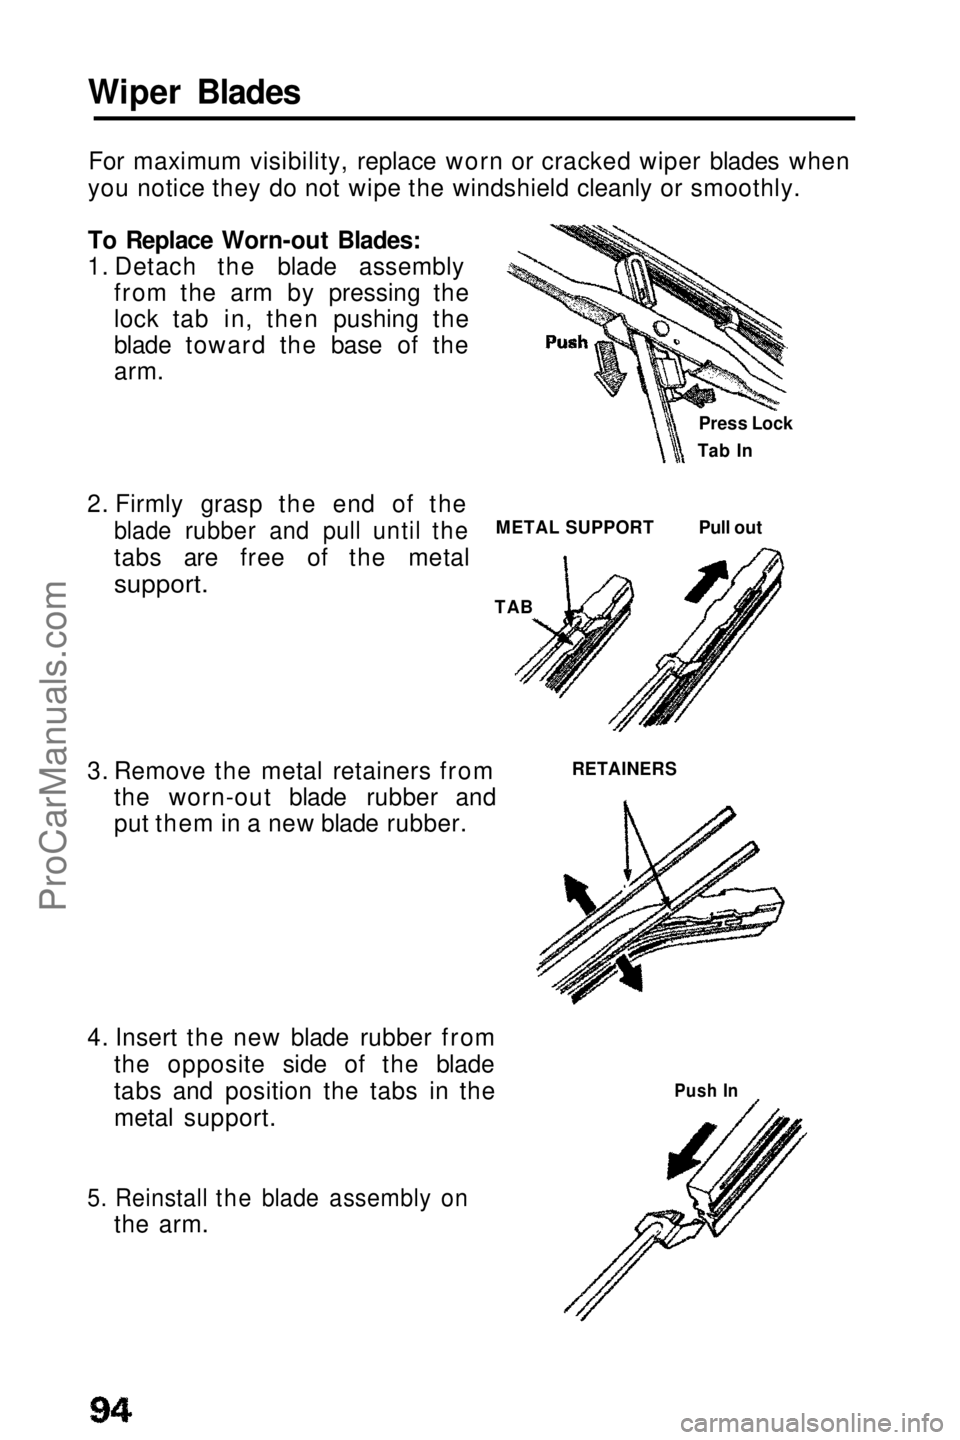
Wiper Blades
For maximum visibility, replace worn or cracked wiper blades when
you notice they do not wipe the windshield cleanly or smoothly.
To Replace Worn-out Blades:
1. Detach the blade assembly from the arm by pressing the
lock tab in, then pushing the
blade toward the base of the
arm.
2. Firmly grasp the end of the
blade rubber and pull until the
tabs are free of the metal
support.
METAL SUPPORT
TAB
Pull out
3. Remove the metal retainers from the worn-out blade rubber and
put them in a new blade rubber. RETAINERS
4. Insert the new blade rubber from the opposite side of the blade
tabs and position the tabs in the
metal support.
5. Reinstall the blade assembly on
the arm. Press Lock
Tab In
Push InProCarManuals.comMain Menu t s
Page 95 of 143
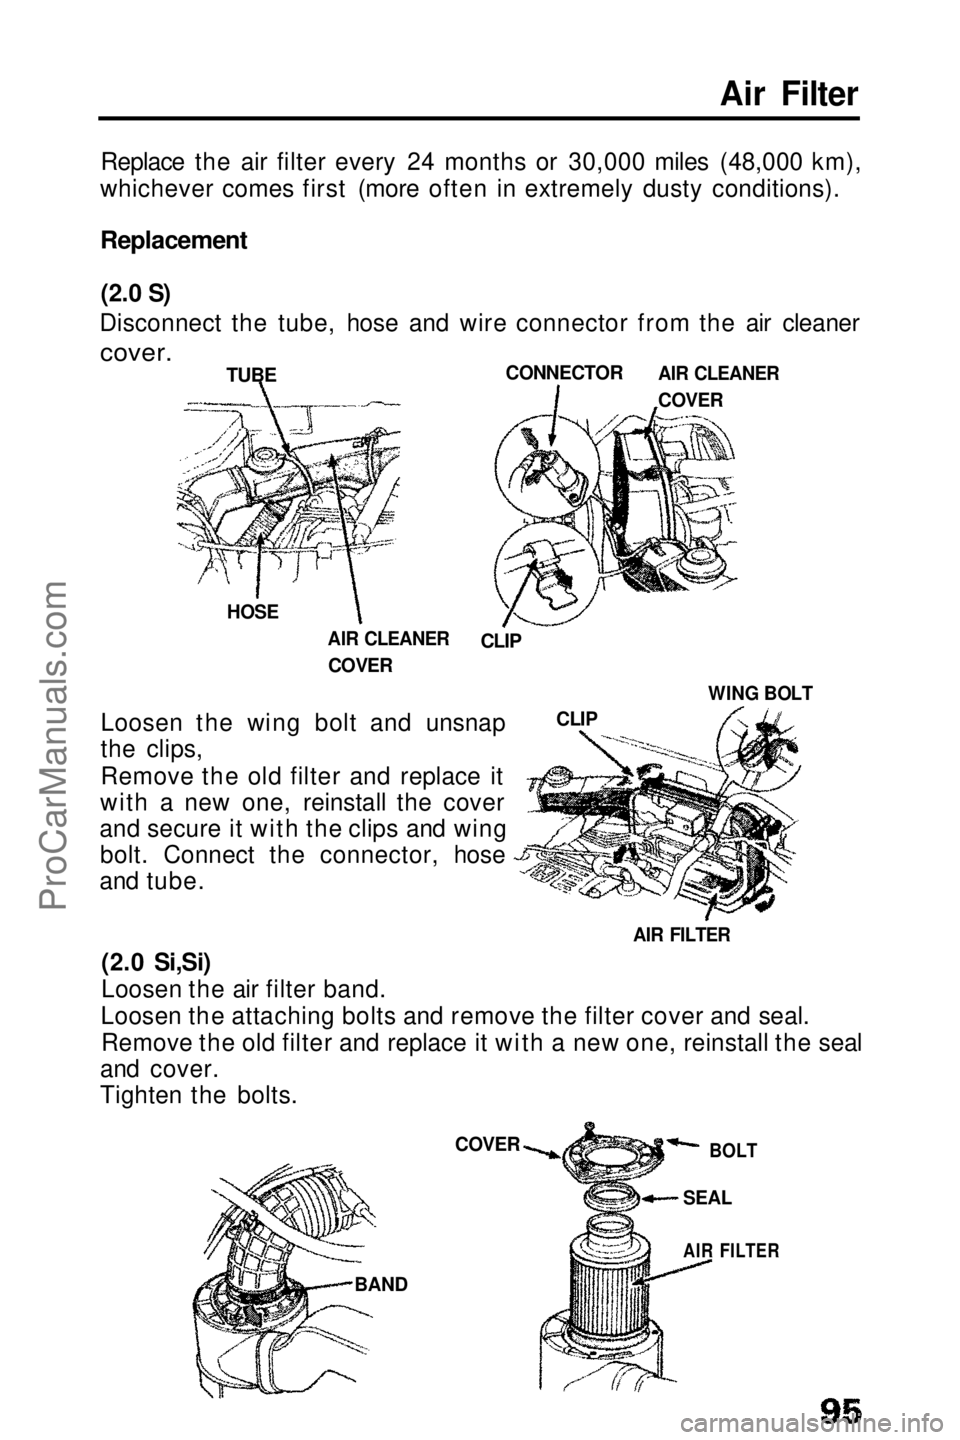
Air Filter
Replace the air filter every 24 months or 30,000 miles (48,000 km),
whichever comes first (more often in extremely dusty conditions).
Replacement
(2.0 S)
Disconnect the tube, hose and wire connector from the air cleaner
cover.
WING BOLT
CLIP
Loosen the wing bolt and unsnap
the clips,
Remove the old filter and replace it
with a new one, reinstall the cover
and secure it with the clips and wing bolt. Connect the connector, hose
and tube.
(2.0 Si,Si)
Loosen the air filter band.
Loosen the attaching bolts and remove the filter cover and seal. Remove the old filter and replace it with a new one, reinstall the seal
and cover.
Tighten the bolts.
TUBE
CLIP
AIR CLEANER
COVER
CONNECTOR
AIR CLEANER
COVER
HOSE
AIR FILTER
BAND COVER
BOLT
SEAL
AIR FILTERProCarManuals.comMain Menu t s
Page 96 of 143

Fuel Filters/Clutch Fluid
Fuel Filters
(2.0 S)
There are two fuel filters in your car; the main filter is located near
the left side of the fuel tank and an auxiliary filter is at the left side
of the air filter in the engine compartment. Both should be replaced at 60,000 miles (96,000 km) or 48 months,
whichever comes first, or any time you suspect contaminated gas
may have clogged them.
For easier access to the main filter, remove the left rear wheel to
inspect or replace the filter.
The fuel filter is located in the engine compartment, on the right
center of the firewall. It should be replaced at 60,000 miles (96,000km) or 48 months whichever comes first, or any time you suspect
contaminated gas may have clogged it.
CAUTION:
Because the fuel system is under pressure, the filter should be
replaced only by a qualified Honda technician.
CLUTCH FLUID
RESERVOIR
Clutch Fluid
Check the fluid level in the clutchreservoir periodically; it should be
between the MAX and MIN marks
on the reservoir.
If the level is near the MIN mark, add
fluid to raise it to the MAX mark. Do not overfill. Use only brake fluid
manufactured to DOT 3 or DOT 4
specifications from a sealed
container. Follow the manufacturer's instructions printed on the can.
NOTE:
A low clutch fluid level may be an indication of clutch fluid leakage.
You should have your clutch checked if the clutch fluid level in the reservoir is low.
When removing the rear wheel, use safety stands to support the
car.
AUXILIARYFILTER
(2.0 Si,Si)
MAIN FILTERProCarManuals.comMain Menu t s