Page 68 of 1273
11-18
ENGINE - Engine Assembly
35-45 Nm 35-45 Nm
25-33
ft.lbs.I
35-45 Nm/ 25-33 ft.lbs.
23-27,‘17-20
Lf+gPf--
2001A0671
36-47 ft.lbs. 40-5o’Nm
29-36
ft.lbs.
Removal steps
19. Connection for generator
20. Connection for oil pressure switch+e l a21 Power steering oil pump (Refer toP.ll-16.)+e .422. Air conditioning compressor (Refer to
P.l 1-16.)23. Self-locking nuts
24. Gasket -
l *
25. Clamp of pressure hose (Power steering)
and high pressure hose (Air conditioning)
26. Engine mount bracket (Refer to P.l l-l 6.)
27. Self locking nut
+* l C28. Engine assembly (Refer to P.l I-16.) 60-80
Nm43-58 ft.lbs.
OlAO670
1 TSB Revision
Page 73 of 1273
ENGINE - Oil Pan and Oil Screen 11-23
OIL PAN
AND
OIL SCREENMllHA-A
REMOVAL AND INSTALLATION
Pre-removal and Post-installation
Bolt hole
portion
0180052
Sealant: MITSUBISHI GENUINE
PART
No.MD970389or equivalent
Removal steps 1. Drain plug
4**4 2. Oil pan3. Oil screen
4. Oil screen gasket
15-22 Nm11-16 ft.lbs.
U’@
35-45 Nm a25- -33 ft.lbs.iowaI32
d- -<
--,\9 -
\’ 63
%e
;
01 LO583\01 LO584
SERVICE POINTS OF REMOVALMllHBAFO
2. REMOVAL OF OIL PAN
(1) Remove the oil pan mounting bolts.
(2) Tap the general service tool in between the cylinderblock and the oil pan
.
Caution
Do not use a screwdriver, a chisel or a similar tool
when removing the oil pan.
(3) Remove the oil pan by placing a brass bar at the corner
of the general service tool and then tapping with a
hammer.
INSPECTIONMllHCACO
lCheck the oil pan for damage and cracks. Replace if faulty.
l Check the oil screen for clogging; damage and cracks. Replace if faulty.
1 TSB Revision
Page 74 of 1273
11-24ENGINE - Oil Pan and Oil ScreenSealant
2 roove
1 EN227
SERVICE POINTS OF INSTALLATIONMllHDAOO
2. INSTALLATION OF OIL PAN
(1) Use a wire brush or other tool to scrape clean all gasket
surfaces of the cylinder block and oil pan so that all
loose material is removed.
(2) Gasket surfaces must be free of oil and dirt.
(3)
APP~the specified sealant around the surface of oil pan
as specified in illustration.
Specified sealant: MITSUBISHI GENUINE PART
No.MD970389 or equivalent
NOTE
To squeeze out proper amount of sealant, cut off the nozzle of sealant. This will provide a nozzle 4 mm
1.16
in.) in drameter.
(4) The sealant should be applied in a continuous bead approximately 4 mm
(.I6 in.) in diameter.
TSB Revision
Page 76 of 1273

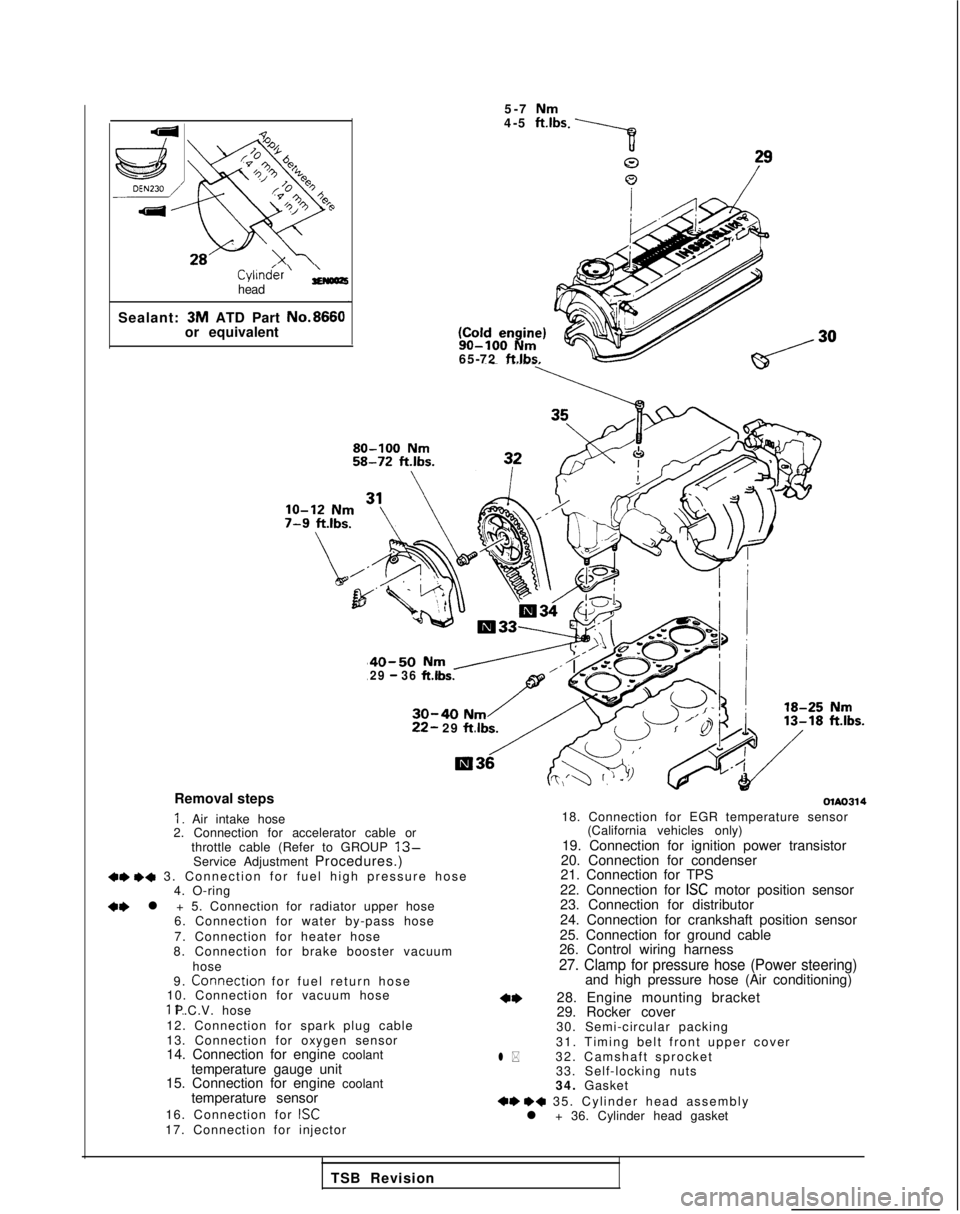
Cyl1n&r’ ;;(oozhead
Sealant: 3M
ATD Part No.8660
or equivalent 5-7
Nm4-5 ft.lbs 90-100
Nm65-72 ftlbs.
40-50 Nm /29 - 36 ft.lbs.
30-40 Nm22- 29
ftlbs.
Removal steps
I. Air intake hose
2. Connection for accelerator cable or
throttle cable (Refer to GROUP
13-Service Adjustment Procedures.)+e +a 3. Connection for fuel high pressure hos
e
4. O-ring
+e l + 5. Connection for radiator upper hose
6. Connection for water by-pass hose
7. Connection for heater hose
8. Connection for brake booster vacuum
hose
9.
Connectron for fuel return hos
e
10. Connection for vacuum hose 11. P.C.V. hose
12. Connection for spark plug cable
13. Connection for oxygen sensor
14. Connection for engine coolant temperature gauge unit
15. Connection for engine coolant
temperature sensor
16. Connection for
ISC17. Connection for injector
olAo314
l *
18. Connection for EGR temperature sensor (California vehicles only)
19. Connection for ignition power transistor
20. Connection for condenser
21. Connection for TPS
22. Connection for
ISC motor position sensor
23. Connection for distributor
24. Connection for crankshaft position sensor
25. Connection for ground cable
26. Control wiring harness
27. Clamp for pressure hose (Power steering)and high pressure hose (Air conditioning)
28. Engine mounting bracket
29. Rocker cover
30. Semi-circular packing
31. Timing belt front upper cover
32. Camshaft sprocket 33. Self-locking nuts
34. Gasket
+e ++ 35. Cylinder head assembl
y
l + 36. Cylinder head gasket
TSB Revision
Page 77 of 1273

ENGINE - Cylinder Head Gasket11-27
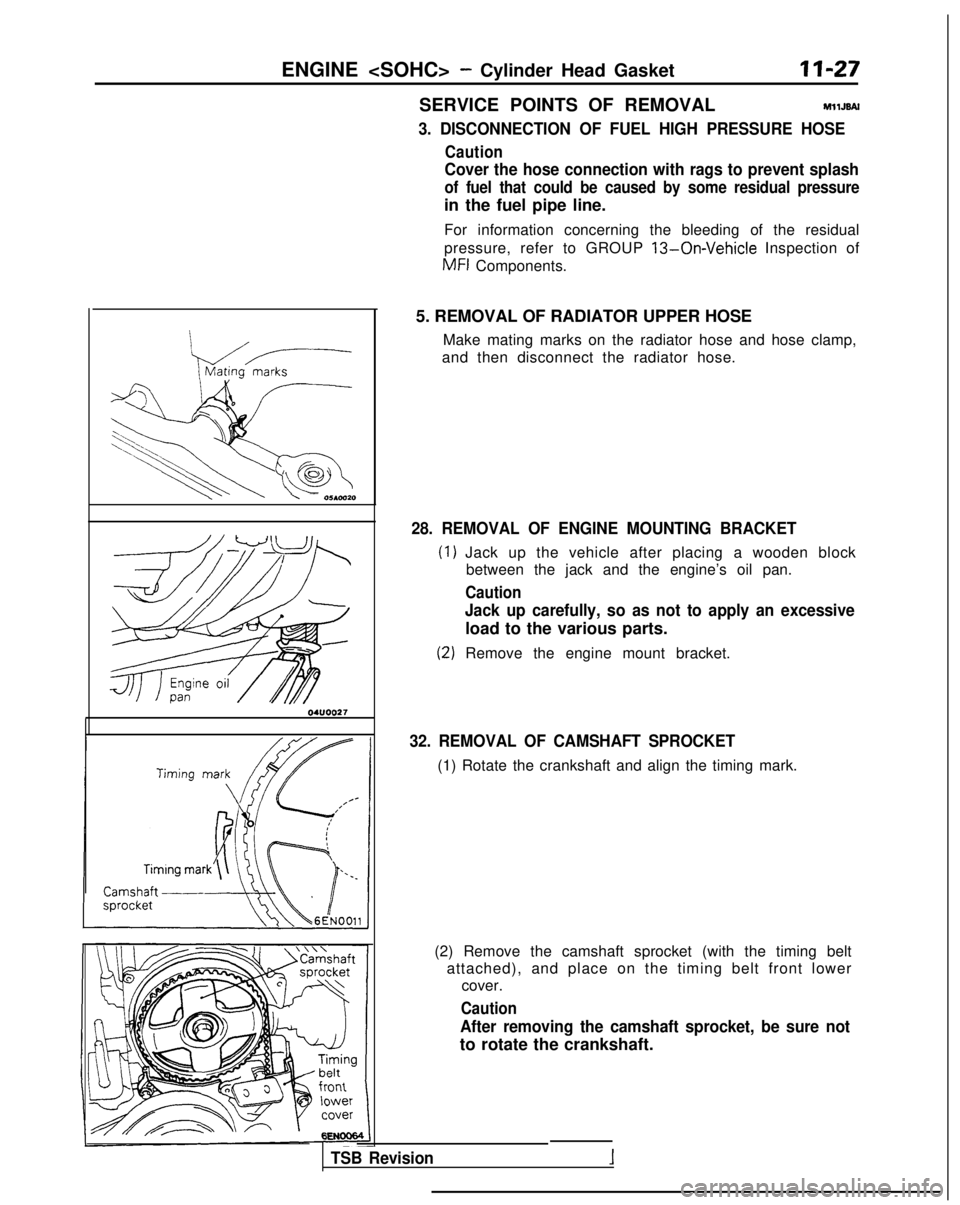
\
r
MatingC
-I
1
J-1.‘T
:-c’ 000510020
SERVICE POINTS OF REMOVALMllJBAl
3. DISCONNECTION OF FUEL HIGH PRESSURE HOSE
Caution
Cover the hose connection with rags to prevent splash
of fuel that could be caused by some residual pressure
in the fuel pipe line.
For information concerning the bleeding of the residual
pressure, refer to GROUP
13-On-Vehicle Inspection of
MFI
Components.
5. REMOVAL OF RADIATOR UPPER HOSE Make mating marks on the radiator hose and hose clamp,
and then disconnect the radiator hose.
28. REMOVAL OF ENGINE MOUNTING BRACKET
Jack up the vehicle after placing a wooden block between the jack and the engine’s oil pan.
Caution
Jack up carefully, so as not to apply an excessive
load to the various parts.
Remove the engine mount bracket.
32. REMOVAL OF CAMSHAFT SPROCKET
(1) Rotate the crankshaft and align the timing mark.
(2) Remove the camshaft sprocket (with the timing belt attached), and place on the timing belt front lower cover.
Caution
After removing the camshaft sprocket, be sure not
to rotate the crankshaft.
TSB Revision
Page 78 of 1273

II-28ENGINE - Cylinder Head Gasket
MD998051-01OPTIONAL\
Front of engine +Intake side
km>
Exhaust side
OlR0391
OlRD417
Identification
mark I
6EN025
OlRO416
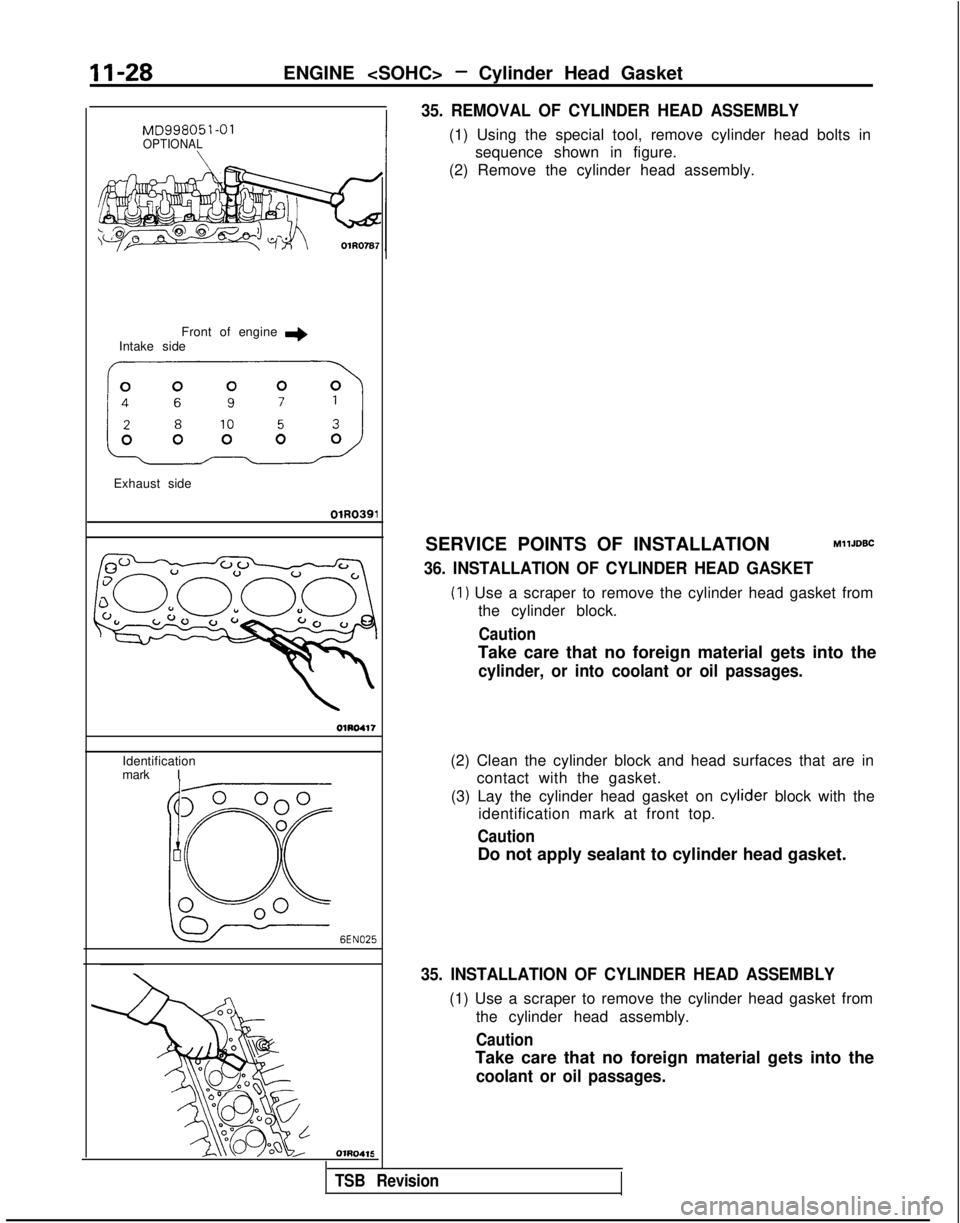
35. REMOVAL OF CYLINDER HEAD ASSEMBLY
(1) Using the special tool, remove cylinder head bolts insequence shown in figure.
(2) Remove the cylinder head assembly.
SERVICE POINTS OF INSTALLATION
MllJDBC
36. INSTALLATION OF CYLINDER HEAD GASKET
(1) Use a scraper to remove the cylinder head gasket from the cylinder block.
Caution
Take care that no foreign material gets into the
cylinder, or into coolant or oil passages.
(2) Clean the cylinder block and head surfaces that are in contact with the gasket.
(3) Lay the cylinder head gasket on cylider
block with the
identification mark at front top.
Caution
Do not apply sealant to cylinder head gasket.
35. INSTALLATION OF CYLINDER HEAD ASSEMBLY
(1) Use a scraper to remove the cylinder head gasket from
the cylinder head assembly.
Caution
Take care that no foreign material gets into the
coolant or oil passages.
TSB Revision
Page 81 of 1273
ENGINE - Winder Head Gasket
3-3.5
Nm2.2-2.5 ft.lbs. 28 Cold Engine80 Nm + 0 Nm - 20 Nm - +1/4
turn + +I/4 turn
58 ft.lbs. - 0 ftlbs. -+ 14fWbs. - +I/4 turn - +1/4 turn
/g$j?&-
- Tiff i ”.\,)
/
3
2
lo-12 Nm7-nu,L.,
40-50 Nm29-36 ftJbs.9
;;I:: k. I@@
30-40 Nm22-29 ft.lbs./18-25 Nm13-18 ft.lbs.
G
R
‘2
4
OlA0660
23. Connection for radiator upper hose
24. Connection for radiator lower hose
1)+25. Water inlet fitting, thermostat and
thermostat case assembly
26. Timing belt upper cover
4*27. Camshaft sprocket 28. Rocker cover
29. Self-locking nuts
30. Gasket
*431_ Cylinder tiead
bolt+e +432. Cylinder head assembly
l +33. Cylinder head gasket
TSB Revision
Page 82 of 1273

11-32ENGINE
>
- Winder Head Gasket
sprocket
’lG90001
Intake side Front of engine e
I
Exhaust side\olCOll!iLoosening order
SERVICE POINTS OF REMOVALMllJEAZ
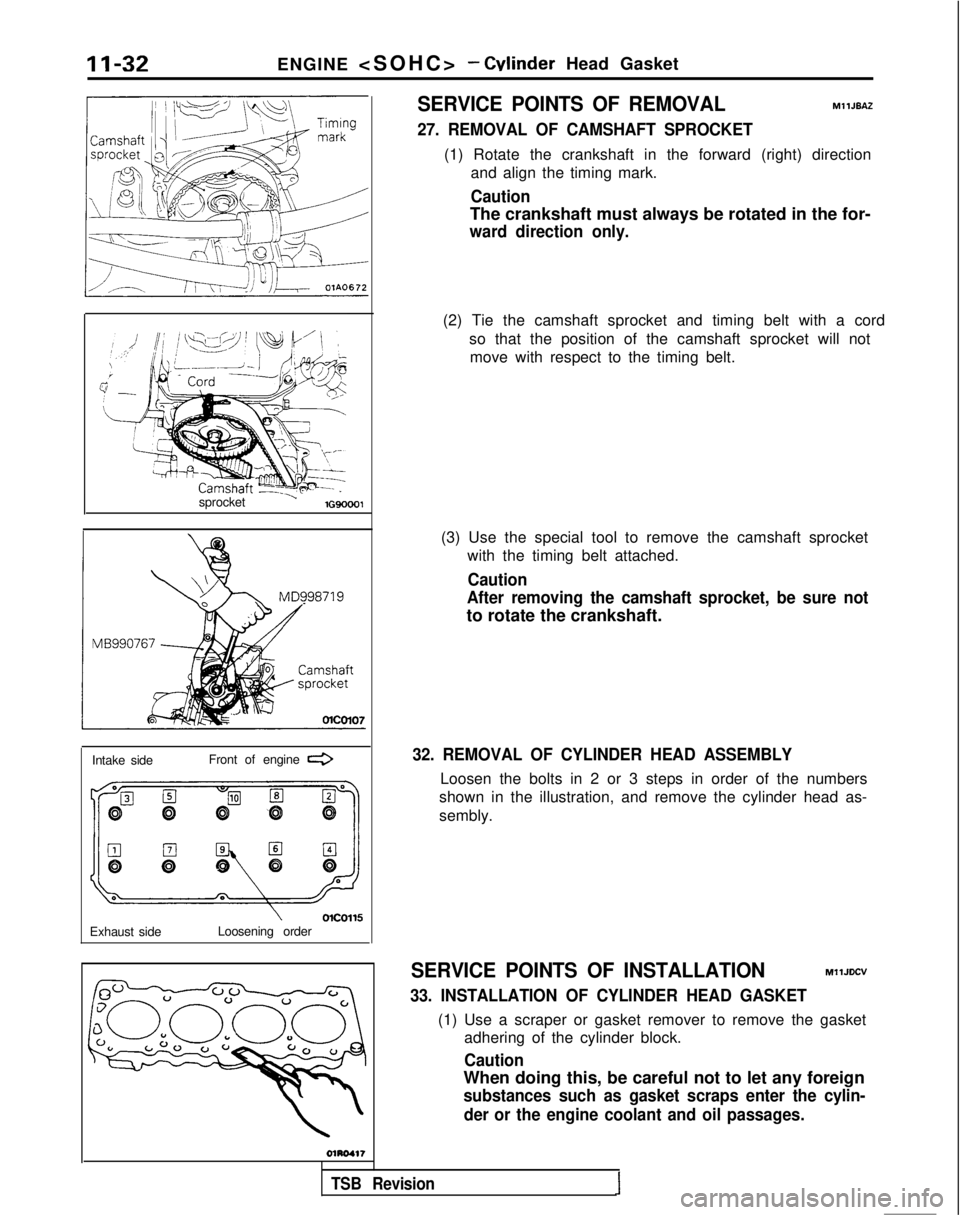
27. REMOVAL OF CAMSHAFT SPROCKET
(1) Rotate the crankshaft in the forward (right) direction
and align the timing mark.
Caution
The crankshaft must always be rotated in the for-
ward direction only.
(3) Use the special tool to remove the camshaft sprocketwith the timing belt attached.
Caution
After removing the camshaft sprocket, be sure not
to rotate the crankshaft.
32. REMOVAL OF CYLINDER HEAD ASSEMBLY
Loosen the bolts in 2 or 3 steps in order of the numbers
shown in the illustration, and remove the cylinder head as-
sembly.
SERVICE POINTS OF INSTALLATIONMllJDCV
33. INSTALLATION OF CYLINDER HEAD GASKET
(1) Use a scraper or gasket remover to remove the gasket adhering of the cylinder block.
Caution
When doing this, be careful not to let any foreign
substances such as gasket scraps enter the cylin-
der or the engine coolant and oil passages.
(2) Tie the camshaft sprocket and timing belt with a cord
so that the position of the camshaft sprocket will notmove with respect to the timing belt.
TSB Revision1