1988 OPEL CALIBRA light
[x] Cancel search: lightPage 95 of 525
6Remove the terminal screw and lift out the
diode assembly.
7Extract the two screws securing the brush
holder and voltage regulator to the slip ring
end housing, and remove the brush holder
assembly. Note the insulation washers under
the screw heads.
8Check that the brushes move freely in their
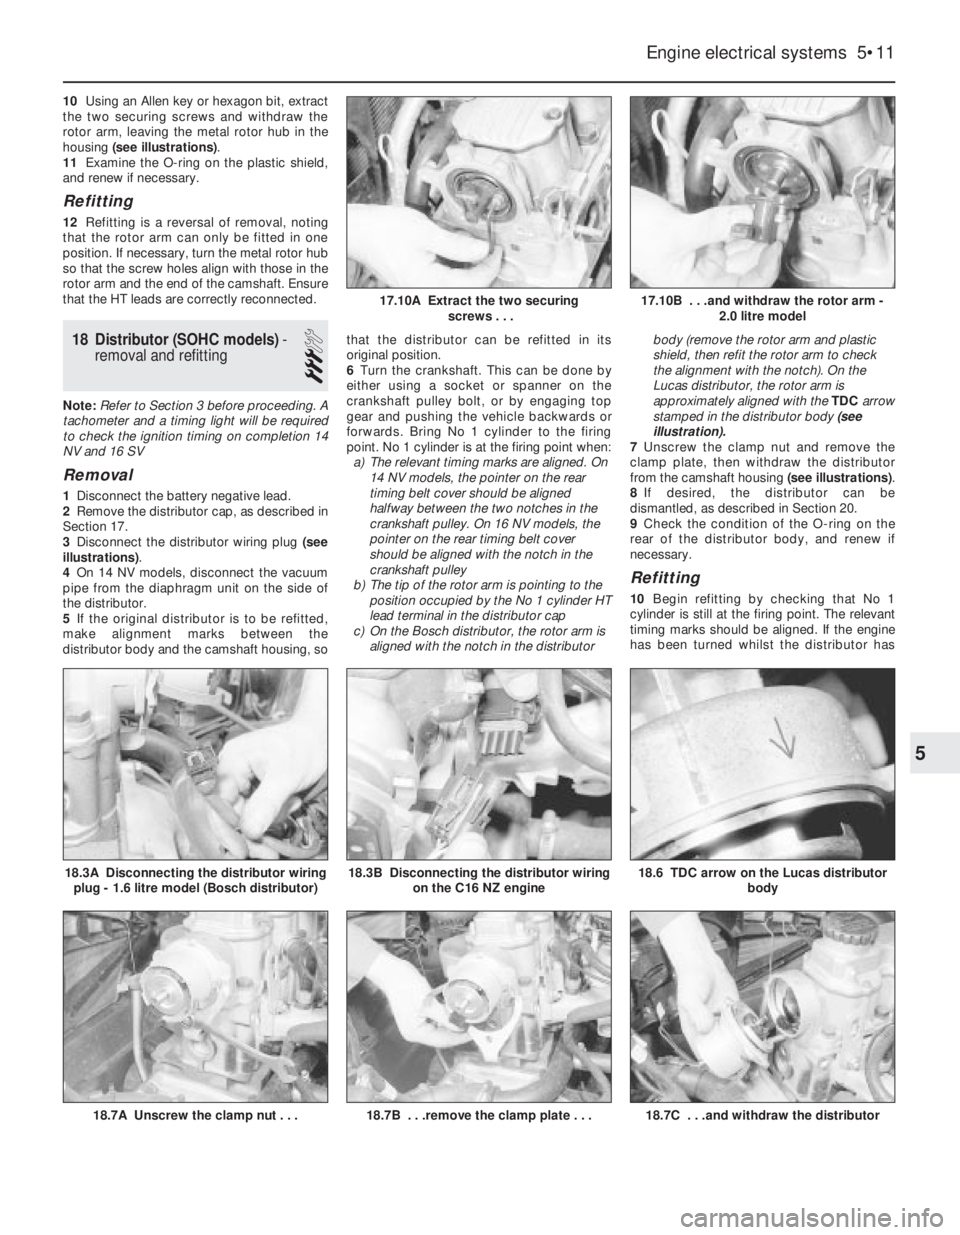
guides, and that the brush lengths are within
the limits given in the Specifications. If any
doubt exists regarding the condition of the
brushes, the best policy is to renew them.
9To fit new brushes, unsolder the old brush
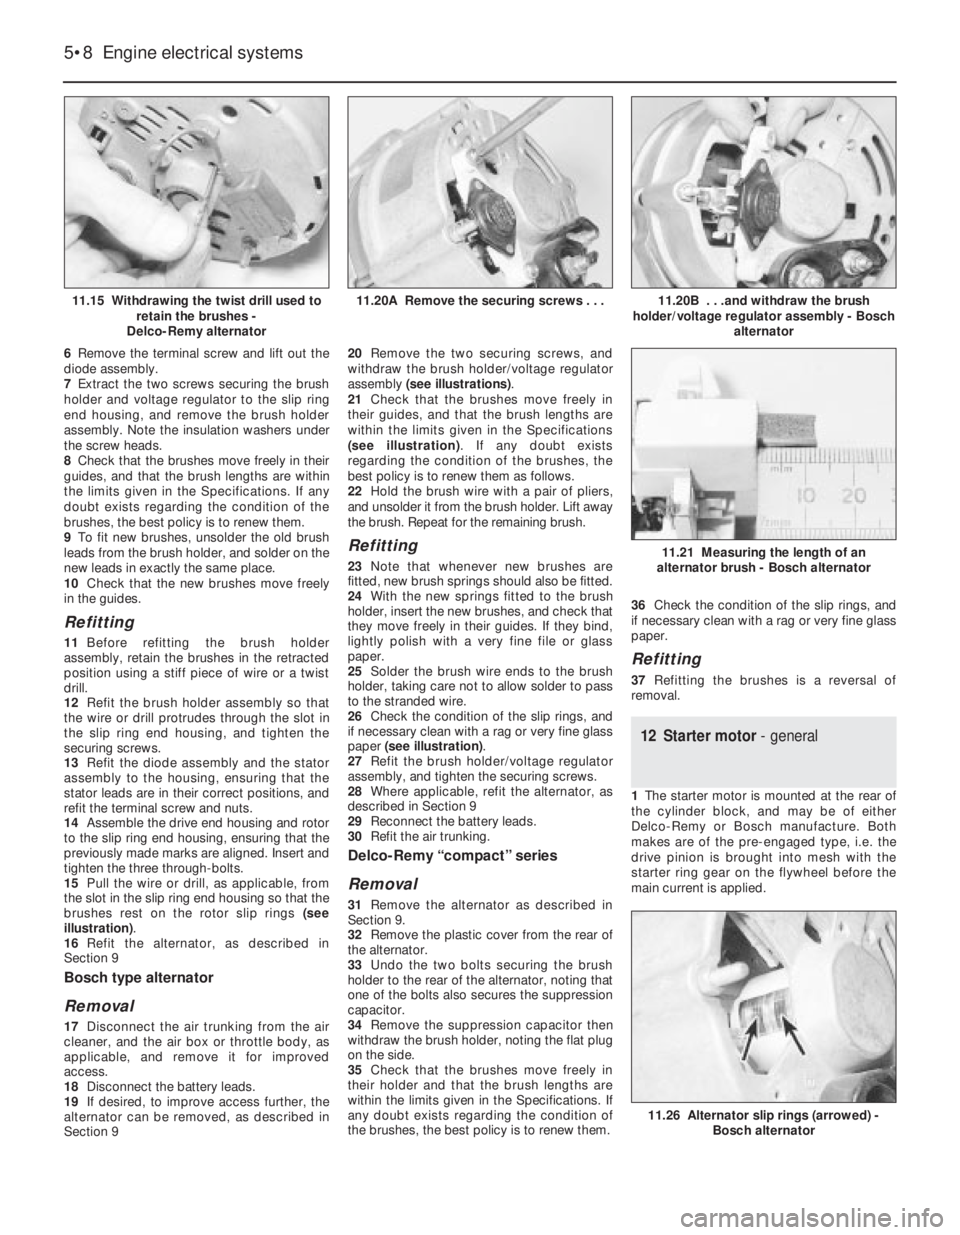
leads from the brush holder, and solder on the
new leads in exactly the same place.
10Check that the new brushes move freely
in the guides.
Refitting
11Before refitting the brush holder
assembly, retain the brushes in the retracted
position using a stiff piece of wire or a twist
drill.
12Refit the brush holder assembly so that
the wire or drill protrudes through the slot in
the slip ring end housing, and tighten the
securing screws.
13Refit the diode assembly and the stator
assembly to the housing, ensuring that the
stator leads are in their correct positions, and
refit the terminal screw and nuts.
14Assemble the drive end housing and rotor
to the slip ring end housing, ensuring that the
previously made marks are aligned. Insert and
tighten the three through-bolts.
15Pull the wire or drill, as applicable, from
the slot in the slip ring end housing so that the
brushes rest on the rotor slip rings (see
illustration).
16Refit the alternator, as described in
Section 9
Bosch type alternator
Removal
17Disconnect the air trunking from the air
cleaner, and the air box or throttle body, as
applicable, and remove it for improved
access.
18Disconnect the battery leads.
19If desired, to improve access further, the
alternator can be removed, as described in
Section 920Remove the two securing screws, and
withdraw the brush holder/voltage regulator
assembly (see illustrations).
21Check that the brushes move freely in
their guides, and that the brush lengths are
within the limits given in the Specifications
(see illustration). If any doubt exists
regarding the condition of the brushes, the
best policy is to renew them as follows.
22Hold the brush wire with a pair of pliers,
and unsolder it from the brush holder. Lift away
the brush. Repeat for the remaining brush.
Refitting
23Note that whenever new brushes are
fitted, new brush springs should also be fitted.
24With the new springs fitted to the brush
holder, insert the new brushes, and check that
they move freely in their guides. If they bind,
lightly polish with a very fine file or glass
paper.
25Solder the brush wire ends to the brush
holder, taking care not to allow solder to pass
to the stranded wire.
26Check the condition of the slip rings, and
if necessary clean with a rag or very fine glass
paper (see illustration).
27Refit the brush holder/voltage regulator
assembly, and tighten the securing screws.
28Where applicable, refit the alternator, as
described in Section 9
29Reconnect the battery leads.
30Refit the air trunking.
Delco-Remy “compact” series
Removal
31Remove the alternator as described in
Section 9.
32Remove the plastic cover from the rear of
the alternator.
33Undo the two bolts securing the brush
holder to the rear of the alternator, noting that
one of the bolts also secures the suppression
capacitor.
34Remove the suppression capacitor then
withdraw the brush holder, noting the flat plug
on the side.
35Check that the brushes move freely in
their holder and that the brush lengths are
within the limits given in the Specifications. If
any doubt exists regarding the condition of
the brushes, the best policy is to renew them.36Check the condition of the slip rings, and
if necessary clean with a rag or very fine glass
paper.
Refitting
37Refitting the brushes is a reversal of
removal.
12Starter motor - general
1The starter motor is mounted at the rear of
the cylinder block, and may be of either
Delco-Remy or Bosch manufacture. Both
makes are of the pre-engaged type, i.e. the
drive pinion is brought into mesh with the
starter ring gear on the flywheel before the
main current is applied.
5•8Engine electrical systems
11.15 Withdrawing the twist drill used to
retain the brushes -
Delco-Remy alternator11.20B . . .and withdraw the brush
holder/voltage regulator assembly - Bosch
alternator
11.26 Alternator slip rings (arrowed) -
Bosch alternator
11.21 Measuring the length of an
alternator brush - Bosch alternator
11.20A Remove the securing screws . . .
Page 98 of 525
10Using an Allen key or hexagon bit, extract
the two securing screws and withdraw the
rotor arm, leaving the metal rotor hub in the
housing (see illustrations).
11Examine the O-ring on the plastic shield,
and renew if necessary.
Refitting
12Refitting is a reversal of removal, noting
that the rotor arm can only be fitted in one
position. If necessary, turn the metal rotor hub
so that the screw holes align with those in the
rotor arm and the end of the camshaft. Ensure
that the HT leads are correctly reconnected.
18Distributor (SOHC models) -
removal and refitting
3
Note: Refer to Section 3 before proceeding. A
tachometer and a timing light will be required
to check the ignition timing on completion 14
NV and 16 SV
Removal
1Disconnect the battery negative lead.
2Remove the distributor cap, as described in
Section 17.
3Disconnect the distributor wiring plug (see
illustrations).
4On 14 NV models, disconnect the vacuum
pipe from the diaphragm unit on the side of
the distributor.
5If the original distributor is to be refitted,
make alignment marks between the
distributor body and the camshaft housing, sothat the distributor can be refitted in its
original position.
6Turn the crankshaft. This can be done by
either using a socket or spanner on the
crankshaft pulley bolt, or by engaging top
gear and pushing the vehicle backwards or
forwards. Bring No 1 cylinder to the firing
point. No 1 cylinder is at the firing point when:
a)The relevant timing marks are aligned. On
14 NV models, the pointer on the rear
timing belt cover should be aligned
halfway between the two notches in the
crankshaft pulley. On 16 NV models, the
pointer on the rear timing belt cover
should be aligned with the notch in the
crankshaft pulley
b)The tip of the rotor arm is pointing to the
position occupied by the No 1 cylinder HT
lead terminal in the distributor cap
c)On the Bosch distributor, the rotor arm is
aligned with the notch in the distributorbody (remove the rotor arm and plastic
shield, then refit the rotor arm to check
the alignment with the notch). On the
Lucas distributor, the rotor arm is
approximately aligned with the TDC arrow
stamped in the distributor body (see
illustration).
7Unscrew the clamp nut and remove the
clamp plate, then withdraw the distributor
from the camshaft housing (see illustrations).
8If desired, the distributor can be
dismantled, as described in Section 20.
9Check the condition of the O-ring on the
rear of the distributor body, and renew if
necessary.
Refitting
10Begin refitting by checking that No 1
cylinder is still at the firing point. The relevant
timing marks should be aligned. If the engine
has been turned whilst the distributor has
Engine electrical systems 5•11
18.6 TDC arrow on the Lucas distributor
body
18.7C . . .and withdraw the distributor18.7B . . .remove the clamp plate . . .18.7A Unscrew the clamp nut . . .
18.3B Disconnecting the distributor wiring
on the C16 NZ engine18.3A Disconnecting the distributor wiring
plug - 1.6 litre model (Bosch distributor)
17.10B . . .and withdraw the rotor arm -
2.0 litre model17.10A Extract the two securing
screws . . .
5
Page 99 of 525
been removed, check that No 1 cylinder is on
its firing stroke by removing No 1 cylinder
spark plug and placing a finger over the plug
hole. Turn the crankshaft until compression
can be felt, which indicates that No 1 piston is
rising on its compression stroke. Continue
turning the crankshaft until the relevant timing
marks are in alignment.
11Turn the rotor arm to the position noted in
paragraph 6c, and hold the rotor arm in this
position as the distributor is fitted. Note that
the distributor driveshaft will only engage with
the camshaft in one position. If the original
distributor is being refitted, align the marks
made on the distributor body and camshaft
housing before removal.
12Refit the clamp plate and nut, but do not
fully tighten the nut at this stage.
13On the Bosch distributor, remove the rotor
arm, then refit the plastic shield and the rotor
arm.
14On 14 NV models, reconnect the vacuum
pipe to the diaphragm unit.
15Reconnect the distributor wiring plug.
16Refit the distributor cap as described in
Section 17.
17Reconnect the battery negative lead.
18Check and if necessary adjust the ignition
timing, as described in Section 21.
19Distributor (DOHC models),
where applicable - removal
and refitting
3
Removal
1Disconnect the battery negative lead.
2Remove the distributor cap, as described in
Section 17.
3Disconnect the distributor wiring plug.
4Unscrew the two securing bolts, and
remove the distributor from the cylinder head.
5Examine the O-ring on the rear of the
distributor, and renew if necessary.
Refitting
6Refitting is a reversal of removal. However,
note that the distributor should be fitted so
that the wiring plug is positioned on the upper
left-hand side of the distributor body, when
viewed from the distributor cap end.
20Distributor - dismantling,
inspection and reassembly
3
Note: Before contemplating dismantling of a
distributor, check the cost and availability of
replacement parts. It may prove more
economical to renew the complete distributor
assembly
14 NV models
Dismantling
1With the distributor removed as described
in Section 18, continue as follows.
2Pull off the rotor arm, and remove the
plastic shield.
3The top bearing plate can be removed after
unscrewing the two securing screws, however
(other than the vacuum diaphragm unit), no
spares are available for the distributor and no
adjustments are required.
4If desired, the vacuum diaphragm unit can
be removed by extracting the two securing
screws and unhooking the operating arm from
the distributor baseplate. Note that the
screws are of differing lengths, the longer
screw also secures one of the distributor cap
clips.
Inspection
5The vacuum unit can be tested by applying
suction to the vacuum port, and checking that
the operating rod moves into the unit as
suction is applied. Remove the suction, and
check that the operating rod returns to its
original position. If the operating rod does not
move as described, renew the vacuum unit.
6Check the distributor cap for corrosion of
the segments, and for signs of tracking,
indicated by a thin black line between the
segments. Make sure that the carbon brush in
the centre of the cap moves freely and stands
proud of the surface of the cap. Renew the
cap if necessary.
7If the metal portion of the rotor arm is badly
burnt or loose, renew it. If slightly burnt or
corroded; it may be cleaned with a fine file.
8Examine the seal ring at the rear of the
distributor body, and renew if necessary.
Reassembly
9Reassembly is a reversal of dismantling,
ensuring that the vacuum unit operating arm
is correctly engaged with the peg on the
baseplate, several attempts may be required
to reconnect it.
10Refit the distributor as described in
Section 18, and then check and if necessary
adjust the ignition timing, as described in
Section 21.
16 SV models
Dismantling
11With the distributor removed as described
in Section 18, pull off the rotor arm and, on
the Bosch distributor, remove the plastic
shield.
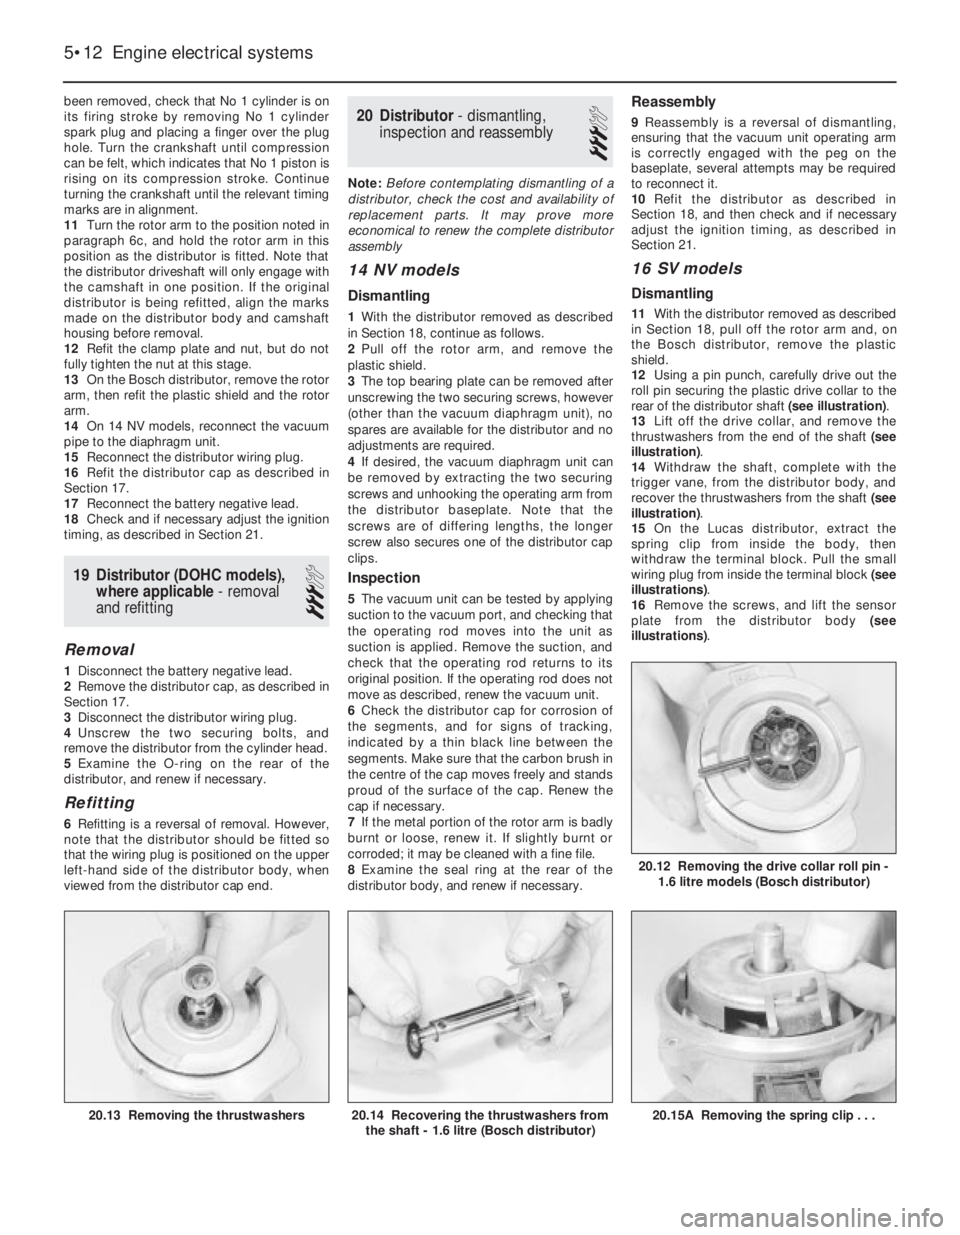
12Using a pin punch, carefully drive out the
roll pin securing the plastic drive collar to the
rear of the distributor shaft (see illustration).
13Lift off the drive collar, and remove the
thrustwashers from the end of the shaft (see
illustration).
14Withdraw the shaft, complete with the
trigger vane, from the distributor body, and
recover the thrustwashers from the shaft (see
illustration).
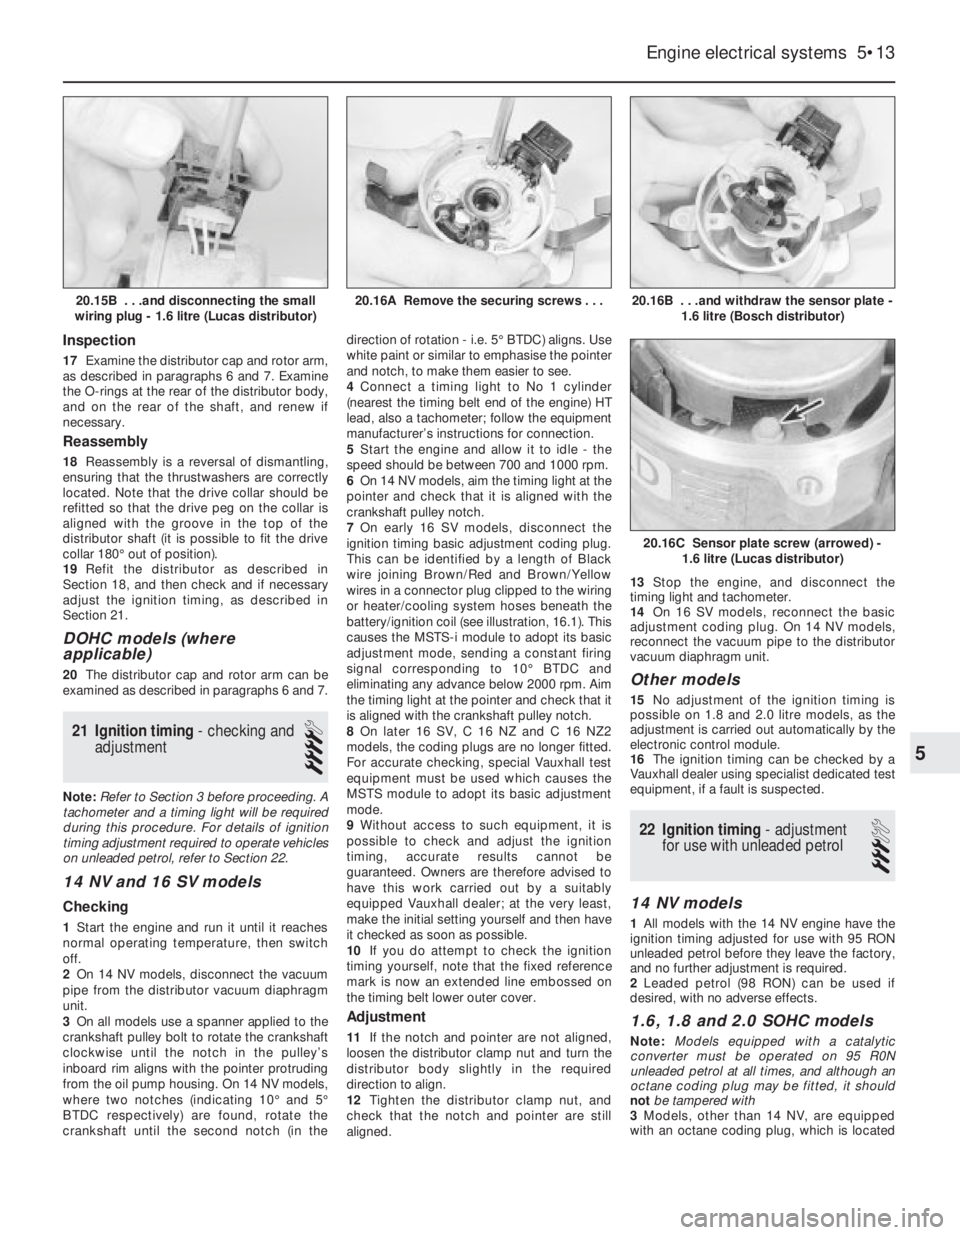
15On the Lucas distributor, extract the
spring clip from inside the body, then
withdraw the terminal block. Pull the small
wiring plug from inside the terminal block (see
illustrations).
16Remove the screws, and lift the sensor
plate from the distributor body (see
illustrations).
5•12Engine electrical systems
20.15A Removing the spring clip . . .20.14 Recovering the thrustwashers from
the shaft - 1.6 litre (Bosch distributor)20.13 Removing the thrustwashers
20.12 Removing the drive collar roll pin -
1.6 litre models (Bosch distributor)
Page 100 of 525
Inspection
17Examine the distributor cap and rotor arm,
as described in paragraphs 6 and 7. Examine
the O-rings at the rear of the distributor body,
and on the rear of the shaft, and renew if
necessary.
Reassembly
18Reassembly is a reversal of dismantling,
ensuring that the thrustwashers are correctly
located. Note that the drive collar should be
refitted so that the drive peg on the collar is
aligned with the groove in the top of the
distributor shaft (it is possible to fit the drive
collar 180°out of position).
19Refit the distributor as described in
Section 18, and then check and if necessary
adjust the ignition timing, as described in
Section 21.
DOHC models (where
applicable)
20The distributor cap and rotor arm can be
examined as described in paragraphs 6 and 7.
21Ignition timing -checking and
adjustment
4
Note: Refer to Section 3 before proceeding. A
tachometer and a timing light will be required
during this procedure. For details of ignition
timing adjustment required to operate vehicles
on unleaded petrol, refer to Section 22.
14 NV and 16 SV models
Checking
1Start the engine and run it until it reaches
normal operating temperature, then switch
off.
2On 14 NV models, disconnect the vacuum
pipe from the distributor vacuum diaphragm
unit.
3On all models use a spanner applied to the
crankshaft pulley bolt to rotate the crankshaft
clockwise until the notch in the pulley’s
inboard rim aligns with the pointer protruding
from the oil pump housing. On 14 NV models,
where two notches (indicating 10°and 5°
BTDC respectively) are found, rotate the
crankshaft until the second notch (in thedirection of rotation -i.e. 5°BTDC) aligns. Use
white paint or similar to emphasise the pointer
and notch, to make them easier to see.
4Connect a timing light to No 1 cylinder
(nearest the timing belt end of the engine) HT
lead, also a tachometer; follow the equipment
manufacturer’s instructions for connection.
5Start the engine and allow it to idle -the
speed should be between 700 and 1000 rpm.
6On 14 NV models, aim the timing light at the
pointer and check that it is aligned with the
crankshaft pulley notch.
7On early 16 SV models, disconnect the
ignition timing basic adjustment coding plug.
This can be identified by a length of Black
wire joining Brown/Red and Brown/Yellow
wires in a connector plug clipped to the wiring
or heater/cooling system hoses beneath the
battery/ignition coil (see illustration, 16.1). This
causes the MSTS-i module to adopt its basic
adjustment mode, sending a constant firing
signal corresponding to 10°BTDC and
eliminating any advance below 2000 rpm. Aim
the timing light at the pointer and check that it
is aligned with the crankshaft pulley notch.
8On later 16 SV, C 16 NZ and C 16 NZ2
models, the coding plugs are no longer fitted.
For accurate checking, special Vauxhall test
equipment must be used which causes the
MSTS module to adopt its basic adjustment
mode.
9Without access to such equipment, it is
possible to check and adjust the ignition
timing, accurate results cannot be
guaranteed. Owners are therefore advised to
have this work carried out by a suitably
equipped Vauxhall dealer; at the very least,
make the initial setting yourself and then have
it checked as soon as possible.
10If you do attempt to check the ignition
timing yourself, note that the fixed reference
mark is now an extended line embossed on
the timing belt lower outer cover.
Adjustment
11If the notch and pointer are not aligned,
loosen the distributor clamp nut and turn the
distributor body slightly in the required
direction to align.
12Tighten the distributor clamp nut, and
check that the notch and pointer are still
aligned. 13Stop the engine, and disconnect the
timing light and tachometer.
14On 16 SV models, reconnect the basic
adjustment coding plug. On 14 NV models,
reconnect the vacuum pipe to the distributor
vacuum diaphragm unit.
Other models
15No adjustment of the ignition timing is
possible on 1.8 and 2.0 litre models, as the
adjustment is carried out automatically by the
electronic control module.
16The ignition timing can be checked by a
Vauxhall dealer using specialist dedicated test
equipment, if a fault is suspected.
22Ignition timing -adjustment
for use with unleaded petrol
3
14 NV models
1All models with the 14 NV engine have the
ignition timing adjusted for use with 95 RON
unleaded petrol before they leave the factory,
and no further adjustment is required.
2Leaded petrol (98 RON) can be used if
desired, with no adverse effects.
1.6, 1.8 and 2.0 SOHC models
Note: Models equipped with a catalytic
converter must be operated on 95 R0N
unleaded petrol at all times, and although an
octane coding plug may be fitted, it should
not be tampered with
3Models, other than 14 NV, are equipped
with an octane coding plug, which is located
Engine electrical systems 5•13
20.16B . . .and withdraw the sensor plate -
1.6 litre (Bosch distributor)
20.16C Sensor plate screw (arrowed) -
1.6 litre (Lucas distributor)
20.16A Remove the securing screws . . .20.15B . . .and disconnecting the small
wiring plug - 1.6 litre (Lucas distributor)
5
Page 105 of 525
wax-based underbody protective coating, it is
a good idea to have the whole of the
underframe of the vehicle steam cleaned,
engine compartment included, so that a
thorough inspection can be carried out to see
what minor repairs and renovations are
necessary. Steam cleaning is available at
many garages and is necessary for removal of
the accumulation of oily grime that sometimes
is allowed to become thick in certain areas.
The dirt can then be simply hosed off. Note
that these methods should not be used on
vehicles with wax-based underbody
protective coating or the coating will be
removed. Such vehicles should be inspected
annually, preferably just before winter, when
the underbody should be washed down and
any damage to the wax coating repaired.
Ideally, a completely fresh coat should be
applied. It would also be worth considering
the use of such wax-based protection for
injection into door panels, sills, box sections,
etc., as an additional safeguard against rust
damage where such protection is not
provided by the vehicle manufacturer.
After washing paintwork, wipe off with a
chamois leather to give an unspotted clear
finish. A coat of clear protective wax polish,
will give added protection against chemical
pollutants in the air. If the paintwork sheen
has dulled or oxidised, use a cleaner/polisher
combination to restore the brilliance of the
shine. This requires a little effort, but such
dulling is usually caused because regular
washing has been neglected. Care needs to
be taken with metallic paintwork, as special
non-abrasive cleaner/polisher is required to
avoid damage to the finish.
Always check that the door and ventilator
opening drain holes and pipes are completely
clear so that water can be drained out. Bright
work should be treated in the same way as
paint work. Windscreens and windows can be
kept clear of the smeary film that often
appears, by using a glass cleaner. Never use
any form of wax or other body or chromium
polish on glass.
3Upholstery and carpets -
maintenance
1
Mats and carpets should be brushed or
vacuum cleaned regularly to keep them free of
grit. If they are badly stained remove them
from the vehicle for scrubbing or sponging
and make quite sure they are dry before
refitting. Seats and interior trim panels can be
kept clean by wiping with a damp cloth. If they
do become stained (which can be more
apparent on light coloured upholstery) use a
little liquid detergent and a soft nail brush to
scour the grime out of the grain of the
material. Do not forget to keep the headlining
clean in the same way as the upholstery.
When using liquid cleaners inside the vehicle
do not over-wet the surfaces being cleaned.Excessive damp could get into the seams and
padded interior causing stains, offensive
odours or even rot. If the inside of the vehicle
gets wet accidentally it is worthwhile taking
some trouble to dry it out properly, particularly
where carpets are involved. Do not leave oil or
electric heaters inside the vehicle for this
purpose.
4Minor body damage - repair
3
Repairs of minor scratches in
bodywork
If the scratch is very superficial, and does
not penetrate to the metal of the bodywork,
repair is very simple. Lightly rub the area of
the scratch with a paintwork renovator, to
remove loose paint from the scratch and to
clear the surrounding bodywork of wax polish.
Rinse the area with clean water.
Apply touch-up paint to the scratch using a
fine paint brush; continue to apply fine layers
of paint until the surface of the paint in the
scratch is level with the surrounding
paintwork. Allow the new paint at least two
weeks to harden: then blend it into the
surrounding paintwork by rubbing the scratch
area with a paintwork renovator or a very fine
cutting paste and apply wax polish.
Where the scratch has penetrated right
through to the metal of the bodywork, causing
the metal to rust, a different repair technique
is required. Remove any loose rust from the
bottom of the scratch with a penknife, then
apply rust inhibiting paint, to prevent the
formation of rust in the future. Using a rubber
or nylon applicator fill the scratch with
bodystopper paste. If required, this paste can
be mixed with cellulose thinners to provide a
very thin paste that is ideal for filling narrow
scratches. Before the stopper-paste in the
scratch hardens, wrap a piece of smooth
cotton rag around the top of a finger. Dip the
finger in cellulose thinners and then quickly
sweep it across the surface of the
stopper-paste in the scratch; this will ensure
that the surface of the stopper-paste is
slightly hollowed. The scratch can now be
painted over as described earlier in this
Section.
Repair of dents in bodywork
When deep denting of the vehicle’s
bodywork has taken place, the first task is to
pull the dent out, until the affected bodywork
almost attains its original shape. There is little
point in trying to restore the original shape
completely, as the metal in the damaged area
will have stretched on impact and cannot be
reshaped fully to its original contour. It is
better to bring the level of the dent up to a
point that is about 8 in (3 mm) below the level
of the surrounding bodywork. In cases where
the dent is very shallow anyway, it is not worthtrying to pull it out at all. If the underside of the
dent is accessible, it can be hammered out
gently from behind, using a mallet with a
wooden or plastic head. Whilst doing this,
hold a block of wood firmly against the
outside of the panel to absorb the impact
from the hammer blows and thus prevent a
large area of the bodywork from being
“belled-out”.
Should the dent be in a section of the
bodywork that has a double skin or some
other factor making it inaccessible from
behind, a different technique is called for. Drill
several small holes through the metal inside
the area particularly in the deeper section.
Then screw long self-tapping screws into the
holes just sufficiently for them to gain a good
purchase in the metal. Now the dent can be
pulled out by pulling on the protruding heads
of the screws with a pair of pliers.
The next stage of the repair is the removal
of the paint from the damaged area, and from
an inch or so of the surrounding “sound”
bodywork. This is accomplished most easily
by using a wire brush or abrasive pad on a
power drill, although it can be done just as
effectively by hand using sheets of abrasive
paper. To complete the preparation for filling,
score the surface of the bare metal with a
screwdriver or the tang of a file, or
alternatively, drill small holes in the affected
area. This will provide a good “key” for the
filler paste.
To complete the repair see the Section on
filling and re-spraying.
Repair of rust holes or gashes in
bodywork
Remove all paint from the affected area and
from an inch or so of the surrounding “sound”
bodywork, using an abrasive pad or a wire
brush on a power drill. If these are not
available a few sheets of abrasive paper will
do the job just as effectively. With the paint
removed you will be able to gauge the severity
of the corrosion and therefore decide whether
to renew the whole panel (if this is possible) or
to repair the affected area. New body panels
are not as expensive as most people think
and it is often quicker and more satisfactory
to fit a new panel than to attempt to repair
large areas of corrosion.
Remove all fittings from the affected area
except those which will act as a guide to the
original shape of the damaged bodywork (e.g.
headlamp shells, etc.). Then, using tin snips or
a hacksaw blade, remove all loose metal and
any other metal badly affected by corrosion.
Hammer the edges of the hole inwards to
create a slight depression for the filler paste.
Wire brush the affected area to remove the
powdery rust from the surface of the
remaining metal. Paint the affected area with
rust inhibiting paint. If the back of the rusted
area is accessible treat this also.
Before filling can take place it will be
necessary to block the hole in some way. This
can be achieved by using aluminium or plastic
mesh, or aluminium tape.
11•2Bodywork and fittings
Page 106 of 525
Aluminium or plastic mesh, or glass fibre
matting, is probably the best material to use
for a large hole. Cut a piece to the
approximate size and shape of the hole to be
filled, then position it in the hole so that its
edges are below the level of the surrounding
bodywork. It can be retained in position by
several blobs of filler paste around its
periphery.
Aluminium tape should be used for small or
very narrow holes. Pull a piece off the roll and
trim it to the approximate size and shape
required. Then pull off the backing paper (if
used) and stick the tape over the hole. It can
be overlapped if the thickness of one piece is
insufficient. Burnish down the edges of the
tape with the handle of a screwdriver or
similar, to ensure that the tape is securely
attached to the metal underneath.
Bodywork repairs filling and
re-spraying
Before using this Section, see the Sections
on dent, deep scratch, rust holes and gash
repairs.
Many types of bodyfiller are available, but
generally those proprietary kits that contain a
tin of filler paste and a tube of resin hardener
are best for this type of repair. These can be
used directly from the tube. A wide, flexible
plastic or nylon applicator will be found
invaluable for imparting a smooth and well-
contoured finish to the surface of the filler.
Mix up a little filler on a clean piece of card
or board - measure the hardener carefully
(follow the maker’s instructions on the pack)
otherwise the filler will set too rapidly or too
slowly. Using the applicator apply the filler
paste to the prepared area; draw the
applicator across the surface of the filler to
achieve the correct contour and to level the
filler surface. When a contour that
approximates to the correct one is achieved,
stop working the paste - if you carry on too
long the paste will become sticky and begin to
“pick up” on the applicator. Continue to add
thin layers of filler paste at twenty-minute
intervals until the level of the filler is just proud
of the surrounding bodywork.
Once the filler has hardened, excess can be
removed using a metal plane or file. From then
on, progressively finer grades of abrasive
paper should be used, starting with a 40
grade production paper and finishing with 400
grade wet-and-dry paper. Always wrap the
abrasive paper around a flat rubber, cork, or
wooden block otherwise the surface of the
filler will not be completely flat. During the
smoothing of the filler surface the wet-and-dry
paper should be periodically rinsed in water.
This will ensure that a very smooth finish is
imparted to the filler at the final stage.
At this stage the “dent” should be
surrounded by a ring of bare metal, which in
turn should be encircled by the finely
“feathered” edge of the good paintwork.
Rinse the repair area with clean water, until all
the dust produced by the rubbing-down
operation has gone.Spray the whole repair area with a light coat
of primer. This will show up any imperfections
in the surface of the filler. Repair these
imperfections with fresh filler paste or
bodystopper, and again smooth the surface
with abrasive paper. If bodystopper is used, it
can be mixed with cellulose thinners to form a
thin paste that is ideal for filling small holes.
Repeat this spray and repair procedure until
you are satisfied that the surface of the filler,
and the feathered edge of the paintwork are
perfect. Clean the repair area with clean water
and allow to dry fully.
The repair area is now ready for final
spraying. Paint spraying must be carried out
in a warm, dry, windless and dust free
atmosphere. This condition can be created
artificially if you have access to a large indoor
working area, but if you are forced to work in
the open, you will have to pick your day very
carefully. If you are working indoors, dousing
the floor in the work area with water will help
to settle the dust that would otherwise be in
the atmosphere. If the repair area is confined
to one body panel, mask off the surrounding
panels; this will help to minimise the effects of
a slight miss-match in paint colours.
Bodywork fittings (e.g. chrome strips, door
handles, etc.), will also need to be masked off.
Use genuine masking tape and several
thicknesses of newspaper for the masking
operations.
Before beginning to spray, agitate the
aerosol can thoroughly, then spray a test area
(an old tin, or similar) until the technique is
mastered. Cover the repair area with a thick
coat of primer; the thickness should be built
up using several thin layers of paint rather
than one thick one. Using 400 grade
wet-and-dry paper, rub down the surface of
the primer until it is smooth. While doing this,
the work area should be thoroughly doused
with water, and the wet-and-dry paper
periodically rinsed in water. Allow to dry
before spraying on more paint.
Spray on the top coat, again building up the
thickness by using several thin layers of paint.
Start spraying in the centre of the repair area
and then work outwards, with a side-to-side
motion, until the whole repair area and about
2 inches of the surrounding original paintwork
is covered. Remove all masking material 10 to
15 minutes after spraying on the final coat of
paint.
Allow the new paint at least two weeks to
harden, then using a paintwork renovator or a
very fine cutting paste, blend the edges of the
paint into the existing paintwork. Finally, apply
wax polish.
Plastic components
With the use of more and more plastic body
components (e.g. bumpers, spoilers, and in
some cases major body panels), repair of
more serious damage to such items has
become a matter of either entrusting repair
work to a specialist in this field, or renewing
complete components. Repair of suchdamage by the DIY owner is not feasible
owing to the cost of the equipment and
materials required for effecting such repairs.
The basic technique involves making a groove
along the line of the crack in the plastic using
a rotary burr in a power drill. The damaged
part is then welded back together by using a
hot air gun to heat up and fuse a plastic filler
rod into the groove. Any excess plastic is then
removed and the area rubbed down to a
smooth finish. It is important that a filler rod of
the correct plastic is used, as body
components can be made of a variety of
different types (e.g. polycarbonate, ABS,
polypropylene).
Damage of a less serious nature (abrasions,
minor cracks, etc.), can be repaired by the DIY
owner using a two-part epoxy filler repair
material. Once mixed in equal proportions this
is used in similar fashion to the bodywork filler
used on metal panels. The filler is usually
cured in twenty to thirty minutes, ready for
sanding and painting.
If the owner is renewing a complete
component himself, or if he has repaired it
with epoxy filler, he will have a problem of
finding a paint for finishing which is
compatible with the type of plastic used. At
one time the use of a universal paint was not
possible owing to the complex range of
plastics come across in body component
applications. Standard paints, generally, will
not bond to plastic or rubber satisfactorily, but
special paints are available to match any
plastic or rubber finish can be obtained from
dealers. However, it is now possible to obtain
a plastic body parts finishing kit that consists
of a pre-primer treatment, a primer and
coloured top coat. Full instructions are
normally supplied with a kit, but the method of
use is to first apply the pre-primer to the
component concerned and allow it to dry for
up to 30 minutes. Then the primer is applied
and left to dry for about an hour before finally
applying the special coloured top coat. The
result is a correctly coloured component
where the paint will flex with the plastic or
rubber, a property that standard paint does
not normally possess.
5Major body damage - repair
5
Major impact or rust damage should only
be repaired by a Vauxhall dealer or other
competent specialist. Alignment jigs are
needed for successful completion of such
work, superficially effective repairs may leave
dangerous weaknesses in the structure.
Distorted components can also impose
severe stresses on steering and suspension
components with consequent premature
failure.
Bodywork and fittings 11•3
11
Page 108 of 525
to be refitted, tie a length of string to the end
of the wiring. Then feed the wiring through the
boot lid and untie the string, leaving it in
position in the boot lid to assist refitting.
3Mark the position of the hinges on the boot
lid.
4With the help of an assistant, support the
weight of the boot lid, then unscrew the
securing bolts from the hinges, and lift the
boot lid from the vehicle. If the boot lid is to be
refitted, rest it carefully on rags or cardboard,
to avoid damaging the paint.
5If a new boot lid is to be fitted, transfer all
the serviceable fittings (rubber buffers, lock
mechanism, etc.), to it.
6If desired, the boot lid hinge counter-
balance springs can be removed, but before
unhooking them from the vehicle body, note
their position so that they can be refitted in
their original positions (see illustration). Use
a lever to unhook the springs.
Refitting
7Refitting is a reversal of removal,
remembering the following points.
8Align the hinges with the precisely made
marks on the boot lid.
9Where applicable, draw the central locking
solenoid wiring through the boot lid, using the
string.
10If necessary, adjust the hinge bolts and
the rubber buffer until a good fit is obtained
with the boot lid shut.
11If necessary, adjust the position of the
lock striker on the body, to achieve
satisfactory lock operation.
10Boot lid lock (Saloon
models) - removal and
refitting
2
Removal
1Open the boot lid fully.
2Unscrew the two securing screws, then
withdraw the lock and disconnect the
operating rod.
Refitting
3Refitting is a reversal of removal, but if
necessary adjust the position of the lock
striker on the body, to achieve satisfactory
lock operation.
11Boot lid lock cylinder
(Saloon models) - removal
and refitting
2
Removal
1Open the boot lid fully.
2Unscrew the two securing nuts, then
withdraw the lock cylinder complete with the
housing, and disconnect the operating rods(s).
3To remove the lock cylinder from the
housing, insert the key into the lock, then
extract the circlip and the operating lever
assembly from the end of the lock cylinder,
and withdraw the cylinder from the housing.
Refitting
4Refitting is a reversal of removal, but check
the operations of the lock on completion (see
illustration).
12Tailgate (Hatchback models)
-removal and refitting
2
Removal
1Open the tailgate fully.
2Disconnect the battery negative lead.
3Remove the securing screws, and withdraw
the tailgate trim panels.
4Disconnect all the relevant wiring now
exposed, and disconnect the washer fluid
hose.5If the original tailgate is to be refitted, tie
string to the ends of all the relevant wires, and
if necessary the washer fluid hose, then feed
the wiring and the hose through the top edge
of the tailgate. Untie the string, leaving it in
position in the tailgate to assist refitting.
6Prise off the rear roof trim panel, taking care
not to break the securing clips, and lower the
rear of the headlining slightly for access to the
tailgate hinge securing screws (see
illustrations). Mark the hinge positions on the
body.
7Have an assistant support the weight of the
tailgate, then disconnect the tailgate struts
from their mounting balljoints, with reference
to Section 15.
8Ensure that the tailgate is adequately
supported, then remove the hinge securing
screws and withdraw the tailgate from the
vehicle. If the tailgate is to be refitted, rest it
carefully on rags or cardboard, to avoid
damaging the paint.
9If desired, the hinges can be removed from
the tailgate by driving out the hinge pins.
10If the tailgate can be moved up and down
on its hinges due to wear in the hinge pins or
their holes, it may be possible to drill out the
holes and fit slightly oversize pins. Consult a
Vauxhall dealer for further advice.
11If a new tailgate is to be fitted, transfer all
serviceable components to it.
Refitting
12Refitting is a reversal of removal,
remembering the following points.
13Align the hinges with the previously made
marks on the body.
Bodywork and fittings 11•5
12.6B . . . for access to the tailgate hinge
screws12.6A Prise off the rear roof trim panel . . .
11.4 Boot lid/tailgate lock cylinder
components
1 Lock cylinder
2 Housing
3 Operating lever assembly
4 Circlip
9.6 Boot lid hinge counterbalance spring
locations - Saloon models
1 Position for basic boot lid
2 Position for boot lid with outer plastic
trim panel or spoiler
3 Position for boot lid with outer plastic
trim panel and spoiler
11
Page 109 of 525
14If the original tailgate is being refitted,
draw the wiring and washer fluid hose (where
applicable) through the tailgate, using the
string.
15If necessary, adjust the hinge bolts and
the rubber buffers, to obtain a good fit when
the tailgate is shut.
16If necessary, adjust the position of the
lock striker on the body, to achieve
satisfactory lock operation.
13Tailgate lock (Hatchback
models) - removal and
refitting
2
Proceed as described in Section 10, but
note that for access to the lock, the rear
tailgate trim panel must be removed, after
unscrewing the securing screws. Note also
that the lock is secured by three screws (see
illustration).
14Tailgate lock cylinder
(Hatchback models) -
removal and refitting
2
Proceed as described in Section 11, but
note that for access to the lock cylinder, the
rear tailgate trim panel must be removed after
unscrewing the securing screws (see
illustration).
15Tailgate strut (Hatchback
models) - removal and
refitting
2
Removal
1Open the tailgate fully, and have an
assistant support it.
2Release the strut from its mounting
balljoints by prising the spring clips a little way
out (see illustration), and pulling the strut off
the balljoints. If the strut is to be re-used, do
not remove the spring clips completely, and
do not prise them out further than 6.0 mm
(0.24 in).
Refitting
3Refitting is a reversal of removal.
16Door - removal and refitting
3
Front door
Removal
1The door hinges are welded onto the door-
frame and the body pillar, so that there is no
provision for adjustment or alignment.
2To remove a door, open it fully and support
it under its lower edge on blocks covered with
pads of rag.
3Where applicable, disconnect the battery
negative lead, and disconnect the wiring
connector from the front edge of the door. To
release the connector, twist the locking collar,
then pull the connector from the socket in the
door (see illustration).
4Using a punch, drive the large roll pin from
the door check arm pivot.
5Remove the plastic covers from the hinge
pins, then drive out the pins using a punch.
Have an assistant support the door as the
pins are driven out, then withdraw the door
from the vehicle.
Refitting
6Refitting is a reversal of removal, using a
new check link roll pin.
7If the door can be moved up and down on
its hinges due to wear in the hinge pins or
their holes, it may be possible to drill out the
holes and fit slightly oversize pins. Consult a
Vauxhall dealer for further advice.8Door closure may be adjusted by altering
the position of the lock striker on the body
pillar, using an Allen key or hexagon bit.
Rear door
9The removal and refitting procedure for
rear doors is as described for front doors.
Note that on models with central locking or
electric windows, it will be necessary to
remove the door inner trim panel, as
described in Section 17, disconnect the
wiring harness and feed it through the front
edge of the door.
17Door inner trim panel -
removal and refitting
2
Front door
Removal
1Prise the trim plate from the door lock
button in the top rear edge of the door, then
pull the lock button from the lock operating
rod.
2On models with manually operated
windows, release the securing clip and
remove the window regulator handle. To
release the securing clip, insert a length of
wire with a hooked end between the handle
and the trim bezel on the door trim panel, and
manipulate it to free the securing clip from the
handle (see illustration). Take care not to
damage the door trim panel.
3Prise the plastic surround from the door
interior handle (see illustration).
11•6Bodywork and fittings
15.2 Prising the spring clip from a tailgate
strut balljoint
17.2 Window regulator handle securing
clip16.3 Disconnect the wiring connector
from the front edge of the door
14.1 Tailgate lock cylinder housing - with
central locking (trim panel removed)13.1 Tailgate lock (trim panel removed)