1987 MAZDA 626 Rear brake
[x] Cancel search: Rear brakePage 10 of 1865
G TOWING
76GOGX-OQ2
i-^C.
y -
- r^jfftj&H
r —I
76UQGX-003
86U0GX-004
G—8
TOWING
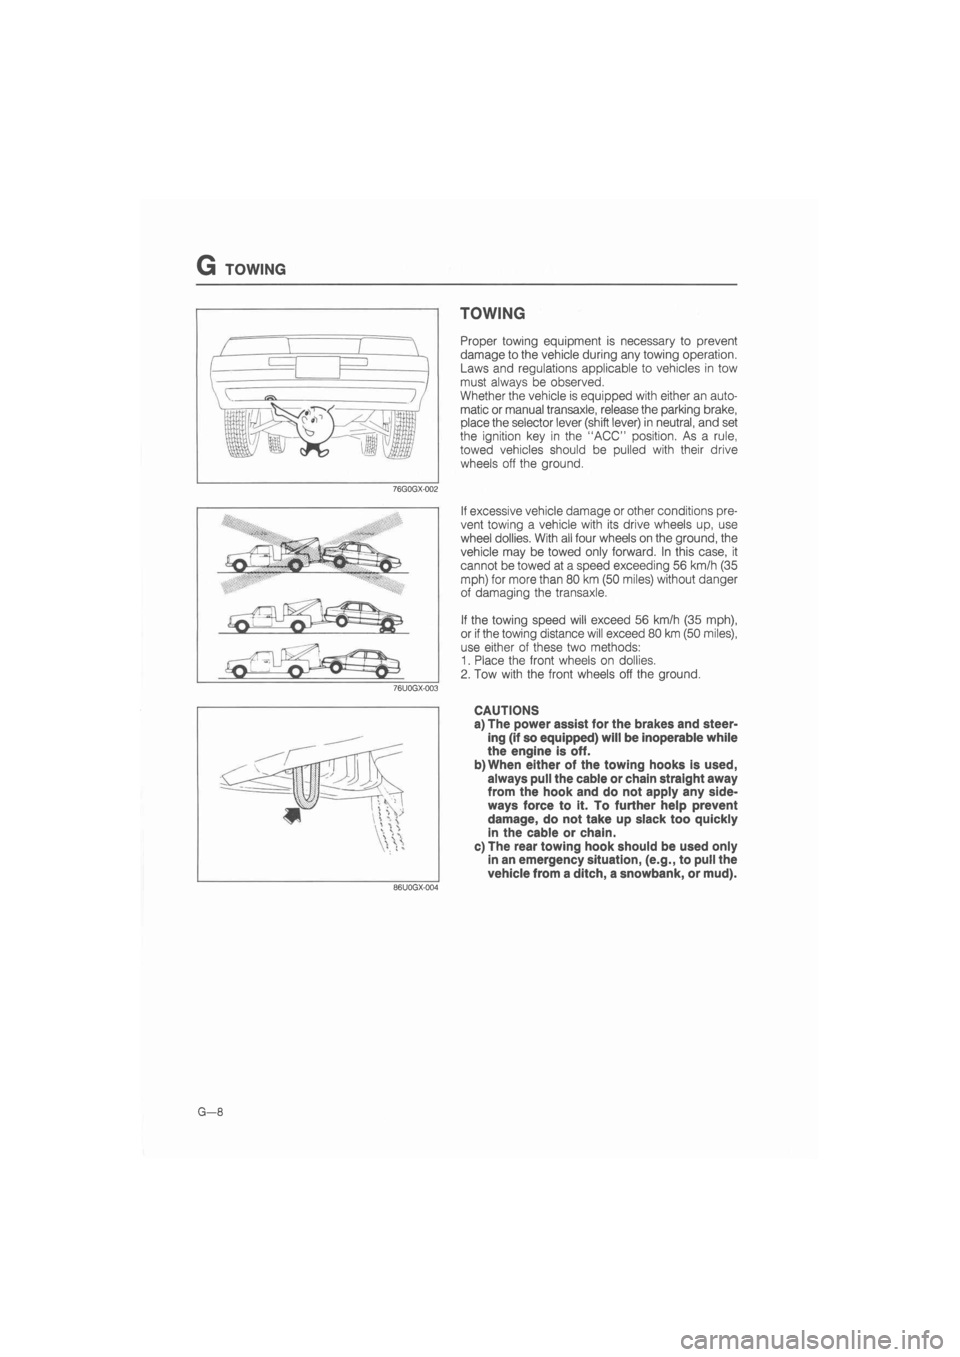
Proper towing equipment is necessary to prevent
damage to the vehicle during any towing operation.
Laws and regulations applicable to vehicles in tow
must always be observed.
Whether the vehicle is equipped with either an auto-
matic or manual transaxle, release the parking brake,
place the selector lever (shift lever) in neutral, and set
the ignition key in the "ACC" position. As a rule,
towed vehicles should be pulled with their drive
wheels off the ground.
If excessive vehicle damage or other conditions pre-
vent towing a vehicle with its drive wheels up, use
wheel dollies. With all four wheels on the ground, the
vehicle may be towed only forward. In this case, it
cannot be towed at a speed exceeding 56 km/h (35
mph) for more than 80 km (50 miles) without danger
of damaging the transaxle.
If the towing speed will exceed 56 km/h (35 mph),
or if the towing distance will exceed 80 km (50 miles),
use either of these two methods:
1. Place the front wheels on dollies.
2. Tow with the front wheels off the ground.
CAUTIONS
a) The power assist for the brakes and steer-
ing (if so equipped) will be inoperable while
the engine is off.
b)When either of the towing hooks is used,
always pull the cable or chain straight away
from the hook and do not apply any side-
ways force to it. To further help prevent
damage, do not take up slack too quickly
in the cable or chain.
c) The rear towing hook should be used only
in an emergency situation, (e.g., to pull the
vehicle from a ditch, a snowbank, or mud).
Page 14 of 1865
0 PRE-DELIVERY INSPECTION
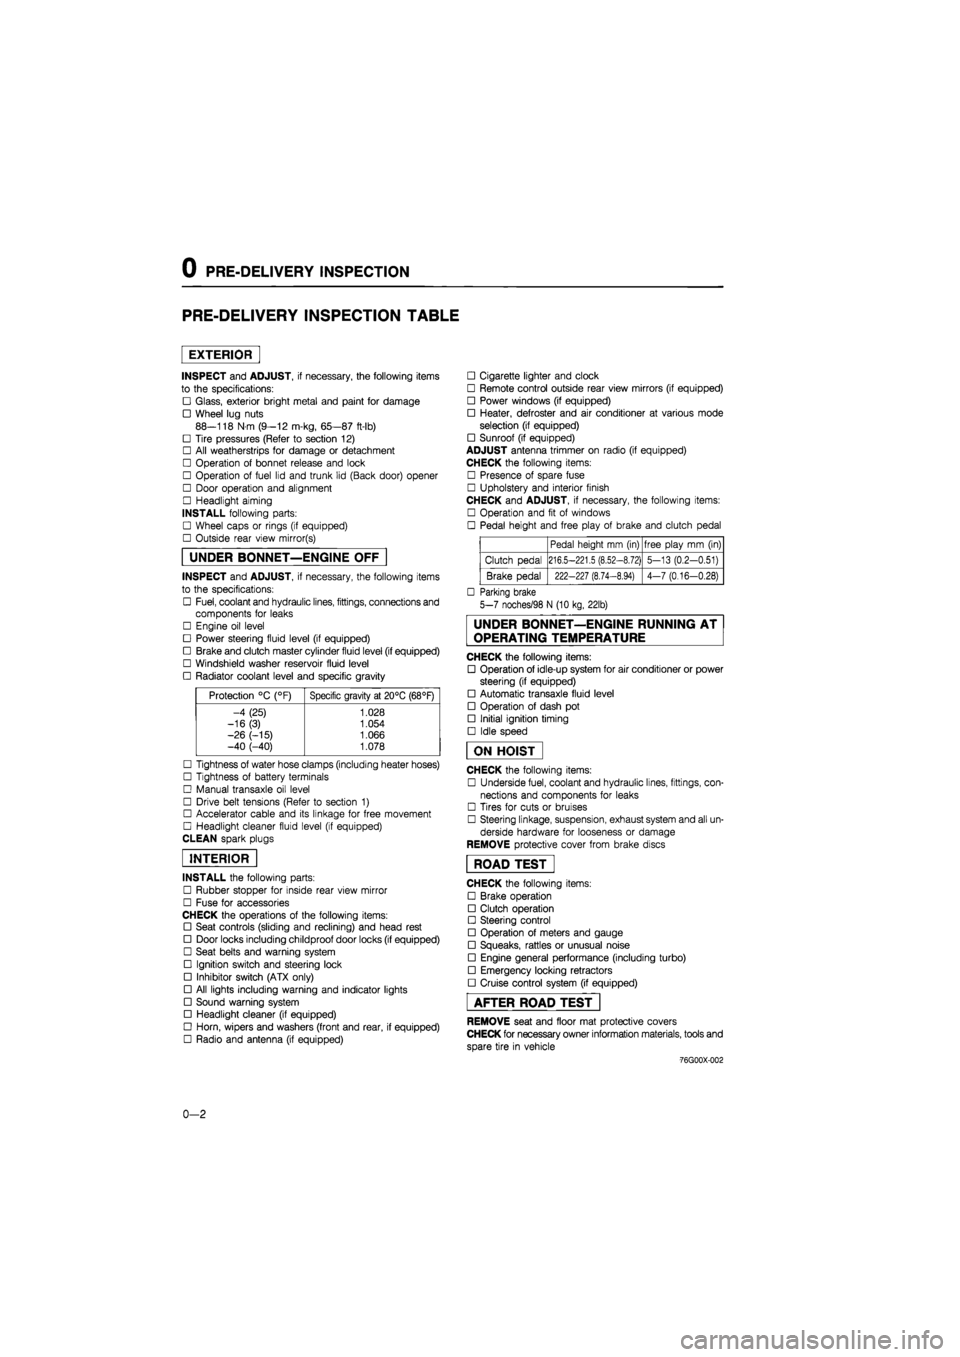
PRE-DELIVERY INSPECTION TABLE
EXTERIOR
INSPECT and ADJUST, if necessary, the following items
to the specifications:
• Glass, exterior bright metal and paint for damage
• Wheel lug nuts
88—118 N m (9—12 m-kg, 65—87 ft-lb)
• Tire pressures (Refer to section 12)
• All weatherstrips for damage or detachment
• Operation of bonnet release and lock
• Operation of fuel lid and trunk lid (Back door) opener
• Door operation and alignment
• Headlight aiming
INSTALL following parts:
• Wheel caps or rings (if equipped)
• Outside rear view mirror(s)
UNDER BONNET—ENGINE OFF
INSPECT and ADJUST, if necessary, the following items
to the specifications:
• Fuel, coolant and hydraulic lines, fittings, connections and
components for leaks
• Engine oil level
• Power steering fluid level (if equipped)
• Brake and clutch master cylinder fluid level (if equipped)
• Windshield washer reservoir fluid level
• Radiator coolant level and specific gravity
Protection °C (°F) Specific gravity at 20°C (68°F)
-4 (25) 1.028
-16(3) 1.054
-26 (-15) 1.066 -40 (-40) 1.078
• Tightness of water hose clamps (including heater hoses)
• Tightness of battery terminals
• Manual transaxle oil level
• Drive belt tensions (Refer to section 1)
• Accelerator cable and its linkage for free movement
• Headlight cleaner fluid level (if equipped)
CLEAN spark plugs
INTERIOR
INSTALL the following parts:
• Rubber stopper for inside rear view mirror
• Fuse for accessories
CHECK the operations of the following items:
• Seat controls (sliding and reclining) and head rest
• Door locks including childproof door locks (if equipped)
• Seat belts and warning system
• Ignition switch and steering lock
• Inhibitor switch (ATX only)
• All lights including warning and indicator lights
• Sound warning system
• Headlight cleaner (if equipped)
• Horn, wipers and washers (front and rear, if equipped)
• Radio and antenna (if equipped)
• Cigarette lighter and clock
• Remote control outside rear view mirrors (if equipped)
• Power windows (if equipped)
• Heater, defroster and air conditioner at various mode
selection (if equipped)
• Sunroof (if equipped)
ADJUST antenna trimmer on radio (if equipped)
CHECK the following items:
• Presence of spare fuse
• Upholstery and interior finish
CHECK and ADJUST, if necessary, the following items:
• Operation and fit of windows
• Pedal height and free play of brake and clutch pedal
Pedal height mm (in) free play mm (in)
Clutch pedal 216.5-221.5 (8.52-8.72) 5-13 (0.2-0.51)
Brake pedal 222-227 (8.74-8.94) 4-7 (0.16-0.28)
• Parking brake
5-7 noches/98 N (10 kg, 22lb)
UNDER BONNET—ENGINE RUNNING AT
OPERATING TEMPERATURE
CHECK the following items:
• Operation of idle-up system for air conditioner or power
steering (if equipped)
• Automatic transaxle fluid level
• Operation of dash pot
• Initial ignition timing
• Idle speed
ON HOIST
CHECK the following items:
• Underside fuel, coolant and hydraulic lines, fittings, con-
nections and components for leaks
• Tires for cuts or bruises
• Steering linkage, suspension, exhaust system and all un-
derside hardware for looseness or damage
REMOVE protective cover from brake discs
ROAD TEST"
CHECK the following items:
• Brake operation
• Clutch operation
• Steering control
• Operation of meters and gauge
• Squeaks, rattles or unusual noise
• Engine general performance (including turbo)
• Emergency locking retractors
• Cruise control system (if equipped)
AFTER ROAD TEST
REMOVE seat and floor mat protective covers
CHECK for necessary owner information materials, tools and
spare tire in vehicle
-76G00X-002
0-2
Page 19 of 1865
Interval
Procedure & item
Number of Months or km, whichever corns first
©1 ©2 ©3 ©4 Service data and inspection point Page
Interval
Procedure & item
Months — 6 12 18 24 30 36 42 48 ©1 ©2 ©3 ©4 Service data and inspection point Page
Interval
Procedure & item
x 1000 Km 1 10 20 30 40 50 60 70 80 ©1 ©2 ©3 ©4 Service data and inspection point Page
Interval
Procedure & item Miles x 1000 0.6 6 12 18 24 30 36 42 48
©1 ©2 ©3 ©4 Service data and inspection point Page
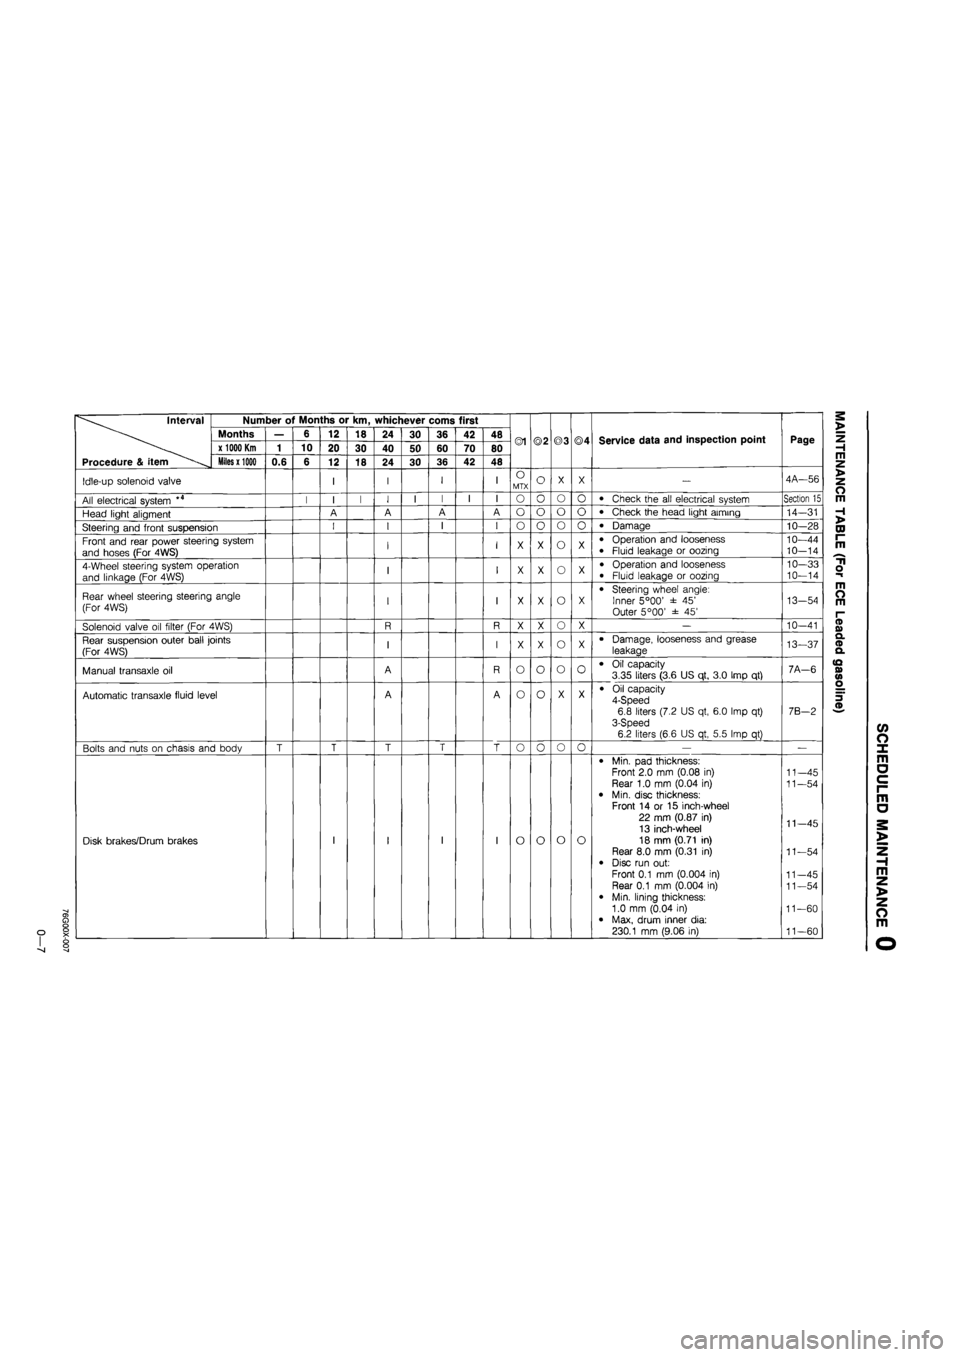
Idle-up solenoid valve I I I I O MTX o X X — 4A—56
All electrical system *4 I I I I I I I I o o o o • Check the all electrical system Section 15
Head light aligment A A A A o o o o • Check the head light aiming 14-31
Steering and front suspension I I I I o o o 0 • Damage 10—28
Front and rear power steering system
and hoses (For 4WS) I I X X o X • Operation and looseness • Fluid leakage or oozing 10—44 10—14
4-Wheel steering system operation
and linkage (For 4WS) I I X X o X • Operation and looseness
• Fluid leakage or oozing
10—33 10—14
Rear wheel steering steering angle
(For 4WS) I I X X o X • Steering wheel angle: Inner 5°00' ± 45' Outer 5°00' ± 45'
13-54
Solenoid valve oil filter (For 4WS) R R X X o X — 10-41
Rear suspension outer ball joints
(For 4WS) I I X X o X • Damage, looseness and grease
leakage 13—37
Manual transaxle oil A R o o o 0 • Oil capacity 3.35 liters (3.6 US qt, 3.0 Imp qt) 7A-6
Automatic transaxle fluid level A A o o X X • Oil capacity 4-Speed 6.8 liters (7.2 US qt, 6.0 Imp qt) 3-Speed 6.2 liters (6.6 US qt, 5.5 Imp qt)
7B-2
Bolts and nuts on chasis and body T T T T T o o o o — —
Disk brakes/Drum brakes I I I I o o o o
• Min. pad thickness: Front 2.0 mm (0.08 in) Rear 1.0 mm (0.04 in) • Min. disc thickness: Front 14 or 15 inch-wheel
22 mm (0.87 in) 13 inch-wheel 18 mm (0.71 in) Rear 8.0 mm (0.31 in)
• Disc run out:
Front 0.1 mm (0.004 in) Rear 0.1 mm (0.004 in)
• Min. lining thickness: 1.0 mm (0.04 in) • Max, drum inner dia: 230.1 mm (9.06 in)
11—45
11—54
11—45
11—54
11-45 11—54
11-60
11—60
Page 25 of 1865
GO
Interval
Procedure & item
Number of Months or km, whichever corns first
©1 ©2 ©3 ©4 Service data and inspection point Page
Interval
Procedure & item
Months — 6 12 18 24 30 36 42 48 ©1 ©2 ©3 ©4 Service data and inspection point Page
Interval
Procedure & item
x 1000 Km 1 10 20 30 40 50 60 70 80 ©1 ©2 ©3 ©4 Service data and inspection point Page
Interval
Procedure & item Miles x 1000 0.6 6 12 18 24 30 36 42 48
©1 ©2 ©3 ©4 Service data and inspection point Page
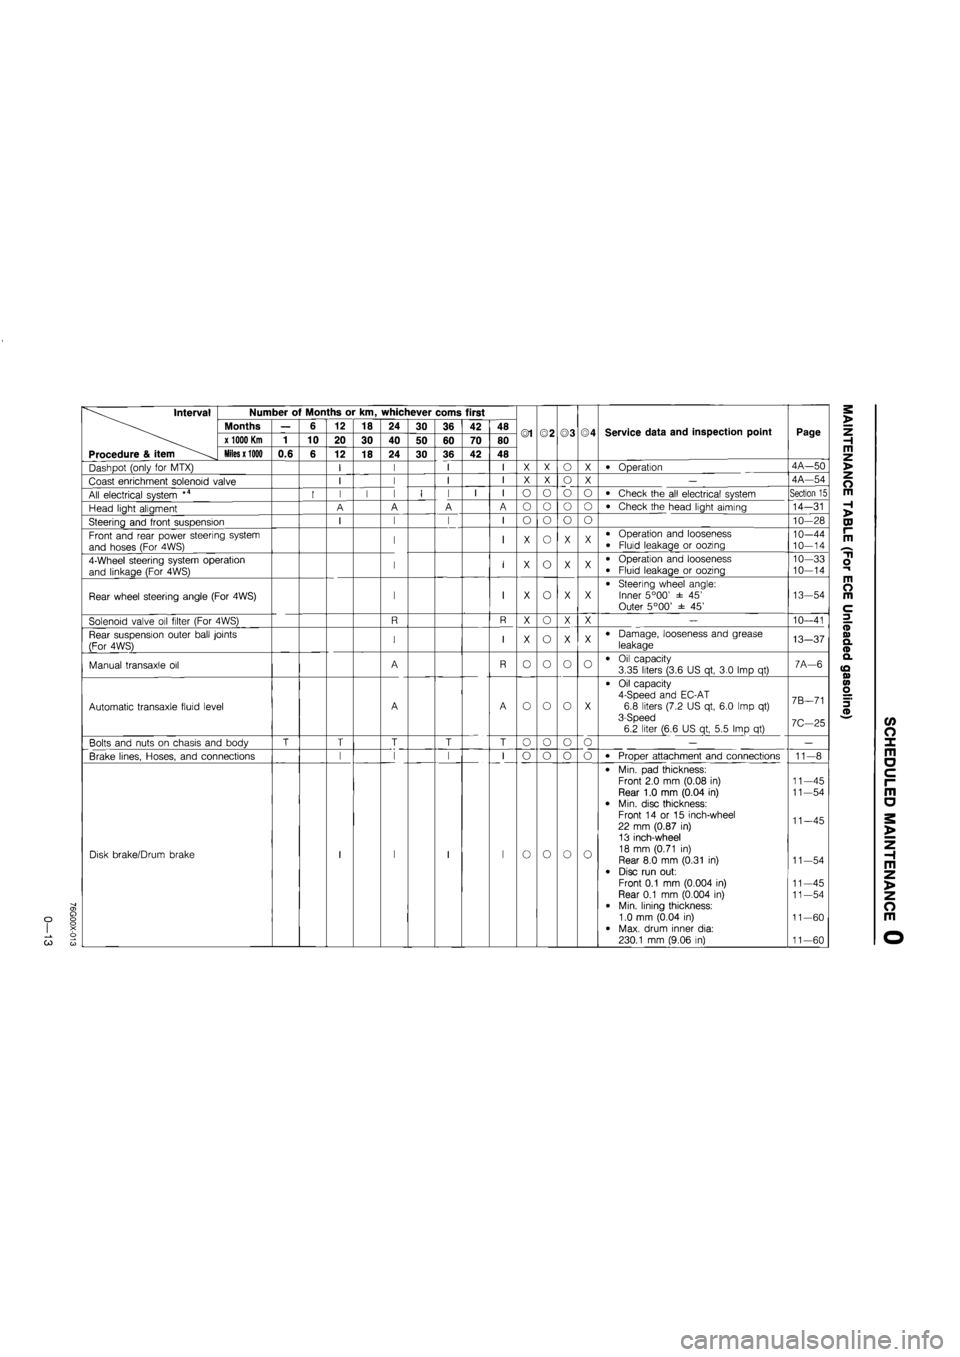
Dashpot (only for MTX) I I I I X X o X • Operation 4A—50
Coast enrichment solenoid valve I I I I X X o X — 4A—54
All electrical system *4 I I I I I I I I o o o o • Check the all electrical system Section 15
Head light aligment A A A A o o o o • Check the head light aiming 14-31
Steering and front suspension I I I I o o o o 10—28
Front and rear power steering system
and hoses (For 4WS) I I X o X X • Operation and looseness
• Fluid leakage or oozing 10—44
10-14
4-Wheel steering system operation
and linkage (For 4WS) I I X o X X • Operation and looseness
• Fluid leakage or oozing
10—33 10—14
Rear wheel steering angle (For 4WS) I I X o X X • Steering wheel angle: Inner 5°00' ± 45' Outer 5°00' ± 45'
13-54
Solenoid valve oil filter (For 4WS) R R X o X X — 10—41
Rear suspension outer ball joints
(For 4WS) I I X o X X • Damage, looseness and grease
leakage 13-37
Manual transaxle oil A R o o o o • Oil capacity 3.35 liters (3.6 US qt, 3.0 Imp qt) 7A—6
Automatic transaxle fluid level A A o o o X
• Oil capacity 4-Speed and EC-AT 6.8 liters (7.2 US qt, 6.0 Imp qt) 3-Speed 6.2 liter (6.6 US qt, 5.5 Imp qt)
7B—71
7C—25
Bolts and nuts on chasis and body T T T T T o o o o — —
Brake lines, Hoses, and connections I I I l_
I
o o o o • Proper attachment and connections 11-8
Disk brake/Drum brake I I I
l_
I o o o 0
• Min. pad thickness: Front 2.0 mm (0.08 in) Rear 1.0 mm (0.04 in)
• Min. disc thickness: Front 14 or 15 inch-wheel 22 mm (0.87 in)
13 inch-wheel 18 mm (0.71 in) Rear 8.0 mm (0.31 in)
• Disc run out:
Front 0.1 mm (0.004 in) Rear 0.1 mm (0.004 in) • Min. lining thickness: 1.0 mm (0.04 in)
• Max. drum inner dia: 230.1 mm (9.06 in)
11—45 11—54
11—45
11-54
11—45
11-54
11—60
11-60
Page 31 of 1865

CD
o> O o o X o
Interval
Procedure & item
Number of Months or km, whichever corns first
©1 ©2 ©3 ©4 Service data and inspection point Page
Interval
Procedure & item
Months — 6 12 18 24 30 36 42 48 ©1 ©2 ©3 ©4 Service data and inspection point Page
Interval
Procedure & item
x 1000 Km
1 10 20 30 40 50 60 70 80 ©1 ©2 ©3 ©4 Service data and inspection point Page
Interval
Procedure & item
Miles x 1000
0.6 6 12 18 24 30 36 42 48
©1 ©2 ©3 ©4 Service data and inspection point Page
Idle mixture (1) only for carbretor (I) I I I I O O o X
• CO concentration 2.0 ± 0.5 % CO concentration FE DOHC 1.5 ± 0.5 % HC concentration FE DOHC Less than 1000 rpm
4A-38
4C-30
Evaporative system
(only for middle east) I I I I X O X X — 4A—78
Dashpot (only for MTX) I I I I o X X X • Operation 4A—50
Coasting leaner system *6 t I I I
,
O X X X — 4A-56
Brake lines, hoses and connections I I I I o o o o • Proper attachment and connections 11-8
Disc brakes [ I I I I [ I I o o o o
• Min. pad thickness: Front 2.0 mm (0.08 in) Rear 1.0 mm (0.04 in)
• Min. disc thickness: Front 14 or 15 inch-wheel 22 mm (0.87 in)
13 inch-whel 18 mm (0.71 in) Rear 8.0 mm (0.31 in) • Disc run out: Front 0.1 mm (0.004 in) Rear 0.1 mm (0.004 in)
11—45 11—54
11—45
11—54
11—45
11—54
Drum brakes I I I I o o X o
• Min. lining thickness: 1.0 mm (0.004 in)
• Max. drum inner dia: 14 or 15 inch-wheel 230.1 mm (9.06 in) 13 inch-wheel 201.5 mm (7.93 in)
11-60
11—60
Steering linkages, rack guide and tie
rod ends I I I I I o o o o • Operation and looseness 10-11
Manual transaxle oil R o o 0 o • Oil capacity
3.35 liters (3.6 US qt, 3.0 Imp qt) 7A—6
Automatic transaxle fluid level I I I I o o X X
• Oil capacity 4-Speed 6.8 liters (7.2 US qt, 6.0 Imp qt) 3-Speed 6.2 liters (6.6 US qt, 5.5 Imp qt)
7B—71
7C-25
m z >
o m
H >
CO I-m
"ti o
a
Page 228 of 1865

1 C ON-VEHICLE MAINTENANCE (CYLINDER HEAD)
CYLINDER HEAD
Removal
1. Disconnect the negative battery cable.
2. Drain the engine coolant.
3. Remove in the sequence shown in the figure referring to the removal note for specially marked parts.
76G01C-031
1. Accelerator cable
2. Air cleaner
3. Brake vacuum pipe
4. Intercooler pipe and hose*
5. Drive belt cover
6. Vacuum pump drive belt
7. Fuel hose
8. Water temperature switch
connector
9. Glow plug connector
10. Water thermo switch con-
nector
11. Heat gauge unit connector
12. Boost air temperature sen-
sor connector*
13. Injection pipes
14. Upper radiator hose
15. Water hose
(thermostat—FIR)
16. Oil level gauge and stay
bolt
17. Oil pipe bolt
18. Timing belt (Refer to page
1C—11)
19. Cylinder head cover
20. Camshaft pulley
21. Rear camshaft pulley
76G01C-032
22. Injection pump pulley
23. Seal plate
24. Water hose and pipe
25. Comprex supercharger
drive belt*
26. Heat insulator*
27. Exhaust manifold stay
28. Front exhaust pipe
29. Cylinder head bolt
30. Cylinder head
31. Cylinder head gasket
32. Comprex supercharger*
33. Exhaust manifold
34. Intake manifold
Note
* marked parts are equipped only for the RF-CX.
1C-16
Page 472 of 1865

4B TROUBLESHOOTING WITH SST
INSPECTION PROCEDURE
1. Connect the SST to the check connector, (Green,
6-pin) and the negative battery terminal.
2. Set the select switch to position A.
Note
The check connector is located at the rear of
the left side wheel housing.
86U04A-011
Test connector: Green (1 pin)
3. Ground the test connector (Green, 1-pin) with a
jumper wire.
Note
The test connector is located near the Self-
Diagnosis Checker check connector.
86U04A-012
OO
uu
SELF-DIAGNOSIS CHECKER
(WPUTOft
SELECT
S*
5
o n==ru
o o o o 49 HO 18 9AI
76G04B-005
4. Turn the ignition switch ON.
5. Verify that 88 flashes on the digital display and that
the buzzer sounds for three seconds after turn-
ing the ignition switch ON.
6. If 88 does not flash, check the main relay (Refer
to page 4B—86), power supply circuit, and check
connector wiring.
7. If 88 flashes and the buzzer sounds continuously
for more than 20 seconds, replace the engine con-
trol unit and perform steps 3 and 4 again.
8. Note the code numbers and check for the causes
by referring to the check sequences shown on
pages from 4B—14 to 4B—24. Repair as
necessary.
Note
Cancel the code numbers by performing the
after-repair procedure after repairing.
AFTER-REPAIR PROCEDURE
1. Cancel the memory of malfunctions by disconnect-
ing the negative battery cable and depressing the
brake pedal for at least 2 seconds; then recon-
nect the negative battery cable.
76G04B-134
4B—10
Page 487 of 1865
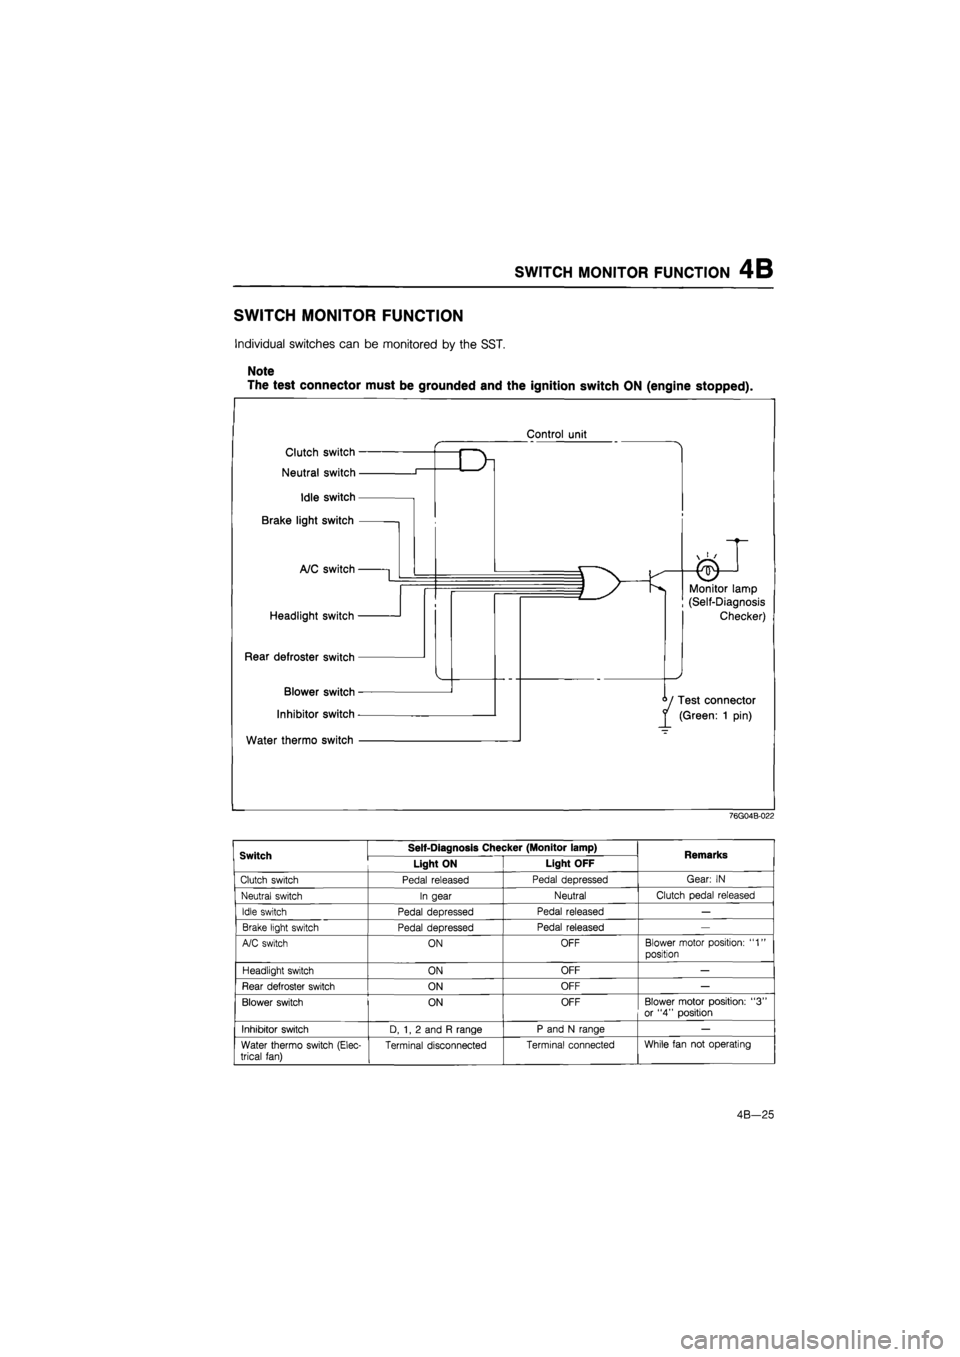
SWITCH MONITOR FUNCTION 4B
SWITCH MONITOR FUNCTION
Individual switches can be monitored by the SST.
Note
The test connector must be grounded and the ignition switch ON (engine stopped).
Control unit
76G04B-022
Switch Self-Diagnosis Checker (Monitor lamp) Remarks Switch Light ON Light OFF Remarks
Clutch switch Pedal released Pedal depressed Gear:
IN
Neutral switch In gear Neutral Clutch pedal released
Idle switch Pedal depressed Pedal released
—
Brake light switch Pedal depressed Pedal released
—
A/C switch ON OFF Blower motor position:
"1"
position
Headlight switch ON OFF
—
Rear defroster switch ON OFF
—
Blower switch ON OFF Blower motor position:
"3"
or
"4"
position
Inhibitor switch D,
1, 2
and
R
range P and
N
range
—
Water thermo switch (Elec-trical fan) Terminal disconnected Terminal connected While fan
not
operating
4B-25