Page 1526 of 1865
REAR SHOCK ABSORBER AND SPRING 1 3
REAR SHOCK ABSORBER AND SPRING
REMOVAL AND INSTALLATION
1. Jack up the front of the vehicle and support it with safety stands.
2. Remove in the sequence shown in the figure, referring to the removal note for specially marked parts.
3. Install in the reverse order of removal, referring to the installation note for specially marked parts.
4. Tighten all nuts and bolts to the specified torque, referring to the figure.
1. Trim 4. Clip 7. Bolt and nut
2. Lug nut 5. Harness and bracket (ABS) 8. Nut
3. Wheel and tire 6. Actuator (AAS) 9. Shock absorber assembly
13-29
Page 1547 of 1865

1 3 FRONT WHEEL ALIGNMENT
FRONT WHEEL ALIGNMENT
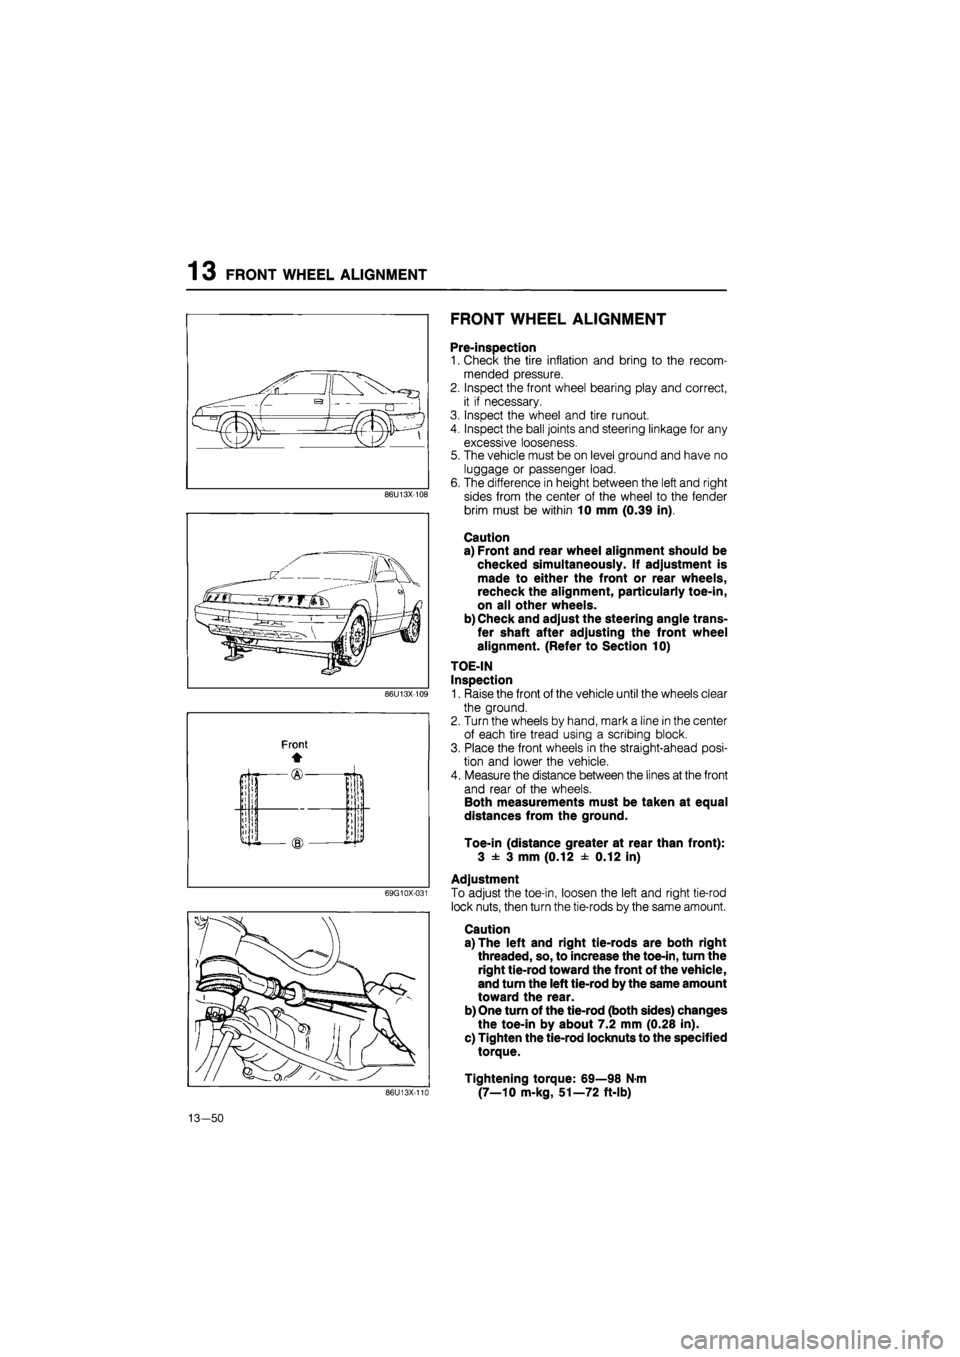
86U13X-108
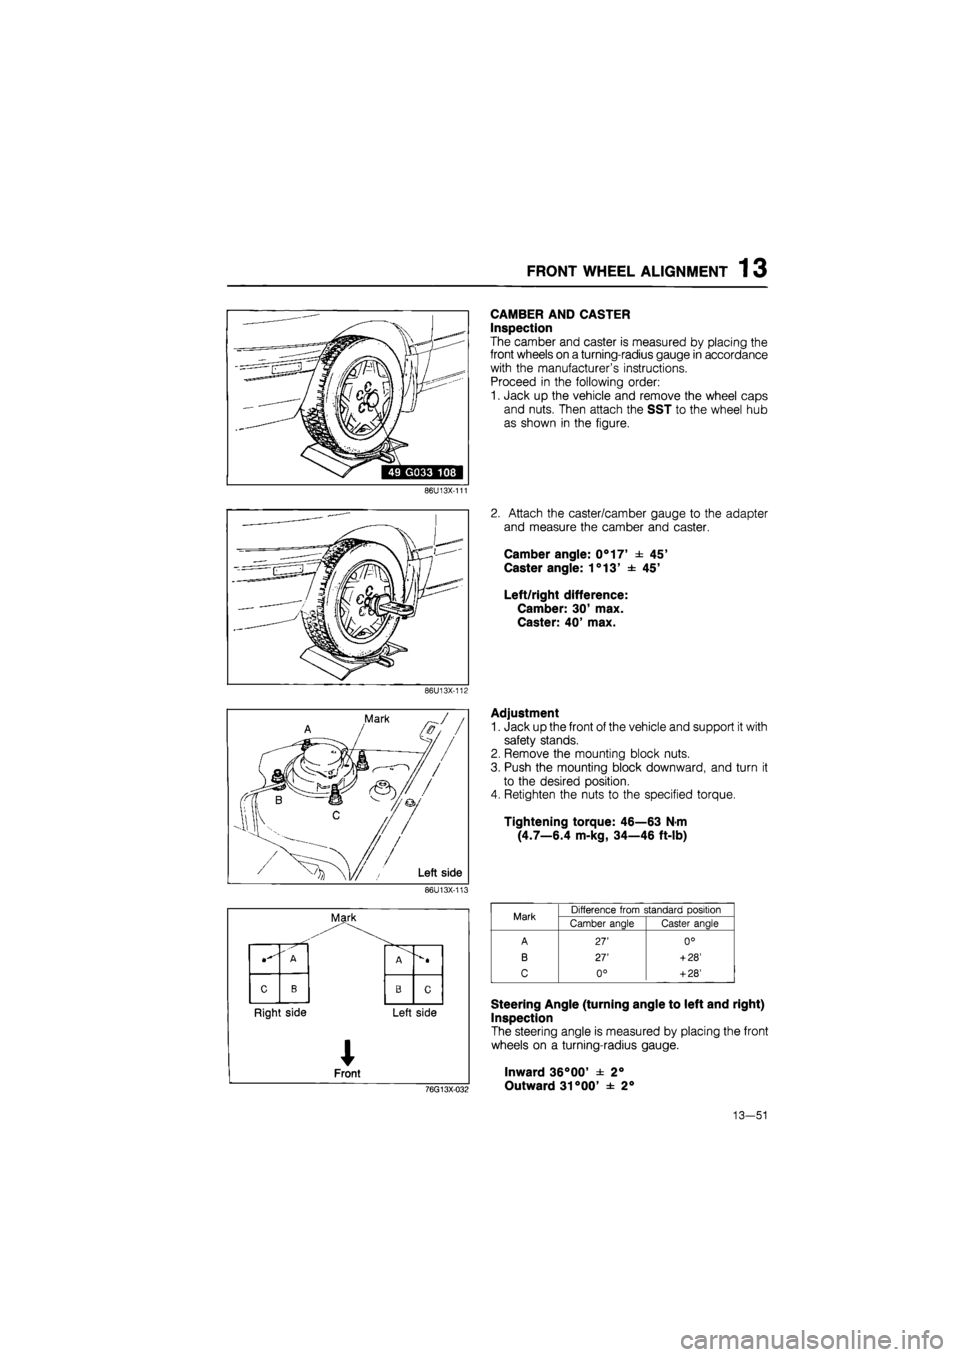
69G10X-031
Pre-inspection
1. Check the tire inflation and bring to the recom-
mended pressure.
2. Inspect the front wheel bearing play and correct,
it if necessary.
3. Inspect the wheel and tire runout.
4. Inspect the ball joints and steering linkage for any
excessive looseness.
5. The vehicle must be on level ground and have no
luggage or passenger load.
6. The difference in height between the left and right
sides from the center of the wheel to the fender
brim must be within 10 mm (0.39 in).
Caution
a) Front and rear wheel alignment should be
checked simultaneously. If adjustment is
made to either the front or rear wheels,
recheck the alignment, particularly toe-in,
on all other wheels.
b) Check and adjust the steering angle trans-
fer shaft after adjusting the front wheel
alignment. (Refer to Section 10)
TOE-IN
Inspection
1. Raise the front of the vehicle until the wheels clear
the ground.
2. Turn the wheels by hand, mark a line in the center
of each tire tread using a scribing block.
3. Place the front wheels in the straight-ahead posi-
tion and lower the vehicle.
4. Measure the distance between the lines at the front
and rear of the wheels.
Both measurements must be taken at equal
distances from the ground.
Toe-in (distance greater at rear than front):
3 ± 3 mm (0.12 ± 0.12 in)
Adjustment
To adjust the toe-in, loosen the left and right tie-rod
lock nuts, then turn the tie-rods by the same amount.
Caution
a) The left and right tie-rods are both right
threaded, so, to increase the toe-in, turn the
right tie-rod toward the front of the vehicle,
and turn the left tie-rod by the same amount
toward the rear.
b) One turn of the tie-rod (both sides) changes
the toe-in by about 7.2 mm (0.28 in).
c) Tighten the tie-rod locknuts to the specified
torque.
Tightening torque: 69—98 N-m
(7—10 m-kg, 51—72 ft-lb) 86U13X-110
13-50
Page 1548 of 1865

FRONT WHEEL ALIGNMENT 13
86U13X-111
86U13X-112
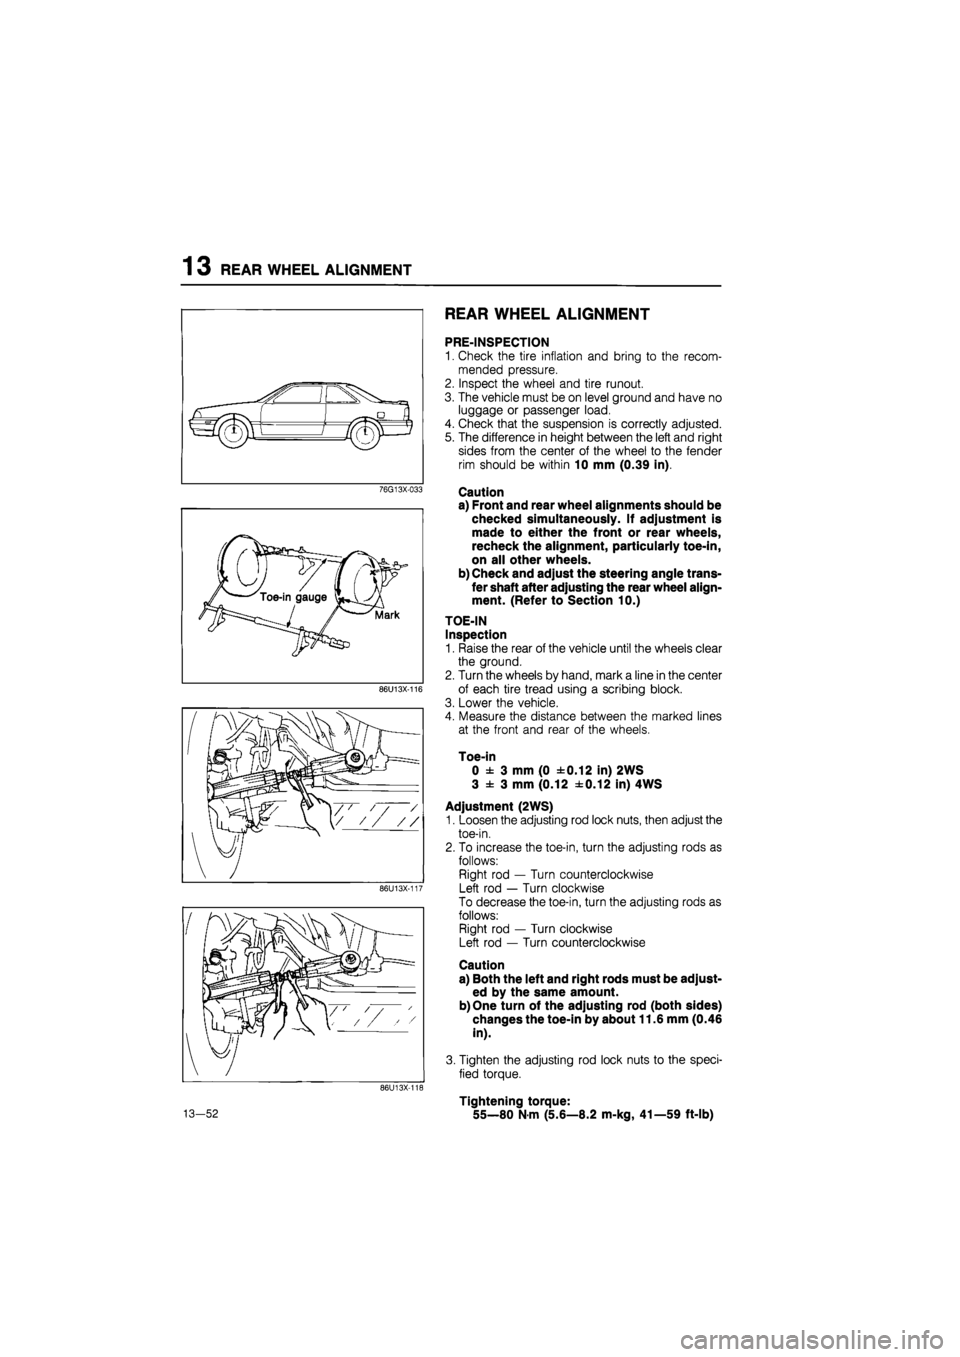
86U13X-113
Mark
" A
c B
Right side
Front
A
B c
Left side
CAMBER AND CASTER
Inspection
The camber and caster is measured by placing the
front wheels on a turning-radius gauge in accordance
with the manufacturer's instructions.
Proceed in the following order:
1. Jack up the vehicle and remove the wheel caps
and nuts. Then attach the SST to the wheel hub
as shown in the figure.
2. Attach the caster/camber gauge to the adapter
and measure the camber and caster.
Camber angle: 0°17' ± 45'
Caster angle: 1°13' ± 45'
Left/right difference:
Camber: 30' max.
Caster: 40' max.
Adjustment
1. Jack up the front of the vehicle and support it with
safety stands.
2. Remove the mounting block nuts.
3. Push the mounting block downward, and turn it
to the desired position.
4. Retighten the nuts to the specified torque.
Tightening torque: 46—63 N-m
(4.7—6.4 m-kg, 34—46 ft-lb)
Mark Difference from standard oosition Mark Camber angle Caster angle
A 27' 0°
B 27' + 28'
C 0° + 28'
76G13X-032
Steering Angle (turning angle to left and right)
Inspection
The steering angle is measured by placing the front
wheels on a turning-radius gauge.
Inward 36°00' ± 2°
Outward 31°00' ± 2°
13—51
Page 1549 of 1865

13 REAR WHEEL ALIGNMENT
76G13X-033
86U13X-116
86U13X-117
86U13X-116
13-52
REAR WHEEL ALIGNMENT
PRE-INSPECTION
1. Check the tire inflation and bring to the recom-
mended pressure.
2. Inspect the wheel and tire runout.
3. The vehicle must be on level ground and have no
luggage or passenger load.
4. Check that the suspension is correctly adjusted.
5. The difference in height between the left and right
sides from the center of the wheel to the fender
rim should be within 10 mm (0.39 in).
Caution
a) Front and rear wheel alignments should be
checked simultaneously. If adjustment is
made to either the front or rear wheels,
recheck the alignment, particularly toe-in,
on all other wheels.
b) Check and adjust the steering angle trans-
fer shaft after adjusting the rear wheel align-
ment. (Refer to Section 10.)
TOE-IN
Inspection
1. Raise the rear of the vehicle until the wheels clear
the ground.
2. Turn the wheels by hand, mark a line in the center
of each tire tread using a scribing block.
3. Lower the vehicle.
4. Measure the distance between the marked lines
at the front and rear of the wheels.
Toe-in
0 ± 3 mm (0 ±0.12 in) 2WS
3 ± 3 mm (0.12 ±0.12 in) 4WS
Adjustment (2WS)
1. Loosen the adjusting rod lock nuts, then adjust the
toe-in.
2. To increase the toe-in, turn the adjusting rods as
follows:
Right rod — Turn counterclockwise
Left rod — Turn clockwise
To decrease the toe-in, turn the adjusting rods as
follows:
Right rod — Turn clockwise
Left rod — Turn counterclockwise
Caution
a) Both the left and right rods must be adjust-
ed by the same amount.
b) One turn of the adjusting rod (both sides)
changes the toe-in by about 11.6 mm (0.46
in).
3. Tighten the adjusting rod lock nuts to the speci-
fied torque.
Tightening torque:
55—80 N-m (5.6—8.2 m-kg, 41—59 ft-lb)
Page 1550 of 1865
REAR WHEEL ALIGNMENT 13
86U13X-119
Adjustment (4WS)
To adjust the toe-in, loosen the left and right tie-rod
locknuts, and turn the tie-rods by the same amount.
Caution
a) The left and right tie-rods are both right
threaded, so, to increase the toe-in, turn the
right tie-rod toward the front of the vehicle,
and turn the left tie-rod by the same amount
toward the rear.
b) One turn of the tie-rod (both sides) changes
the toe-in by about 7.8 mm (0.31 in).
c) Adjust the toe-in after adjusting the steer-
ing angle.
Tighten the tie-rod locknuts to the specified torque.
Tightening torque: 69—98 N-m
(7—10 m-kg, 51—72 ft-lb)
86U13X-120
CAMBER
Preparation
1. Remove the center caps from the wheels.
2. Uncrimp the locknut and remove it.
86U13X-121
Inspection
1. Install the SST to the driveshaft.
86U13X-122
13—53
Page 1631 of 1865

14 INSTRUMENT PANEL
INSTALLATION
Install in the reverse order of removal, noting the fol-
lowing.
1. Tightening torque:
.^Torque Bolt
N-m (m-kg,
ft-lb)
©
4.22-6.18 (0.43-0.63, 3.10-4.54)
®(D
8.8-14 (0.9—1.4, 6.5—10)
©(D
8.8—14 (0.9—1.4, 6.5—10)
©@
8.8-14 (0.9-1.4, 6.5-10)
Steering wheel 39-49 (4.0—5.0, 29—36)
86U14X-195
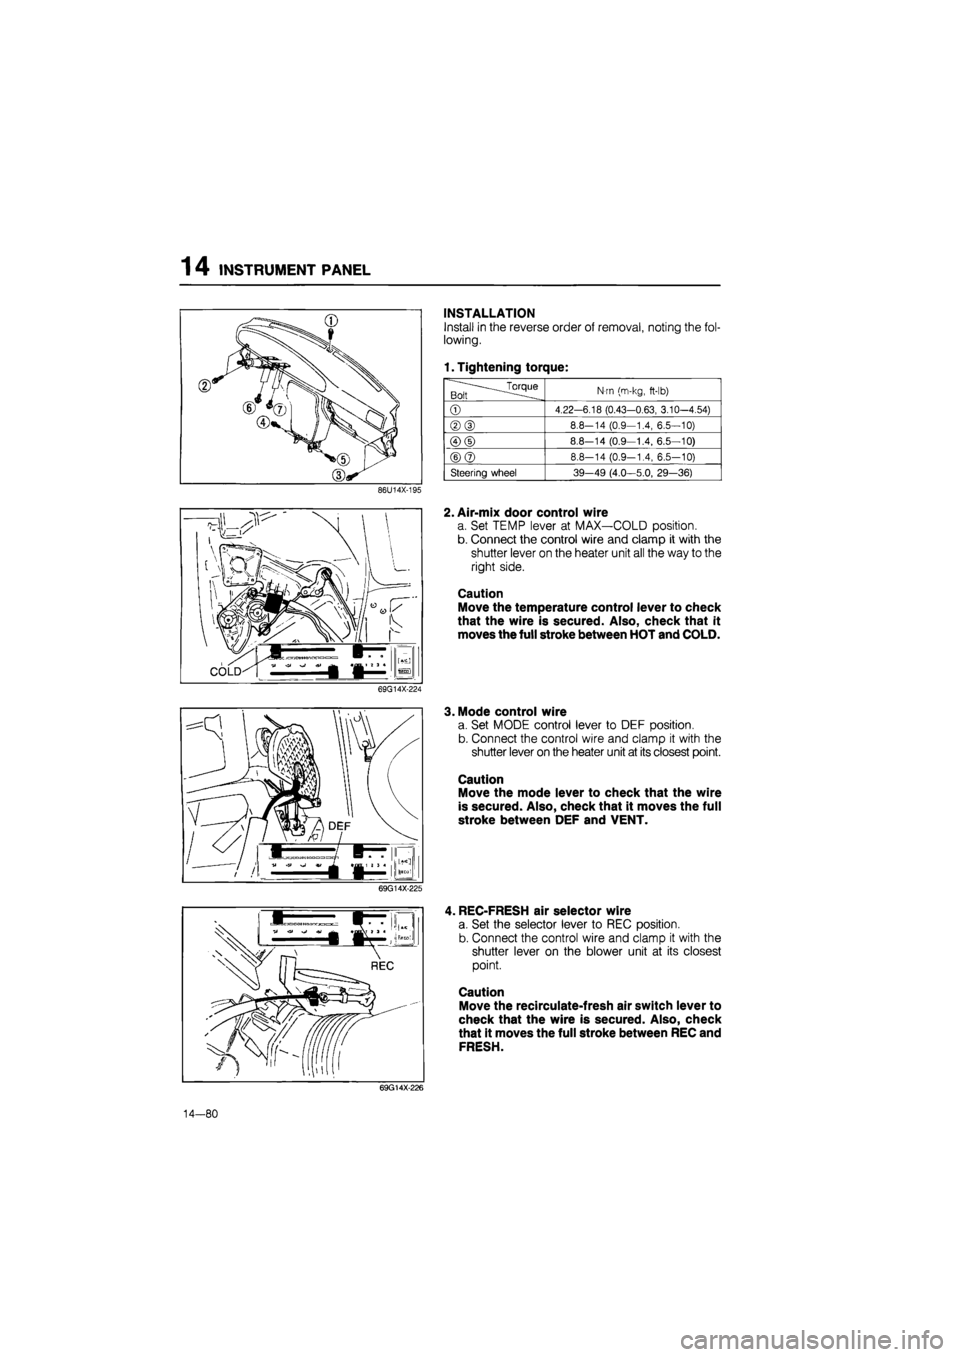
2. Air-mix door control wire
a. Set TEMP lever at MAX—COLD position.
b. Connect the control wire and clamp it with the
shutter lever on the heater unit all the way to the
right side.
Caution
Move the temperature control lever to check
that the wire is secured. Also, check that it
moves the full stroke between HOT and COLD.
69G14X-224
3. Mode control wire
a. Set MODE control lever to DEF position.
b. Connect the control wire and clamp it with the
shutter lever on the heater unit at its closest point.
Caution
Move the mode lever to check that the wire
is secured. Also, check that it moves the full
stroke between DEF and VENT.
69G14X-225
, REC-FRESH air selector wire
a. Set the selector lever to REC position.
b. Connect the control wire and clamp it with the
shutter lever on the blower unit at its closest
point.
Caution
Move the recirculate-fresh air switch lever to
check that the wire is secured. Also, check
that it moves the full stroke between REC and
FRESH.
69G14X-226
14—80
Page 1815 of 1865
30
TECHNICAL DATA
MEASUREMENT 30— 2
ENGINE (SOHC) 30— 2
ENGINE (DOHC) 30— 8
ENGINE (DIESEL) 30—11
LUBRICATION SYSTEM (GASOLINE) 30—14
LUBRICATION SYSTEM (DIESEL) 30—15
COOLING SYSTEM (GASOLINE) 30—16
COOLING SYSTEM (DIESEL) 30—17
FUEL AND EMISSION CONTROL SYSTEM
(CARBURETOR) 30—18
FUEL AND EMISSION CONTROL SYSTEM
(FUEL INJECTION FE) 30—20
FUEL AND EMISSION CONTROL SYSTEM
(FE DOHC) 30—21
FUEL AND EMISSION CONTROL SYSTEM
(DIESEL) 30—22
ENGINE ELECTRICAL SYSTEM 30—23
CLUTCH 30—25
MANUAL TRANSAXLE 30—26
AUTOMATIC TRANSAXLE
(ELECTRONICALLY CONTROLLED AND
4-SPEED) 30—27
AUTOMATIC TRANSAXLE (3-SPEED) 30—33
FRONT AND REAR AXLES 30—36
STEERING SYSTEM 30—36
BRAKING SYSTEM 30—37
WHEEL AND TIRE 30—38
SUSPENSION 30—38
BODY ELECTRICAL SYSTEM 30—39
STANDARD BOLT AND NUT
TIGHTENING TORQUE 30—40
76G30X-001