Page 1075 of 1865
ASSEMBLY 7B
86U07B-418
86U07B-419
76G07B-223
Procedure
1. Use the following procedure to adjust the total end
play and select a suitable bearing race.
(1) Set the thrust bearing onto the clutch assembly.
(2) Remove the previous race and gasket.
(3) Set the thickest bearing race 2.2 mm (0.087
in) onto the oil pump.
(4) Set the oil pump onto the clutch assembly.
(5) Measure clearance between the transaxle case
and oil pump.
(6) Select a suitable bearing race from the chart
below.
Clearance mm (in) Select this bearing race mm (in)
0.91-1.10 (0.036—0.043) 1.2 (0.047)
0.71-0.90 (0.028-0.035) 1.4 (0.055)
0.51-0.70 (0.020—0.027) 1.6 (0.063)
0.31-0.50 (0.012-0.019) 1.8 (0.071)
0.11-0.30 (0.004-0.011) 2.0 (0.078)
0-0.10 (0-0.003) 2.2 (0.087)
(7) Remove the oil pump.
(8) Place the selected bearing race and a new gas-
ket onto the oil pump.
(9) Install the oil pump onto the clutch assembly.
Tightening torque:
19—26 Nm (1.9—2.6 m-kg, 14—19 ft-lb)
86U07B-421
7B-209
Page 1076 of 1865
7B ASSEMBLY
2. Adjust the 2-4 brake band.
(1) Loosen the locknut and tighten the piston stem
to the specified torque.
Tightening torque:
9—11
N
m (90—110 cm-kg, 78—95 in-lb)
86U07B-422
(2) Loosen the piston stem 2 turns.
(3) Tighten the locknut to the specified torque.
Tightening torque:
25—39 N-m (2.5—4.0 m-kg, 18—29 tt-lb)
86U07B-423
Install the oil strainer along with a new O-ring to
the transaxle.
Tightening torque:
8—11 N-m (80—110 cm-kg, 69—95 in-lb)
86U07B-424
4. Install the oil pan along with a new gasket.
Tightening torque:
8—11 N-m (85—110 cm-kg, 74—95 in-lb)
Note
Install the magnets in the positions shown in
the illustration.
86U07B-425
7B—210
Page 1078 of 1865
7B ASSEMBLY
76G07B-186
76G07B-187
76G07B-188
10. G4A-EL
(1) Install the oil pipes, oil hoses, and switch box
as an assembly; then install the harness clip.
Tightening torque:
Switch box
16—24 Nm (1.6—2.4 m-kg, 12—17 ft-lb)
Harness clip
8—11 Nm (80—110 cm-kg, 69—95 in-lb)
(2) Install the ball, spring, gasket, and a plug.
Tightening torque:
31—47
N
m (3.2—4.8 m-kg, 23—35 ft-lb)
G4A-HL
Install the oil pipe, ball, spring, oil pipe, gasket, and
plug.
Tightening torque: 31—47
N
m
(3.2—4.8 m-kg, 23—35 ft-lb)
11. Install the solenoid connector.
76G07B-189
7B—212
Page 1079 of 1865

ASSEMBLY 7B
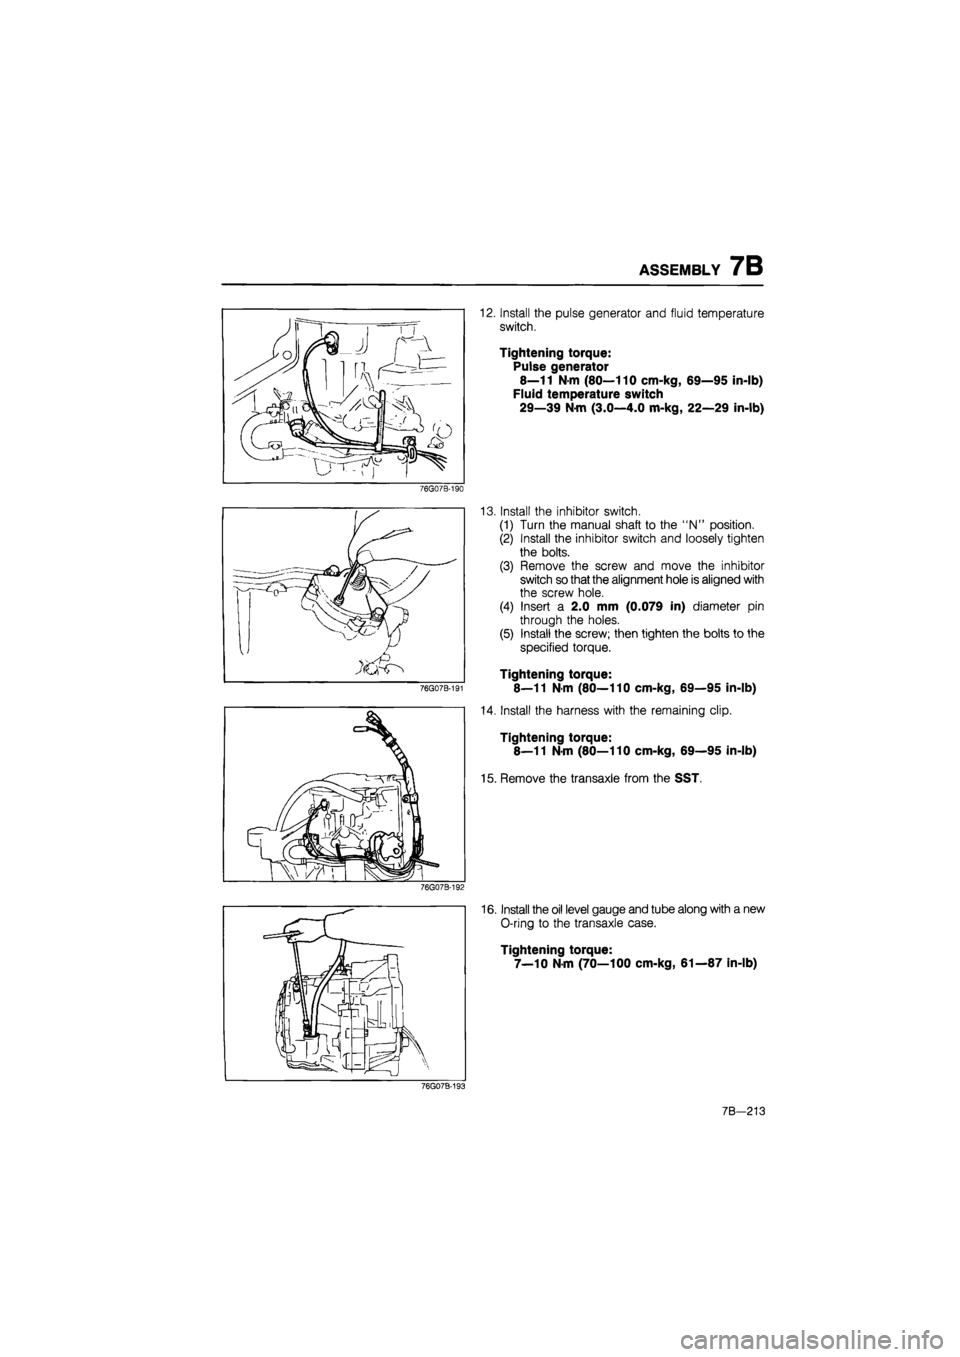
12. Install the pulse generator and fluid temperature
switch.
Tightening torque:
Pulse generator
8—11 N-m (80—110 cm-kg, 69—95 in-lb)
Fluid temperature switch
29—39 N-m (3.0—4.0 m-kg, 22—29 in-lb)
76G07B-190
76G07B-191
13. Install the inhibitor switch.
(1) Turn the manual shaft to the "N" position.
(2) Install the inhibitor switch and loosely tighten
the bolts.
(3) Remove the screw and move the inhibitor
switch so that the alignment hole is aligned with
the screw hole.
(4) Insert a 2.0 mm (0.079 in) diameter pin
through the holes.
(5) Install the screw; then tighten the bolts to the
specified torque.
Tightening torque:
8—11 N-m (80—110 cm-kg, 69—95 in-lb)
14. Install the harness with the remaining clip.
Tightening torque:
8—11 N-m (80—110 cm-kg, 69—95 in-lb)
15. Remove the transaxle from the SST.
76G07B-192
16. Install the oil level gauge and tube along with a new
O-ring to the transaxle case.
Tightening torque:
7—10 N-m (70—100 cm-kg, 61—87 in-lb)
76G07B-193
7B-213
Page 1080 of 1865
7B ASSEMBLY
/ O-ring
17. Install the oil pump shaft.
18. Install a new O-ring onto the turbine shaft.
76G07B-194
76G07B-195
19. Fill the torque converter with ATF if it has been
drained and washed.
ATF type: Dexron II or M III
20. Install the torque converter in the converter hous-
ing while rotating it to align the splines.
Caution
a) Hold the torque converter in an erect posi-
tion when filling it with ATF, do not allow
the fluid to overflow.
b) If the converter does not fit in easily, do not
try to force it; install carefully.
21. To ensure that the torque converter is installed ac-
curately, measure distance A between the end of
the torque converter and the end of the converter
housing.
(A): approx. 25 mm (0.98 in)
22. Install the engine mount No.1
Tightening torque:
58—67
N
m (5.9—6.8 m-kg, 43—49 ft-lb)
76G07B-197
7B-214
Page 1084 of 1865

7B INSTALLATION
86U07B-449
Standard bolt Reamer bolt
86U07B-450
86U07B-451
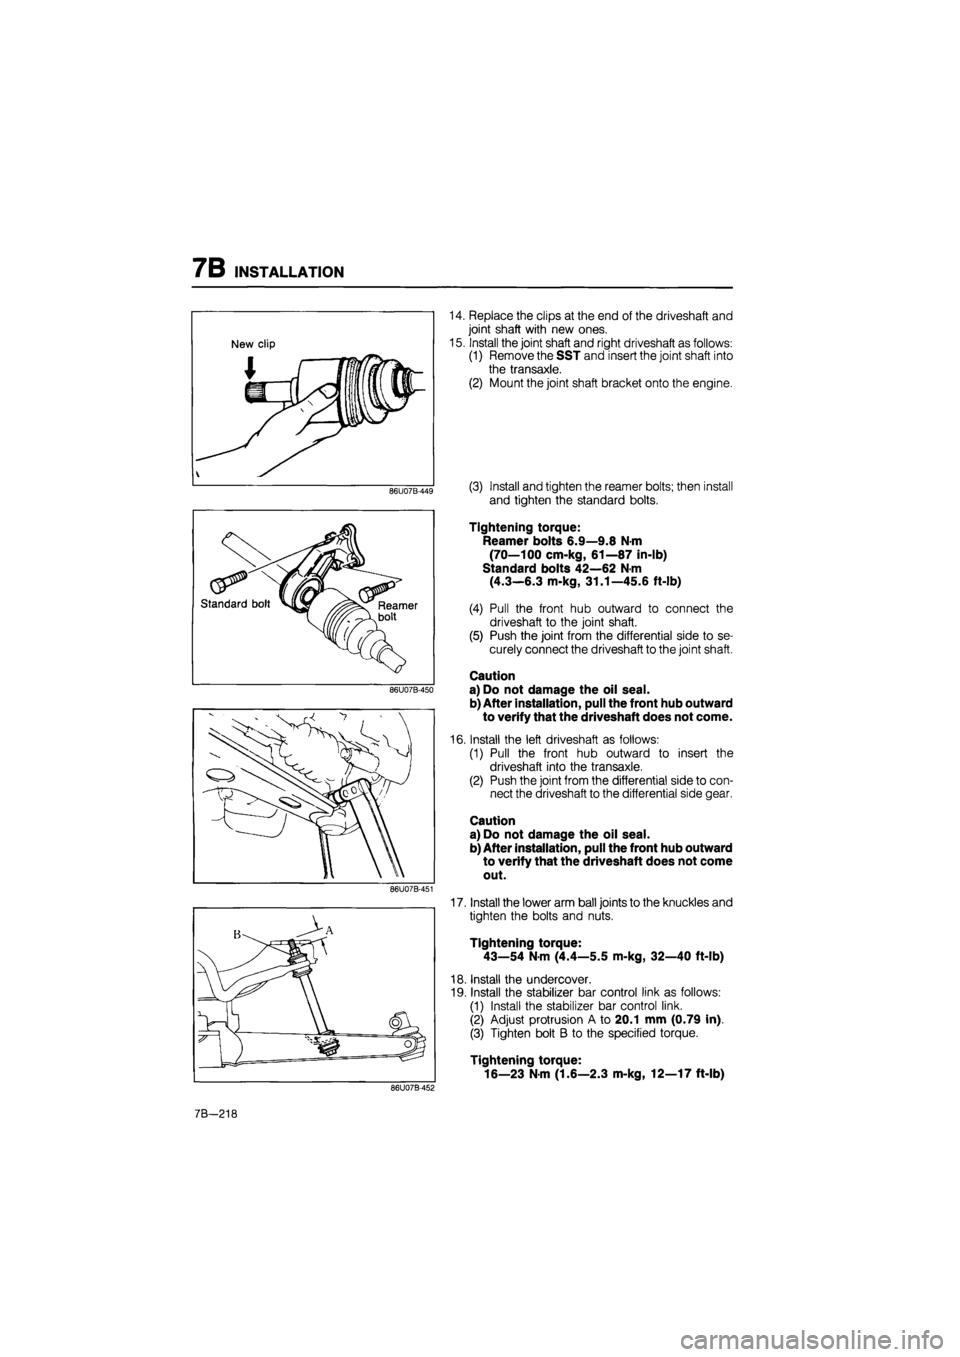
14. Replace the clips at the end of the driveshaft and
joint shaft with new ones.
15. Install the joint shaft and right driveshaft as follows:
(1) Remove the SST and insert the joint shaft into
the transaxle.
(2) Mount the joint shaft bracket onto the engine.
(3) Install and tighten the reamer bolts; then install
and tighten the standard bolts.
Tightening torque:
Reamer bolts 6.9—9.8 N-m
(70—100 cm-kg, 61—87 in-lb)
Standard bolts 42—62 N-m
(4.3—6.3 m-kg, 31.1—45.6 ft-lb)
(4) Pull the front hub outward to connect the
driveshaft to the joint shaft.
(5) Push the joint from the differential side to se-
curely connect the driveshaft to the joint shaft.
Caution
a) Do not damage the oil seal.
b) After installation, pull the front hub outward
to verify that the driveshaft does not come.
16. Install the left driveshaft as follows:
(1) Pull the front hub outward to insert the
driveshaft into the transaxle.
(2) Push the joint from the differential side to con-
nect the driveshaft to the differential side gear.
Caution
a) Do not damage the oil seal.
b) After installation, pull the front hub outward
to verify that the driveshaft does not come
out.
17. Install the lower arm ball joints to the knuckles and
tighten the bolts and nuts.
Tightening torque:
43—54 N-m (4.4—5.5 m-kg, 32—40 ft-lb)
18. Install the undercover.
19. Install the stabilizer bar control link as follows:
(1) Install the stabilizer bar control link.
(2) Adjust protrusion A to 20.1 mm (0.79 in).
(3) Tighten bolt B to the specified torque.
Tightening torque:
16—23 N-m (1.6—2.3 m-kg, 12—17 ft-lb)
86U07B-452
7B-218
Page 1085 of 1865
INSTALLATION 7B
86U07B-453
86U07B-454
76G07B-198
20. Install the tie-rod ends and cotter pins.
Tightening torque:
29—44 N-m (3.0—4.5 m-kg, 22—33 ft-lb)
21. Install the oil cooler outlet and inlet hoses.
22. Install the splash shields.
Tightening torque:
8—11 N-m (80—110 cm-kg, 69—95 in-lb)
23. Install the front wheels.
Tightening torque:
88—118 N-m (9—12 m-kg, 65—87 ft-lb)
24. Connect the throttle cable.
Note
Adjust the throttle cable with the oil pressure
test. (Refer to page 7B—75, 76)
25. Connect the selector cable.
Tightening torque:
Nut
29—39 N-m (3.0—4.0 m-kg, 22—29 ft-lb)
Bolts
16—22 N-m (1.6—2.3 m-kg, 12—17 ft-lb)
26. Connect the ground wires to the transaxle case.
Tightening torque:
8—11 N-m (80—115 cm-kg, 69—99 in-lb)
86U07B-456
7B—219
Page 1087 of 1865
OD
IV) K>
2-4 brake band
—Coasting clutch pressure brake pressure
To oil cooler
N-R accumulator 12-3 accumulator
2-3 Timingr valve 18 Coasting bypass valve Bypass valve Servo control y valve (Blocked)
Pressure modifier valve (Blocked)
3-4 shift valve
Low reducing valve
Pressure regulator valve 3-2 timing valve 3-2 Icapacity valve
Manual valve
Throttle valve
Oil pump
• Throttle pressure
1 Throttle modulated pressure
• Line pressure
I Torque converter pressure Forward clutch pressure\^
Reverse clutch pressure—_____
1-2 accumulator
Throttle back-up valve (Blocked)
-j Throttle J modulator I valve
Apply side 9
Lock-up control valve
-< O
u >
o
o
J3 o
Q >
• m
-< o
3D >
C n
O
O
J3 o
a •C* > • m
-si
CD