1987 MAZDA 626 wheel alignment
[x] Cancel search: wheel alignmentPage 1508 of 1865
TROUBLESHOOTING GUIDE 1 3
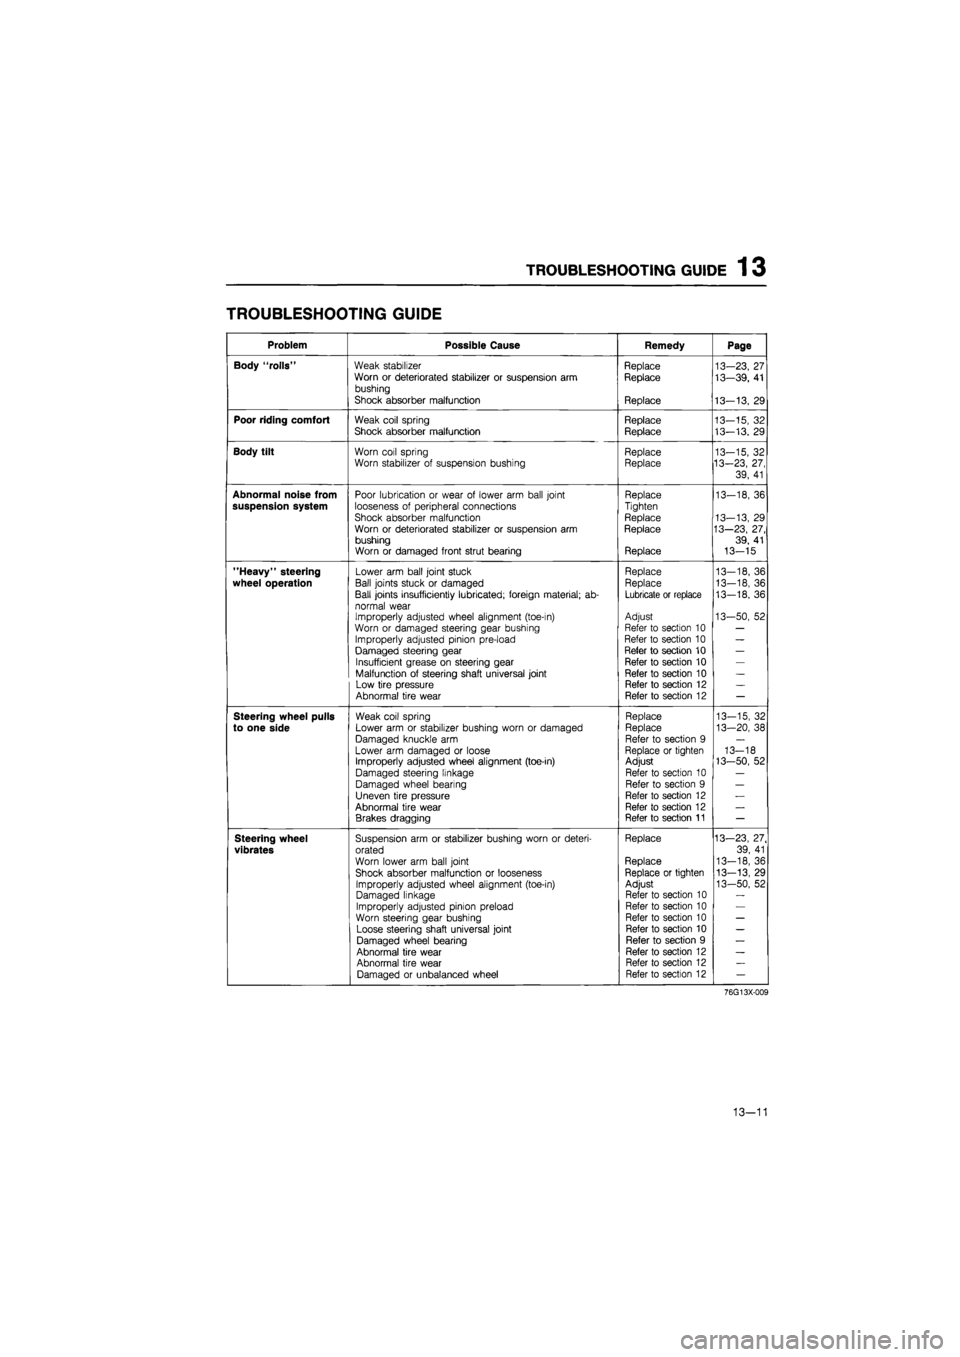
TROUBLESHOOTING GUIDE
Problem Possible Cause Remedy Page
Body "rolls" Weak stabilizer Replace 13-23, 27 Worn or deteriorated stabilizer or suspension arm Replace 13—39, 41 bushing
Shock absorber malfunction Replace 13-13, 29
Poor riding comfort Weak coil spring Replace 13-15, 32 Shock absorber malfunction Replace 13-13. 29
Body tilt Worn coil spring Replace 13-15, 32 Worn stabilizer of suspension bushing Replace 13-23, 27,
39, 41
Abnormal noise from Poor lubrication or wear of lower arm ball joint Replace 13-18, 36 suspension system looseness of peripheral connections Tighten
Shock absorber malfunction Replace 13-13, 29 Worn or deteriorated stabilizer or suspension arm Replace 13—23, 27, bushing 39, 41 Worn or damaged front strut bearing Replace 13-15
"Heavy" steering Lower arm ball joint stuck Replace 13—18, 36
wheel operation Ball joints stuck or damaged Replace 13-18, 36
Ball joints insufficiently lubricated; foreign material; ab-Lubricate or replace 13-18, 36
normal wear Improperly adjusted wheel alignment (toe-in) Adjust 13-50, 52
Worn or damaged steering gear bushing Refer to section 10 —
Improperly adjusted pinion pre-load Refer to section 10 —
Damaged steering gear Refer to section 10 —
Insufficient grease on steering gear Refer to section 10 —
Malfunction of steering shaft universal joint Refer to section 10 —
Low tire pressure Refer to section 12 —
Abnormal tire wear Refer to section 12 —
Steering wheel pulls Weak coil spring Replace 13-15, 32
to one side Lower arm or stabilizer bushing worn or damaged Replace 13-20, 38
Damaged knuckle arm Refer to section 9 —
Lower arm damaged or loose Replace or tighten 13-18 Improperly adjusted wheel alignment (toe-in) Adjust 13-50, 52
Damaged steering linkage Refer to section 10 —
Damaged wheel bearing Refer to section 9 —
Uneven tire pressure Refer to section 12 —
Abnormal tire wear Refer to section 12 —
Brakes dragging Refer to section 11 —
Steering wheel Suspension arm or stabilizer bushing worn or deteri-Replace 13—23, 27.
vibrates orated 39, 41
Worn lower arm ball joint Replace 13-18, 36
Shock absorber malfunction or looseness Replace or tighten 13-13, 29
Improperly adjusted wheel alignment (toe-in) Adjust 13-50, 52 Damaged linkage Refer to section 10
Improperly adjusted pinion preload Refer to section 10
Worn steering gear bushing Refer to section 10 —
Loose steering shaft universal joint Refer to section 10 —
Damaged wheel bearing Refer to section 9 —
Abnormal tire wear Refer to section 12 —
Abnormal tire wear Refer to section 12 —
Damaged or unbalanced wheel Refer to section 12 —
76G13X-009
13—11
Page 1509 of 1865
1 3 TROUBLESHOOTING GUIDE
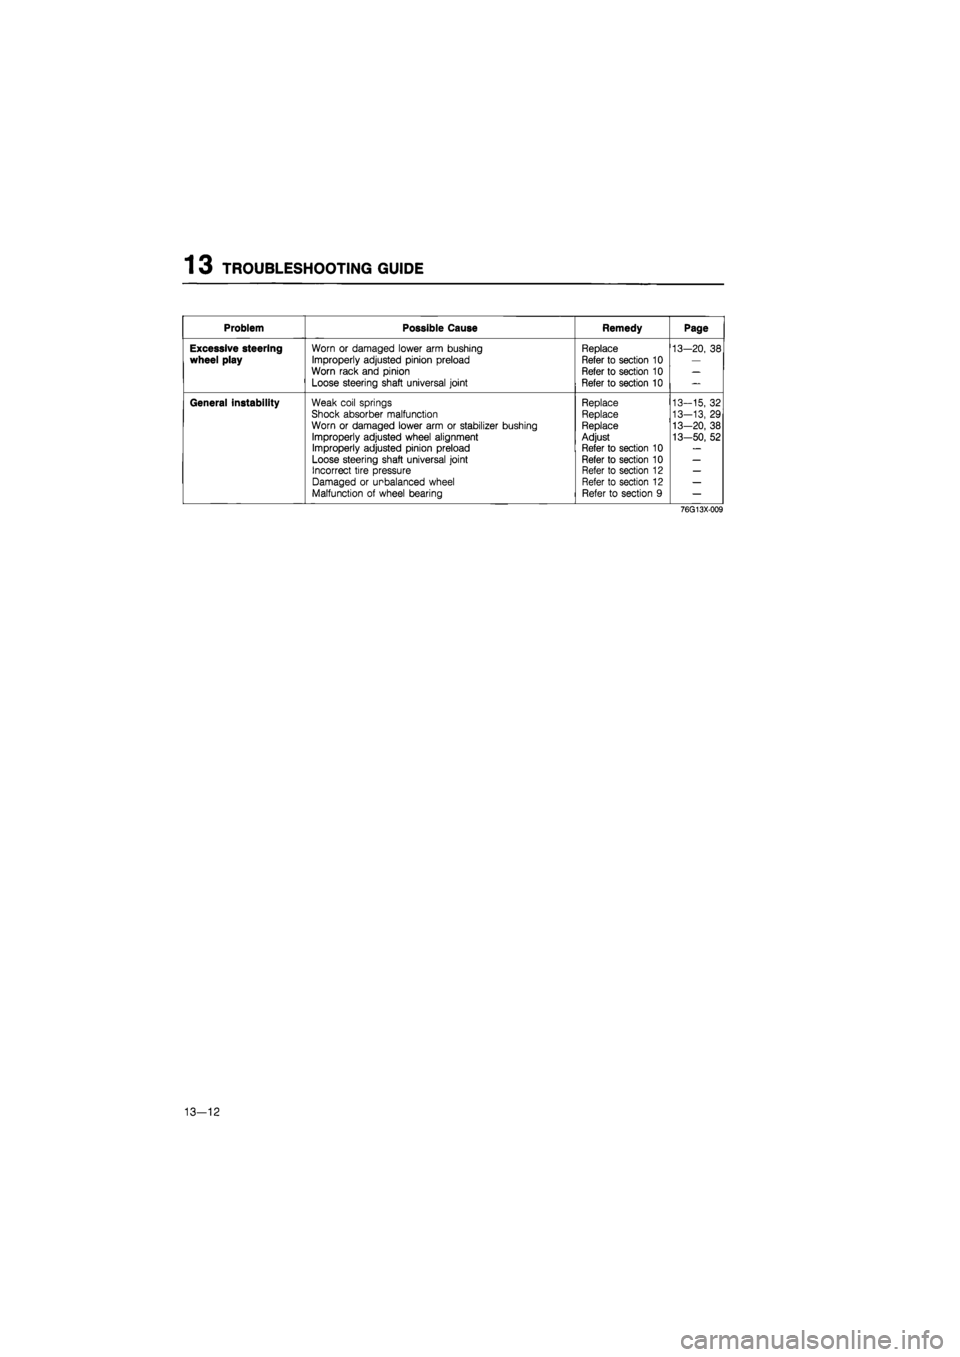
Problem Possible Cause Remedy Page
Excessive steering wheel play
Worn or damaged lower arm bushing
Improperly adjusted pinion preload
Worn rack and pinion
Loose steering shaft universal joint
Replace
Refer to section 10
Refer to section 10
Refer to section 10
13-20, 38
General instability Weak coil springs
Shock absorber malfunction Worn or damaged lower arm or stabilizer bushing
Improperly adjusted wheel alignment Improperly adjusted pinion preload
Loose steering shaft universal joint Incorrect tire pressure Damaged or unbalanced wheel Malfunction of wheel bearing
Replace Replace Replace Adjust
Refer to section 10 Refer to section 10 Refer to section 12 Refer to section 12 Refer to section 9
13-15, 32
13-13, 29
13-20, 38
13-50, 52
76G13X-009
13-12
Page 1547 of 1865
1 3 FRONT WHEEL ALIGNMENT
FRONT WHEEL ALIGNMENT
86U13X-108
69G10X-031
Pre-inspection
1. Check the tire inflation and bring to the recom-
mended pressure.
2. Inspect the front wheel bearing play and correct,
it if necessary.
3. Inspect the wheel and tire runout.
4. Inspect the ball joints and steering linkage for any
excessive looseness.
5. The vehicle must be on level ground and have no
luggage or passenger load.
6. The difference in height between the left and right
sides from the center of the wheel to the fender
brim must be within 10 mm (0.39 in).
Caution
a) Front and rear wheel alignment should be
checked simultaneously. If adjustment is
made to either the front or rear wheels,
recheck the alignment, particularly toe-in,
on all other wheels.
b) Check and adjust the steering angle trans-
fer shaft after adjusting the front wheel
alignment. (Refer to Section 10)
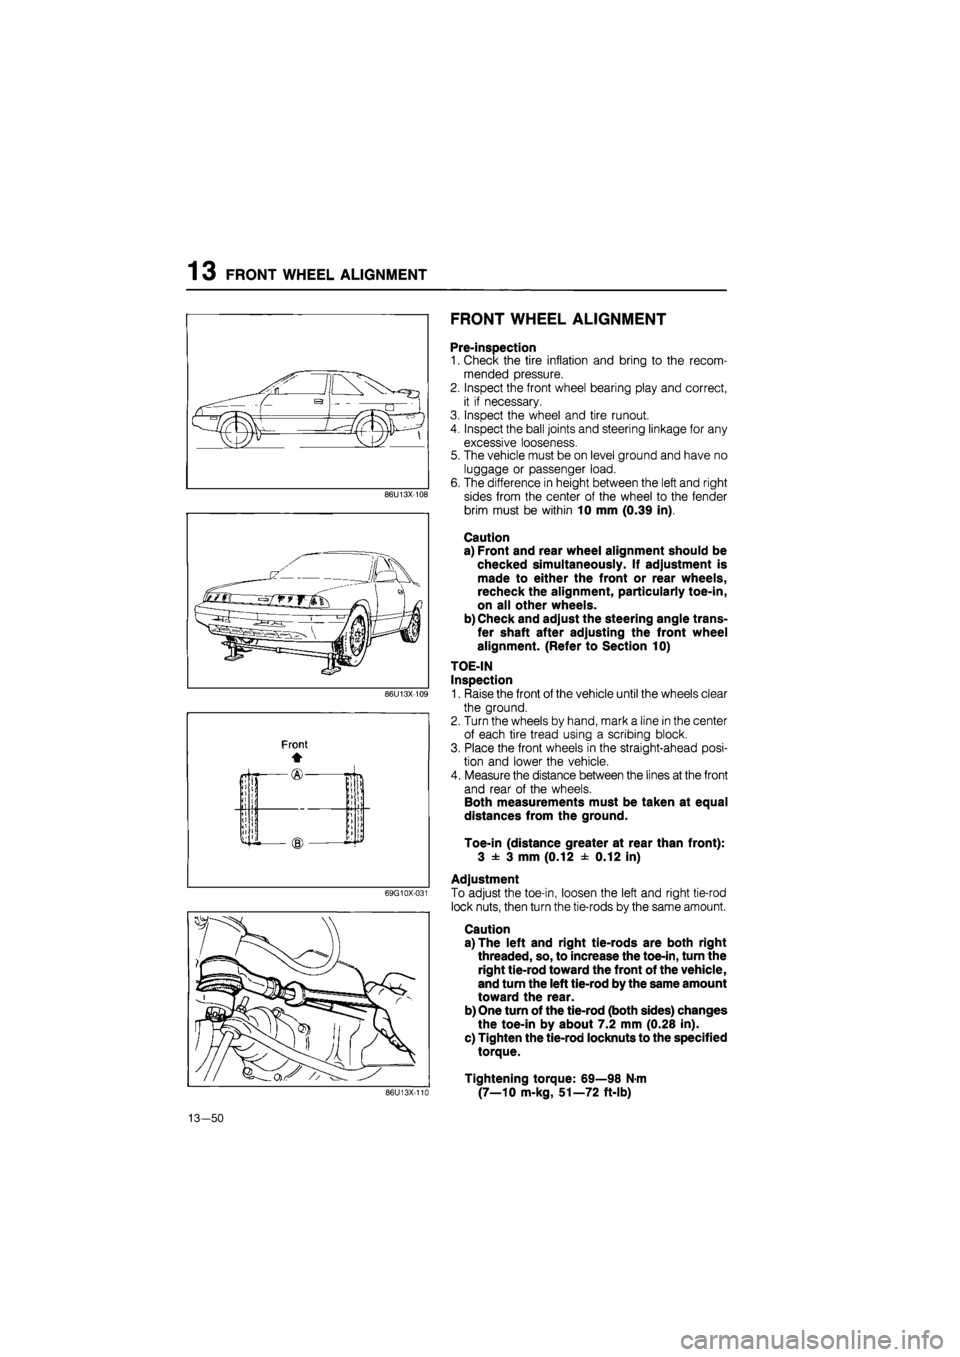
TOE-IN
Inspection
1. Raise the front of the vehicle until the wheels clear
the ground.
2. Turn the wheels by hand, mark a line in the center
of each tire tread using a scribing block.
3. Place the front wheels in the straight-ahead posi-
tion and lower the vehicle.
4. Measure the distance between the lines at the front
and rear of the wheels.
Both measurements must be taken at equal
distances from the ground.
Toe-in (distance greater at rear than front):
3 ± 3 mm (0.12 ± 0.12 in)
Adjustment
To adjust the toe-in, loosen the left and right tie-rod
lock nuts, then turn the tie-rods by the same amount.
Caution
a) The left and right tie-rods are both right
threaded, so, to increase the toe-in, turn the
right tie-rod toward the front of the vehicle,
and turn the left tie-rod by the same amount
toward the rear.
b) One turn of the tie-rod (both sides) changes
the toe-in by about 7.2 mm (0.28 in).
c) Tighten the tie-rod locknuts to the specified
torque.
Tightening torque: 69—98 N-m
(7—10 m-kg, 51—72 ft-lb) 86U13X-110
13-50
Page 1548 of 1865
FRONT WHEEL ALIGNMENT 13
86U13X-111
86U13X-112
86U13X-113
Mark
" A
c B
Right side
Front
A
B c
Left side
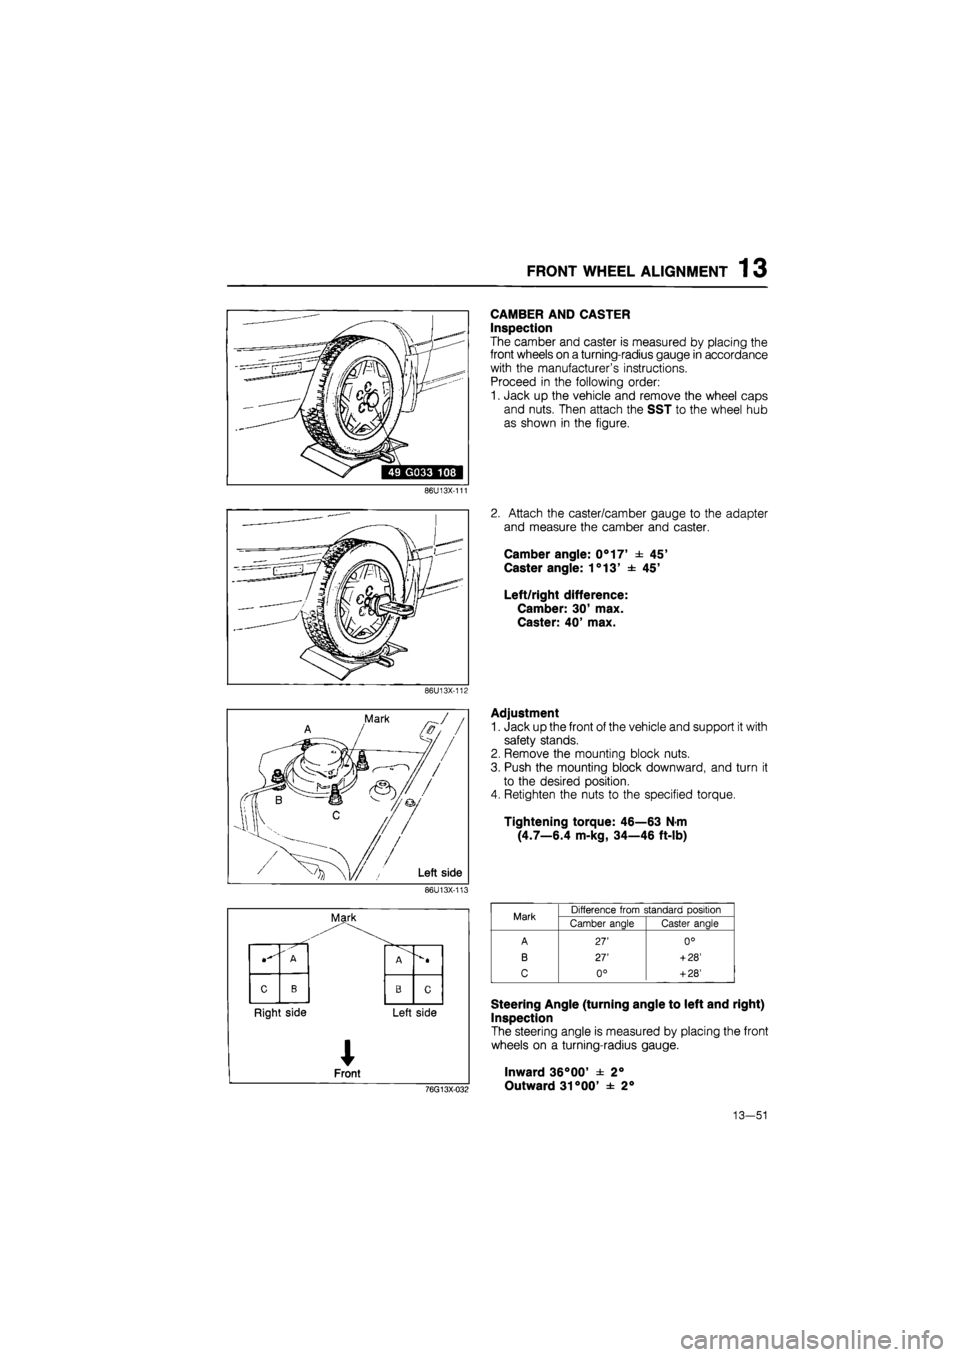
CAMBER AND CASTER
Inspection
The camber and caster is measured by placing the
front wheels on a turning-radius gauge in accordance
with the manufacturer's instructions.
Proceed in the following order:
1. Jack up the vehicle and remove the wheel caps
and nuts. Then attach the SST to the wheel hub
as shown in the figure.
2. Attach the caster/camber gauge to the adapter
and measure the camber and caster.
Camber angle: 0°17' ± 45'
Caster angle: 1°13' ± 45'
Left/right difference:
Camber: 30' max.
Caster: 40' max.
Adjustment
1. Jack up the front of the vehicle and support it with
safety stands.
2. Remove the mounting block nuts.
3. Push the mounting block downward, and turn it
to the desired position.
4. Retighten the nuts to the specified torque.
Tightening torque: 46—63 N-m
(4.7—6.4 m-kg, 34—46 ft-lb)
Mark Difference from standard oosition Mark Camber angle Caster angle
A 27' 0°
B 27' + 28'
C 0° + 28'
76G13X-032
Steering Angle (turning angle to left and right)
Inspection
The steering angle is measured by placing the front
wheels on a turning-radius gauge.
Inward 36°00' ± 2°
Outward 31°00' ± 2°
13—51
Page 1549 of 1865
13 REAR WHEEL ALIGNMENT
76G13X-033
86U13X-116
86U13X-117
86U13X-116
13-52
REAR WHEEL ALIGNMENT
PRE-INSPECTION
1. Check the tire inflation and bring to the recom-
mended pressure.
2. Inspect the wheel and tire runout.
3. The vehicle must be on level ground and have no
luggage or passenger load.
4. Check that the suspension is correctly adjusted.
5. The difference in height between the left and right
sides from the center of the wheel to the fender
rim should be within 10 mm (0.39 in).
Caution
a) Front and rear wheel alignments should be
checked simultaneously. If adjustment is
made to either the front or rear wheels,
recheck the alignment, particularly toe-in,
on all other wheels.
b) Check and adjust the steering angle trans-
fer shaft after adjusting the rear wheel align-
ment. (Refer to Section 10.)
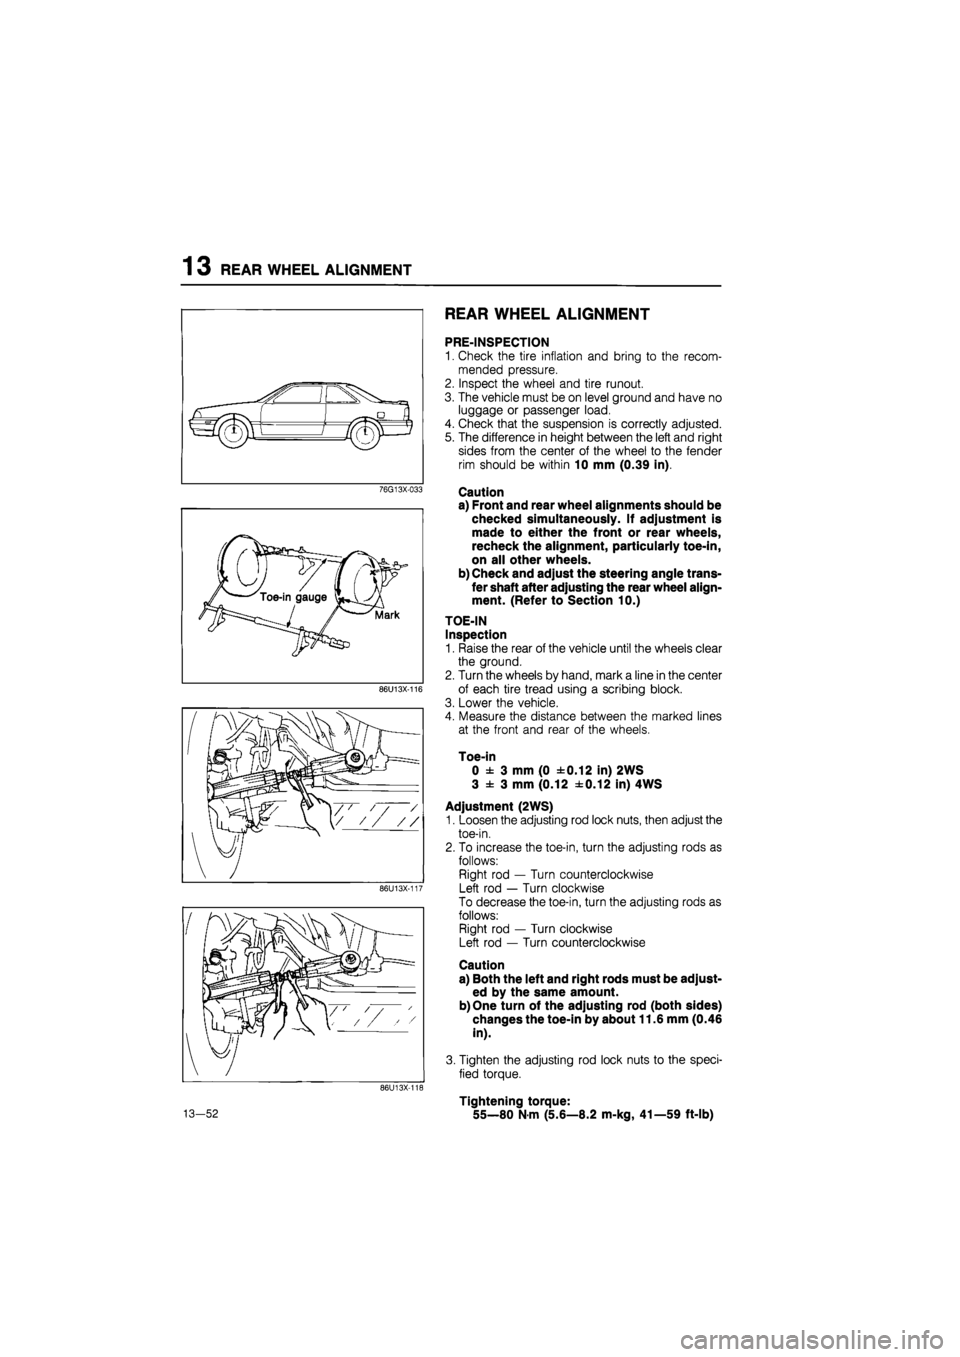
TOE-IN
Inspection
1. Raise the rear of the vehicle until the wheels clear
the ground.
2. Turn the wheels by hand, mark a line in the center
of each tire tread using a scribing block.
3. Lower the vehicle.
4. Measure the distance between the marked lines
at the front and rear of the wheels.
Toe-in
0 ± 3 mm (0 ±0.12 in) 2WS
3 ± 3 mm (0.12 ±0.12 in) 4WS
Adjustment (2WS)
1. Loosen the adjusting rod lock nuts, then adjust the
toe-in.
2. To increase the toe-in, turn the adjusting rods as
follows:
Right rod — Turn counterclockwise
Left rod — Turn clockwise
To decrease the toe-in, turn the adjusting rods as
follows:
Right rod — Turn clockwise
Left rod — Turn counterclockwise
Caution
a) Both the left and right rods must be adjust-
ed by the same amount.
b) One turn of the adjusting rod (both sides)
changes the toe-in by about 11.6 mm (0.46
in).
3. Tighten the adjusting rod lock nuts to the speci-
fied torque.
Tightening torque:
55—80 N-m (5.6—8.2 m-kg, 41—59 ft-lb)
Page 1550 of 1865

REAR WHEEL ALIGNMENT 13
86U13X-119
Adjustment (4WS)
To adjust the toe-in, loosen the left and right tie-rod
locknuts, and turn the tie-rods by the same amount.
Caution
a) The left and right tie-rods are both right
threaded, so, to increase the toe-in, turn the
right tie-rod toward the front of the vehicle,
and turn the left tie-rod by the same amount
toward the rear.
b) One turn of the tie-rod (both sides) changes
the toe-in by about 7.8 mm (0.31 in).
c) Adjust the toe-in after adjusting the steer-
ing angle.
Tighten the tie-rod locknuts to the specified torque.
Tightening torque: 69—98 N-m
(7—10 m-kg, 51—72 ft-lb)
86U13X-120
CAMBER
Preparation
1. Remove the center caps from the wheels.
2. Uncrimp the locknut and remove it.
86U13X-121
Inspection
1. Install the SST to the driveshaft.
86U13X-122
13—53
Page 1551 of 1865
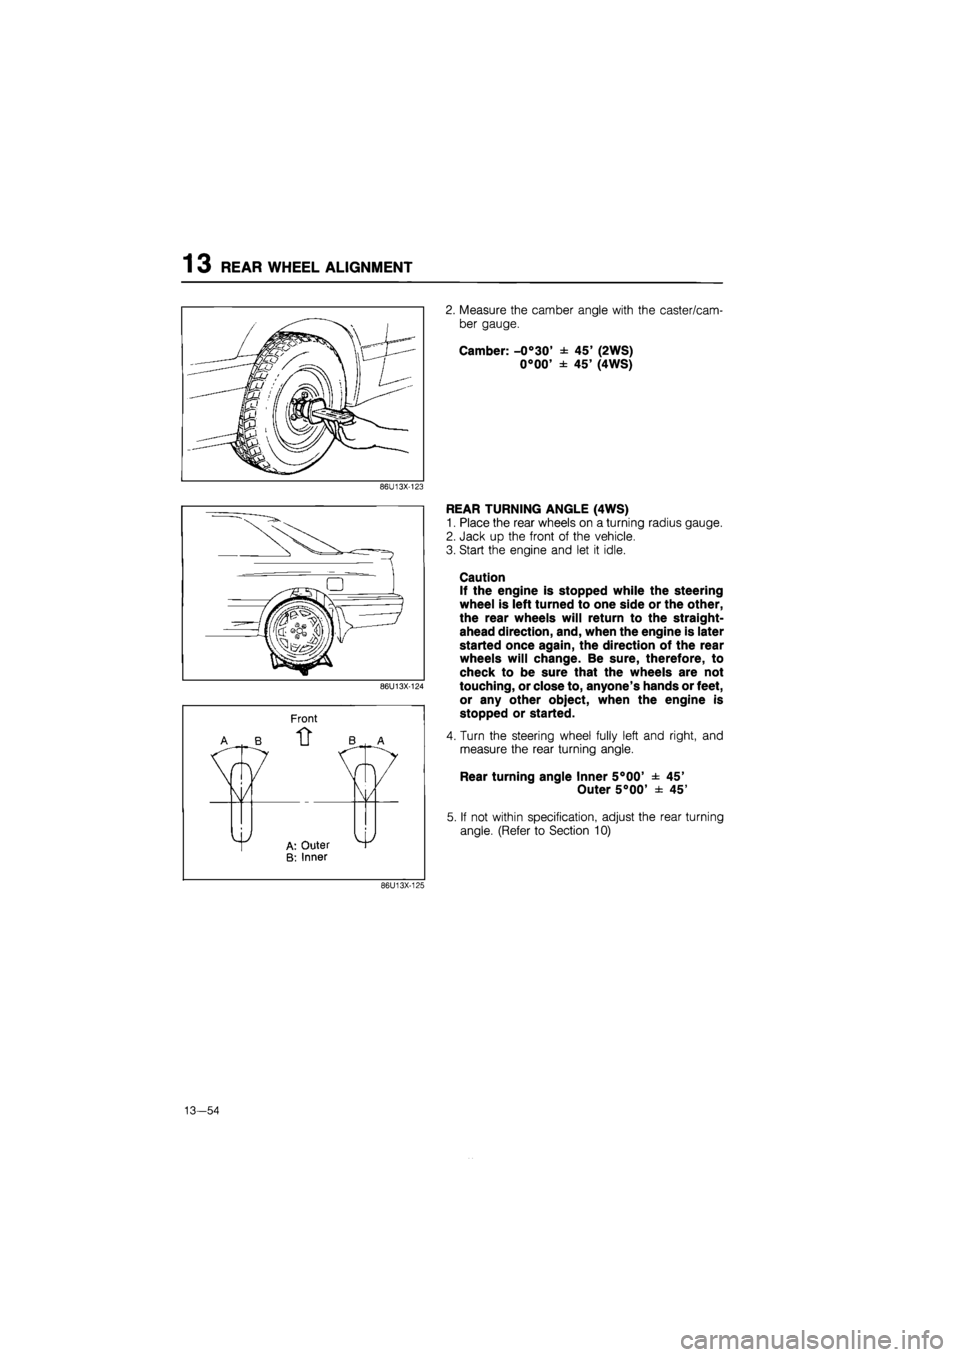
13 REAR WHEEL ALIGNMENT
2. Measure the camber angle with the caster/cam-
ber gauge.
Camber: -0°30' ± 45' (2WS)
0°00' ± 45' (4WS)
86U13X-123
Front
EAR TURNING ANGLE (4WS)
Place the rear wheels on a turning radius gauge.
Jack up the front of the vehicle.
Start the engine and let it idle.
Caution
If the engine is stopped while the steering
wheel is left turned to one side or the other,
the rear wheels will return to the straight-
ahead direction, and, when the engine is later
started once again, the direction of the rear
wheels will change. Be sure, therefore, to
check to be sure that the wheels are not
touching, or close to, anyone's hands or feet,
or any other object, when the engine is
stopped or started.
Turn the steering wheel fully left and right, and
measure the rear turning angle.
Rear turning angle Inner 5°00' ± 45'
Outer 5°00' ± 45'
If not within specification, adjust the rear turning
angle. (Refer to Section 10)
86U13X-125
13—54
Page 1852 of 1865
30 TECHNICAL DATA
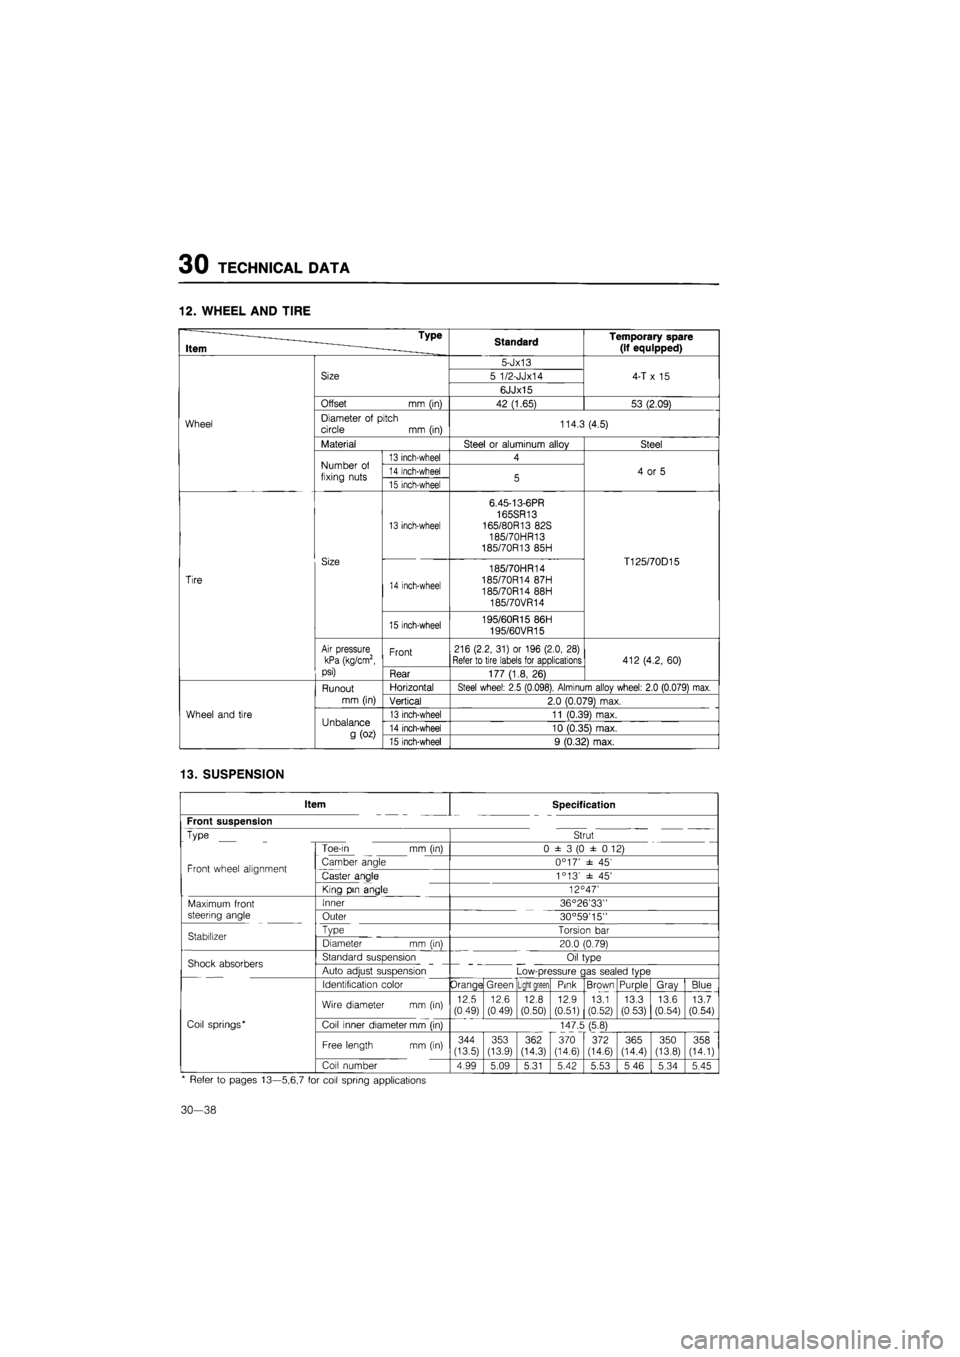
12. WHEEL AND TIRE
* ~— - Type
Item ~ ———_____ Standard Temporary spare
(if equipped)
Wheel
Size
5-Jx13
4-T
x 15
Wheel
Size 5 1/2-JJx14 4-T
x 15
Wheel
Size
6JJx15
4-T
x 15
Wheel
Offset
mm (in)
42 (1.65) 53 (2.09)
Wheel Diameter
of
pitch circle
mm
(in) 114.3 (4.5) Wheel
Material Steel
or
aluminum alloy Steel
Wheel
Number
of
fixing nuts
13 inch-wheel 4
4
or 5
Wheel
Number
of
fixing nuts 14 inch-wheel 5 4
or 5
Wheel
Number
of
fixing nuts 15 inch-wheel 5 4
or 5
Tire
Size
13 inch-wheel
6.45-13-6PR 165SR13 165/80R13 82S
185/70HR13 185/70R13 85H
T125/70D15
Tire
Size
14 inch-wheel
185/70HR14 185/70R14 87H 185/70R14 88H 185/70VR14
T125/70D15
Tire
Size
15 inch-wheel 195/60R15 86H 195/60VR15
T125/70D15
Tire
Air pressure kPa (kg/cm2, psi)
Front 216 (2.2, 31)
or
196 (2.0, 28)
Refer to tire labels for applications 412 (4.2, 60)
Tire
Air pressure kPa (kg/cm2, psi) Rear 177 (1.8,
26)
412 (4.2, 60)
Wheel and tire
Runout
mm (in)
Horizontal Steel wheel: 2.5 (0.098), Alminum allov wheel: 2.0 (0.079) max.
Wheel and tire
Runout
mm (in) Vertical 2.0 (0.079) max.
Wheel and tire Unbalance
g
(oz)
13 inch-wheel 11 (0.39) max. Wheel and tire Unbalance
g
(oz) 14 inch-wheel 10 (0.35) max.
Wheel and tire Unbalance
g
(oz) 15 inch-wheel 9 (0.32) max.
13. SUSPENSION
Item Specification
Front suspension
Type Strut
Toe-in
mm
(in) 0 ±
3 (0
±
0
12)
Front wheel alignment Camber angle 0°17' ±
45'
Front wheel alignment Caster angle 1 °13' ±
45'
King pin angle 12C 47'
Maximum front Inner 36°26'33"
steering angle Outer 30°59'15"
Stabilizer Type Torsion
bar
Stabilizer Diameter
mm (in)
20.0 (0.79)
Shock absorbers Standard suspension Oil type Shock absorbers Auto adjust suspension Low-pressure gas sealed type
Identification color Orange Green Light green Pink Brown Purple Gray Blue
Wire diameter
mm (in)
12.5
(0.49)
12.6
(0.49) 12.8 (0.50) 12.9 (0.51) 13.1 (0.52) 13.3 (0.53) 13.6 (0.54) 13.7 (0.54)
Coil springs* Coil inner diameter mm (in) 147.5 (5.8)
Free length
mm
(in) 344 (13.5)
CO <35
362
(14.3)
370
(14.6)
372 (14.6) 365 (14.4) 350 (13.8) 358 (14.1)
Coil number 4.99 5.09 5.31 5.42 5.53 5.46 5.34 5.45
* Refer
to
pages 13—5,6,7
for
coil spring applications
30-38