Page 1132 of 1865

7C TROUBLESHOOTING
STEP 4 (ROAD TEST)
This step is performed to check for problems in the various ranges. If these tests show any problems,
adjust or replace by referring to the QUICK DIAGNOSIS CHART and mechanical sections.
Caution
Perform the test at normal ATF operating temperature (50—80°C, 122—176°F).
Gearshift Function Check Items
1. Shift shock must be minimal, and shifting must be smooth.
2. Engine speed must not run away, and the shifting must not be delayed.
3. Transaxle must shift through Di D2 -»• D3 in D range.
4. Transaxle must shift from 3rd in D range to 2nd gear when 2 range is selected.
5. Transaxle must shift from 2nd to 1st when 1 range is selected from 3rd gear in D range.
6. Transaxle must not upshift in 1 range.
7. Transaxle must remain in 2nd gear in 2 range.
8. Transaxle must positively lock in P range.
The transaxle must positively lock when P range is selected while moving at a speed below 4 km/h
(2.5 mph) on level ground. The transaxle must positively lock when set in P range with the vehicle
on a gentle slope and the brakes disengaged.
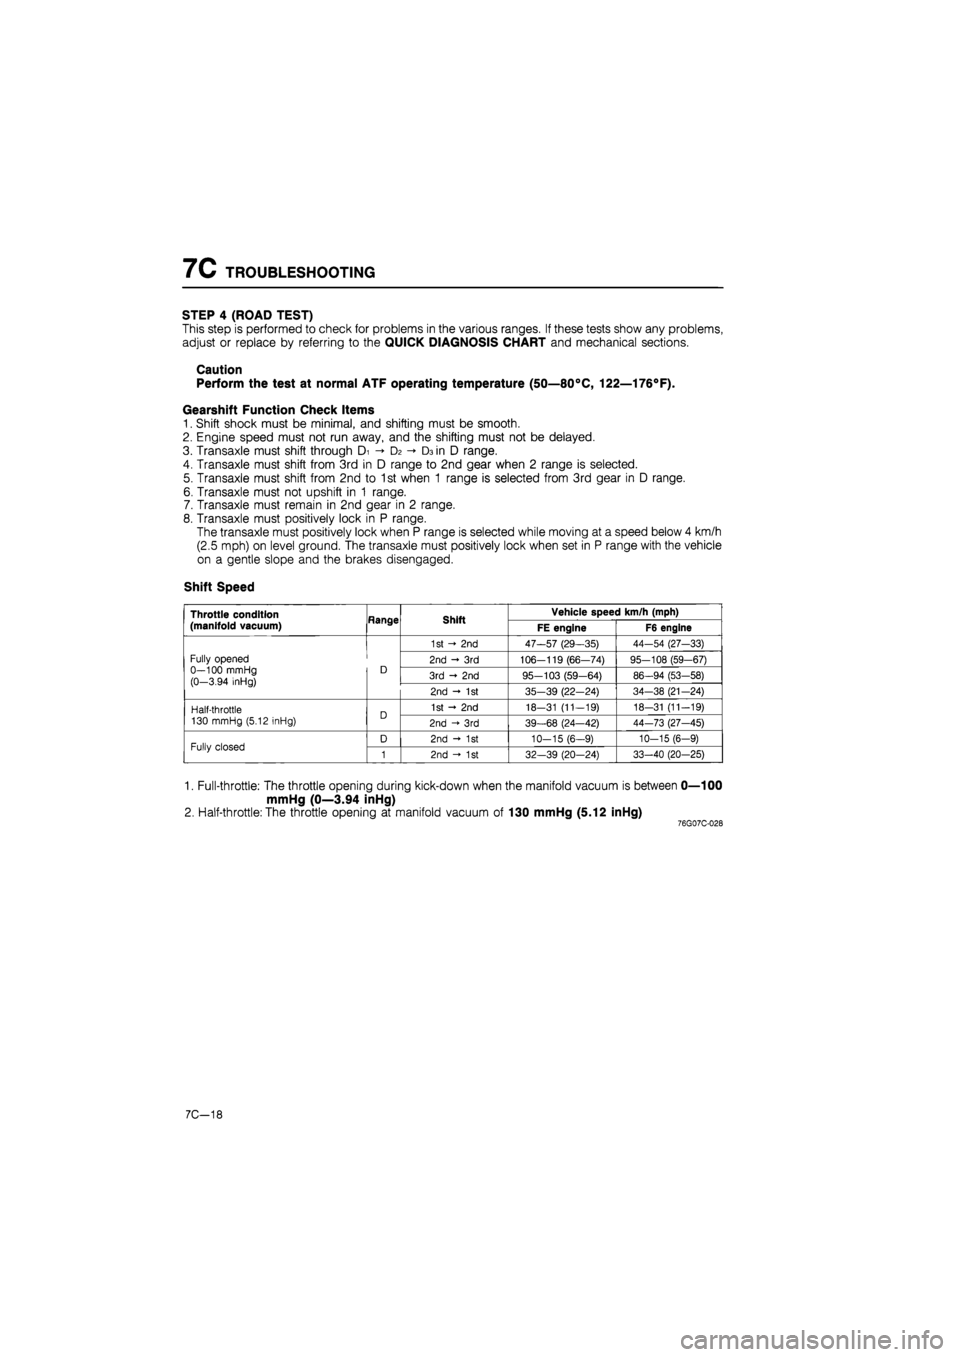
Shift Speed
Throttle condition
(manifold vacuum) Hange Shift Vehicle speed km/h (mph) Throttle condition
(manifold vacuum) Hange Shift FE engine F6 engine
Fully opened 0—100 mmHg (0-3.94 inHg)
D
1st - 2nd 47—57 (29—35) 44-54 (27-33)
Fully opened 0—100 mmHg (0-3.94 inHg)
D 2nd - 3rd 106-119 (66—74) 95-108 (59-67) Fully opened 0—100 mmHg (0-3.94 inHg)
D 3rd - 2nd 95-103 (59-64) 86-94 (53-58)
Fully opened 0—100 mmHg (0-3.94 inHg)
D
2nd - 1st 35-39 (22-24) 34-38 (21-24)
Half-throttle 130 mmHg (5.12 inHg) D 1st - 2nd 18-31 (11-19) 18-31 (11-19) Half-throttle 130 mmHg (5.12 inHg) D 2nd -»• 3rd 39-68 (24—42) 44-73 (27-45)
Fully closed D 2nd - 1st 10-15 (6-9) 10-15 (6-9) Fully closed 1 2nd - 1st 32—39 (20-24) 33-40 (20-25)
1. Full-throttle: The throttle opening during kick-down when the manifold vacuum is between 0—100
mmHg (0—3.94 inHg)
2. Half-throttle: The throttle opening at manifold vacuum of 130 mmHg (5.12 inHg) 76G07C-028
7C-18
Page 1134 of 1865
7C TROUBLESHOOTING
STEP 5 (OIL PRESSURE TEST)
This step determines line pressure, and governor pressure to check the hydraulic components and
for oil leakage.
Line Pressure Test
Preparation
1. Connect the SST to the line pressure output point.
2. Connect a tachometer to the engine.
3. Follow the test preparation procedure show in STEP 2 (STALL TEST).
Procedure
76G07C-030
1. Start the engine and verify that the idle speed is 950-5° rpm.
2. Shift the selector lever to D range.
3. Read the line pressure at idle.
4. Depress the brake pedal firmly with the left foot, and gradually depress the accelerator pedal with
the right foot.
5. Read the line pressure as soon as the engine speed becomes constant; then release the accelera-
tor pedal.
Caution
Steps 4 to 5 must be done within 5 seconds.
5. Shift the selector lever to N range and let the engine idle for one minute or more.
6. Read the line pressure at idle and engine stall speeds for each range in the same manner.
7C—20
Page 1135 of 1865

TROUBLESHOOTING 7C
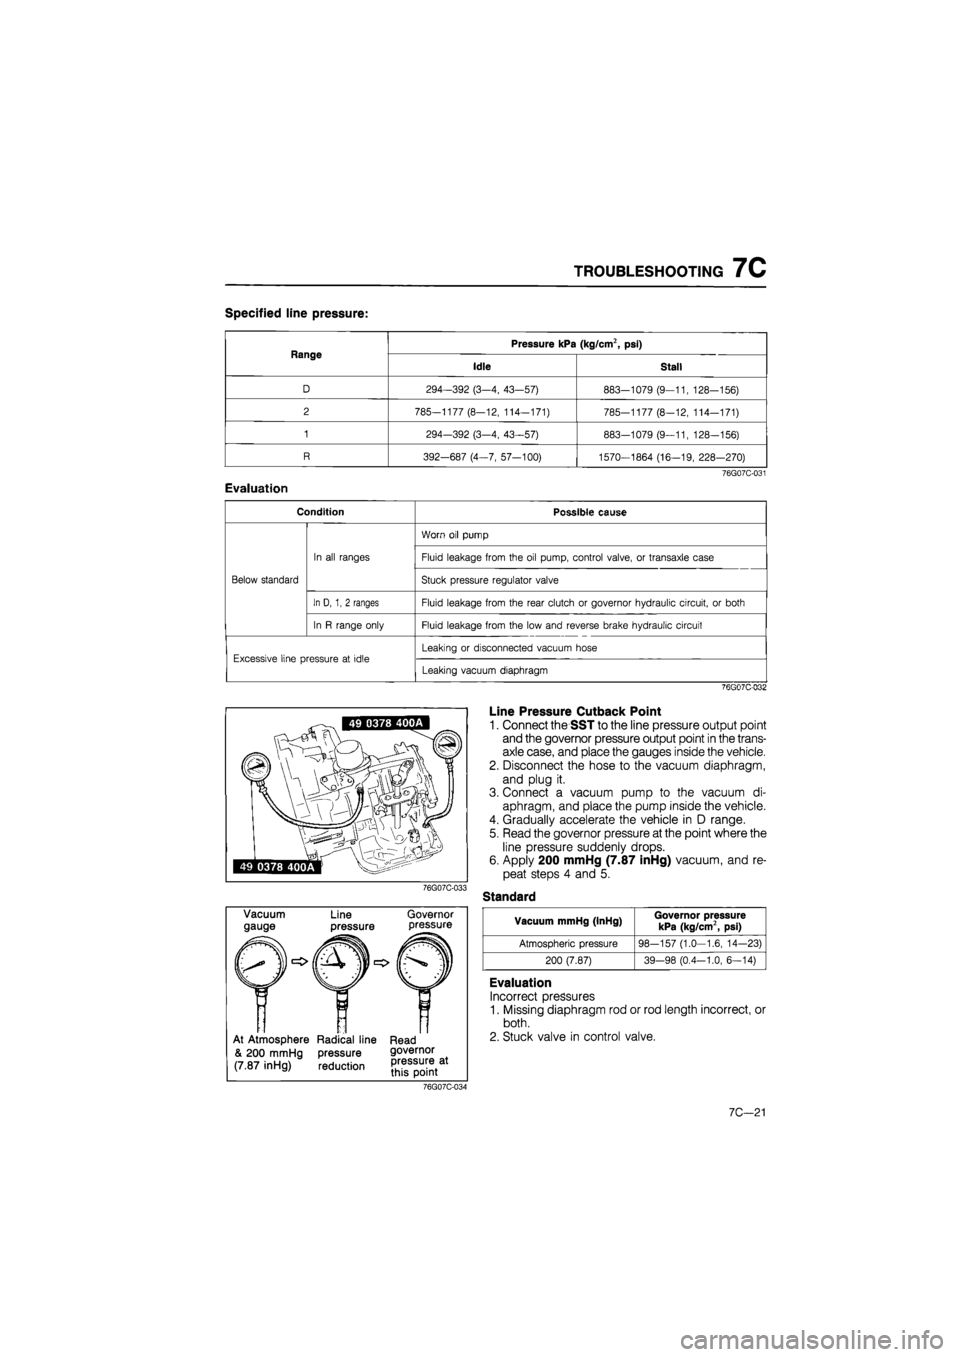
Specified line pressure:
Range Pressure kPa (kg/cm2, psi) Range
Idle Stall
D 294-392 (3-4, 43-57) 883-1079 (9—11, 128-156)
2 785—1177 (8—12, 114—171) 785-1177 (8—12, 114-171)
1 294-392 (3-4, 43—57) 883-1079 (9—11, 128—156)
R 392-687 (4-7, 57-100) 1570—1864 (16—19, 228-270)
76G07C-031
Evaluation
Condition Possible cause
Below standard
In all ranges
Worn oil pump
Below standard
In all ranges Fluid leakage from the oil pump, control valve, or transaxle case
Below standard
In all ranges
Stuck pressure regulator valve Below standard
In D, 1, 2 ranges Fluid leakage from the rear clutch or governor hydraulic circuit, or both
Below standard
In R range only Fluid leakage from the low and reverse brake hydraulic circuit
Excessive line pressure at idle Leaking or disconnected vacuum hose Excessive line pressure at idle
Leaking vacuum diaphragm
76G07C-032
76G07C-033
Vacuum
gauge Line
pressure
Governor pressure
At Atmosphere Radical line Read
& 200 mmHg pressure governor
(7.87 inHg) reduction
Line Pressure Cutback Point
1. Connect the SST to the line pressure output point
and the governor pressure output point in the trans-
axle case, and place the gauges inside the vehicle.
2. Disconnect the hose to the vacuum diaphragm,
and plug it.
3. Connect a vacuum pump to the vacuum di-
aphragm, and place the pump inside the vehicle.
4. Gradually accelerate the vehicle in D range.
5. Read the governor pressure at the point where the
line pressure suddenly drops.
6. Apply 200 mmHg (7.87 inHg) vacuum, and re-
peat steps 4 and 5.
Standard
Vacuum mmHg (InHg) Governor pressure kPa (kg/cm2, psi)
Atmospheric pressure 98-157 (1.0—1.6, 14-23)
200 (7.87) 39-98 (0.4-1.0, 6—14)
Evaluation
Incorrect pressures
1. Missing diaphragm rod or rod length incorrect, or
both.
2. Stuck valve in control valve.
76G07C-034
7C—21
Page 1139 of 1865
ON-VEHICLE MAINTENANCE 7C
ON-VEHICLE MAINTENANCE
AUTOMATIC TRANSAXLE FLUID (ATF)
Inspection for Fluid Leaks
Check for fluid leaks; the following figure shows the locations where fluid leakage may possibly occur.
1. Kick-down solenoid
2. Vacuum diaphragm
3. Manual shaft
4. Speedometer driven gear
5. Oil level tube
6. Governor cover
7. Governor
8. Oil pan
9. Oil pump
10. Inhibitor switch
11. Transaxle case
12. Oil pump
13. Square head plugs
14. Bearing cover
15. Drive shaft
76G07C-041
©
i
©
[JdQ©
I
Inspection of Level
1. Apply the parking brake and block the wheels to
prevent the vehicle from rolling.
Note
Place the car on a flat, level surface.
2. Run the engine so that the automatic transaxle fluid
reaches operating temperature.
3. While the engine is idling, shift the select lever from
P to 1 and back again.
4. Let the engine idle.
5.Shift the select lever to P.
76G07C-042
7C-25
Page 1154 of 1865
7C DISASSEMBLY
17. Remove the oil pump.
Note
If the oil pump is difficult to remove, remove
it after tightening the anchor-end bolt to se-
cure the front clutch with the brake band.
76G07C-084
18. Measure the total end play.
Standard clearance:
a) Straight edge—Pump cover
Maximum 0.10 mm (0.004 in)
b) Straight edge—Transaxle case
Maximum 0.15 mm (0.006 in)
Note
If it is not within specification, use the bear-
ing outer race to make the adjustment at the
time of installation. (Refer to page 7C—112.)
76G07C-085
7C-40
Page 1155 of 1865
DISASSEMBLY 7C
DISASSEMBLY - STEP 2 76G07C-086
76G07C-087
1. Anchor-end bolt and
locknut
2. Brake band
3. Strut
4. Front clutch
5. Rear clutch
6. Rear clutch hub assembly
7. Planetary carrier (front)
8. Seal sleeve
9. Sun gear and spacer
10. Connecting shell
11. Servo
12. Transaxle case
13. Governor
7C—41
Page 1156 of 1865
7C DISASSEMBLY
Procedure
1. Remove the anchor-end bolt and locknut.
76G07C-088
2. Remove the brake band and strut.
Note
Use a piece of wire to secure the brake band
so that it is not damaged by being stretched.
76G07C-089
3. Remove the front clutch.
76G07C-090
4. Remove the rear clutch.
76G07C-091
7C-42
Page 1159 of 1865
DISASSEMBLY 7C
DISASSEMBLY - STEP 3
76G07C-100
1. Oil pipe
2. Parking pawl assembly
3. Drum hub assembly
4. One-way clutch inner race
assembly
5. One-way clutch
6. Retaining plate
7. Drive and driven plate
8. Dished plate
9. Low and reverse brake hub
10. Low and reverse brake
piston
76G07C-101
11. Actuator support
12. Manual shaft assembly
13. Knock pin
14. Control rod, detent ball,
and spring
7C—45