Page 313 of 878
09205±76030Cylinder Head Setting Bolt
Tightening Adaptor
09268±41045Injection Measuring Tool Set
(09268±41070)No.4 Union
(09268±41090)No.7 Union
(90405±09015)No.1 Union
09268±45012 EFI Fuel Pressure Gauge
ECT sensor
09612±24014 Steering Gear Housing Overhaul
Tool Set
(09617±24011) Steering Rack Wrench
09631±22020 Power Steering Hose Nut
14 x 17 mm Wrench Set
09808±14010Fuel Sender Gauge Tool Assy
09816±30010 Oil Pressure Switch Socket
09842±30070 Wiring ªFº EFI InspectionInjector
Knock sensor
Fuel line flare nut
Fuel pressure pulsation damper
SFI SYSTEM (2JZ±GE)
PREPARATION
SST (SPECIAL SERVICE TOOLS)
± ENGINESFI SYSTEM (2JZ±GE)EG±187
Page 317 of 878
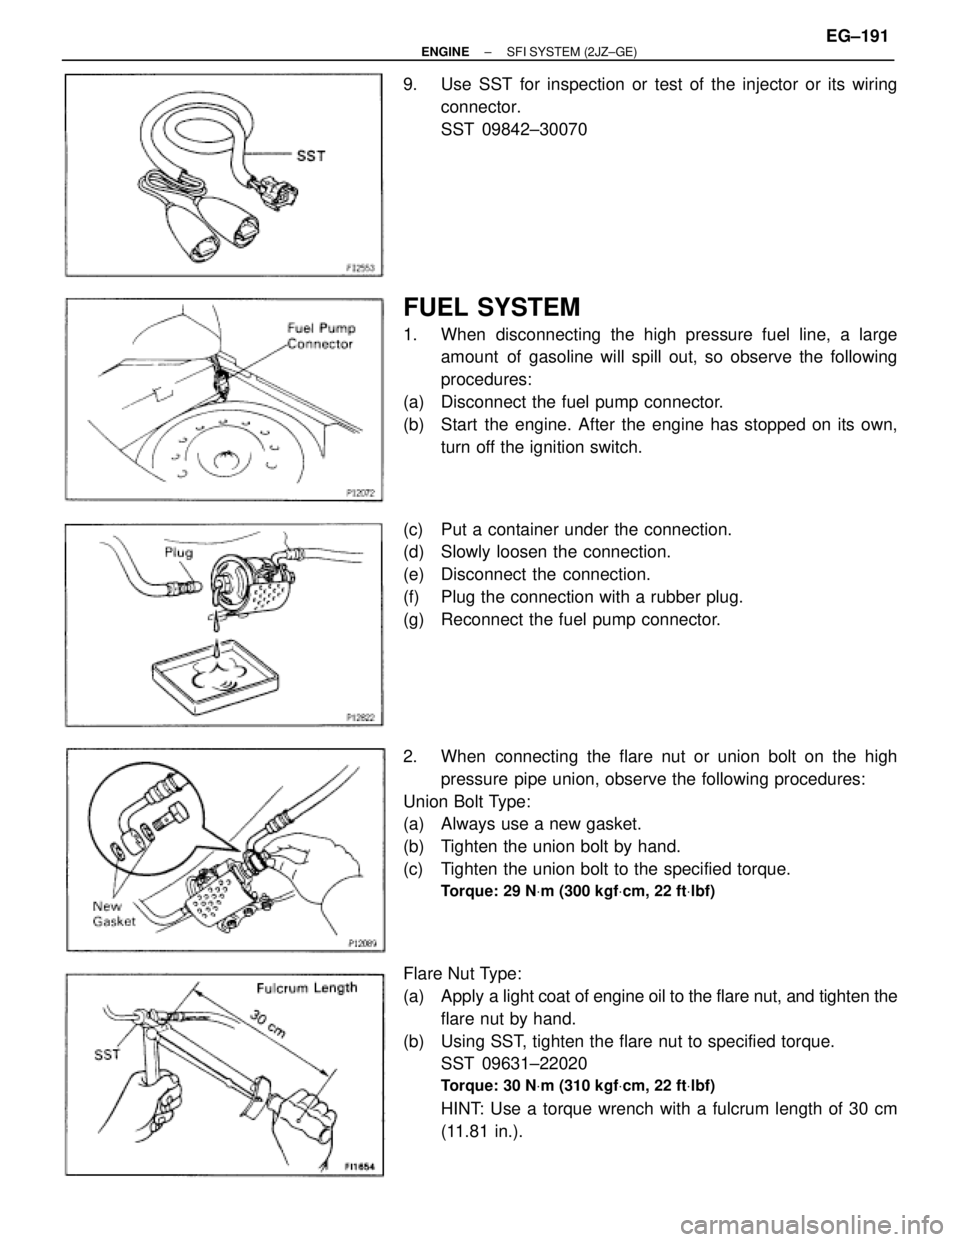
9. Use SST for inspection or test of the injector or its wiring
connector.
SST 09842±30070
FUEL SYSTEM
1. When disconnecting the high pressure fuel line, a large
amount of gasoline will spill out, so observe the following
procedures:
(a) Disconnect the fuel pump connector.
(b) Start the engine. After the engine has stopped on its own,
turn off the ignition switch.
(c) Put a container under the connection.
(d) Slowly loosen the connection.
(e) Disconnect the connection.
(f) Plug the connection with a rubber plug.
(g) Reconnect the fuel pump connector.
2. When connecting the flare nut or union bolt on the high
pressure pipe union, observe the following procedures:
Union Bolt Type:
(a) Always use a new gasket.
(b) Tighten the union bolt by hand.
(c) Tighten the union bolt to the specified torque.
Torque: 29 NVm (300 kgfVcm, 22 ftVlbf)
Flare Nut Type:
(a) Apply a light coat of engine oil to the flare nut, and tighten the
flare nut by hand.
(b) Using SST, tighten the flare nut to specified torque.
SST 09631±22020
Torque: 30 NVm (310 kgfVcm, 22 ftVlbf)
HINT: Use a torque wrench with a fulcrum length of 30 cm
(11.81 in.).
± ENGINESFI SYSTEM (2JZ±GE)EG±191
Page 318 of 878
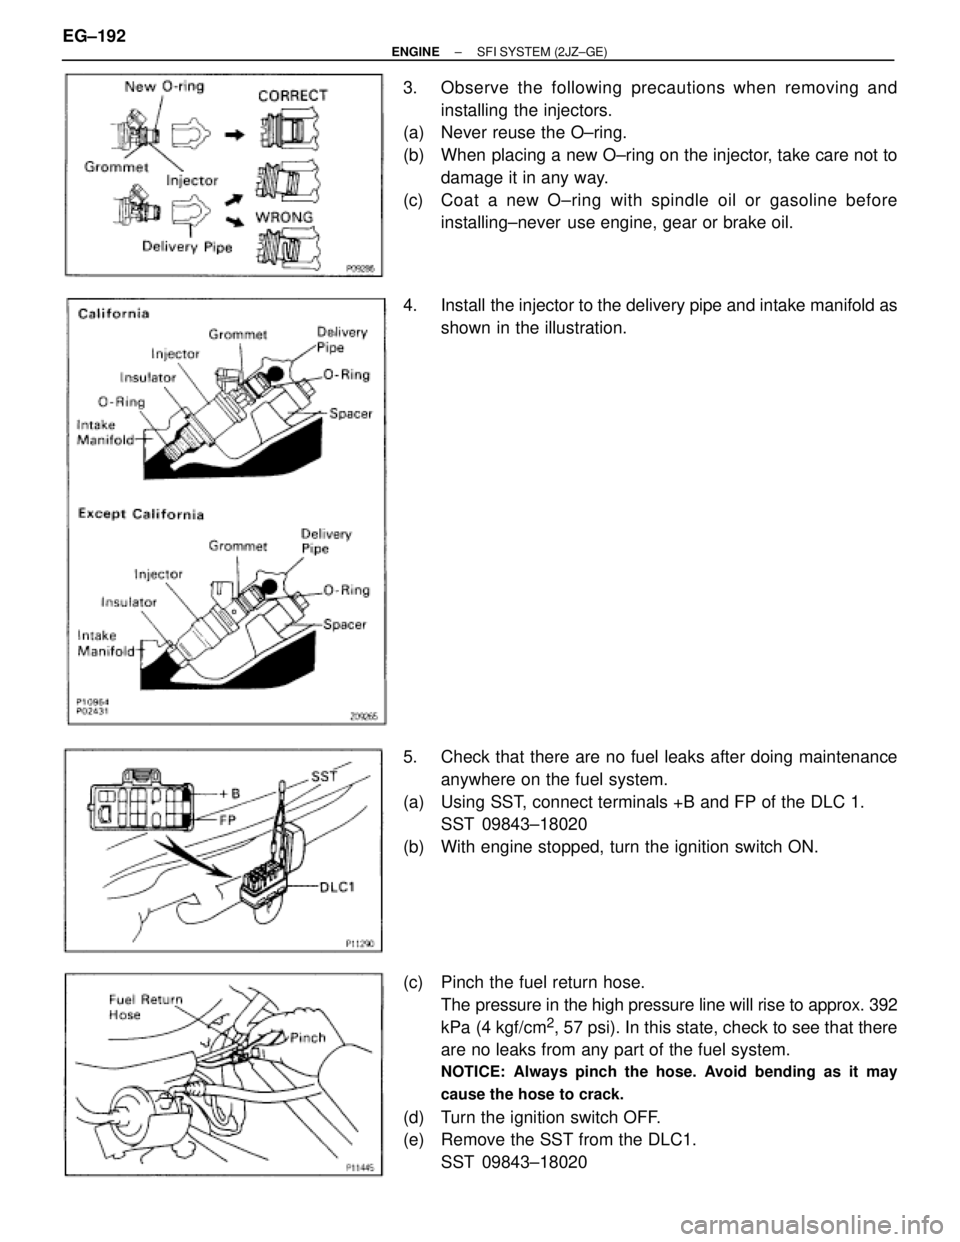
3. Observe the following precautions when removing and
installing the injectors.
(a) Never reuse the O±ring.
(b) When placing a new O±ring on the injector, take care not to
damage it in any way.
(c) Coat a new O±ring with spindle oil or gasoline before
installing±never use engine, gear or brake oil.
4. Install the injector to the delivery pipe and intake manifold as
shown in the illustration.
5. Check that there are no fuel leaks after doing maintenance
anywhere on the fuel system.
(a) Using SST, connect terminals +B and FP of the DLC 1.
SST 09843±18020
(b) With engine stopped, turn the ignition switch ON.
(c) Pinch the fuel return hose.
The pressure in the high pressure line will rise to approx. 392
kPa (4 kgf/cm
2, 57 psi). In this state, check to see that there
are no leaks from any part of the fuel system.
NOTICE: Always pinch the hose. Avoid bending as it may
cause the hose to crack.
(d) Turn the ignition switch OFF.
(e) Remove the SST from the DLC1.
SST 09843±18020 EG±192
± ENGINESFI SYSTEM (2JZ±GE)
Page 319 of 878
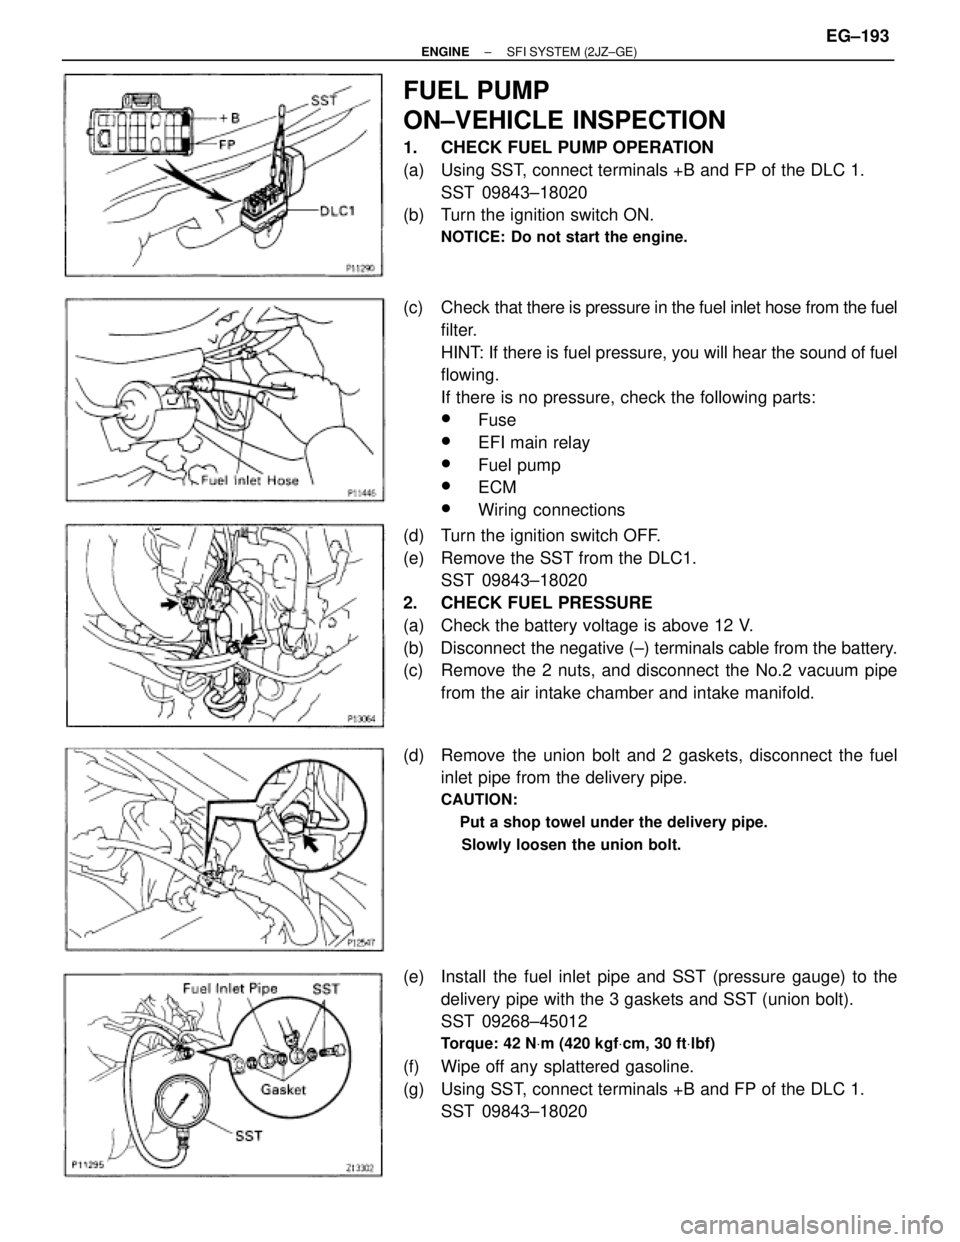
FUEL PUMP
ON±VEHICLE INSPECTION
1. CHECK FUEL PUMP OPERATION
(a) Using SST, connect terminals +B and FP of the DLC 1.
SST 09843±18020
(b) Turn the ignition switch ON.
NOTICE: Do not start the engine.
(c) Check that there is pressure in the fuel inlet hose from the fuel
filter.
HINT: If there is fuel pressure, you will hear the sound of fuel
flowing.
If there is no pressure, check the following parts:
wFuse
wEFI main relay
wFuel pump
wECM
wWiring connections
(d) Turn the ignition switch OFF.
(e) Remove the SST from the DLC1.
SST 09843±18020
2. CHECK FUEL PRESSURE
(a) Check the battery voltage is above 12 V.
(b) Disconnect the negative (±) terminals cable from the battery.
(c) Remove the 2 nuts, and disconnect the No.2 vacuum pipe
from the air intake chamber and intake manifold.
(d) Remove the union bolt and 2 gaskets, disconnect the fuel
inlet pipe from the delivery pipe.
CAUTION:
� Put a shop towel under the delivery pipe.
� Slowly loosen the union bolt.
(e) Install the fuel inlet pipe and SST (pressure gauge) to the
delivery pipe with the 3 gaskets and SST (union bolt).
SST 09268±45012
Torque: 42 NVm (420 kgfVcm, 30 ftVlbf)
(f) Wipe off any splattered gasoline.
(g) Using SST, connect terminals +B and FP of the DLC 1.
SST 09843±18020
± ENGINESFI SYSTEM (2JZ±GE)EG±193
Page 320 of 878
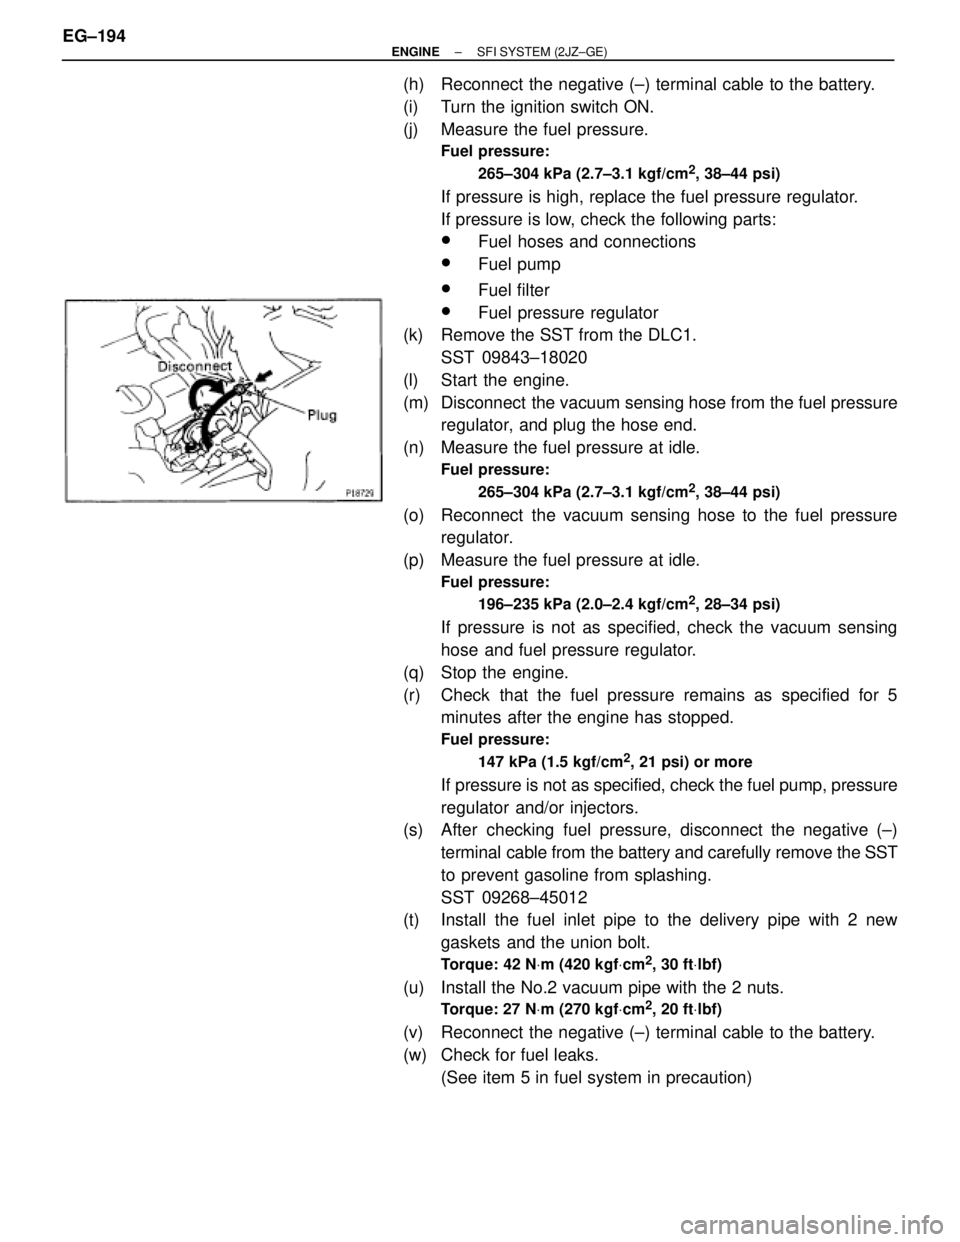
(h) Reconnect the negative (±) terminal cable to the battery.
(i) Turn the ignition switch ON.
(j) Measure the fuel pressure.
Fuel pressure:
265±304 kPa (2.7±3.1 kgf/cm
2, 38±44 psi)
If pressure is high, replace the fuel pressure regulator.
If pressure is low, check the following parts:
wFuel hoses and connections
wFuel pump
wFuel filter
wFuel pressure regulator
(k) Remove the SST from the DLC1.
SST 09843±18020
(l) Start the engine.
(m) Disconnect the vacuum sensing hose from the fuel pressure
regulator, and plug the hose end.
(n) Measure the fuel pressure at idle.
Fuel pressure:
265±304 kPa (2.7±3.1 kgf/cm
2, 38±44 psi)
(o) Reconnect the vacuum sensing hose to the fuel pressure
regulator.
(p) Measure the fuel pressure at idle.
Fuel pressure:
196±235 kPa (2.0±2.4 kgf/cm
2, 28±34 psi)
If pressure is not as specified, check the vacuum sensing
hose and fuel pressure regulator.
(q) Stop the engine.
(r) Check that the fuel pressure remains as specified for 5
minutes after the engine has stopped.
Fuel pressure:
147 kPa (1.5 kgf/cm
2, 21 psi) or more
If pressure is not as specified, check the fuel pump, pressure
regulator and/or injectors.
(s) After checking fuel pressure, disconnect the negative (±)
terminal cable from the battery and carefully remove the SST
to prevent gasoline from splashing.
SST 09268±45012
(t) Install the fuel inlet pipe to the delivery pipe with 2 new
gaskets and the union bolt.
Torque: 42 NVm (420 kgfVcm2, 30 ftVlbf)
(u) Install the No.2 vacuum pipe with the 2 nuts.
Torque: 27 NVm (270 kgfVcm2, 20 ftVlbf)
(v) Reconnect the negative (±) terminal cable to the battery.
(w) Check for fuel leaks.
(See item 5 in fuel system in precaution) EG±194
± ENGINESFI SYSTEM (2JZ±GE)
Page 326 of 878
FUEL PRESSURE REGULATOR
COMPONENTS FOR REMOVAL AND
INSTALLATION
FUEL PRESSURE REGULATOR
REMOVAL
1. DISCONNECT VACUUM SENSING HOSE FROM FUEL
PRESSURE REGULATOR
2. DISCONNECT FUEL RETURN PIPE FROM FUEL
PRESSURE REGULATOR
Remove the union bolt and 2 gaskets, and disconnect the re-
turn pipe from the pressure regulator.
CAUTION:
� Put a shop rag under the pressure regulator.
� Slowly loosen the union bolt.
3. REMOVE FUEL PRESSURE REGULATOR
(a) Remove the 2 bolts, and pull out the pressure regulator.
(b) Remove the O±ring from the pressure regulator. EG±200
± ENGINESFI SYSTEM (2JZ±GE)
Page 327 of 878
FUEL PRESSURE REGULATOR
INSTALLATION
1. INSTALL FUEL PRESSURE REGULATOR
(a) Apply a light coat of gasoline to a new O±ring, and install it
to the pressure regulator.
(b) Attach the pressure regulator to the delivery pipe.
(c) Check that the pressure regulator rotates smoothly.
NOTICE: If it does not rotate smoothly, the O±ring may be
pinched, so remove the pressure regulator and do steps (b)
and (c) above again.
(d) Install the pressure regulator with the 2 bolts.
Torque: 8.8 NVm (90 kgfVcm, 78 in.Vlbf)
2. CONNECT FUEL RETURN PIPE TO FUEL PRESSURE
REGULATOR
Install the return pipe with 2 new gaskets and the union bolt.
Torque: 27 NVm (280 kgfVcm, 20 ftVlbf)
3. CONNECT VACUUM SENSING HOSE TO FUEL
PRESSURE REGULATOR
4. CHECK FOR FUEL LEAKS
(See item 5 in fuel system in precaution)
± ENGINESFI SYSTEM (2JZ±GE)EG±201
Page 330 of 878
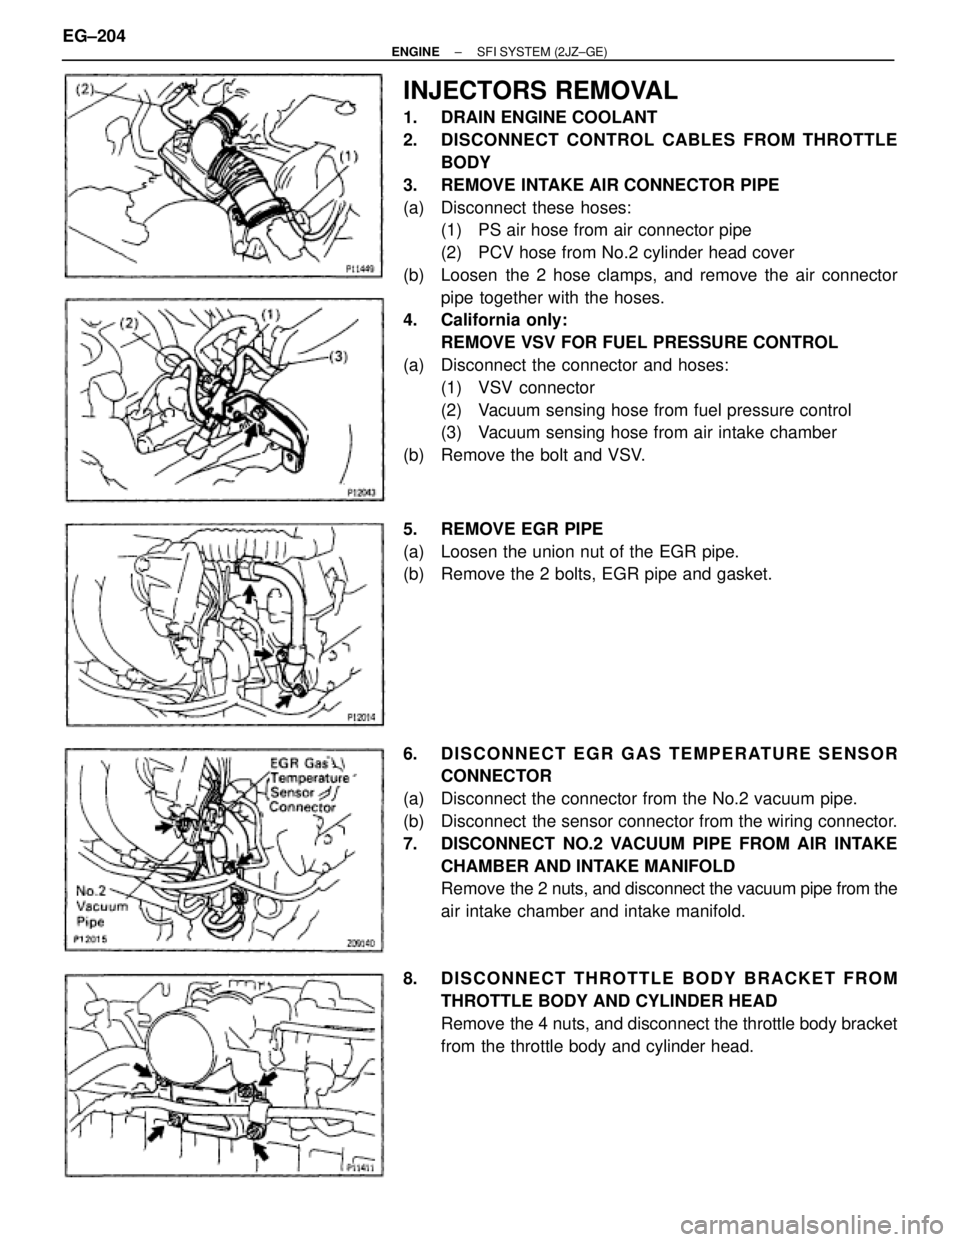
INJECTORS REMOVAL
1. DRAIN ENGINE COOLANT
2. DISCONNECT CONTROL CABLES FROM THROTTLE
BODY
3. REMOVE INTAKE AIR CONNECTOR PIPE
(a) Disconnect these hoses:
(1) PS air hose from air connector pipe
(2) PCV hose from No.2 cylinder head cover
(b) Loosen the 2 hose clamps, and remove the air connector
pipe together with the hoses.
4. California only:
REMOVE VSV FOR FUEL PRESSURE CONTROL
(a) Disconnect the connector and hoses:
(1) VSV connector
(2) Vacuum sensing hose from fuel pressure control
(3) Vacuum sensing hose from air intake chamber
(b) Remove the bolt and VSV.
5. REMOVE EGR PIPE
(a) Loosen the union nut of the EGR pipe.
(b) Remove the 2 bolts, EGR pipe and gasket.
6. DISCONNECT EGR GAS TEMPERATURE SENSOR
CONNECTOR
(a) Disconnect the connector from the No.2 vacuum pipe.
(b) Disconnect the sensor connector from the wiring connector.
7. DISCONNECT NO.2 VACUUM PIPE FROM AIR INTAKE
CHAMBER AND INTAKE MANIFOLD
Remove the 2 nuts, and disconnect the vacuum pipe from the
air intake chamber and intake manifold.
8. DISCONNECT THROTTLE BODY BRACKET FROM
THROTTLE BODY AND CYLINDER HEAD
Remove the 4 nuts, and disconnect the throttle body bracket
from the throttle body and cylinder head. EG±204
± ENGINESFI SYSTEM (2JZ±GE)