Page 1441 of 2389
Special ToolSpecial Tool Locking
Lug
Locking
Lug
Terminal
Retainer
[Retainer at Full Lock Position] [Retainer at Temporary Lock Position]
Terminal Retainer
[Retainer at Full Lock Position]
Stopper
[Retainer at Temporary Lock Position]Terminal
Retainer Special
Tool
Service hole
TERMINAL AND CONNECTOR REPAIR±TERMINAL REPLACEMENT
B±12
22
Wire Harness Repair Manual (RM1022E)
[Case 2]
(1)Using the special tool, push the terminal retainer
locking lug (clip) and pull the terminal retainer up to
the temporary lock position.
[Case 3]
(1)Using the special tool, raise the retainer up to the
temporary lock position.
[Case 4]
Page 1442 of 2389
Appearance when the double
locking is releasedA
Special tool
B
B±13
TERMINAL AND CONNECTOR REPAIR±TERMINAL REPLACEMENT
23
Wire Harness Repair Manual (RM1022E)
(1)Insert the special tool into the service hole and move
it to the direction of the arrow to release the lock on
the side A.
(2)Push the lock on the side B up by the special tool and
release the lock. Then pull the retainer forward.
Page 1446 of 2389
Service hole
Retainer
Lock Special tool
B±17
TERMINAL AND CONNECTOR REPAIR±TERMINAL REPLACEMENT
27
Wire Harness Repair Manual (RM1022E)
Type F (For C±Type Connector)
(1)Insert the special tool into the service hole.
(2)Move the special tool to the direction of the arrow and
release the lock.
HINT: Lift the retainer up after moving it to the direction
of the thin arrow shown in the illustration.
(3)Pull the retainer forward by hand and remove the
retainer from the housing.
Type G
�Insert the special tool into the position shown in the
illustration. Pry it to the direction of the arrow and
push the lock up to release it.
Page 1816 of 2389
G±1
APPENDIX±WIRE HARNESS REPAIR KIT WITH CASE
Wire Harness Repair Manual (RM1022E)
397
WIRE HARNESS REPAIR KIT WITH CASE (REFERENCE ONLY)
We would like to recommend to you use of the ºWire Harness Repair Kit with the Caseº
according to your after service market demand.
Example:
or
[portable type] [stationary type]
Remark: This kind of kit is not available from Toyota Motor Corporation.
G
Page 1835 of 2389
4. As some tachometers are not compatible with this igni-
tion system, we recommend that you confirm the
compatibility of your unit before use.
5. NEVER allow the tachometer test probe to touch ground
as this could damage the igniter and/or ignition coil.
6. Do not disconnect the battery when the engine is run-
ning.
7. Check that the igniter is properly grounded to the body.
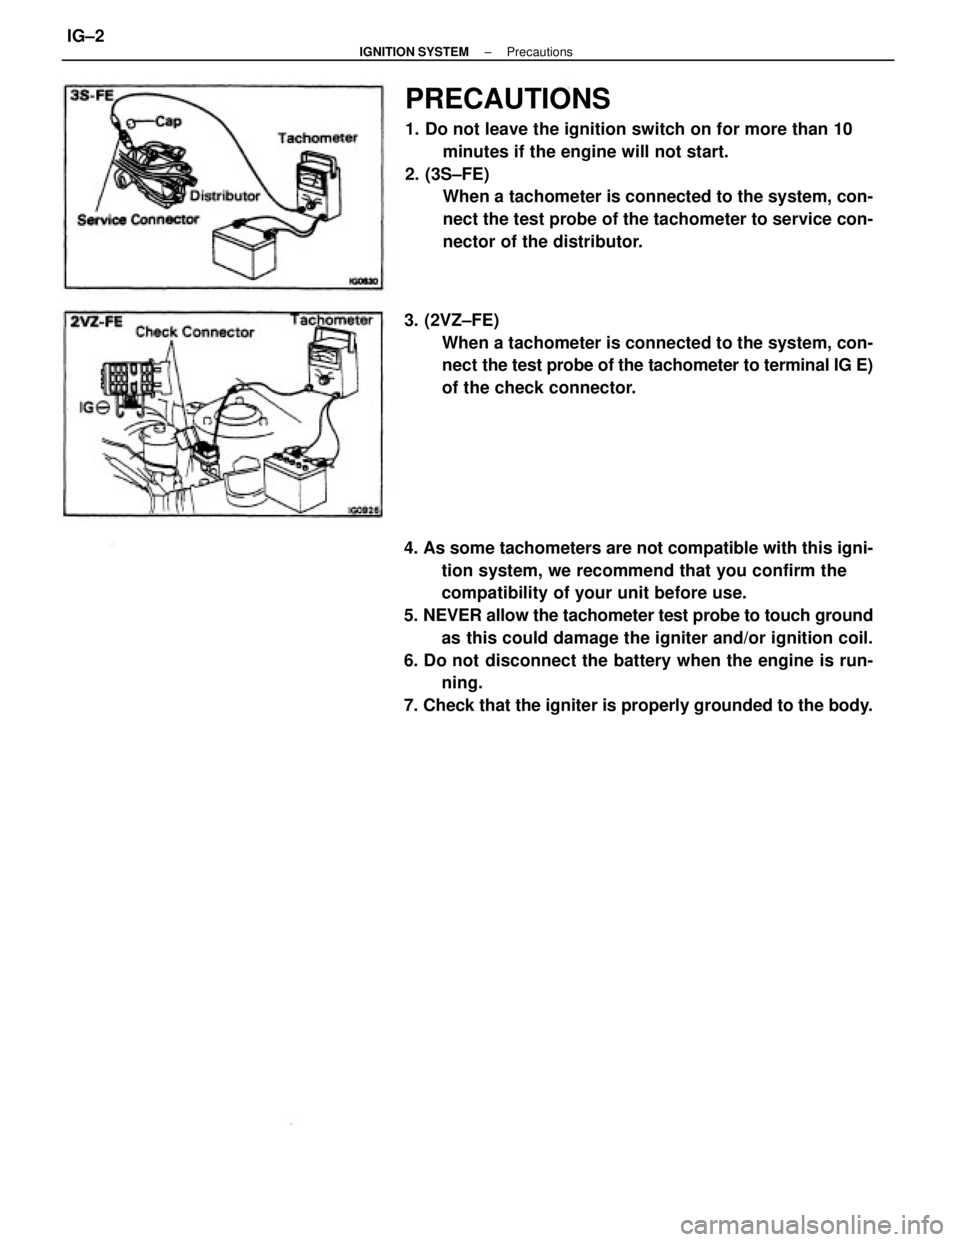
PRECAUTIONS
1. Do not leave the ignition switch on for more than 10
minutes if the engine will not start.
2. (3S±FE)
When a tachometer is connected to the system, con-
nect the test probe of the tachometer to service con-
nector of the distributor.
3. (2VZ±FE)
When a tachometer is connected to the system, con-
nect the test probe of the tachometer to terminal IG E)
of the check connector.
± IGNITION SYSTEMPrecautionsIG±2
Page 1849 of 2389
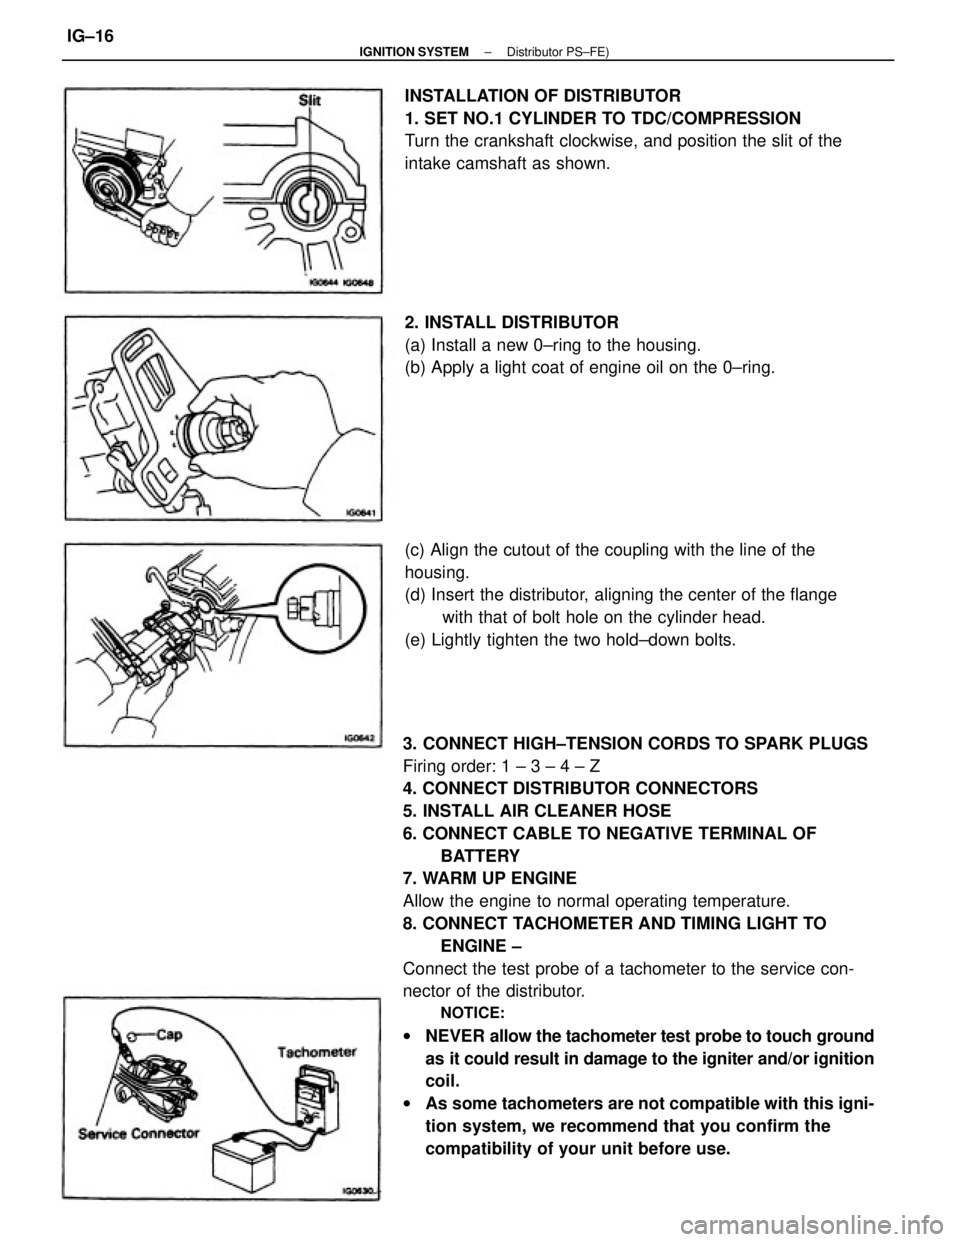
3. CONNECT HIGH±TENSION CORDS TO SPARK PLUGS
Firing order: 1 ± 3 ± 4 ± Z
4. CONNECT DISTRIBUTOR CONNECTORS
5. INSTALL AIR CLEANER HOSE
6. CONNECT CABLE TO NEGATIVE TERMINAL OF
BATTERY
7. WARM UP ENGINE
Allow the engine to normal operating temperature.
8. CONNECT TACHOMETER AND TIMING LIGHT TO
ENGINE ±
Connect the test probe of a tachometer to the service con-
nector of the distributor.
NOTICE:
wNEVER allow the tachometer test probe to touch ground
as it could result in damage to the igniter and/or ignition
coil.
wAs some tachometers are not compatible with this igni-
tion system, we recommend that you confirm the
compatibility of your unit before use. (c) Align the cutout of the coupling with the line of the
housing.
(d) Insert the distributor, aligning the center of the flange
with that of bolt hole on the cylinder head.
(e) Lightly tighten the two hold±down bolts. INSTALLATION OF DISTRIBUTOR
1. SET NO.1 CYLINDER TO TDC/COMPRESSION
Turn the crankshaft clockwise, and position the slit of the
intake camshaft as shown.
2. INSTALL DISTRIBUTOR
(a) Install a new 0±ring to the housing.
(b) Apply a light coat of engine oil on the 0±ring.
± IGNITION SYSTEMDistributor PS±FE)IG±16
Page 1860 of 2389
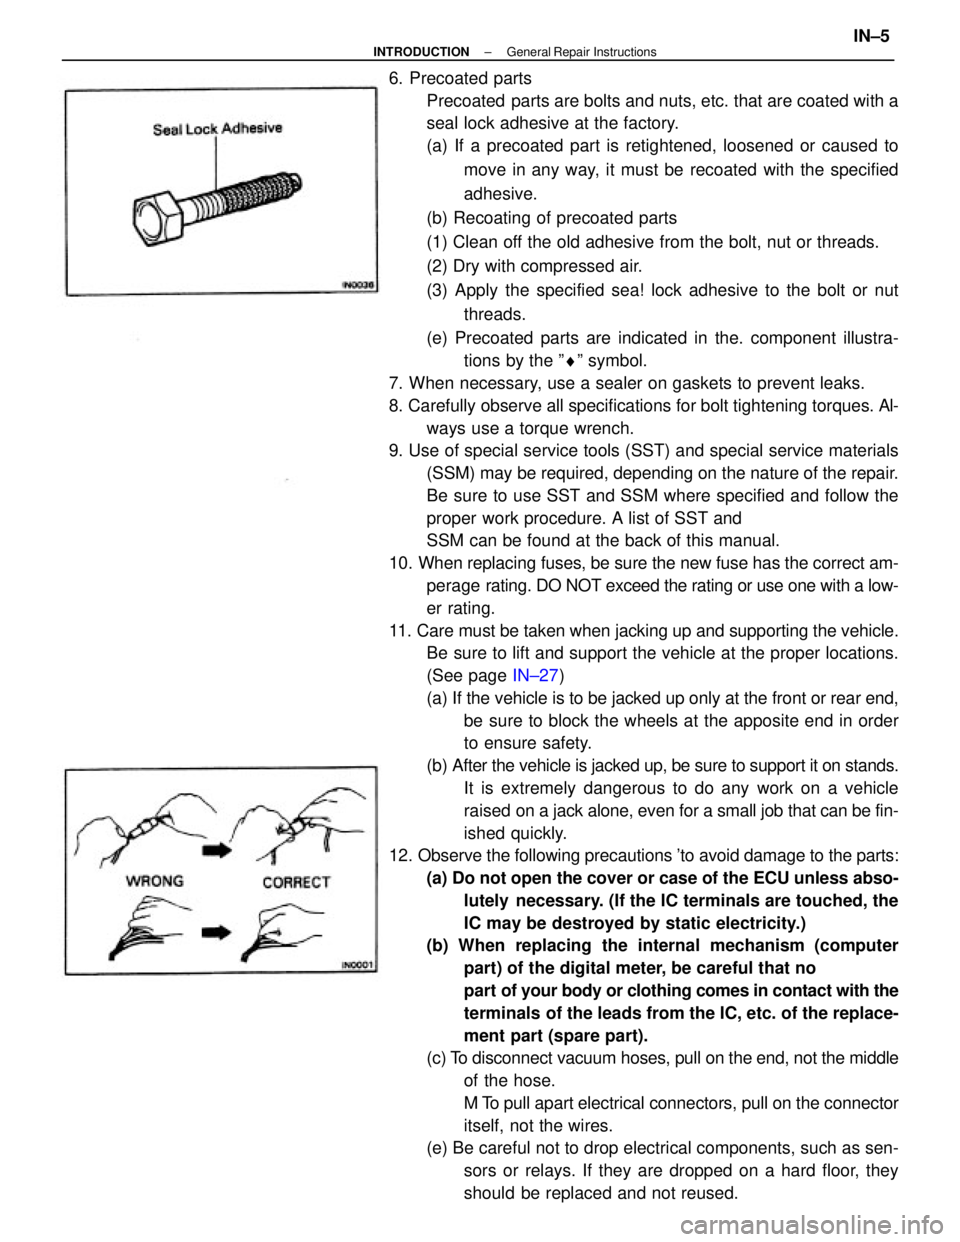
6. Precoated parts
Precoated parts are bolts and nuts, etc. that are coated with a
seal lock adhesive at the factory.
(a) If a precoated part is retightened, loosened or caused to
move in any way, it must be recoated with the specified
adhesive.
(b) Recoating of precoated parts
(1) Clean off the old adhesive from the bolt, nut or threads.
(2) Dry with compressed air.
(3) Apply the specified sea! lock adhesive to the bolt or nut
threads.
(e) Precoated parts are indicated in the. component illustra-
tions by the ºrº symbol.
7. When necessary, use a sealer on gaskets to prevent leaks.
8. Carefully observe all specifications for bolt tightening torques. Al-
ways use a torque wrench.
9. Use of special service tools (SST) and special service materials
(SSM) may be required, depending on the nature of the repair.
Be sure to use SST and SSM where specified and follow the
proper work procedure. A list of SST and
SSM can be found at the back of this manual.
10. When replacing fuses, be sure the new fuse has the correct am-
perage rating. DO NOT exceed the rating or use one with a low-
er rating.
11. Care must be taken when jacking up and supporting the vehicle.
Be sure to lift and support the vehicle at the proper locations.
(See page IN±27)
(a) If the vehicle is to be jacked up only at the front or rear end,
be sure to block the wheels at the apposite end in order
to ensure safety.
(b) After the vehicle is jacked up, be sure to support it on stands.
It is extremely dangerous to do any work on a vehicle
raised on a jack alone, even for a small job that can be fin-
ished quickly.
12. Observe the following precautions 'to avoid damage to the parts:
(a) Do not open the cover or case of the ECU unless abso-
lutely necessary. (If the IC terminals are touched, the
IC may be destroyed by static electricity.)
(b) When replacing the internal mechanism (computer
part) of the digital meter, be careful that no
part of your body or clothing comes in contact with the
terminals of the leads from the IC, etc. of the replace-
ment part (spare part).
(c) To disconnect vacuum hoses, pull on the end, not the middle
of the hose.
M To pull apart electrical connectors, pull on the connector
itself, not the wires.
(e) Be careful not to drop electrical components, such as sen-
sors or relays. If they are dropped on a hard floor, they
should be replaced and not reused.
± INTRODUCTIONGeneral Repair InstructionsIN±5
Page 1912 of 2389
Maintenance services indicated by a star (*) or asterisk (*) are required under the terms of the Emission Control Systems Warranty. See Owner's Guide or Warranty Booklet
for complete warranty information.
* For vehicles sold in California
* For vehicles sold outside California
(1) Applicable to vehicles operated under conditions of extensive idling and /or low speed driving for long distances such as police, taxi or door±to±door delivery use.
(2) Applicable when operating mainly on dusty roads. If not, follow SCHEDULE B.
(3) Includes inspection of fuel tank band and vapor vent system.
(4) Also applicable to lining drum for parking brake.
(5) Check for leakage.
(6) Check for oil leaks from steering gear housing.
(7) Applicable only when operating mainly on rough, muddy roads. The applicable parts are listed below. For other usage conditions, refer to SCHEDULE B.
w
Front and rear suspension member to body
w
0 Strut bar bracket to body bolts
w
Bolts for sheet installation
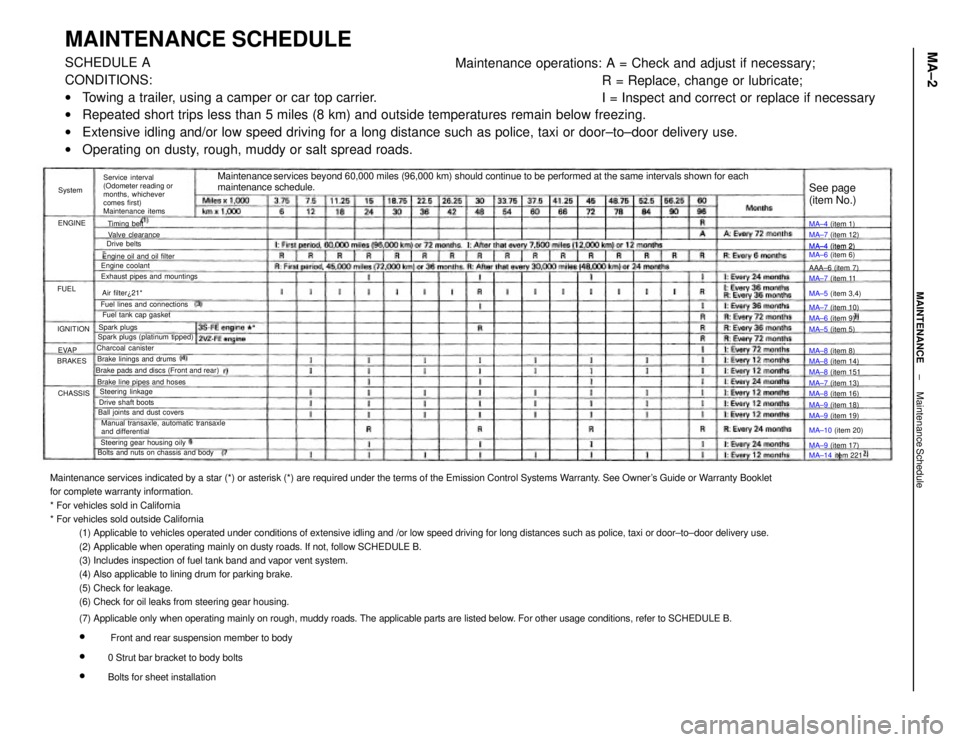
MAINTENANCE SCHEDULESCHEDULE A
CONDITIONS:
wTowing a trailer, using a camper or car top carrier.
wRepeated short trips less than 5 miles (8 km) and outside temperatures remain below freezing.
wExtensive idling and/or low speed driving for a long distance such as police, taxi or door±to±door delivery use.
wOperating on dusty, rough, muddy or salt spread roads.Maintenance operations: A = Check and adjust if necessary;
R = Replace, change or lubricate;
I = Inspect and correct or replace if necessary
Maintenance services beyond 60,000 miles (96,000 km) should continue to be performed at the same intervals shown for each
maintenance schedule.
Service interval
(Odometer reading or
months, whichever
comes first)
Maintenance items
Manual transaxle, automatic transaxle
and differential Brake pads and discs (Front and rear)
Bolts and nuts on chassis and bodyExhaust pipes and mountings
Steering gear housing oily Brake line pipes and hosesFuel lines and connections
Ball joints and dust coversEngine oil and oil filter
Spark plugs (platinum tipped)MA±4 (item 2)
MA±6 (item 6)
Brake linings and drumsFuel tank cap gasket
Drive shaft boots
MA±14 item 221 MA±10 (item 20) MA±5 (item 3,4)
Steering linkageMA±7 (item 12)
MA±8 (item 14) Valve clearance
MA±8 (item 16)
MA±9 (item 19) MA±7 (item 13) MA±7 (item 11
MA±7 (item 10)
MA±9 (item 18) Charcoal canister
MA±9 (item 17) MA±8 (item 151
See page
(item No.)
Engine coolant
MA±6 (item 9) MA±4 (item 1)
MA±4 (item 2)
MA±5 (item 5)
MA±8 (item 8) AAA±6 (item 7)
Air filter¿21*
Spark plugsTiming belt
Drive belts
IGNITION
CHASSIS BRAKESENGINESystem
EVAP FUEL
± MAINTENANCEMaintenance ScheduleMA±2