Page 694 of 2389

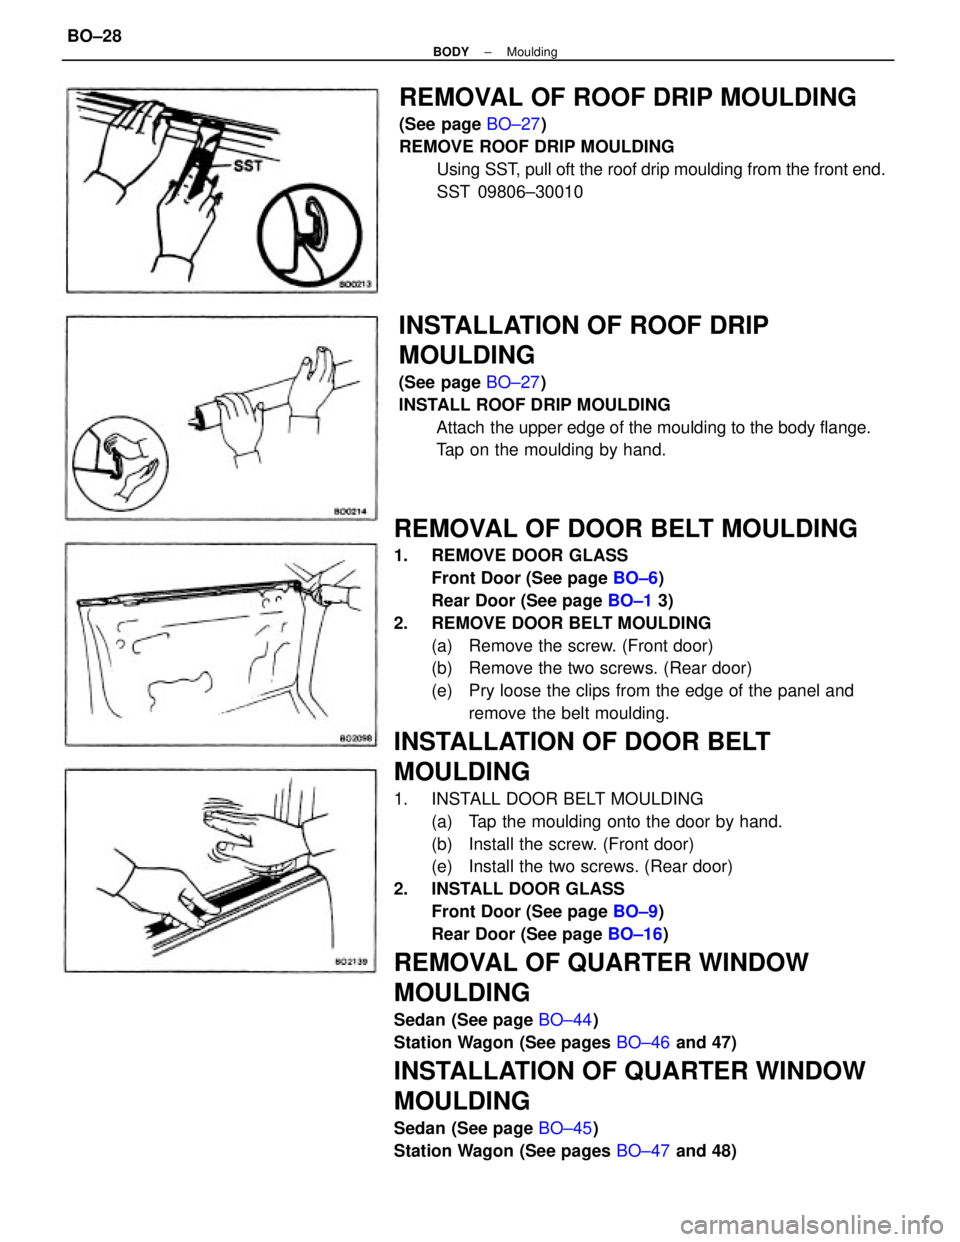
REMOVAL OF DOOR BELT MOULDING
1. REMOVE DOOR GLASS
Front Door (See page BO±6)
Rear Door (See page BO±1 3)
2. REMOVE DOOR BELT MOULDING
(a) Remove the screw. (Front door)
(b) Remove the two screws. (Rear door)
(e) Pry loose the clips from the edge of the panel and
remove the belt moulding.
INSTALLATION OF DOOR BELT
MOULDING
1. INSTALL DOOR BELT MOULDING
(a) Tap the moulding onto the door by hand.
(b) Install the screw. (Front door)
(e) Install the two screws. (Rear door)
2. INSTALL DOOR GLASS
Front Door (See page BO±9)
Rear Door (See page BO±16)
REMOVAL OF QUARTER WINDOW
MOULDING
Sedan (See page BO±44)
Station Wagon (See pages BO±46 and 47)
INSTALLATION OF QUARTER WINDOW
MOULDING
Sedan (See page BO±45)
Station Wagon (See pages BO±47 and 48)
REMOVAL OF ROOF DRIP MOULDING
(See page BO±27)
REMOVE ROOF DRIP MOULDING
Using SST, pull oft the roof drip moulding from the front end.
SST 09806±30010
INSTALLATION OF ROOF DRIP
MOULDING
(See page BO±27)
INSTALL ROOF DRIP MOULDING
Attach the upper edge of the moulding to the body flange.
Tap on the moulding by hand.
± BODYMouldingBO±28
Page 710 of 2389

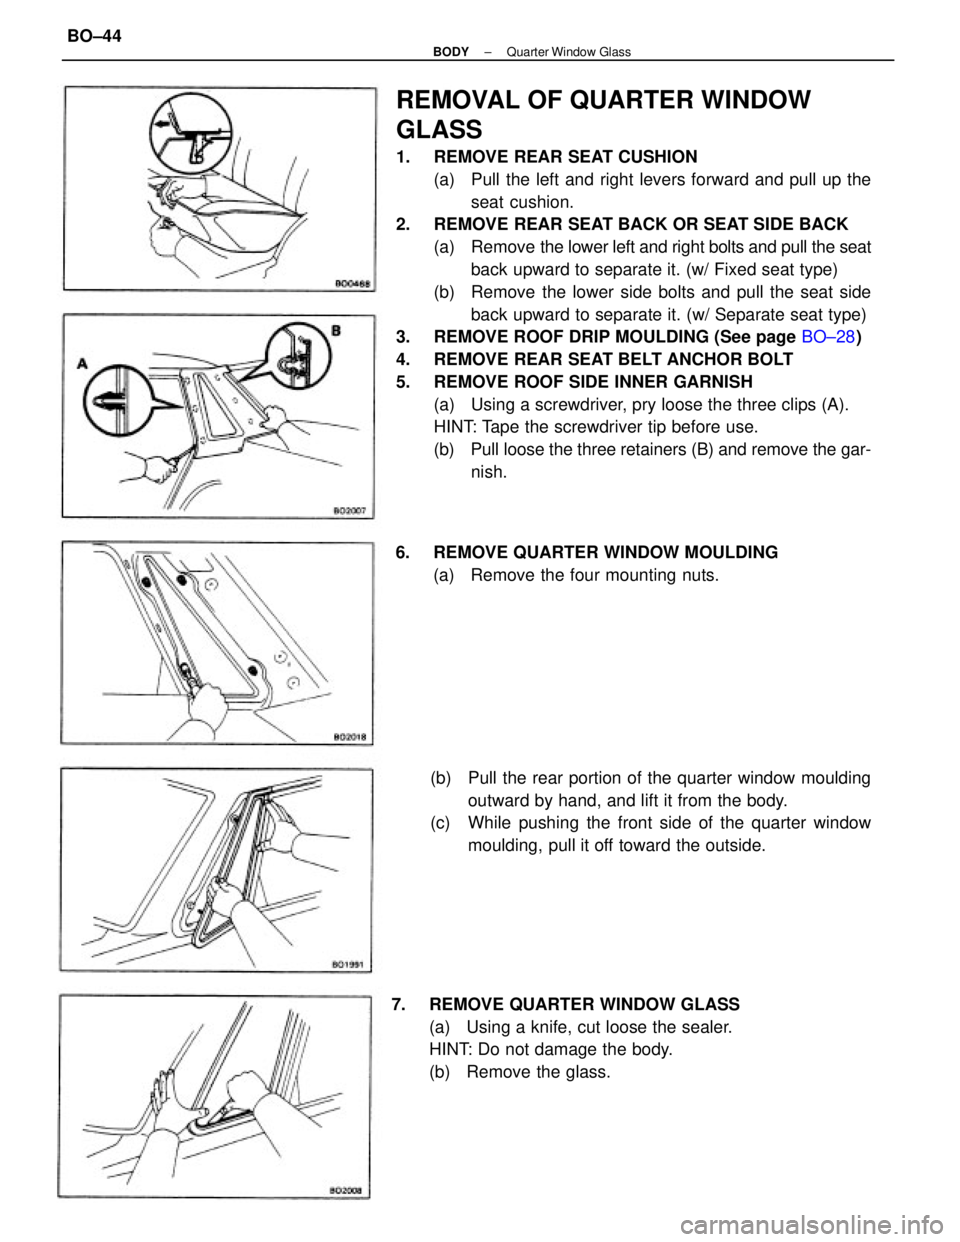
REMOVAL OF QUARTER WINDOW
GLASS
1. REMOVE REAR SEAT CUSHION
(a) Pull the left and right levers forward and pull up the
seat cushion.
2. REMOVE REAR SEAT BACK OR SEAT SIDE BACK
(a) Remove the lower left and right bolts and pull the seat
back upward to separate it. (w/ Fixed seat type)
(b) Remove the lower side bolts and pull the seat side
back upward to separate it. (w/ Separate seat type)
3. REMOVE ROOF DRIP MOULDING (See page BO±28)
4. REMOVE REAR SEAT BELT ANCHOR BOLT
5. REMOVE ROOF SIDE INNER GARNISH
(a) Using a screwdriver, pry loose the three clips (A).
HINT: Tape the screwdriver tip before use.
(b) Pull loose the three retainers (B) and remove the gar-
nish.
(b) Pull the rear portion of the quarter window moulding
outward by hand, and lift it from the body.
(c) While pushing the front side of the quarter window
moulding, pull it off toward the outside.
7. REMOVE QUARTER WINDOW GLASS
(a) Using a knife, cut loose the sealer.
HINT: Do not damage the body.
(b) Remove the glass. 6. REMOVE QUARTER WINDOW MOULDING
(a) Remove the four mounting nuts.
± BODYQuarter Window GlassBO±44
Page 711 of 2389
5. INSTALL FOLLOWING PARTS:
(a) Roof side inner garnish
(b) Rear seat belt anchor bolt
Torque: 440 kg±cm (32 ft±Ib, 43 N¿rn)
(c) Roof drip moulding
(d) (w/ Fixed Seat Type)
Rear seat
(e) (w/ Separate Seat Type)
Rear side seat back and seat cushion. 2. COAT CONTACT SURFACE OF GLASS WITH PRIMER
(a) Using a sponge, apply the primer around the entire
ceramic application area.
HINT: Apply primer evenly and to the ceramic application
area only.
(b) Let the primer coating dry for 10 minutes.
4. INSTALL QUARTER WINDOW GLASS WITH
MOULDING
(a) Fit on the moulding.
(b) Install the glass using the moulding stud bolts as a
guide.
(c) Install the four mounting nuts.
INSTALLATION OF QUARTER
WINDOW GLASS
(See page BO±43)
1. CLEAN BODY OR GLASS
Wipe oft any adhesive left on the body and glass with
cleaner.
3. APPLY SEAL TO GLASS
Install the seal to the glass.
HINT: Overlap the seal approx. 40 mm (1.57 in.) at the
front area.
± BODYQuarter Window GlassBO±45
Page 712 of 2389
REMOVAL OF QUARTER WINDOW
GLASS
1. REMOVE REAR ROOF DRIP MOULDING
(See page BO±28)
2. REMOVE QUARTER WINDOW UPPER MOULDING
Using a scraper, pry the upper moulding.
HINT: Apply tape to the scraper blade to prevent scratch-
ing the vehicle body.
3. REMOVE QUARTER BELT MOULDING
Pry oft the belt moulding by hand.
4. REMOVE SEAT SIDE BACK
(See page BO±73)
Remove the lower side bolts and pull the seat side back
upward to separate it.
5. REMOVE QUARTER INSIDE UPPER TRIM
6. REMOVE REAR SEAT BELT ANCHOR BOLT
QUARTER WINDOW GLASS
Station Wagon
PREPARE ITEMS LISTED
(See page BO±43)
COMPONENTS
± BODYQuarter Window GlassBO±46
Page 714 of 2389

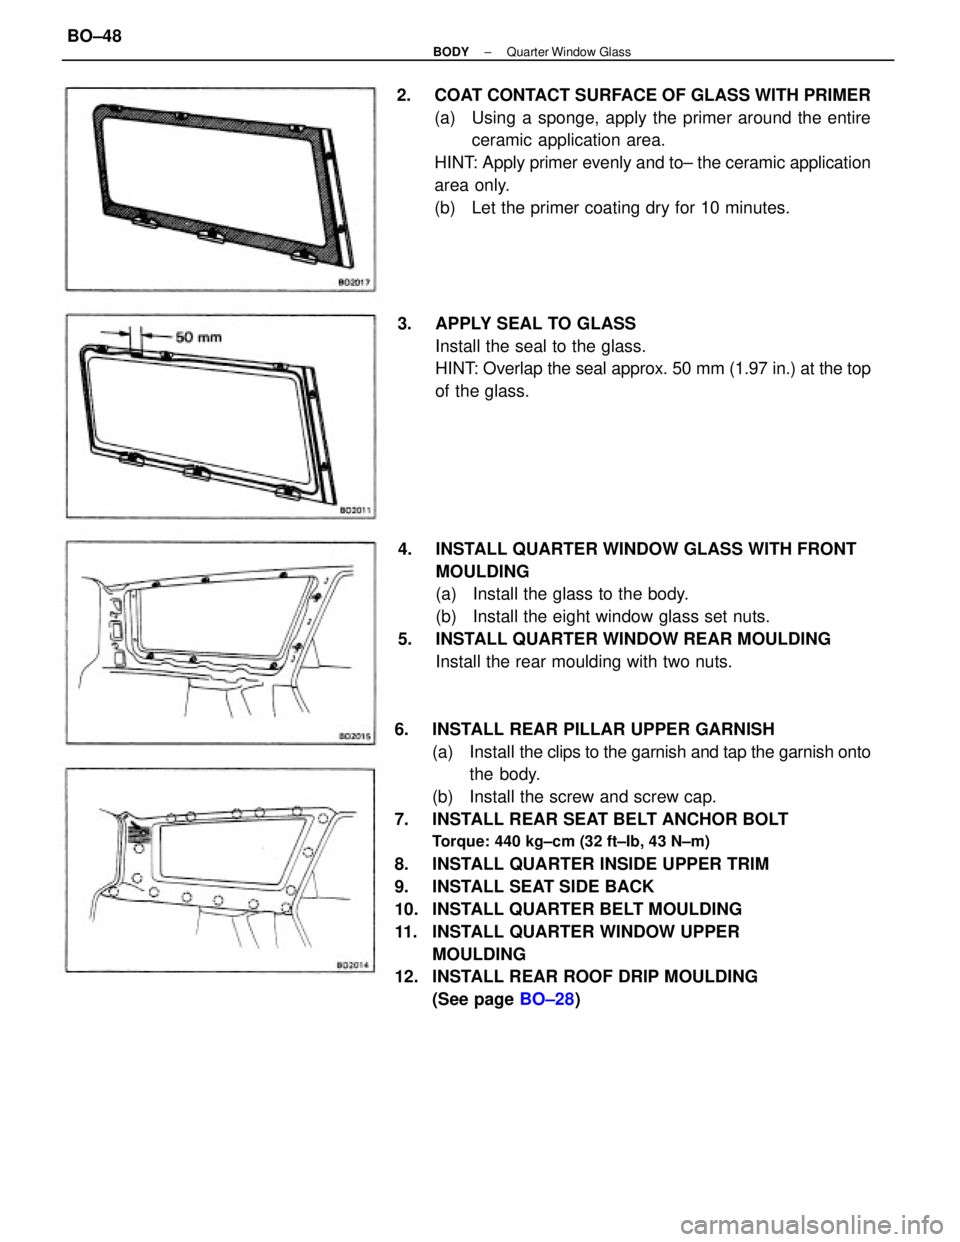
6. INSTALL REAR PILLAR UPPER GARNISH
(a) Install the clips to the garnish and tap the garnish onto
the body.
(b) Install the screw and screw cap.
7. INSTALL REAR SEAT BELT ANCHOR BOLT
Torque: 440 kg±cm (32 ft±Ib, 43 N±m)
8. INSTALL QUARTER INSIDE UPPER TRIM
9. INSTALL SEAT SIDE BACK
10. INSTALL QUARTER BELT MOULDING
11. INSTALL QUARTER WINDOW UPPER
MOULDING
12. INSTALL REAR ROOF DRIP MOULDING
(See page BO±28) 4. INSTALL QUARTER WINDOW GLASS WITH FRONT
MOULDING
(a) Install the glass to the body.
(b) Install the eight window glass set nuts.
5. INSTALL QUARTER WINDOW REAR MOULDING
Install the rear moulding with two nuts. 2. COAT CONTACT SURFACE OF GLASS WITH PRIMER
(a) Using a sponge, apply the primer around the entire
ceramic application area.
HINT: Apply primer evenly and to± the ceramic application
area only.
(b) Let the primer coating dry for 10 minutes.
3. APPLY SEAL TO GLASS
Install the seal to the glass.
HINT: Overlap the seal approx. 50 mm (1.97 in.) at the top
of the glass.
± BODYQuarter Window GlassBO±48
Page 715 of 2389
REMOVAL OF REAR WINDOW GLASS
1. DISCONNECT DEFOGGER WIRE CONNECTORS
2. REMOVE REAR SEAT BELT ANCHOR BOLT
3. REMOVE ROOF SIDE INNER GARNISH
(See page BO±44)
4. REMOVE REAR MOULDING AND CLIPS
(See page BO±33)
5. REMOVE HIGH MOUNT STOP LIGHT
(a) Remove the high mount stop light cover.
(b) Disconnect the connector from the high mount stop
light.
(c) Remove the two bolts and high mount stop light.
6. REMOVE CRS TETHER ANCHOR
Remove the bolt with CRS tether anchor.
7. REMOVE PACKAGE TRAY TRIM
REAR WINDOW GLASS
PREPARE ITEMS LISTED
(See page BO±37)
COMPONENTS
± BODYRear Window GlassBO±49
Page 716 of 2389

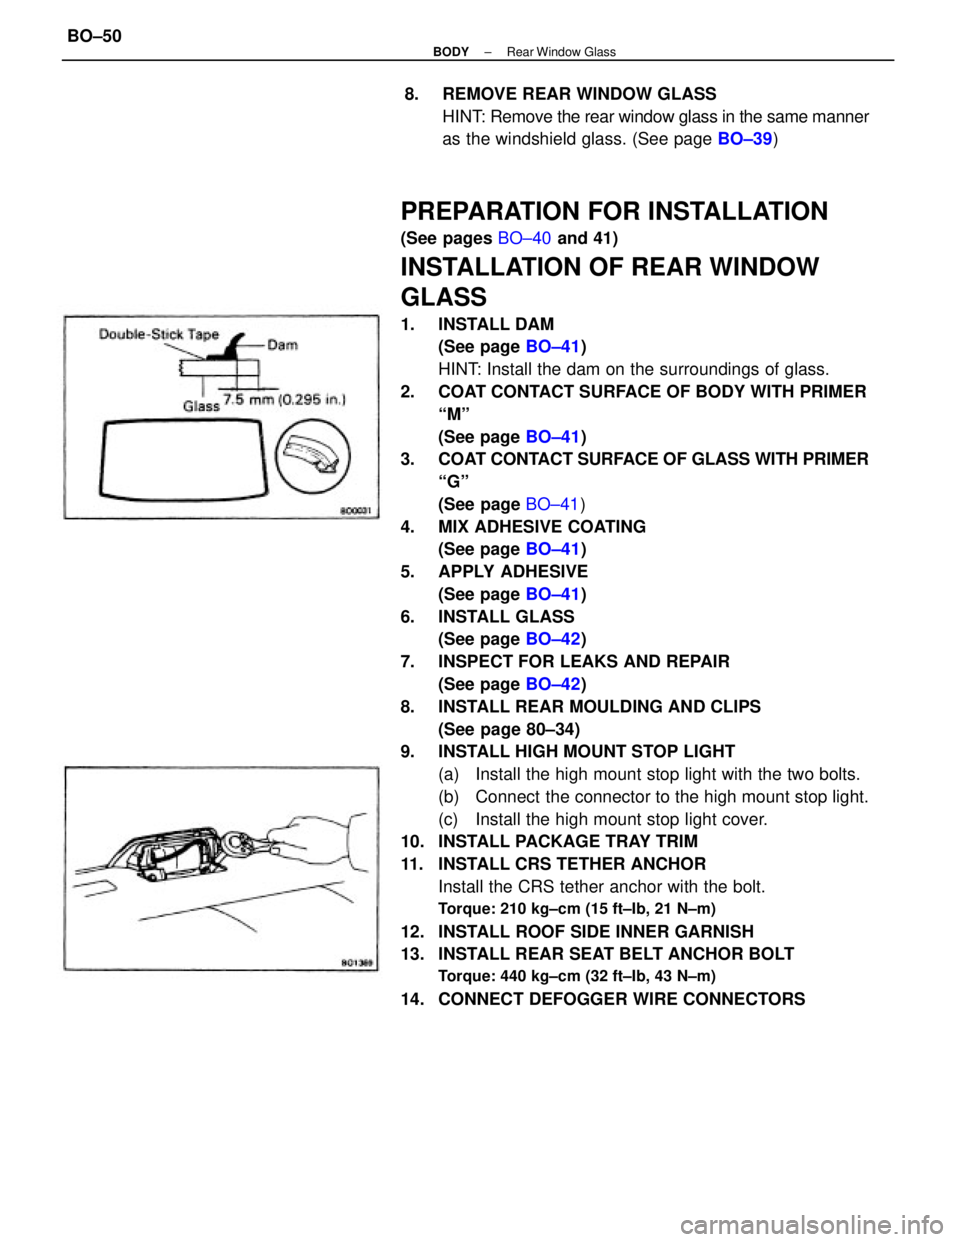
PREPARATION FOR INSTALLATION
(See pages BO±40 and 41)
INSTALLATION OF REAR WINDOW
GLASS
1. INSTALL DAM
(See page BO±41)
HINT: Install the dam on the surroundings of glass.
2. COAT CONTACT SURFACE OF BODY WITH PRIMER
ªMº
(See page BO±41)
3. COAT CONTACT SURFACE OF GLASS WITH PRIMER
ªGº
(See page BO±41)
4. MIX ADHESIVE COATING
(See page BO±41)
5. APPLY ADHESIVE
(See page BO±41)
6. INSTALL GLASS
(See page BO±42)
7. INSPECT FOR LEAKS AND REPAIR
(See page BO±42)
8. INSTALL REAR MOULDING AND CLIPS
(See page 80±34)
9. INSTALL HIGH MOUNT STOP LIGHT
(a) Install the high mount stop light with the two bolts.
(b) Connect the connector to the high mount stop light.
(c) Install the high mount stop light cover.
10. INSTALL PACKAGE TRAY TRIM
11. INSTALL CRS TETHER ANCHOR
Install the CRS tether anchor with the bolt.
Torque: 210 kg±cm (15 ft±Ib, 21 N±m)
12. INSTALL ROOF SIDE INNER GARNISH
13. INSTALL REAR SEAT BELT ANCHOR BOLT
Torque: 440 kg±cm (32 ft±Ib, 43 N±m)
14. CONNECT DEFOGGER WIRE CONNECTORS8. REMOVE REAR WINDOW GLASS
HINT: Remove the rear window glass in the same manner
as the windshield glass. (See page BO±39)
± BODYRear Window GlassBO±50
Page 722 of 2389
REMOVAL OF SUN ROOF
(See page BO±53)
1. DISCONNECT BATTERY CABLE FROM NEGATIVE
TERMINAL
2. REMOVE CONTROL SWITCH
3. REMOVE FOLLOWING PARTS:
wFront pillar garnishr Assist grip
wRear view mirror
wSun visor and holder
wOpening trim moulding
4. REMOVE CENTER PILLAR LOWER GARNISH
(a) Remove the front and rear door opening trims.
(b) Remove the front and rear scuff plates.
(e) Pry out the clips and remove the center pillar lower
garnish.
6. REMOVE FRONT SIDE ROOF HEADLINING
Tear off the roof headlining portion stuck with double±stick
tape between front all center pillar. 5. REMOVE CENTER PILLAR UPPER GARNISH
(a) (CANADA)
Remove the front shoulder belt anchor.
(b) Using a screwdriver, pry out the clips.
HINT: Tape the screwdriver tip before use.
(c) Remove the center pillar upper garnish.
± BODYSun RoofBO±56