Page 1007 of 2389

INSTALLATION OF RADIATOR
1. INSTALL ELECTRIC COOLING FANS TO RADIATOR
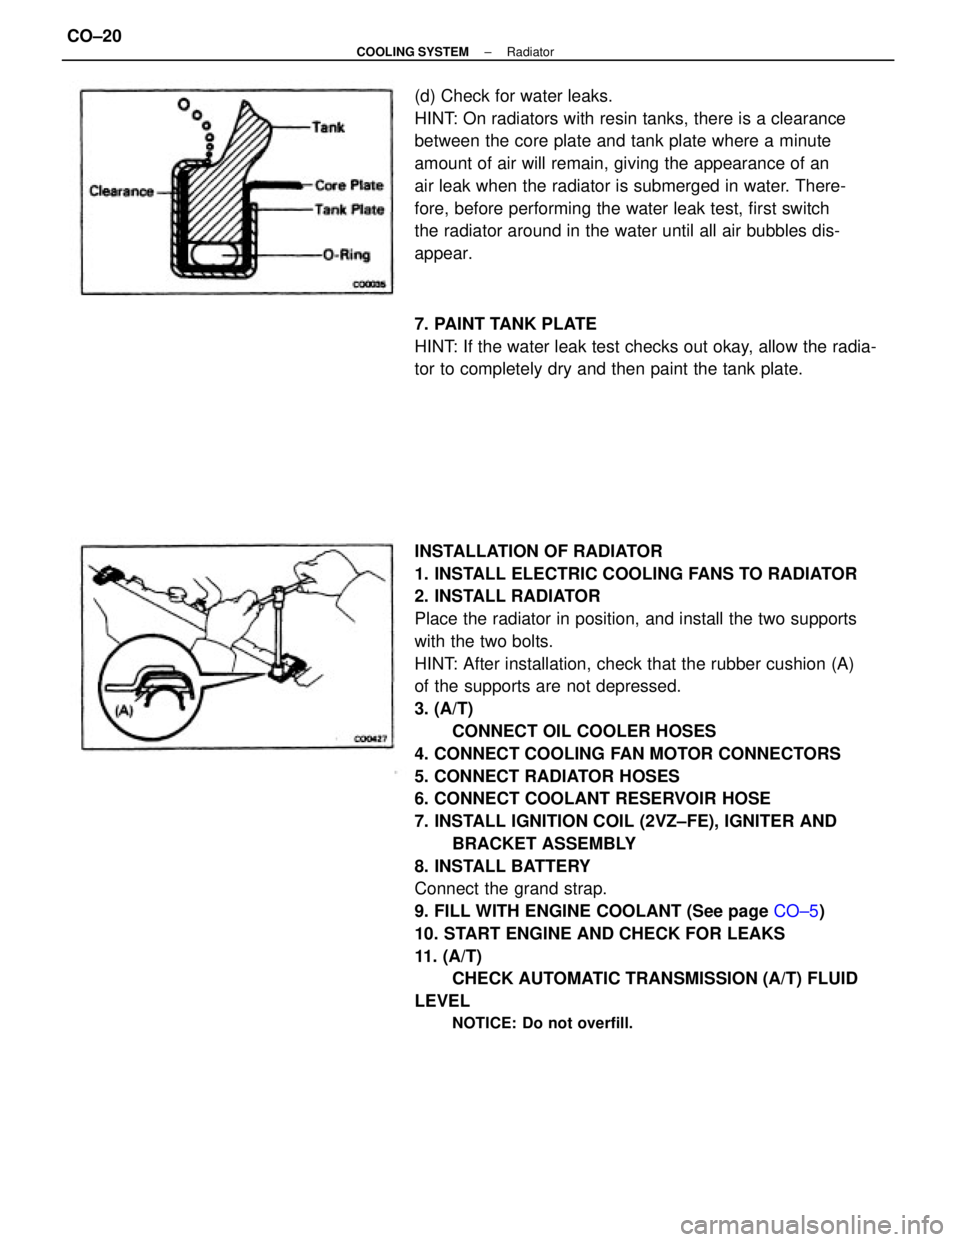
2. INSTALL RADIATOR
Place the radiator in position, and install the two supports
with the two bolts.
HINT: After installation, check that the rubber cushion (A)
of the supports are not depressed.
3. (A/T)
CONNECT OIL COOLER HOSES
4. CONNECT COOLING FAN MOTOR CONNECTORS
5. CONNECT RADIATOR HOSES
6. CONNECT COOLANT RESERVOIR HOSE
7. INSTALL IGNITION COIL (2VZ±FE), IGNITER AND
BRACKET ASSEMBLY
8. INSTALL BATTERY
Connect the grand strap.
9. FILL WITH ENGINE COOLANT (See page CO±5)
10. START ENGINE AND CHECK FOR LEAKS
11. (A/T)
CHECK AUTOMATIC TRANSMISSION (A/T) FLUID
LEVEL
NOTICE: Do not overfill.
(d) Check for water leaks.
HINT: On radiators with resin tanks, there is a clearance
between the core plate and tank plate where a minute
amount of air will remain, giving the appearance of an
air leak when the radiator is submerged in water. There-
fore, before performing the water leak test, first switch
the radiator around in the water until all air bubbles dis-
appear.
7. PAINT TANK PLATE
HINT: If the water leak test checks out okay, allow the radia-
tor to completely dry and then paint the tank plate.
± COOLING SYSTEMRadiatorCO±20
Page 1885 of 2389

ABBREVIATIONS USED IN THIS
MANUAL
A.B.S. Anti±Lock Brake System
A/C Air Conditioner
ALR Automatic Locking Retractor
Approx. Approximation
A/T, ATM Automatic Transaxle
ATF Automatic Transmission Fluid
B
0 Overdrive Brake
B
1 Second Coast Brake
B
2 Second Brake
B
3 First and Reverse Brake
BDC Bottom Dead Center
BTDC Before Top Dead Center
BVSV Bimetal Vacuum Switching Valve
C
0 Overdrive Clutch
C
1 Forward Clutch
C
2 Direct Clutch
CB Circuit Breaker
DP Dash Pot
CRS Child Restraint System
ECT Electronic Controlled Transaxle
ECU Electronic Controlled Unit
EFI Electronic Fuel Injection
E/G Engine
EGR Exhaust Gas Recirculation
ELR Emergency Locking Retractor
ESA Electronic Spark Advance
EVAP Evaporative (Emission Control)
EX Exhaust (manifold, valve)
Ex. Except
F
0 Overdrive One±Way Clutch
F
1 No. 1 One±Way Clutch
F
2 No. 2 One±Way Clutch
FIPG Formed in Place Gasket
FL Fusible Link
Fr Front
IG Ignition
IN Intake (manifold, valve)
ISC Idle Speed Control
LED Light Emitting Diode
LH Left±Hand
LSPV Load Sensing Proportioning Valve
Max. Maximum
Min. Minimum
MP Multipurpose
M/T, MTM Manual Transaxle
O/D, OD Overdrive
O/S Oversize
PCV Positive Crankcase Ventilation
PKB Parking Brake
± INTRODUCTIONAbbreviations Used in This ManualIN±28
Page 1915 of 2389

18. ACCELERATOR PEDAL
Check the pedal for smooth operation and uneven
pedal effort or catching.
19. CLUTCH PEDAL (See page CL±3)
Check the pedal for smooth operation.
Check that the pedal has the proper freeplay.
20. BRAKE PEDAL (See page BR±6)
(a) Check the pedal for smooth operation.
(b) Check that the pedal has the proper reserve
distance and freeplay.
(c) Check the brake booster function.
21. BRAKES
At a safe place, check that the brakes do not pull
to one side when applied.
22. PARKING BRAKE (See page BR±8)
(a) Check that the lever has the proper travel.
(b) On a safe incline, check that the vehicle is
held securely with only the parking brake
applied.
23. AUTOMATIC TRANSMISSION PARK
MECHANISM
(a) Check the lock release button of the selector
lever for proper and smooth operation.
(b) On a safe incline, check that vehicle is held
securely with the selector lever in the ºPº
position and all brakes released.
UNDER HOOD
24. WINDSHIELD WASHER FLUID
Check that there is sufficient fluid in the tank.
25. ENGINE COOLANT LEVEL
Check that the coolant level is between the
ºFULLº and ºLOWº lines on the see±through reser-
voir.
26. RADIATOR AND HOSES
(a) Check that the front of the radiator is clean
and not blocked with leaves, dirt or bugs.
(b) Check the hoses for cracks, kinks, rot or
loose connections.
27. BATTERY ELECTROLYTE LEVEL
Check that the electrolyte level of all battery cells
is between the upper and lower level lines on the
case. If level is low, add distilled water only.28. BRAKE AND CLUTCH FLUID LEVELS
(a) Check that the brake fluid level is near the
upper level line on the see±through reser-
voir.
(b) Check that the clutch fluid level is within
+ 5 mm (0.20 in.) of the reservoir hem.
29. ENGINE DRIVE BELTS
Check all drive belts for fraying, cracks, wear or
oiliness.
30. ENGINE OIL LEVEL
Check the level on the dipstick with the engine
turned off.
31. POWER STEERING FLUID LEVEL
Check the level.
The level should be in the ºHOTº or ºCOLDº
range depending on the fluid temperature.
32. AUTOMATIC TRANSMISSION FLUID
LEVEL
(a) Park the vehicle on a level surface.
(b) With the engine idling and the parking
brake applied, shift the selector into all
positions from ºPº to ºLº, and then shift
into ºPº.
(c) Pull out the dipstick and wipe off the fluid
with a clean rag. Re±insert the dipstick
and check that the fluid level is in the HOT
range.
(d) Perform this check with the fluid at normal
driving temperature (70 ± 80
°C or
158 ± 176°F).
NOTE: Wait about 30 minutes before check-
ing the fluid level after extended driving at high
speeds i n hot weather, driving i n heavy traffic
or with a trailer.
33. EXHAUST SYSTEM
Visually inspect for cracks, holes or loose sup-
ports.
If any change in the sound of the exhaust oK
smell of the exhaust fumes is noticed, have the
cause located and corrected.
± MAINTENANCEGeneral MaintenanceMA±17
Page 1922 of 2389

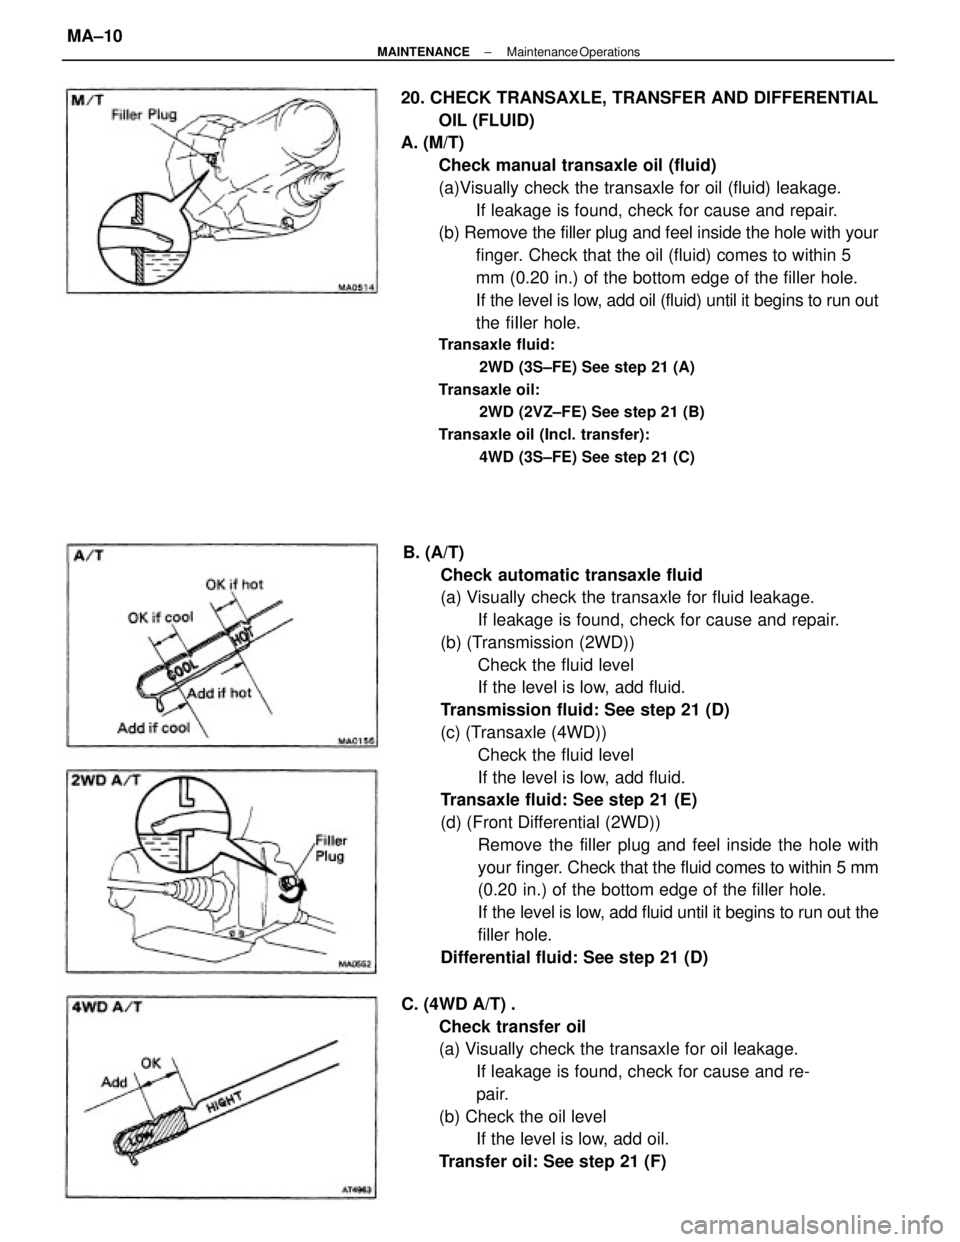
B. (A/T)
Check automatic transaxle fluid
(a) Visually check the transaxle for fluid leakage.
If leakage is found, check for cause and repair.
(b) (Transmission (2WD))
Check the fluid level
If the level is low, add fluid.
Transmission fluid: See step 21 (D)
(c) (Transaxle (4WD))
Check the fluid level
If the level is low, add fluid.
Transaxle fluid: See step 21 (E)
(d) (Front Differential (2WD))
Remove the filler plug and feel inside the hole with
your finger. Check that the fluid comes to within 5 mm
(0.20 in.) of the bottom edge of the filler hole.
If the level is low, add fluid until it begins to run out the
filler hole.
Differential fluid: See step 21 (D) 20. CHECK TRANSAXLE, TRANSFER AND DIFFERENTIAL
OIL (FLUID)
A. (M/T)
Check manual transaxle oil (fluid)
(a)Visually check the transaxle for oil (fluid) leakage.
If leakage is found, check for cause and repair.
(b) Remove the filler plug and feel inside the hole with your
finger. Check that the oil (fluid) comes to within 5
mm (0.20 in.) of the bottom edge of the filler hole.
If the level is low, add oil (fluid) until it begins to run out
the fiIler hole.
Transaxle fluid:
2WD (3S±FE) See step 21 (A)
Transaxle oil:
2WD (2VZ±FE) See step 21 (B)
Transaxle oil (Incl. transfer):
4WD (3S±FE) See step 21 (C)
C. (4WD A/T) .
Check transfer oil
(a) Visually check the transaxle for oil leakage.
If leakage is found, check for cause and re-
pair.
(b) Check the oil level
If the level is low, add oil.
Transfer oil: See step 21 (F)
± MAINTENANCEMaintenance OperationsMA±10