1985 FORD GRANADA ECU
[x] Cancel search: ECUPage 92 of 255
16Locate the heater matrix feed and return
hoses on the engine compartment bulkhead.
Slacken the retaining clips and disconnect
both hoses from the matrix unions. Be
prepared for some coolant spillage. Plug the
matrix unions to prevent residual coolant
being spilt as the assembly is removed.
17Slacken and remove the two retaining
screws then remove the matrix cover plate
and gasket from the bulkhead; discard the
gasket as a new one should be used on
refitting.
18Remove the facia panel.
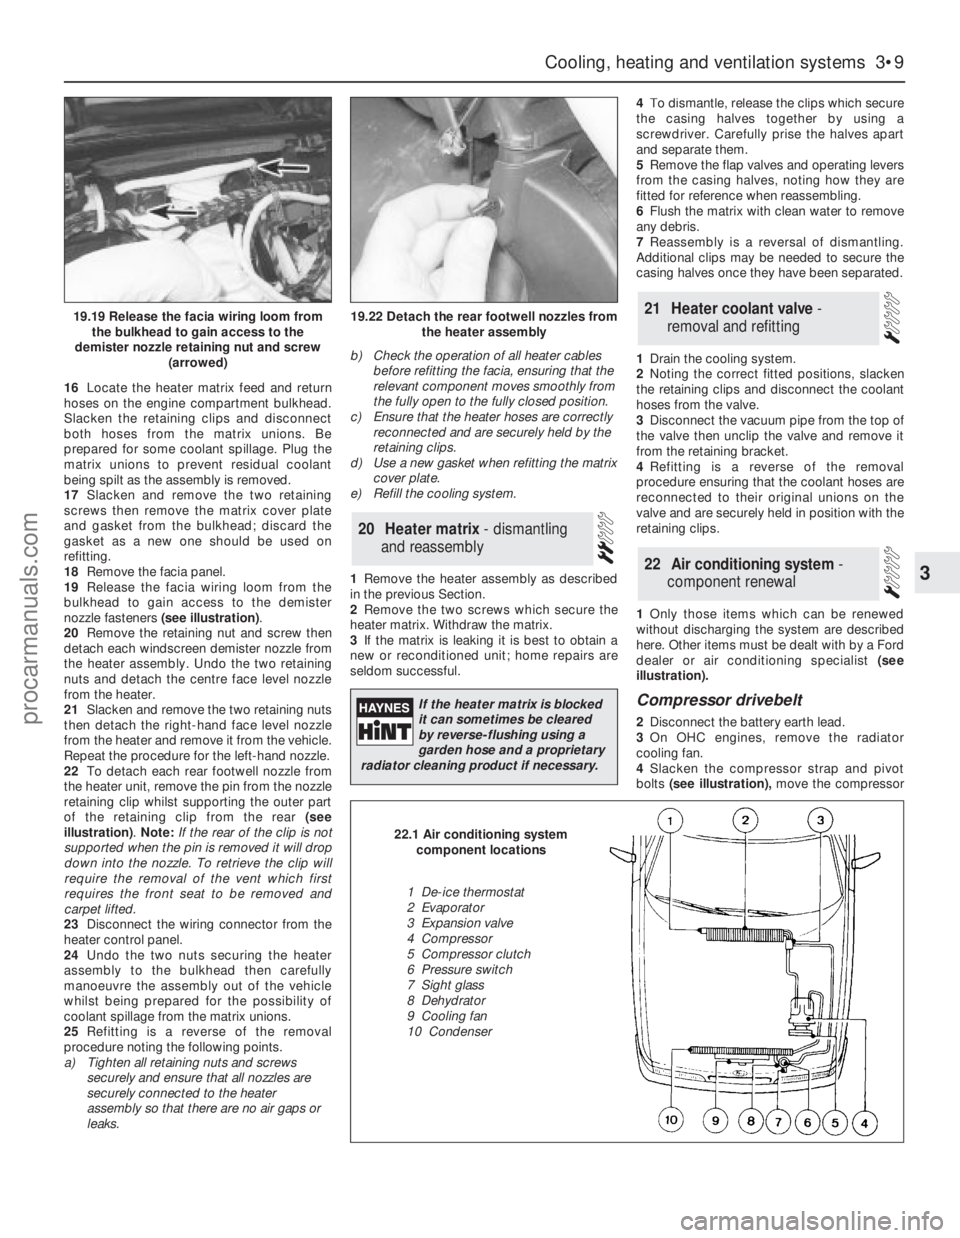
19Release the facia wiring loom from the
bulkhead to gain access to the demister
nozzle fasteners (see illustration).
20Remove the retaining nut and screw then
detach each windscreen demister nozzle from
the heater assembly. Undo the two retaining
nuts and detach the centre face level nozzle
from the heater.
21Slacken and remove the two retaining nuts
then detach the right-hand face level nozzle
from the heater and remove it from the vehicle.
Repeat the procedure for the left-hand nozzle.
22To detach each rear footwell nozzle from
the heater unit, remove the pin from the nozzle
retaining clip whilst supporting the outer part
of the retaining clip from the rear (see
illustration). Note: If the rear of the clip is not
supported when the pin is removed it will drop
down into the nozzle. To retrieve the clip will
require the removal of the vent which first
requires the front seat to be removed and
carpet lifted.
23Disconnect the wiring connector from the
heater control panel.
24Undo the two nuts securing the heater
assembly to the bulkhead then carefully
manoeuvre the assembly out of the vehicle
whilst being prepared for the possibility of
coolant spillage from the matrix unions.
25Refitting is a reverse of the removal
procedure noting the following points.
a)Tighten all retaining nuts and screws
securely and ensure that all nozzles are
securely connected to the heater
assembly so that there are no air gaps or
leaks.b)Check the operation of all heater cables
before refitting the facia, ensuring that the
relevant component moves smoothly from
the fully open to the fully closed position.
c)Ensure that the heater hoses are correctly
reconnected and are securely held by the
retaining clips.
d)Use a new gasket when refitting the matrix
cover plate.
e)Refill the cooling system.
1Remove the heater assembly as described
in the previous Section.
2Remove the two screws which secure the
heater matrix. Withdraw the matrix.
3If the matrix is leaking it is best to obtain a
new or reconditioned unit; home repairs are
seldom successful.4To dismantle, release the clips which secure
the casing halves together by using a
screwdriver. Carefully prise the halves apart
and separate them.
5Remove the flap valves and operating levers
from the casing halves, noting how they are
fitted for reference when reassembling.
6Flush the matrix with clean water to remove
any debris.
7Reassembly is a reversal of dismantling.
Additional clips may be needed to secure the
casing halves once they have been separated.
1Drain the cooling system.
2Noting the correct fitted positions, slacken
the retaining clips and disconnect the coolant
hoses from the valve.
3Disconnect the vacuum pipe from the top of
the valve then unclip the valve and remove it
from the retaining bracket.
4Refitting is a reverse of the removal
procedure ensuring that the coolant hoses are
reconnected to their original unions on the
valve and are securely held in position with the
retaining clips.
1Only those items which can be renewed
without discharging the system are described
here. Other items must be dealt with by a Ford
dealer or air conditioning specialist (see
illustration).
Compressor drivebelt
2Disconnect the battery earth lead.
3On OHC engines, remove the radiator
cooling fan.
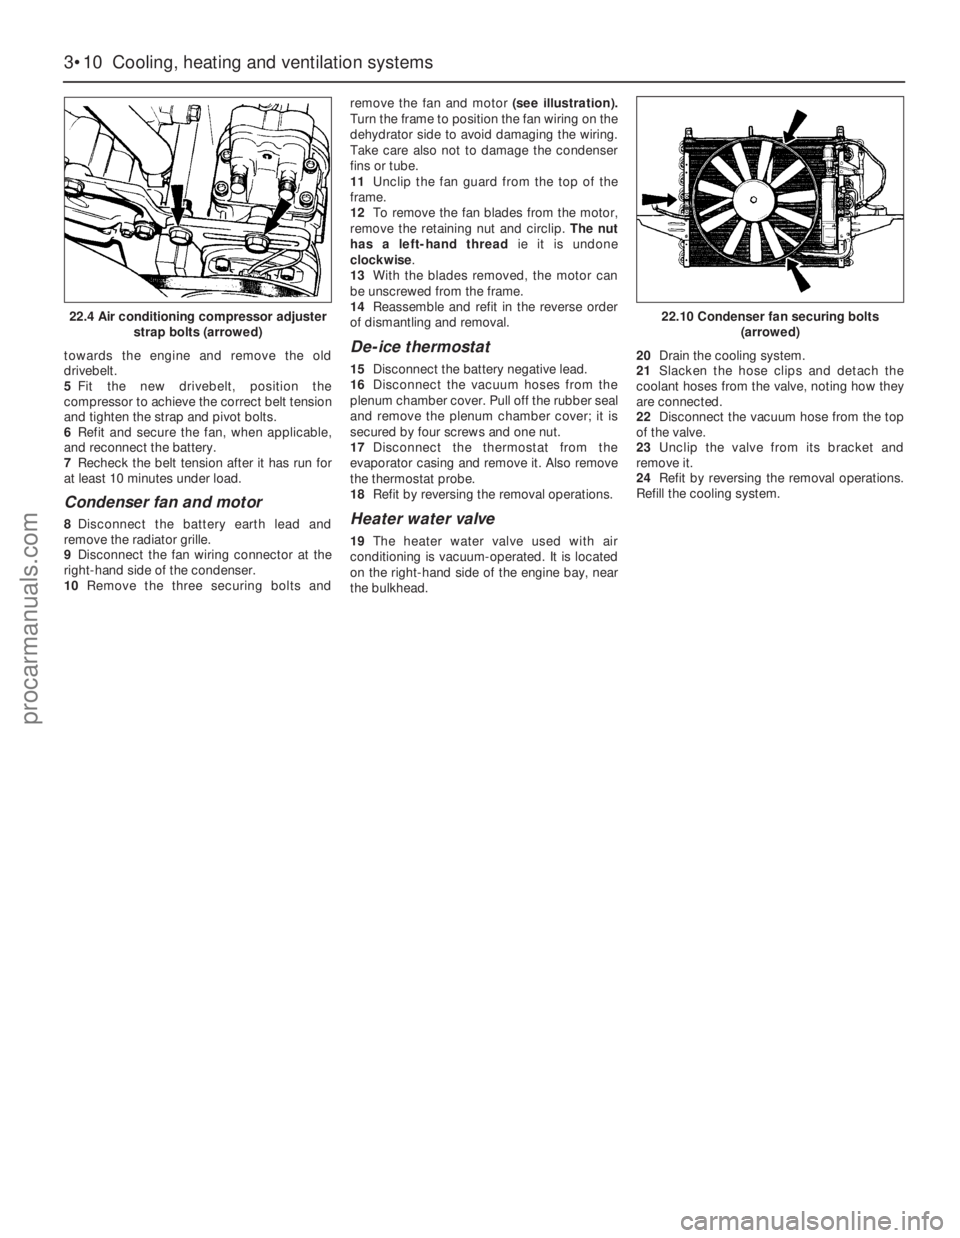
4Slacken the compressor strap and pivot
bolts (see illustration),move the compressor
22Air conditioning system -
component renewal
21Heater coolant valve -
removal and refitting
20Heater matrix - dismantling
and reassembly
Cooling, heating and ventilation systems 3•9
3
19.19 Release the facia wiring loom from
the bulkhead to gain access to the
demister nozzle retaining nut and screw
(arrowed)19.22 Detach the rear footwell nozzles from
the heater assembly
If the heater matrix is blocked
it can sometimes be cleared
by reverse-flushing using a
garden hose and a proprietary
radiator cleaning product if necessary.
22.1 Air conditioning system
component locations
1 De-ice thermostat
2 Evaporator
3 Expansion valve
4 Compressor
5 Compressor clutch
6 Pressure switch
7 Sight glass
8 Dehydrator
9 Cooling fan
10 Condenser
procarmanuals.com
Page 93 of 255
towards the engine and remove the old
drivebelt.
5Fit the new drivebelt, position the
compressor to achieve the correct belt tension
and tighten the strap and pivot bolts.
6Refit and secure the fan, when applicable,
and reconnect the battery.
7Recheck the belt tension after it has run for
at least 10 minutes under load.
Condenser fan and motor
8Disconnect the battery earth lead and
remove the radiator grille.
9Disconnect the fan wiring connector at the
right-hand side of the condenser.
10Remove the three securing bolts andremove the fan and motor(see illustration).
Turn the frame to position the fan wiring on the
dehydrator side to avoid damaging the wiring.
Take care also not to damage the condenser
fins or tube.
11Unclip the fan guard from the top of the
frame.
12To remove the fan blades from the motor,
remove the retaining nut and circlip. The nut
has a left-hand threadie it is undone
clockwise.
13With the blades removed, the motor can
be unscrewed from the frame.
14Reassemble and refit in the reverse order
of dismantling and removal.
De-ice thermostat
15Disconnect the battery negative lead.
16Disconnect the vacuum hoses from the
plenum chamber cover. Pull off the rubber seal
and remove the plenum chamber cover; it is
secured by four screws and one nut.
17Disconnect the thermostat from the
evaporator casing and remove it. Also remove
the thermostat probe.
18Refit by reversing the removal operations.
Heater water valve
19The heater water valve used with air
conditioning is vacuum-operated. It is located
on the right-hand side of the engine bay, near
the bulkhead. 20Drain the cooling system.
21Slacken the hose clips and detach the
coolant hoses from the valve, noting how they
are connected.
22Disconnect the vacuum hose from the top
of the valve.
23Unclip the valve from its bracket and
remove it.
24Refit by reversing the removal operations.
Refill the cooling system.
3•10Cooling, heating and ventilation systems
22.4 Air conditioning compressor adjuster
strap bolts (arrowed)22.10 Condenser fan securing bolts
(arrowed)
procarmanuals.com
Page 99 of 255
25To remove the pump, first remove the fuel
tank.
26Unscrew the fuel pump/fuel level sender
unit by engaging two crossed screwdrivers in
the slots on either side of the unit mounting
flange. Recover the seal.
27Refitting is a reversal of removal. It is
necessary to fit a new seal.
1Run the fuel level as low as possible before
removing the tank.
2Disconnect the battery negative lead.
3Remove the fuel filler cap. Siphon or pump
the remaining fuel out of the tank. Store the
fuel in a suitable sealed container.
4Remove the two screws on either side of the
filler neck.
5Raise and support the rear of the vehicle.
6Remove the shield from the right-hand rear
inner wheel arch. Also remove the rear bumper
undershield. which is secured by six screws.
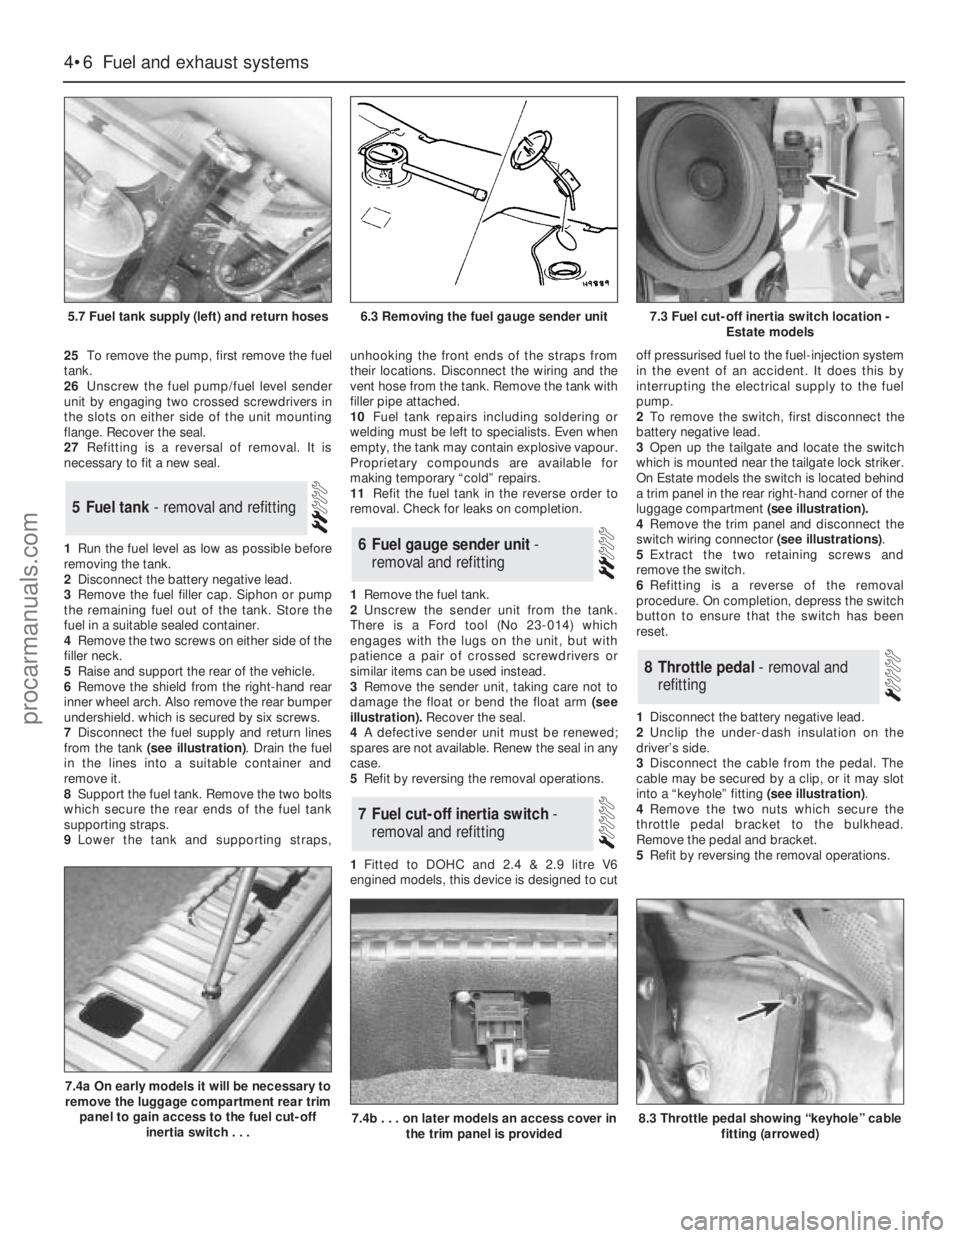
7Disconnect the fuel supply and return lines
from the tank (see illustration). Drain the fuel
in the lines into a suitable container and
remove it.
8Support the fuel tank. Remove the two bolts
which secure the rear ends of the fuel tank
supporting straps.
9Lower the tank and supporting straps,unhooking the front ends of the straps from
their locations. Disconnect the wiring and the
vent hose from the tank. Remove the tank with
filler pipe attached.
10Fuel tank repairs including soldering or
welding must be left to specialists. Even when
empty, the tank may contain explosive vapour.
Proprietary compounds are available for
making temporary “cold” repairs.
11Refit the fuel tank in the reverse order to
removal. Check for leaks on completion.
1Remove the fuel tank.
2Unscrew the sender unit from the tank.
There is a Ford tool (No 23-014) which
engages with the lugs on the unit, but with
patience a pair of crossed screwdrivers or
similar items can be used instead.
3Remove the sender unit, taking care not to
damage the float or bend the float arm(see
illustration).Recover the seal.
4A defective sender unit must be renewed;
spares are not available. Renew the seal in any
case.
5Refit by reversing the removal operations.
1Fitted to DOHC and 2.4 & 2.9 litre V6
engined models, this device is designed to cutoff pressurised fuel to the fuel-injection system
in the event of an accident. It does this by
interrupting the electrical supply to the fuel
pump.
2To remove the switch, first disconnect the
battery negative lead.
3Open up the tailgate and locate the switch
which is mounted near the tailgate lock striker.
On Estate models the switch is located behind
a trim panel in the rear right-hand corner of the
luggage compartment (see illustration).
4Remove the trim panel and disconnect the
switch wiring connector (see illustrations).
5Extract the two retaining screws and
remove the switch.
6Refitting is a reverse of the removal
procedure. On completion, depress the switch
button to ensure that the switch has been
reset.
1Disconnect the battery negative lead.
2Unclip the under-dash insulation on the
driver’s side.
3Disconnect the cable from the pedal. The
cable may be secured by a clip, or it may slot
into a “keyhole” fitting (see illustration).
4Remove the two nuts which secure the
throttle pedal bracket to the bulkhead.
Remove the pedal and bracket.
5Refit by reversing the removal operations.
8Throttle pedal - removal and
refitting
7Fuel cut-off inertia switch -
removal and refitting
6Fuel gauge sender unit -
removal and refitting
5Fuel tank - removal and refitting
4•6Fuel and exhaust systems
5.7 Fuel tank supply (left) and return hoses
7.4a On early models it will be necessary to
remove the luggage compartment rear trim
panel to gain access to the fuel cut-off
inertia switch . . .
7.4b . . . on later models an access cover in
the trim panel is provided8.3 Throttle pedal showing “keyhole” cable
fitting (arrowed)
6.3 Removing the fuel gauge sender unit7.3 Fuel cut-off inertia switch location -
Estate models
procarmanuals.com
Page 100 of 255
1Disconnect the battery negative lead.
2Disconnect the cable from the pedal.
3Working under the bonnet, free the cable
outer from the bulkhead and pull the cable into
the engine bay.
4On carburettor models, remove the air cleaner.5On V6 models, remove the throttle linkage
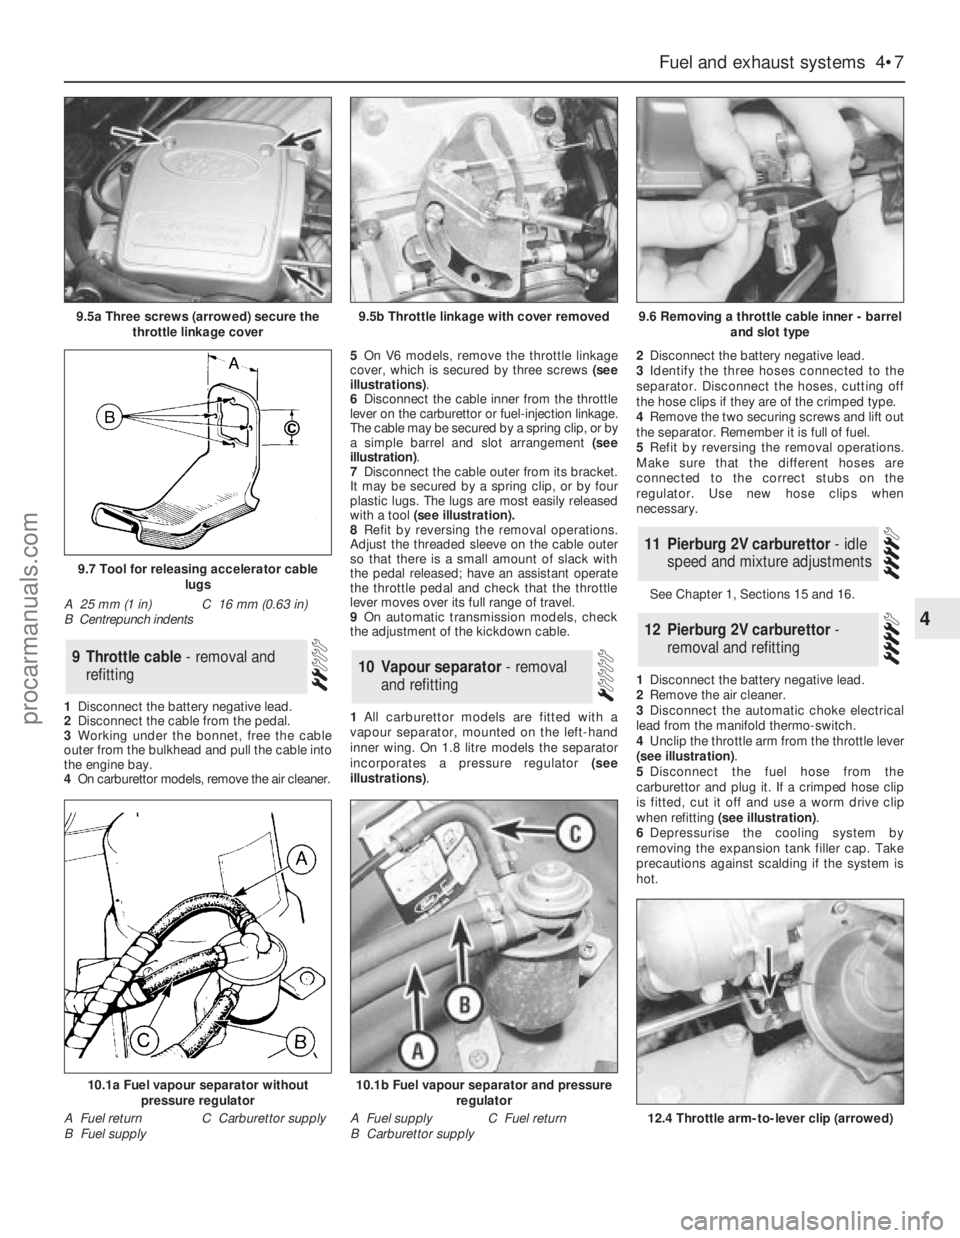
cover, which is secured by three screws (see
illustrations).
6Disconnect the cable inner from the throttle
lever on the carburettor or fuel-injection linkage.
The cable may be secured by a spring clip, or by
a simple barrel and slot arrangement (see
illustration).
7Disconnect the cable outer from its bracket.
It may be secured by a spring clip, or by four
plastic lugs. The lugs are most easily released
with a tool (see illustration).
8Refit by reversing the removal operations.
Adjust the threaded sleeve on the cable outer
so that there is a small amount of slack with
the pedal released; have an assistant operate
the throttle pedal and check that the throttle
lever moves over its full range of travel.
9On automatic transmission models, check
the adjustment of the kickdown cable.
1All carburettor models are fitted with a
vapour separator, mounted on the left-hand
inner wing. On 1.8 litre models the separator
incorporates a pressure regulator (see
illustrations).2Disconnect the battery negative lead.
3Identify the three hoses connected to the
separator. Disconnect the hoses, cutting off
the hose clips if they are of the crimped type.
4Remove the two securing screws and lift out
the separator. Remember it is full of fuel.
5Refit by reversing the removal operations.
Make sure that the different hoses are
connected to the correct stubs on the
regulator. Use new hose clips when
necessary.
See Chapter 1, Sections 15 and 16.
1Disconnect the battery negative lead.
2Remove the air cleaner.
3Disconnect the automatic choke electrical
lead from the manifold thermo-switch.
4Unclip the throttle arm from the throttle lever
(see illustration).
5Disconnect the fuel hose from the
carburettor and plug it. If a crimped hose clip
is fitted, cut it off and use a worm drive clip
when refitting (see illustration).
6Depressurise the cooling system by
removing the expansion tank filler cap. Take
precautions against scalding if the system is
hot.
12Pierburg 2V carburettor -
removal and refitting
11Pierburg 2V carburettor - idle
speed and mixture adjustments
10Vapour separator - removal
and refitting9Throttle cable - removal and
refitting
Fuel and exhaust systems 4•7
4
9.5a Three screws (arrowed) secure the
throttle linkage cover9.5b Throttle linkage with cover removed9.6 Removing a throttle cable inner - barrel
and slot type
12.4 Throttle arm-to-lever clip (arrowed)
9.7 Tool for releasing accelerator cable
lugs
A 25 mm (1 in)
B Centrepunch indentsC 16 mm (0.63 in)
10.1a Fuel vapour separator without
pressure regulator
A Fuel return
B Fuel supplyC Carburettor supply
10.1b Fuel vapour separator and pressure
regulator
A Fuel supply
B Carburettor supplyC Fuel return
procarmanuals.com
Page 101 of 255
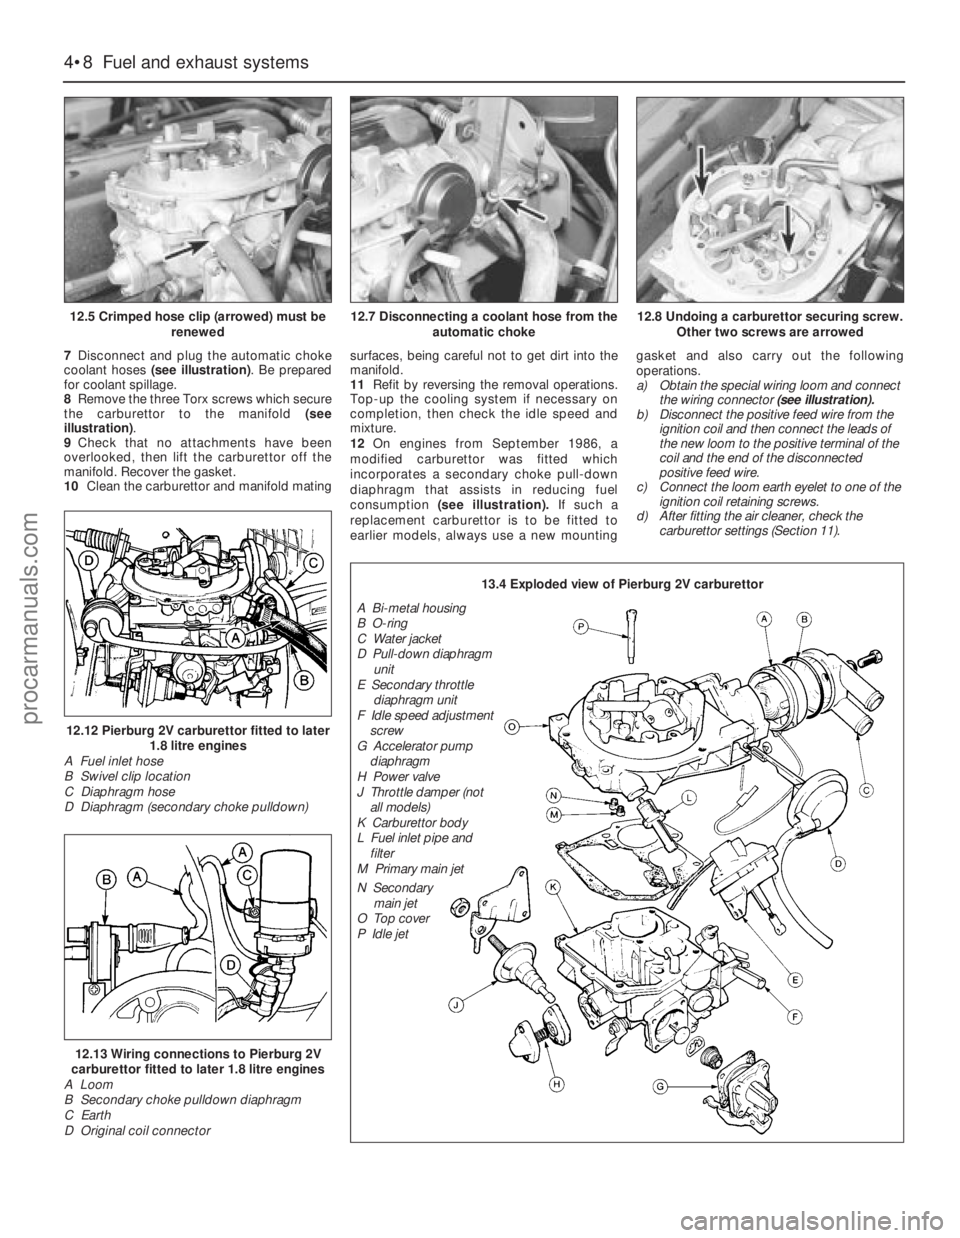
7Disconnect and plug the automatic choke
coolant hoses (see illustration). Be prepared
for coolant spillage.
8Remove the three Torx screws which secure
the carburettor to the manifold (see
illustration).
9Check that no attachments have been
overlooked, then lift the carburettor off the
manifold. Recover the gasket.
10Clean the carburettor and manifold matingsurfaces, being careful not to get dirt into the
manifold.
11Refit by reversing the removal operations.
Top-up the cooling system if necessary on
completion, then check the idle speed and
mixture.
12On engines from September 1986, a
modified carburettor was fitted which
incorporates a secondary choke pull-down
diaphragm that assists in reducing fuel
consumption (see illustration).If such a
replacement carburettor is to be fitted to
earlier models, always use a new mountinggasket and also carry out the following
operations.
a)Obtain the special wiring loom and connect
the wiring connector(see illustration).
b)Disconnect the positive feed wire from the
ignition coil and then connect the leads of
the new loom to the positive terminal of the
coil and the end of the disconnected
positive feed wire.
c)Connect the loom earth eyelet to one of the
ignition coil retaining screws.
d)After fitting the air cleaner, check the
carburettor settings (Section 11).
4•8Fuel and exhaust systems
12.5 Crimped hose clip (arrowed) must be
renewed
12.12 Pierburg 2V carburettor fitted to later
1.8 litre engines
A Fuel inlet hose
B Swivel clip location
C Diaphragm hose
D Diaphragm (secondary choke pulldown)
12.13 Wiring connections to Pierburg 2V
carburettor fitted to later 1.8 litre engines
A Loom
B Secondary choke pulldown diaphragm
C Earth
D Original coil connector
12.7 Disconnecting a coolant hose from the
automatic choke12.8 Undoing a carburettor securing screw.
Other two screws are arrowed
13.4 Exploded view of Pierburg 2V carburettor
A Bi-metal housing
B O-ring
C Water jacket
D Pull-down diaphragm
unit
E Secondary throttle
diaphragm unit
F Idle speed adjustment
screw
G Accelerator pump
diaphragm
H Power valve
J Throttle damper (not
all models)
K Carburettor body
L Fuel inlet pipe and
filter
M Primary main jet
N Secondary
main jet
O Top cover
P Idle jet
procarmanuals.com
Page 103 of 255
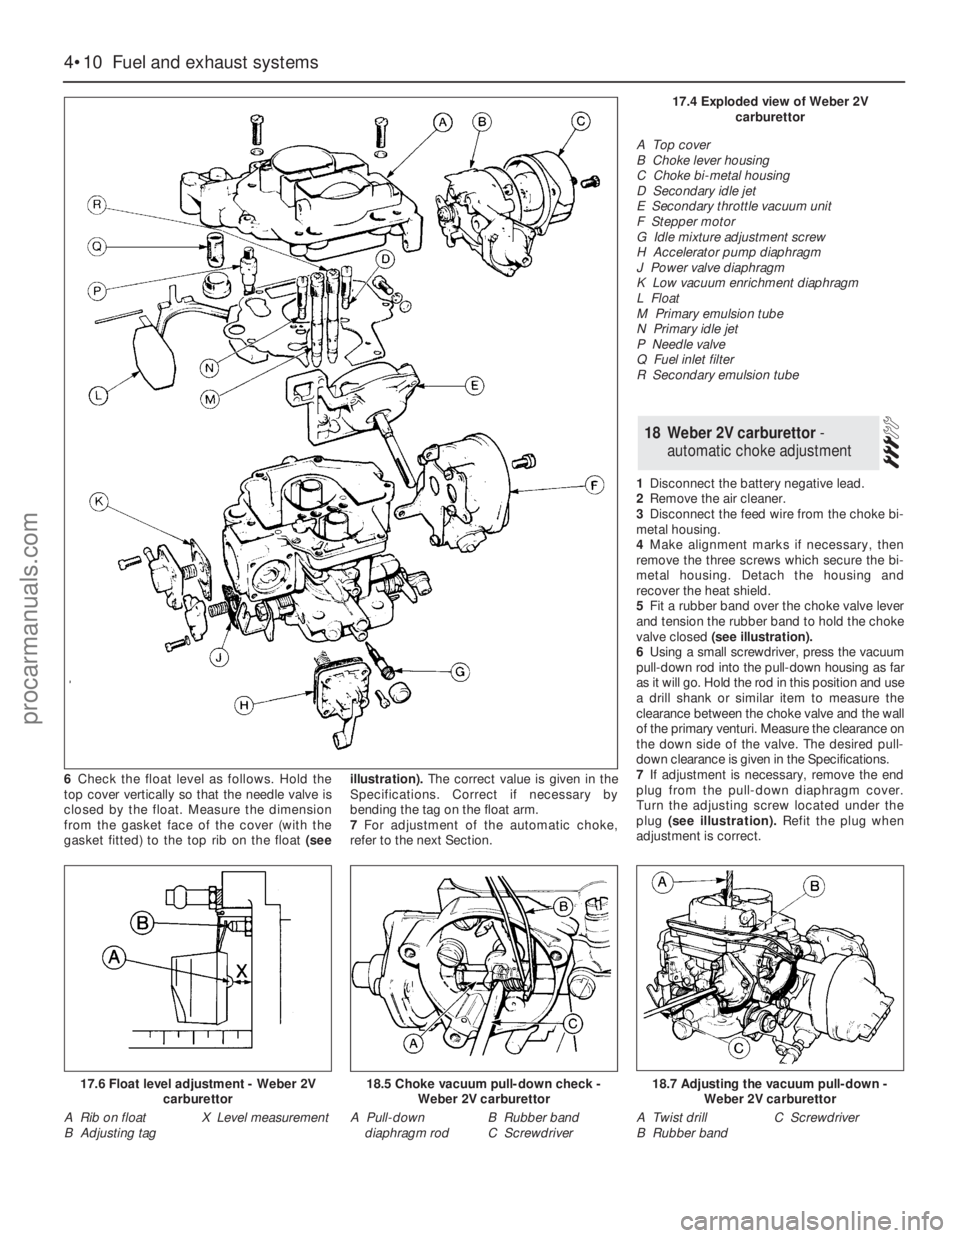
6Check the float level as follows. Hold the
top cover vertically so that the needle valve is
closed by the float. Measure the dimension
from the gasket face of the cover (with the
gasket fitted) to the top rib on the float(seeillustration).The correct value is given in the
Specifications. Correct if necessary by
bending the tag on the float arm.
7For adjustment of the automatic choke,
refer to the next Section.1Disconnect the battery negative lead.
2Remove the air cleaner.
3Disconnect the feed wire from the choke bi-
metal housing.
4Make alignment marks if necessary, then
remove the three screws which secure the bi-
metal housing. Detach thehousing and
recover the heat shield.
5Fit a rubber band over the choke valve lever
and tension the rubber band to hold the choke
valve closed(see illustration).
6Using a small screwdriver, press the vacuum
pull-down rod into the pull-down housing as far
as it will go. Hold the rod in this position and use
a drill shank or similar item to measure the
clearance between the choke valve and the wall
of the primary venturi. Measure the clearance on
the down side of the valve. The desired pull-
down clearance is given in the Specifications.
7If adjustment is necessary, remove the end
plug from the pull-down diaphragm cover.
Turn the adjusting screw located under the
plug (see illustration).Refit the plug when
adjustment is correct.
18Weber 2V carburettor -
automatic choke adjustment
4•10Fuel and exhaust systems
17.6 Float level adjustment - Weber 2V
carburettor
A Rib on float
B Adjusting tagX Level measurement
18.5 Choke vacuum pull-down check -
Weber 2V carburettor
A Pull-down
diaphragm rodB Rubber band
C Screwdriver
18.7 Adjusting the vacuum pull-down -
Weber 2V carburettor
A Twist drill
B Rubber bandC Screwdriver
17.4 Exploded view of Weber 2V
carburettor
A Top cover
B Choke lever housing
C Choke bi-metal housing
D Secondary idle jet
E Secondary throttle vacuum unit
F Stepper motor
G Idle mixture adjustment screw
H Accelerator pump diaphragm
J Power valve diaphragm
K Low vacuum enrichment diaphragm
L Float
M Primary emulsion tube
N Primary idle jet
P Needle valve
Q Fuel inlet filter
R Secondary emulsion tube
procarmanuals.com
Page 104 of 255
8Remove the drill and the rubber band.
9Refit the heat shield, making sure it is
properly located.
10Refit the bi-metal housing, engaging the
end of the spring with the choke valve lever.
Fit the three screws, position the housing in its
original alignment (paragraph 4) and tighten
the screws.
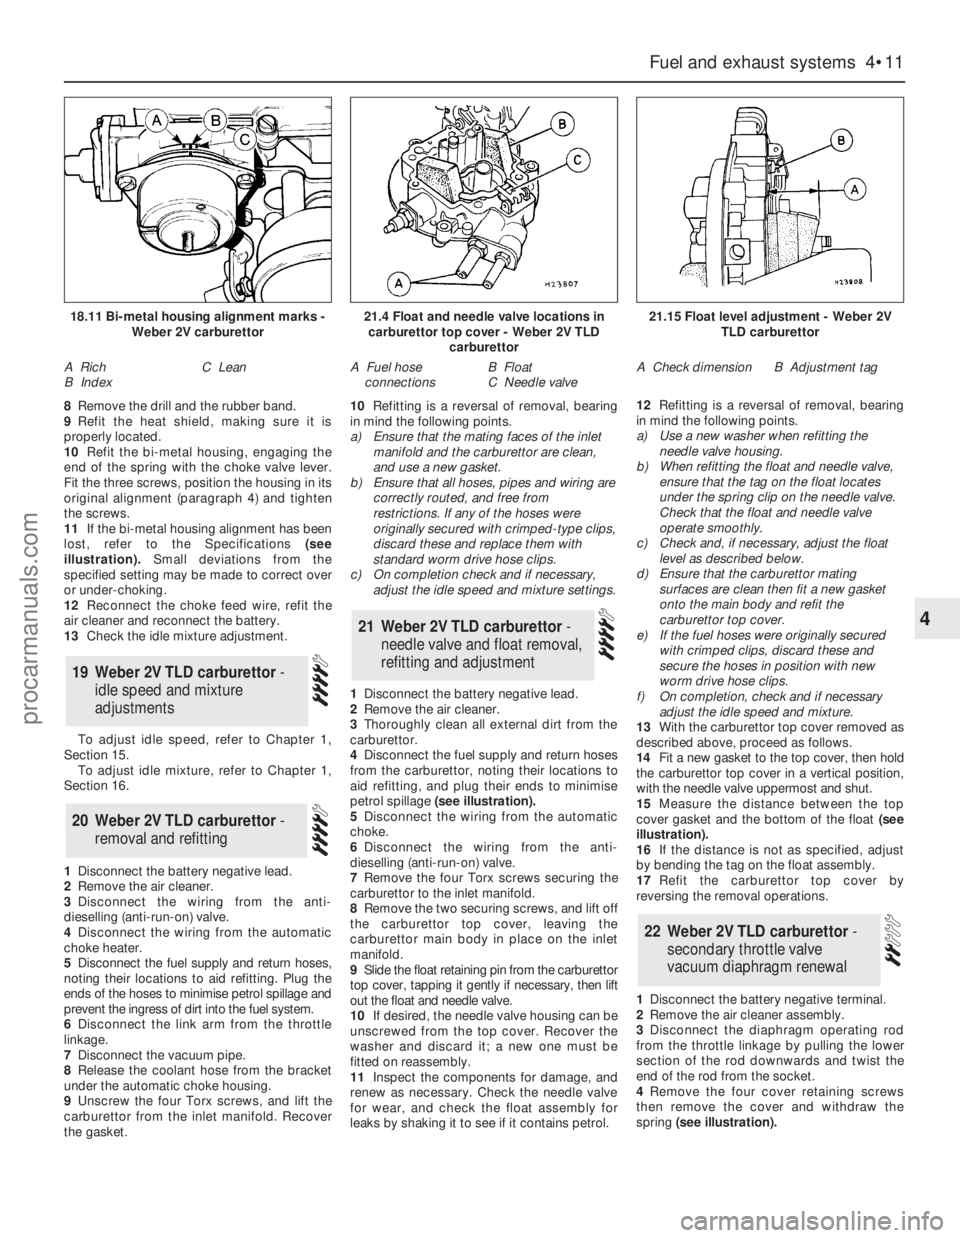
11If the bi-metal housing alignment has been
lost, refer to the Specifications(see
illustration).Small deviations from the
specified setting may be made to correct over
or under-choking.
12Reconnect the choke feed wire, refit the
air cleaner and reconnect the battery.
13Check the idle mixture adjustment.
To adjust idle speed, refer to Chapter 1,
Section 15.
To adjust idle mixture, refer to Chapter 1,
Section 16.
1Disconnect the battery negative lead.
2Remove the air cleaner.
3Disconnect the wiring from the anti-
dieselling (anti-run-on) valve.
4Disconnect the wiring from the automatic
choke heater.
5Disconnect the fuel supply and return hoses,
noting their locations to aid refitting. Plug the
ends of the hoses to minimise petrol spillage and
prevent the ingress of dirt into the fuel system.
6Disconnect the link arm from the throttle
linkage.
7Disconnect the vacuum pipe.
8Release the coolant hose from the bracket
under the automatic choke housing.
9Unscrew the four Torx screws, and lift the
carburettor from the inlet manifold. Recover
the gasket.10Refitting is a reversal of removal, bearing
in mind the following points.
a)Ensure that the mating faces of the inlet
manifold and the carburettor are clean,
and use a new gasket.
b)Ensure that all hoses, pipes and wiring are
correctly routed, and free from
restrictions. If any of the hoses were
originally secured with crimped-type clips,
discard these and replace them with
standard worm drive hose clips.
c)On completion check and if necessary,
adjust the idle speed and mixture settings.
1Disconnect the battery negative lead.
2Remove the air cleaner.
3Thoroughly clean all external dirt from the
carburettor.
4Disconnect the fuel supply and return hoses
from the carburettor, noting their locations to
aid refitting, and plug their ends to minimise
petrol spillage (see illustration).
5Disconnect the wiring from the automatic
choke.
6Disconnect the wiring from the anti-
dieselling (anti-run-on) valve.
7Remove the four Torx screws securing the
carburettor to the inlet manifold.
8Remove the two securing screws, and lift off
the carburettor top cover, leaving the
carburettor main body in place on the inlet
manifold.
9Slide the float retaining pin from the carburettor
top cover, tapping it gently if necessary, then lift
out the float and needle valve.
10If desired, the needle valve housing can be
unscrewed from the top cover. Recover the
washer and discard it; a new one must be
fitted on reassembly.
11Inspect the components for damage, and
renew as necessary. Check the needle valve
for wear, and check the float assembly for
leaks by shaking it to see if it contains petrol.12Refitting is a reversal of removal, bearing
in mind the following points.
a)Use a new washer when refitting the
needle valve housing.
b)When refitting the float and needle valve,
ensure that the tag on the float locates
under the spring clip on the needle valve.
Check that the float and needle valve
operate smoothly.
c)Check and, if necessary, adjust the float
level as described below.
d)Ensure that the carburettor mating
surfaces are clean then fit a new gasket
onto the main body and refit the
carburettor top cover.
e)If the fuel hoses were originally secured
with crimped clips, discard these and
secure the hoses in position with new
worm drive hose clips.
f)On completion, check and if necessary
adjust the idle speed and mixture.
13With the carburettor top cover removed as
described above, proceed as follows.
14Fit a new gasket to the top cover, then hold
the carburettor top cover in a vertical position,
with the needle valve uppermost and shut.
15Measure the distance between the top
cover gasket and the bottom of the float(see
illustration).
16If the distance is not as specified, adjust
by bending the tag on the float assembly.
17Refit the carburettor top cover by
reversing the removal operations.
1Disconnect the battery negative terminal.
2Remove the air cleaner assembly.
3Disconnect the diaphragm operating rod
from the throttle linkage by pulling the lower
section of the rod downwards and twist the
end of the rod from the socket.
4Remove the four cover retaining screws
then remove the cover and withdraw the
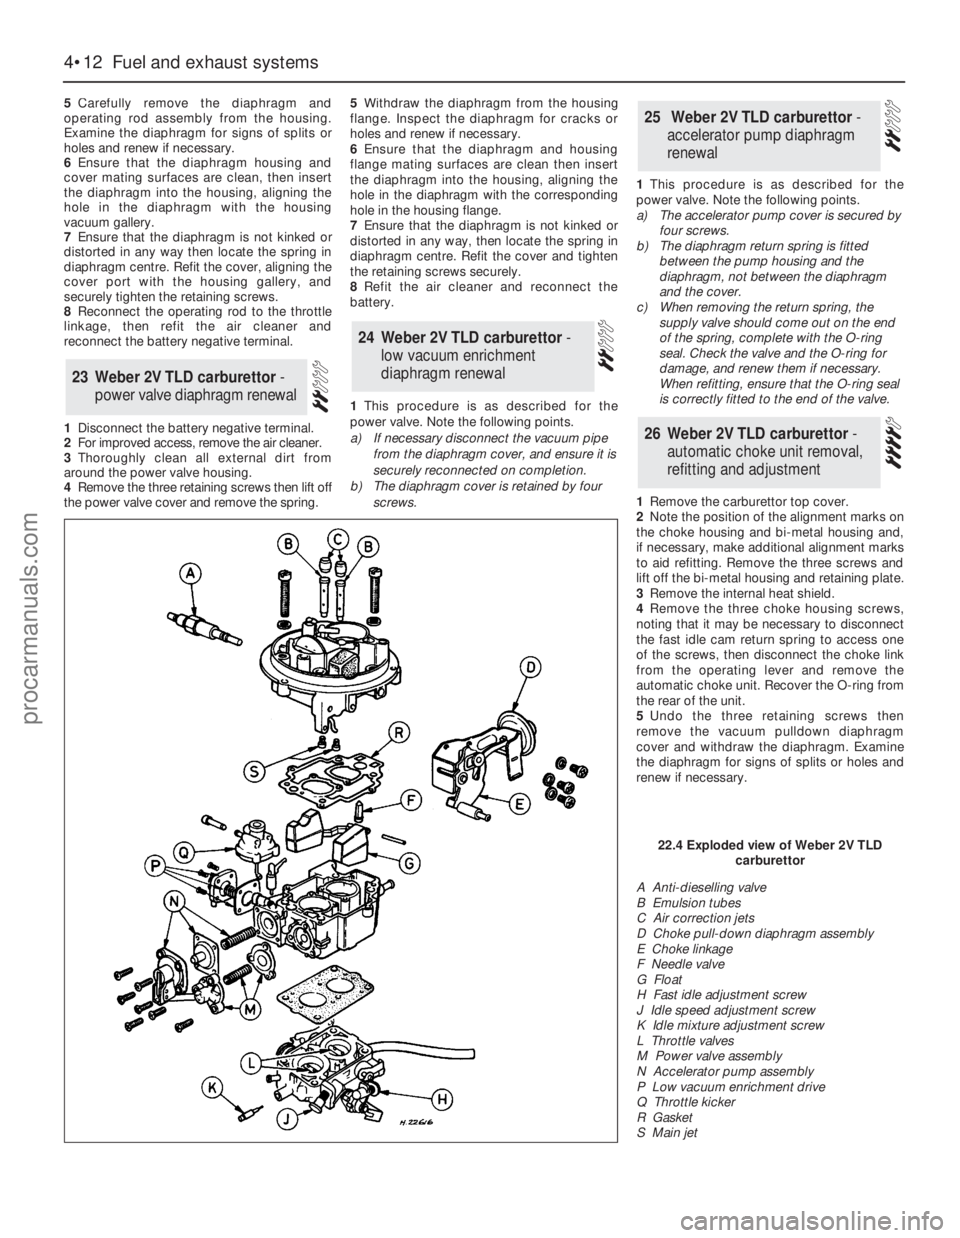
spring (see illustration).
22Weber 2V TLD carburettor -
secondary throttle valve
vacuum diaphragm renewal
21Weber 2V TLD carburettor -
needle valve and float removal,
refitting and adjustment
20Weber 2V TLD carburettor -
removal and refitting
19Weber 2V TLD carburettor -
idle speed and mixture
adjustments
Fuel and exhaust systems 4•11
4
18.11 Bi-metal housing alignment marks -
Weber 2V carburettor
A Rich
B IndexC Lean
21.4 Float and needle valve locations in
carburettor top cover - Weber 2V TLD
carburettor
A Fuel hose
connectionsB Float
C Needle valve
21.15 Float level adjustment - Weber 2V
TLD carburettor
A Check dimensionB Adjustment tag
procarmanuals.com
Page 105 of 255
5Carefully remove the diaphragm and
operating rod assembly from the housing.
Examine the diaphragm for signs of splits or
holes and renew if necessary.
6Ensure that the diaphragm housing and
cover mating surfaces are clean, then insert
the diaphragm into the housing, aligning the
hole in the diaphragm with the housing
vacuum gallery.
7Ensure that the diaphragm is not kinked or
distorted in any way then locate the spring in
diaphragm centre. Refit the cover, aligning the
cover port with the housing gallery, and
securely tighten the retaining screws.
8Reconnect the operating rod to the throttle
linkage, then refit the air cleaner and
reconnect the battery negative terminal.
1Disconnect the battery negative terminal.
2For improved access, remove the air cleaner.
3Thoroughly clean all external dirt from
around the power valve housing.
4Remove the three retaining screws then lift off
the power valve cover and remove the spring.5Withdraw the diaphragm from the housing
flange. Inspect the diaphragm for cracks or
holes and renew if necessary.
6Ensure that the diaphragm and housing
flange mating surfaces are clean then insert
the diaphragm into the housing, aligning the
hole in the diaphragm with the corresponding
hole in the housing flange.
7Ensure that the diaphragm is not kinked or
distorted in any way, then locate the spring in
diaphragm centre. Refit the cover and tighten
the retaining screws securely.
8Refit the air cleaner and reconnect the
battery.
1This procedure is as describedfor the
power valve. Note the following points.
a)If necessary disconnect the vacuum pipe
from the diaphragm cover, and ensure it is
securely reconnected on completion.
b)The diaphragm cover is retained by four
screws.1This procedure is as described for the
power valve. Note the following points.
a)The accelerator pump cover is secured by
four screws.
b)The diaphragm return spring is fitted
between the pump housing and the
diaphragm, not between the diaphragm
and the cover.
c)When removing the return spring, the
supply valve should come out on the end
of the spring, complete with the O-ring
seal. Check the valve and the O-ring for
damage, and renew them if necessary.
When refitting, ensure that the O-ring seal
is correctly fitted to the end of the valve.
1Remove the carburettor top cover.
2Note the position of the alignment marks on
the choke housing and bi-metal housing and,
if necessary, make additional alignment marks
to aid refitting. Remove the three screws and
lift off the bi-metal housing and retaining plate.
3Remove the internal heat shield.
4Remove the three choke housing screws,
noting that it may be necessary to disconnect
the fast idle cam return spring to access one
of the screws, then disconnect the choke link
from the operating lever and remove the
automatic choke unit. Recover the O-ring from
the rear of the unit.
5 Undo the three retaining screws then
remove the vacuum pulldown diaphragm
cover and withdraw the diaphragm. Examine
the diaphragm for signs of splits or holes and
renew if necessary.
26Weber 2V TLD carburettor -
automatic choke unit removal,
refitting and adjustment
25Weber 2V TLD carburettor -
accelerator pump diaphragm
renewal
24Weber 2V TLD carburettor -
low vacuum enrichment
diaphragm renewal
23Weber 2V TLD carburettor -
power valve diaphragm renewal
4•12Fuel and exhaust systems
A Anti-dieselling valve
B Emulsion tubes
C Air correction jets
D Choke pull-down diaphragm assembly
E Choke linkage
F Needle valve
G Float
H Fast idle adjustment screw
J Idle speed adjustment screw
K Idle mixture adjustment screw
L Throttle valves
M Power valve assembly
N Accelerator pump assembly
P Low vacuum enrichment drive
Q Throttle kicker
R Gasket
S Main jet
22.4 Exploded view of Weber 2V TLD
carburettor
procarmanuals.com