1982 CHEVROLET CAMARO check oil
[x] Cancel search: check oilPage 719 of 875

GM – CAMARO 1982-1992 – Repair Guide (Checked by WxMax) 719
11. Lubricate the new large O-ring with cl
ean engine oil and install it directly
over the backup washer. Be sure t he O-ring is seated properly and is
flush with the top of the fuel meter body surface.
12. Lubricate the new small O-ring with clean engine oil and install it on the
nozzle end of the injector. Push t he O-ring on far enough to contact the
filter.
WARNING - Do not attempt to reverse this procedure and install the backup
washer and O-ring after the injector is located in the cavity. To do so will
prevent proper seating of the O-ring in th e cavity recess which could result in a
fuel leak and possible fire.
13. Install the injector by aligning the raised lug on the injector base with the
notch cast into the fuel meter body . Push down on the injector making
sure it is fully seated in the cavity. In jector installation is correct when the
lug is seated in the notch and the electrical terminals are parallel to the
throttle shaft.
14. Using new gaskets on the fuel mete r cover and a new dust seal, install
the cover to the fuel meter body. Use an appropriate thread locking
compound on the cover attaching screws.
15. Connect the injector electrical c onnector by pushing straight down until
seated firmly in place.
16. Connect the negative battery cable.
17. With the engine OFF and the igniti on ON, check for fuel leaks.
18. Install the air cleaner.
ADJUSTMENTS
MINIMUM IDLE SPEED
Minimum idle speed should only be adjus ted when installing a replacement
throttle body. The idle stop screw is used to regulate the minimum idle speed of
the engine. The throttle body is adjusted at the factory, then covered with a cap
or plug to discourage unnecessary readjustment.
2.5L ENGINES 1. Remove the air cleaner and pl ug the THERMAC vacuum port.
2. Disconnect the TV cable from the th rottle control bracket to allow access
to the idle adjustment screw.
3. Remove the throttle stop screw plug or cap.
4. Connect a tachometer to the engine.
5. Disconnect the Idle Air Control (IAC) valve connector.
6. Start the engine with the transmi ssion in PARK (auto transmission) or
NEUTRAL (manual transmission) and allow the engine speed to
stabilize. All accessories (A/C, rear defogger, etc.) should be OFF.
7. Install tool J-33047 in t he idle air passage of the throttle body. Be certain
that the tool seats fully in t he passage and no air leaks exist.
Page 744 of 875

GM – CAMARO 1982-1992 – Repair Guide (Checked by WxMax) 744
7. Start the engine and che
ck for proper operation.
FUEL INJECTORS
REMOVAL & INSTALLATION
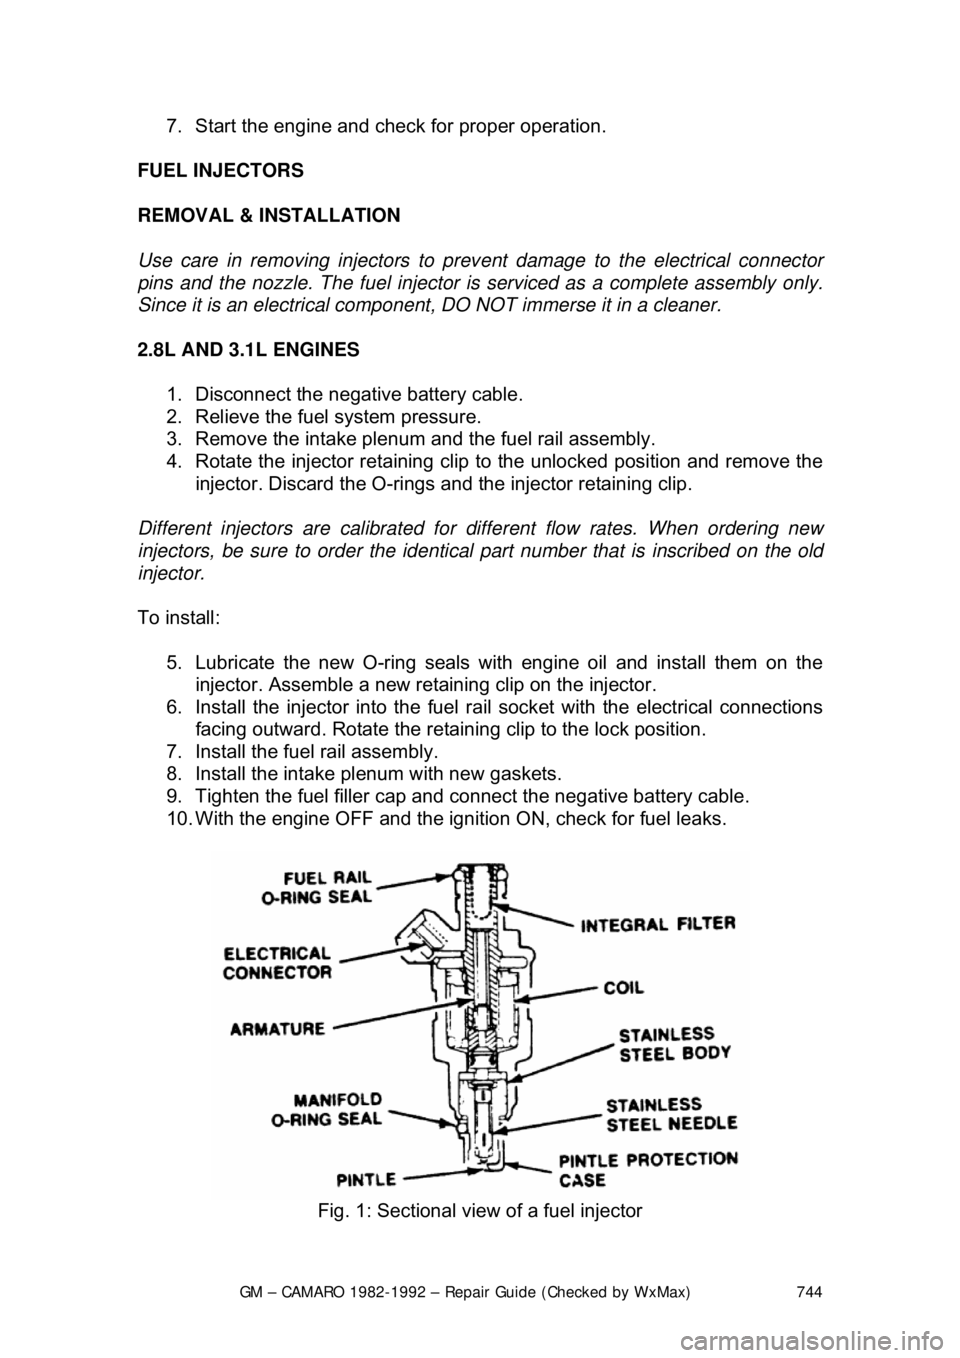
Use care in removing injectors to prev ent damage to the electrical connector
pins and the nozzle. The fuel injector is serviced as a complete assembly only.
Since it is an electrical compon ent, DO NOT immerse it in a cleaner.
2.8L AND 3.1L ENGINES 1. Disconnect the negative battery cable.
2. Relieve the fuel system pressure.
3. Remove the intake plenum and the fuel rail assembly.
4. Rotate the injector retaining clip to the unlocked position and remove the
injector. Discard the O-rings and the injector retaining clip.
Different injectors are calibrated for different flow rates. When ordering new
injectors, be sure to order the identical part number that is inscribed on the old
injector.
To install: 5. Lubricate the new O-ri ng seals with engine oil and install them on the
injector. Assemble a new reta ining clip on the injector.
6. Install the injector into the fuel ra il socket with the electrical connections
facing outward. Rotate the retaini ng clip to the lock position.
7. Install the fuel rail assembly.
8. Install the intake pl enum with new gaskets.
9. Tighten the fuel filler cap and connect the negative battery cable.
10. With the engine OFF and the igniti on ON, check for fuel leaks.
Fig. 1: Sectional view of a fuel injector
Page 746 of 875

GM – CAMARO 1982-1992 – Repair Guide (Checked by WxMax) 746
5.0L AND 5.7L TPI ENGINES
1. Disconnect the negative battery cable.
2. Relieve the fuel system pressure.
3. Remove the intake plenum and runners.
4. Remove the fuel rail assembly.
5. Rotate the injector retaining clip to the unlocked position and remove the
injector. Discard the O-rings and the injector retaining clip.
There are two different injector part numbers for the 5.0L and the 5.7L engine.
Do not intermix injectors with different part numbers, as this will result in engine
roughness and excessive emissions. When or dering new injectors, be sure to
order the identical part number that is inscribed on the old injector. However, if a
complete set of injectors is being repl aced, either part number for that engine
application may be used.
To install:
6. Lubricate the new O-ri ng seals with engine oil and install them on the
injector. Assemble a new reta ining clip on the injector.
7. Install the injector into the fuel ra il socket with the electrical connections
facing outward. Rotate the retaini ng clip to the lock position.
8. Install the fuel rail assembly.
9. Install the intake plenum and runners with new gaskets.
10. Tighten the fuel filler cap and connect the negative battery cable.
11. With the engine OFF and the igniti on ON, check for fuel leaks.
FUEL RAIL ASSEMBLY
REMOVAL & INSTALLATION
When servicing the fuel system, be sure to relieve the pressure of the system
and drain the fuel into an approved contai ner. Cap all open fuel lines and plug
any other open passages. DO NO T allow dirt or other contaminants to enter the
system.
2.8L AND 3.1L ENGINES 1. Disconnect the negative battery cable.
2. Relieve the fuel system pressure.
3. Remove the intake plenum.
4. Clean the fuel rail assembly to pr event dirt from entering the system.
5. Remove the cold start tube at th e fuel rail fitting. Use a backup wrench
on the fuel rail fitting to pr event it from turning.
6. Disconnect the fuel feed and return lines at the rail.
7. Disconnect the vacuum hose at the pressure regulator.
8. Unplug the electrical connectors.
9. Loosen and remove the fuel rail attaching bolts.
10. Remove the fuel rail assembly from the intake manifold.
11. Discard all of the O-ring seals t hat are exposed during this procedure.
Page 747 of 875

GM – CAMARO 1982-1992 – Repair Guide (Checked by WxMax) 747
To install:
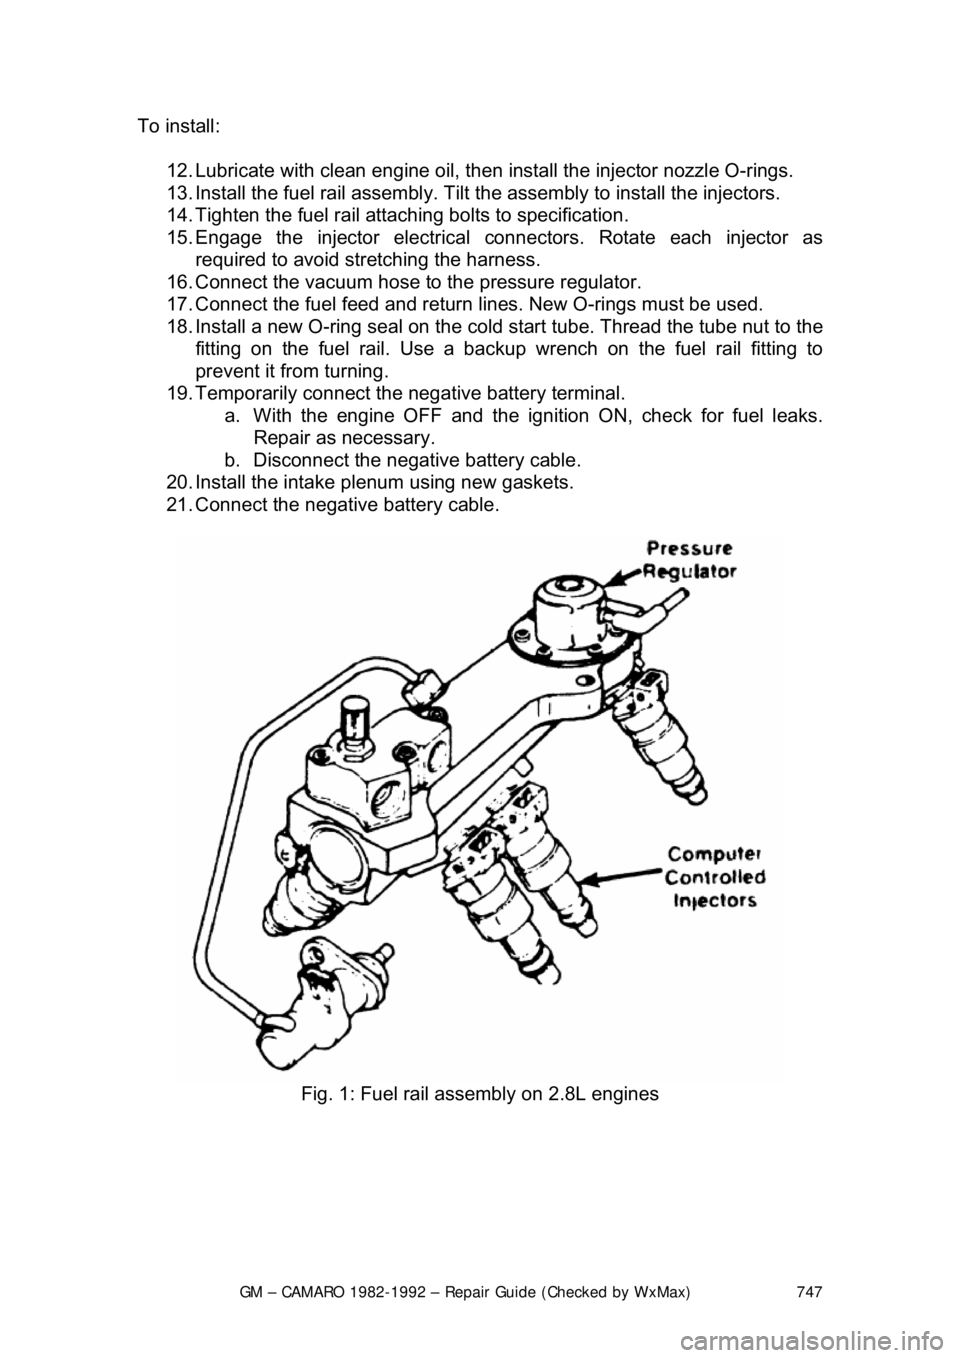
12. Lubricate with clean engine oil, then install the injector nozzle O-rings.
13. Install the fuel rail assembly. Tilt t he assembly to install the injectors.
14. Tighten the fuel rail attachi ng bolts to specification.
15. Engage the injector electrical connectors. Rotate each injector as
required to avoid stretching the harness.
16. Connect the vacuum hose to the pressure regulator.
17. Connect the fuel feed and return lines. New O-rings must be used.
18. Install a new O-ring seal on the cold start tube. Thread the tube nut to the
fitting on the fuel rail. Use a backup wrench on the fuel rail fitting t\
o
prevent it from turning.
19. Temporarily connect the negative battery terminal. a. With the engine OF F and the ignition ON, check for fuel leaks.
Repair as necessary.
b. Disconnect the negative battery cable.
20. Install the intake plenum using new gaskets.
21. Connect the negative battery cable.
Fig. 1: Fuel rail assembly on 2.8L engines
Page 750 of 875

GM – CAMARO 1982-1992 – Repair Guide (Checked by WxMax) 750
6. Disconnect the vacuum hose
at the pressure regulator.
7. Unplug the electrical connectors.
8. Loosen and remove the fuel rail attaching bolts.
9. Remove the fuel rail assembly from the intake manifold.
10. Discard all of the O-ring seals t hat are exposed during this procedure.
To install: 11. Lubricate with clean engine oil, then install the injector nozzle O-rings.
12. Install the fuel rail assembly in the intake manifold.
13. Tighten the fuel rail attachi ng bolts to specification.
14. Engage the injector electrical connectors. Rotate each injector as
required to avoid stretching the harness.
15. Connect the vacuum hose to the pressure regulator.
16. Connect the fuel feed and return lines. New O-rings must be used.
17. Temporarily connect the negative battery terminal. a. With the engine OF F and the ignition ON, check for fuel leaks.
Repair as necessary.
b. Disconnect the negative battery cable.
18. Install the intake plenum and runners. Use new gaskets.
19. Connect the negative battery cable.
FUEL PRESSURE REGULATOR
REMOVAL & INSTALLATION
2.8L AND 3.1L ENGINES
The pressure regulator and the fuel rail are serviced as a complete assembly
only. DO NOT attempt to remove the regulator cove r from the fuel rail.
5.0L AND 5.7L TPI ENGINES 1. Disconnect the negative battery cable.
2. Relieve the fuel system pressure.
3. Remove the intake plenum and runners.
4. Remove the fuel rail assembly.
5. Remove the rear crossover re tainer and base attaching screw.
6. Remove the rear crossover tube and O-ring from the regulator base.
Discard the O-ring.
7. Remove the pressure regulator bracket.
8. Remove the pressure r egulator base-to-rail screw.
9. Separate the regulator base from the fuel rail, then disconnect from the
fuel outlet tube.
10. Remove the fuel outle t tube O-ring and discard.
11. Remove the regulator bas e-to-fuel rail connector.
To install: 12. Lubricate and install new regul ator base-to-fuel rail O-rings.
Page 763 of 875

GM – CAMARO 1982-1992 – Repair Guide (Checked by WxMax) 763
•
Jackstands for support.
• Oil filter wrench.
• Spout or funnel for pouring fluids.
• Grease gun for chassis lubrication (unl ess your vehicle is not equipped
with any grease fittings)
• Hydrometer for checking the battery (unless equipped with a sealed,
maintenance-free battery).
• A container for draining oil and other fluids.
• Rags for wiping up the inevitable mess.
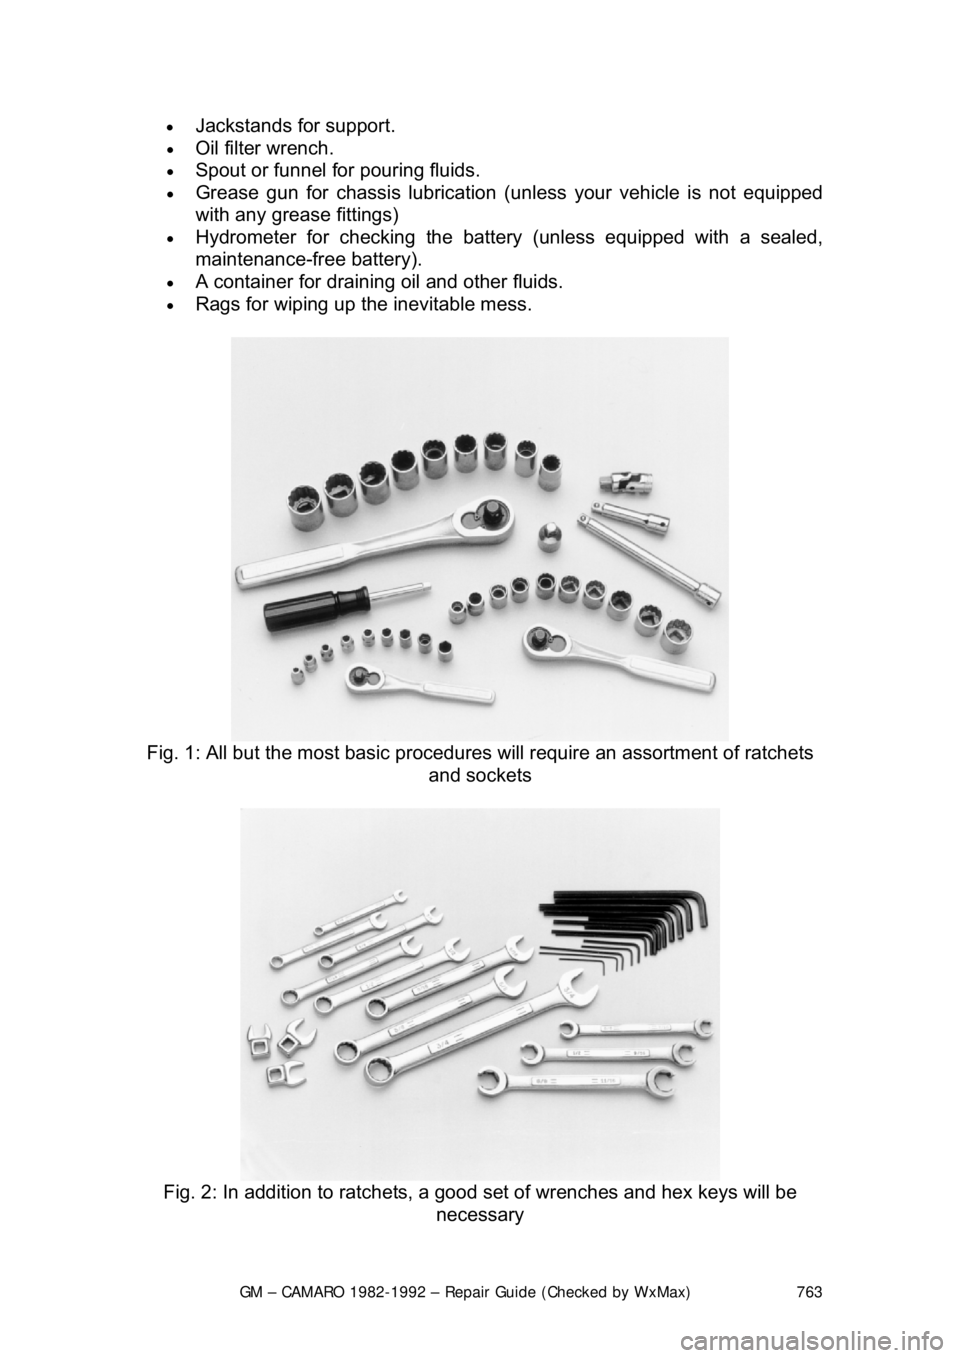
Fig. 1: All but the most basic procedures will require an assortment of ratchets
and sockets
Fig. 2: In addition to ratchets, a good set of wrenches and hex keys will be
necessary
Page 766 of 875

GM – CAMARO 1982-1992 – Repair Guide (Checked by WxMax) 766
In addition to the above it
ems there are several others that are not absolutely
necessary, but handy to have around. These include an equivalent oil
absorbent gravel, like cat litter, and the usual supply of lubricants, antifreeze
and fluids. This is a basic list for rout ine maintenance, but only your personal
needs and desire can accurately determine your list of tools.
After performing a few projects on the vehi cle, you'll be amazed at the other
tools and non-tools on your workbench. Some useful household items are: a
large turkey baster or siphon, empty coff ee cans and ice trays (to store parts), a
ball of twine, electrical t ape for wiring, small rolls of colored tape for tagging
lines or hoses, markers and pens, a note pad, golf tees (for plugging vacuum
lines), metal coat hangers or a roll of mechanic's wire (to hold things out of the
way), dental pick or similar long, poi nted probe, a strong magnet, and a small
mirror (to see into rece sses and under manifolds).
Fig. 7: Although not always necessary, us ing specialized brake tools will save
time
Page 774 of 875

GM – CAMARO 1982-1992 – Repair Guide (Checked by WxMax) 774
FLUIDS AND LUBRICANTS
FLUID DISPOSAL
Used fluids such as engine
oil, transmission fluid, antifreeze and brake fluid are
hazardous wastes and must be disposed of properly. Befo re draining any fluids,
consult with your local authorities; in many areas waste oil, etc. is being
accepted as a part of recycling programs. A number of service stations and auto
parts stores are also accepti ng waste fluids for recycling.
Be sure of the recycling cent er's policies before draining any fluids, as many will
not accept different fluids that have been mixed together.
FUEL RECOMMENDATIONS
The engine is designed to operate on unleaded gasoline ONLY and is essential
for the proper operation of the emissi on control system. The use of unleaded
fuel will reduce spark plug fouling, exhaust system corrosion and engine oil
deterioration.
In most parts of the United States, f uel with an octane rating of 87 should be
used; in high altitude areas, fuel wit h an octane rating as low as 85 may be
used.
In some areas, fuel consisting of a blen d of alcohol may be used; this blend of
gasoline and alcohol is known as gaso hol. When using gasohol, never use
blends exceeding 10% ethanol (e thyl or grain alcohol) or 5% methanol (methyl
or wood alcohol).
The use of fuel with excessive amounts of alcohol may jeopardize the new car
and emission control system warranties.