1980 CHEVROLET CITATION lights
[x] Cancel search: lightsPage 5 of 95
Downloaded from www.Manualslib.com manuals search engine SECTION 1
BEFORE DRIVING YOUR
CHEVROLET
DRIVER DAILY CHECKLIST
Be sure you know your vehicle and its, equipment and how to use it safely.
Before Entering the Vehicle
1. See that windows, mirrors, and lights are clean and unobstructed.
2. Check whether any tire is low or flat. (If any tire looks different from nonnal,
we recommend you check
it with a tire pressure gage.)
3. Check that all lights work.
4. Look for fluid leaks.
5. Be sure everything is properly stowed.
6. Check the area behind the vehicle if you are about to back up.
Before Driving Off
1. Lock all doors.
2. Adjust seat.
3. Adjust inside and outside mirrors.
4. Fasten seat belts.
5. Check that all the warning lights work as the key is turned to "'Start."
6. Check all gages (including the fuel gage).
7. Release the parking brake (and see that the "Brake" light turns om.
Seerelated topics in this manual, or the Maintenance Schedule folder, if problems
are found.
Guard Against Theft
For tips on how to protect your vehicle and its contents, see "Starting and
Operating" in section 2 of this manuaL
KEYS
Two different keys are· provided for the locks on your vehicle. The key code is
stamped on the "knock out" plug in each key head.
• Key with square head (letter "A" or "e") -for ignition lock only.
• Key with oval head (letter "8" or "0") ~ for all other locks.,
For vehicle security:
• Record the key code numbers; then knock the plugs out of the keys.
• Keep the key codes in a safe place (such as your wallet), NOT IN THE
VEHICLE.
If the original keys are lost, duplicates can
be made using the key codes. Contact
any
OM dealer or a locksmith.
If yO~i park in an attended lot, leave only your square-head ignition key.
1-1
Page 7 of 95
Downloaded from www.Manualslib.com manuals search engine CAUTION: For safety's s~ke, always lock the doors and any hatchback when driving. Along with using the seat belts properly, locking the doors, etc. helps prevent occupants from being thrown from the vehicl~ during accidents. It also helps prevent unintended opening of the doors and helps keep out intruders when stopped.
STOWING THINGS IN (OR ON) THE CAR
CAUTION: luggage or other cargo should not be piled higher than the seatbacks. When at all possible. luggage or cargo should be carried in the trunk area. The filler panel or cargo cover, betWeen the rear seatback and the rear window should not be used to carry objects-.even those that are small and light. All items should be secured in place. This will help keep such things from being thrown about and iniurying people in the car during an accident. Cargo weight. whether inside or on the roof, should be positioned as evenly as possible from front to rear.
INSIDE REARVIEW MIRROR
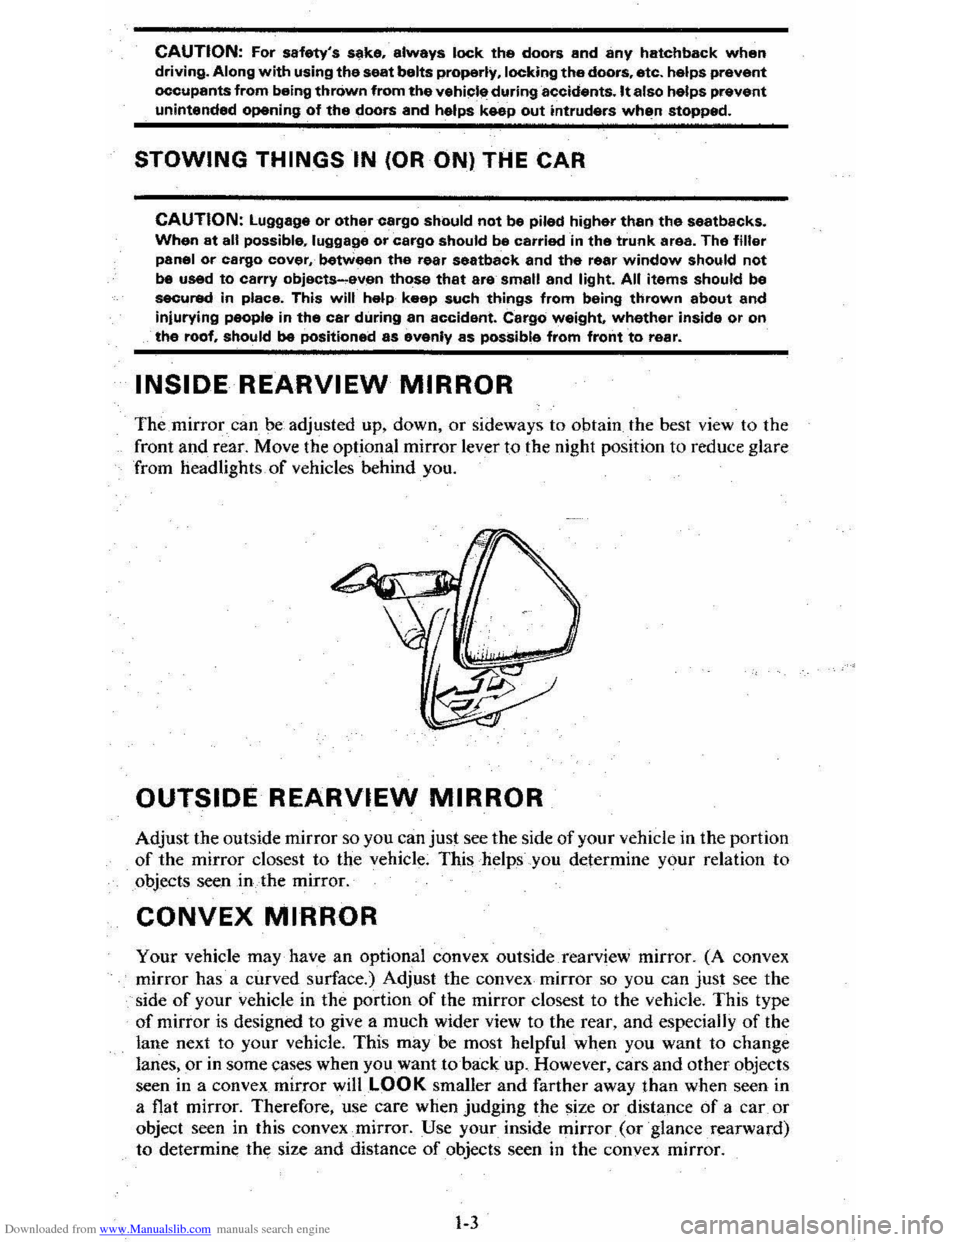
The mirror can be adjusted up, down, or sideways to obtain the best view to the
front
and rear. Move the optional mirror lever to the night position to reduce glare
from headlights of vehicles behind you.
OUTSIDE REARVIEW MIRROR
Adjust the outside mirror so you can just see the side of your vehicle in the portion of the mirror closest to the vehicle; This helps you determine your relation to
objects seen
in the mirror.
CONVEX MIRROR
Your vehicle may have an optional convex outside rearview mirror. (A convex
mirror has a curved surface.) Adjust the convex mirror so you can
just see the
side of your vehicle in the portion of the mirror closest to the vehicle. This type
of mirror is designed to give a much wider view to the rear, and especially of the
lane next to your vehicle. This
may· be most helpful when you want to change
lanes, or in some cases when you want to back up. However, cars and other objects
seen in a convex mirror
willLOOK smaller and farther away than when seen in
a flat mirror. Therefore, use care when Judging the size or distance of a car or
object seen in this convex
.. mirror. Use your inside mirror. (or ·glance .rearward)
to determine the size and distance of objects seen in the convex mirror.
1-3
Page 21 of 95
Downloaded from www.Manualslib.com manuals search engine Tires
If you plan to use your vehicle in countries where speeds over 75 mph (120 kmlh) are allowed. see Item 3 on page 5-12.
IMPORTANT FACTS YOU SHOULD KNOW ABOUT FUEL
ECONOMY AND HOW TO IMPROVE IT
How you drive . where you drive and when you drive an affect how many
mileslkilometers you can get from a gallon/liter of fuel. The careful attention you give your vehicle as far as maintenance and repairs 'are concerned 'will also help fuel economy. .
Fuel Selection
Use only unle8;ded gasoline meeting the octane ratings given under "Fuel Requirements" in "Starting and Operating," Section 2 of this manual. Unleaded
gasoline must be used for the, emission control system to operate properly. Its use will also reduce spark plug fouling , exhaust system corrosio n and engine oil
deterioration . Using leaded gasoline can damage the emission control system and could result in IO$S of emission warranty coverage.
"Jackrabbit" Starts
You can save fuel (and prolong engine and tire life) by avoiding fast starts away
from lights and stop Signs. . '
Stop-And·Start Driving
Frequent stops and starts while driving cut down on your miJesper gaUon
(kilometers per liter). Plan even your short shopping trips to take advantage of
through streets to avoid traffic lights. Pace your driving like the expert drivers
to avoid unneeded stops _and braking.
Sudden Stops
Sudden stops can also waste fuel; instead of moving the vehicle , the energy of fuel
is wasted as, heal in braking. Ene'rg'y in the form of fuel is also needed to accelerate
back to driving speed~
Excessive Idling
An idling engine uses fuel, too. If you're faced with more than a minute wait, and
you're not i,n traffic, it may be better to tum, off the engine and start again later.
Lubricants
A well~lubricated vehicle means less friction between moving parts. See the
Maintenan ce Schedule folder for
the_ proper lubrication intervals.
Air Cleane.r
Your vehicle receives its power from a mixture of gasoline and air. The air enters
the engine through the air cleaner. A-dirty air cleaner element lessens engine
performance and can waste
fuel. So, it's important to -replace the air cleaner
element (filter) at required intervals. (See the Maintenance Schedule -folder.)
2-4
Page 23 of 95
Downloaded from www.Manualslib.com manuals search engine • Off· You can turn off the engine without loc king the steering ,wheel and shirt control s o'n aut omatic tranSaxle models. or steering -wh eel only on
mariual transaxle models.
• Run· Normal operating position.
• Start -Cranks the engine:
If you have trouble turning the key to unlock the ignition. first be sure the key
i s pushed in all the way. Then try to turn the ste ering wheel as hard as you can
in the _di rec tion the Wheels are turned. At th e same time, turn the ignition key
with
as mu ch effort as you can apply with your ha nd. Do not try to use a tool
of any kind to
a_pply more force on 'the lock knob. as this could bre ak the kn.ob.
CAUTION: .on manual tranS8xle cars. if you need to turn off the engina while the car is moving. turn the key onlv to ".off." DO NOT press down on the key release lever while turning the ignition off. This will result in locking the steering wheel and If'S8 of steering control.
NOTICE: Do_.oot drive through . idle or park your vehicle over combustible materials. such as grass or lC!'aves. They could touch the hot exhaust system and Ignite.
Parking
When leaving your car unatte nded :
• Firml y appl y the park ing brake. Do n o t use th e tran saxle a 's a substitut e for (he parking brake.
• Mov e the automatic transaxle shift lever to "P"(Park) ("Rever se" for man ual
tran saxle ).
• 'Turn the key to "Lock ," On manualtransaxle cars, press,down the key release
lever a
nd turn the key to "Lock. "
•
Close all windows.
• Remove the key (the buzzer is designed to remind you).
• Lock ,,'n doors.
TURN SIGNAL AND MULTI-FUNCTION LEVER
The I urn signa l-lever on th e left side of the ste erin g column also co ntr ols headlight
l ow -beam
or high·beam. and the windshield wiper/washer .
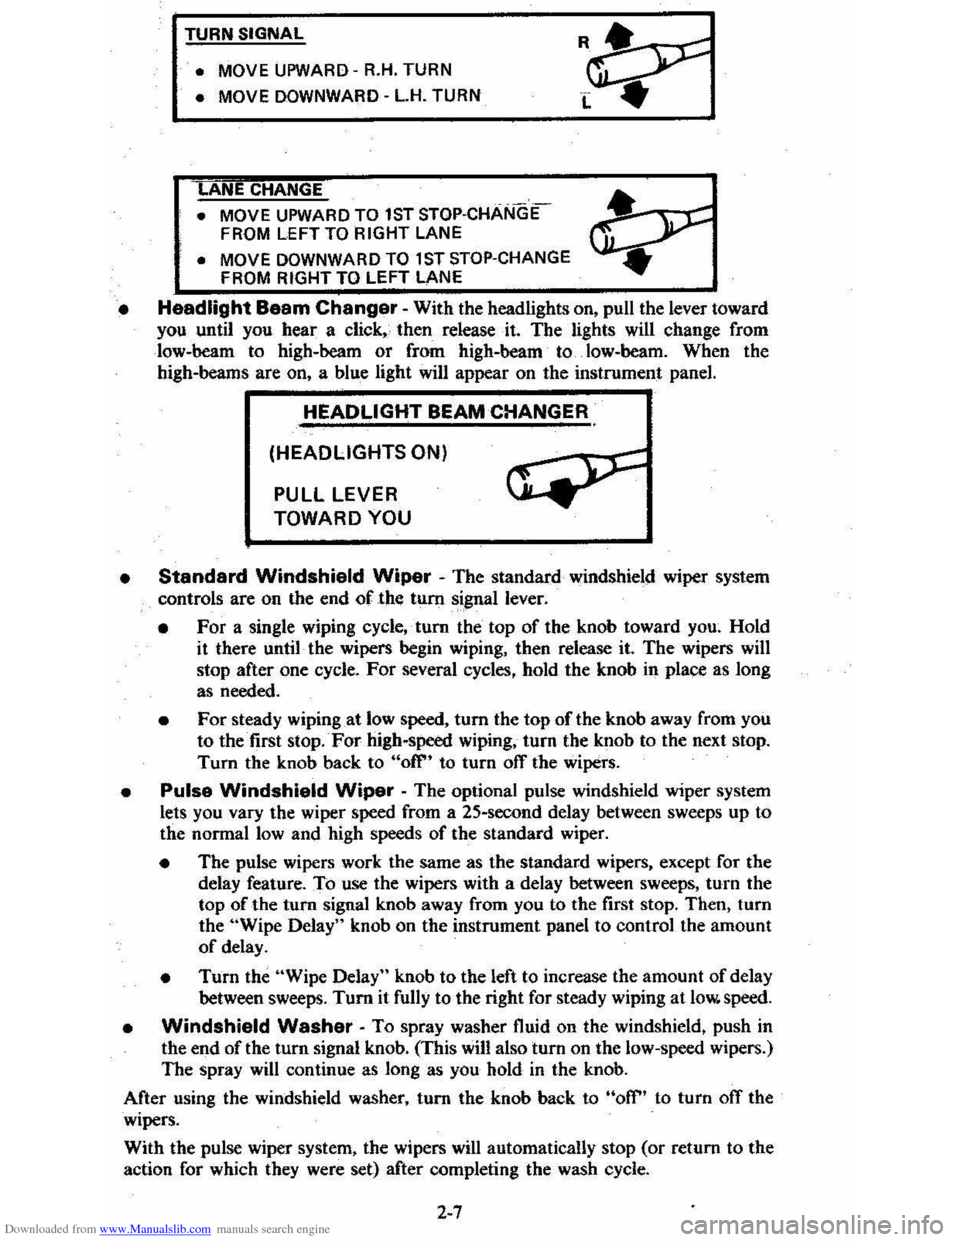
• Turn Signal -Move the lever up to t he second stop to signal a right tum.
Move it do wn 10 the seco nd stop to sig nal a left turn . When the turn is
compleled, the signal will cancel and the lever will return to' h o rizont al.
• Lane Change Signal. In some turns. such as ch an ging lanes, the steering wheel is not turned far enou gh 10 ca nce l th e turn signal. Fo r convenience.
you
can flash Ihe turn signal by moving the lever part way (to t-he first stop) and h olding it there. The lever will re turn to horizo ntal when 'You release it.
Tw o green lights_ o n the instrum ent panel are des igned to nas h 10 tell you that
th e front and rear turn
sign al light s are working. If the light stays on, but does
not flash, check for bur ned- out turn signal bulbs. If Ihe green light does not com e
all when yo u m ove the leve r. c _h ec k the fuse and indicator . bulb. However, iryou
ordered a ,tra iler towing optio n in which extra wiring waS added to attach the
trailer lighting, a different type
of flasher was installed . In this case , the gree n light will co ntinu e 10 flas h even if a turn sig nal bulb burns out. Therefore, you must
regularly look at the front and
rear turn signal light s 10 be sure they are working.
2-6
Page 24 of 95
Downloaded from www.Manualslib.com manuals search engine TURN SIGNAL
• MOVE
UPWARD -R.H. TURN
• MOVE DOWNWARD -L.H. TURN
ANE CHANGE
• MOVE UPWARD TO 1ST STOP·CHANGE
FROM LEFT TO RIGHT LANE
• MOVE DOWNWARD TO 1 ST STOP-CHANGE
FROM RIGHT TO LEFT LANE
• Headlight Baam Changer -With the headlights on, pull the lever toward you until you hear a click" then release· it. The lights will change from
low-beam to high-beam
or from high-beam to. low-heam. When the high-beams are on, a blue light will appear on the instrument panel.
HEADLIGHT BEAM CHANGER
(HEADLIGHTS ON)
PULL LEVER
TOWARD YOU
•
Standard Windshield Wiper - The standard windshield wiper system
controls are on the end of the tum signal lever.
• For a single wiping cycle,' tum the top of the knob toward you~ Hold
it there until· the wipers begin wiping, then release it. The wipers will stop after one cycle. For several cycles, hold the knob in place as long
as needed.
• For steady wiping at low speed, tum the top of the knob away from you to the first stop. For high-speed wiping, turn the knob to the next stop.
Turn the knob back to "ofr' to turn off the wipers.
• Pulse Windshield Wiper -The optional pulse windshield wiper system
lets you vary the wiper speed from a 25-second delay between sweeps up to
the normal
low and high speeds of the standard wiper.
• The pulse wipers work the same as the standard wipers, except for the
delay feature. To use the wipers with a delay between sweeps, turn the
top of the turn signal knob away from you to the first stop. Then, turn
the "Wipe Delay" knob on the instrument panel to control the amount
of delay.
• Turn the "Wipe Delay" knob to the left to increase the amount of delay
between sweeps. Tum it fully to the right for steady wiping at low. speed.
• Windshield Washer -To spray washer fluid on the windshield, push in the end of the tum signal knob. (This will also turn on the low-speed wipers.)
The spray will continue as long as you hold
in the knob.
After using the windshield washer, turn the knob back to
"off" to turn ofT the
wipers.
With the pulse wiper system, the wipers
will automatically stop (or return to the
action for which they were set) after completing the wash cycle.
2-7
Page 32 of 95
Downloaded from www.Manualslib.com manuals search engine • Never drive-the vehicle _with the parking brake set as this -may overheat the
reaf brakes reducing their effectiveness and causing excessive wear or damage,
DISC BRAKE WEAR INDICATORS
Front disc brakes have built-in wear indicators that are designed to make a
high-pitched
squealing or cricket-like warning sound when the brake linings are
worn 10 where -new linings are needed. The sound will come and go, or be heard
all the time
when the wheels are rolling, and when the brake pedal is pu~hed down
firmly . Expensive damage can result
if linings are not replaced when needed.
See also the brake checks listed in the Maintenance Schedule folder.
CLUTCH .PEDAL
On models equiPPed with a manual transaxle, a clutch pedal is used to engage
or disengage the clutch, thereby connecting
or disconnecting the engine from the
transaxle and drive1ine to the front wheels. -When the pedal is fully extended the
clutch
is engaged, driving the transaxle arid the front wheels.
INSTRUMENT PANEL P.ND CONTROLS
INSTRUMENTS
The instruments, gages and indicator lights conveniently grouped in the
instrument cluster are des igned to
tell you at a glance many important things about
_the perfonnance of your vehicle _, _ The following information will enable you to
more quickly -understand and properly it';:rerpretthese instruments.
Speedometer
The speedometer chand ·indicatt:5 vehicle speed in miles per hour and kilometers
per hour.
Odometer
The group of six figures . in the speedometer lower center section indicates the
accumulated mileage.
Fuel Gage
The fuel gagewiH register the_APPROXIMATE fuel level in the tank, when the
ignition
is in the RUN position.
When the gage registers
EMPTY, some fuel is still available as a reserve. When
the gage registers
FULL. some additional" fuel can"still be added to the tank. The
following conditiqns may be considered normal:
• Gas station _pump may shut off before fuel gage indicates FULL. •
•
Amount of gasoline required for fill-up may not exactly correspond to gage.
• Needle may not move away from FULL until some time after fill·up.
• Needle may !Dove during turns. stops and-accelerations.
When the ignition switch
is turned to the OFF position, the needle will not
necessarily
retiJrn · all the way to the EMPTY mark.
2-15
Page 33 of 95
Downloaded from www.Manualslib.com manuals search engine '" 0;
o STANDARD
o OPTIONAL
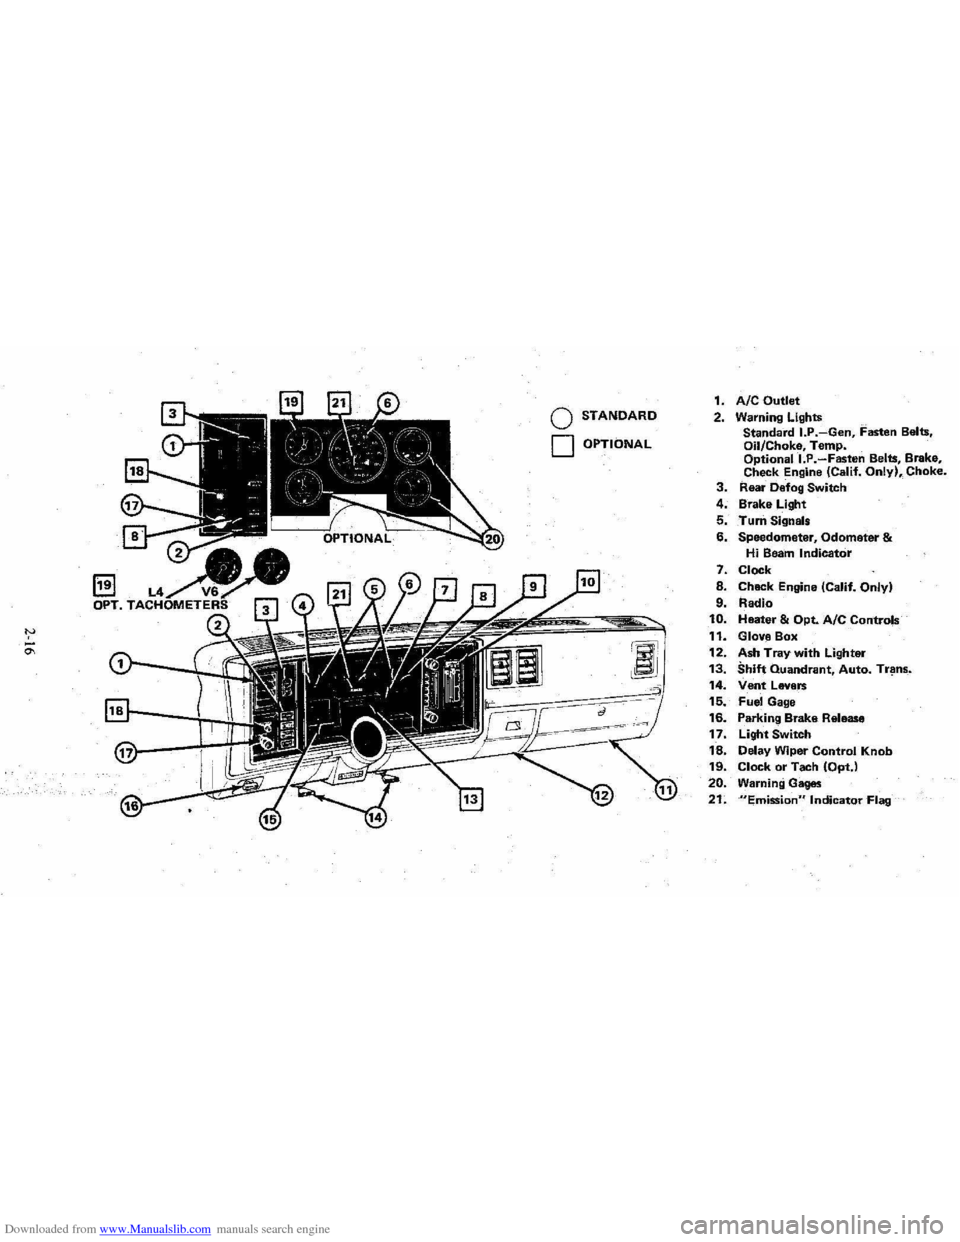
1. AIC Outlet 2. Warning Lights
Standard I.P.-Gen, Fasten Belts.
Oil/Choke, Temp.
Optionall.P.-Fasten Belts, Brake,
Check Engine (Calif. Only), Choke. 3. Rear Defog Switch
4. Brake Light
5. Turn Signals
6. Speedometer, Odometer & Hi Beam Indicator
7. Clock
8. Chack Engine (Calif. Only)
9. Radio 10. Heater & Opt. Ale Controls
11. Glove Box
12. Ash Tray with Lighter 13. Shift Quandrant, Auto. Tr~ns_.
14. Vent Levers 15. Fuel Gage
16. Parking Brake Release
17. Light Switch
18. Delay Wiper Control Knob 19. Clock or Tach (OptJ
20. Warning Gages
21. "Emission" Indicator Flag
Page 36 of 95
Downloaded from www.Manualslib.com manuals search engine Engine Temperature Gage
This gage indicat~cCX?lant temperature which will vary with air temperature and
operating condition~, The ignition must be on for accurate readings. Hard driving
or prolonged idling In very hot weather will cause the pointer to move beyond the center of the band; Should pointer move to the Red Zone, see "Engine Cooling
System" on page 3-3.
Oil Pressure Gage
The oil pressure gage indicates the pn;ssure at which oil is being delivered 10 the various parts of the engine requiring lubrication. Pressures registered by the gage
I11.!lY vary according to outside air temperatures or weight of oil being used. Oil
pressure of a cold engine ~ing operated at a given speed will be somewhat higher
than when the engine is at normal operating temperature at the same speed .
. Prolonged high speed operation on a hot day at the given speed will result in somewhat lower oil pressure readings. Readings of 30 to 40 psi (205 to 275 kPa)
mny
be considered normal during moderate road speeds of 35 to 40 mph (55 to
60 km/h) \\lith the engine at proper operating temperature. Gage readings which
are
consistently high or Im\l under these conditions may indicate lubrication system
When the engine is operating, the voltmeter indicates the electrical system voltage.
During minimum electrical load, the pointer will read to the right of the center.
As the electrical load is increased,
or in stop-and-go driving, the pointer will rotate
to the left. A meter reading continuously in
the left or right red zone indicates
an electrical system
failure .. Cause of the failure should be determined and corrected~
Light Switch
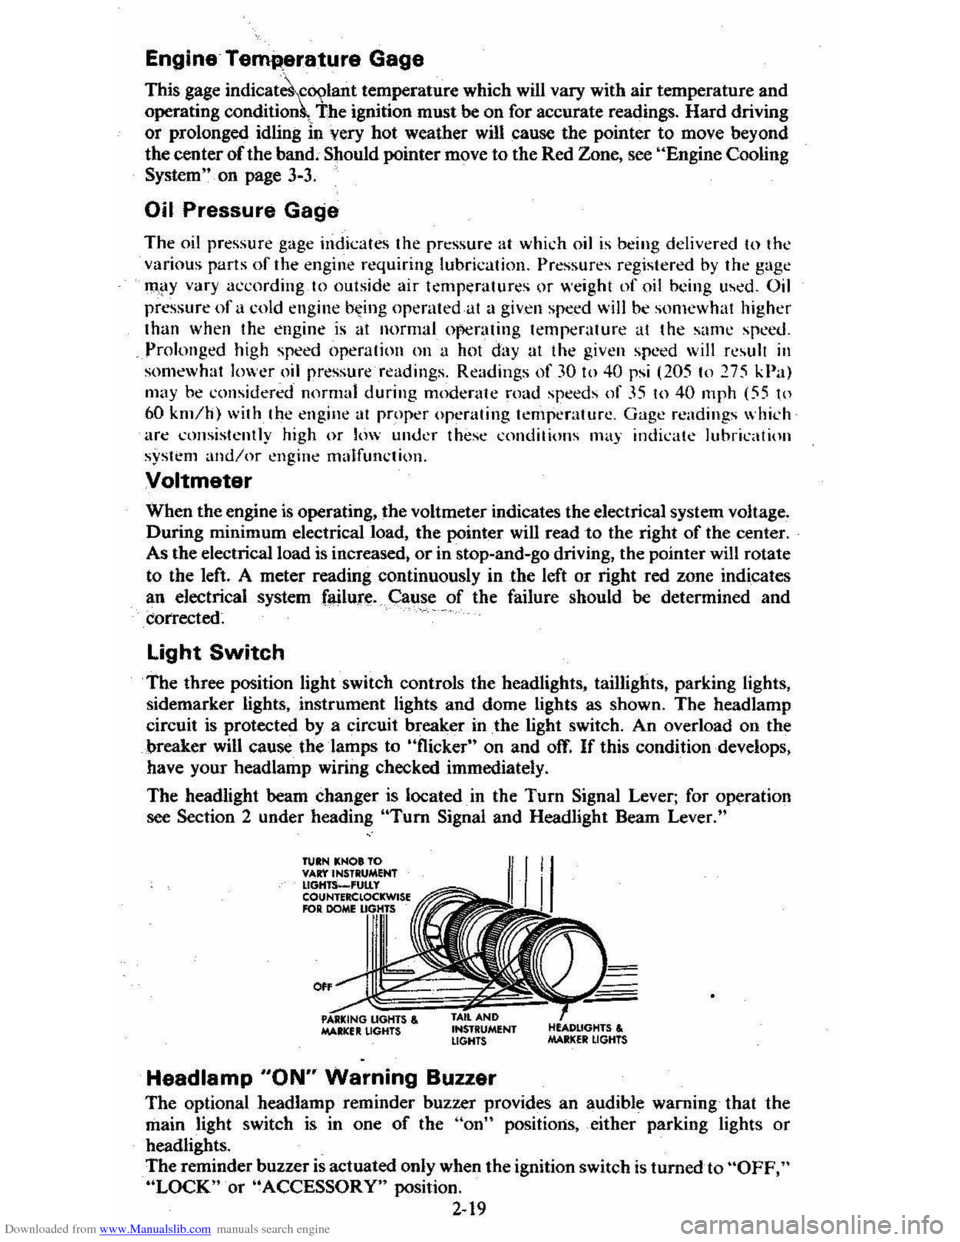
The three position light switch controls the headlights, taillights, parking lights,
sidemarker lights, instrument lights and dome lights as shown. The headlamp
circuit is protected by a circuit breaker in
the light switch. An overload on the
breaker will cause the lamps to "flicker" on and off. If this condition develops,
have your headlamp wiring checked immediately.
The headlight beam changer is located. in the
Turn Signal Lever; for operation
see Section 2 under heading "Tum Signal and Headlight Beam Lever."
TUIN KNOt TO VAr:t'INSTRUMENT lIGHTS_'UtLy COUNTERClOCKWISE RlR DOME
0"
MAltlCfIt LIGHTS , INSTRUMENT LIGHTS
Headlamp "ON" Warning Buzzer
The optional headlamp reminder buzzer provides an audible warning that the
main light switch is in one
of the "on" positions, either parking lights or
headlights.
The reminder buzzer
is actuated only when the ignition switch is turned to "OFF," "LOCK" or "ACCESSORY" position.
2-19