1976 CHEVROLET MONTE CARLO seats
[x] Cancel search: seatsPage 4 of 102
Downloaded from www.Manualslib.com manuals search engine ,;
Door Locks
Front and rear side doors can be
locked from:the inside by. depress ,
ing the passenger guard door lock
lllttons located on tbe upper door
.Mne!. All doors can be locked from
. the outside by first depressing the
door lock button and
closing the
door.
"'.
The ' front doors can also ·be
locked by using the key,
A\I.'
models have as a standard
safety,feature overriding door locks.
Whert the doors are locked. the
door latch mechanism is inopera
tive,
preventing inadvertent open
ing of the door by movement of the
inside handle .
' REMINDER: Avoid hanging
ob
jects on the right hand coat hook
in
such a way that you block the
driver's ' vision
to the right rear
quarter.
R~MINDER: " Always lock the
doors when driving , for greater
se
curity in the event of an accident ,'
to help keep children from
open
ing door, and for greater security
against entry by unwelcome persons
while momentarily stopped.
Seats
Folding seat backs are equipped
witli
s elf -latch ing mechani sms and
release
controls · designed for the
convenience of entering
·and exit
ing passengers.
1-2
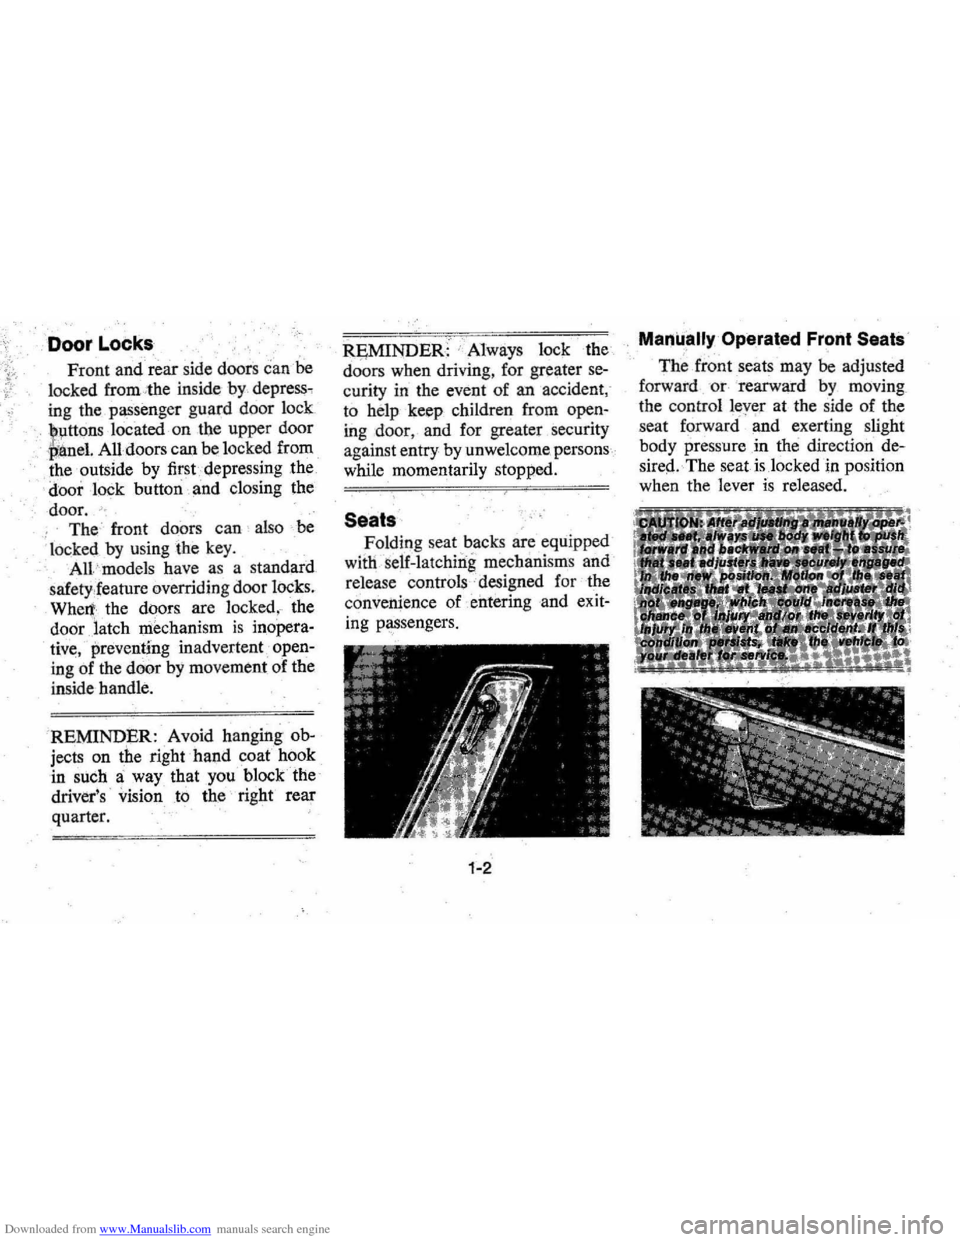
Manually Operated Front Seats , ,
The front seats may be adjusted
forward
or · rearward by moving
the control lever
at the side of the
seat
forward ' and ex erting slight
body pressure in the direction
de
sireq.
·· The seat is locked in position
when the lever
is released.
Page 5 of 102

Downloaded from www.Manualslib.com manuals search engine Front Seat Back ... ~'""\ ..
Front seat backs on two-door
styles are equipped with a self-lock
ing mechanism to
.• keep the seat
back locked in
phlge while in the
up position. The lock release lever
is located on the upper outboard
portion of the
s~at back.
To tilt the
sell,t back forward,
rotate the levertearward and tilt
the seat back
f?rward. When the
seat back
is r¢turned to the up
position,
• the se~t back will auto
matically 'lock.
Keep
belt re~traints.and buckles
clear of mechanism when tilting
folding seats
forward or backwards,
to help prevent damage
to these
belt systems.
Power Operated Front Seats
The six-way power seat control switch
is located
on the driver's seat
left side panel.
The seat can be operated
as
follows:
I. The front control provides up
and down movement of the
frontof the seat.
2. The center control provides
forward and backward move
ment and up and down move
ment of the entire front seat.
3. The provides up
and of the
Power Windows ,
Power windows have an ignition
interlock
so the windows cannot be
operated unless the ignition switch
is in the "on" position.
1-3
REMINDER: Remove the ignition
key when the vehicle
is not at
tended by a responsible person. A
master control for all windows
is
provided at the driver's position,
Individual switches are provided
under each window for passenger
use.
Inside Rearview Mirrors
Switch mirror to night position
to reduce glare from following
headlights. To raise or lower
mir
ror to achieve desired field of.view,
grasp mirror and exert sufficient
pressure by pushing or pulling up,
down or sideways.
Page 8 of 102

Downloaded from www.Manualslib.com manuals search engine Beit Restraint Bu~zer/Light
Reminder
• When .the ignition key is turp.ed
to On or Start, a ,reminder light
is desigl1ed to come on for four
to eight seconds,
to remind occu
pants to fasten their belt re'
straints.
• If the driver hils not buckled
his belt restraint prior to turning
th~key to On or Start, a buzzer
is . ,designed to sound for four to
, dei~t seco'Yds to remind h.i!I!' to
9 so. ".
If ,the belt restraint system or
reminder system
dOes not work as
described,
see your Chevrolet
dealer for information and
assis
tance.
Lap Belts (For Rear Seat and
Center ·,Fr,on1 Seal
Passengers)
• Seating positions next to side
windows (except station wagon third
seats)
' have retractors
'which ar!) designed to automat
ically take.up¢xcess webbing.
, TIrese beltS should be positioned,
secured
ahd released as described
above undei
"Lap-Shoulder Belt
Combination." (Retractors are
, available as an option on station
wa.gon third seats. ) ,
•
Lap belts at center seating posi
tions
( and third seats) also
should be positioned, secured
and
releaseda.s described above, '
arjd adjusted'fo a SNUG FIT by
pulling on the end of the belt ex
teiiaing froin the adjustable latch
plai~. '
• To .;lengthen.Jap
belt at center
seating
positions (and station
wagonthitd seats) place adjust
able ,latch 'plate
at right angles to
the belt webbing and pull on
latch plate; belt
should then slide
easily thro)lgh the adjus\ment
featute.
r'~
Optional Sho~lder ~elts
(Rear Seat, Outboard)
• Whenptoperlil>vorn with a lap
belt,a shoulde~;belt can provide
l\dditiona.! protej;tion by prevent
ing or minimizing impact with
the car interior;
by restraining
forward rnotion of the upper
torso in a ,collision. This
is par~ ,
ticularlytrue in 'the case of a
frontalforce impact.
Page 43 of 102
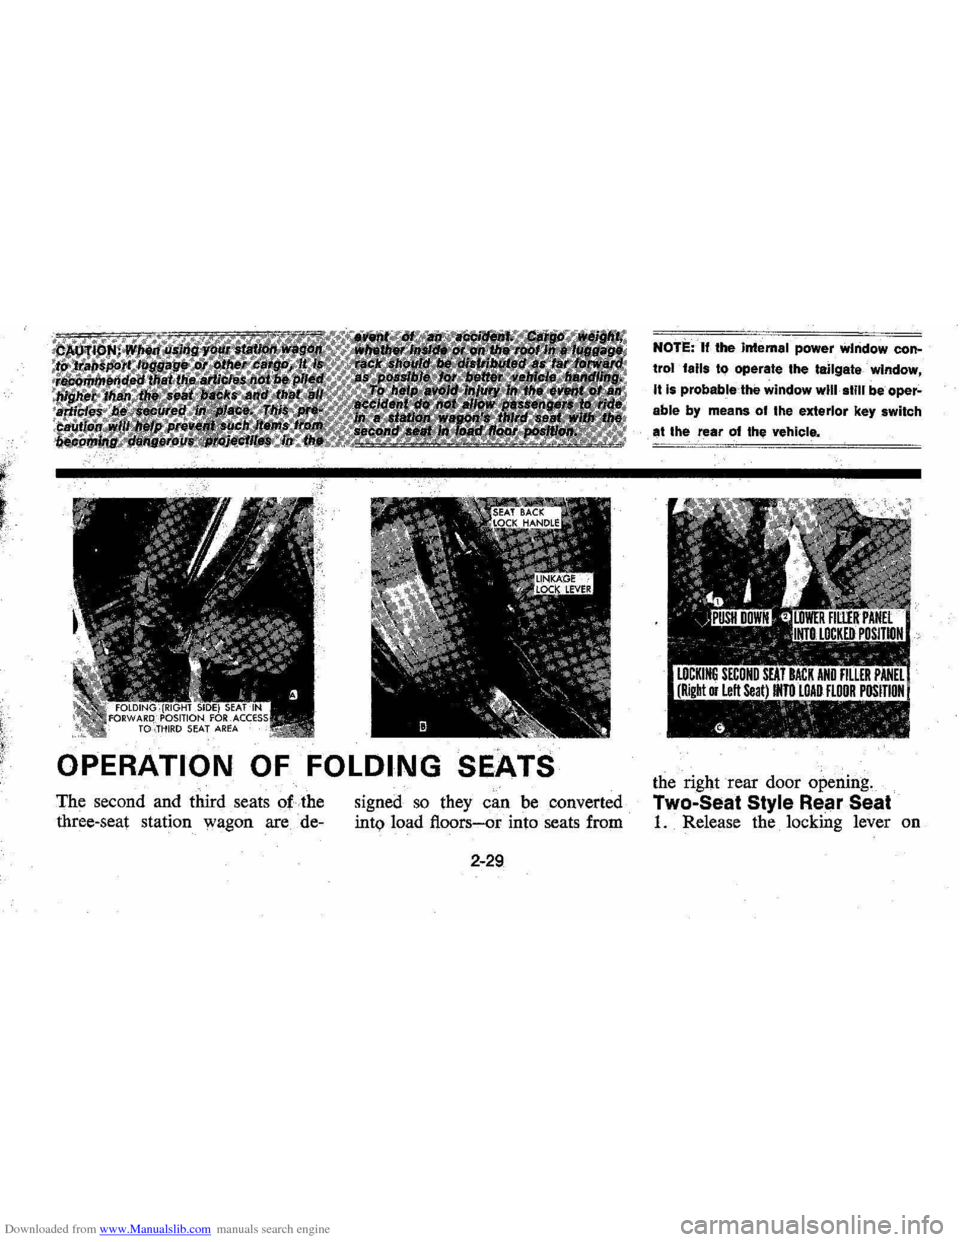
Downloaded from www.Manualslib.com manuals search engine OPERATION OF FOLDING SEATS
The second and third seats of the
three-seat station wagon are de- signed so they
can be converted
into load floors-or into seats from
2-29
NOTE: If the intemal power window con
trol falls to operate the tailgate· window,
It Is probable:the window will· still be oper~
able by means of the exterior key switch
at the rear of the vehicle.
the right rear door opening.
Two-Seat Style Rear Seat
1. Release the locking lever on
Page 44 of 102
Downloaded from www.Manualslib.com manuals search engine the right hand side of the rear
seat back.
2.
Pull seat back forward and
down.
3. To raise the seat, lean on the
front edge of the
seat back
pimet to remove ctehsion from
the filler panel,
liit up the filler
pan¢l, then lift .seat back up
and rearward until it locks into
place.
Three-Seat Sfitle Seats
Second Seat Operation '" ' ;
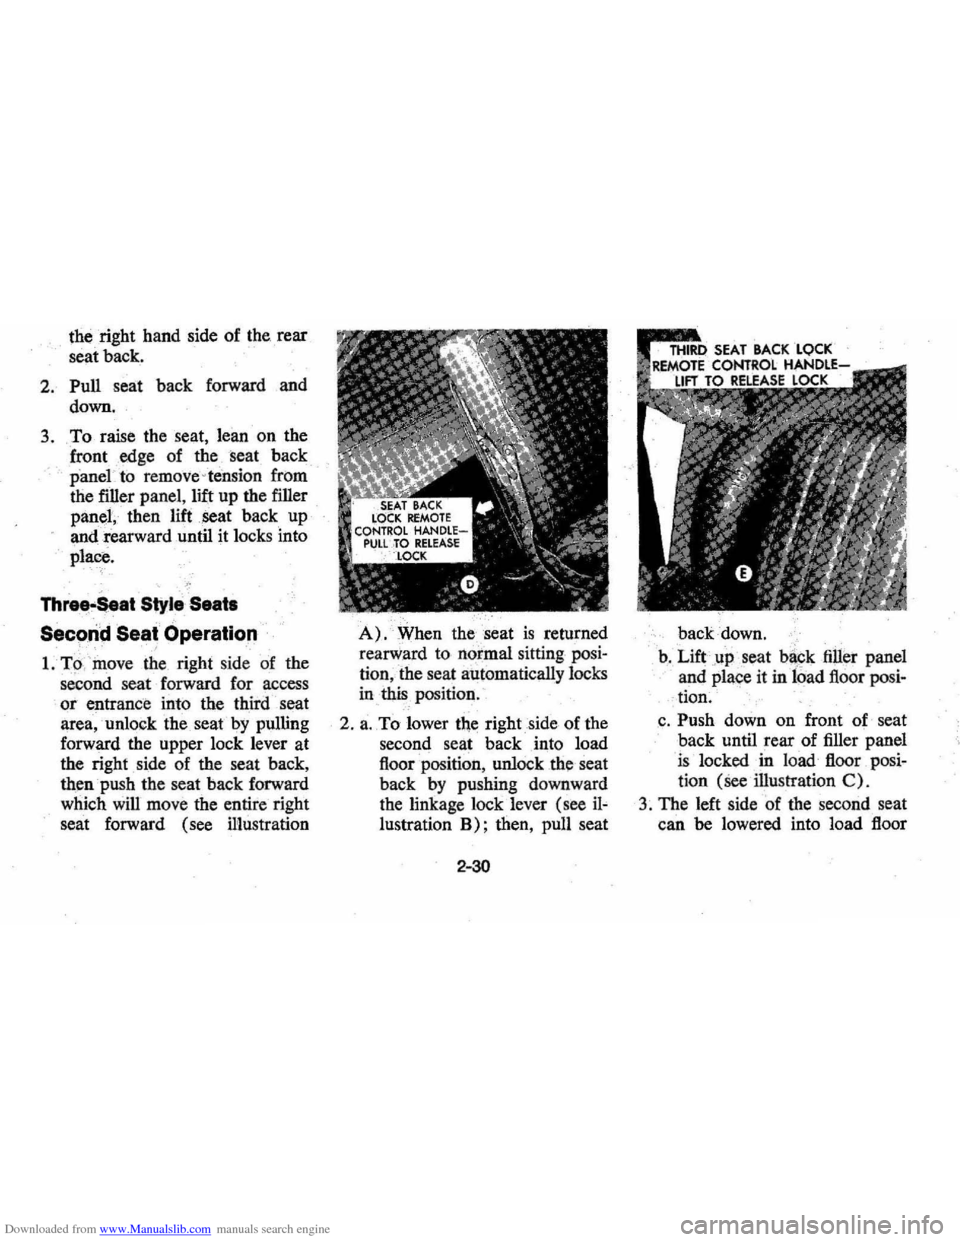
1. TO,move the right side of the
second seat forward for access
or entrance into the third seat
area, unlock the seat
by pulling
forward the upper lock lever at
the right side of the seat back,
then push the seat back forward
which will move the entire right
seat forward (see illustration
A). When the. seat is returned
rearward to normal sitting posi
tion,the seat automatically locks
in
this position.
2 .
a. To lower the right side of the
second seat back into load
floor position , unlock
the seat
back
by pushing downward
the linkage lock lever (see
iJ~
lustration B); then, pull seat
2-30
back down.
b .
Lift.up seat backfiUel' panel
and place it
in load floor posi
- tion.
,c . Push down on front of seat
back until rear of filler panel
is locked in load floor posi
tion
(See illustration C)_
3. The left side of the second seat
can be lowered into load floor
Page 46 of 102
Downloaded from www.Manualslib.com manuals search engine ond seat forward for access to
the third seat area.
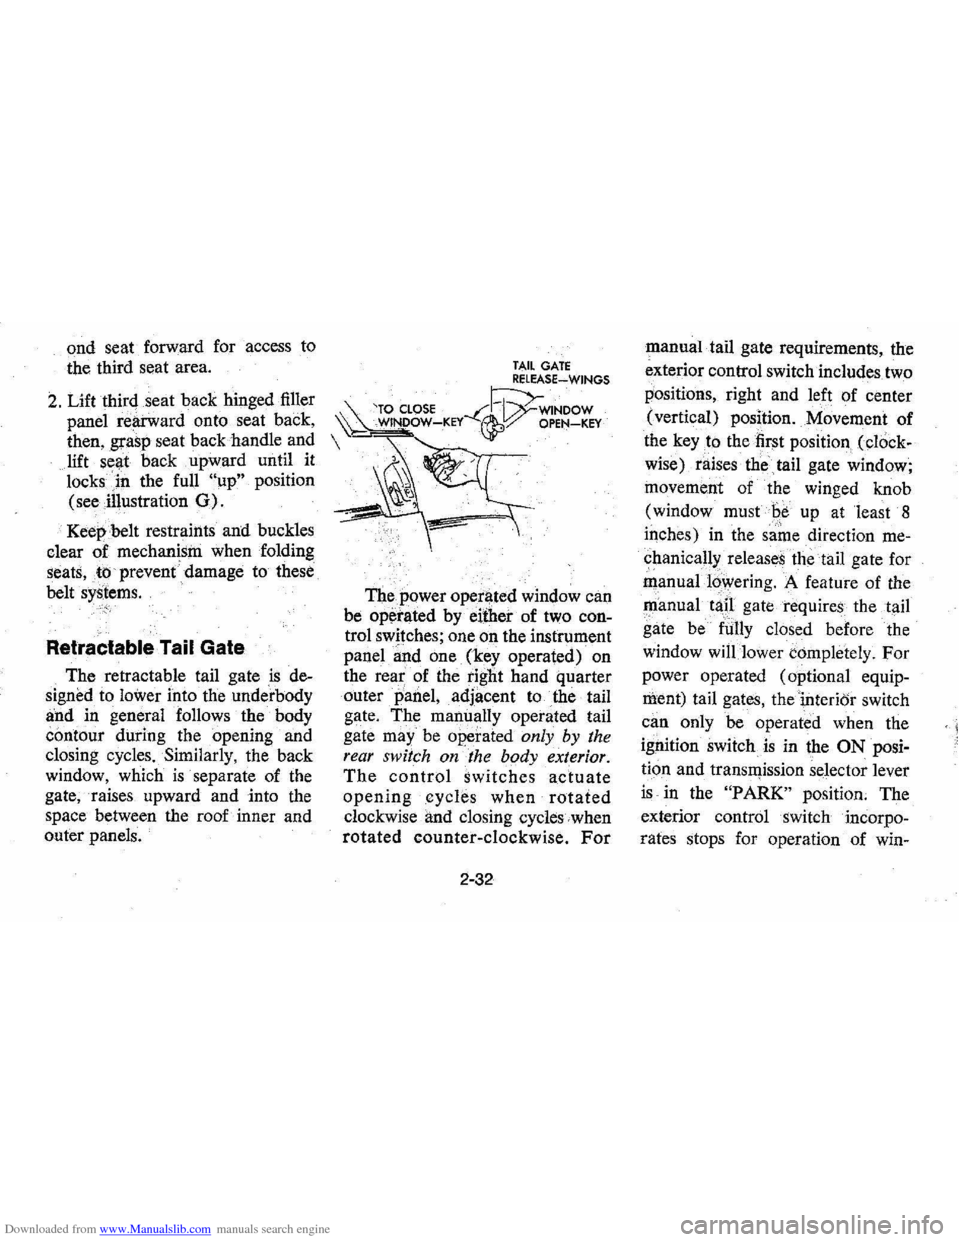
2. Lift third seat back hinged filler
panel
rearward onto seat back,
then, grasp seat back handle and
lift seat
back. upward until it
locks
in the full "up" position
(see illustration
0).
Keep belt restraints and buckles
clear of mechanism when folding
seats,to prevent damage to these
belt
systems. C·>·i
Retractable Tail Gate
The retractable tail gate is de
signed to
lower into the underbody
and in general follows the body
contour during the opening and
closing cycles. Similarly, the back
window, which
is separate of the
gate, raises upward and into the
space between the roof inner and
outer panels.
TAIL GATE RELEASE~WINGS
'TO CLOSE --C~WINDOW ~ WINDOW-KEY ~:/ OPEN-KEY
The power operl)ted window can
be
op~rated by either of two con
trol switches; one on the instrument
panel
~nd one (key operated) on
the
rea~ of the tight hand quarter
outer
panel, adjacent to the tail
gate. The manually operated tail
gate
may" be operated only by the
rear switch on the body exterior.
The control switches actuate
openingcycle.s when rotated
clockwise and closing cycles when
rotated counter-clockwise. For
2-32
manual tail gate requirements, the
exterior control switch includes two
positions, right and left of center
(vertical) position. Movement of
the
key to the first position (cl()ck
wise) raises the
tail gate window;
movement of the winged knob
(window must
Be up at least 8
iqches) in the same direction me
chanical!>: releases the tail gate for
manual16wering. A feature of the
~anual tap gate requires the tail
gate be
fUlly closed before the
window
will lower completely. For
power operated (optional equip
ment) tail gates, thei,nterior switch
can only be operated when the
ignition switch
is in the ON posi
tion and transll)ission selector lever
is in the "PARK" position. The
exterior control switch incorpo
rates stops for operation of win-
< I
Page 61 of 102
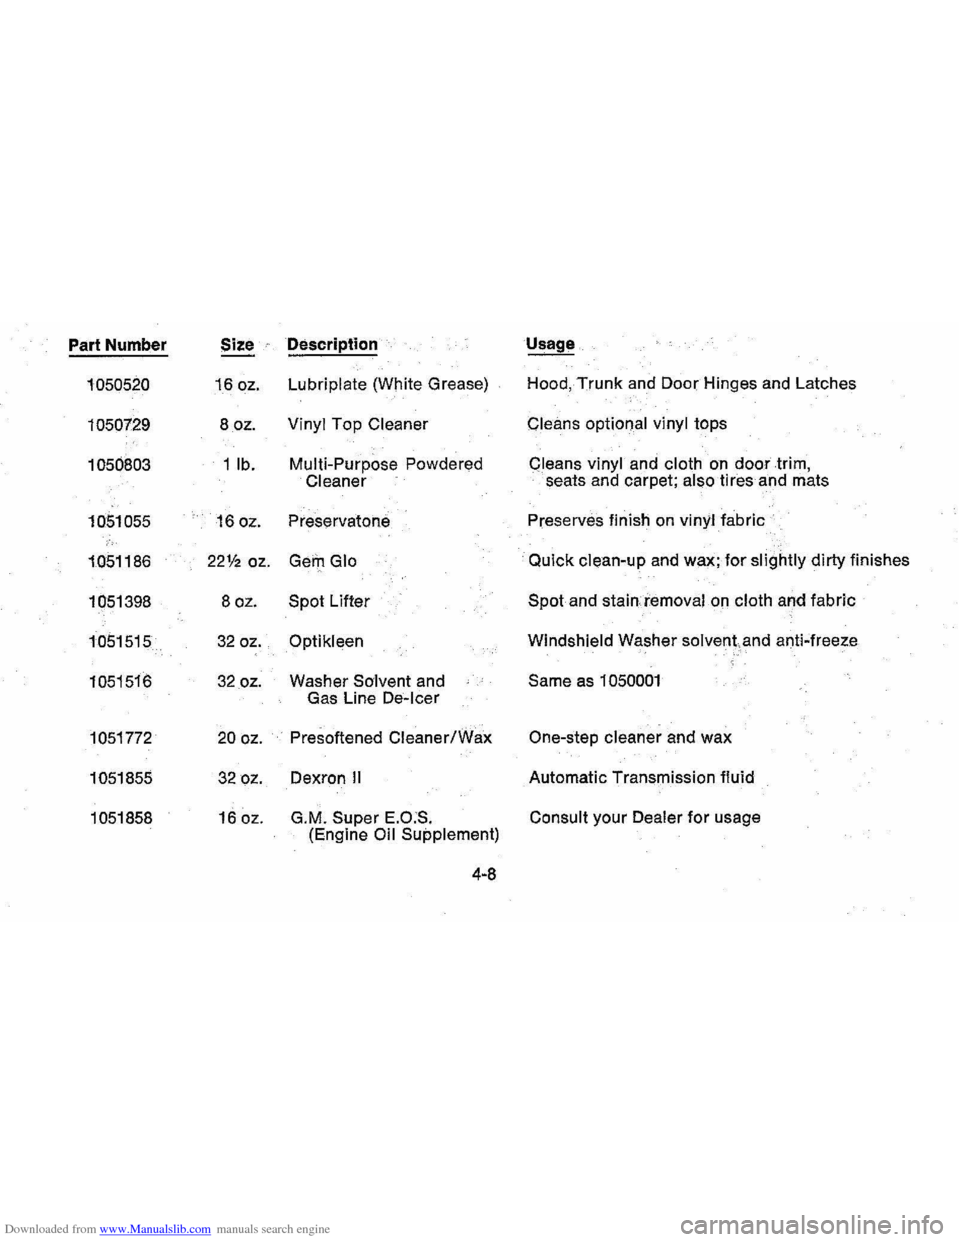
Downloaded from www.Manualslib.com manuals search engine Pari Number SiZe
1050520 16 oz.
1050729 8 oz.
1050803 1 lb.
1051055
16 oz.
1051186 22% oz.
1051398 8
oz.
1051515 32 oz.
1051516 32 oz.
1051772 20 oz.
1051855 32 oz.
1051858 16 oz.
Description
Lubriplate (White Grease)
Vinyl Top Cleaner
Multi-Purpose
Powdered
Cleaner
Preservatone
Gem Glo
Spot
Lifter
Optikleen
Washer Solvent and
Gas Line
De-Icer
Presoftened Cleaner/Wax
Dexron II
G.M. Super E.O:S.
(Engine Oil Supplement)
4-8 Hood,
Trunk and Door Hinges and Latches
Cleans optional vinyl tops
Qleans vinyl and cloth on door trim,
seats and carpet;
also ti res and mats
Preserves finish on
vinyl fabric
Quick
clean-up and wax; for slightly dirty finishes
Spot and stainiemoval on cloth and fabric
Windshield Washer solvent and anti-freeze
Same as 1050001
One-step cleaner and wax
Automatic Transmission fluid
Consult your Dealer for usage
Page 66 of 102
Downloaded from www.Manualslib.com manuals search engine TRANSMISSION ITEMS
Automatic Transmission
Fluid Level
Recommendations
Use automatic transmission
fluids identified with the mark
DEXRON®-II available from your
Chevrolet dealer
or local service
station.
Check the fluid level
at each en
gine oil change period.
Automatic transmissions are
fre
quently overfill¢
level
is checked when the fluid is
cold and the dipsick indicates fluid
should be added. However, the low
reading may
be normal since the
fluid level will rise as the fluid tem
perature increases. A level change
of over
% inch will occur as fluid
temperature rises from
60° F. to
180° F. (16° C. to 82° C.)
Overfilling can cause foaming
and loss of fluid through the vent.
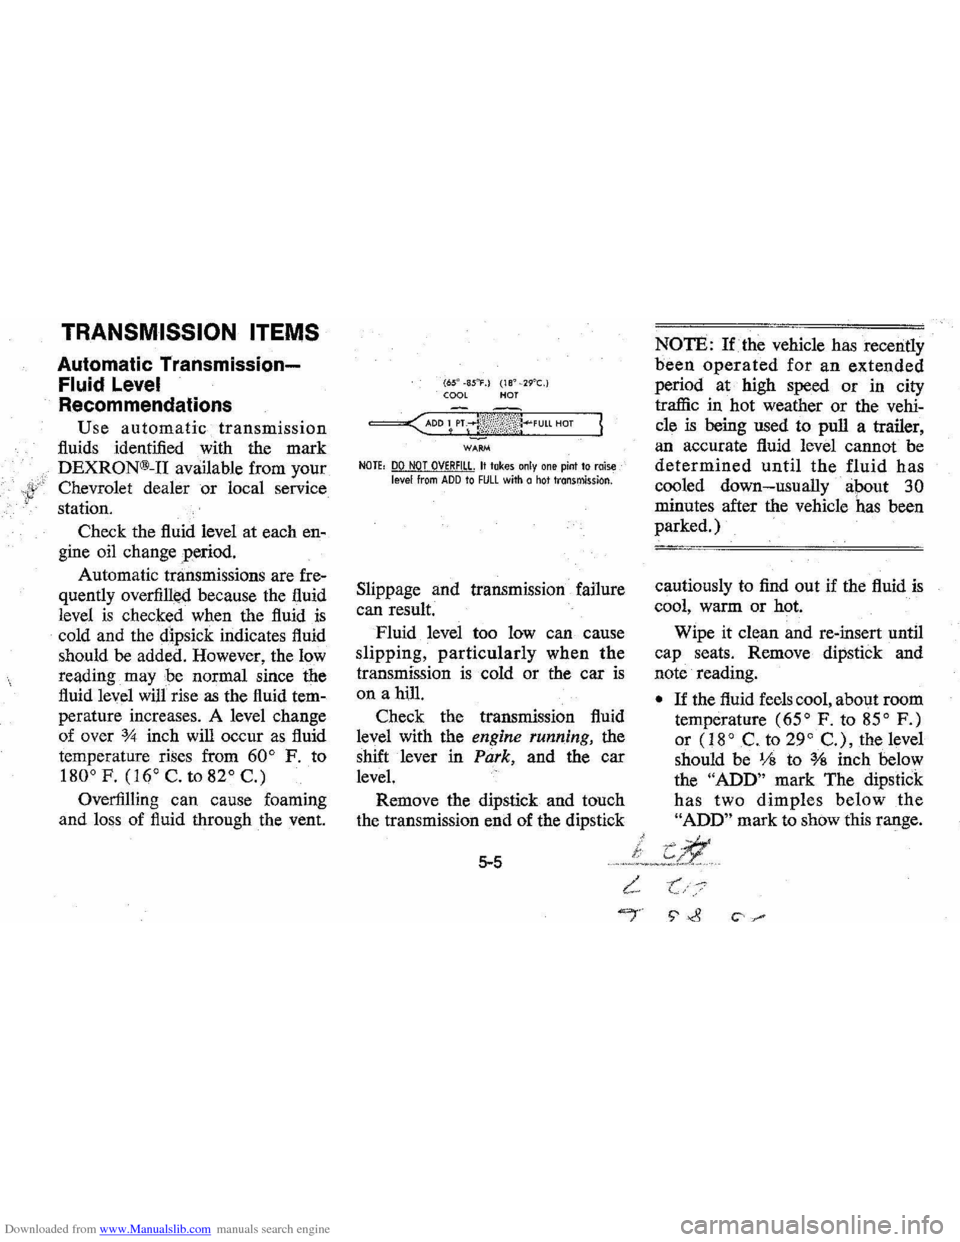
(650 -8S"F.) (18" _29°C.) COOL HOT
WARM
NOTE, DO NOT OVERFill. It takes only one pint to raise level from ADD to FULL with a hot transmission.
Slippage and transmission failure
can result.
Fluid level too low can cause
slipping, particularly when the
transmission is cold or the car is
on a hill.
Check the transmission fluid
level with the
engine running, the
shift lever
in Park, and the car
level.
Remove the dipstick and touch
the transmission
end of the dipstick
5-5
L.
NOTE: lithe vehicle has recently
been operated for an extended
period at high speed or in city
traffic
in hot weather or the vehi
cle is being used to pull a trailer,
an accurate fluid level cannot be
determined until the fluid has
cooled down-usually apout 30
minutes after the vehicle has been
parked.)
cautiously to find out if the fluid is
cool, warm or hot.
Wipe it clean and re-insert until
cap seats. Remove dipstick and
note reading.
• If the fluid feels cool, about room
temperature
(65° F. to 85° F.)
or (18° C. to 29° C.), the level
should
be 1;8 to % inch below
the
"ADD" mark The dipstick
has two dimples below the
"ADD" mark to show this range.
"'j' S' ~ c· "