1974 FORD CAPRI brake
[x] Cancel search: brakePage 156 of 205

) Chapter 9 Braking syste m 155
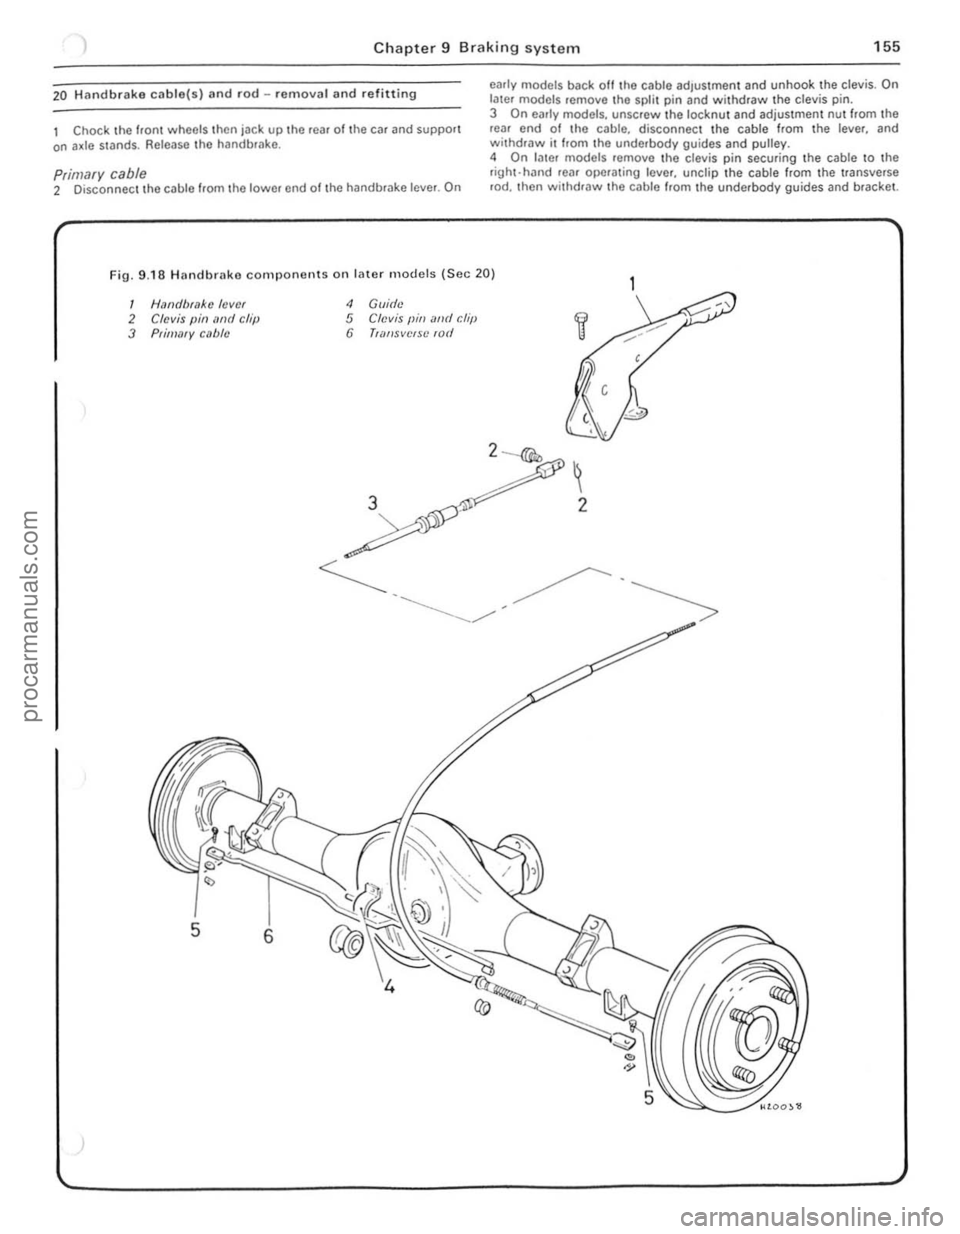
20 Hllndbrake ctlble(s) and rod -removal and refitting
I Chock the hon wheels Ihen jack up Ihe rea, ollhe car and support on a~le stands. Release tho handbfilke .
p,imary cable 2 Disconnect \heCllble flom Ihe lower end of Ihe handbrilke lever. On
c1'IIIy mOdels back 011 the cable ad,ustment and unhook the clevis . On latcr models remove the split pin and withdraw the clevis pin. 3 On early models, unscrew the locknut and adjustme nt nut hom the rOlll end 01 Ihe cable. disconnect the cable Irom Ihe lever, and withdraw it Irom the underbody guides and pulley.
4 On l
•
I HaN/brake lever 2 Clevis pin lIml chi) 3 Prif!!lIfY clIble
4 Gllidc 5 Clevis {lin illld r:hiJ 6 TWf/sveISC lOti
3
, , ,
, '. , /
·f
! I i ,
I:
!
1 1
i 1·
!
j j
procarmanuals.com
Page 157 of 205

,
156 Chapter 9 Brakin g syste m
Secondary cc1ble (early models) 5 Loosen 1I1c lock.nut ~nd unscrew the adju stment ferrule from the right-hand rear clevis.
6 Remove the split pin and clevis pin securing the secanda.v caulo \0 the left-hand Icar operating le ve l. 7 htrac the clip, remove the clovis pin. and withdraw the pullcy wheel from the lever on the Ical a~le. 8 Remove Ihe cable from the lever.
Transverse rod (later models) 9 Disconne ct the cable from the righi-hand rear opCfating Icvcr by
removing the split pin and clovis pin. to Uncl.p the cable hom the 'Hlnsvcrse rod . 11 Remove Iho spli, pin and clevis pin securing the fod 10 the Icft·h~nd le;!1 operating lever . 12 Slide the transverse rod Irom the guide on the rOM axle . 13 Check thO {luide bush lor wear and dama ge and renew It il necessary by prising il oul and pressing a new bush irllo POSilioll.
All models 14 Refining is a r e versa' of removal. but lubr icllto the lin kage as )scflhed in Section 2, and atljl' stthe cable as (fescri bed in Section 18.
21 VilCUUrll sorvo unit -dosCrilHion
A vacuum servo unit is linod Into the lir,lk e hydrallirc cil cu il. 111 series with I he 111,1S ler cylinde f. to provide assiswnco to the dllver whlln Ihe brake pedal is depressed . Thi s reduces the eHolI le{luired try the driller to oper,lIe the brakes, under all brak ing condi tions .
This unit operates by vacuum, obtained from Ihe indu ction mnni rold and comprises basicall y iI booster diilphragnl and check lIallle . The servo unit and hydraulic master cylinder are connected
t o gether so that th e serllO unit piston rod acts as the master cylrnder pUShrod. The driller's b rilking ellon is trilnsmitted through allot her PIi ShlOd 10 the serllO unit piston and ils built-in COmrol system . The scrllo unll pislon docs not fit tightly inro the cylinder. but has a strong ,lltl flhril!Jlllto ke el) liS edges in COllst ilnt COntaCI with I he cylinder Willi_
23 rilult diagnosis -hrilking system
~ylllptom
-'ceSSllle ped,,1 u;tllel
nrakcs pull 10 ono Side
Or;tke ludder
E~cessive eHor l to stop car
so ensuring an i1inigh t seal between the two parts, The fo rward
chamber is held undelllaCUUm condi tions cleilted in the inle t manifold of the engine and during periods when the brake pedill is not in use, the controls open a passtlge 10 the rear ch ambe ., so placing it under lIacuum conditions as well. When the b.ake pedal is dep.essed. the lIacuum pass.Jge to the rear chamber is CUI oH and the chamber expos ed to atmospheric pressure. The consequent rush 01 ail pushes
the servo piston lorward in tile lIacuum chamber and operates the main push rod to the m.Jster cylindcl. The controls are designed so that assistance is given under all condllions. When the brakes are 1'101 requ ired, vacuum in the rear chamuer i s .e -es tabl ished when the br.Jke ped.J1 is released . All air Irom the atmosphe.e entering tho rear ch.Jmbe. is passed through II sma ll air trlter. Und er normal opcr.Jting cond itions tho IIflC(IUm serllO unit is lIery relraule and does not require ollerhaul e~cepl at IIcry high mile,1geS. In this case it is far bcner 1 0 o bta in a serllice e~hange uni l. r,1the, than rcp;ti . the o,igi'lo11 unit . Although inlernal components we,e once .Jv'lIlaule 10 ' ovcrhauling purposes this service has no w been
d,scont,nue(t .
22 Vacuulll servo unit _ remOlla l MId re filtillg
I RemOIlO the master cylinder as desc.ihed In Section 10. 2 D,scolllwc l thc vacuum hose from the non·return lIalve on the serllo \lI1it. 3 Work i,,!) insido thc cal. remOlle th e lower l;t cia panel below the stccring column. 4 E~tractlhc clip and l)ul1 outlho clellis pin attaching Ihe push.od to the l ootu .ake ped;t!. 5 Unsc.ew the nuts securing thc mount ing b.ack.et to the bulkhead.
then withdraw thc serllo unit and bracket from the engine COlllp,lJtlnen t, 6 UnSClew th e nuts ar1(1 serlar,lle the braket 110m the SCIIIO uni, . 7 netrning IS;t rell e.sal 0 1 remOllal w ith leference .Jlso 10 Section 1 0 when retrumg Ihe master cylrnder.
Renson(s)
RC.Jr blake self adju sting mechanism faulty All i n hydrilulic system
WOIll or cont,llllina led /rnin{Js Seized Caliper or wheel cy linde r
E~cessille run-out or distortion of discs o. drums
Worn Of cont aminated linings Brake backplate or caliper l oose WOIll suspensio n bailloints
SerllO unit faulty
Worn or conwmin.Jted linings
I
J
procarmanuals.com
Page 163 of 205

162 Chapte r 10 S uspension and steering
)
Fin· 10.6 Front
@",.,i
, 5
Y 6
hub cOnll)oncnts (Sec 3)
12
1 0,1 seal 7 Diller be,?li/!{J Iwck 2 IIIlIcr bcaring wee 8 GUiN Iwmitlfl filct' 3 Inner bemiJlg /I,?ck 9 ThlllS! wilslwf 4 Screw 10 NIII 5 Disc 11 Sf"il (lin 6 H", 12 01151 C.1jJ
4 Remove the split pin frorn the nul rC\;linCf and undo the adluS\ing nul from the stub a xle. 5 Wilhd,nw the thr ust washer and the outer tapered he,..ing. 6 Pull off the complete hub ;111(1 disc ilsscrnbly ffOIl11hc s tuh tlXlc. 7 To refit locale the huh tlSscmb ly on the stub il~lc <'Ind slide on the outer hc"rinu nnd II1
1 0 Rei" the nut ret;)u)Cr SO th~t the spill pUl holes ~re ~lIg"ed. Fit a
v split pin
2 Cmelully prise out the gre.lse senl Irom the b~ck 01 the hub
Scoop out the grease 110m inside the huh imd wash clea". S Drive the new bearing tr
glease well into th e beiu ings. lully p
Front Suspension strut _ renl0v
Apply the handbrake then jack up the Iro"t of thc car ilnd SuppOrt r ViC S\Jnds, Remove the roadwheel.
.lel1love th e front hub with referen ce to Sec lion 3,
56 Front SllSI',,"~'nll Slrut uppe, moullt"l{j
5.7 Lowellnl) 110" f'o"l SUSrlt''' S'OIl ~lr"tlro"'ll"der the wheel a,ch
I !:'~
!; ... ~
-;;
3 On e~rly n,,,dds. Icmove the "\lI d brake p'pu ""d dew ch Ihe flex'hle hose 1,0 '" the br.1ckct on thu strut (, f neccssilry ruler to Ch"p ll'r 9 ).
4 OlsconneClilHlu.u:k rod l'nd from the steer;ou n'm (Sect ion 14) 5 Extrncllhl' spirt p,,'
tool.
6 Workrng Ul1d'; r Ihe bonnet. un screw the three mounting nuts sec(Jl iog the 51'Ul 10 the wheel arCh (photo). Where applicable note the location 0 1 Ihe ilce ele r" tor cnble Slipporl bracket be ne3th one of the
nulS .
7 Lower the stru t ~ssembly from undl'r the wheel arch (photo).
8 Refll,!n\) '5 i' reve rsal 01 removal. hut ti\)htcn all nuts 10 Ihe
specified torq(,e fl"fe r 10 Section s 14 and 3 as necessary.
6 F ront coil sp ring - removal and refitting
Note: In Off"" /0 ,(:mo ve Ihe corl .~"{!finy ffOIl! the strut it writ be neccssa,y /0 ub/."" .1 sui/able sP"".
Page 164 of 205

Chapter 10 S uspension and steering 163
~~--,,$iJO
~~\~
Fig. 10.7 Coil spri n g compressor lOo ls (Sec 6 )
\.
FiU. 1 0 .8 C o rn pressi nu the frOllt Goil spring ( S ec 6)
~ " / ron t stobiliser bar clamp mountrng
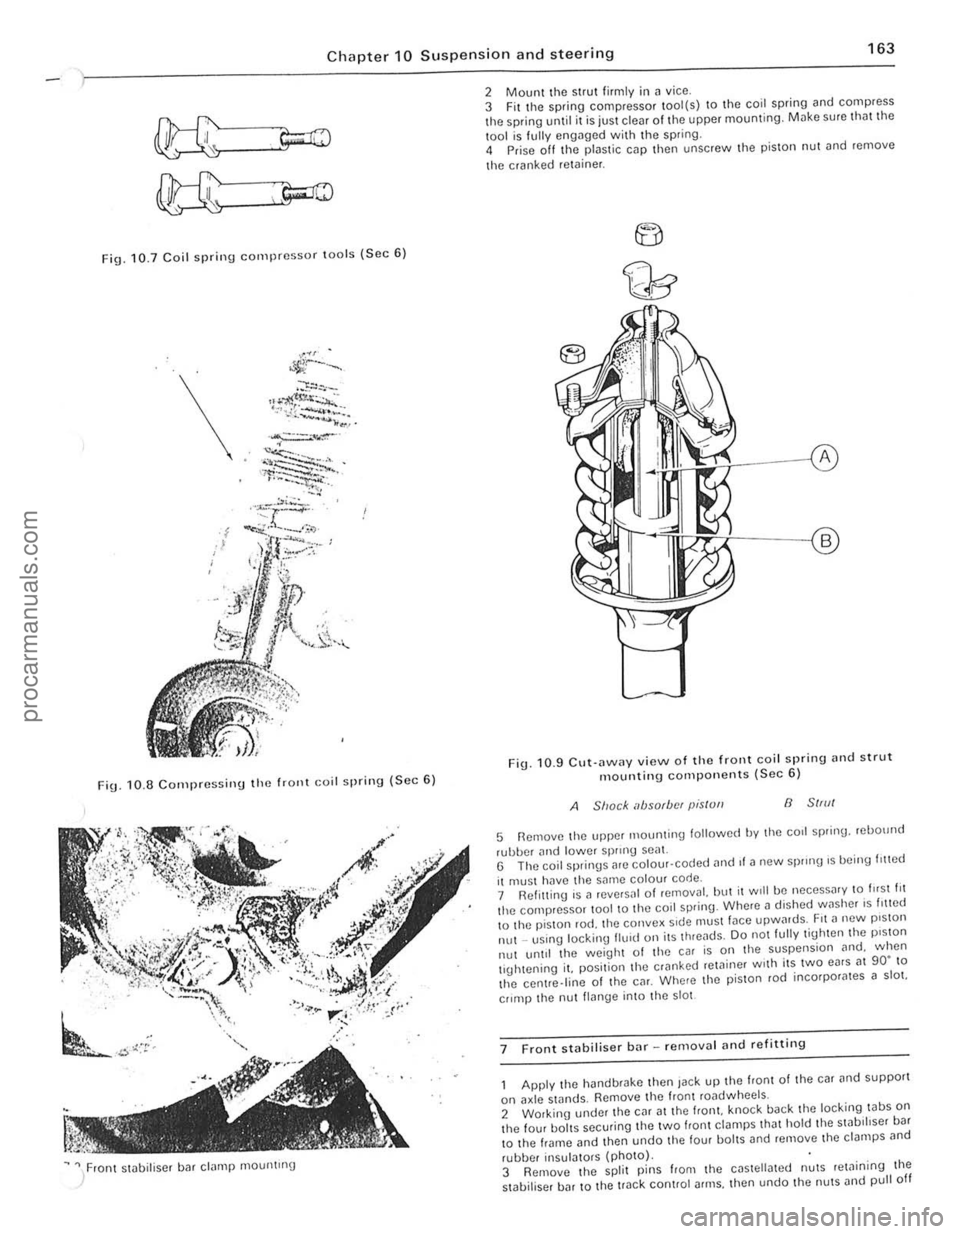
2 Mount the strut firmly i n ~ vice .
3 Fit t he spring compressor tool(s) to the coil spring and compress the spring until it is juSt clear of the upper mounting. Milke sure tho t the
1001 is f ully engilged with the spring.
4 Prise off Ihe plastic cap then unscrew Ihe pis ton nut ~nd remove
t he cranked
retoiner .
F ig . 10 .9 CU\·
ilWilY view o f th e front coil spring nnd strut mountin g compo nents (Sec 6)
A Shack absorbfN pis/ull B 51,,11
5 Remove Ihe upper 1110unling lollowed by Ihe corl spring. rebOllnd
rubber and lowe r sprrnU seal. G The coil springs are colour· coded ,1nd II a new sprong 's being I,!led
il muSI hilve the same colour code.
7 Ref itting is a reve,sal 01 removal. but il Will be neceSS
lhe centre.line of Ihe CM. Where the p iSlon rod incorpor
II~nge into the 5101
7 F ront stabiliser bar -removal
he hand brake then Jack up the front of the car and supporl
on axle stands. Remove Ihe fronl roadwheels.
2 Working under Ihe CM at the Irani. knock back the loc king tabS on the four baits securing tile two f,ont ct~mps Iha t hold the swb,hser ba r
t o the frame and then undo t he four bol tS and remove lhe clampS
,
I " I , ,
j
!
procarmanuals.com
Page 190 of 205

-
) Chapter 11 Bodywork and fitting 189
/~
32 8A I',,~c 0111 Ihe alp 32 an ali(I ,(,mo .. c the console screw 329 Removing the hnndbrake lever boot find be~el
Fig.n.la C lock ro:.,,"ov
32 Centre cOIl~ole·· fUIllUV,,1 ,,,,d refiUinu
IJasic tYlle '.111 Ihe caqll:l 110m ;!lolllni the r'OIlI of t im t:()Il~()lo, thun push the " .J
33 Sunroof piln el -ndjustments
Gap adjustment 1 When closed. a Unp of 5 8 10 6.9 mm (0.2310 027 "') should eXI~t hetwecn thc slIn(oof and (h e CM rool. II;) vmyl roof cover IS lilted. Ih,s gap should he reduced by 1 .78 mm (0.07 Ill). If adlllst'!\(Jnl IS requued. pwceed ns detaIled below. 2 With the sunrool hall open. remove (he sunrool heildhlunll hnlne 3 Close the sUllfool. then pull Ihe hei!dhnll1H hOIll (he Ie." and remove ,I. 1 To ndlust the hOnl 01 the sumoo!. loosen the front Uu,de relillnu1U screws. then whIlst p,essu1!J (he Uuitles IIlwilrds. lighten thc screws. 5 To ;)d,ustthe rear. loosen (he twa h.II1!) screws nt eneh Side of the ,1dlustinU hnsc. thcn p,ess (he reilr shdes mw,uds ,1"d t'Uh!Cn . 6 F,t the hCildllmn(J and hemU",,,,U h,,,ne 7 lithe ild)lIsunenl is slill Incorrect. ,emove (he we,l\hel$I"p from Ille rool panel ;)11(1 hend ,IS mountll1g lIange as necessary
.,.,.'~ ..... ,,--...... ;;
• · .. ···"'·' -·0 . .'--
,"·""",-- 'r
FiU 11.19 Sunroof controllllechanism (Secs 33. 34 and 35)
, . , , , ,
I
,j
procarmanuals.com
Page 199 of 205

)
Index
A
Accelerator cilble removal ilnd refining -14 shnft ilnd pedal removal and refining -75 Air cleaner removill Jnd ref,nrng cal buren or mod cis -68 fuel injecllon models -80
P rnator .,rushes inspecllon. removal and refilling Bosch -202 Femsa -203 Lucas - 202
dismantling and rcassembly -203
removal and refining -201 Antifreeze mixture -60 Automatic transmission descrip tion -122
B
downshift cable removal. refi11ing and adjustment -121 extension housing oil seal renewal -121 faull diagnosis -127
maintenance. routine -123
removal and refOlting -123
selector mechanism ildjustment - 126 rcmovill. overhaul ilnd refl11lng -125 speclflf:iltions -103 SI.1r1er IIlh'bilm/reVerse lamp switch remov
demister
noules reOlov
doms-178.180. 18210 185 face level vents removal and refItting -197 facia panel -188 fuel filler flap -188 heater -192 to 194. 196 10
uphOISlCry
and carpets -176 mirrors
-
192 open rem quarter glass assembly
removal and refitting -186
re~r qllMlcr trim panel removal and refitting -185 repi'lir millor damaue -178 minor damage -176 sent belts -191 seats -192 sunroof-189la 191 lailgate -180. 187. 188 torque wrench scuings -173 windscreen -180 Bodywork repair sequence (colour) -174, 175 Bonnet release c
Camshaft (3.0 litre engine) retitting -54 removal -50 Camshaft and camshaf t bearings examination and renovation 2 _8 litre engine -35
3 .0 litre engine -51 Camshah and front intermediate plate (2.8 litre engine) refilling -41 Capacities. general -6 Carburetlor (Weber) aulomat ic choke
adjustment -71 removal. overhaul and retitting -71
dismantling and reassembly -69 general -68 idling adjustment -73
procarmanuals.com
Page 200 of 205

)
rernoy .. ' and refl Uing -69 spcc,'iC
(IlIvchells
G3 e~p:mSloll I nnk 6<1 Ian hub l)()nllllH (30 hilI] 1110<1111,;) 64 f~ull (II;)Ul1osl~ 65
flll".U -
60 lIush"'9 59
",nmlen,lncc. roullllC 59
'ild,nlOr
GO speclficn llon5 57 lem,)er;!lurc unuuc Sf:n(Ie. unil -134 IhcrmOSl<11 -61 10Htlle wrench selll ngs 57 VISCOUS drlv\! 11'111 -63 W1)ler IWIllP 61 Crankca se ventiln tion system 2.8 tol'c engine -39 3.0 rillC engine 53 Cranksh1)ft 2.8 li l.e engine examinat ion nnd rcnoviuion -37 refilling -<10
3 .0 til.e cn gine examination lind renOV1'l110n -52 Crankshilft and main bearings (3.0 litr o engino) removal -51 Crankshllft pulley refitting (2.8 hIre engine) -44
removal ( 3 .0 litre engine) -50 Crankshaft r ear oil seal (3.0 litre engine) .efllling - 55 .emova l -51 Cylinder bores ~xaminalion and .enovation -36. 51 Indo r heads 2.8 titre engine dismanll ing .• cnova lion and .eassembl y -35
Index
D
refining - 45
3.0 litre engin e
. eassembly -55 refining -55 .emoval wilh engIne -49
removal wil h engine in car -49
Decarhonising -52 Dimensions. vehicle _ 6 Dim-dip lighting system _ 226 Disc br1lke s scc Front disc brakes Distributor overhaul 2.8 hlle engIne -93 3 a !r1l0 cng,ne -92 rcmoval and r efIlling _ 90 Doors eXle.io. hllndle ,emoval and refilling - 183 lock 1Issernbly removal and .efilling -184 pillar swi lc h -224
priVill e lock ,ernovill and ref'lIing -185 fnllics tracing nnd feCllik al ion -178 remOle conlroi hnndle removal and refilling -180 Hlmoval and rell\1l11g _ 185 Irim j>ilnel removal and ,efi ning _ 182 window Irnm c
moul(II ng nnd door wealhcrSlrips
removal and refining -185 rcmoval and relining -185 wmdow glass removal and retilling - 184 window regulnlor nssembly
r emoval and relilling -183 Drivebelt s .emov,,1 ilnd refil ling -63 Drum brakes sce Renl drum brakes
E
Eloc triclIl.system -198 e/ seq Electrical systcm altell11110, -201 10 203
ilu xiha.y driving "ghl -212 bmlery -200. 201 bulbs -199.21310217 ciga. IighlOf -225
clock -223
d escrip llon -200 dim-dip ligh ling syslem -226 laull diilgnOSIS -19. 233 ""sher unils and rel1lys -225
fuse s -199. 220
headligllls -211 10213 horn -220
inSI.ument clUSler -22 1 inSI.ument vollage .egula lor - 226 Inmp5 -21410217 mninlenance. fOUline w 200 mobite r"dio equIpment - 226
precautions - 200
rildio /casse tte player -226 specif ications - 198
speedomeler cab le -226 Slmte . mOlOr -207 swi tches -223 10 22 5 lailgall) wash er -217 laHgme wipef -217 to.que wrench sell ings -199
w indscree n washer -219 windscreen wiper -21810 220 wi.ing diagrams -235 10 249
25'
Ii
procarmanuals.com
Page 202 of 205

inlet manifold - 83
main system components remova l and refilling -80 m~intenilnce, routine -79
specificiltions -67 to rque wrench settings -67 Fuel pump carburettor system cleaning - 68 re moval and refilling - 68
testing -68
fuel inject ion system removal and refining -80 Fuel system (carbureUor) accelera tor cable -74
accelerator shah and pedal - 75 air cleaner - 68
carburetlor -66, 68 to 73
description -67 e~ haust manifold - 76 lault diagnosis -85 luel pump -68 fu el wnk -73, 74 fu el lan k fille r pipe -74 fuel tank sender unit -74 inle l manifold -75 mainte nance, routine -67 specifiCiltions -66 torque wrench senings - 67 Fue l tank cleaning and repai r -74
filler pipe removal and re fi\ling .-74 remova l and refilling -73
sender uni t removal and ref il\in g -74 Fuel tank sender unit (fuel injection models) -83 Fuses
G
general -220 specifica tio ns - 199
Gearbo~ see Manual gearbO K Gudgeon pins - 37. 52
pdbrake adjus tment -153 cable(s} and rod removal and refilling 155 lever removal and refitting -154
warnin g hght switc h -225 Headlights alignment - 212 assembl y: removal and refilling ~ 211 bulbs renewal-2 13 Heater assembly: diSI11(lntting and reassembly 8ehr - 19 4 Smiths standard and heavy duty -196 assembly: removal and ret.tting -193 contlols
adjustmen t -192 removal and refilling ~ 1 93 water valve (heavy dUly heater)
removal and re fitting - 193 History o f tho nlodal-5 Horn faul t tra cing . remova l and refilling -220 Hubs, front
bearings renewal -162 removal. ret lu in g and bearing adjustment -16 1 Iraulic systam (brakes) bleed ing - 152 pipes and hoses removal and refilling -151
Index
Ignition switch and lock -224 Ignition system -87 el seq Ignition sys tem amplrlier module (2 .8 l i\(e mode ls)
r emova l and refilling - 94
condenser (3. 0 litre models) -90 COntact bre aker points (3.0 litre models) - 89
description -88
dis tributo r -
90. 92. 93 fau lt diagnosis -96
firing order -87 mainteMnce. routine -88
spare plugs - 91. 95 speci fications -87
t im ing -94
torque wrench settings -87 In strument cluster ill umina tion switch -224 removal and refitting _ 221 Instrument voltage regulator removal and refilling -226 Interior lamp and bulb
removal and refilling -217
J
Jacking -7
L
lubricants and fluids recommended - 17 lubrication chart - 17 lubrication system
M
2.8 litre engine -39 3.0 litre engi ne -53
Main and big·eOld bO(lrings e~amination and renovation -37, 52 Main bearings (3.0 litro engine) removal - 51 Maintenanco , routine bodywork and fillings d oor ch ec k straps security check - 16 locks, door chec k Straps. tuellilte r C
h andbrake linkage lubricat ion -16, 144
h ydraulic fluid levul check /lap up - 16 . 143 hydraulic flu id renewal -16. 144
line s and hoses check -16
pads ilnd shoes we." check -16 , 14 3 servo check -16 . 144 vacuum hose check -16 Clutch adjustment chock -16, 98 cooling syslem
coolan l leve l chec k/top up -16, 59 coolant renewal -16, 59 drivebelt condl tion/wnsion check -16, 59 leaks check - 59 electrical system
ballery elec tro lyt e leve l cheek /top up - 16. 200 equ ipmen t opera tio n check -16. 200 headlamps cleaning -16
253
'i
'" , '.;.l
•
procarmanuals.com