1974 FORD CAPRI brake
[x] Cancel search: brakePage 146 of 205
) Chapter 9 Braking system 145
/ll.Iid reservoir tille , cap \0 help roduce any fluid loss. 4 Where a rigi d brake line is connec ted \0 the calipe r, comple tely unscrOw the union nUl . Where Iho flex ible hose is connected directly \0 Ihe caliper. loosen only .he union (lnd unscrew Ihc caliper f.om Ihe
hose later. S Prise back the laus on the locking plale and unscrew Ihe mouming boilS (photo). The cJliper may now be wit hdrawn ove r th o disc and where neCessary unscrew ed from Ihc flex ible hose, 6 Refilling is a revCfsal of fernOv;!I, but lit a new locking plate and
l ighten the mouming bol ts \0 the specified torque. Bend the Inbs \0 Io<:k I he boils. On comple tion bleed the hydwulic system wit h
reference \ 0 Sec tion 15.
5 Front brake caliper -ovorlulU l
1 With the c~liper removed . cle~n away all external dlr1. 2 Where applicable, prise out the dust cover cirClips
IrOIl' lho bores. 4 nove tho dust covers Irom the pistons or bores as apphc
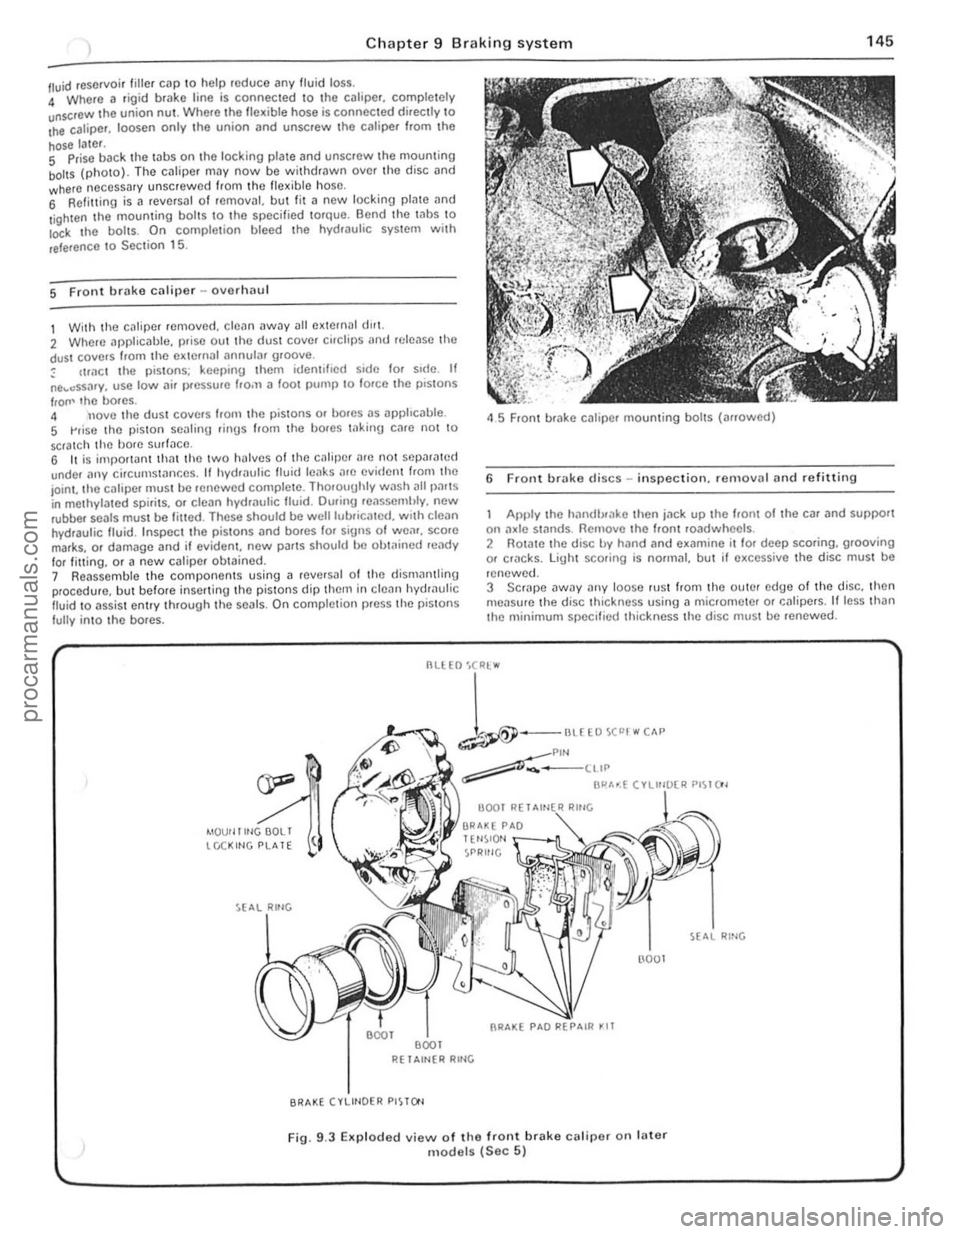
45 Front brake caliper mounting bolts (arrowed)
6 Front brake discs -in spection. re rnovnl and refitting
Apply the hilndlxake then jn ck up the hom of the car and support on :1xle st:1flds. Remove the Iront roadwheels . 2 Rotate the disc by hand and examine il lor deep scoring, grooving or cf1lcks. light scoring is normal, but if excessive the disc must be
renewed.
3 SCrJpe
--
1-""£0""""" ~Plf'l ~-____ ttIP
BI"'~( ".",~"" PI~I()'
4IOUf llltlGOOLI tCCKltlG PLATE
R( 1 Altl{R RltlG
BRAKE (VLIHOER PISTO'l
(l001
Fig. 9.3 EKp loded view of the front brake calipe( on fater models (Sec 5)
RING
., .,
,
procarmanuals.com
Page 147 of 205
Chapter 9 Braking system
4 Note that in order to m,lintOIll even braking both discs should he renewed ill the sal1 1 e lime
5 T o remove il dl~c. first remove the tHlb as described in Chllpter 10 . 6 Prise lip th(J locklllU I"hs. unscrew the fOlll bolts. and remove the disc from Ihe huh.
7 Clcilll the Illllirnu !ilces of the disc and hub then locale the diSC on the huh and allgel the holt holes.
8 InScrt new holt~. tOI){)ther w rth new locking plates. and tiuhten them to the specrfre(1 torque_ loc k b y bending the tabs. 9 Th e huh Illily now he ref Illed with reference to Chapter 10.
7 ReM hrake shoes -rt)rlewal
Check the front wheels th!:n lilck up the rem of the CM lind support on ,1~le stands. Rel(,a5e Ihe handbr,lke lind femove the reM roadwh~~els
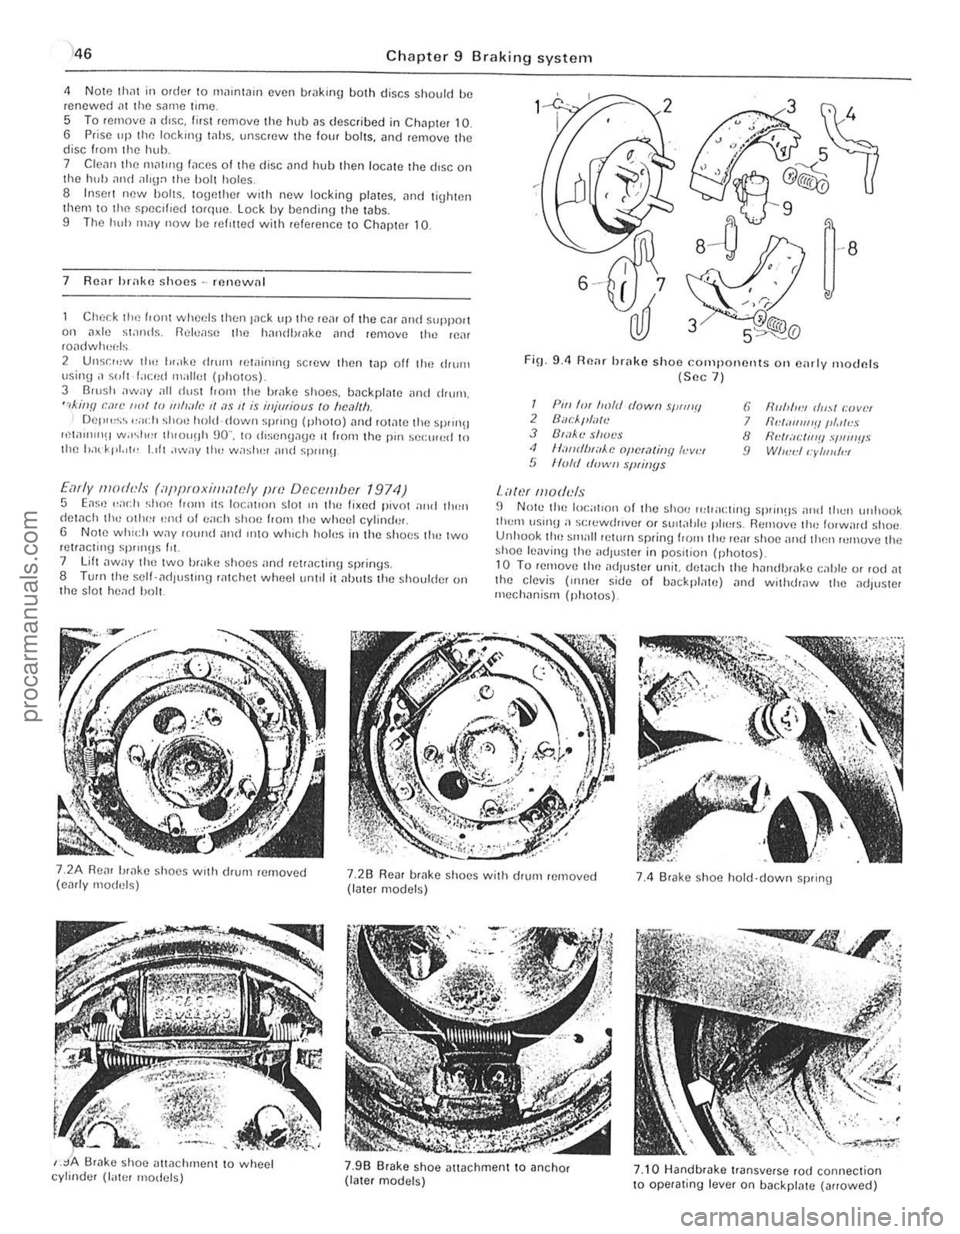
2 Unsr",w th" I"ake drum lewinrnu scrow then t.1p off the ,IIurn \Jsing ;I ~"It f.lced milliet (photos) 3 Barsh away all dust I.orll the brilke shoos, backplate ilnd drum, ",killfl can' ""I /0 11111""., II ;I S 1/ is iHjmiaus to "e,11Ih Del""~~ ,,;och shoe hold-down sprrng (photo) ,lnt! rOt,lte the sprrn!! ",w"nIlH w.r~I"" th,ou!lh 90" , to rhsengage ,t from the pm sel:rr",d 10 Ihe had' pt. 'I" 1.,11 ,"wily 1Ill! w;'shel and spm}!J
Early moth'ls (iippmxilllawly pm Df!c()tllbcf 1974) 5 Eas,) .. ad} shoe loom ,t~ loc;rllol1 slor III the lixed pivot nrrd tllen detach th,-othe! '~nd 01 ea(.11 shoe f,om the wheel cylind'lr, 6 Note whld, W.1Y fOwul and IIltO which holus in the s hoes tlH~ two retracting sP""Hs Ill. 7 lift ,lway t ho two brake shoes "nd retracting springs. 8 TUf(lthe self- ad lust'ng ratchot wheetum,1 it alJuts the shoulder on t he s lot head bolt.
FiO_ 9.4 Renr brake shoo components Oil e,lrly moclnfs (Sec 7 )
I Pili 'm froft! dowII sWIIIII 2 Buc/."liTlt! J B',l~'l! shot's <1 II,-IIIrflHiiAe opcra/jllY h-v", 5 lIo/d d"wII slNil/ys
Lawf lII oduls
6 fir"",,:, (/",,1 r:lJvlH 7 IId;III1I1'!IIII.llr!S 8 flNr;Il:IIl'!! .,'I,"IIIIS 9 WI",,:II:yllJldl!l
fJ N Ole the local,on of the shoe 1"lpacl,no sprrll!ls nrld thell unllook tlwm \lSUl!l a s(;lewrh,vef or SUil;!tJle plo~"s. Remuv,) th" lorw,lrd shoe Unhuok tho small pelurn spring loom the reill shoe and then rumuve the shoe lenvinlJ the adJus!Cr in pos,tiol} (ph o tos)_ 10 Tu remove tim adjuster unit. del
,
j
procarmanuals.com
Page 148 of 205
Chapter 9 Braking system 147
Br;'lke IlIlInU
Wheel Adjustment
"m
cylinder --·-·_.L
-::'~~:.J/
I
'j
~
l
~
• shoe hold down spring/pin
Br.lke shoe
Fig. 9
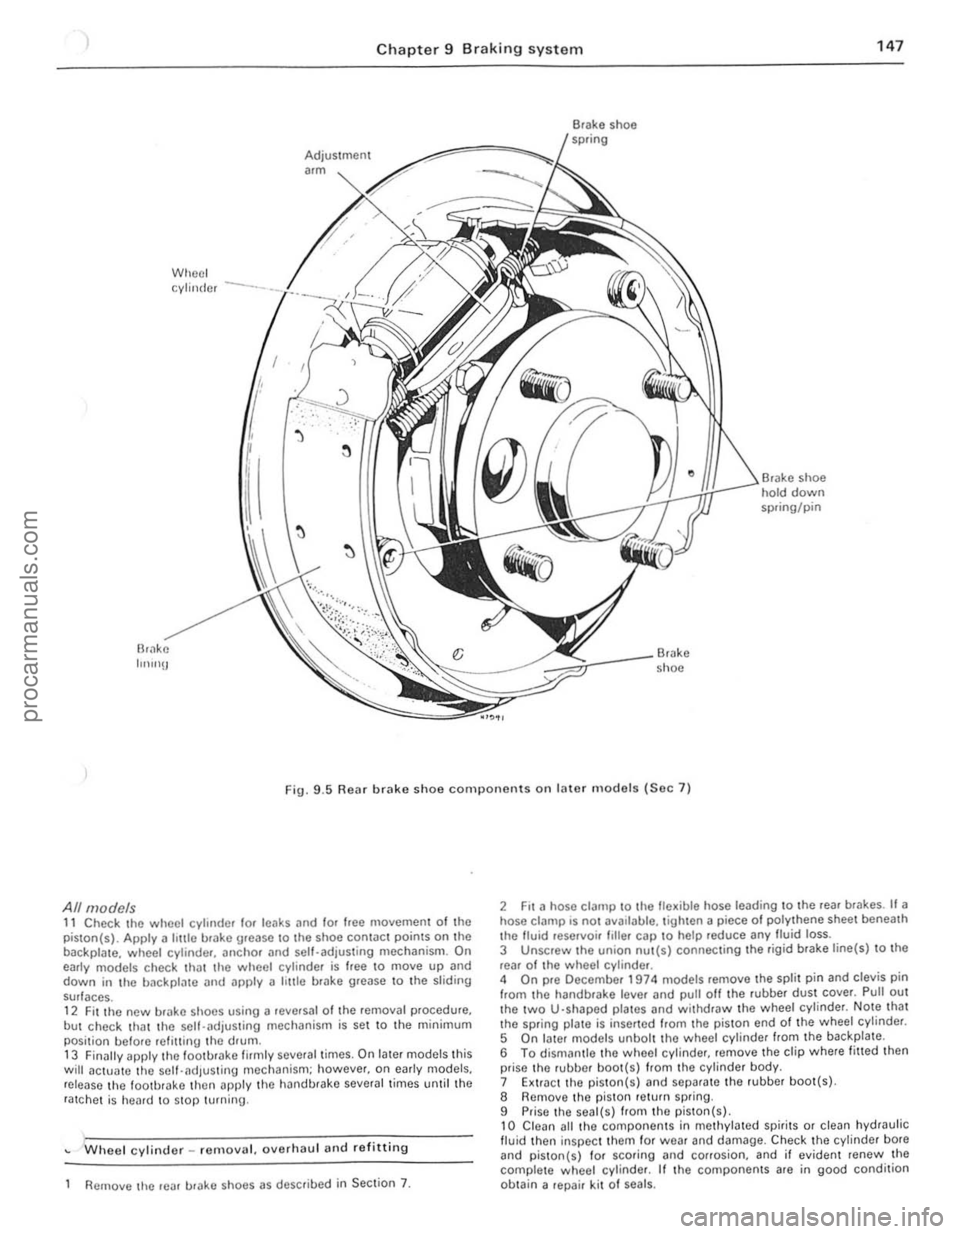
.5 Rear brake shoe components on later m odels (Sec 7)
All models 11 Check the wheel cylinder lor leaks and lor Ioee moyemen t of the
piston(s). Apply a hule brake urease to Ihe shoe contac t points on the
backpla te. wheel cylinde r, anchOr and sell-adjusting mechanism. On
early models check th
but check that the self-.. djusting mechanism is set to the minimum
posi tion belore refilling the drum .
13 Finilily apply lhe loo tbrake firmly several times. On later models this will actua1e the self-adjus ting mechanism; however. on e
Wheel cylinder _ remo yal. oyerhaul and re fitting
Remove lhe rear urake shoes as described in Section 7.
2 Fit a hose clalllp to the fle~ible hose leading to the reaf br .. kes. If a hose ci
5 On I.ller models unbolt the wheel cylinde r from the backplate .
6 To dismantle thO wheel cylinder, remoye the clip where fitted then
prise the rubber boo t(s) from the cylinder body.
7 Extr.lct the piston( s)
9 Prise the seal(s) from the piston(s) , 10 Clean all thO compo nents in methylated spirits or clean hydraulic fluid then inspec t them for wea r and damage. Check the cylinder bote and piston{s) 10f scoring and corrosion. and il eviden t renew the
complete w heol cylinder. If the components are in good condition
ob tain a repair kit 01 seals.
i.
i I
II
j
I ;
procarmanuals.com
Page 150 of 205

1 Chapter 9 Braki ng system 1 49
,1 M aste r cylinder -overhaul
With tho m
recuperating valvo. Oepress Ihe primll'y piston during Ihis procedure. 5 Exl.;'!ct Ihe primary and secondary pistons. IOgether wi,h their associated components. noting Ihe order of lemOlln l. H nccessary top Ihe master cylinder on a block of wood or use air pressure from il foot pUIllP through the inlel porlS. G Separate rhe primmy ,10d secondary l)is10 11S irani lha intermediilte
sprinu . Uso tho !inUe.s 10 remove tile Ulilnd seDI from the primil'Y
r""' lon .
The secondil'y piSlon assembly should ho sOfh"ated by lilting the u"mblo leaf ove , Ihe shouldered cnd 01 tho viston . Using the lingo,s.
rr 'wo the se
9 Dotach lhe villve space ,. tilking c
master cylinder on a block of wood or use air pressure from a 1001 pump through tho inlet ports. 12 Prise the seals from the pistons, nOling which way round they are lilled. then il necessary remove tho springs and seals. The prima ry
pis ton spring is retained by a screw.
Both types 13 Clean all tho components in melhylated spirits or brake fluid then
inspec t them for wear and damage. Check the cylinder bore and pistons for scorinu and corrosion. and if eviden t renew the complete nI
1
2~
3~
13
1
2
3
4 5 6
7 8
R
22
21
Fig. 9
.8 Exploded view 01 the Girlin g master cylinder (Sec 11)
Filler cap 9 Seal 16 Secondary piston
Seal 10 MaSler cylinder body 17 Seal
Seal !Clainer
11 WiJslrer 18 Rell11i1er
Fluid reservoi r 12 Reservoir relaining screw 19 Spring
Seal
1 3 Seal 20 Spring fl/Miner
Relainer
14 Primary piSlon 21 Valve
Primary fCCllpCfaling valve
15 Spring 22 Seal
Circlip
10
!
" 1 ,
1
I
!
!
I ,
J
,[
1
I
I
; .
!I ' i ;.
procarmanuals.com
Page 152 of 205
-
)
Chapter 9 Braking system
,,-
")_'J ,
: ~~ 11111JIII/IIIJ II /I /III Ii hIIllllIlIlIllllIlll 11111#111111 III! -------
8
9
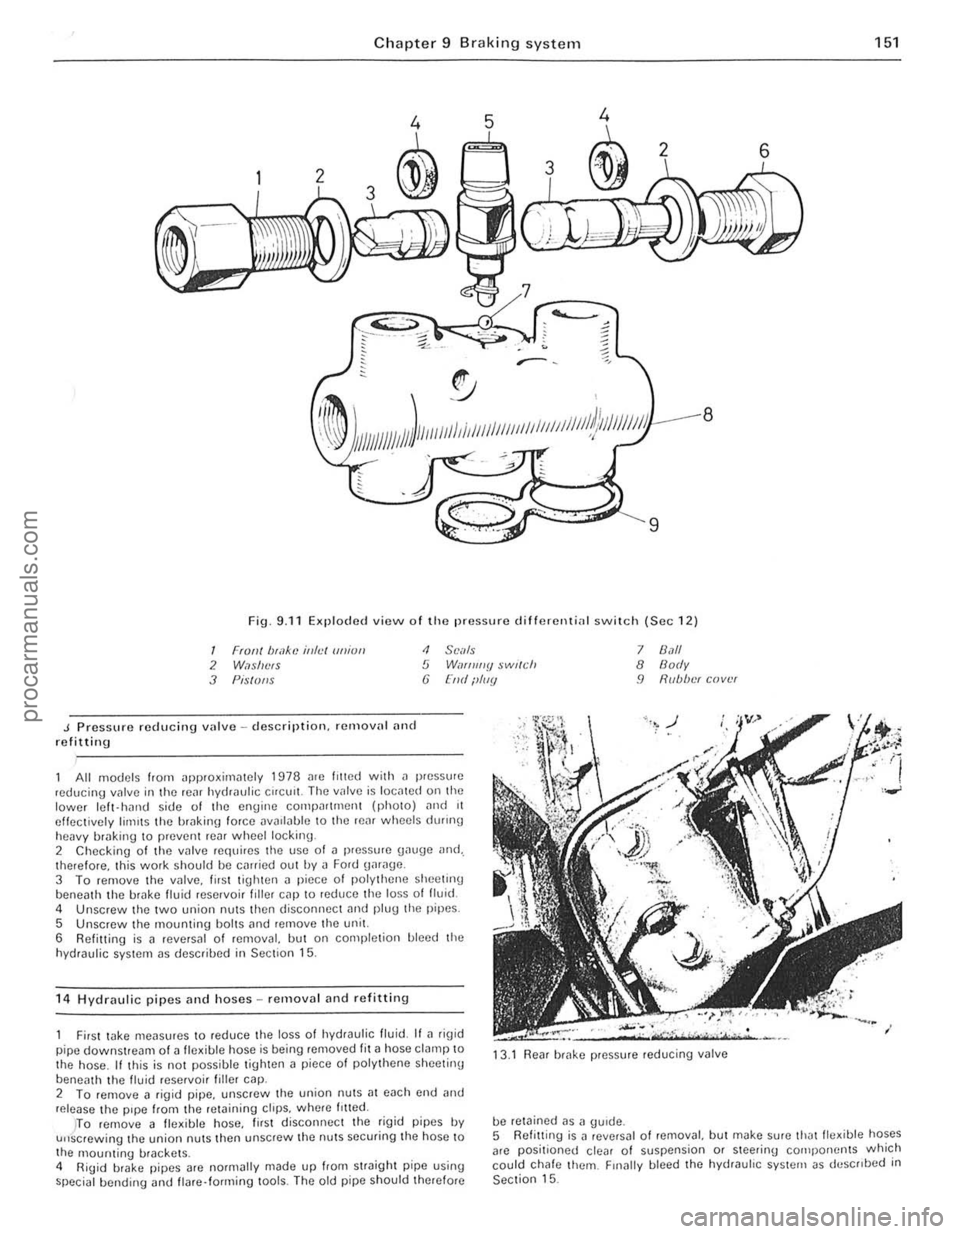
Fig. 9.11 Exploded view o f Iho pressure d ifferenti
J Pressure reducing vulve -description. remalln' nnd refitting
<1 SCi/Is 5 W,If/ll//y $wl(ch (j [lid ilIIIY
All models from ~pproxirniltely 1978 me lilted with il pressure ,educing valve in the rC~f hydraulic Cifelli!. The IInlve is IOCillCd on the lower Icft- hJrHJ side of the engine compn((mcnt (phOIO) ,mel 11 effectively limIts the hrakin\1 force DV
5 Unscrew the mounting bolts ,md remove the unit.
6 Refitting is a reversal of removal, but on completion bleed the
hydraulic system as descrihed in Section 15.
1 4
Hydraulic pipes and hoses -removal and refittin g
7 8.1/1 8 Body 9 R(lb/w( cover
First wke meilsures to reduce the loss 01 hydraulic fluid. If ~ rig id
pipe downstream of a fle~ible hose is being removed fit ~ hose clamp to
the hose . If this is not possible tighten a piece 01 polythene sheetinu
beneath th e livid reservoi r filler cap. 13
.1
Rear brake pressure reducing valve
2 To femove a figid pipe, unscrew the union nutS;]1 each cnd and release the pipe from the retaining ctrps. wh(Jre /riled.
be retained as a gUide.
151
)TO remove 11 fle~ible hose, lirst disconnec t the rigid pipes IN u"screwing the union nuts then unscrew the nuts securing the hose to
the 1l10unting brackets .
4 RiUid brake pipes arc normally made up from straight pipe using special bending <.rnd flare· forming lools. The old pipe should therefore 5
Refitt ing
is J revNsal o f removal, but make sure thJtlle~ible hoses
arc positioned clear of suspension or steering cOlilpo rwnts which
could chafe them. Finally bleed the hydrauhc system as deSCribed in Section 15.
••
procarmanuals.com
Page 153 of 205
152 Chapter 9 Braking system
)
OIOIN -.1
(2 ~i MMI __ J-j -I , h= .. OJ"N , r-t1 8 7MH)
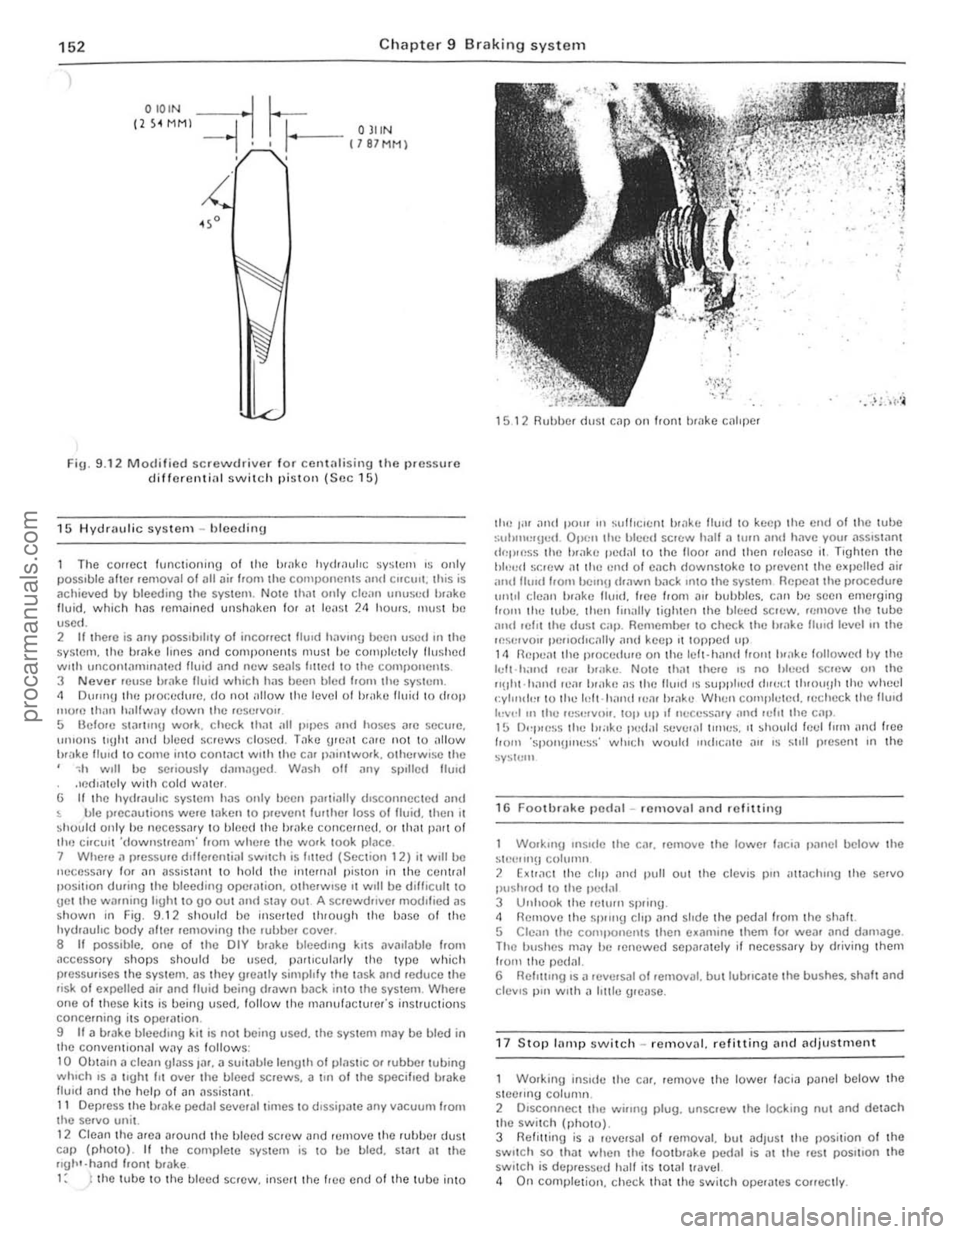
Fig. 9 .12 Modified screVlldrivcr f o r CC01t;llisillg {he IHcss urc different;", switch pisto n (SIlC 15 )
15 Hydraulic systerll -hfccdiliU
The correct functioning 01 the bfl,kc hyd,~ulo<.: sy Stem IS only possible aile! removal of all ai, from the components ilnd CIICUI1. Ihis is ilchieved by bleeding the system. Note \h
'\'~!.; .~ . .,.
15 12 Ruhhe. (i'lsi C,lP 011 Ironi brake Cilllper
tht!
J;II ill111 porn 111 sull,c.(,:nt hrilkc lIuld 10 keep Ihe end 0 1 Ihe tube ,"uhml!r!Jed . Opel1the IJIL'Cd screw hall a ilIOn anti hnve your ilSSlstilnt dnp,nss IIII! IHilk e pedal In the flOOr and then relColse il. Tlghton Ihe billed ~r.rew ill Ihe end 0 1 cilch downstoko to prevent Ihe e_I)OJled
16 Foolbrake pod,,1 -removal and .elillinll
Wo.kll1g InSide Ihe CM, ,emove the lower In c. a I","el below the 511,."," Ill!! C()IUIllIl 2 F.xlrilct the chI' ilnd pull out the clOVIS pIn "t1achlng thc servo pushrO
Th o bushes may be renewed separately if neCeSSilry by driving thel11 hom the pcdaL G Rehlllng.s a reve,sal 01 ,emoval. but lubrIcate Ihe bushes, sh
WOlking inSldc the car. remove the lower I"cia p"nel bolOw the slcCllng cOl ullin. 2 D,sconnoct the wiling plug, unscrew the locking nut and detach the swiech (photo).
3 Refilling is il revers
Page 154 of 205

Chapter 9 Braking syste'm 153
3
Fig, 9 .13 Foothr
Spring clips 7 Clip 2 Washer 8 Bushes 3 Shafl 9 Clevis " in , Spacer 10 Rdl/fn sp,illY
5 Bushes /I Rub/u."r P,lI/
6 Pl1d;1I
172 Stop lilOlP switch iHld witi:lg plug
18 Handbrake -adjustment
)Jack up the ,e
11
Early (1974/1975) models 2 loosen the locknul on the end 01 the primMY c
3 Loosen the locknul on the IIgill·hnnd end 01 the secondnry cable then IUfn the adjustment le"ule until
, .,
" I
,
t , t
i
J
I
i
J
I
procarmanuals.com
Page 155 of 205

)4 Chapter 9 Braking system
Fig 9 .16 H an dbrak8 cable adjusting nul (A) on later models (Sec 18) ~'9. 9 .15 Handbrako secondary cable adjustment fonu le and lockn u t (arrowed ) on early models (Soc 18)
I
Fig. 9 .17 Hnndhrnke operating lover n n d (llwtment (ldjuSlment gn p ·A' on later models (Sec 18)
'-iller mode!!s 4 LO(:,'I" trw r.al,lo .1dlUS1Cf lust forWi1f(1 01 the 10." axle dillCrcntinl , ;;.~.IIl!J (,.holn). then Sflp,l'ate Ihe ndjus\ing nul and sio eve usinIJ II se.ewtl""cr ["n,'IIO lhe keyed sleove in the bracket.
5 T 11m Ihe lldlu sling nul unlot all c.,l>lo slilc k is eliminated and a cleiuallr.e of I 0 '0 1 5 mill (0.039 to 0.059 in) exists at tho handb'Jke ope.aling 10l'm .. butment points (Fig. 9.17) Temporarily apply the holn(i!),,,kc 10 cnUage t he ilujus\ing nut with the sleeve then recheCk the ildJuSlmcnt.
All models 6 Lower Ihe r.'lr In the ground.
1 9 H ,1"dbrako lover -removal and refilling
Chock till) front whecls then lack l'P thO tcat 01 t he Cllt and SUllport on ilxlc swnds . Rclc~!se the halldbmko . 2 Whete applicahle remove the centre console with reference to Chapter 11.
3 Disc;onnecl the l>fiOlilJy cable from the lower end of t he h andbrilke
lever beneath the etlr . On early mooels baek all the cable adjustmen t
and unhook the c lev is (photo). On lale r m odels remove the splil pin and withdtaw the clevis pin (photo). <1 Remove the SCHlWS and withdraw the gaiter over the top 0 1 th e lever.
S Unbol t the hanrlhtake lever Irom the lIoot. 6 Relinin g is a revetsal 01 removal, but check the handbHlke
ildjustment as desClibed in Section 18 .
19 .
3A Prim ary cable connection to
handbtake lever (early models) 19.39 p.ima.y cable connection 10 handbrake leve r (Iale. models)
procarmanuals.com