1971 CHEVROLET CAMARO transmission oil
[x] Cancel search: transmission oilPage 13 of 88
Downloaded from www.Manualslib.com manuals search engine tongue load be maintained at ap
proximately
10% of the loaded
trailer weight. Tongue loads can be
adjusted by proper distribution of
the load in the trailer, and can be
checked by weighing separately the
loaded trailer and then the tongue.
When towing trailers, tires should
be inflated to the standard pressure
shown
on the placard, affixed to
left front door. The allowable pas
senger and cargo load also shown
on the same placard,
is reduced by
an amount equal to the trailer
tongue load on the trailer hitch.
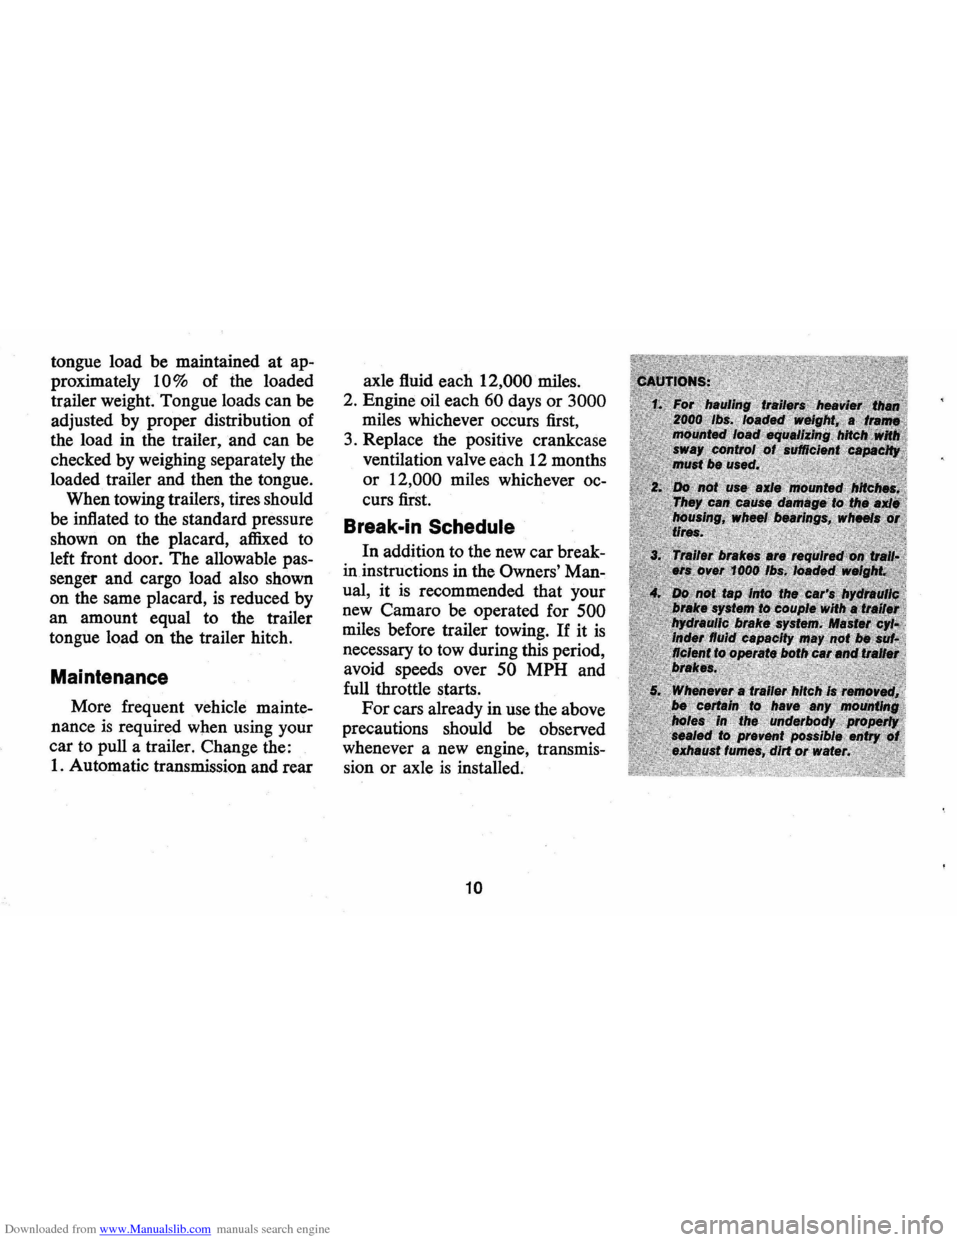
Maintenance
More frequent vehicle mainte
nance
is required when using your
car to pull a trailer. Change the:
1. Automatic transmission and rear axle
fluid each
12,000 miles.
2. Engine oil each
60 days or 3000
miles whichever occurs first,
3. Replace the positive crankcase
ventilation valve each 12 months
or 12,000 miles whichever oc
curs first.
Break .. in Schedule
In addition to the new car break
in instructions in the
Owners' Man
ual,
it is recommended that your
new Camaro be operated for
500
miles before trailer towing. If it is
necessary to tow during this period,
avoid speeds over
50 MPH and
full throttle starts.
For cars already in use the above
precautions should be observed
whenever a new engine, transmis
sion
or axle is installed.
10
Page 36 of 88
Downloaded from www.Manualslib.com manuals search engine SAFETY CHECKS
Your Camaro not only conforms to all U.S. Fed
eral Motor Vehicle
Safety Standards applicable at
time of manufacture, but also incorporates other im
portant General Motors safety features. Even with
these safety features, however, continued safe and
dependable operation depends greatly upon regular
vehicle maintenance.
This section discusses the various components and
systems of your vehicle that should be checked regu-
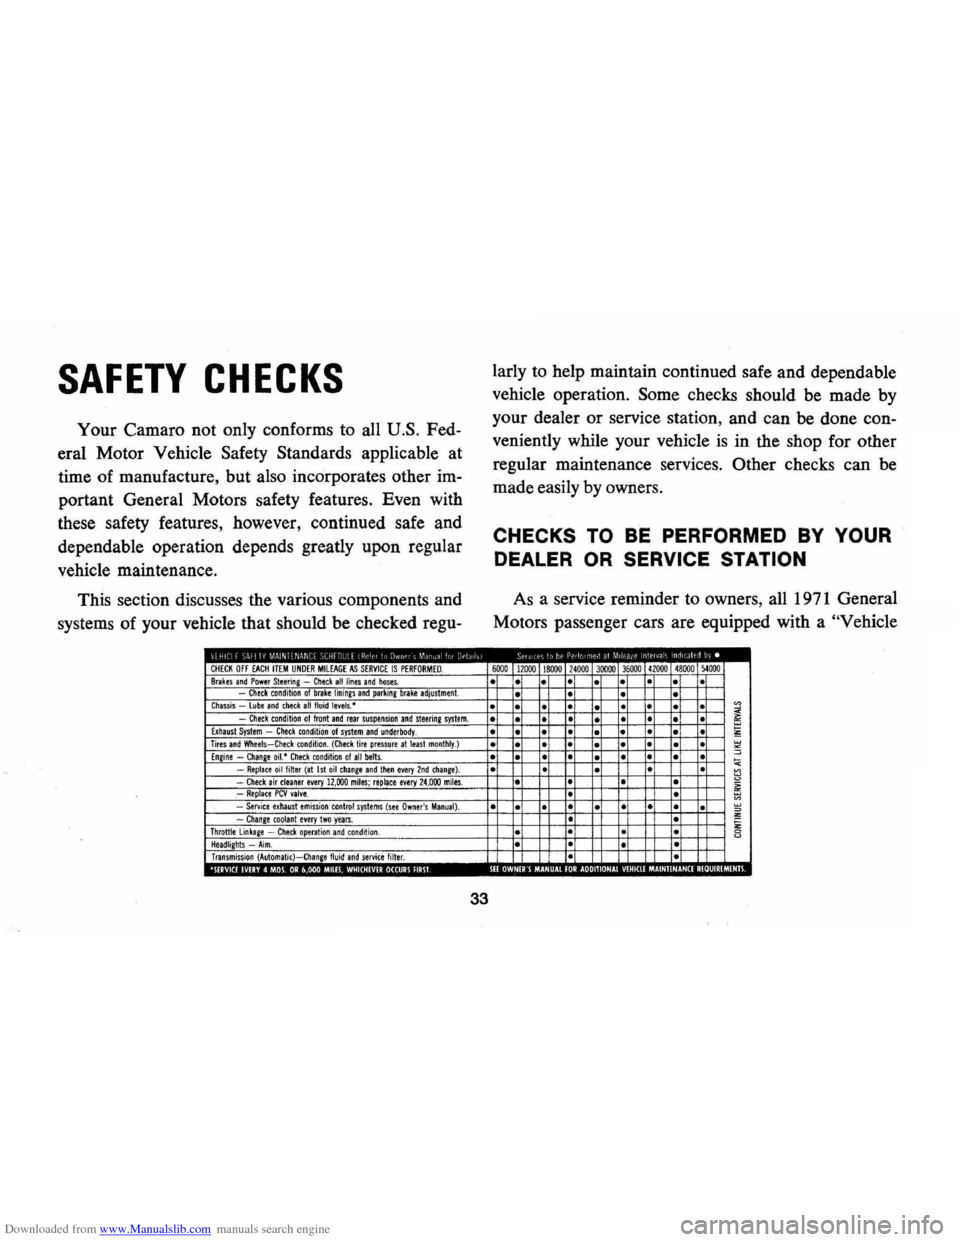
CHECK OFF EACH ITEM UNDER MIlEAGE AS SERVICE IS PERFORMED. Brakes and Power Steering -Check all lines and hoses. Check condition of brake linings and parking brake adjustment. Chassis lube and check all fluid levels,· Check condition of front and rear suspension and steerine system. Exhaust System -Check condition of system and underbody. Tires and Wheels-Check condition. (Check tire pressure at least monthly.) Engine -Change oil.· Check condition 01 all belts. -Replace oil filter (at 1st oil change and tllen every 2nd chanie). -Check air cleaner every 12,000 miles; replace every 24,000 miles. .-Replace PCV valve. -Service exhaust emission control systems (see Owner's Manual). -Change toolanl every Iwo years. Throttle linkage -Check operation and condition . Headlights -Aim. Transmission (Automatic)-Change fluid and service filter. 0 ,', III · 0
33
larly to help maintain continued safe and dependable
vehicle operation.
Some checks should be made by
your dealer or service station, and can be done con
veniently while your vehicle
is in the shop for other
regular maintenance services.
Other checks can be
made easily by owners.
CHECKS TO BE PERFORMED BY YOUR
DEALER OR SERVICE STATION
As a service reminder to owners, all 1971 General
Motors passenger cars are equipped with a
"Vehicle
6000 12000 18000 24000 30000 36000 41000 48000 )4000
• •
• •
• • • •
• • •
• •
• • • • • • •
• • • • • • • • • • •
• • • •
• • •
• •
• • • •
• • • • • • •
• • • • •
• •
• •
• • •
• •
• • • • •
• • • • • •
•
• • •
· • · •
• • • • •
• 0 o· 00 0 ·
0
Page 37 of 88
Downloaded from www.Manualslib.com manuals search engine Safety Maintenance Schedule" on the inside of the
glove box door
as illustrated.
The schedule lists the various safety checks to be
performed at regularly scheduled intervals,
as well
as some of the other important vehicle maintenance
requirements. You are urged to check
off each item
on the schedule after the operation has been per
formed. Following are further details on the safety
check items:
Checks To Be Made At Oil Change Intervals
(4 months or 6,000 miles, whichever comes
first)
• Brake Lines and Hoses -Check for proper at
tachments, leaks, cracks, chafing, deterioration,
etc. Any questionable parts noted should be re
placed or repaired immediately.
• Fluid Levels-Check level of fluid in brake master
cylinder, power steering pump, radiator, engine,
axle and transmission. Any significant
loss could
mean that a malfunction
is developing in the sys
tem and corrective action should be taken imme
diately.
On cars with disc brakes, a low fluid level
in the front brake master cylinder reservoir could
34
also be an indicator that disc brake pads need
replacing.
• Front and Rear Suspension and Steering Sys
tem-Check for damaged or missing parts, or parts
showing visible signs of excessive wear or lack of
lubrication. Questionable parts should be replaced
by a qualified mechanic without delay.
• Exhaust System -Check complete exhaust sys
tem and nearby body areas and trunk lid for
broken, damaged, missing or mispositioned parts,
open seams, holes, loose connections
or other de
terioration which could permit exhaust fumes to
seep into the trunk or passenger compartment. Any
defects should be corrected immediately. To help
insure continued integrity, exhaust system pipes
rearward of the
muffler must be replaced whenever
a new
muffler is installed.
• Tires and Wheels -Check tires for excessive
wear, nails, cuts or other damage. Make certain
wheels are not bent
~nd wheel nuts are tight. Un
even or abnormal tire wear may indicate the need
for alignment service. Check tire inflation pressure
at least monthly, or more often
if daily visual
inspection indicates the need.
Page 40 of 88

Downloaded from www.Manualslib.com manuals search engine lights, turn signals, backup lamps, and hazard
warning flashers. Have someone observe operation
of each light while you activate the controls.
• Starter Safety Switch (Automatic Transmis
sion Cars)
CAUTION: Before making the following check, be sure to have a clear distance ahead and behind the car, set the parking brake and firmly apply the foot brake. Do not depress accelerator pedal. Be prepared to turn ott ignition switch immediately if engine should start.
Check starter safety switch by placing the transmis
sion in each of the driving gears while attempting to
start the engine. The starter should operate only in the
Park ("P") or Neutral ("N") positions.
• Starter Interlock (Manual Transmission Cars)
-To check a manual transmission equipped car,
depress the clutch halfway, place the transmission
in neutral, and attempt to start.
The starter should
operate only when clutch
is fully depressed.
• Transmission Shift Indicator-Check to be sure
shift indicator accurately indicates the shift posi
tion selected.
• Horn-Blow the horn occasionally to be sure that
it works.
37
• Seat Back LatcheS-Check to see that seat bac k
latches are holding by pulling forward on the seat
back top.
• Rearview Mirrors and Sun Visors-Check that
friction joints are properly adjusted so mirrors and
sun visors stay in the selected position.
• Door LatcheS-Check for positive closing, la tch
ing and locking.
• Hood Latches-Check to make sure hood closes
firmly . Check also for broken , d amaged or missing
parts which might prevent secure latching.
• Fluid LeakS-Check for fuel, water, oil or other
fluid leaks by observing the ground beneath the
vehicle after it has been parked for a while . (Water
dripping from air conditioning system after use
is
normal). If gasoline fumes are noticed at any time,
the cause should be determined
and corrected with
out delay because of the possibility of fire.
• Exhaust System-See engine exhaust gas caution
at beginning of starting and operating section of
this manual for suggested driver observations and
checks.
Page 43 of 88
Downloaded from www.Manualslib.com manuals search engine · Changing Tires
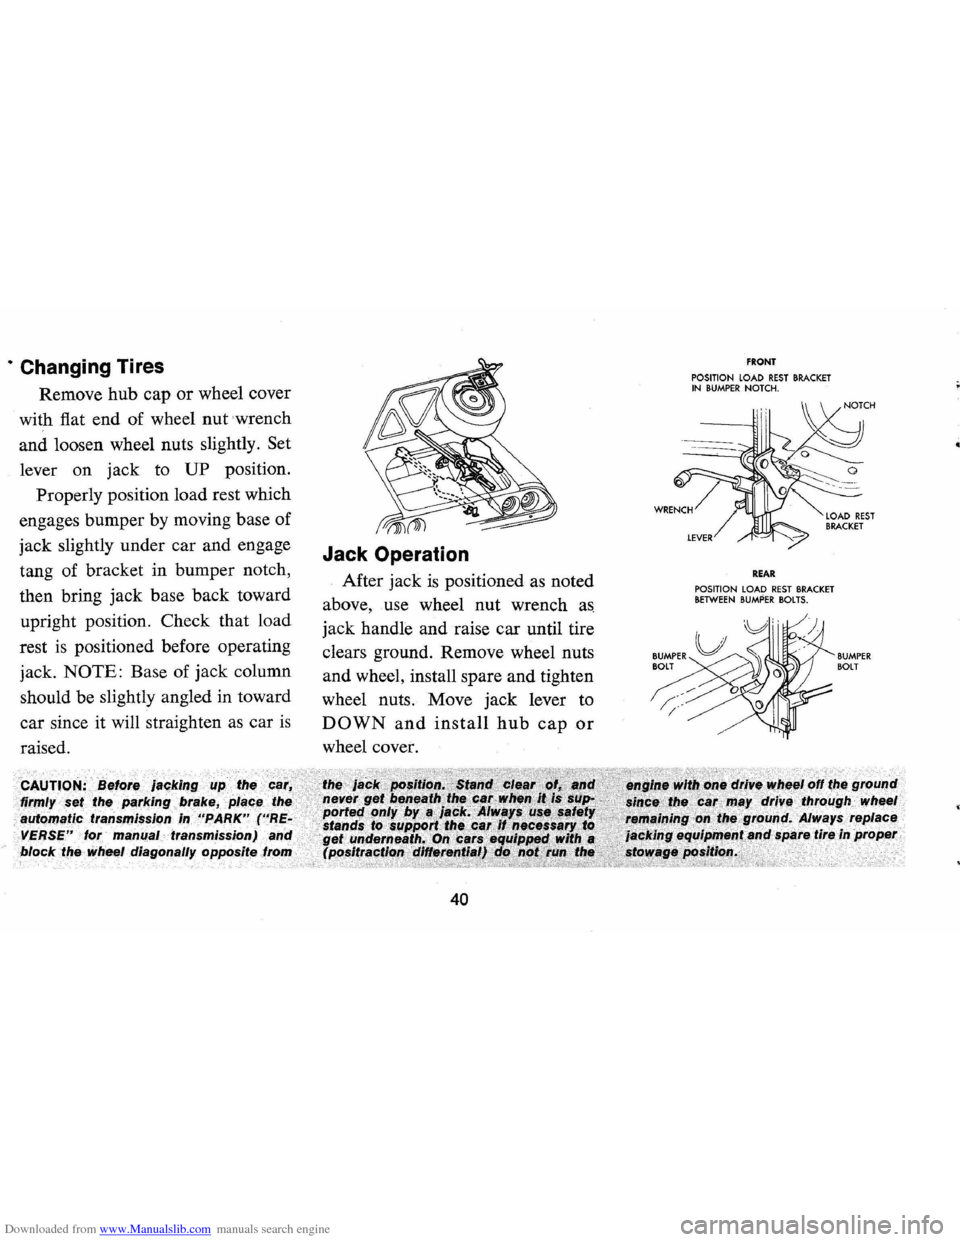
Remove hub cap or wheel cover
with fiat end of wheel
nut wrench
and loosen wheel nuts slightly.
Set
lever on jack to UP position.
Properly position load rest which
engages bumper by moving base of
jack slightly under car and engage
tang of bracket in bumper notch,
then bring jack base back toward
upright position. Check that load
rest is positioned before operating
jack.
NOTE: Base of jack column
should be slightly angled in toward
car since it will straighten as car
is
raised.
firmly
automatic rralrlSOIlSSlon
VERSE" lor manual transmission)
Jack Operation
After jack is positioned as noted
above, use wheel nut wrench
as
jack handle and raise car until tire
clears ground. Remove wheel nuts
and wheel, install spare and tighten
wheel nuts. Move jack lever to
DOWN and install hub cap or
wheel cover.
block the wheel diagonally opposite .. _.... .,.. __
40
FRONT POSITION LOAD REST BRACKET IN BUMPER NOTCH.
REAR POSITION LOAD REST BRACKET BETWEEN BUMPER BOLTS.
BUMPER BOlT
Page 59 of 88
Downloaded from www.Manualslib.com manuals search engine Distributor Cam Lubricator
6 Cylinder Engine -Rotate cam
lubricator
1800 at 12,000 mile in
tervals -Replace at
24,000 mile
intervals.
8 Cylinder Engine-Change cam
lubricator end for end at
12,000
mile intervals-Replace at 24,000
mile intervals.
Rear Axle
Standard -Every 4 months or
6,000 miles, whichever occurs
first, check lubricant level and add
lubricant, if necessary, to
fill to
level of filler plug hole.
Use SAE
80 or SAE 90 GL-5 Gear Lubri
cant.
Positraction -Same as standard
axle
but use only the special posi
traction lubricant available from
your Chevrolet Dealer.
Manual Transmissions
3-Speed and 4-Speed -Every
6,000 miles or 4 months-Check
at operating temperature and fill
as necessary to level of filler plug
hole with SAE
80 or SAE 90 GL-
5 Gear Lubricant.
Clutch Cross-Shaft -Every
36,000 miles or sooner if neces
sary -Remove the plug, install a
lubrication fitting
and lubricate
with water resistant
EP Chassis
Lubricant which meets
GM Speci
fication 6031M.
Automatic Transmission
Fluid Recommendations
General Motors DEXRON®
Automatic Transmission Fluid,
part no. 1050568 and United
Delco DEXRON® Automatic
Transmission Fluid, part no. 301-
RD, which have been especially
formulated and tested for use in
your automatic transmission are
recommended.
Other automatic
transmission fluids identified with
the
mark DEXRON@ are also
recommended.
56
Check the fluid level at each
engine oil change period.
To make
an accurate fluid level check:
1. Drive car several miles, making
frequent starts and stops, to
bring transmission up to normal
operating temperature (ap
proximately 180-190 OF) .
2.
Park car on a level surface.
3. Place selector lever
in "Park"
and leave engine running.
4. Remove dipstick and
WIpe
clean.
5. Reinsert dipstick until cap seats.
6. Remove dipstick and note read
ing.
If oil level is at or below the
"ADD" mark on the dipstick, oil
should be added as necessary.
One pint raises the level from ADD
to FULL.
Do not overfill.
Under normal driving condi
tions, the transmission fluid should
Page 62 of 88
Downloaded from www.Manualslib.com manuals search engine Standard Steering Gear
The steering gear is factory
filled with steering gear lubricant.
Seasonal change of this lubricant
should not be performed
and the
housing should
not be drained-no
lubrication
is required for the life
of the steering gear.
Every 36,000 miles, the gear
should be inspected for seal leak
age (actual solid
grease-not just
oily film).
If a seal is replaced or
the gear is overhauled, the gear
housing should be refilled with
Part No. 1051052 (13 oz. con
tainer)
Steering ' Gear Lubricant
which meets
GM Specification GM
4673M, or its equivalent.
NOTE: Do not use EP Chassis
Lube, meeting
GM Specification
GM 6031 M, to lubricate the gear.
DO NOT OVER-FILL the gear
housing.
Power Steering Pump
Every 6,000 miles or 4 months
Check level in pump reservoir. Fill
pump reservoir
as required with
GM Power Steering Fluid or, if
this
is not available, DEXRON®
Automatic Transmission fluid.
Oil
should be at operating tempera
ture
and wheels in straight ahead
position when checking
or filling
operation is performed to ensure
against over-filling.
Hood Latches
Every 4 months or 6,000 miles,
whichever occurs first, lubricate
hood latch assembly
and hood
hinge assembly as follows:
1. Wipe off any accumulation of
dirt
or contamination on latch
parts.
2. Apply Lubriplate
or equivalent
to latch pilot bolts
and latch
locking plate.
3. Apply light engine oil to
all
59
pivot points in release mecha
nism, as well as primary
and sec
ondary latch mechanisms.
4. Lubricate hood hinges.
5. Make hood hinge
and latch
mechanism functional check to
assure the assembly is working
correctly.
Air Conditioning
Have your Chevrolet Dealer
check your Air Conditioning sys
tem at some time during the winter
months to
be sure there has been
no loss in cooling output. During
the summer, see your Chevrolet
Dealer immediately if you suspect
the system is
not performing as it
should.
NOTE: On vehicles equipped with
a
Four Season Air Conditioning
System, the system will not operate
below ambient temperatures of
30oP. regardless of control posi
tion.
Page 69 of 88
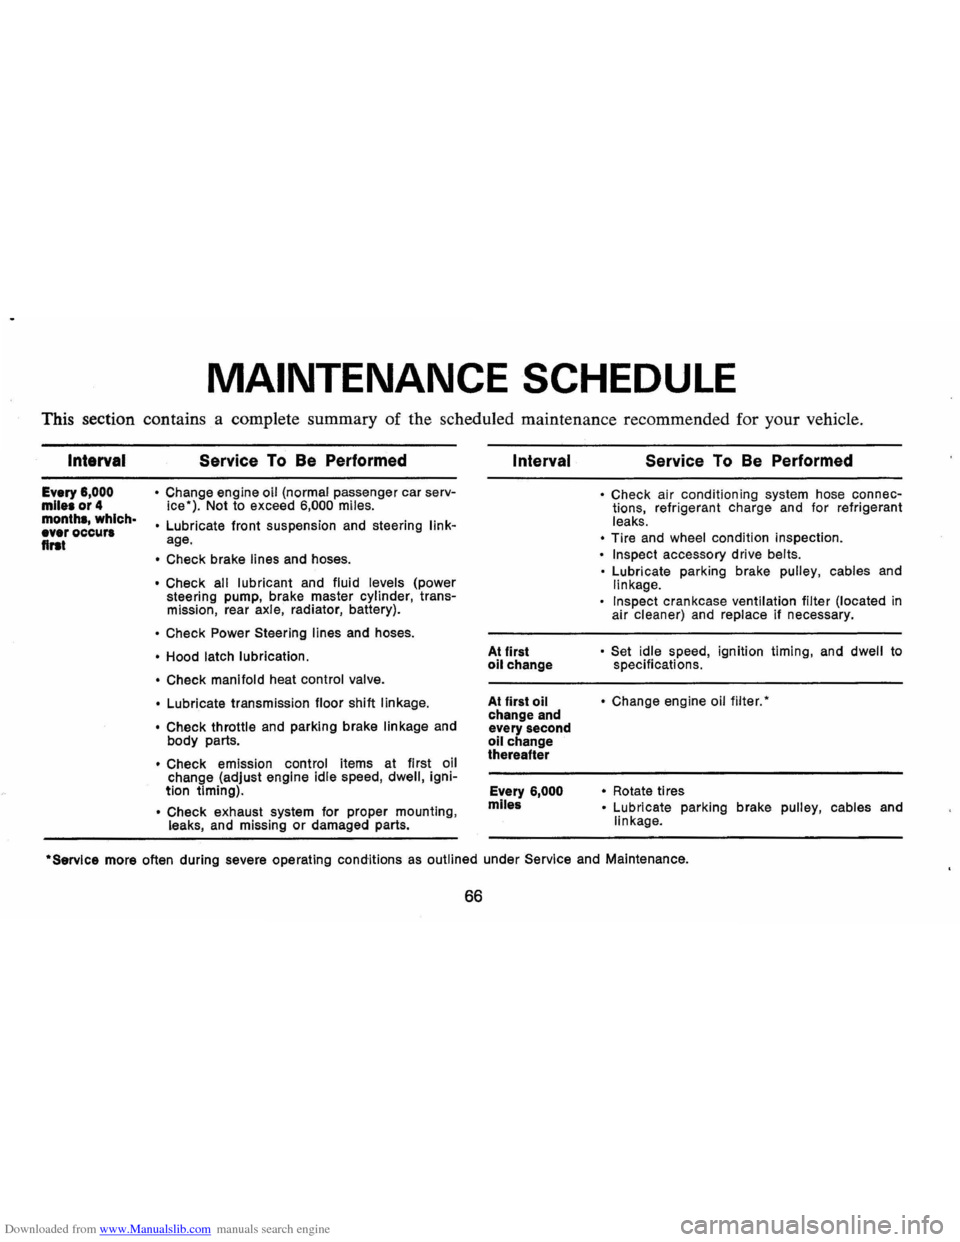
Downloaded from www.Manualslib.com manuals search engine MAINTENANCE SCHEDULE
This section contains a complete summary of the scheduled maintenance recommended for your vehicle.
Intarval
Every 6,000 mile. or 4 month., which· ever occur. flrat
Service To Be Performed
• Change engine oil (normal passenger car serv
ice"). Not to exceed 6,000 miles.
•
Lubricate front suspension and steering linkage.
• Check brake lines and hoses.
• Check all lubricant and fluid levels (power
steering pump, brake master cylinder, transmission, rear axle, radiator, battery).
• Check Power Steering lines and hoses.
• Hood latch lubrication.
• Check manifold
heat control valve.
•
Lubricate transmission floor shift linkage.
• Check
throttle and parking brake linkage and
body parts.
• Check emission control items at first oil
change (adjust engine idle speed, dwell, ignition timing) .
• Check exhaust system for proper mounting , leaks, and missing or damaged parts.
Interval
At first oil change
At first
oil change and
every second
oil change
thereafter
Every
6,000
mlle&
Service To Be Performed
• Check air conditioning system hose connections, refrigerant charge and for refrigerant
leaks.
• Tire and wheel condition inspection.
• Inspect accessory drive belts.
•
Lubricate parking brake pulley, cables and linkage.
Inspect crankcase ventilation filter (located in
air cleaner) and replace if necessary.
• Set idle speed , ignition timing, and dwell to
specifications.
• Change engine oil filter."
•
Rotate ti res • Lubricate parking brake pulley, cables and
linkage .
·Servlce more often during severe operating conditions as outlined under Service and Maintenance.
66