1971 CHEVROLET CAMARO fuel filter
[x] Cancel search: fuel filterPage 49 of 88

Downloaded from www.Manualslib.com manuals search engine EVAPORATION CONTROL SYSTEM
LIQUID/VAPOR SEPARATOR
OPERATION: All General Motors passenger cars
and light trucks are equipped with an Evaporation
Control
System. This system is designed to minimize
the escape of fuel vapors to the atmosphere. Included
in the system are a special fuel tank, liquid-vapor
separator, carbon canister, canister purge hoses, and
carburetor modifications. Fuel vapors which would
otherwise escape to the atmosphere are directed into
the carbon canister. The carbon adsorbs the vapors
and stores them. The vapor
is removed from the
46
canister during periods of engine operation as mani
fold vacuum draws the vapors into the engine and
burns them.
NOTE: Th. G.n.r.' Motora E".por.tlon Control Sy.t.m I. de.'gn.d to control ."aporatlon 10 •••• trom your c.r und.r normal condition. u.'ng 9 lb. R.ld Vapor Pr ••• ur. tu.' .p.cltl.d by F.d.r.' .nd C.lltorn/a t •• t r.qulr.m.nt •. How.".r, It 'Iou .hould u.. tu.' ot .bnorm.lly high "o/.tlllty tor .x/.tlnll t.mperatur.
condition., you may d.t.ct • ga.olln. odor during or att.r dr/,,· Ing In h •• "y tr.mc. It 'Iou find thl. obJ.ctlonabl., you may pr.t.r to u ••• low.r "o/atlllty tu.'.
MAINTENANCE: For proper system perform
ance, periodic canister tllter servicing II re
quired. Every
12 months or 12,000 miles, which
ever comes first (more often under dusty con
ditions) the filter
In the base of the can liter
should be replaced and the canister Inspected.
NOTE: Should It .".r b. n.c •••• ry to r.pl.c. the tu.' tank cap, u •• only the .peclfl.d c.p.
NOTE: For your convenience, all of the recom
mended services for air pollution control systems
previously discussed are summarized
by time and
mileage intervals in the Maintenance Schedule of
this manual.
Page 58 of 88

Downloaded from www.Manualslib.com manuals search engine the crankcase ventilation valve.
Regular replacement of the PCV
Valve
is recommended at 24-month
or
24,000-mile intervals.
G.M. Evaporation
Control SYltem
The Evaporation Control System
requires only periodic canister filter
servicing.
Every 12 months
or 12,000
miles, whichever occurs first, (more
often under dusty conditions) the
filter in the base of the canister
must be replaced and the canister
inspected.
Drive Beltl
Every 6,000 miles or 4 months
inspect drive belts for wear, fray
ing, cracking, and tension. Belts
which are in poor condition should
be replaced immediately.
Check tension by applying
mod
erate thumb pressure midway be
tween pUlleys. If the center-to
center distance between pulleys
is
13 to 16 inches, the belt should
deflect
lh inch. If the center-to
center distance
is 7 to 10 inches,
the belt should deflect
1;4 inch.
Loose belts should be retensioned
to give the correct deflection.
Air Cleaner
Paper Ellment Type -First
12,000 miles, inspect element for
dust leaks, holes
or other damage,
replace
if necessary. If satisfac
tory, rotate element
1800 from
originally installed position.
Re
place element at 24,000, miles.
Element must not be washed,
oiled, tapped or cleaned with an
air hose.
Crankca.e Ventilation Filter
(located within Air Cleaner)
If so equipped, inspect at every oil
change and replace if necessary.
Replace at least every
24,000
miles; more often under dusty
driving conditions.
Flame Arrester -Every 12,000
55
miles-Clean the arrester (located
in the base of the air cleaner) with
kerosene
or a suitable solvent. Dry
with compressed air.
The engine air cleaner should
be installed at all times unless
temporary removal
is necessary
during repair or maintenance of
the vehicle, because in the absence
of the air cleaner backfiring could
cause
fire in the engine compart
ment.
For maximum protection spe
cify an AC Acron air filter ele
ment.
Fuel Filter
Replace carburetor inlet filter
element every 12 months or
12,000 miles, whichever occurs
first or, if an in-line filter
is also
used, every
24,000 miles.
Replace in-line filter every
24,000 miles.
When replacement
is necessary,
always insist on AC Acron filters.
Page 70 of 88

Downloaded from www.Manualslib.com manuals search engine Interval
First 12,000 miles Every 12
months
or 12,000 miles
Every
24,000 miles
Service To Be Performed
• Rotate distributor cam lubricator. See 24,000 mile recommendation.
• Insp .ect air cleaner element, if satisfactory
rotate 1800 from original position and reinstall. See 24,000 mile recommendation.
• Inspect brake linings and check system for
leaks
• Inspect parking brake and throttle linkage. • Engine tune-up.
Replace carburetor 'Inlet fuel filter element. • Check emission control items. • Inspect AIR drive belt.
Evaporation Control System-Replace filter in
base of canister and inspect canister. • Check headlamp aiming.
• Repack front wheel bearings.
• Replace distributor cam lubricator. • Drain automatic transmission sump and add
fresh fluid (normal passenger car service).' Adjust Powerglide low band at first fluid
change.
• Replace crankcase ventilation filter (located
within air cleaner).
• Replace Turbo Hydra-Matic sump filter.
Interval Service To Be Performed
Every 2 years • Drain radiator coolant, flush and refill system.
Every
24 months· Replace PCV Valve. Inspect all hoses and or 24,(100 miles fittings.
Every
36,000 • Check steering gear for seal leakage (actual
miles solid grease-not just oily film).
• Lubricate clutch cross shaft (sooner if necessary), remove plug and install lube fittIng.
During Winter
• Check operation of air conditioning system.
months
Periodically • Check battery liquid leve/.
• Inspect seat belts, buckles, retractors and
anchors.
• Check all lights for proper operation.
As Required
• Check wheel alignment and balancing.
'Service more often during severe operating conditions as outlined under Service and Maintenance.
67
Page 72 of 88

Downloaded from www.Manualslib.com manuals search engine The chart on the previous page, and the information on the pages
which
follow, contains information designed to aid the average
driver to discover, and possibly correct, conditions resulting in minor
mechanical
difficulties in his car. The chart, designed to point out
possible solutions to several of the most common automotive mal
functions and point out a logical checking sequence, will lead step
by step to the most likely causes and corrective procedures. If, after
making the checks and adjustments suggested, the source of the
trouble has not been found and corrected, it is strongly recom
mended that an Authorized Chevrolet Dealer inspect the vehicle and
make whatever repairs
or adjustments are necessary.
FUEL SYSTEM AND ENGINE
If the ignition switch will cause the engine to "turn over" or
"crank" but the car will not start, check Steps A through D below.
NOTE:
If continual "Rooding" of the carburetor is evidenced by a
carbur.tor wet with
fuel or black exhaust smoke, perform the
operation suggested in paragraph D only.
(A) The first and most obvious,
and one of the most frequently overlooked, items to check when
you have difficulty in sta rting you r car is the amount . of fuel in the
tank. Make it a habit to check the FUEL GAUGE regularly and most especially at a time when the engine will "turn over" but will not
start.
(8)
If the fuel tank is noi empty,
you may cheek further to see Checking Fllel Flow
69
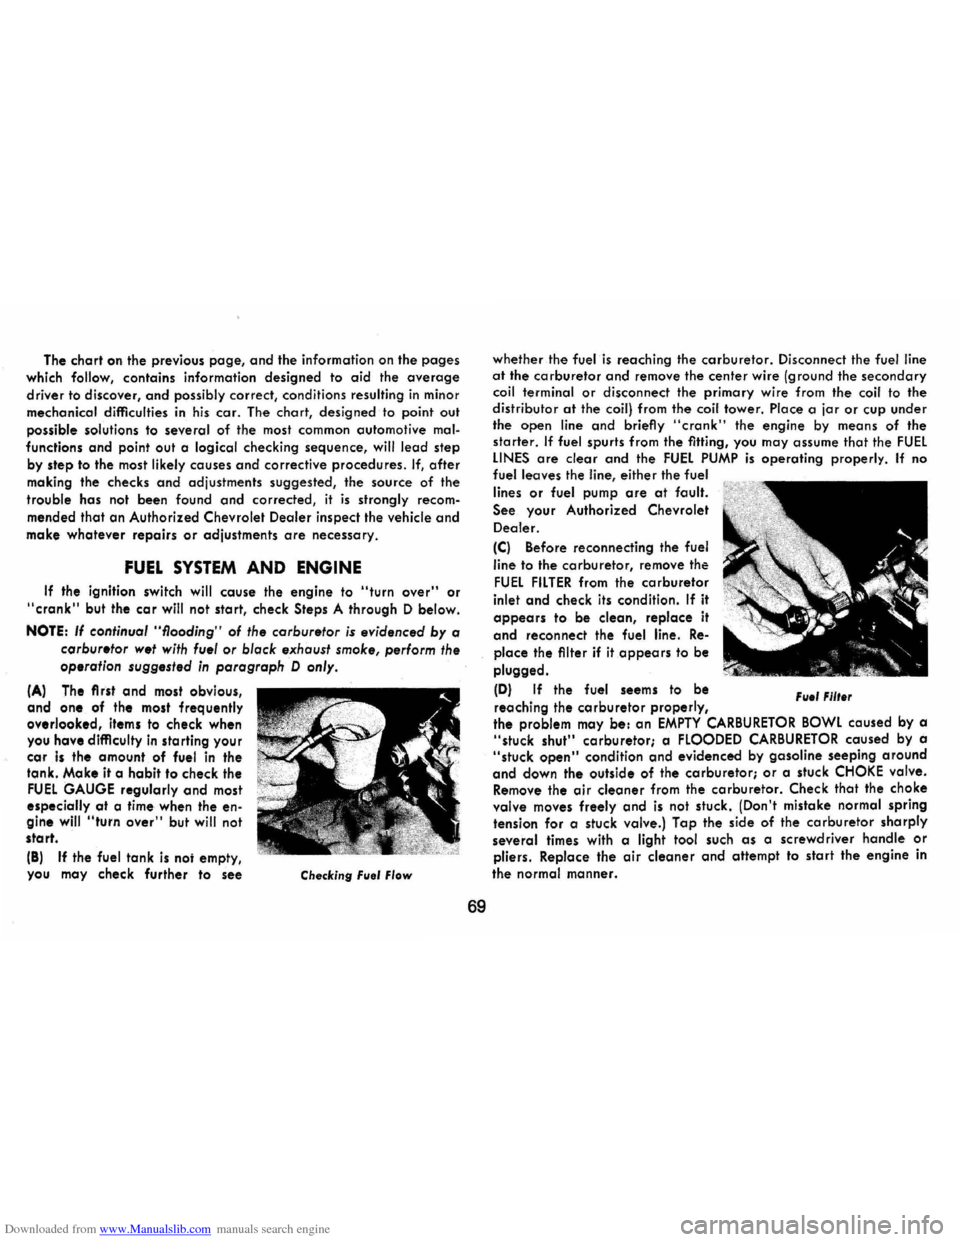
whether the fuel is reaching the carburetor. Disconnect the fuel line at the carburetor and remove the center wire (ground the secondary coil terminal or disconnect the primary wire from the coil to the distributor at the coil) from the coil tower. Place a jar or cup under
the open line and briefly "cronk" the engine by means of the
starter. If fuel spurts from the fitting, you may assume that the FUEL LINES are clear and the FUEL PUMP is operating properly. If no fuel leaves the line, either the fuel
lines
or fuel pump are at fault.
See. your Authorized Chevrolet
Dealer.
(C) Before reconnecting the fuel
line
to the carburetor, remove the
FUEL FILTER from the carburetor
inlet and check its condition. If it
appears to be clean, replace it
and reconnect the fuel line. Re
place the filter if it appears to be
plugged.
(D) If the fuel seems to be
reaching the
carburetor properly, File' Fllt.r
the problem may be: an EMPTY CARBURETOR BOWL caused by a "stuck shut" carburetor; a FLOODED CARBURETOR caused by a "stuck open" condition and evidenced by gasoline seeping around
and down the outside of the carburetor; or a stuck CHOKE valve. Remove the air cleaner from the carburetor. Check that the choke valve moves freely and is not stuck. (Don't mistake normal spring
tension for a stuck valve.) Tap the side of the carburetor sharply
several times with a light tool such as a screwdriver handle or pliers. Replace the air cleaner and attempt to start the engine in
the
normal manner.
Page 78 of 88

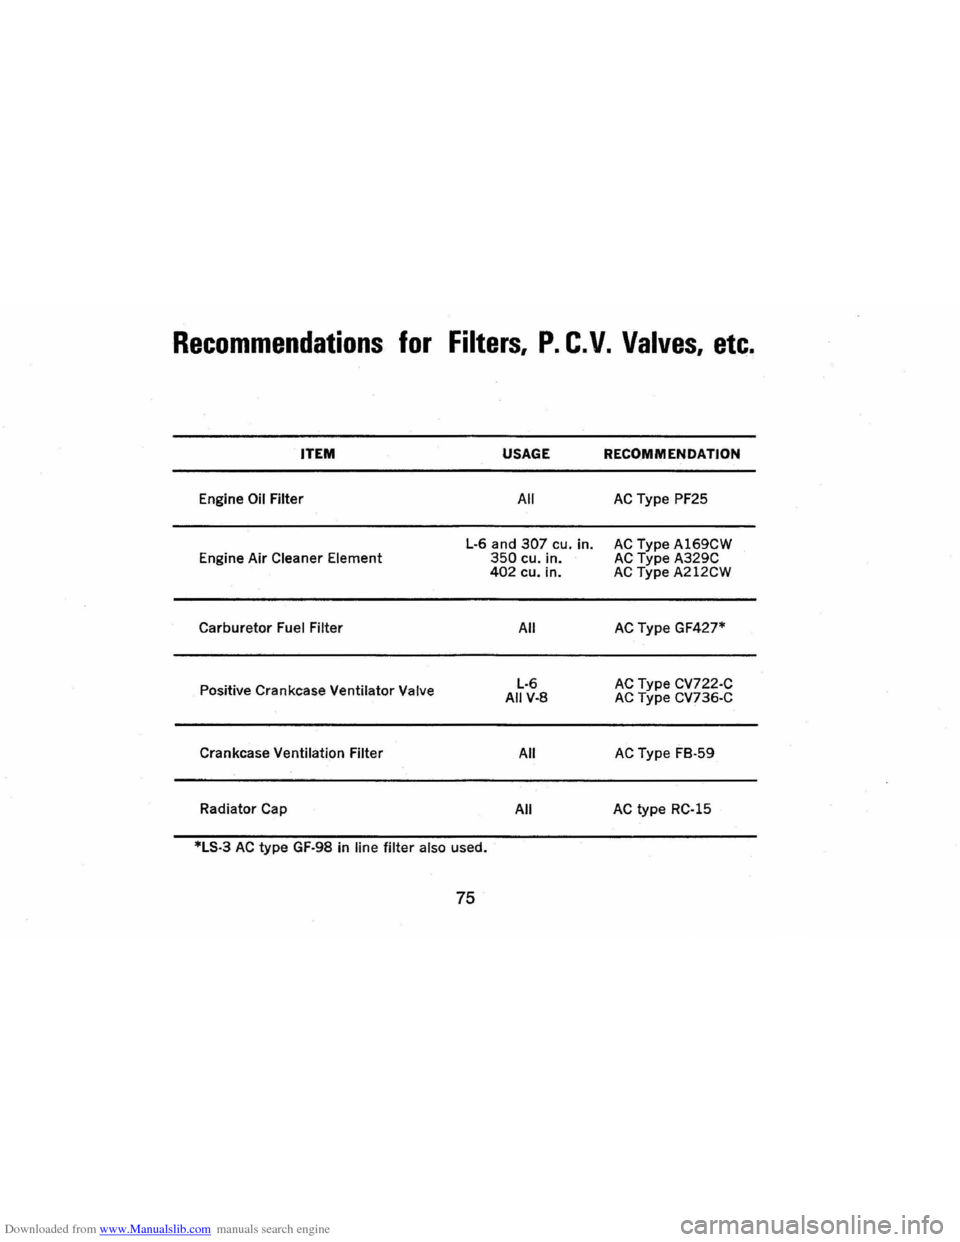
Downloaded from www.Manualslib.com manuals search engine Recommendations for Filters, P. C. V. Valves, etc.
ITEM
Engine Oil Filter
Engine Air
Cleaner Element
Carburetor Fuel Filter
Positive Crankcase Ventilator
Valve
Crankcase Ventilation Filter
Radiator Cap
USAGE
All
L·G and 307 cu. in. 350 cu. in. 402 cu. in.
All
L·G AIIV·8
All
All
*LS·3
AC type GF·98 in line filter also used.
75
RECOMMENDATION
AC Type PF25
AC Type AIG9CW AC Type A329C AC Type A212CW
AC Type GF427*
AC Type CV722·C AC Type CV73G·C
AC Type FB·59
AC type RC·15
Page 86 of 88

Downloaded from www.Manualslib.com manuals search engine INDEX
Air Cleaner. . . . . . . . . . . . . . . . . . . . . . . . .. 55
Air Conditioning. . . . . . . . . . . . . . . . . . . .. 29
Air Pollution Control Systems ...... .... 41
Ammeter ............................ 23
Antenna ............... .............. 29
Appearance Care ..................... 47
Automatic Brake Adjusters ............ 31
Axle, Rear. . . . . . . . . . . . . . . . . . . . . . . . . .. 32
Battery .. .................... ........ 64
Bearings, Front Wheel. . . . . . . . . . . . . . . .. 58
Before Driving your Car.. . . . . . . . . . . . .. 3
Brakes
................... ........... 31 Driving Through Deep Water ........ 31
Maintenance. . . . . . . . . . . . . . . . . . . . . .. 58
Master Cylinder Level. . . . . . . . . . . . . .. 58
Parking Brake ...................... 31
Warning Light. . . . . . . . . . . . . . . . . . . .. 21
Break-In Period Cars Pulling Trailers. . . . . . . . . . . . . . . . 9
New
Car . ......................... 2
Bulbs and Fuses .
..................... 76
Bumper Jack
Operation
......... . ................ 40 Stowage ........................... 40
Carbon Monoxide Caution ......... .... 11
Circuit Breakers, Headlamps. . . . . . .. 74, 76
Cleaning ............................. 47
Clock ..
............................. 24
Clutch ..................... .......... 32
Controls ....... .... ....... ........... 31
Cooling System Care. . . . . . . . . . . . . . . . .. 60
Defogger, Rear Window
............... 26
Defroster , Defogger, Windshield ........ 25
Dimmer Switch, Headlamp . . . . . . . . . . . .. 32
Directional Signals. . . . . . . . . . . . . . . . . . .. 16
Door Locks.. . . .. . . .. . . . . . . . . . . .. .. .. 3
Emergency, In Case
Of ................ 38
Brake Warning Light. . . . . . . . . . . . . . .. 21 Generator Indicator Not
Charging. . . . . . . . . . . . . . . . . . . . . . .. 21 Hazard Warning Flasher ........... .. 38
Jacking To Change Wheels ........... 40
Jump Starting With Auxiliary
Battery .......................... 39
Overheated Radiator. . . . . . . . . . . . . . .. 39
Towing ..................... ..... .. 38
Emission Control Systems .............. 41
Engine
Cooling
........................... 60
Exhaust Gas Caution ................ 11 Flooded, Starting Procedure . . . . . . . . .. 13
Overheating. . . . . . . . . . . . . . . . . . . . . . .. 39
Specifications . . . . . . . . . . . . . . . . . . . . . .. 72
Starting . . . . . . . . . . . . . . . . . . . . . . . . . .. 13
Temperature Gauge. . . . . . . . . . . . . . . .. 23
Engine Oil
Capacity. . . . . . . . . . . . . . . . . . . . . . . . . .. 72
Change Interval. . . . . . . . . . . . . . . . . . .. 53 Dip Stick. . . . . . . . . . . . . . . . . . . . . . . . . . 52
Filter .......... .................... 53
Oil Recommendations ............... 52
Viscosity
.............. ........ . .. .. 54
Exhaust
System .................... ... 37 Filters .................... ........... 75
Flashers
Hazard Warning
.................... 38 Turn Signal. ...................... , 16
Fluid Levels
Battery
............... Inside Back Cover
Brake Master Cylinder . . . . . . . . . . . .
.. 58
Engine Oil. . . . . . . . . . . . . . . . . . . . . . . .. 52
Power Steering. . . . . . . . . . . . . . . . . . . .. 59
Radiator. . . . . . . . . . . . . . . . . . . . . . . . . .. 39
Rear Axle. . . . . . . . . . . . . . . . . . . . . . .
.. 32
Transmission. . . . . . . . . . . . . . . . . . . . . .. 56
Foreign Countries, Operation In
...... .. 65
Fuel Gauge. . . . . . . . . . . . . . . . . . . . . . . . .. 20
Full Rated Load (See Tires)
Fumes ..
........ ..... ............ .. .. 37
Fuses ............................... 76
Gasoline Filler Cap
......... 51, Inside Back Cover
Low-Lead .
........................ 42
Recommendations. . . . . . . . . . . . . . . . ..
42
Generator Indicator Light. ............. 21