1971 CHEVROLET CAMARO checking oil
[x] Cancel search: checking oilPage 55 of 88

Downloaded from www.Manualslib.com manuals search engine NOTE: If this cap requires a re
placement, only· a cap with these
same features should be used. Fail
ure to use the correct cap can re
sult in a serious malfunction of the
system. Correct replacement caps
may
be obtained from your Au
thorized Chevrolet Dealer.
Engine Oil
Recommendations
Use only engine oil which meets
oil quality standard GM 6041-M.
High quality oils which are in
tended for service
MS and pass car
makers' tests are
of this quality.
The oil change interval (see para
graph entitled
"Engine Oil Change
Interval") and the new vehicle
warranty are based on the use of
oils that meet these requirements.
NOTE: Non-detergent and other
low quality oils are specifically not
recommended. The use of proper
engine oils and oil change intervals are
your best assurance of contin
ued reliability and performance
from your Camaro engine.
Checking Oil Level
The engine oil should be main
tained at proper level. The best
time to check it
is before operating
the engine or as
the last step in a
fuel stop. This will allow the oil ac
cumulation in the engine to drain
back in the crankcase .
To check
the evel, remove the oil gauge rod
(dip stick), wipe it clean and rein
sert it firmly for an accurate read
ing. The oil gauge rod
is marked
"FULL" and "ADD." The oil level
should be maintained in the safety
margin, neither going above the
"FULL" line nor below the "ADD"
line. Reseat the gauge firmly after
taking the reading.
NOTE: The oil gauge rod is also
marked
"Use GM 6041-M Quality
MS Oil" as a reminder to use only
52
high quality oils as prescribed
under "Engine Oil Recommenda
tions."
Supplemental Engine Oil
Additives
The regular use of supplemental
additives
is specifically not recom
mended and will increase operat
ing costs. However, in cases of spe
cific problems which may arise
under certain conditions, additive
supplements are available that can
effectively and economically solve
these problems without causing
other difficulties.
For example, if
higher detergency
is required to re
duce varnish and sludge deposits
resulting from some unusual opera
tional difficulty, a thoroughly tested
and approved concentrate -
"En
gine Oil Supplement"-is available
at your Chevrolet dealer.
It is sug
gested that, in the event of
an oper
ational problem, you consult your
dealer for advice.
Page 62 of 88

Downloaded from www.Manualslib.com manuals search engine Standard Steering Gear
The steering gear is factory
filled with steering gear lubricant.
Seasonal change of this lubricant
should not be performed
and the
housing should
not be drained-no
lubrication
is required for the life
of the steering gear.
Every 36,000 miles, the gear
should be inspected for seal leak
age (actual solid
grease-not just
oily film).
If a seal is replaced or
the gear is overhauled, the gear
housing should be refilled with
Part No. 1051052 (13 oz. con
tainer)
Steering ' Gear Lubricant
which meets
GM Specification GM
4673M, or its equivalent.
NOTE: Do not use EP Chassis
Lube, meeting
GM Specification
GM 6031 M, to lubricate the gear.
DO NOT OVER-FILL the gear
housing.
Power Steering Pump
Every 6,000 miles or 4 months
Check level in pump reservoir. Fill
pump reservoir
as required with
GM Power Steering Fluid or, if
this
is not available, DEXRON®
Automatic Transmission fluid.
Oil
should be at operating tempera
ture
and wheels in straight ahead
position when checking
or filling
operation is performed to ensure
against over-filling.
Hood Latches
Every 4 months or 6,000 miles,
whichever occurs first, lubricate
hood latch assembly
and hood
hinge assembly as follows:
1. Wipe off any accumulation of
dirt
or contamination on latch
parts.
2. Apply Lubriplate
or equivalent
to latch pilot bolts
and latch
locking plate.
3. Apply light engine oil to
all
59
pivot points in release mecha
nism, as well as primary
and sec
ondary latch mechanisms.
4. Lubricate hood hinges.
5. Make hood hinge
and latch
mechanism functional check to
assure the assembly is working
correctly.
Air Conditioning
Have your Chevrolet Dealer
check your Air Conditioning sys
tem at some time during the winter
months to
be sure there has been
no loss in cooling output. During
the summer, see your Chevrolet
Dealer immediately if you suspect
the system is
not performing as it
should.
NOTE: On vehicles equipped with
a
Four Season Air Conditioning
System, the system will not operate
below ambient temperatures of
30oP. regardless of control posi
tion.
Page 63 of 88

Downloaded from www.Manualslib.com manuals search engine Cooling System Care
Checking the coolant level at
each engine oil change. Level
should be
3" below bottom of filler
neck when cold.
Coolant Recommendations
The inhibited year-around cool
ant, used to
fill the cooling system
at the factory,
is a high quality so
lution that meets General Motors
Specifications 1899-M. This fac
tory-fill coolant solution
is formu
lated to withstand two full calendar
years of normal operation without
draining, provided the same con
centration of coolant
is added if the
system needs additional fluid be
tween drain periods. The original
factory-fill coolant provides freez
ing protection to
-20°F (-32°F
in Canada).
Every two years, the cooling sys
tem should be serviced as follows:
1. Drain coolant, when hot,
through the radiator drain valve.
2. Close valve and add sufficient
plain· water to
fill system.
3. Run engine until normal operat
ing temperature
is reached.
4. Drain and refill the system as
described in steps 1, 2, and 3 a
sufficient number of times until
the drained liquid
is colorless.
5. Allow system to drain com
pletely and then close radiator
drain valve tightly.
6.
Add the necessary amount of
high quality inhibited glycol
base coolant meeting GM
Speci
fication 1899-M to provide the
required freezing and corrosion
protection
(at least to O°F.)
7. Run engine until normal oper
ating temperature
is reached.
8. Check and adjust level of cool
ant after system has cooled
suffi
ciently to remove radiator cap.
60
NOTE: Addition of supplemental
additives and other available ma
terials which have not been specifi
cally approved by GM are not nor
mally required in your car. Use of
these materials will result in un
warranted operating expense.
It is the owner's responsibility to
keep the freeze protection at a level
commensurate with the tempera
tures which may occur in the area
in which the vehicle will be oper
ated. Regardless of whether freez
ing temperatures are
or are not ex
pected, cooling system protection
should be maintained at least to
OaF to provide adequate corrosion
protection. When coolant addi
tions are required because of cool
ant loss or to provide additional
protection against freezing at tem
peratures lower than
-20°F,
(-32°F in Canada), a sufficient
amount of an ethylene glycol base
Page 72 of 88

Downloaded from www.Manualslib.com manuals search engine The chart on the previous page, and the information on the pages
which
follow, contains information designed to aid the average
driver to discover, and possibly correct, conditions resulting in minor
mechanical
difficulties in his car. The chart, designed to point out
possible solutions to several of the most common automotive mal
functions and point out a logical checking sequence, will lead step
by step to the most likely causes and corrective procedures. If, after
making the checks and adjustments suggested, the source of the
trouble has not been found and corrected, it is strongly recom
mended that an Authorized Chevrolet Dealer inspect the vehicle and
make whatever repairs
or adjustments are necessary.
FUEL SYSTEM AND ENGINE
If the ignition switch will cause the engine to "turn over" or
"crank" but the car will not start, check Steps A through D below.
NOTE:
If continual "Rooding" of the carburetor is evidenced by a
carbur.tor wet with
fuel or black exhaust smoke, perform the
operation suggested in paragraph D only.
(A) The first and most obvious,
and one of the most frequently overlooked, items to check when
you have difficulty in sta rting you r car is the amount . of fuel in the
tank. Make it a habit to check the FUEL GAUGE regularly and most especially at a time when the engine will "turn over" but will not
start.
(8)
If the fuel tank is noi empty,
you may cheek further to see Checking Fllel Flow
69
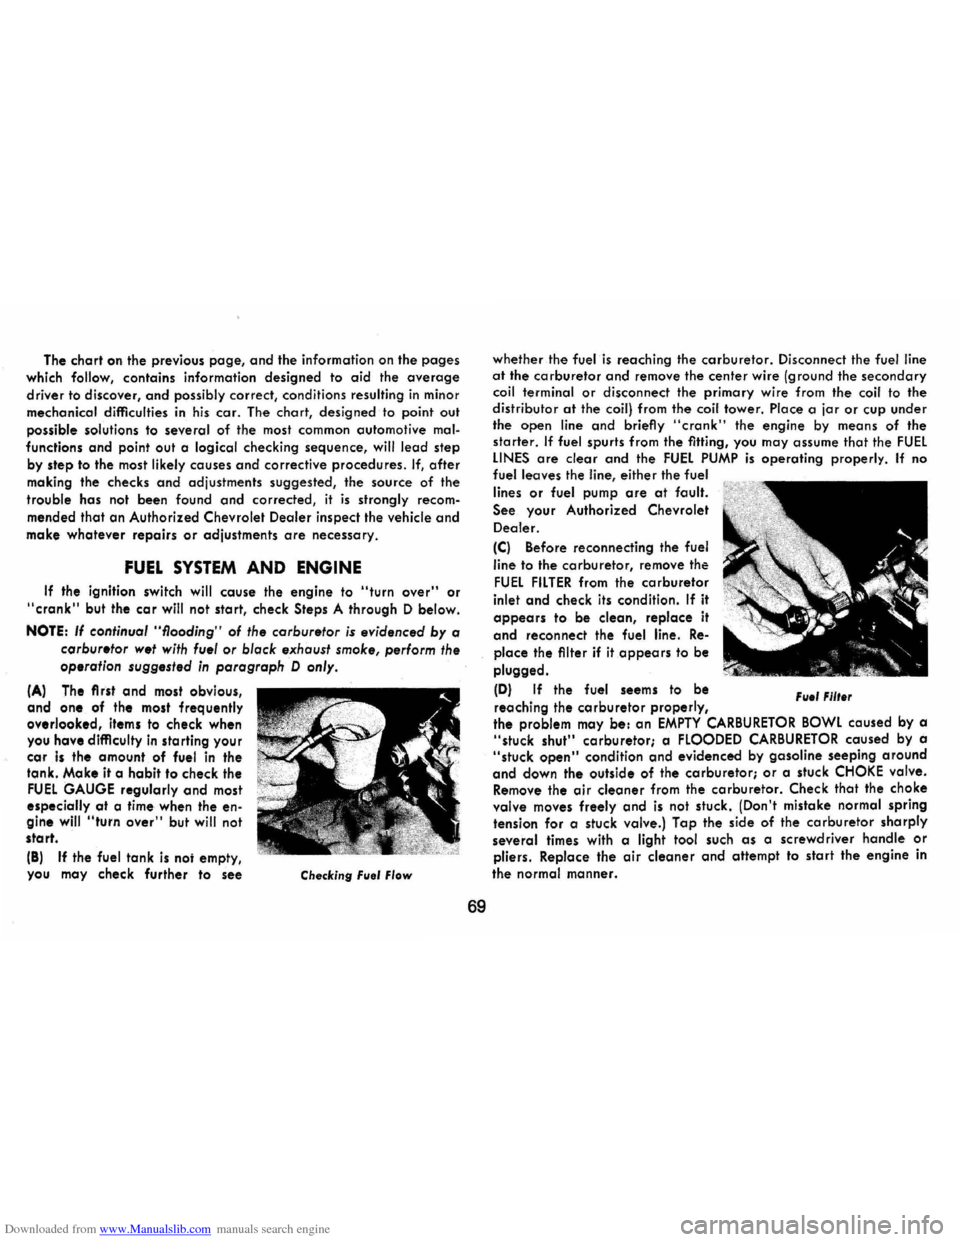
whether the fuel is reaching the carburetor. Disconnect the fuel line at the carburetor and remove the center wire (ground the secondary coil terminal or disconnect the primary wire from the coil to the distributor at the coil) from the coil tower. Place a jar or cup under
the open line and briefly "cronk" the engine by means of the
starter. If fuel spurts from the fitting, you may assume that the FUEL LINES are clear and the FUEL PUMP is operating properly. If no fuel leaves the line, either the fuel
lines
or fuel pump are at fault.
See. your Authorized Chevrolet
Dealer.
(C) Before reconnecting the fuel
line
to the carburetor, remove the
FUEL FILTER from the carburetor
inlet and check its condition. If it
appears to be clean, replace it
and reconnect the fuel line. Re
place the filter if it appears to be
plugged.
(D) If the fuel seems to be
reaching the
carburetor properly, File' Fllt.r
the problem may be: an EMPTY CARBURETOR BOWL caused by a "stuck shut" carburetor; a FLOODED CARBURETOR caused by a "stuck open" condition and evidenced by gasoline seeping around
and down the outside of the carburetor; or a stuck CHOKE valve. Remove the air cleaner from the carburetor. Check that the choke valve moves freely and is not stuck. (Don't mistake normal spring
tension for a stuck valve.) Tap the side of the carburetor sharply
several times with a light tool such as a screwdriver handle or pliers. Replace the air cleaner and attempt to start the engine in
the
normal manner.
Page 74 of 88

Downloaded from www.Manualslib.com manuals search engine a bobby pin) between the rubber
cup at the end of the spark plug
wire
and the tubular metal con
nector inside of it. If the spark plug wire is wet or oily, wipe it
dry. Wrap a dry handkerchief or facial tissue, folded several thick·
nesses, around the wire at least
three inches back from the end
and grasp the wire at this point.
Hold the bare wire about 1f4 inch
from the
bare tip of the spark
plug from which you removed the Checking Spark
wire. When the engine is "turned over" a spark should jump across
the 1f4 inch space, indicating ample current supply. If no spark
jumps, the difficulty is probably caused by a defective ignition part
and should be corrected by. your Authorized Chevrolet Dealer.
COOLING SYSTEM
When the car will run but evidences serious overheating on the temperature gauge in the instrument panel, there are several items
which may be checked.
(L) Engine overheating will occur when the OIL LEVEL falls dangerously low. Check the oil level as a matter of course.
(M) Low COOLANT LEVEL will, of course, cause engine over
heating. Determine the cause of the low coolant level and have
it corrected if necessary.
(N) Check the RADIATOR CORE. Clean it if it is plugged with
bugs, leaves or other foreign material.
71
(0) Condition of the FAN BELT is very important, not only for engine cooling but also for proper
generator operation. Check the
condition of the belt. Replace it if it is worn or frayed. Loosen the generator toward the engine to remove and replace the belt. Tighten the belt, whether new or old, by loosening the generator bolts, prying with a bar on the generator until the belt is ten
sioned properly, then retighten
the
generator bolts.
(P) Another cause of engine overheating may be an inoperative COOLING SYSTEM THERMOSTAT. If the thermostat should fail in the closed position, it will not
permit coolant to circulate through
the system.
In such an emergency the thermostat may be removed
but should be replaced with a properly functioning thermostat as soon as possible.
Fan Belt Tension
Thermostat
Installation