1971 CHEVROLET CAMARO check engine light
[x] Cancel search: check engine lightPage 40 of 88

Downloaded from www.Manualslib.com manuals search engine lights, turn signals, backup lamps, and hazard
warning flashers. Have someone observe operation
of each light while you activate the controls.
• Starter Safety Switch (Automatic Transmis
sion Cars)
CAUTION: Before making the following check, be sure to have a clear distance ahead and behind the car, set the parking brake and firmly apply the foot brake. Do not depress accelerator pedal. Be prepared to turn ott ignition switch immediately if engine should start.
Check starter safety switch by placing the transmis
sion in each of the driving gears while attempting to
start the engine. The starter should operate only in the
Park ("P") or Neutral ("N") positions.
• Starter Interlock (Manual Transmission Cars)
-To check a manual transmission equipped car,
depress the clutch halfway, place the transmission
in neutral, and attempt to start.
The starter should
operate only when clutch
is fully depressed.
• Transmission Shift Indicator-Check to be sure
shift indicator accurately indicates the shift posi
tion selected.
• Horn-Blow the horn occasionally to be sure that
it works.
37
• Seat Back LatcheS-Check to see that seat bac k
latches are holding by pulling forward on the seat
back top.
• Rearview Mirrors and Sun Visors-Check that
friction joints are properly adjusted so mirrors and
sun visors stay in the selected position.
• Door LatcheS-Check for positive closing, la tch
ing and locking.
• Hood Latches-Check to make sure hood closes
firmly . Check also for broken , d amaged or missing
parts which might prevent secure latching.
• Fluid LeakS-Check for fuel, water, oil or other
fluid leaks by observing the ground beneath the
vehicle after it has been parked for a while . (Water
dripping from air conditioning system after use
is
normal). If gasoline fumes are noticed at any time,
the cause should be determined
and corrected with
out delay because of the possibility of fire.
• Exhaust System-See engine exhaust gas caution
at beginning of starting and operating section of
this manual for suggested driver observations and
checks.
Page 43 of 88

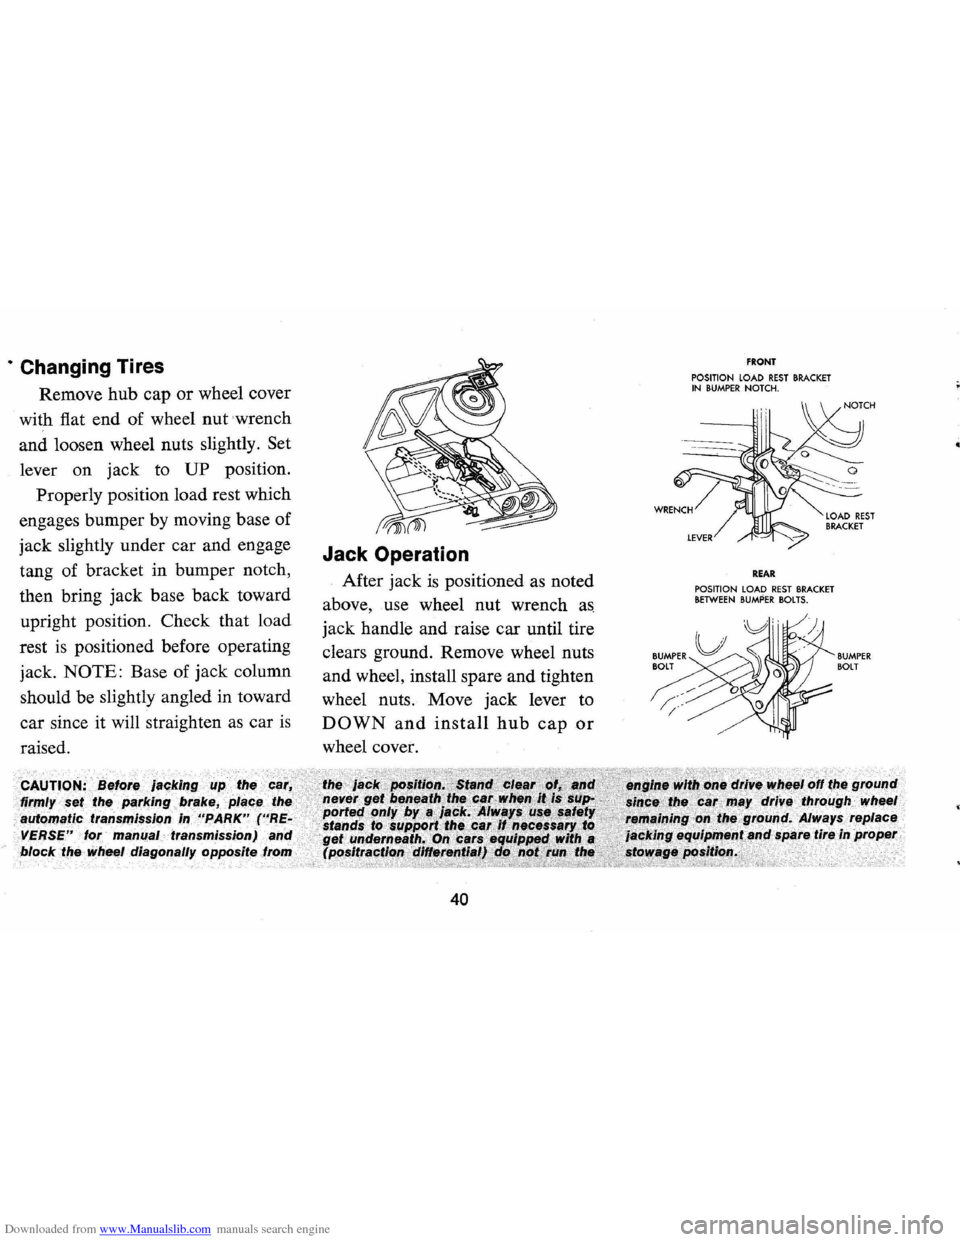
Downloaded from www.Manualslib.com manuals search engine · Changing Tires
Remove hub cap or wheel cover
with fiat end of wheel
nut wrench
and loosen wheel nuts slightly.
Set
lever on jack to UP position.
Properly position load rest which
engages bumper by moving base of
jack slightly under car and engage
tang of bracket in bumper notch,
then bring jack base back toward
upright position. Check that load
rest is positioned before operating
jack.
NOTE: Base of jack column
should be slightly angled in toward
car since it will straighten as car
is
raised.
firmly
automatic rralrlSOIlSSlon
VERSE" lor manual transmission)
Jack Operation
After jack is positioned as noted
above, use wheel nut wrench
as
jack handle and raise car until tire
clears ground. Remove wheel nuts
and wheel, install spare and tighten
wheel nuts. Move jack lever to
DOWN and install hub cap or
wheel cover.
block the wheel diagonally opposite .. _.... .,.. __
40
FRONT POSITION LOAD REST BRACKET IN BUMPER NOTCH.
REAR POSITION LOAD REST BRACKET BETWEEN BUMPER BOLTS.
BUMPER BOlT
Page 62 of 88

Downloaded from www.Manualslib.com manuals search engine Standard Steering Gear
The steering gear is factory
filled with steering gear lubricant.
Seasonal change of this lubricant
should not be performed
and the
housing should
not be drained-no
lubrication
is required for the life
of the steering gear.
Every 36,000 miles, the gear
should be inspected for seal leak
age (actual solid
grease-not just
oily film).
If a seal is replaced or
the gear is overhauled, the gear
housing should be refilled with
Part No. 1051052 (13 oz. con
tainer)
Steering ' Gear Lubricant
which meets
GM Specification GM
4673M, or its equivalent.
NOTE: Do not use EP Chassis
Lube, meeting
GM Specification
GM 6031 M, to lubricate the gear.
DO NOT OVER-FILL the gear
housing.
Power Steering Pump
Every 6,000 miles or 4 months
Check level in pump reservoir. Fill
pump reservoir
as required with
GM Power Steering Fluid or, if
this
is not available, DEXRON®
Automatic Transmission fluid.
Oil
should be at operating tempera
ture
and wheels in straight ahead
position when checking
or filling
operation is performed to ensure
against over-filling.
Hood Latches
Every 4 months or 6,000 miles,
whichever occurs first, lubricate
hood latch assembly
and hood
hinge assembly as follows:
1. Wipe off any accumulation of
dirt
or contamination on latch
parts.
2. Apply Lubriplate
or equivalent
to latch pilot bolts
and latch
locking plate.
3. Apply light engine oil to
all
59
pivot points in release mecha
nism, as well as primary
and sec
ondary latch mechanisms.
4. Lubricate hood hinges.
5. Make hood hinge
and latch
mechanism functional check to
assure the assembly is working
correctly.
Air Conditioning
Have your Chevrolet Dealer
check your Air Conditioning sys
tem at some time during the winter
months to
be sure there has been
no loss in cooling output. During
the summer, see your Chevrolet
Dealer immediately if you suspect
the system is
not performing as it
should.
NOTE: On vehicles equipped with
a
Four Season Air Conditioning
System, the system will not operate
below ambient temperatures of
30oP. regardless of control posi
tion.
Page 70 of 88

Downloaded from www.Manualslib.com manuals search engine Interval
First 12,000 miles Every 12
months
or 12,000 miles
Every
24,000 miles
Service To Be Performed
• Rotate distributor cam lubricator. See 24,000 mile recommendation.
• Insp .ect air cleaner element, if satisfactory
rotate 1800 from original position and reinstall. See 24,000 mile recommendation.
• Inspect brake linings and check system for
leaks
• Inspect parking brake and throttle linkage. • Engine tune-up.
Replace carburetor 'Inlet fuel filter element. • Check emission control items. • Inspect AIR drive belt.
Evaporation Control System-Replace filter in
base of canister and inspect canister. • Check headlamp aiming.
• Repack front wheel bearings.
• Replace distributor cam lubricator. • Drain automatic transmission sump and add
fresh fluid (normal passenger car service).' Adjust Powerglide low band at first fluid
change.
• Replace crankcase ventilation filter (located
within air cleaner).
• Replace Turbo Hydra-Matic sump filter.
Interval Service To Be Performed
Every 2 years • Drain radiator coolant, flush and refill system.
Every
24 months· Replace PCV Valve. Inspect all hoses and or 24,(100 miles fittings.
Every
36,000 • Check steering gear for seal leakage (actual
miles solid grease-not just oily film).
• Lubricate clutch cross shaft (sooner if necessary), remove plug and install lube fittIng.
During Winter
• Check operation of air conditioning system.
months
Periodically • Check battery liquid leve/.
• Inspect seat belts, buckles, retractors and
anchors.
• Check all lights for proper operation.
As Required
• Check wheel alignment and balancing.
'Service more often during severe operating conditions as outlined under Service and Maintenance.
67
Page 72 of 88

Downloaded from www.Manualslib.com manuals search engine The chart on the previous page, and the information on the pages
which
follow, contains information designed to aid the average
driver to discover, and possibly correct, conditions resulting in minor
mechanical
difficulties in his car. The chart, designed to point out
possible solutions to several of the most common automotive mal
functions and point out a logical checking sequence, will lead step
by step to the most likely causes and corrective procedures. If, after
making the checks and adjustments suggested, the source of the
trouble has not been found and corrected, it is strongly recom
mended that an Authorized Chevrolet Dealer inspect the vehicle and
make whatever repairs
or adjustments are necessary.
FUEL SYSTEM AND ENGINE
If the ignition switch will cause the engine to "turn over" or
"crank" but the car will not start, check Steps A through D below.
NOTE:
If continual "Rooding" of the carburetor is evidenced by a
carbur.tor wet with
fuel or black exhaust smoke, perform the
operation suggested in paragraph D only.
(A) The first and most obvious,
and one of the most frequently overlooked, items to check when
you have difficulty in sta rting you r car is the amount . of fuel in the
tank. Make it a habit to check the FUEL GAUGE regularly and most especially at a time when the engine will "turn over" but will not
start.
(8)
If the fuel tank is noi empty,
you may cheek further to see Checking Fllel Flow
69
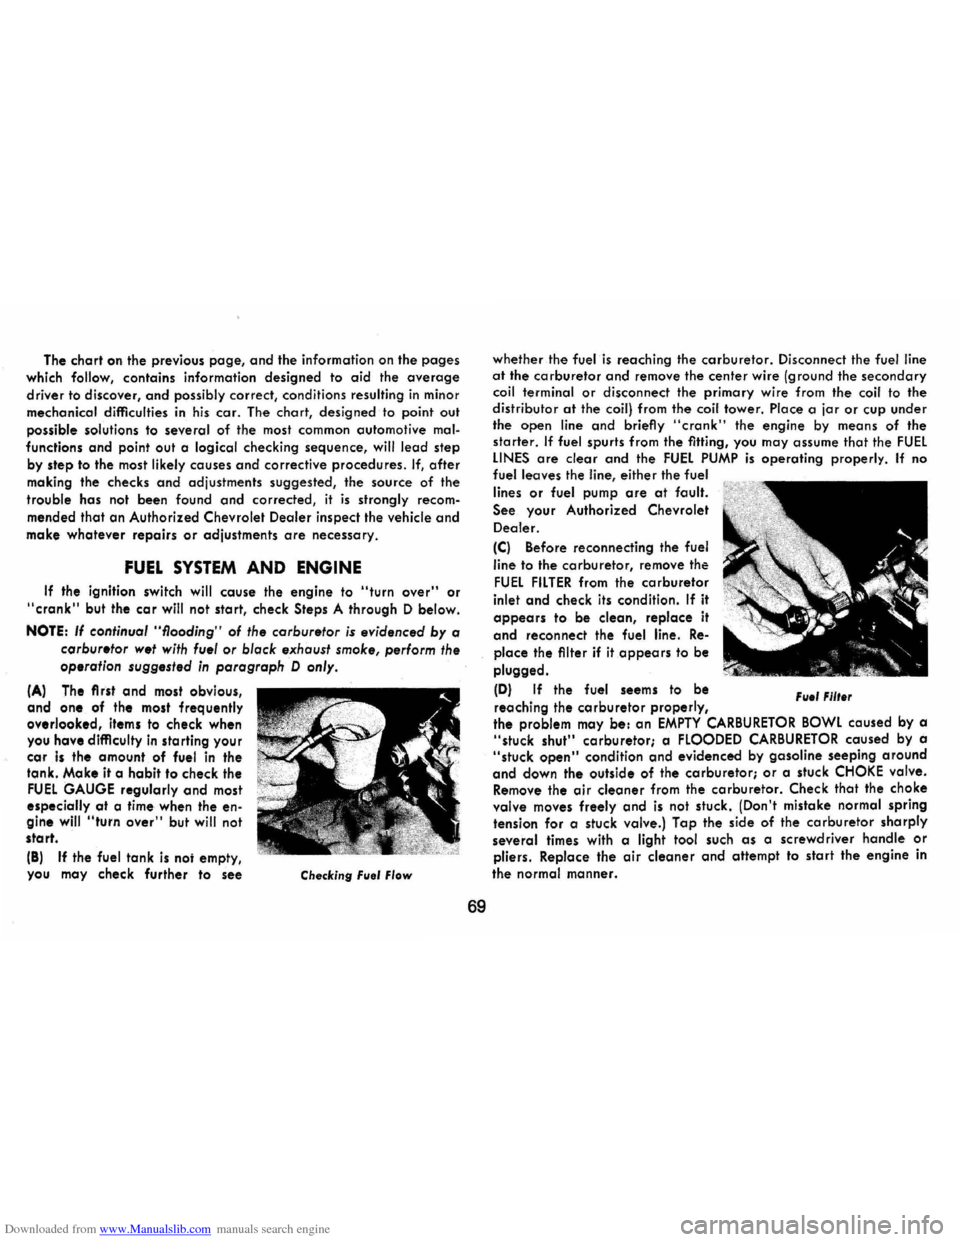
whether the fuel is reaching the carburetor. Disconnect the fuel line at the carburetor and remove the center wire (ground the secondary coil terminal or disconnect the primary wire from the coil to the distributor at the coil) from the coil tower. Place a jar or cup under
the open line and briefly "cronk" the engine by means of the
starter. If fuel spurts from the fitting, you may assume that the FUEL LINES are clear and the FUEL PUMP is operating properly. If no fuel leaves the line, either the fuel
lines
or fuel pump are at fault.
See. your Authorized Chevrolet
Dealer.
(C) Before reconnecting the fuel
line
to the carburetor, remove the
FUEL FILTER from the carburetor
inlet and check its condition. If it
appears to be clean, replace it
and reconnect the fuel line. Re
place the filter if it appears to be
plugged.
(D) If the fuel seems to be
reaching the
carburetor properly, File' Fllt.r
the problem may be: an EMPTY CARBURETOR BOWL caused by a "stuck shut" carburetor; a FLOODED CARBURETOR caused by a "stuck open" condition and evidenced by gasoline seeping around
and down the outside of the carburetor; or a stuck CHOKE valve. Remove the air cleaner from the carburetor. Check that the choke valve moves freely and is not stuck. (Don't mistake normal spring
tension for a stuck valve.) Tap the side of the carburetor sharply
several times with a light tool such as a screwdriver handle or pliers. Replace the air cleaner and attempt to start the engine in
the
normal manner.
Page 73 of 88

Downloaded from www.Manualslib.com manuals search engine (E) If the car will start but stalls when hot or has a rough idle, you can suspect a faulty IDLE ADJUSTMENT, a malfunctioning AUTOMATIC CHOKE or an extremely dirty and blocked AIR CLEANER ELEMENT. Replace paper element air cleaner if necessary. Idle adjustment or automatic choke service (other than that outlined in paragraph D above) should be performed by your Chevrolet Dealer.
If the above Fuel System checks and the checks suggested under the Electrical System following do not correct the malfunction, it is recommended that you return to your Authorized Chevrolet Dealer for further checks, adjustments or repairs.
ELECTRICAL SYSTEM
If, when the ignition key is turned to "Start", the engine will not
turn over, you have good reason to suspect electrical trouble.
NOTE: Never remove Delcotron bat lead without first disconnecting battery ground cable.
(F) When there is no response at all to attempts to start the car, check the obvious-your AUTOMATIC TRANSMISSION SELECTOR LEVER must be in Neutral or Park position before the engine can be started. Turning the IGNITION SWITCH rapidly back and forth several times will sometimes correct a poor internal switch contact.
(G) The BATIERY may be discharged. If so, lights will be dim and the horn will have a poor tone if it will blow at all.
Usually
a garage recharge will be necessary to return the battery to operation. Occasionally, however, a long drive will recharge the battery.
NOTE: If the battery is determined to be dead, and for no apparent reason, have your Authorized Chevrolet Dealer check the
battery, the GENERATOR and the VOLTAGE REGULATOR. GENERATOR trouble should already have been indicated by the gene~ator indicator light on the instrument panel.
70
POOR BATIERY CONNECTIONS may be suspected if the car has operated properly a short time before and now not even the horn will operate. Check both ends of both battery cables. If the con
nections are corroded, a car may sometimes be restored to operation by removing all cable ends, scraping all contacting surfaces clean with a pen knife, and reassembling. If the cables are broken,
they must be replaced. The power supply should now be restored unless the battery is dead.
(H) If, however, the lights and horn work properly but the starter will still not turn over, check the STARTER connections. A "click" from the starter solenoid indicates that the wiring to the starter is properly installed. If the wiring seems to be clean and tightly installed, the trouble is probably in the starter itself and should be referred to your Authorized Chevrolet Dealer.
When the engine will "turn over" but will not start, the following items may be checked along with the Fuel Systems Checks listed
previously.
(I) With a clean dry cloth, wipe the ceramic portions of the spark plugs dry. In particularly damp or rainy weather dampness may be the cause of not starting, especially when the engine is cold.
(J) Check the cables at the top of the distributor and coil as well as each spark plug cable for tightness.
(K) If the car will still not start, check for spark at the spark plugs in the following manner:
Pull one of the spark plug wires off its spark plug. Insert a
short piece of bare wire (such as Distributor and Coil Cables
Page 79 of 88

Downloaded from www.Manualslib.com manuals search engine FUSES AND CIRCUIT BREAKER:
The headlamp circuit is protected by a circuit breaker in the light switch. An overload on the breaker will cause the lamps to "flicker" on and off. If this condition develops, have your headlamp wiring checked immediately. Where current load is too heavy, the circuit breaker intermittently opens and closes, protecting the circuit until the cause is found and eliminated.
Fuses, located in the Junction Block beneath the dash are:
Radio, T.S.C. Sol. Rear Defogger Glove Box lamp .... .. ............. 10 Amp.
Wiper .................... . . . ............... 25 Amp.
Stop and Hazard Warning Lamps .. ...... ... .. ... ... ... .. . 20 Amp.
Dir. Sig. B/U lamps .. ......... . .
.. .. .. ....... 20 Amp.
Heater, A /C. . . . . . .. .. .. .. .. .. . .. .. . .. .. . .......... . . 25 Amp.
Inst. Lamps, Anti·Diesel Relay Dome, Floor Shift lamps ............. ..................... 2 Amp.
Gauges, Warning Lamps .... ................... ........... 10 Amp.
Clock, Lighter, Courtesy ......................... .... .. .. 20 Amp.
Tail, License, Luggage sidemarker and Parking Lamps ............... .................... 20 Amp.
An Air Conditioning high blower speed fuse, 30 amp. is located in an In·line fuse holder running from horn relay to Air Conditioning relay.
Do not use fuses of higher amperage rating than those recommended above.
Fusible Links are incorporated into the wiring system. These are wires of such a gauge that they will fuse (or melt) before damage occurs to an entire wiring harness in the event of an electrical overload. See your Chevrolet Dealer if fusible link replacement becomes necessary.
76
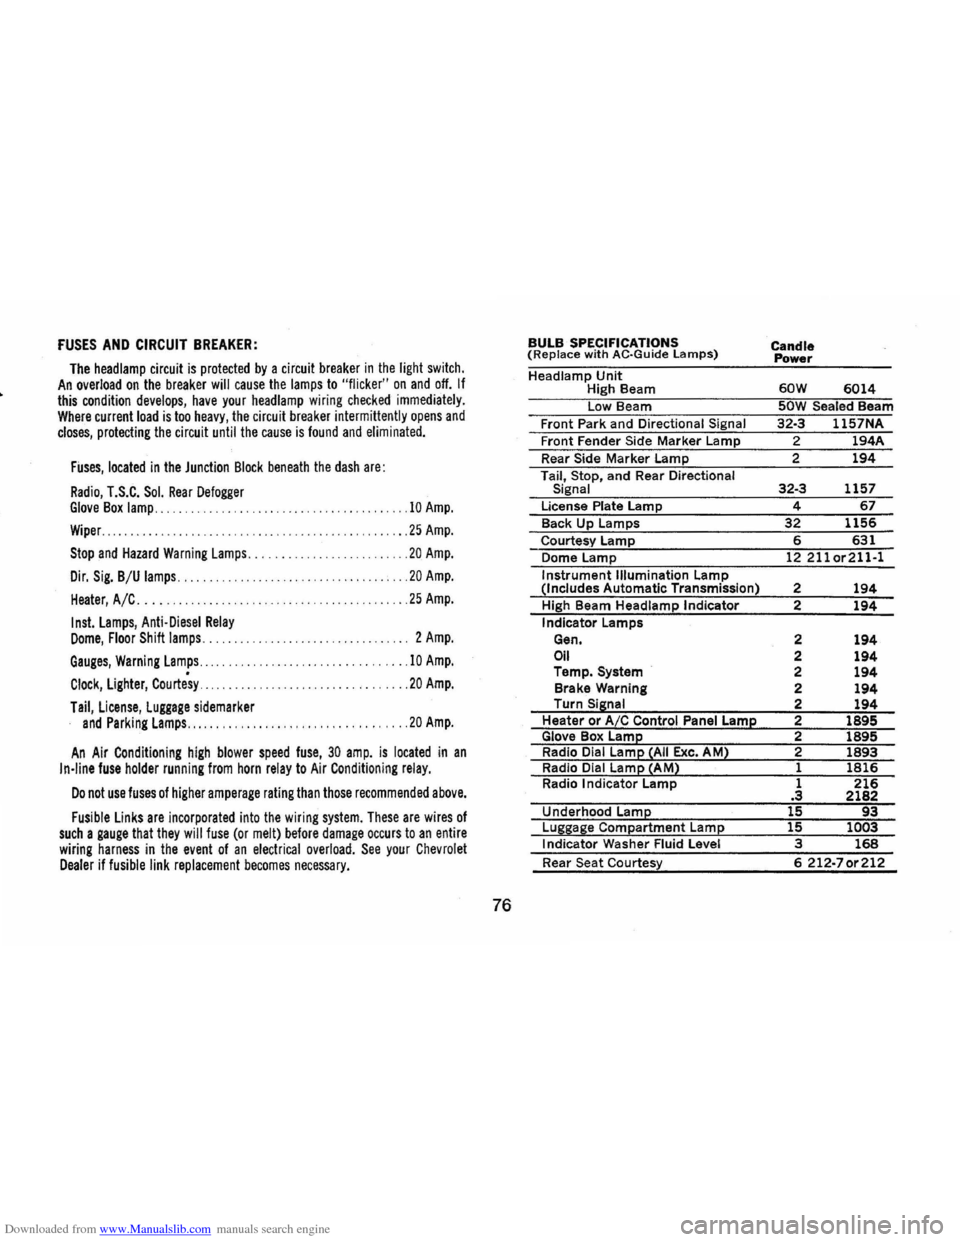
BULB SPECIFICATIONS (Replace with AC·Guide lamps)
Headlamp Unit High Beam
Low Beam
Front Park and Directional Signal
Front Fender Side Marker Lamp
Rear Side Marker Lamp
Tail, Stop, and Rear Directional
Signal
License Plate Lamp
Back Up Lamps
Courtesy Lamp
Dome Lamp
Instrument Illumination Lamp (Includes Automatic Transmission)
High Beam Headlamp Indicator
Indicator Lamps
Gen.
Oil Temp. System
Brake Warning
Turn
Sisnal Heater or A/C Control Panel Lame Glove Box Lame Radio Dial Lame ~AII Exc. AM2 Radio Dial Lame ~AM2 Radio Indicator Lamp
Underhood
Lame
Luggase Compartment Lame Indicator Washer Fluid Level
Rear Seat Courtesy Candle
Power
60W 6014 50W Sealed Beam
32·3 1157NA
2 194A
2
194
32·3 1157
4 67
32 1156
6 631 12211or211·1
2 194 2 194
2 194 2 194 2 194 2 194 2 194 2 1895 2 1895 2
1893
1 1816 1 216 .3 2182 15 93 15 1003 3 168
6 212·70r212
Page 87 of 88

Downloaded from www.Manualslib.com manuals search engine Headlamp Aim
............................... 35 Flickering (Circuit Breaker). . . . . . . . . . 76
Dimmer Switch ..................... 32 High Beam Indicator ................ 22
Light Switch. . . . . . . . . . . .. . . . . . . . . .. 22
Heater Operation ..................... 25
Hood
Latch Maintenance. . . . . . . . . . . . . . .
.. 59
Release ............... Inside Back Cover
Identification Numbers. . . . . . . . . . . . .
.. 72
Ignition Keys and Lock. . . . . . . . . . . . . . . 3
Inflation Pressure, Tires. . . . . . . . . . . . . .. 62
Instrument Panel. . . . . . . . . . . . . . . . . . .
.. 19
Keys................................ 3
Knocking Engine
(See Fuel
Recommendations)
Lane Changer and Turn
Signal. . . . . . . . . 16
Lights
Bulb Chart. . . . . . . . . . . . . . . . . . . . . . .
.. 76
Hazard Flasher. .. . .. . .. . . .. . . .. . ... 38
Headlamps. . . . . . . . . . . . . . . . . . . . . . . .. 32
Turn Signal. . . . .. .. . .. . .. . . .. . . . ... 16
Locks Door............. ................. 3
Ignition. . . . . . . . . . . . . . . . . . . . . . . . . . . 3
Steering Column .................... 12
Maintenance. . . . . . . . . . . . . . . . . . . . . . . .. 51
Maintenance Schedule. . . . . . . . . . . . . . . .. 66
Overheated Engine
Indicator Light. .
.. .. .. .. .. .. .. .. 21, 23
What To Do. . . . . . . . . . . . . . . . . . . . . .. 39 Owner Relations ...................... 77
Owner Safety Checks .................. 33
Polishing and Waxing. . . . . . . . . . . . . . . .. 47 Radiator
Coolant
................... .. ...... 60
Overheating. . . . . . . . . . . . . . . . . . . . . . .. 39
Pressure Cap. . . . . . . . . . . . . . . . . . . . . .. 61
Radio ......... .. .................... 29
Safety Check Schedule.. .. . . . . . . . . . . . .. 33
Seat
Adjustment, Manual. . . . . . . . . . . . . .
.. 4
Back Latch, Folding Front. ......... , 4
Child
Safety. . . . . . . . . . . . . . . . . . . . . . .. 8
Folding............................ 4
Sea t Belts. . . . . . . . . . . . . . . . . . . . . . . . . . .. 5
Child Restraint. ..
.. .. . . . . . . . . . . . . .. 8
Inspection and Care. . . . . . . . . . . . . . .
.. 7
Lap............................... 5
Releasing Belts. .. . . . . . . . . . . . . . . . . .. 7
Shoulder...
.. . . .. . ... . .... . . . . . . . .. 6
Self~Adjusting Brakes .............. ... 31 Spare Tire
Jacking Instructions
................ , 40
Specifications ......................... 72
Starter Safety Switch. . . . . . . . . . . . . . . . .. 37
Starting
Automatic Transmission Cars. . . . . . .. 13
Emergency . . . . . . . . . . . . . . . . . . . . . . . .. 39 Manual Transmission Cars ........... 13
Steering
Column Controls. . . . . . . . . . . . . . . . . .. 12
Gear Lubricant. . . . . . . . . . . . . . . . . . . .. 59
Maintenance . . . . . . . . . . . . . . . . . . . . . .. 59
Power. ............................ 17
Stuck in Sand, Snow or Mud ........... 39
Tachometer. . . . . . . . . . . . . . . . . . . . . . . . .. 23
Thermostat. . . . . . . . . . . . . . . . . . . . . . . . .. 61
Tires ................................ 61
Towing .......... ........... ......... 38
Trailer Hauling. . . . . . . . . . . . . . . . . . . . . . . 9
Transmission
3-Speed Manual. ........... ~ . . . . . .. 16
4-Speed Manual.. . .. . . .. . . . .. . . .... 16
Automatic. . . . . . . . . . . . . . . . . . . . . . . .. 14
Turn Signals. . . . . • . . . . . . . . . . . . . . . . . .. 16
Warning Lights
Generator. . . . . . . . . . . . . . . . . . . . . . .
.. 21 Brake ............................. 21
Engine Temperature .............. 21, 23
Oil Pressure ........................ 23
Wheel Changing .................... .. 40
Windshield
Defrosting and Defogging.. . . . . . . . . ..
25
Washer Solution .................... 24
Wipers and Washers ................ 24
Zone Offices. . . . . . . . . . . . . . . . . . . . . . . .. 79