1969 DATSUN B110 wheel
[x] Cancel search: wheelPage 75 of 136
Brakes
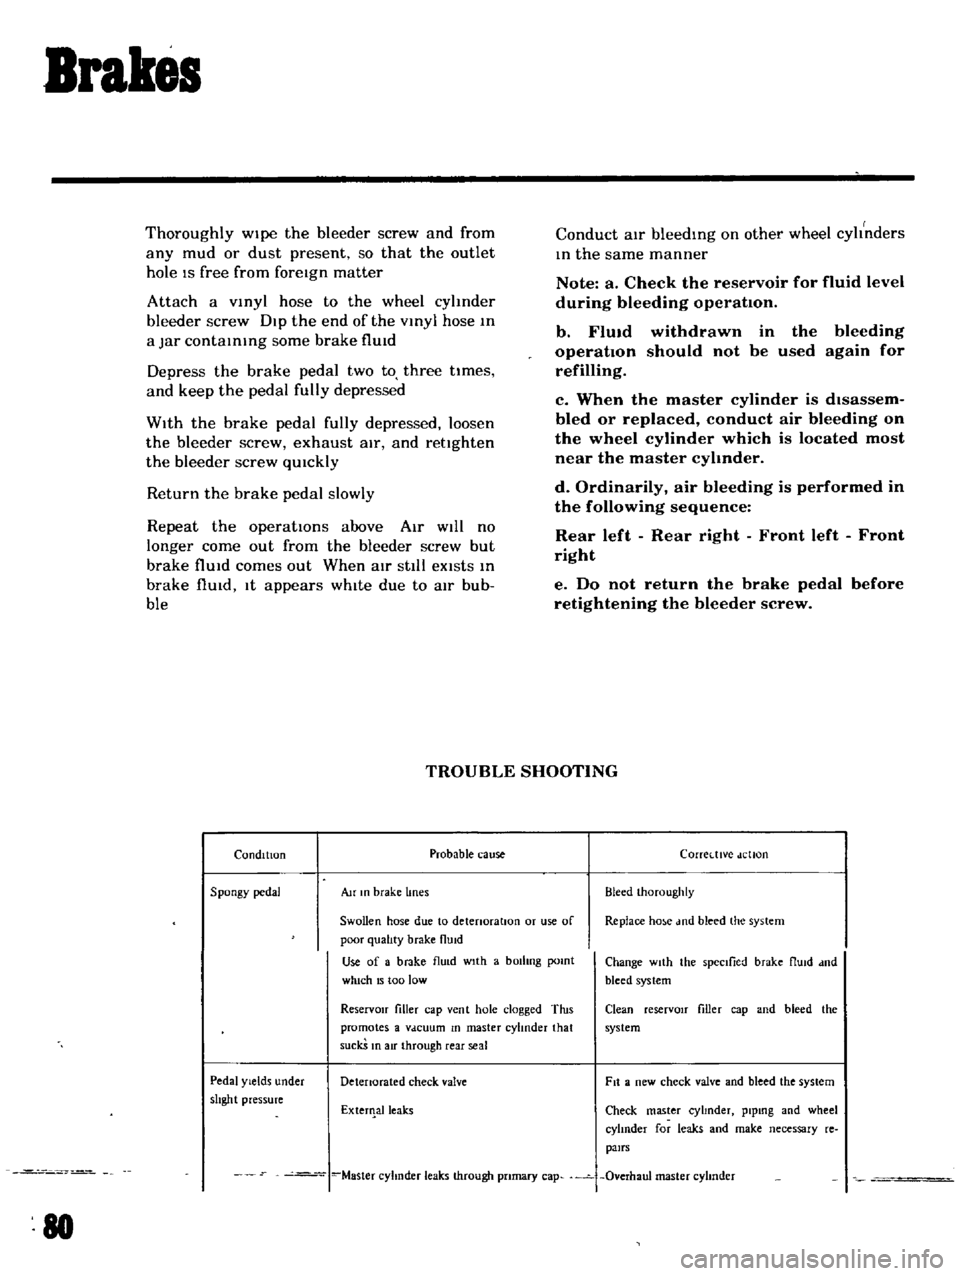
Thoroughly
Wipe
the
bleeder
screw
and
from
any
mud
or
dust
present
so
that
the
outlet
hole
IS
free
from
foreign
matter
Attach
a
VInyl
hose
to
the
wheel
cyhnder
bleeder
screw
Dip
the
end
of
the
VInyl
hose
In
a
Jar
contaInIng
some
brake
flUId
Depress
the
brake
pedal
two
to
three
times
and
keep
the
pedal
fully
depressed
With
the
brake
pedal
fully
depressed
loosen
the
bleeder
screw
exhaust
air
and
rettghten
the
bleeder
screw
qUIckly
Return
the
brake
pedal
slowly
Repeat
the
operatIons
above
Air
WIll
no
longer
come
out
from
the
bleeder
screw
but
brake
flUId
comes
out
When
atr
stIll
eXists
In
brake
flUId
It
appears
whIte
due
to
aIr
bub
ble
Conduct
aIr
bleedIng
on
other
wheel
cyhnders
In
the
same
manner
Note
a
Check
the
reservoir
for
fluid
level
during
bleeding
operation
b
FlUid
withdrawn
in
the
operation
should
not
be
used
refilling
bleeding
again
for
c
When
the
master
cylinder
is
dIsassem
bled
or
replaced
conduct
air
bleeding
on
the
wheel
cylinder
which
is
located
most
near
the
master
cyhnder
d
Ordinarily
air
bleeding
is
performed
in
the
following
sequence
Rear
left
Rear
right
Front
left
Front
right
e
Do
not
return
the
brake
pedal
before
retightening
the
bleeder
screw
TROUBLE
SHOOTING
Condition
Probable
cause
Corretttve
dellon
Spongy
pedal
Au
In
brake
lines
Bleed
Ihoroughly
Swollen
hose
due
to
detenoratlOn
or
use
of
Replace
ho
e
md
bleed
the
system
poor
qualIty
brake
flUid
Use
of
a
brake
flu
d
wIth
a
bOilIng
pomt
Change
wIth
the
spectlied
brake
flUId
dnd
which
15
too
low
bleed
system
ReservOir
filler
cap
vent
hole
clogged
Tins
Clean
reserVOIr
filler
cap
and
bleed
the
promotes
a
Vdcuum
In
master
cylinder
that
system
suckS
In
air
through
rear
seal
Pedal
Yields
under
Detenorated
check
valve
Fit
a
new
check
valve
and
bleed
the
system
shght
pressure
ExterIlalleaks
Check
master
cyhnder
plpmg
and
wheel
cylInder
for
leaks
and
make
necessary
re
pairs
Master
cyhnder
leaks
through
pnmary
cap
Overhaul
master
cyhnder
80
Page 76 of 136
Brakes
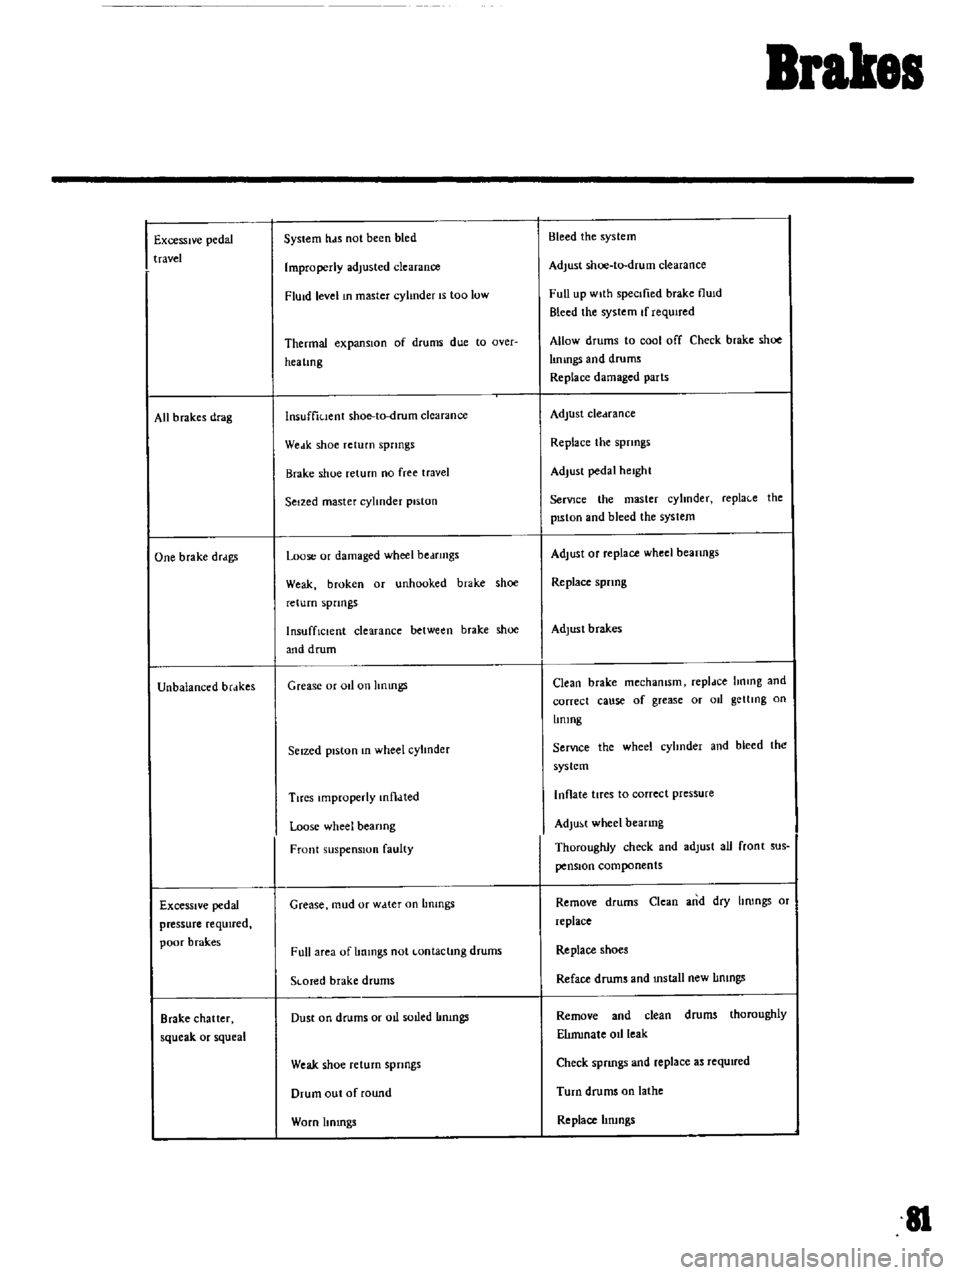
Excessive
pedal
travel
All
b
rakes
drag
One
brake
drdgs
Unbalanced
brdkes
Excessive
pedal
pressure
required
poor
brak
es
Brake
chatter
squeak
or
squeal
System
hds
not
been
bled
Improperly
adjusted
clearance
FlUid
level
In
master
cylinder
IS
too
low
Thermal
expansIOn
of
drums
due
to
Qver
hea
lmg
lnsuffiuent
shoe
to
drum
clearance
Weak
shoe
return
springs
Brake
shoe
return
no
free
travel
Seized
master
cylinder
piston
Loose
or
damaged
wheel
bedfmgs
Weak
broken
or
unhooked
brake
shoe
return
spnngs
InsuffiCient
clearance
between
brake
shoe
and
drum
Grease
or
011
on
hnmgs
Seized
piston
In
wheel
cylInder
Tires
Improperly
mtl
lted
Loose
wheel
bearing
Front
suspension
faulty
Grease
mud
or
w
tter
on
Lmmgs
Full
area
of
Immgs
not
Lontaclmg
drums
SLOTed
brake
drums
Dust
on
drums
or
oIl
soLled
Immgs
Weak
shoe
return
springs
Drum
out
of
round
Worn
Itmngs
Bleed
the
system
Adjust
shoe
to
drum
clearance
Full
up
wIth
specIfied
brake
flUId
Bleed
the
system
If
requIred
Allow
drums
to
cool
off
Check
brake
shoe
lImngs
and
drums
Replace
damaged
parts
Adjust
cledrance
Replace
the
spnngs
Adjust
pedal
height
SerVJce
the
master
cyhnder
repla
e
the
pISton
and
bleed
the
syslem
Adjust
Of
replace
wheel
beanngs
Replace
spnng
Adjust
brakes
Clean
brake
mechamsm
repldce
hnmg
and
correct
cause
of
grease
or
011
getllng
on
Lmmg
SerVIce
the
wheel
cyhnder
and
bleed
the
system
Inflate
tires
to
correct
pressure
Adjust
wheel
bearing
Thoroughly
check
and
adlust
all
front
sus
pensIOn
components
Remove
drums
Clean
and
dry
hrongs
or
replace
Replace
shoes
Reface
drums
and
mstall
new
IImngs
Remove
and
clean
drums
thoroughly
ElImmale
oIl
leak
Check
spnngs
and
replace
as
required
Turn
drums
on
lathe
Replace
hrungs
II
Page 79 of 136
Pront
Suspension
j
I
t
4
l
I
i
r
t
I
J
l
I
hf
c
a
j
ll
l
l
11
J
1
f
t
r
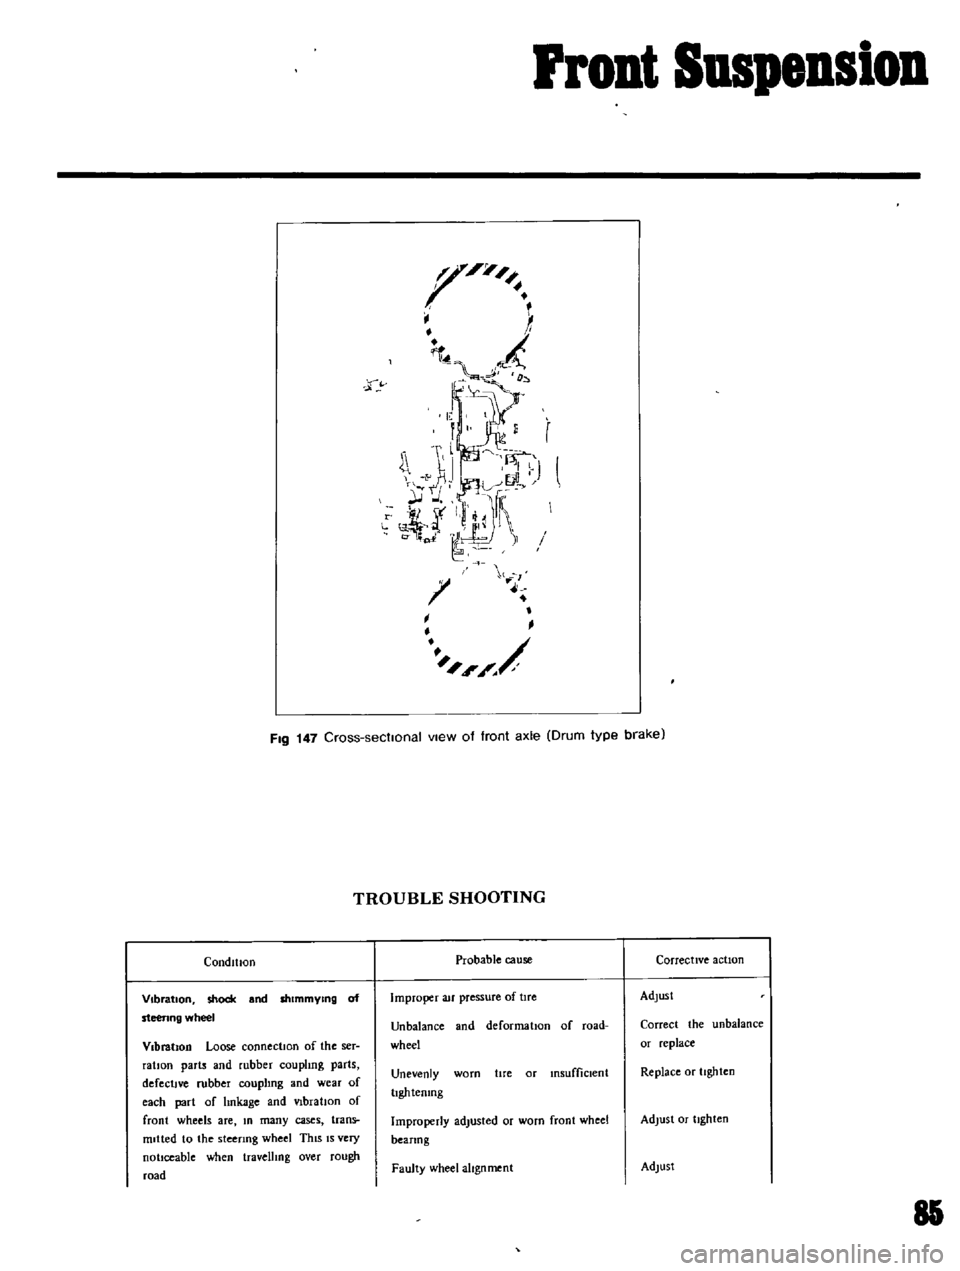
FIg
147
Cross
sectIonal
vIew
of
front
axle
Drum
type
brake
CondltJOn
Vibration
shock
and
shimmYing
of
steenng
wheel
Vibration
Loose
connectIOn
of
the
ser
ratIOn
parts
and
rubber
coupling
parts
defectIve
rubber
couplIng
and
wear
of
each
part
of
hnkage
and
VIbration
of
front
wheels
are
In
many
cases
trans
mitted
to
the
steenng
wheel
ThiS
IS
very
nottceable
when
travellIng
over
rough
road
TROUBLE
SHOOTING
Probable
cause
Improper
au
pressure
of
tIre
Unbalance
and
deformatIon
of
road
wheel
Unevenly
worn
hre
or
insufficient
IIghtemng
Improperly
adlusted
or
worn
front
wheel
beanng
Faulty
wheel
alignment
Corrective
action
Adjust
Correct
the
unbalance
or
replace
Replace
or
ttghten
Adjust
or
tIghten
Adlust
85
Page 80 of 136
Pront
Suspension
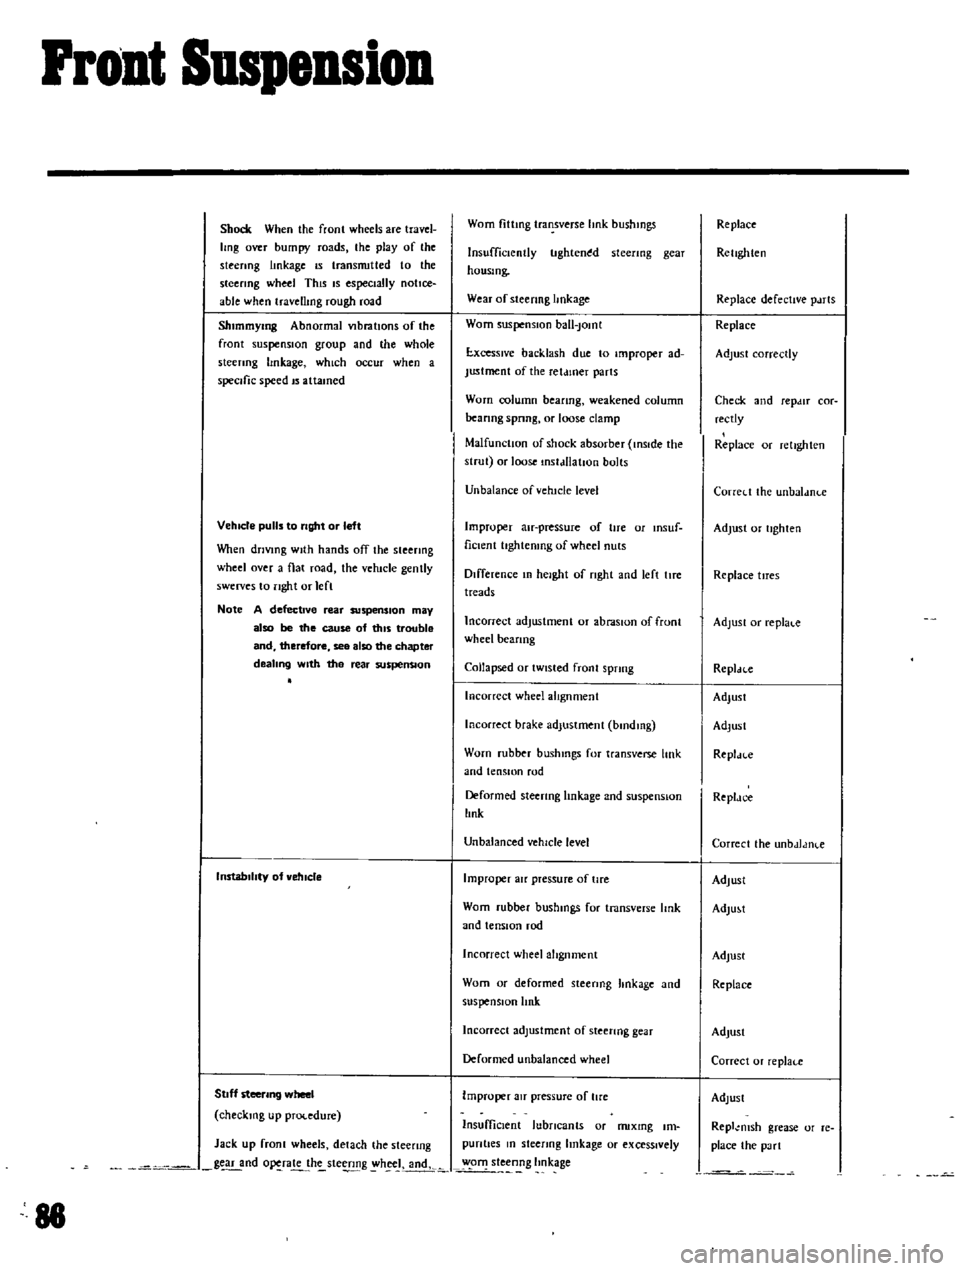
Shock
When
the
fronl
wheels
are
travel
Img
over
bumpy
roads
the
play
of
the
steenng
linkage
IS
transnutted
to
the
steering
wheel
This
IS
especially
notice
able
when
travellmg
rough
road
Shlmmymg
Abnormal
VIbratIOns
of
the
front
suspensIOn
group
and
lhe
whole
sleenng
hnkage
which
occur
when
a
specific
speed
IS
attamed
VehIcle
pulls
to
right
or
left
Vhen
driVing
With
hands
off
the
steering
wheel
over
a
flat
road
the
vehicle
gently
swerves
to
nght
or
lefl
Note
A
defective
rear
suspenSion
may
also
be
the
cause
of
tillS
trouble
and
therefore
see
also
the
chapter
dealing
With
the
rear
suspenSion
InstabilIty
of
vehIcle
Stoff
steering
wheel
checking
up
procedure
Jack
up
fronl
wheels
detach
the
steenng
g
nd
o
ra
h
ste
g
h
J
andk
88
Worn
fittmg
transverse
hnk
bushmgs
Insufficiently
tlghten
d
steenng
gear
housmg
Wear
of
steenng
hnkage
Worn
suspensIOn
ball
Jomt
E
xcesslve
backlash
due
to
improper
ad
Justment
of
the
ret
uner
parts
Worn
column
beanng
weakened
column
beanng
spnng
or
loose
clamp
MalfunctIOn
of
shock
absorber
inSIde
the
strut
or
loose
mstdllatJon
bolts
Unbalance
ofvehtcle
level
Improper
au
pressure
of
tire
or
msuf
ficlent
hghtenmg
of
wheel
nuts
Difference
In
height
of
nght
and
left
lIre
treads
Incorrect
adjustment
or
abraSIOn
of
front
wheel
beanng
Collapsed
or
tWisted
front
sprmg
Incorrect
wheel
alIgnment
Incorrect
brake
adjustment
bmdmg
Worn
rubber
bushmgs
for
transverse
link
and
tensIOn
rod
Deformed
steering
linkage
and
suspensIOn
lInk
Unbalanced
vehicle
level
Improper
au
pressure
of
tire
Worn
rubber
bushmgs
for
tmnsverse
Imk
and
tensIOn
rod
Incorrect
wheel
alignment
Worn
or
deformed
steenng
hnkage
and
suspensIOn
link
Incorrect
adjustment
of
steenng
gear
Deformed
unbalanced
wheel
Improper
au
pressure
of
lire
InsuffiCient
lubricants
or
nuxmg
Im
pun
ties
m
sleenng
linkage
or
exceSSively
o
steenng
Imkage
Replace
Rellghten
Replace
defective
p
uts
Replace
Adjust
correctly
Check
and
repdlT
cor
rectly
Replace
or
relighlen
Correl
t
the
unbaldnl
e
Adjust
or
tighten
Replace
tlTes
Adjust
or
replal
c
Repldcc
Adjust
Adlusl
Repl
n
e
Repldc
e
Correcl
the
unbdJdlKe
Adjust
AdlU
t
Adjust
Replace
AdJusl
Correcl
or
replaf
e
Adlust
Repl
msh
grease
or
re
place
the
pa
rt
Page 81 of 136
i
l
Front
SuspeDsion
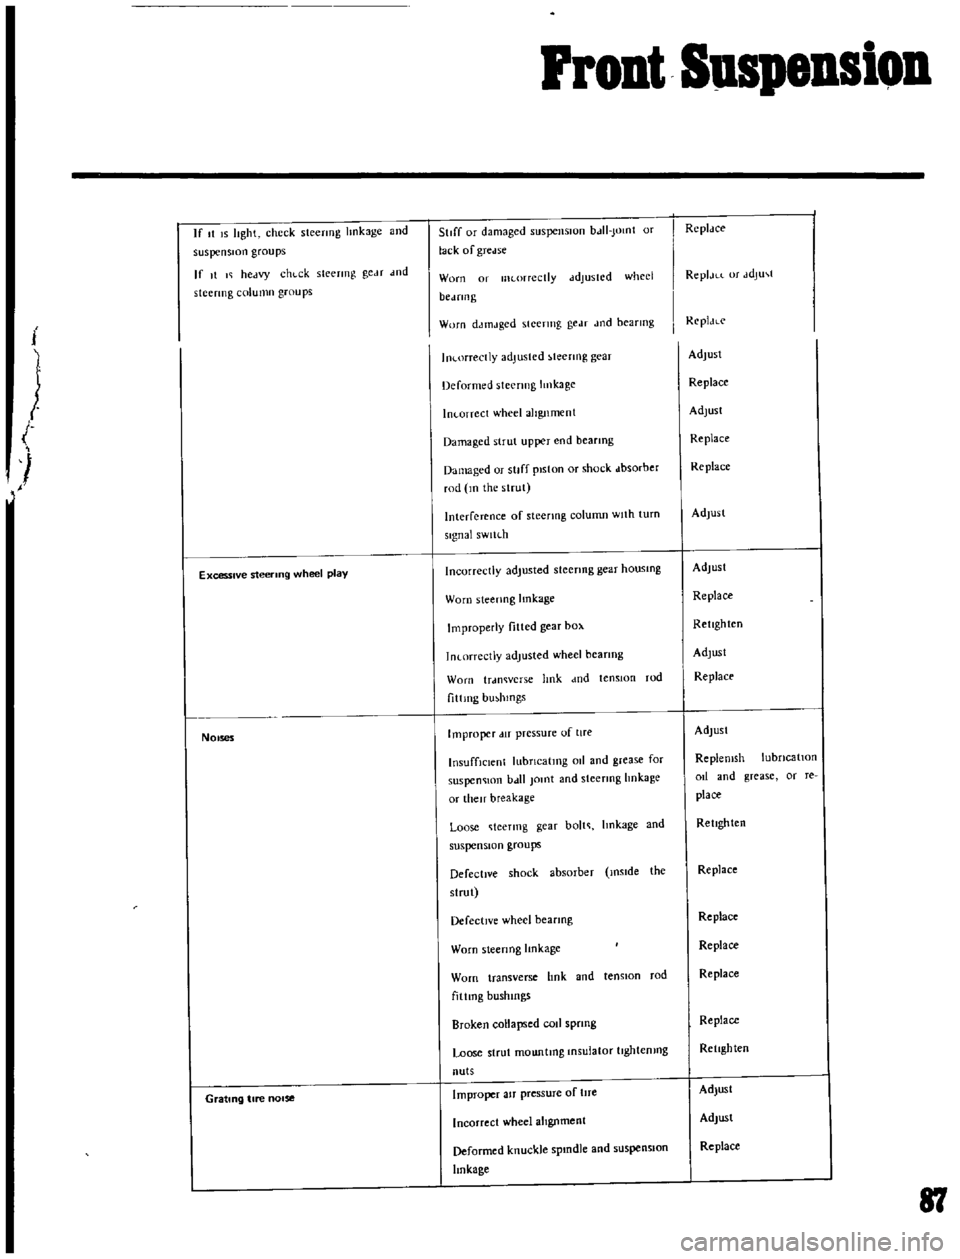
If
t
IS
lIght
check
stecrmg
hnkage
and
suspension
groups
If
It
I
hectvy
chl
ck
sleermg
geM
wd
stcermg
column
groups
Excessive
steering
wheel
play
1
NOises
Grating
tire
nOise
StIff
or
dJmaged
5llspenslUn
bJII
Jomt
or
lack
of
gTcelse
Worn
01
lIKorrcctly
ddJuSICd
whed
bCJfIll
g
Worn
dJtnJged
steering
gedf
Jod
bearmg
In
orrectly
adjusted
teenng
gear
Deformed
steering
Imkage
In
orrcct
wheel
alignment
Damaged
strut
upper
end
bearmg
Damaged
or
stiff
piston
or
shock
dbsorber
rod
m
the
strut
Interference
of
steenng
column
Wllh
turn
signal
sWlh
h
Incorrectly
adjusted
steenng
gear
housmg
Worn
steenng
lmkage
Improperly
fitted
gear
box
1n
orrectJy
adjusted
wheel
bearIng
Worn
trdl1Wcrs
e
hnk
dnd
tensIOn
rod
f1ttlllg
bmhlOgs
Improper
lIT
pressure
of
lire
InsuffiCient
lubncatmg
011
and
grease
for
suspen
lOn
b
t11
Jomt
and
steermg
hnkage
or
then
breakage
Loose
teermg
gear
bolt
Imkage
and
suspension
groups
Defective
shock
absorber
mslde
the
slrut
Defective
wheel
bearmg
Worn
sleenng
Imkage
Worn
transverse
hnk
and
tenston
rod
fiUmg
bushmgs
Broken
collapsed
rod
sprmg
Loose
strut
mountmg
Insulator
tJghtemng
nuts
Improper
aJf
pressure
of
tlfe
Incorrect
wheel
alIgnment
Deformed
knuckle
spmdle
and
suspensIOn
linkage
RcplJce
ReplJLL
or
JdJu
t
ReplJLc
AdJusl
Replace
Adlust
Replace
Replace
Adlusl
Adjust
Replace
Retighten
Adjust
Replace
Adlusl
Replemsh
lubncatlOn
od
and
grease
or
re
place
Retighten
Replace
Replace
Replace
Replace
Replace
Retighten
Adjust
Adjust
Replace
81
Page 82 of 136
Front
Suspension
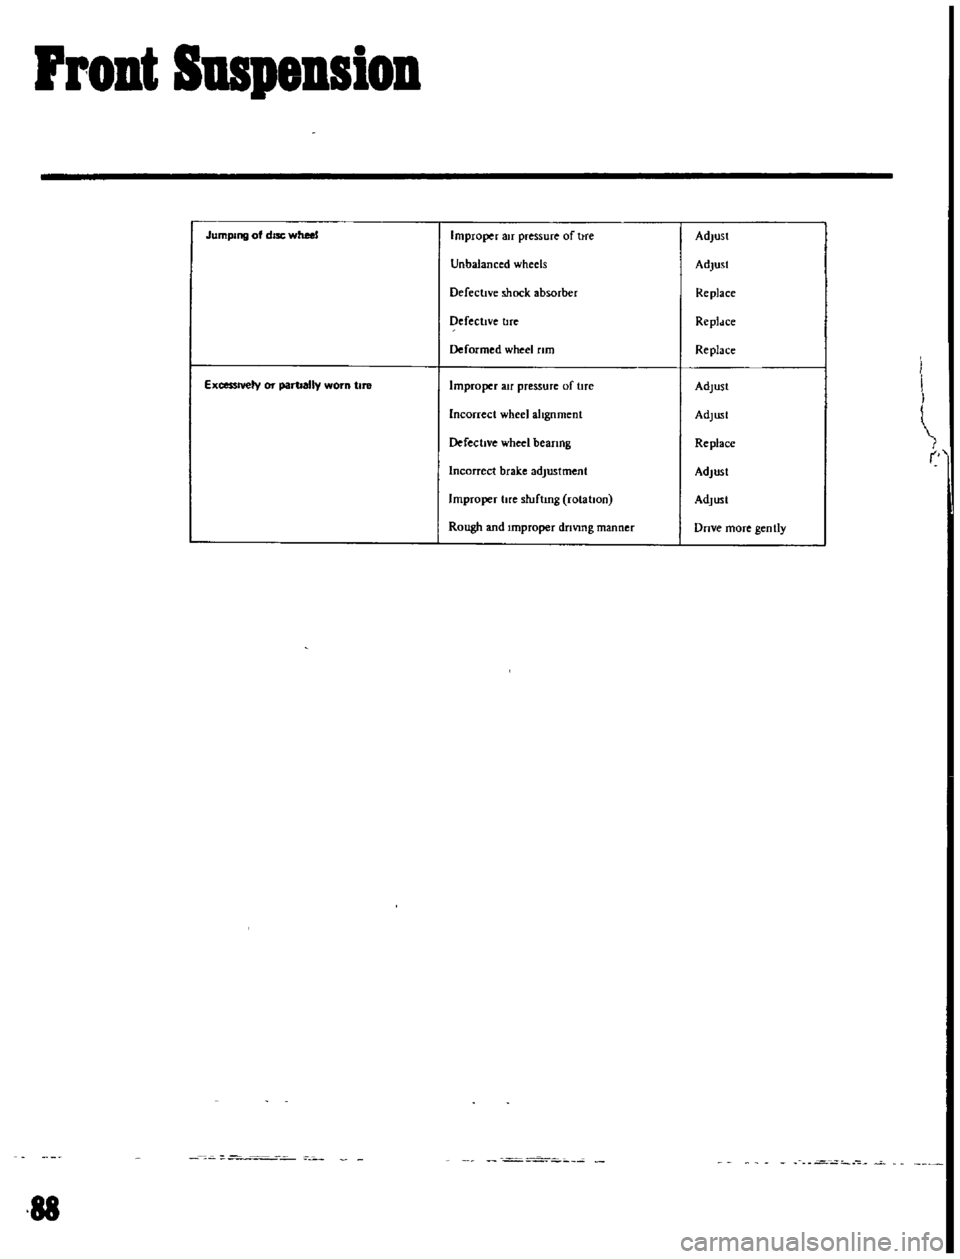
Jumping
of
disc
wheel
Improper
air
pressure
of
hre
Adjust
Unbalanced
wheels
Adjust
Defective
shock
absorber
Replace
DefectIve
tlfe
Repldce
Deformed
wheel
rim
Replace
ExcessIVely
or
partially
worn
tIre
Improper
au
pressure
of
tlfe
Adlust
Incorrect
wheel
alIgnment
Adlusl
DefectIVe
wheel
beanng
Replace
Incorrect
brake
adjustment
Adjust
Improper
lire
sluflmg
rolahon
Adlusl
Rough
and
Improper
driVing
manner
Dnve
more
gen
tly
I
88
Page 84 of 136
Steering
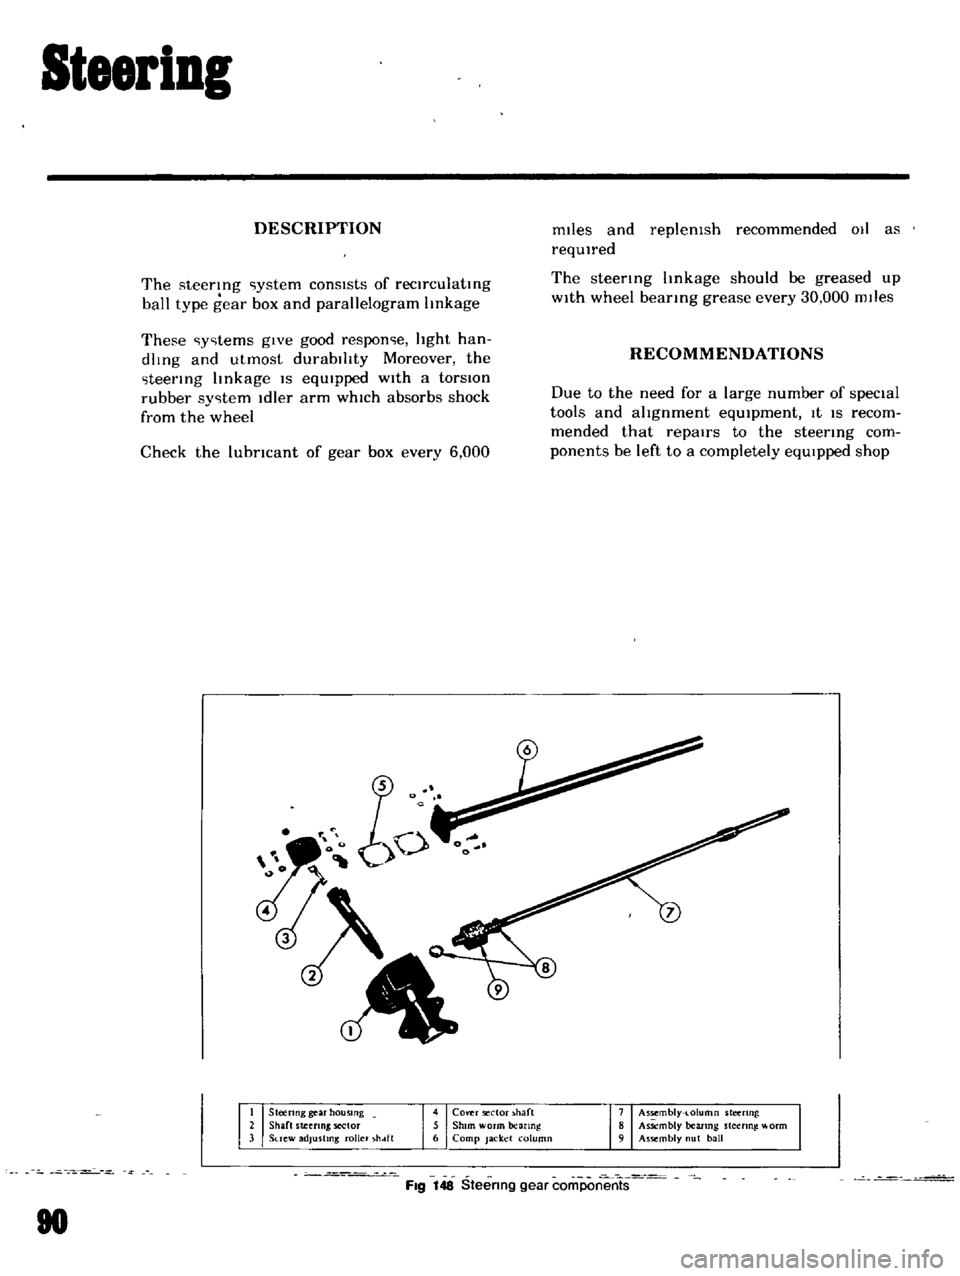
DESCRIPTION
mtles
and
replenIsh
recommended
011
as
reqUIred
The
steetlng
linkage
should
be
greased
up
WIth
wheel
bearing
grease
every
30
000
mtles
The
steering
ystem
consIsts
of
reclrculatmg
ball
type
gear
box
and
parallelogram
linkage
These
y
tems
gIve
good
respon
e
light
han
dlmg
and
utmost
durabIlity
Moreover
the
teermg
linkage
IS
eqUIpped
With
a
torsIOn
rubber
sy
tem
Idler
arm
whIch
absorbs
shock
from
the
wheel
RECOMMENDATIONS
Check
the
lubricant
of
gear
box
every
6
000
Due
to
the
need
for
a
large
number
of
specIal
tools
and
alignment
eqUIpment
It
IS
recom
mended
that
repairs
to
the
steering
com
ponents
be
left
to
a
completely
eqUIpped
shop
Steenng
gear
housing
Shaft
steeling
sector
Suew
adjusting
roller
hdft
4
Cover
ector
haft
5
Shim
worm
anng
6
Camp
Jacket
column
7
Assembly
t
olumn
steering
8
As
mbly
bearmg
steering
l
orm
9
Assembly
ut
ball
Fig
148
Steering
gear
coriiPon
rrts
80
Page 85 of 136
SteeriDg
ConditIon
lIeavy
steering
Loose
steenng
Pull
to
one
side
Steermg
shock
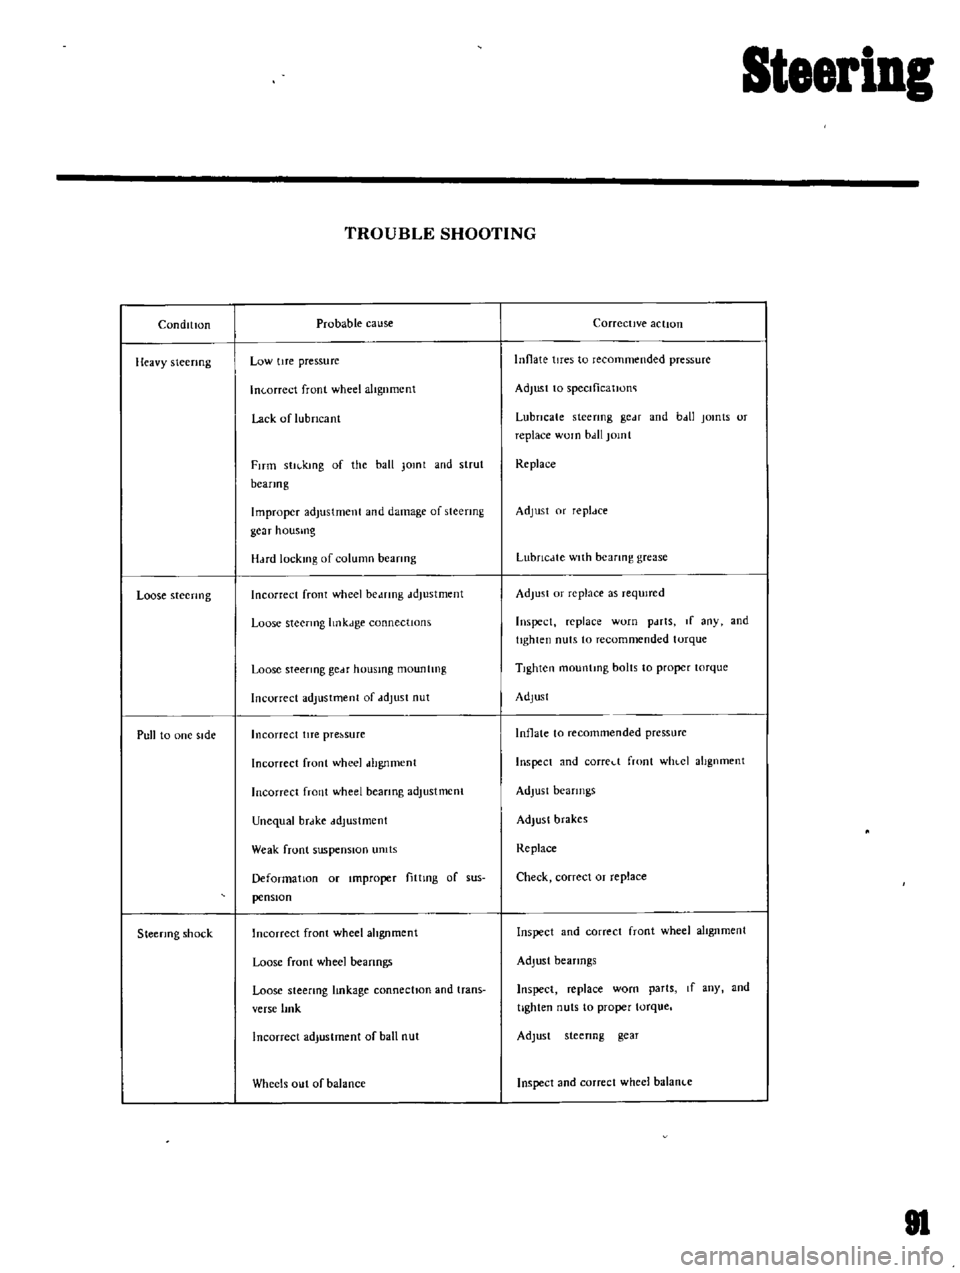
TROUBLE
SHOOTING
Probable
cause
Low
tIre
pressure
In
orreet
front
wheel
altgnmcnt
Lack
of
lubricant
FITm
stll
kmg
of
the
ball
Jomt
and
strut
beanog
Improper
adjustment
and
damage
of
steering
gcar
housmg
H
Hd
lock1l1g
of
column
beanng
Incorrect
front
wheel
be
mng
ddJustment
Loose
steermg
hnkJge
connectIOns
Loose
steermg
gCdf
housmg
mountIng
Incorrect
adjustment
of
ddJust
nut
Incorrect
lITe
pre
sure
Incorrect
front
wheel
dhgnment
Incorrect
front
wheel
beanng
adjustment
Unequal
brdke
ddJustment
Weak
front
suspensIOn
umts
Deformation
or
Improper
fittmg
of
sus
pensIOn
Incorrect
front
wheel
ahgnment
Loose
front
wheel
beanngs
Loose
steering
lmkage
connectIOn
and
trans
verse
lmk
Incorrect
adjustment
of
ball
nut
Wheels
out
of
balance
Corrective
action
Innate
tires
to
recommended
pressure
Adjust
to
speclficatJono
Lubricate
steering
gc
H
and
b
dl
jomts
or
replace
WOln
bdll
jomt
Replace
Adjust
or
repldce
LubrlcJte
with
bearing
grease
Adjust
or
replace
as
reqUired
Inspect
replace
worn
pdrts
If
any
and
tighten
nuts
to
recommended
torque
TIghten
mountmg
bolts
to
proper
torque
Adjust
Inflate
to
recommended
pressurc
Inspect
and
corred
front
WhlCI
alignment
Adjust
bearings
Adjust
brakes
Replace
Check
correct
or
replace
Inspect
and
correct
front
wheel
alIgnment
Adjust
bearings
Inspect
replace
worn
parts
If
any
and
tighten
nuts
to
proper
torque
Adjust
steenng
gear
Inspect
and
correct
wheel
balanl
e
81