1900 MITSUBISHI DIAMANTE light
[x] Cancel search: lightPage 144 of 408
EMISSION CONTROLS 4-2
CRANKCASEVENTILATIONSYSTEM 4-2
OPERATION 4-2
COMPONENTTESTING 4-2
REMOVAL &INSTALLATION 4-2
EVAPORATIVEEMISSIONCONTROLS 4-2
OPERATION 4-2
COMPONENTTESTING 4-3
REMOVAL&INSTALLATION 4-4
EXHAUSTGASRECIRCULATION
SYSTEM 4-5
OPERATION 4-5
COMPONENTTESTING 4-5
REMOVAL&INSTALLATION 4-6
ELECTRONIC ENGINE CONTROLS 4-7
ENGlNECONTROLUNIT/POWERTRAIN
CONTROLMODULE(ECU/PCM) 4-7
OPERATION 4-7
REMOVAL&INSTALLATION 4-7
OXYGENSENSOR 4-8
OPERATION 4-8
TESTING 4-8
REMOVAL&INSTALLATION 4-8
IDLEAIRCONTROLMOTOR 4-9
OPERATION 4-9
TESTING 4-9
REMOVAL&INSTALLATION 4-9
ENGINECOOLANTTEMPERATURE
SENSOR 4-10
OPERATION 4-10
TESTING 4-10
REMOVAL&INSTALLATION 4-10
INTAKEAIRTEMPERATURESENSOR 4-10
OPERATION 4-10
TESTING 4-11
REMOVAL&INSTALLATION 4-11
MASSAIRFLOWSENSOR 4-11
OPERATION 4-11
TESTING 4-11
REMOVAL&INSTALLATION 4-11
MANIFOLDABSOLUTEPRESSURE
SENSOR 4-12
OPERATION 4-12
TESTING 4-12
REMOVAL&INSTALLATION 4-13
THROTTLEPOSITIONSENSOR 4-13
OPERATION 4-13
TESTING 4-13
REMOVAL&INSTALLATION 4-13
CAMSHAFT POSITIONSENSOR 4-14
OPERATION 4-14
TESTING 4-14
REMOVAL&INSTALLATION 4-14
CRANKSHAFTPOSlTlONSENSOR/CRANK
ANGLE SENSOR 4-14
OPERATION 4-14 I
TESTING 4-15 REMOVAL&INSTALLATION 4-15
COMPONENT LOCATIONS 4-16
OBD-1 TROUBLE CODES 4-26
GENERALINFORMATION 4-26
CHECKENGINVMALFUNCTION
INDICATOR LIGHT 4-26
SERVICEPRECAUTIONS 4-26
READING CODES 4-26
WITHASCANTOOL 4-26
WITHOUTASCANTOOL 4-27
CLEARINGCODES 4-27
DIAGNOSTICTROUBLECODES 4-27
OBD-II TROUBLE CODES 4-27
GENERALINFORMATION 4-27
READING CODES 4-27
WITHASCANTOOL 4-27
WITHOUTASCANTOOL 4-27
CLEARINGCODES 4-28
WITHASCANTOOL 4-28
WITHOUTASCANTOOL 4-28
DIAGNOSTICTROUBLECODES 4-28
FLASH OUTCODELIST 4-32
VACUUM DIAGRAMS 4-36
Page 147 of 408
4-4 DRIVEABILITYAND EMISSIONS CONTROLS
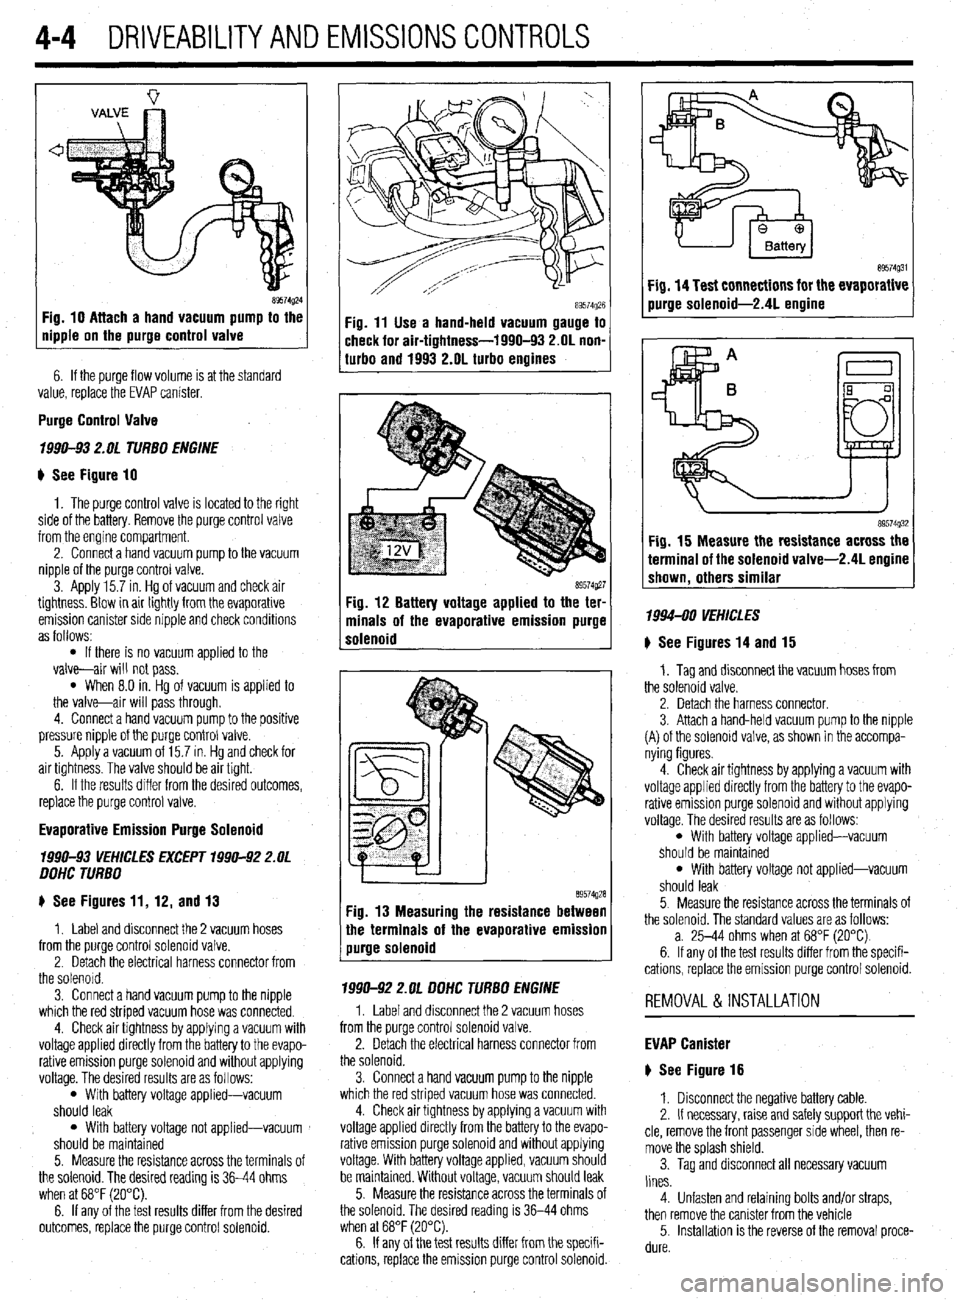
Fig. 10 Attach a hand vacuum pump to the
Ripple on the purge control valve
6. If the purge flow volume is at the standard
value, replace the EVAP canister.
Purge Control Valve
7990-93 2. OL TURBO ENGINE
u See Figure 10
1. The purge control valve is located to the right
side of the battery. Remove the purge control valve
from the engine compartment.
2. Connect a hand vacuum pump to the vacuum
nipple of the purge control valve.
3 Apply 15.7 in. Hg of vacuum and check air
tightness. Blow in air lightly from the evaporative
emission canister side nipple and check conditrons
as follows:
l If there is no vacuum applied to the
valve-air will not pass.
l When 8.0 in. Hg of vacuum is applied to
the valve-air will pass through.
4. Connect a hand vacuum pump to the positive
pressure nipple of the purge control valve.
5. Apply a vacuum of 15.7 in. HQ and check for
air tightness. The valve should be air tight.
6. If the results differ from the desired outcomes,
replace the purge control valve.
Evaporative Emission Purge Solenoid
1990-93 VEHICLES EXCEPT 1990-92 Z.OL
OOHC TURBO
p See Figures 11, 12, and 13
1. Label and disconnect the 2 vacuum hoses
from the purge control solenoid valve.
2. Detach the electrical harness connector from
the solenord.
3. Connect a hand vacuum pump to the nipple
which the red striped vacuum hose was connected.
4. Check air tightness by applying a vacuum with
voltage applied directly from the battery to the evapo-
rative emission purge solenoid and without applying
voltage. The desired results are as follows:
l With battery voltage applied-vacuum
should leak
l With battery voltage not applied-vacuum
should be maintained
5. Measure the resistance across the terminals of
the solenoid. The desired reading is 36-44 ohms
when at 68°F (20°C).
6. If any of the test results differ from the desired
outcomes, replace the purge control solenoid.
Fig. 11 Use a hand-held vacuum gauge to
check for air-tightness-1990-93 2.OL non-
turbo and 1993 2.OL turbo engines
8957dQ27 Fig. 12 Battery voltage applied to the ter-
minals of the evaporative emission purge
solenoid
89574Q28 1 Fig. 13 Measuring the resistance between
the terminals of the evaporative emission
/ purge solenoid
7990-92 2.OL OOHC TURBO ENGINE
1. Label and disconnect the 2 vacuum hoses
from the purge control solenoid valve.
2. Detach the electrical harness connector from
the solenoid.
3. Connect a hand vacuum pump to the nipple
which the red striped vacuum hose was connected.
4. Check air tightness by applying a vacuum with
voltage applied directly from the battery to the evapo-
rative emission purge solenoid and without applying
voltage. With battery voltage applied, vacuum should
be maintained. Without voltage, vacuum should leak
5. Measure the resistance across the terminals of
the solenoid. The desired reading is 36-44 ohms
when at 68°F (20°C).
6. If any of the test results differ from the specifi-
cations, replace the emission purge control solenoid.
Fig. 15 Measure the resistance across the
terminal of the solenoid valve-2.4L engine
shown, others similar
1994-00 VEHICLES
) See Figures 14 and 15
1. Tag and disconnect the vacuum hoses from
the solenoid valve.
2. Detach the harness connector.
3. Attach a hand-held vacuum pump to the nipple
(A) of the solenord valve, as shown in the accompa-
nying figures.
4. Check air tightness by applying a vacuum with
voltage applied directly from the battery to the evapo-
rative emission purge solenoid and without applying
voltage. The desired results are as follows:
l With battery voltage applied-vacuum
should be maintained
l With battery voltage not applied-vacuum
should leak
5. Measure the resistance across the terminals of
the solenoid. The standard values are as follows:
a. 25-44 ohms when at 68°F (20°C)
6. If any of the test results differ from the specifi-
cations, replace the emission purge control solenoid.
REMOVAL &INSTALLATION
EVAP Canister
p See Figure 16
1. Disconnect the negative battery cable.
2. If necessary, raise and safely support the vehi-
cle, remove the front passenger side wheel, then re-
move the splash shield.
3. Tag and disconnect all necessary vacuum
lines.
4. Unfasten and retaining bolts and/or straps,
then remove the canister from the vehicle
5. lnstallahon is the reverse of the removal proce-
dure.
Page 149 of 408
the temperature of the gas passing through +h
control valve. It converts the detected temf
Ierature
into an electrical voltage signal which is sent the ve-
hicle’s Powertrain Control Module (PCM). If the cir-
cuit of the EGR temperature sensor is broken, the
warning light will come on.
1. Remove the EGR temperature sensor from the
engine.
2. Place the EGR sensor into water. While in-
creasing the temperature of the water, measure the
sensor resistance. Compare the values to following
specifications:
a. 122°F 50°C
b. 212°F 100” )-11-14 kohms resistance
t P O-83 kohms resistance
3. If the resistance obtained varies significantly ,
.,. . .
i, replace the sensor, nom specmcaoom
Thermal Vacuum Valva
therm0 valve.
2. Connect a hand held vacuum pump to the vac-
uum hose on the therm0 valve.
3. Apply vacuum and check the air passage
through the therm0 vOrL’n %ults to the fnrm
lowinq specifications:
ant temperature of 122°F
vacuum leaks
lant temoerature of 176’F 4 n;rm.nnnn+ +h.n s,r,,~,,,,rn hnm frnm ‘h.n +hrotle
body EGR vacuum nipple. Connect a hand-held
vac-
uum pump to the nipple.
2. Start the engine, then slowly raise the speed
and compare with the following specifications.
a. For 1990-93 vehides, check to be sure the
vacuum raised proportionally with the rise in en-
gine s eed.
b. Ior 199450 vehicles, the vacuum reading
on the pump should remain constant.
EGR Solenoid
1990-93 L’EHICL ES
# See Figures 24 and 25
1. Label and disconnect the yellow and green
striped vacuum hose from the EGR solenoid.
netted.
4. Apply vacuum and check for air-tightness
when voltage is applied and discontinued. When
voltage is applied, the vacuum should be maintained.
When voltage is discontinued, vacuum should leak.
5. Measure the resistance between the terminals
of the solenoid valve. The resistance should be
36-44 ohms at 68°F (20°C).
6. If the test results differ from the soecifications.
4-6 DRIVEABILITYAND EMISSIONSCONTROLS
Fig. 26 EGR solenoid
check connections-
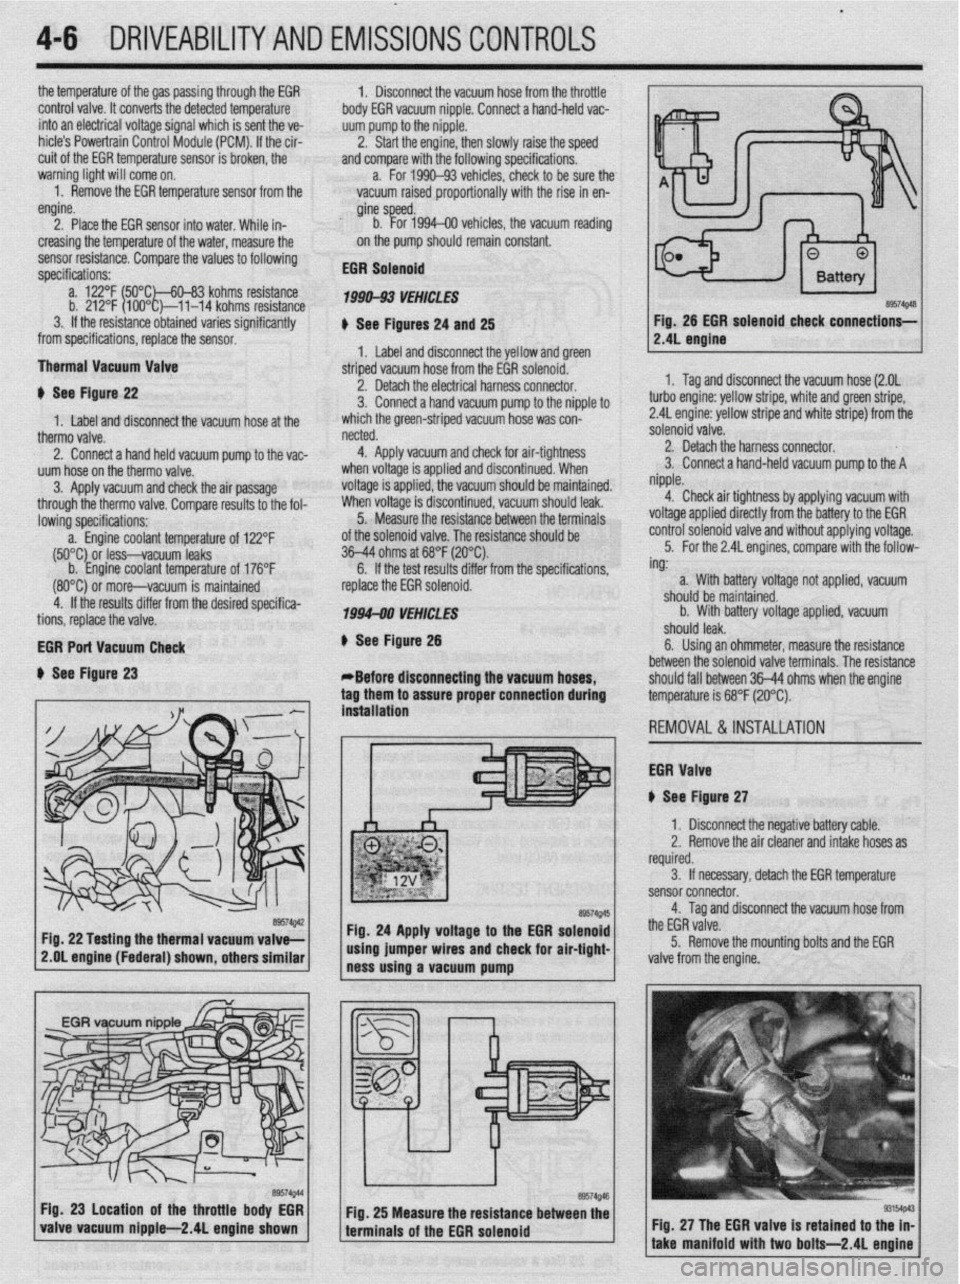
# See Figure 22
1. Label and disconnect the vacuum hose at the 2. Detach the electrical harness connector.
3. Connect a hand vacuum pump to the nipple to
which the green-striped vacuum hose was con-
(80°C) 0; more-vacuum is maintained
4. If the results differ from the desired specifica-
tions, replace the valve.
EGR Port Vacuum Check
+ See Figure 23 replace the EGR solenoid.
1994-00 VEHICLES
# See Figure 26
*Before disconnecting the vacuum hoses,
tag them to assure proper connection during
. . ** *. 1. Tag and disconnect the vacuum hose (2.OL
turbo engine: yellow stripe, white and green stripe,
2.4L engine: yellow stripe and white stripe) from the
solenoid valve.
2. Detach the harness connector.
3. Connect a hand-held vacuum pump to the A
nipple.
4. Check air tightness by applying vacuum with
voltage applied directly from the battery to the EGR
control solenoid valve and without applying voltage.
5. For the 2.4L engines, compare with the follow-
ing:
. .
roltage not applied, vacuum a. With battery
should be maintainr
b. With battery
.I III I
snoura
iea~.
sd. -
/oltage applied, vacuum
6. Using an ohmmeter, measure the resistance
between the solenoid valve terminals. The resistance
should fall between 36-44 ohms when the enaine
temperature is 68°F (20°C).
REMOVAL&INSTALLATION
EGR Valve
iI See Figure 27 mslatlanon
1 I Disconnect the negative battery cable.
2. Remove the air cleaner and intake hoses as
required.
3. If necessary, detach the EGR temperature
sensor connector.
4. Tag and disconnect the vacuum hose from
the EGR valve.
5. Remove the mounting bolts and the EGR
2.OL engine (Federal) shown, others similar
valve from the engine.
Fig. 27 The EGR valve is retained to t
take manifold with two bolts-2.4L e
Page 156 of 408
DRIVEABILITYAND EMISSIONS CONTROiS 4-13
4. If the voltaoe check in sbo 3 was OK. then
check the voltage-between GND’and SIG RTN termi-
nals and suddenly depress the accelerator, the volt-
age should rise and stay at 2.4 volts. If the voltage
OPERATION does not stay at 2.4 volts, replace the MAP sensor.
REMOVAL&INSTALLATION '
ti See Figures 68, 69, and 70
1. Disconnect the negative bat lery cable.
2. Detach the connector for thl e MAP sensor.
3. Remove the sensor mountir ig screws.
4. Lift the sensor up and remove it from the intake
manifold. The Throttle Posii
ti-* \*. Inn ITPl smsnr is 8 Dotentiome- , WI...,". *., . ter that provides a si gnal to the PCM that is directly
proportion: il to the throttle plate position. The TP
sensor is rr iounted on the side of the throttle body
and is connected to the throttle plate shaft. The TP
sensor monitors throttle plate movement and posi-
tion, and transmits an appropriate electrical signal to
the PCM. These signals grp IIQX-I hv rho PCM to ad-
just the air/flnI mivtlI “-- ------li
5. The installation is the reverse of removal. WI I dLfUl U full throttle The TP c
UyI ,,,,,,,:re, spark timing and EGR opera-
ng to engine load at idle, part throttle, or
The TP sensor is not adjustable.
..-
lensor receives a 5 volt reference signal
and a ground circuit from the PCM. A return signal
circuit is connected to a wiper that runs on a resistor
internally on the sensnr ThP fmth@r rho throttle is
opined the winnr mr oP -*lY”, .I,” ..,y’V, 111 Jves along the resistor, at wide
en throttle, the wiper essentially creates a loop be-
tween the reference signal and the signal return re-
turning the full or nearly full 5 volt signal back to the
PCM. At idle, the signal return should be approxi-
rnz
rtely 0.9 volts.
TF
iSTING
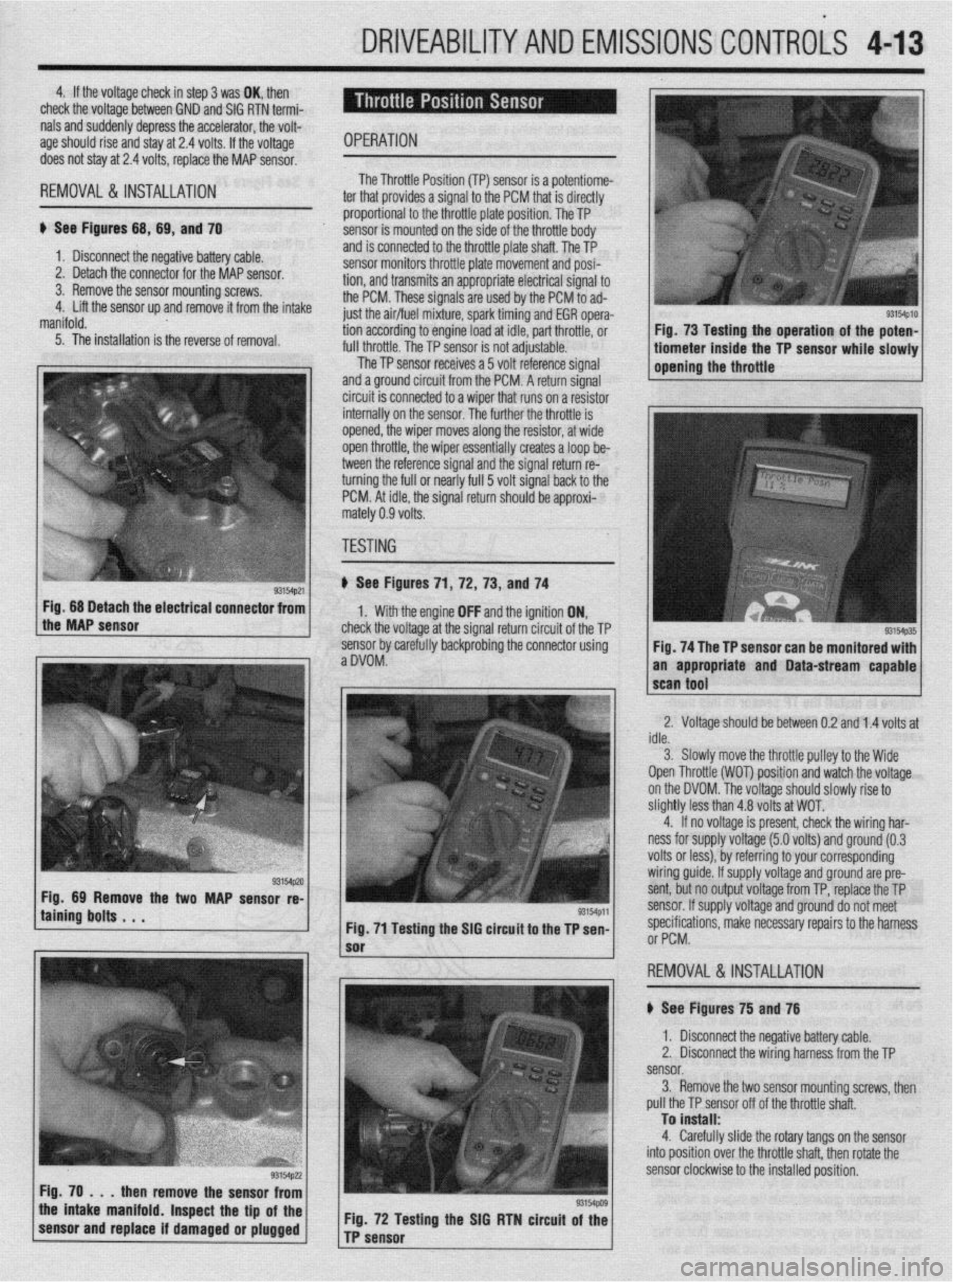
) See Figures 71 ,72, 73, and 74
1. With the engine OFF and the ignition ON,
check the voltage at the signal return circuit of the TP
sensor bv carefullv backorobina the connector using
aDVOM: . ” Fig. 68 Detach the electrical connector from
the MAP sensor
taining bolts . . . WMp,l
Fig. 71 Testing the SIG circuit to the TP sen-
then remove the sensor from
the intake manifold. Inspect the tip of the
sensor and replace if damaged or plugged Fig. 72 Testing the SIG RTN circuit of the
TP sensor
sm4p10 I Fig. 73 Testing the operation of the poten- 1
tiometer inside the TP sensor while slowly 1
opening the throttle
Fig. 74 The TP sensor can be monitored with
an appropriate and Data-stream capable
2. Voltage should be between 0.2 and 1.4 volts at
idle.
3. Slowlv move the throttle oullev to the Wide
Open Throttle (WOT) position and watch the voltage
on the DVOM. The voltage should slowly rise to
slightly less than 4.8 volts at WOT.
4. If no voltage is present, check the wiring har-
ness for supply voltage (5.0 volts) and ground (0.3
volts or less), by referring to your corresponding
wiring guide. If supply voltage and ground are pre-
sent, but no output voltage from TP, replace the TP
sensor. If supply voltage and ground do not meet
specifications, make necessarv reoairs to the harness
or PCM.
,
REMOVAL&INSTALLATION
# See Figures 75 and 76
1. Disconnect the negative battery cable.
2. Disconnect the wiring harness from the TP
sensor.
3. Remove the two sensor mounting screws, then
pull the TP sensor off of the throttle shaft.
To install:
4. Carefully slide the rotary tangs on the sensor
into position over the throttle shaft. then rotate the
sensor clockwise to the installed position.
Page 169 of 408
4-26 DRIVEABILITYAND EMISSIONS CONTROLS
The Powertrain Control Module (PCM) monitors
the signals of input and output sensors, some all the
time and others at certain times and processes each
signal. When the PCM notices that an irregularity has
continued for a specified time or longer from when
the irregular signal was initially monitored, the PCM
judges that a malfunction has occurred and will
memorize the malfunction code. The code is then
stored in the memory of the PCM and is accessible
through the data link (diagnostic connector) with the
use of an electronic scan tool or a voltmeter.
CHECK ENGINE/MALFUNCTION
INDICATOR LIGHT
Among the on-board diagnostic items, a check
engine/malfunction indicator light comes on to notify
the driver of a emission control component irregular-
ity. If the irregularity detected returns to normal or the
PCM judges that the component has returned to nor-
mal, the check engine/malfunction indicator light will
be turned off Moreover, if the ignition is turned OFF
and then the engine is restarted, the check
engine/malfunction indicator light will not be turned
on unttl a malfunction is detected.
The check engine/malfunction indicator light will
come on immediately after the ignition switch is
turned ON. The light should stay lit for 5 seconds
and then will go off. This Indicates that the check en-
gine/malfunction indicator lamp is operating nor-
mally. This does not signify a problem with the sys-
tem.
*The check engine/malfunction indicator
lamp will come on when the terminal for the
ignition timing adjustment is shorted to
ground. Therefore, it is not abnormal that the
light comes on even when the terminal for ig-
nition timing is shorted at time of ignition
timing adjustment.
To test the light, perform the following:
1. Turn the ignition switch ON. Inspect the check
engine/malfunction indicator lamp for Illumination.
2. The light should be lit for 5 seconds and then
should go out.
3. If the lamp does not illuminate, check for open
circuit In the harness, blown fuse or blown bulb.
SERVICE PRECAUTIONS
l Before attachrng or detaching the PCM harness
connectors, make sure the ignition switch is OFF and
the negative battery cable is disconnected to avoid
the possibility of damage to the PCM.
l When performing PCM input/output signal di-
agnosis, remove the pin terminal retainer from the
connectors to make it easier to insert tester probes
into the connector.
l When attaching or detaching pin connectors ,
from the PCM, take care not to bend or break any pin
terminals. Check that there are no bends or breaks on
PCM pin terminals before attempting any connec-
tions.
l Before replacing any PCM, perform the PCM
input/output signal diagnosis to make sure the PCM
is functioning properly.
l When measuring supply voltage of PCM-con-
trolled components with a circuit tester, separate 1
tester probe from another. If the 2 tester probes acci-
dentally make contact with each other during mea-
surement, a short circuit WIII result and damage the
PCM.
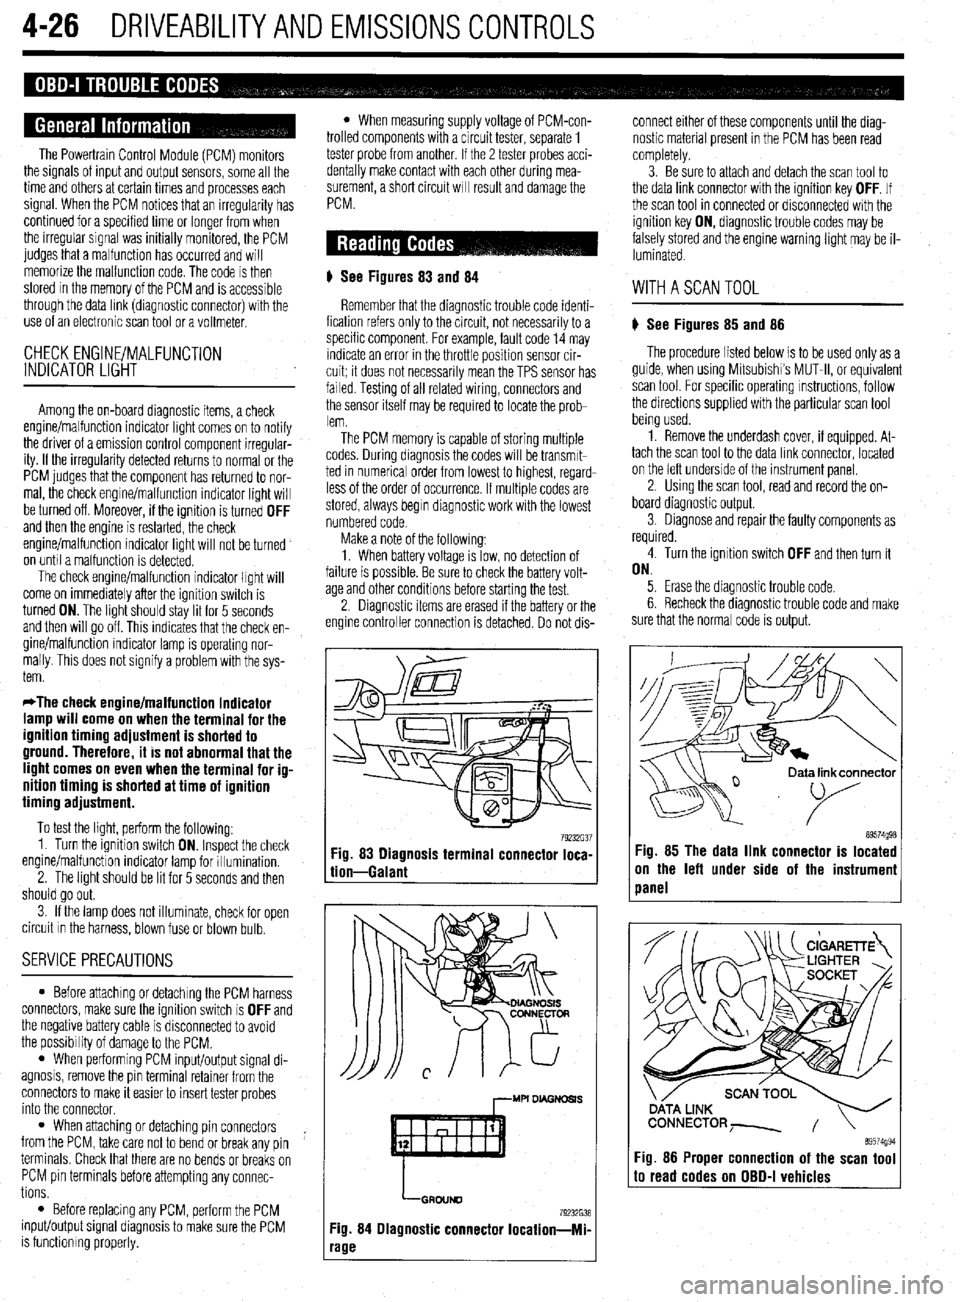
# See Figures 83
and 84
Remember that the diagnostic trouble code identi-
fication refers only to the circuit, not necessarily to a
specific component. For example, fault code 14 may
indicate an error in the throttle position sensor cir-
cuit; it does not necessarily mean the TPS sensor has
failed Testing of all related wiring, connectors and
the sensor itself may be required to locate the prob-
lem.
The PCM memory is capable of storing multiple
codes. During diagnosis the codes will be transmlt-
ted in numerical order from lowest to highest, regard-
less of the order of occurrence. If multiple codes are
stored, always begin diagnostic work with the lowest
numbered code
Make a note of the following:
1. When battery voltage IS low, no detection of
failure is possible. Be sure to check the battery volt-
age and other conditions before starting the test.
2. Diagnostic items are erased if the battery or the
engine controller connection is detached. Do not dis- connect either of these components until the diag-
nostic material present in the PCM has been read
completely.
3. Be sure to attach and detach the scan tool to
the data link connector with the ignition key OFF. If
the scan tool in connected or disconnected with the
ignition key ON, diagnostic trouble codes may be
falsely stored and the engine warning light may be il-
luminated. WITHASCANTOOL
) See Figures 85 and 86
The procedure listed below is to be used only as a
guide, when using Mitsubishi’s MUT-II, or equivalent
scan tool. For specific operating instructions, follow
the directions supplied with the particular scan tool
bemg used.
1. Remove the underdash cover, if equipped. At-
tach the scan tool to the data link connector, located
on the left underside of the instrument panel.
2. Using the scan tool, read and record the on-
board diagnostic output.
3. Diagnose and repair the faulty components as
required
4. Turn the ignition switch OFF and then turn it
ON.
5. Erase the diagnostic trouble code.
6 Recheck the diaanostic trouble code and make
sure that the normal &de is output.
79232G37 89574g98 Fig. 83 Diagnosis terminal connector loca-
tion-Galant Fig. 85 The data link connector is located
on the left under side of the instrumeni
panel
,--MU DL4GNDSl.S
LGRDIJND
79232638
Fig. 84 Diagnostic connector Iocation-Mi-
‘age
ata link connector
89574994 Fig. 86 Proper connection of the scan tool to read codes on OBD-I vehicles
Page 170 of 408
DRIVEABILITYAND EMISSIONS CONTROLS 4-27
WITHOUTASCANTOOL
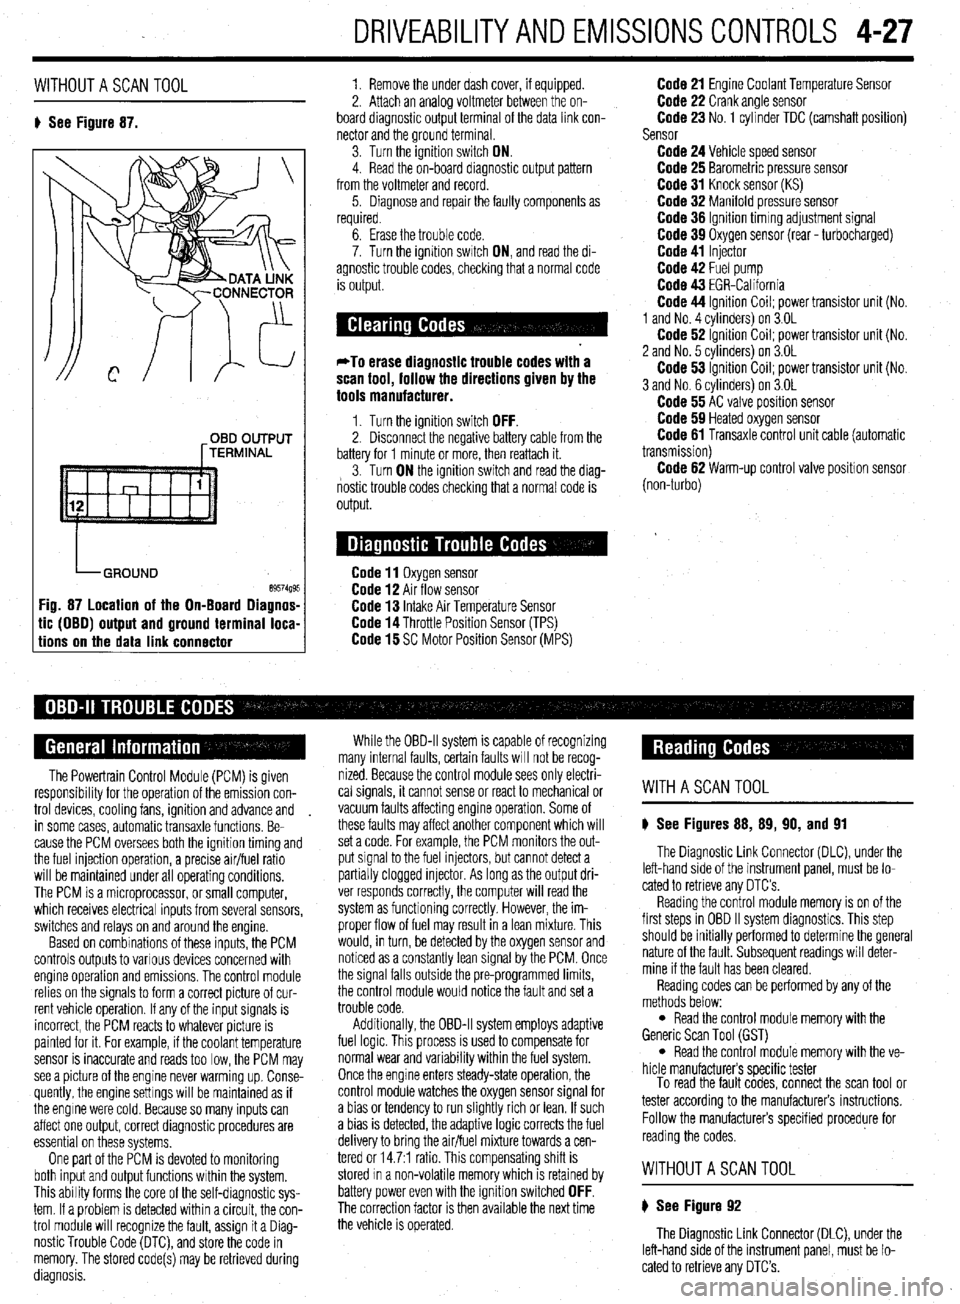
8 See Figure 87. 1. Remove the under dash cover, if equipped.
2. Attach an analoa voltmeter between the on-
board diagnostic outpit terminal of the data link con-
nector and the ground terminal
3. Turn the ignition switch ON.
4. Read the on-board diagnostic output pattern
from the voltmeter and record.
5. Diagnose and repair the faulty components as
required.
OBD OUTPUT
[TERMINAL
tic (OBO) output and ground terminal loca-
tions on the data link connector
6. Erase the trouble code.
7. Turn the ignition swatch ON, and read the di-
agnostic trouble codes, checking that a normal code
is output.
*To erase diagnostic trouble codes with a
scan tool, follow the directions given by the
tools manufacturer.
1. Turn the ignition switch OFF. 2. Disconnect the negative battery cable from the
battery for 1 minute or more, then reattach it.
3. Turn ON the ignition switch and read the diag-
nostic trouble codes checking that a normal code is
output.
Code 11 Oxygen sensor Code 12 Air flow sensor Code 13 Intake Air Temperature Sensor Code 14 Throttle Position Sensor (TPS) Code 15 SC Motor Position Sensor (MPS)
Code 21 Engine Coolant Temperature Sensor Code 22 Crank angle sensor Code 23 No. 1 cylinder TDC (camshaft position)
Sensor
Code 24 Vehicle speed sensor Code 25 Barometric pressure sensor Code 31 Knock sensor (KS) Code 32 Manifold pressure sensor Code 36 Ignition timmg adjustment signal Code 39 Oxygen sensor (rear - turbocharged) Code 41 Injector Code 42 Fuel pump Code 43 EGR-California Code 44 Ignition Coil; power transistor unit (No.
1 and No. 4 cvlinders) on 3.OL
Code 62 ignition Coil; power transistor unit (No.
2 and No. 5 cvlinders) on 3.OL
Code 53 ignition Coil; power transistor unit (No.
3 and No. 6 cylinders) on 3.OL
Code 55 AC valve position sensor Code 59 Heated oxygen sensor Code 61 Transaxle control unit cable (automatic
transmission)
Code 62 Warm-up control valve position sensor
(non-turbo)
The Powertrain Control Module (PCM) is given
responsibrlity for the operation of the emission con-
trol devices, cooling fans, ignition and advance and
in some cases, automatic transaxle functions. Be-
cause the PCM oversees both the ignition timing and
the fuel injection operation, a precise air/fuel ratio
will be maintained under all operating conditions,
The PCM is a microprocessor, or small computer,
which receives electrical inputs from several sensors,
switches and relays on and around the engine.
Based on combinations of these inputs, the PCM
controls outputs to various devices concerned with
engine operation and emissions. The control module
relies on the signals to form a correct picture of cur-
rent vehicle operation. If any of the input signals is
incorrect, the PCM reacts to whatever picture is
painted for it. For example, if the coolant temperature
sensor is inaccurate and reads too low, the PCM may
see a picture of the engine never warming up. Conse-
quently, the engine settings will be maintained as if
the engine were cold. Because so many inputs can
affect one output, correct diagnostic procedures are
essential on these systems,
One part of the PCM is devoted to monitoring
both input and output functions within the system.
This ability forms the core of the self-diagnostic sys-
tem. If a problem is detected within a circuit, the con-
trol module will recognize the fault, assign it a Diag-
nostic Trouble Code (DTC), and store the code in
memory. The stored code(s) may be retrieved during
diagnosis. While the OBD-II system is capable of recognizing
many internal faults, certain faults WIII not be recog-
nized. Because the control module sees only electri-
cal signals, it cannot sense or react to mechanical or
vacuum faults affecting engine operation. Some of
these faults may affect another component which will
set a code. For example, the PCM monitors the out-
put signal to the fuel injectors, but cannot detect a
partially clogged injector. As long as the output dri-
ver responds correctly, the computer will read the
system as functioning correctly. However, the im-
proper flow of fuel may result in a lean mixture. This
would, in turn, be detected by the oxygen sensor and
noticed as a constantly lean signal by the PCM. Once
the signal falls outside the pre-programmed limits,
the control module would notice the fault and set a
trouble code.
Additionally, the OBD-II system employs adaptive
fuel logic. This process is used to compensate for
normal wear and variability within the fuel system.
Once the engine enters steady-state operation, the
control module watches the oxygen sensor signal for
a bias or tendency to run slightly rich or lean. If such
a bias is detected, the adaptive logic corrects the fuel
delivery to bring the air/fuel mixture towards a cen-
tered or 14.7:1 ratio. This compensating shift is
stored In a non-volatile memory which is retained by
battery power even with the ignition switched
OFF. The correction factor is then available the next time
the vehicle is operated.
WITHASCANTOOL
8 See Figures 88, 89, 90, and 91
The Diagnostic Link Connector (DLC), under the
left-hand side of the instrument panel, must be lo-
cated to retrieve any OTC’s
Reading the control module memory is on of the
first steps in OBD II system diagnostics. This step
should be initially performed to determine the general
nature of the fault. Subsequent readings will deter-
mine if the fault has been cleared.
Reading codes can be performed by any of the
methods below:
l Read the control module memory with the
Generic Scan Tool (GST)
l Read the control module memory with the ve-
hicle manufacturers specific tester
To read the fault codes, connect the scan tool or
tester according to the manufacturers instructions.
Follow the manufacturers specified procedure for
reading the codes.
WITHOUTASCANTOOL
8 See Figure 92
The Diagnostic Link Connector (DLC), under the
left-hand side of the instrument panel, must be lo-
cated to retrieve any DTC’s.
Page 181 of 408
.
4-38 DRIVEABILITYAND EMISSIONS CONTROLS
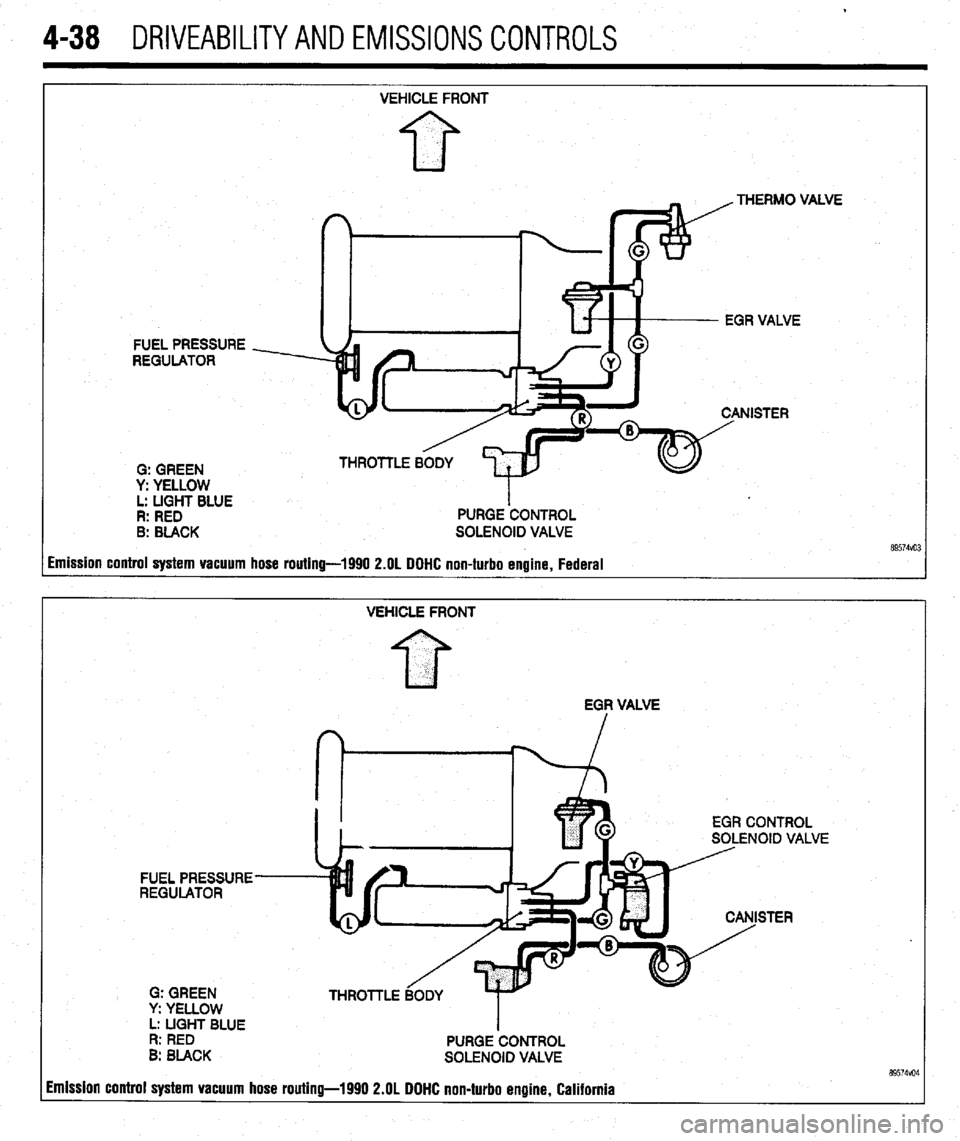
FUEL PRESSURE
REGULATOR
0: GREEN
y: YELLOW
L: LIGHT BLUE
R: RED
B: BLACK VEHICLE FRONT
PURGE ‘CONTROL
SOLENOID VALVE .VE
imission control system vacuum hose routing-1990 2.OL DOHC non-turbo engine, Federal
VEHICLE FRONT
EGF VALVE
EGR CONTROL
SOLENOID VALVE
FUEL PRESSURE
REGULATOR
STER
G: GREEN
y: YELLOW
L: UGHT BLUE
I
R: RED
PURGE CONTROL
B: BLACK
SOLENOID VALVE 89574vo4 imission control system vacuum hose routing-1990 2.OL DOHC non-turbo engine, California
Page 182 of 408
.
DRIVEABILITYAND EMISSIONS CONTROLS 4-39
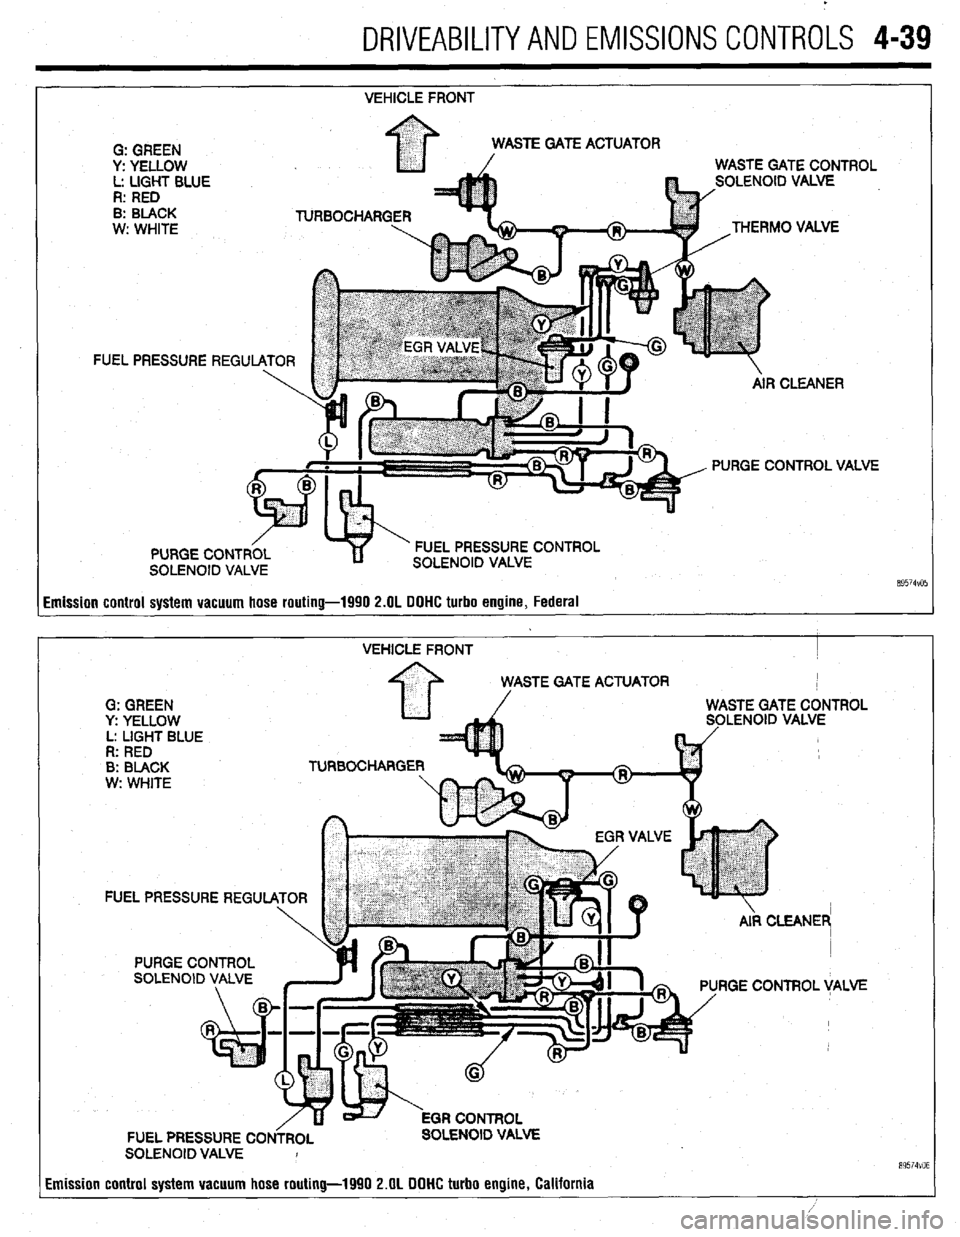
VEHICLE FRONT
FI
Emission control system vacuum hose routing-1990 2.OL DOHC turbo engine, Federal
VEHICLE FRONT I
STE GATE ACTUATOR
G: GREEN
y: YELLOW LENOID VALVE
L: LIGHT BLUE
R: RED
B: BLACK TURBOCHARGE
w: WHITE
FUEL PRESSURE REGU
RGE CONTROL VALVE
FUEL PRESSURE CO OLENOID VALVE
SOLENOID VALVE I
Emission control system vacuum hose routing-1990 2.OL DOHC turbo engine, California
89574VO6