1900 MITSUBISHI DIAMANTE torque
[x] Cancel search: torquePage 108 of 408
ENGINEANDENGINEOVERHAUL 3-47
DO NOT rotate or turn the camshafts when re-
moving the sprockets or severe engine dam-
age will result from internal component in-
terference.
22. Align the mark on the crankshaft sprocket
with the mark on the front case. Then, move the
crankshaft sprocket 1 tooth counterclockwise.
23. Align the timing marks of the camshafts with
the marks on the rear covers.
24. Using large paper clips to secure the timing
belt to the sprockets, install the timing belt in the fol-
lowing order. Be sure camshafts-to-cylinder heads
and crankshaft-to-front cover timing marks are
aligned. Install the timing belt around the pulleys in
the following order:
a. Exhaust camshaft sprocket (front bank).
b. Intake camshaft sprocket (front bank).
c. Water pump pulley.
d. Intake camshaft sprocket (rear bank).
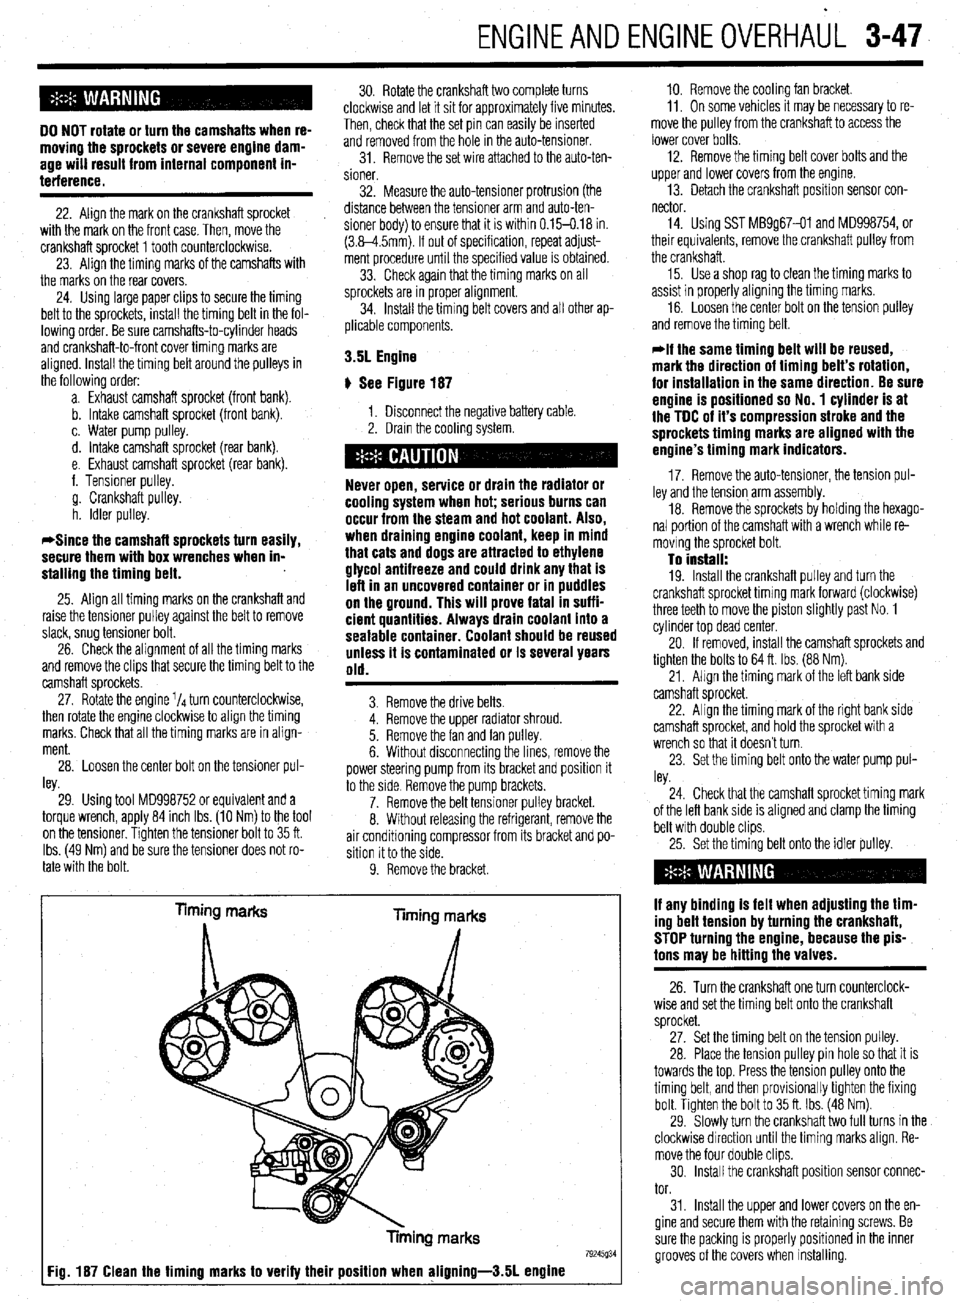
e. Exhaust camshaft sprocket (rear bank).
f. Tensioner pulley.
g. Crankshaft pulley.
h. Idler pulley.
*Since the camshaft sprockets turn easily,
secure them with box wrenches when in-
stalling the timing belt.
25. Align all timing marks on the crankshaft and
raise the tensioner pulley against the belt to remove
slack, snug tensioner bolt.
26. Check the alignment of all the timing marks
and remove the clips that secure the timing belt to the
camshaft sprockets.
27. Rotate the engine 1/4 turn counterclockwise,
then rotate the engine clockwise to align the timing
marks. Check that all the timing marks are in align-
ment.
28. Loosen the center bolt on the tensioner pul-
ley.
29. Using tool MD998752 or equivalent and a
torque wrench, apply 84 inch Ibs. (10 Nm) to the tool
on the tensioner. Tighten the tensioner bolt to 35 ft.
Ibs. (49 Nm) and be sure the tensioner does not ro-
tate with the bolt. 30. Rotate the crankshaft two complete turns
clockwise and let it sit for approximately five minutes.
Then, check that the set pin can easily be inserted
and removed from the hole in the auto-tensioner.
31. Remove the set wire attached to the auto-ten-
sioner
32. Measure the auto-tensioner protrusion (the
distance between the tensioner arm and auto-ten-
sioner body) to ensure that it is within 0.15-0.18 in.
(3.8-4.5mm). If out of specification, repeat adjust-
ment procedure until the specified value is obtained.
33. Check again that the timing marks on all
sprockets are in proper alignment.
34. Install the timing belt covers and all other ap-
plicable components.
3.51 Engine
p See Figure 187
1. Disconnect the negative battery cable.
2. Drain the cooling system.
Never open, service or drain the radiator or
cooling system when hot; serious burns can
occur from the steam and hot coolant. Also,
when draining engine coolant, keep in mind
that cats and dogs are attracted to ethylene
giycoi antifreeze and could drink any that is
left in an uncovered container or in puddles
on the ground. This will prove fatal in suffi-
cient quantities. Always drain coolant into a
sealable container. Coolant should be reused
unless it is contaminated or is several years
old.
3. Remove the drive belts.
4. Remove the upper radiator shroud.
5. Remove the fan and fan pulley.
6. Without disconnecting the lines, remove the
power steering pump from its bracket and position it
to the side Remove the pump brackets.
7. Remove the belt tensioner pulley bracket.
8. Without releasing the refrigerant, remove the
air conditioning compressor from its bracket and po-
sition it to the side.
9. Remove the bracket.
Timing marks
liming marks
Tinning marks
79245934 Fig. 187 Clean the timing marks to verify their position when aligning-3.51 engine
10. Remove the cooling fan bracket.
11, On some vehicles It may be necessary to re-
move the pulley from the crankshaft to access the
lower cover bolts.
12. Remove the timing belt cover bolts and the
upper and lower covers from the engme.
13. Detach the crankshaft position sensor con-
nector
14. Using SST MB9g67-01 and MD998754, or
their equivalents, remove the crankshaft pulley from
the crankshaft.
15. Use a shop rag to clean the timing marks to
assist in properly aligning the timing marks.
16. Loosen the center bolt on the tension pulley
and remove the timing belt.
@if the same timing belt will be reused,
mark the direction of timing belt’s rotation,
for installation in the same direction. Be sure
engine is positioned so No. 1 cylinder is at
the TDC of it’s compression stroke and the
sprockets timing marks are aligned with the
engine’s timing mark indicators.
17. Remove the auto-tensioner, the tension pul-
ley and the tension arm assembly.
18. Remove the sprockets by holding the hexago-
nal portion of the camshaft with a wrench while re-
moving the sprocket bolt.
To install: 19. Install the crankshaft pulley and turn the
crankshaft sprocket timing mark forward (clockwise)
three teeth to move the piston slightly past No. 1
cylinder top dead center.
20. If removed, install the camshaft sprockets and
tighten the bolts to 64 ft. Ibs. (88 Nm).
21, Align the timing mark of the left bank side
camshaft sprocket.
22. Align the timing mark of the right bank side
camshaft sprocket, and hold the sprocket with a
wrench so that it doesn’t turn.
23. Set the timing belt onto the water pump pul-
ley.
24. Check that the camshaft sprocket timing mark
of the left bank side is aligned and clamp the timing
belt with double clips.
25. Set the timing belt onto the idler pulley.
if any binding is felt when adjusting the tim-
ing belt tension by turning the crankshaft,
STOP turning the engine, because the pis-
tons may be hitting the valves.
26. Turn the crankshaft one turn counterclock-
wise and set the timing belt onto the crankshaft
sprocket.
27. Set the timing belt on the tension pulley.
28. Place the tension pulley pin hole so that it is
towards the top. Press the tension pulley onto the
timing belt, and then provisionally tighten the fixing
bolt. Tighten the bolt to 35 ft. Ibs. (48 Nm).
29. Slowly turn the crankshaft two full turns in the
clockwise direction until the timing marks align. Re-
move the four double clips.
30. Install the crankshaft position sensor connec-
tor.
31. Install the upper and lower covers on the en-
gine and secure them with the retaining screws. Be
sure the packing is properly positioned in the inner
grooves of the covers when installing.
Page 110 of 408
ENGINEANDENGINEOVERHAUL 3-49
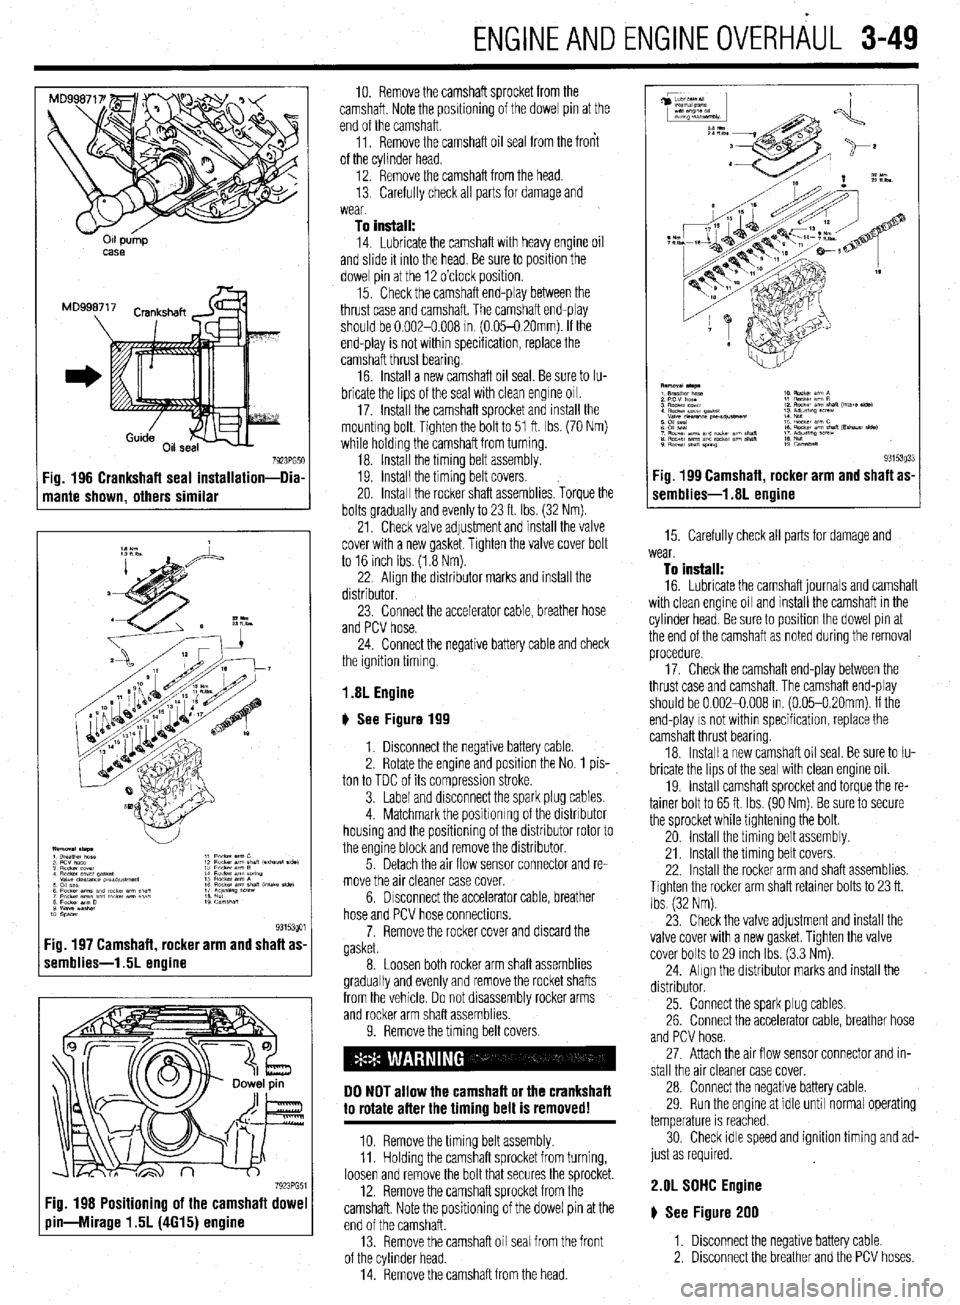
011 pump
MS8
7923PG51 Fig. 196 Crankshaft seal installation-Dia
mante shown, others similar
:ig. 197 Camshaft, rocker arm and shaft as
remblies-1.5L engine
7923PG5 Fig. 198 Positioning of the camshaft dowe
pin-Mirage 1.5L (4615) engine
10. Remove the camshaft sprocket from the
camshaft. Note the positioning of the dowel pin at the
end of the camshaft.
11. Remove the camshaft oil seal from the front
of the cylinder head.
12. Remove the camshaft from the head.
13. Carefully check all parts for damage and
wear
To install:
14. Lubricate the camshaft with heavy engine oil
and slide it mto the head. Be sure to position the
dowel pin at the 12 o’clock position.
15. Check the camshaft end-play between the
thrust case and camshaft. The camshaft end-play
should be 0.002-0.008 m (0.05-O 20mm). If the
end-play is not within specification, replace the
camshaft thrust bearing.
16 Install a new camshaft oil seal. Be sure to Iu-
bricate the lips of the seal with clean engine 011.
17. Install the camshaft sprocket and install the
mountrng bolt. Tighten the bolt to 51 ft. Ibs. (70 Nm)
while holding the camshaft from turning.
18. Install the timing belt assembly.
19. Install the timing belt covers.
20. Install the rocker shaft assemblies. Torque the
bolts gradually and evenly to 23 ft. Ibs. (32 Nm).
21. Check valve adjustment and install the valve
cover with a new gasket. Tighten the valve cover bolt
to 16 inch Ibs (1.8 Nm).
22 Align the distributor marks and install the
distributor.
23. Connect the accelerator cable, breather hose
and PCV hose.
24. Connect the negative battery cable and check
the ignition timing
1.8L Engine
# See Figure 199
1. Disconnect the negative battery cable
2. Rotate the engine and position the No. 1 pis-
ton to TDC of its compression stroke.
3. Label and disconnect the spark plug cables.
4. Matchmark the positronrng of the distributor
housing and the positioning of the distributor rotor to
the engine block and remove the distributor.
5. Detach the air flow sensor connector and re-
move the air cleaner case cover.
6. Drsconnect the accelerator cable, breather
hose and PCV hose connections.
7. Remove the rocker cover and discard the
gasket.
8. Loosen both rocker arm shaft assemblies
gradually and evenly and remove the rocket shafts
from the vehicle. Do not disassembly rocker arms
and rocker arm shaft assemblies.
9. Remove the timing belt covers.
DO NOT allow the camshaft or the crankshaft
to rotate after the timing belt is removed!
10. Remove the timing belt assembly.
11. Holding the camshaft sprocket from turning,
loosen and remove the bolt that secures the sprocket.
12. Remove the camshaft sprocket from the
camshaft. Note the positioning of the dowel pin at the
end of the camshaft.
13. Remove the camshaft oil seal from the front
of the cylinder head.
14. Remove the camshaft from the head.
(r.mblies-1.8L Agine g3i53033 Fig 199 Camshaft rocker arm and shaft as-
15. Carefully check all parts for damage and
wear.
To install:
16. Lubricate the camshaft journals and camshaft
with clean engine oil and install the camshaft in the
cylinder head. Be sure to position the dowel pin at
the end of the camshaft as noted during the removal
procedure.
17. Check the camshaft end-play between the
thrust case and camshaft The camshaft end-play
should be 0.002-0.008 in. (0.05-0.20mm). If the
end-play
IS not within specification, replace the
camshaft thrust bearing
18. Install a new camshaft oil seal. Be sure to Iu-
bricate the lips of the seal with clean engine oil.
19. Install camshaft sprocket and torque the re-
tainer bolt to 65 ft. Ibs. (90 Nm). Be sure to secure
the sprocket while tightening the bolt.
20 Install the timing belt assembly.
21. Install the timing belt covers.
22. Install the rocker arm and shaft assemblies.
Tighten the rocker arm shaft retainer bolts to 23 ft.
Ibs (32 Nm).
23 Check the valve adjustment and install the
valve cover with a new gasket. Tighten the valve
cover bolts to 29 inch Ibs. (3.3 Nm).
24. Align the distributor marks and install the
distributor.
25. Connect the spark plug cables.
26. Connect the accelerator cable, breather hose
and PCV hose.
27. Attach the air flow sensor connector and in-
stall the air cleaner case cover.
28. Connect the negative battery cable.
29. Run the engine at idle until normal operating
temperature is reached.
30. Check idle speed and ignition timing and ad-
just as required.
2.OL SDHC Engine
# See Figure 200
1. Disconnect the negative battery cable.
2. Disconnect the breather and the PCV hoses
Page 111 of 408
.
3-50 ENGINEANDENGINEOVERHALJL
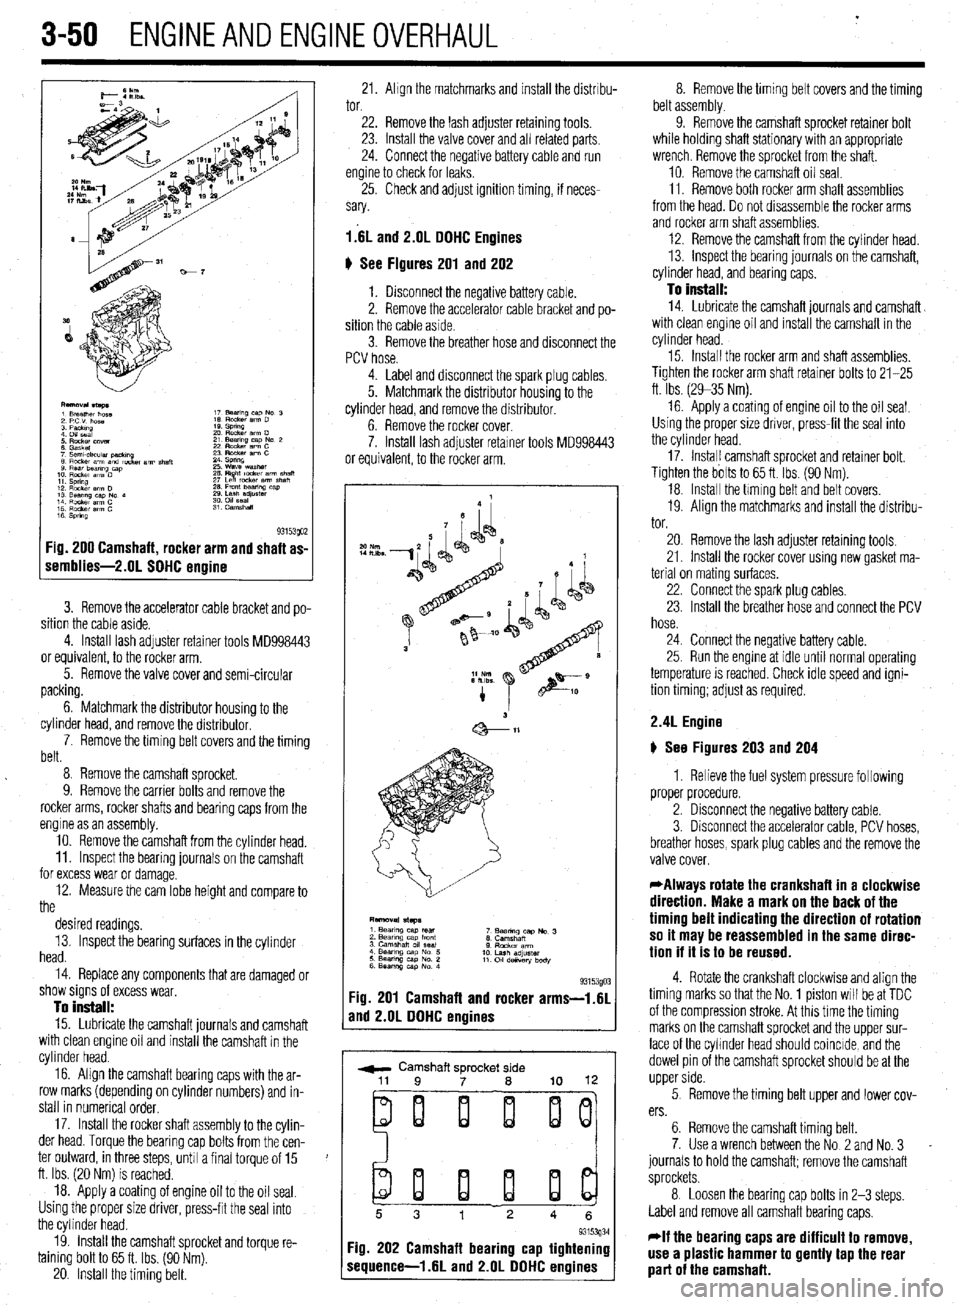
F
1 s 93153QO2 :ig. 200 Camshaft, rocker arm and shaft as-
iemblies-2.01 SOHC ermine
3. Remove the accelerator cable bracket and po-
sition the cable aside.
4. Install lash adjuster retainer tools MD998443
or equivalent, to the rocker arm.
5. Remove the valve cover and semi-circular
packing.
6. Matchmark the distributor housing to the
cylinder head, and remove the distributor,
7. Remove the timing belt covers and the timing
belt.
8 Remove the camshaft sprocket.
9. Remove the carrier bolts and remove the
rocker arms, rocker shafts and bearing caps from the
engine as an assembly.
10. Remove the camshaft from the cylinder head.
11. Inspect the bearing journals on the camshaft
for excess wear or damage.
12. Measure the cam lobe height and compare to
the
desired readings.
13. Inspect the bearing surfaces in the cylinder
head.
14. Replace any components that are damaged or
show signs of excess wear,
To install:
15. Lubricate the camshaft journals and camshaft
with clean engine oil and install the camshaft in the
cylinder head.
16. Align the camshaft bearing caps with the ar-
row marks (depending on cylinder numbers) and in-
stall in numerical order,
17. Install the rocker shaft assembly to the cylin-
der head. Torque the bearing cap bolts from the cen-
ter outward, in three steps, unh a final torque of 15
ft. Ibs. (20 Nm) is reached.
18. Apply a coating of engine oil to the oil seal.
Using the proper size driver, press-frt the seal into
the cylinder head.
19. install the camshaft sprocket and torque re-
taining bolt to 65 ft. Ibs. (90 Nm).
20. Install the timing belt. 21. Ahgn the matchmarks and install the distrrbu- 8. Remove the timing belt covers and the timing
tor. belt assembly.
22. Remove the lash adjuster retaining tools.
23. Install the valve cover and all related parts
24. Connect the negative battery cable and run
engine to check for leaks,
25. Check and adjust ignition timing, if neces-
sary.
l.‘6L and 2.lJL DOHC Engines
6 See Figures 201 and 202
1. Disconnect the negative battery cable.
2. Remove the accelerator cable bracket and po-
sition the cable aside.
3. Remove the breather hose and disconnect the
PCV hose. 9. Remove the camshaft sprocket retainer bolt
while holding shaft stationary with an appropriate
wrench. Remove the sprocket from the shaft.
10. Remove the camshaft oil seal.
11. Remove both rocker arm shaft assemblies
from the head. Do not drsassemble the rocker arms
and rocker arm shaft assemblies.
12. Remove the camshaft from the cylinder head.
13. inspect the bearing journals on the camshaft,
cylinder head, and bearing caps.
To install:
14. Lubricate the camshaft journals and camshaft
with clean engine oil and install the camshaft in the
cylinder head.
4. Label and disconnect the spark plug cables.
5. Matchmark the distributor housing to the
cylinder head, and remove the distributor.
6. Remove the rocker cover.
7. Install lash adjuster retarner tools MD998443
or equivalent, to the rocker arm. 15. Install the rocker arm and shaft assemblies.
Tighten the rocker arm shaft retainer bolts to 21-25
ft. Ibs. (2935 Nm).
16 Apply a coating of engine oil to the oil seal.
Using the proper size driver, press-fit the seal into
the cylinder head.
17. Instal! camshaft sprocket and retainer bolt.
Tighten the bolts to 65 ft. Ibs. (90 Nm).
18. Install the hming belt and belt covers.
19. Align the matchmarks and install the distribu-
tor.
93153gO: :ig. 201 Camshaft and rocker arms-i.61
rnd 2.OL DOHC engines
r ,
w Camshaft sprocket side
ei i i ij
20. Remove the lash adjuster retaining tools,
21. Install the rocker cover using new gasket ma-
terial on mating surfaces,
22. Connect the spark plug cables.
23. Install the breather hose and connect the PCV
hose.
24. Connect the negative battery cable.
25. Run the engme at idle until normal operating
temperature is reached. Check idle speed and igni-
tion timing; adjust as required.
2.4L Engine
) See Figures 203 and 204
1. Relieve the fuel system pressure following
proper procedure.
2. Disconnect the negative battery cable.
3. Disconnect the accelerator cable, PCV hoses,
breather hoses, spark plug cables and the remove the
valve cover.
*Always rotate the crankshaft in a clockwise
direction. Make a mark on the back of the
timing belt indicating the direction of rotation
so it may be reassembled in the same direc-
tion if it is to be reused.
4. Rotate the crankshaft clockwise and align the
timing marks so that the No. 1 piston will be at TDC
of the compression stroke. At this time the timing
marks on the camshaft sprocket and the upper sur-
face of the cyhnder head should coincide, and the
dowel pin of the camshaft sprocket should be at the
upper side.
5 Remove the timing belt upper and lower cov-
ers.
6. Remove the camshaft timing belt.
7. Use a wrench between the No 2 and No. 3
journals to hold the camshaft; remove the camshaft
sprockets.
8 Loosen the bearing cap bolts in 2-3 steps.
Label and remove all camshaft bearing caps,
*If the bearing caps are difficult to remove,
use a plastic hammer to gently tap the rear
part of the camshaft.
Page 112 of 408
ENGlNEANDENGlNEOVERHALiL 3-51
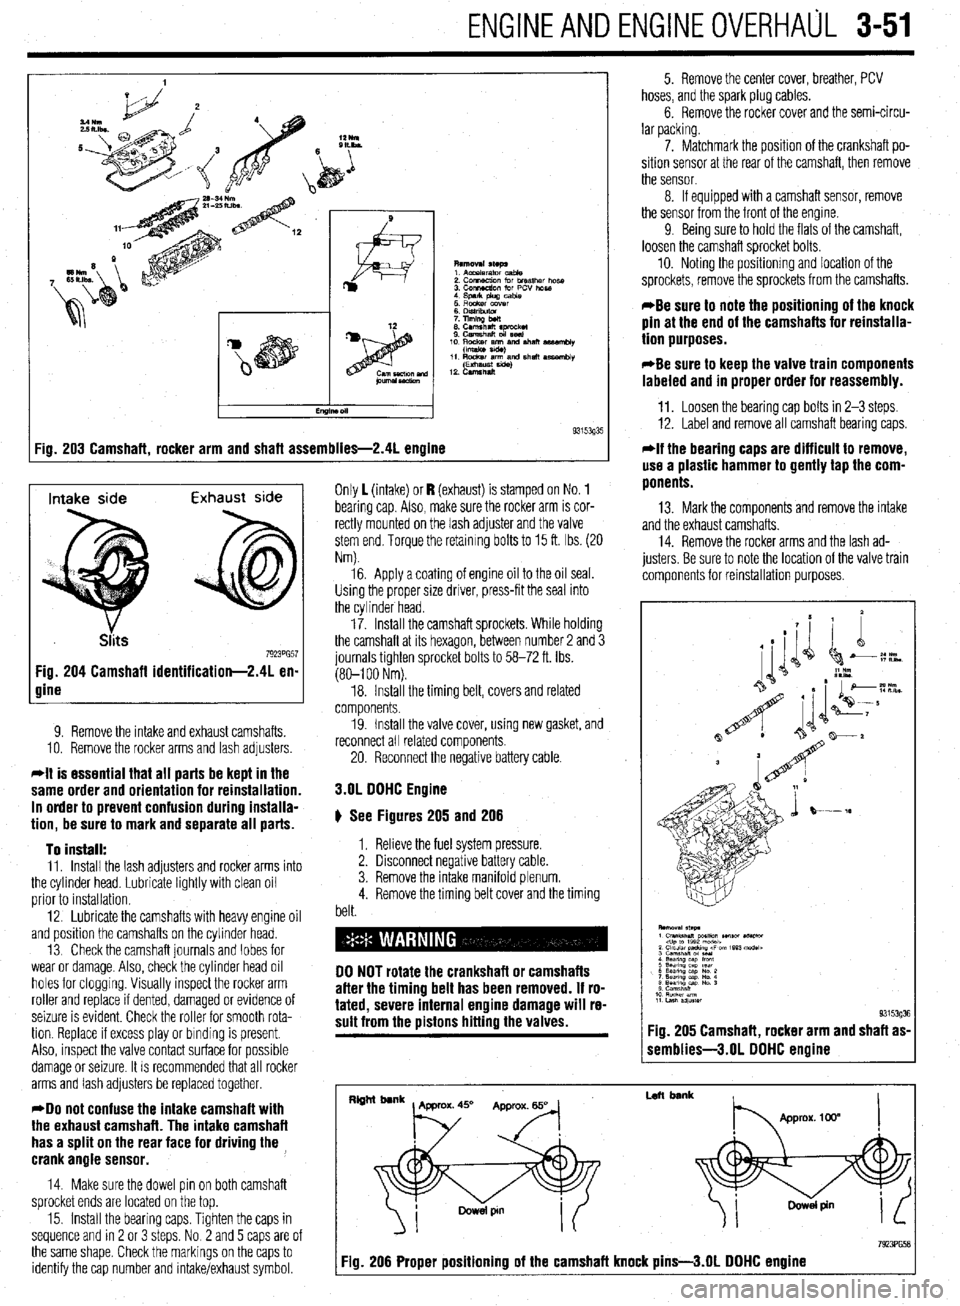
:ig. 203 Camshaft, rocker arm and shaft assemblies-2.41 engine 9315393'
Intake side Exhaust side
7923PG57 Fig. 204 Camshaft identification-2.41 en-
gine
9. Remove the intake and exhaust camshafts.
10. Remove the rocker arms and lash adjusters
*It is essential that all parts be kept in the
same order and orientation for reinstallation.
In order to prevent confusion during installa-
tion, be sure to mark and separate all parts.
To install:
11. Install the lash adjusters and rocker arms into
the cylinder head. Lubricate lightly with clean oil
prior to installation.
12. Lubricate the camshafts with heavy engine oil
and position the camshafts on the cylinder head.
13 Check the camshaft journals and lobes for
wear or damage. Also, check the cylinder head oil
holes for clogging. Visually inspect the rocker arm
roller and replace if dented, damaged or evidence of
seizure is evident. Check the roller for smooth rota-
tion. Replace If excess play or binding is present.
Also, inspect the valve contact surface for possible
damage or seizure. It is recommended that all rocker
arms and lash adjusters be replaced together.
*Do not confuse the intake camshaft with
the exhaust camshaft. The intake camshaft
has a split on the rear face for driving the ,
crank angle sensor.
14. Make sure the dowel pin on both camshaft
sprocket ends are located on the top.
15. Install the bearing caps. Tighten the caps in
sequence and rn 2 or 3 steps. No 2 and 5 caps are of
the same shape. Check the markings on the caps to
identify the cap number and intake/exhaust symbol. Only 1 (intake) or I? (exhaust) is stamped on No. 1
bearing cap Also, make sure the rocker arm is cor-
rectly mounted on the lash adjuster and the valve
stem end. Torque the retaining bolts to 15 ft. Ibs. (20
Nm).
16. Apply a coating of engine oil to the oil seal.
Using the proper size driver, press-fit the seal into
the cylinder head.
17. Install the camshaft sprockets. While holding
the camshaft at its hexagon, between number 2 and 3
journals tighten sprocket bolts to 58-72 ft. Ibs.
(80-l 00 Nm).
18. Install the timing belt, covers and related
components.
19. Install the valve cover, using new gasket, and
reconnect all related components
20. Reconnect the negative battery cable.
3.OL DOHC Engine
# See Figures 205 and 206
1. Relieve the fuel system pressure.
2. Disconnect negative battery cable.
3. Remove the intake manifold plenum.
4. Remove the timing belt cover and the timing
belt.
DO NOT rotate the crankshaft or camshafts
after the timing belt has been removed. If ro-
tated, severe internal engine damage will re-
sult from the pistons hitting the valves.
5. Remove the center cover, breather, PCV
hoses, and the spark plug cables.
6. Remove the rocker cover and the semi-circu-
lar packing.
7. Matchmark the position of the crankshaft po-
sition sensor at the rear of the camshaft, then remove
the sensor.
8. If equipped with a camshaft sensor, remove
the sensor from the front of the engine.
9 Being sure to hold the flats of the camshaft,
loosen the camshaft sprocket bolts.
10. Noting the positionmg and location of the
sprockets, remove the sprockets from the camshafts.
*Be sure to note the positioning of the knock
pin at the end of the camshafts for reinstalla-
tion purposes.
*Be sure to keep the valve train components
labeled and in proper order for reassembly.
11. Loosen the bearing cap bolts in 2-3 steps.
12. Label and remove all camshaft bearing caps.
*If the bearing caps are difficult to remove,
use a plastic hammer to gently tap the com-
ponents.
13. Mark the components and remove the intake
and the exhaust camshafts.
14. Remove the rocker arms and the lash ad-
justers. Be sure to note the location of the valve train
components for reinstallation purposes.
1 semblies-3.01 DOHC engine
I
Left bank
7923PG58 Fig. 206 Proper positioning of the camshaft knock pins-3.01 DOHC engine
Page 113 of 408
.
3-52 ENGINEANDENGINEOVERHAUL
15. Check the camshaft journals for wear or dam-
age. Check the cam lobes for damage. Also, check
the cylinder head oil holes for clogging.
To install:
*Lubricate the valve train components with
clean engine oil.
16. Bleed and install the lash adjusters to the to
the original bores in the cylinder head.
17. Install the rocker arms to the cylinder head.
18. Lubricate the camshafts with clean engine oil
and position the camshafts on the cylinder head
Be sure to properly position the knock pins of
the camshaft to prevent valve to piston inter-
ference.
*Do not confuse the intake camshaft with
the exhaust camshaft. The intake camshaft
on the Diamante has a B or J stamped on the
hexagon depending on the application. The
exhaust camshaft on the Diamante has a D or
K stamped on the hexagon depending on ap-
plication.
-Install the bearing caps according to the
identification mark and cap number. Bearing
caps No. 2,3 and are marked as such. The
caps also are marked I for intake or E for ex-
haust.
19 Install the bearing caps. Tighten the caps in
sequence, gradually in 2 or 3 steps Caps 2,3 and 4
have a front mark. Install with the mark aligned with
the front mark on the cylinder head. Torque the re-
taining bolts for caps No. 2,3 and 4 to 8 ft. Ibs. (11
Nm) and torque the retaining bolts for the front and
rear caps to 14 ft. Ibs. (20 Nm).
20. Apply a coating of engine oil to the oil seals
and install the oil seals to the front and rear of the
camshafts.
21. Holding the flats of the camshaft, install and
tighten the sprocket bolts to 65 ft. Ibs. (90 Nm).
22. If removed, install the camshaft position sen-
sor and tighten the mounting bolts to 78 inch Ibs. (9
Nm).
23. Aligning the matchmark, install the crankshaft
position sensor at the rear of the camshaft and
tighten the mountrng nut to 7 ft. Ibs. (12 Nm).
24. Align the marks on the camshaft and crank-
shaft sprockets. Install the timing belt assembly.
25. Install the rocker cover and the semi-circular
packing.
26. Install the intake manifold plenum.
27. Install the spark plug cables, center cover,
breather and PCV hoses.
28. Connect the negative battery cable and check
for leaks.
3.OL SDHC Engine
ti See Figures 207, 208, 209, and 210
1. Disconnect the negative battery cable,
2. Rotate and position the engine to TDC of
compression stroke.
3. If removing the right side (front) camshaft,
matchmark the distributor rotor and distributor hous-
ing to the engine block and remove the distributor.
4. Remove the Intake manifold plenum stay
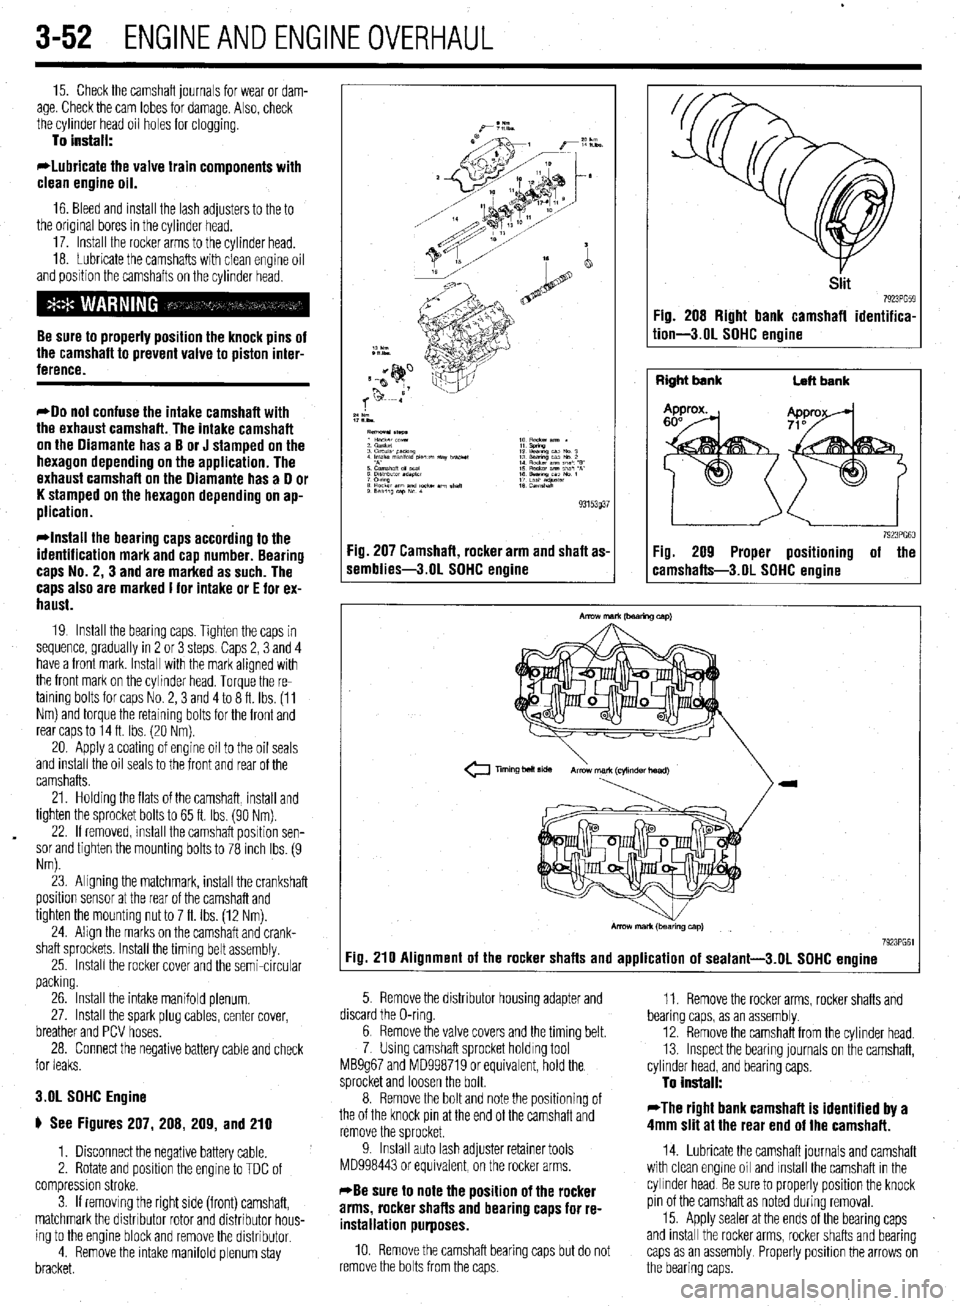
bracket. Fig. 207 Camshaft, rocker arm and shaft as-
iemblies-3.01 SDHC engine
Siit 7923'659 Fig. 208 Right bank camshafl identifica-
tion-3.01 SDHC engine
Right bank
Left bank
7923PG60 Fig. 209 Proper positioning of the
:amshafts-3.OL SDHC enoine
Tmng bolt side Armwmark(cql~ndertmad)
7923PG61
:ig. 210 Alignment of the rocker shafts and application of sealant-3.01 SDHC engine
5. Remove the distributor housing adapter and
,. ,.^.
bearmg caps, as an assembly 11. Remove the rocker arms, rocker shafts and
aiscara tne u-rmg.
^ -
6; Kemove the valve covers and the tlmmg belt.
7 Using camshaft sprocket holding tool
MB9g67 and MD998719 or equivalent, hold the
sprocket and loosen the bolt.
8. Remove the bolt and note the positioning of
the of the knock pin at the end of the camshaft and
remove the sprocket.
9. Install auto lash adjuster retainer tools
MD998443 or equivalent, on the rocker arms.
*Be sure to note the position of the rocker
arms, rocker shafts and bearing caps for re-
installation purposes.
10 Remove the camshaft bearing caps but do not
remove the bolts from the caps. 12. Remove the camshaft from the cylinder head.
13. Inspect the bearing journals on the camshaft,
cylinder head, and bearing caps.
To install:
*The right bank camshaft is identified by a
4mm slit at the rear end of the camshaft.
14. Lubricate the camshaft journals and camshaft
with clean engme oil and install the camshaft in the
cylinder head Be sure to properly position the knock
pin of the camshaft as noted during removal.
15. Apply sealer at the ends of the bearing caps
and install the rocker arms, rocker shafts and bearing
caps as an assembly Properly positron the arrows on
the bearing caps.
Page 114 of 408
ENGINEANDENGINEOVERHAUL 3-53
16. Torque the bearing cap bolts in the following
sequence: No. 3, No. 2, No. 1 and No. 4 to 85 inch
Ibs. (10 Nm).
17. Repeat the sequence increasing the torque to
14 ft. Ibs. (20 Nm).
18. Remove the auto lash adjuster retainer tools
from the rocker arms.
19. Install the camshaft sprocket and bolt.
20. Using camshaft sprocket holding tool
MB9g67 and MD998719 or equivalent, hold the
sprocket and tighten the bolt to 65 ft. Ibs. (90 Nm).
21. Install the timing belt and valve covers.
22. Using a new O-ring, install the distributor ex-
tension housing.
23. Install the intake manifold plenum stay
bracket.
24. Install the distributor assembly Be sure to
align the rotor and distributor housing matchmarks.
25. Connect the negative battery cable and check
for leaks.
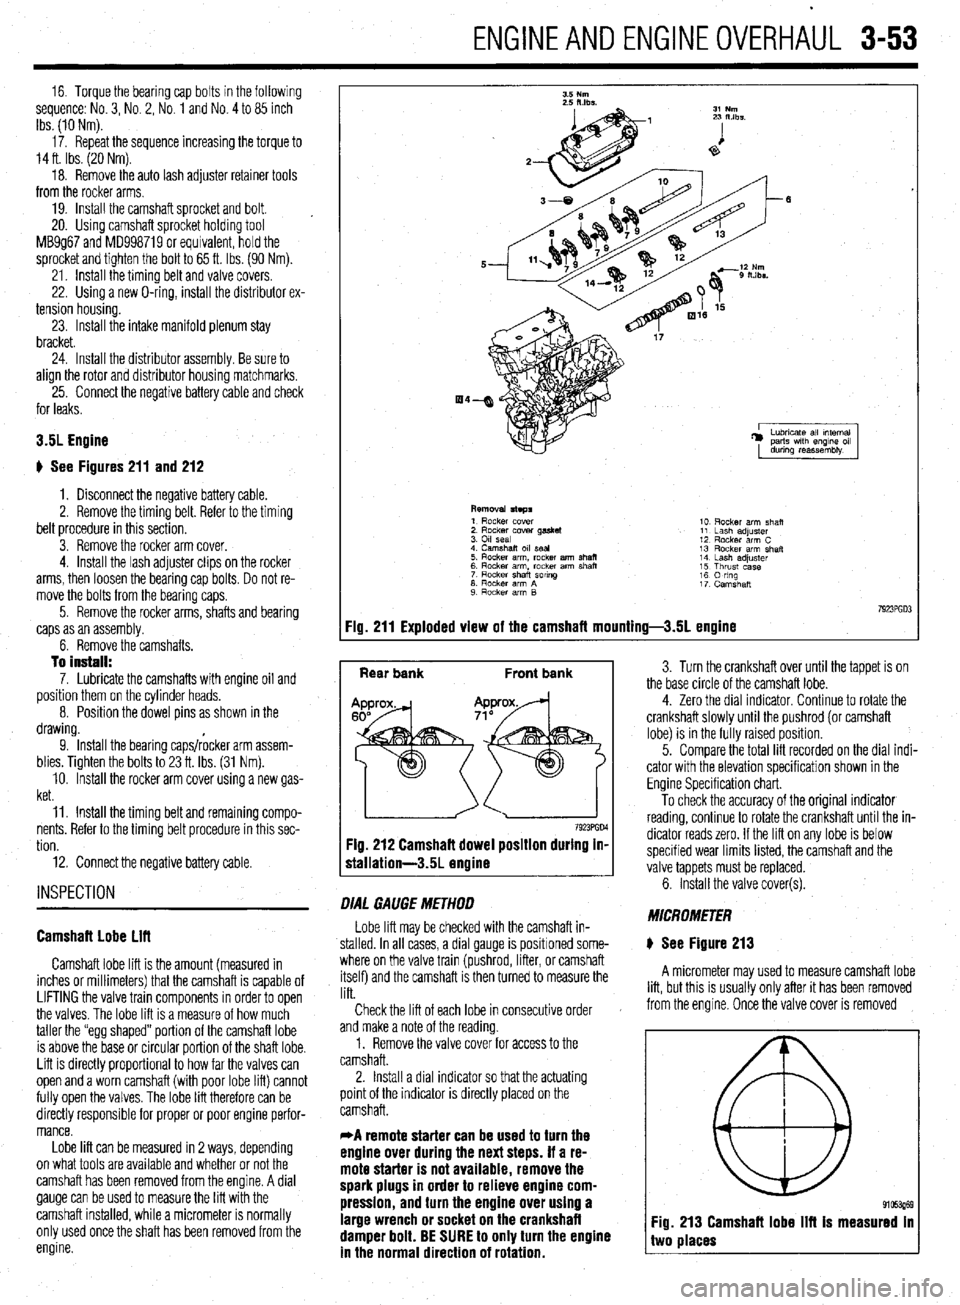
3.5L Engine
+ See Figures 211 and 212
1. Disconnect the negative battery cable.
2. Remove the timing belt. Refer to the timing
belt procedure in this section.
3. Remove the rocker arm cover.
4. Install the lash adjuster clips on the rocker
arms, then loosen the bearing cap bolts. Do not re-
move the bolts from the bearing caps.
5. Remove the rocker arms, shafts and bearing
caps as an assembly.
6. Remove the camshafts.
To install: 7. Lubricate the camshafts with engine oil and
position them on the cylinder heads.
8. Position the dowel Dins as shown in the
drawing.
9. Install the bearing caps/rocker arm assem-
blies. Tighten the bolts to 23 ft. Ibs. (31 Nm).
10. hstall the rocker arm cover using a new gas-
ket.
11. Install the timing belt and remaining compo-
nents Refer to the timing belt procedure in this sec-
tion.
12. Connect the negative battery cable.
INSPECTION
Camshaft Lobe Liff
Camshaft lobe lift is the amount (measured in
inches or millimeters) that the camshaft is capable of
LIFTING the valve train components in order to open
the valves. The lobe lift is a measure of how much
taller the “egg shaped” portion of the camshaft lobe
is above the base or circular portion of the shaft lobe.
Lift is directly proportional to how far the valves can
open and a worn camshaft (with poor lobe lift) cannot
fully open the valves. The lobe lift therefore can be
directly responsible for proper or poor engine perfor-
mance.
Lobe lift can be measured in 2 ways, depending
on what tools are available and whether or not the
camshaft has been removed from the engine. A dial
gauge can be used to measure the lift with the
camshaft installed, while a micrometer is normally
only used once the shaft has been removed from the
engine.
10 Rocker arm shaft
11 Lash ad,uster
12 Rocker arm C
13 Rocker arm six,,
14 Lash adluster
15 Thrust case
16 orng
17 Camshan
:ig. 211 Exploded view of the camshaft mounting-3.51 engine 1923PGD
Rear bank Front bank
7923PGD4 Fig. 212 Camshaft dowel position during in-
stallation-3.51 engine
DIAL GAUGE METHOD
Lobe lift may be checked with the camshaft in-
stalled. In all cases, a dial gauge is positroned some-
where on the valve train (pushrod, lifter, or camshaft
itself) and the camshaft is then turned to measure the
lift.
Check the lift of each lobe in consecutive order
and make a note of the reading.
1. Remove the valve cover for access to the
camshaft.
2. Install a dial indicator so that the actuating
point of the indicator is directly placed on the
camshaft.
*A remote starter can be used to turn the
engine over during the next steps. If a re-
mote starter is not available, remove the
spark plugs in order to relieve engine com-
pression, and turn the engine over using a
large wrench or socket on the crankshaft
damper bolt. BE SURE to only turn the engine
in the normal direction of rotation.
3. Turn the crankshaft over until the tappet is on
the base circle of the camshaft lobe.
4. Zero the dial indicator. Continue to rotate the
crankshaft slowly until the pushrod (or camshaft
lobe) is in the fully raised position.
5. Compare the total lift recorded on the dial indi-
cator with the elevation specification shown in the
Engine Specification chart.
To check the accuracy of the original indicator
reading, continue to rotate the crankshaft until the in-
dicator reads zero. If the lift on any lobe is below
specified wear limits listed, the camshaft and the
valve tappets must be replaced.
6. Install the valve cover(s).
MICROMETER
) See Figure 213
A micrometer may used to measure camshaft lobe
lift, but this is usually only after it has been removed
from the engine. Once the valve cover is removed
I
@
Fig. 213 Camshaff lobe IIR Is measured In
Page 128 of 408
ENGINEANDENGINEOVERHAUL 3-67
CONNECTING ROD
You should have the connecting rod checked for
StraiQhtness at a machine shop. If the connecting rod
is bent, it will unevenly wear the bearing and piston,
as well as place greater stress on these components.
Any bent or twisted connecting rods must be re-
placed. If the rods are straight and the wrist pin clear-
ance is within specifications, then only the bearing
end of the rod need be checked. Place the connecting
rod into a vice, with the bearing inserts in place, in-
stall the cap to the rod and torque the fasteners to
specifications. Use a telescoping gauge and carefully
measure the inside diameter of the bearings. Com-
pare this reading to the rods original crankshaft jour-
nal diameter measurement. The difference is the oil
clearance. If the oil clearance is not within specifica-
tions, install new bearings in the rod and take another
.
specifica- L
need to
shop as the pistons must be installed in the con measurement. it the Clearance is still out of :
tions, and the crankshaft is not, the rod will
be reconditioned by a machine shop.
*You can also use Plastigage’
@to check the
bearing clearances. The assen- . ...= - _______
Mm sectinn has complete instructions on its use.
Camshaft
Inspect the camshaft and lifters/followers as de
scribed earlier in this section.
Bearings
All of the enaine bearinos should be visuallv in-
~~~ I~ .- - -- ..-_-..,
spected for we; and/or damage. The bearing should
look evenly worn all around with no deep scores or
pits. If the bearing is severely worn, scored, pitted or
heat blued, then the bearing, and the components
that use it, should be brought to a machine shop for
block. ,ect
relationshipto the rod or engine damage can occur,
Pistons and Connecting Rods
I
b See Fiaute 264 --- --*------
Only pistons with the wrist pin retained by C-clips
are serviceable by the home-mechanic. Press fit pis-
tons require special presses and/or heaters to re- I”
rr
rove/install the connecting rod and should only be
PC srformed by a machine shop.
All pistons will have a mark indicating the direc-
tir 9n to the front of the engine and the must be in-
stalled into the engine in that manner. Usually it is a
notch or arrow on the top of the piston, or it may be
the letter F cast or stamped into the piston.
ASEtiBlY
1
crankshaft. Replace any freeze or oil galley plugs
which were removed during disassembly.
Crankshaft
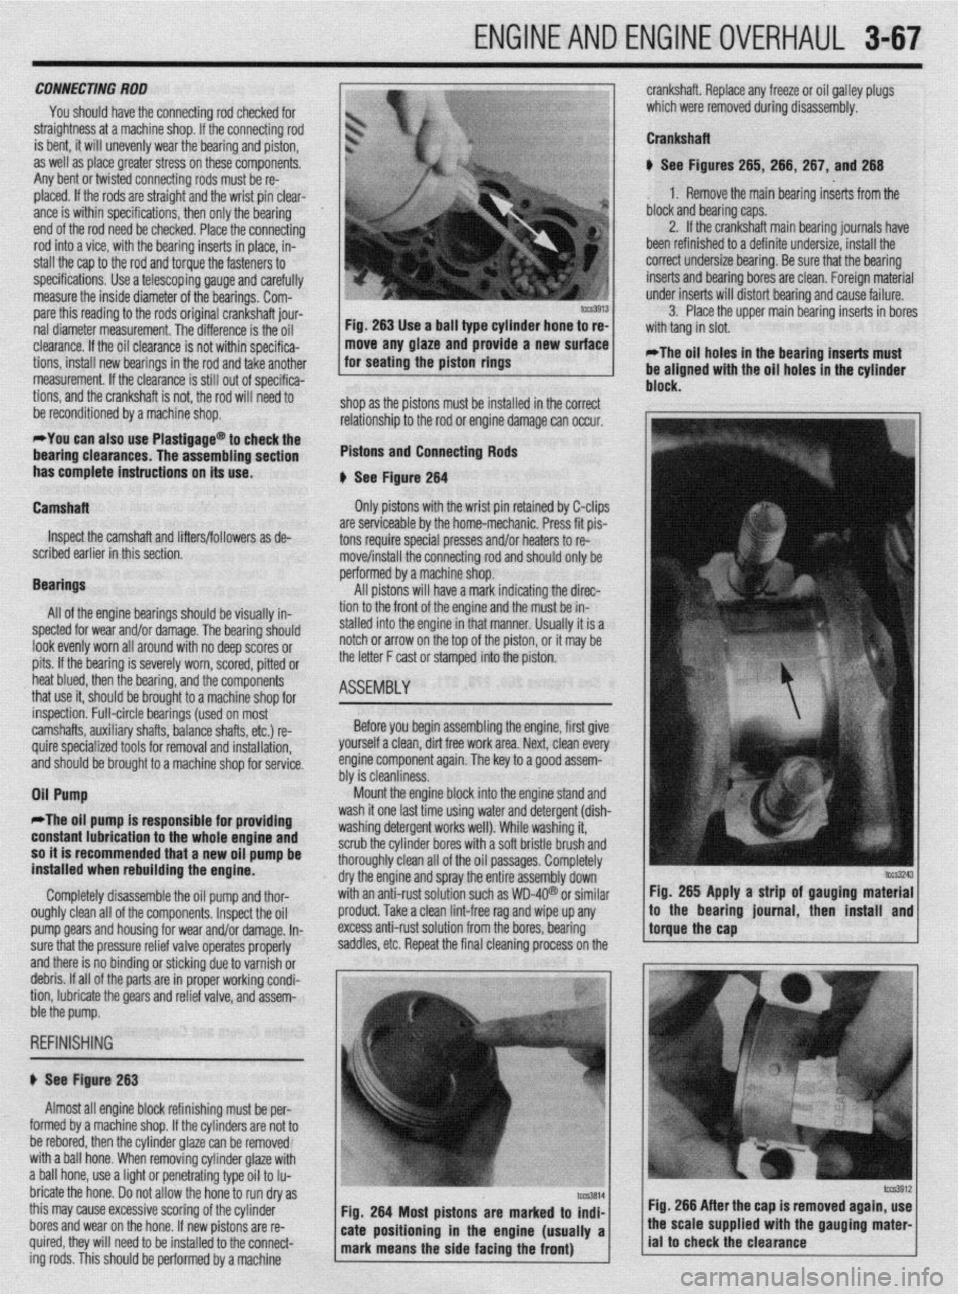
u See Figures 265, 266, 267, and 266
1. Remove the main bearing inserts from the
block and bearing caps.
2. If the crankshaft main bearing journals have
been refinished to a definite undersize, install the
correct undersize bearina. Be sure that the bearina
inserts and bearing bores are clean. Foreign mateiial
under inserts will distort bearinq and cause failure.
3. Place the upper main bearing inserts in bores
*The oil holes in the bearing inserts must
be aligned with the oil holes in the cylinder
. . .
inspection. Full-circle bearings (used on most
camshafts, auxiliary shafts, balance shafts, etc.) re-
quire specialized tools for removal and installation, ’
and should be brought to a machine shop for service.
Oil Pump Before you begin assembling the engine, first give
yourself a clean, dirt free work area. Next, clean every
engine component again. The key to a QOOd assem-
hhr io da~nlinmw “‘I Ia ~rGiOllll,lc7.Ja. Mount the engine block into the engine stand and
II
*The oil pump is responsible fo
r providing wasn It one last time usmg water and detergent (dish-
unrhinn rldarnant ~nrirc well), While washing it, with a soft bristle brush and
: oil oassaoes. Comoletelv constant lubrication to the whole engine and 1ILl.M 0, ,y “GSGl ycx II ““1 n
so it is recommended that a new oil pump be scrub the cylinder bore:
installed when rebuilding the engine. thoroughly clean all oft
dry the engine and spra
Completely disassemble the oil pump and thor- with an anti-rust solutio
oughly clean all of the components. Inspect the oil
pro
pump Qears and housing for wear and/or damage. In- exe
sure that the pressure relief valve operates properly sac
and there is no binding or sticking due to varnish or
debris. If all of the parts are in proper working condi-
tion, lubricate the gears and relief valve, and assem-
r
j ht
y the entire assembly down’
in such as WD-4Q@ or similar Fig. 265 Apply a strip of gauging material
Iduct. Take a clean lint-free rag and wipe up any
less anti-rust solution from the bores, bearing
Idles, etc. Repeat the final cleaning process on the !torguethe~~p * ,’ / to the bearmg lournal, then mstall and
ble the pump.
REFINISHING
# See Figure 263
Almost all engine block refinishing must be per-
I
IUIIII~U uy a macnme snap. ir me cynnoers are nor ro
be rebored, then the cylinder glaze can be removed
with a ball hone. When removing cylinder glaze with
a ball hone, use a light or penetrating type oil to Iu-
bricate the hone. Do not allow the hone to run dry as
this may cause excessive scoring of the cylinder
bores and wear on the hone. If new pistons are re-
quired, they will need to be installed to the connect-
ing rods. This should be oerformed bv a machine Fig. 266 After the cap is removed again, use
Page 142 of 408
3.5L SOHC ENGINE MECHANICAL SPECIFICATIONS
Description
Connecting rod English
Specifications Metric
Specifications
Rod big end side clearance
Standard
Llrnll
Piston pin outslde dnmeler
P~slon pin press-~” load
Crankshalt pm 011 clearance
Standard 0 0039-o 0096 I” 0 10-O 25mm
0016ln
0 4mm
067rn 22mm
Flngerprewre
0 0006-0 0020 in
0 02-O 05mm
Llmtt
0 004 I” Olmm
Crankshaft
Maln bearing 011 clearance
Standard
0 0006-0 0020 I”
0 02-O 05mm
Llmlt
0 004 I”
Olmm
Pin outside dram&r
197m 50mm
Journal outslde diameter
2361n 60mm
Out-+round (max
) -
0 0006 I”.
0015mm
Crankshaft end.play
Standard
0 002-0 0096 I”.
0 05-O 25mm
TIP clearance
Side clearance
Body clearance
Standard 0
1X24-0 0071 1”
0
0016-O 0039 I” 0 06-O 16mm
0 040 IOmm
0 0039-o 0071 I” 0 10.0.16mm Components
Camshall
TORQUE SPECIFICATIONS English Metric
Camshalt sprwket bolt
1 5L engjne
1 6L, 1 8L, and 2 OL (SOHC and DOHC) engines
2 4L engine
3 OL (SOHC and DOHC) engme
Bearing cap retalnlng bolts
2 OL SOHC engine
1 6L and 2 OL DOHC engines
2 4L eng,ne
3 OL (SOHC and DOHC) engme
3 5L engine
Crankshalt dampedpullev 51 it Ibs
6511 Ibs
56.72 R Ibs.
65 It Ibs
1511 Ibs
21.25ft Ibs
15 fl lbs. 70 Nm
90 Nm
60-l 00 Nm
WNm
2ONm
29-35 Nm
20 Nm
0
23 11 Ibs 31 Nm
Pullev bolts
1 5L engine loft Ibs 14Nm
1 6L and 2 OL (SOHC and DOHC)engines
14.22 It lbs
20-30 Nm
2 4L enqme
16 fl Ibs. 25 Nm
Center reta!ino bolt
51-72 It lbs
13411 Ibs 70.100 Nm
165Nm
3 OL (SOHC and DOHC) engine
Cvllnder head 106-11611 lbs 150-160 Nm
1 6L englne
2 OL SOHC engine
2 4L
engine
3 OL SOHC engine
3 OL DOHC enwe
- 3 5L eqne
Flywheel/dnvaplale retaining b&s 22lt Ibs
11.14ll Ibs
16-21 it Ibs
21 ll Ibs
14 It Ibs
21 It Ibs 3ONm
15-19 Nm
25-29 Nm
29 Nm
19Nm
29 Nm
1 5L engine
1 6L 2 OL (SOHC and DOHC), and 2 4L engmes 98 It Ibs
94.101 II Ibs 135Nm
130-140 Nm
1 6L
engine 72 It lbs
100 Nm
3 OL SOHC, 3 OL DOHC, and 3 5L engmes
53-56 It Ibs
72-76 Nm
Intake manlfoid retanmg bolts
1 5L engine
16Land20L DOHC engines 1311 lbs
Ii-141 Ibs 16Nm
15-19 Nm
1 6L engine
2 OL SOHC engme
Plenum bolts
Manifold bolts
2 4L
eng,ne
1994 models 1411 Ibs
11.14R Ibs.
11-1411 Ibs
left Ibs 15.19Nm
15.19Nm
25 Nm
Bolts
NUk
1995.00 models 15fl ibs 20 Nm
26 ‘I lbs.
35 Nm
SOItS 15fi Ibs 20 Nm
Nuts
15 ft Ibs.
20 Nm
3 OL SOHC 3 OL DOHC, and 3 5L engines
0
93153~24
m
F5
/ m
P
0
m
is
7
m