1900 MITSUBISHI DIAMANTE oil level
[x] Cancel search: oil levelPage 90 of 408
ENGINEANDENGINEOVERHAUL 3-29
l HOzS sensor l ECT gauge sender l ECT sensor l MAP sensor l IAT sensor l TP sensor l IAC motor l injector harness l ignition coil l CMP sensor l EGR solenoid valve
33. Install the spark plug wires and cover,
34. Replace the O-rings and connect the fuel
lines.
35. Install the air cleaner and intake hose. Con-
nect the breather hose.
36. Fill the cooling system.
37. Connect the negative battery cable
3.01 DDHC Engine
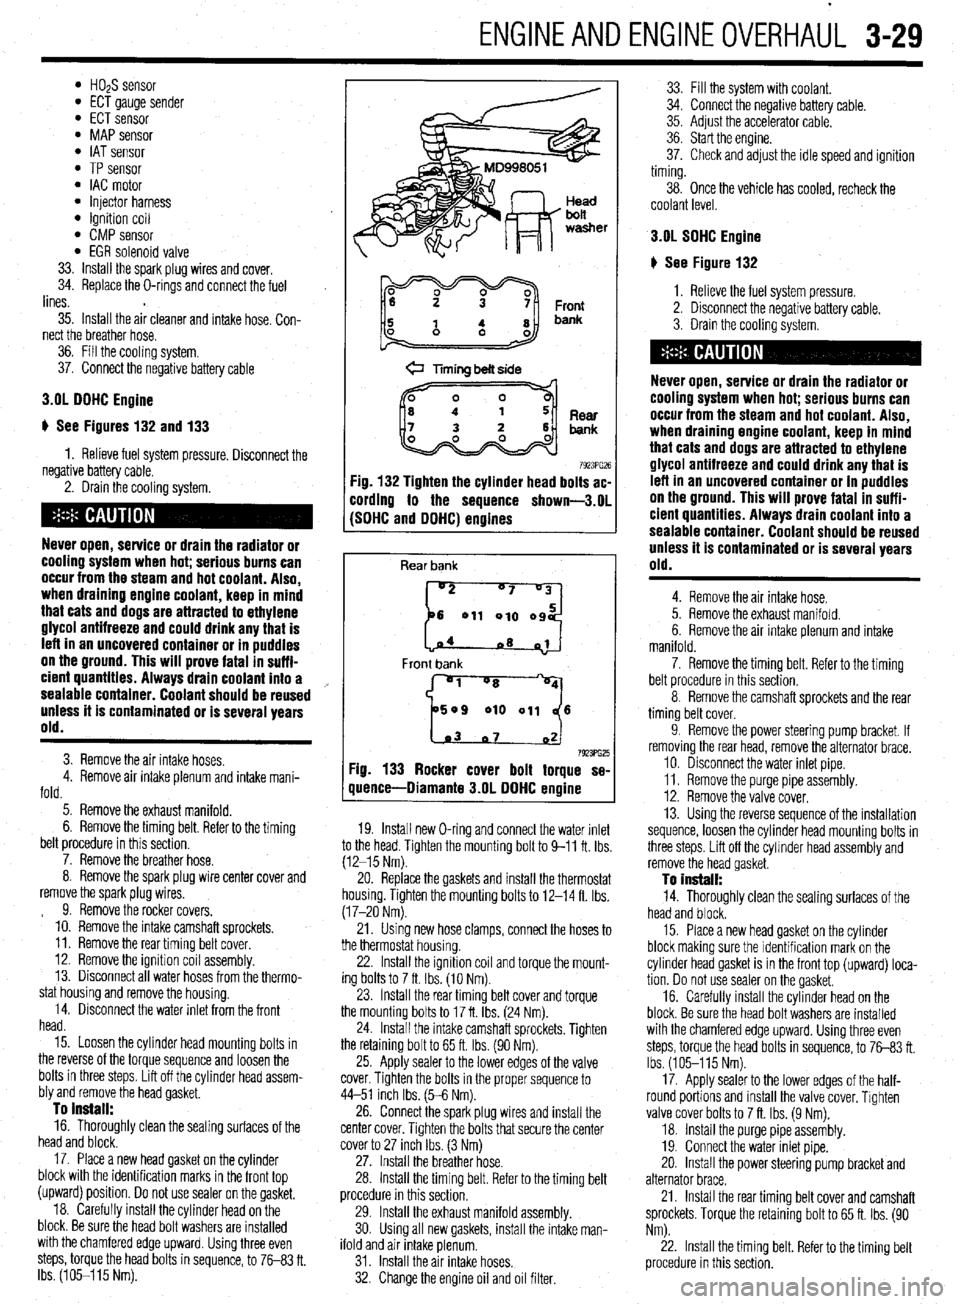
ti See Figures 132 and 133
1. Relieve fuel system pressure. Disconnect the
negative battery cable.
2. Drain the cooling system.
Never open, service or drain the radiator or
cooling system when hot; serious burns can
occur from the steam and hot coolant. Also,
when draining engine coolant, keep in mind
that cats and dogs are attracted to ethylene
glycol antifreeze and could drink any that is
left in an uncovered container or in puddles
on the ground. This will prove fatal in suffi-
cient quantltles. Always drain coolant into a
sealable container. Coolant should be reused
unless it is contaminated or is several years
old.
3. Remove the air intake hoses.
4. Remove air intake plenum and intake mani-
fold.
5. Remove the exhaust manifold.
6. Remove the timing belt. Refer to the timing
belt procedure in this section.
7. Remove the breather hose.
8. Remove the spark plug wire center cover and
remove the spark plug wires.
9. Remove the rocker covers.
10. Remove the intake camshaft sprockets.
11. Remove the rear timing belt cover.
12. Remove the ignition coil assembly.
13. Disconnect all water hoses from the thermo-
stat housing and remove the housing.
14. Disconnect the water inlet from the front
head.
15. Loosen the cylinder head mounting bolts in
the reverse of the torque sequence and loosen the
bolts in three steps. Lift off the cylinder head assem-
bly and remove the head gasket.
To install: 16. Thoroughly clean the sealing surfaces of the
head and block.
17. Place a new head gasket on the cylinder
block with the identification marks in the front top
(upward) position. Do not use sealer on the gasket,
18. Carefully install the cylinder head on the
block. Be sure the head bolt washers are installed
with the chamfered edge upward. Using three even
steps, torque the head bolts in sequence, to 76-83 ft.
Ibs. (105-115 Nm).
@ Timing belt side
7923PG26 :ig. 132 Tighten the cylinder head bolts ac-
:ording to the sequence shown-3.01
SDHC and DDHC) engines
Rear bank
[::od
04
~8 01
Front bank
'1 "8
509 010 011 6
1.03 07 02 7923ffi25 Fig. 133 Rocker cover bolt torque se-
quence-Diamante 3.OL DDHC engine
19. Install new O-ring and connect the water inlet
to the head. Tighten the mounting bolt to 9-11 ft. Ibs
(12-15 Nm).
20. Replace the gaskets and install the thermostat
housing. Tighten the mounting bolts to 12-14 ft. Ibs.
(17-20 Nm).
21. Using new hose clamps, connect the hoses to
the thermostat housing.
22. Install the Ignition coil and torque the mount-
ing bolts to 7 ft. Ibs. (10 Nm).
23. Install the rear timing belt cover and torque
the mounting bolts to 17 ft. Ibs. (24 Nm).
24. Install the intake camshaft sprockets. Tighten
the retaining bolt to 65 ft. Ibs. (90 Nm).
25. Apply sealer to the lower edges of the valve
cover. Tighten the bolts in the proper sequence to
44-51 inch Ibs. (5-6 Nm).
26. Connect the spark plug wires and install the
center cover. Tighten the bolts that secure the center
cover to 27 inch Ibs. (3 Nm)
27. Install the breather hose.
28. Install the timing belt. Refer to the timing belt
procedure in this section,
29. Install the exhaust manifold assembly.
30. Using all new gaskets, install the intake man-
ifold and air intake plenum.
31. Install the air intake hoses.
32. Change the engine oil and oil filter. 33. Fill the system wrth coolant.
34. Connect the negabve battery cable.
35. Adjust the accelerator cable.
36. Start the engine.
37. Check and adjust the idle speed and ignition
timing.
38. Once the vehicle has cooled, recheck the
coolant level.
3.OL SDHC Engine
# See Figure 132
1. Relieve the fuel system pressure.
2. Disconnect the negative battery cable.
3. Drain the cooling system.
Never open, service or drain the radiator or
cooling system when hot; serious burns can
occur from the steam and hot coolant. Also,
when draining engine coolant, keep in mind
that cats and dogs are attracted to ethylene
alvcol antifreeze and could drink any that is
Left in an uncovered container or in puddles
on the ground. This will Drove fatal in suff i-
cient quantities. Always drain coolant into a
sealable container. Coolant should be reused
Unless it is Contaminated or is several years
old.
4. Remove the air intake hose.
5. Remove the exhaust manifold.
6. Remove the air intake plenum and intake
manifold.
7. Remove the timing belt. Refer to the timing
belt procedure in this section.
8. Remove the camshaft sprockets and the rear
timing belt cover.
9. Remove the power steering pump bracket. If
removing the rear head, remove the alternator brace.
10. Disconnect the water inlet pipe.
11. Remove the purge pipe assembly.
12. Remove the valve cover,
13. Using the reverse sequence of the installation
sequence, loosen the cylinder head mounting bolts in
three steps. Lift off the cylmder head assembly and
remove the head gasket.
To install: 14. Thoroughly clean the sealing surfaces of the
head and block.
15. Place a new head gasket on the cylinder
block making sure the identification mark on the
cylrnder head gasket is in the front top (upward) loca-
tion. Do not use sealer on the gasket,
16. Carefully install the cylinder head on the
block. Be sure the head bolt washers are installed
with the chamfered edge upward. Using three even
steps, torque the head bolts in sequence, to 7683 ft.
Ibs. (105-115 Nm).
17. Apply sealer to the lower edges of the half-
round portions and install the valve cover. Tighten
valve cover bolts to 7 ft. Ibs. (9 Nm).
18. Install the purge pipe assembly.
19. Connect the water inlet pipe.
20. Install the power steering pump bracket and
alternator brace.
21. Install the rear timing belt cover and camshaft
sprockets. Torque the retaining bolt to 65 ft. Ibs. (90
Nm).
22. Install the timing belt. Refer to the timing belt
procedure in this section.
Page 91 of 408
.
3-30 ENGINEANDENGINEOVERHAUL
23. Using all new gaskets, install the intake man-
ifold, air intake plenum and exhaust manifold.
24. Install the air intake hose.
25. Fill the system with coolant.
26. Connect the negative battery cable.
27. Start the engine.
28. Check and adjust the idle speed and ignition
timing.
29. Once the vehicle has cooled, recheck the
coolant level.
3.51 Engine
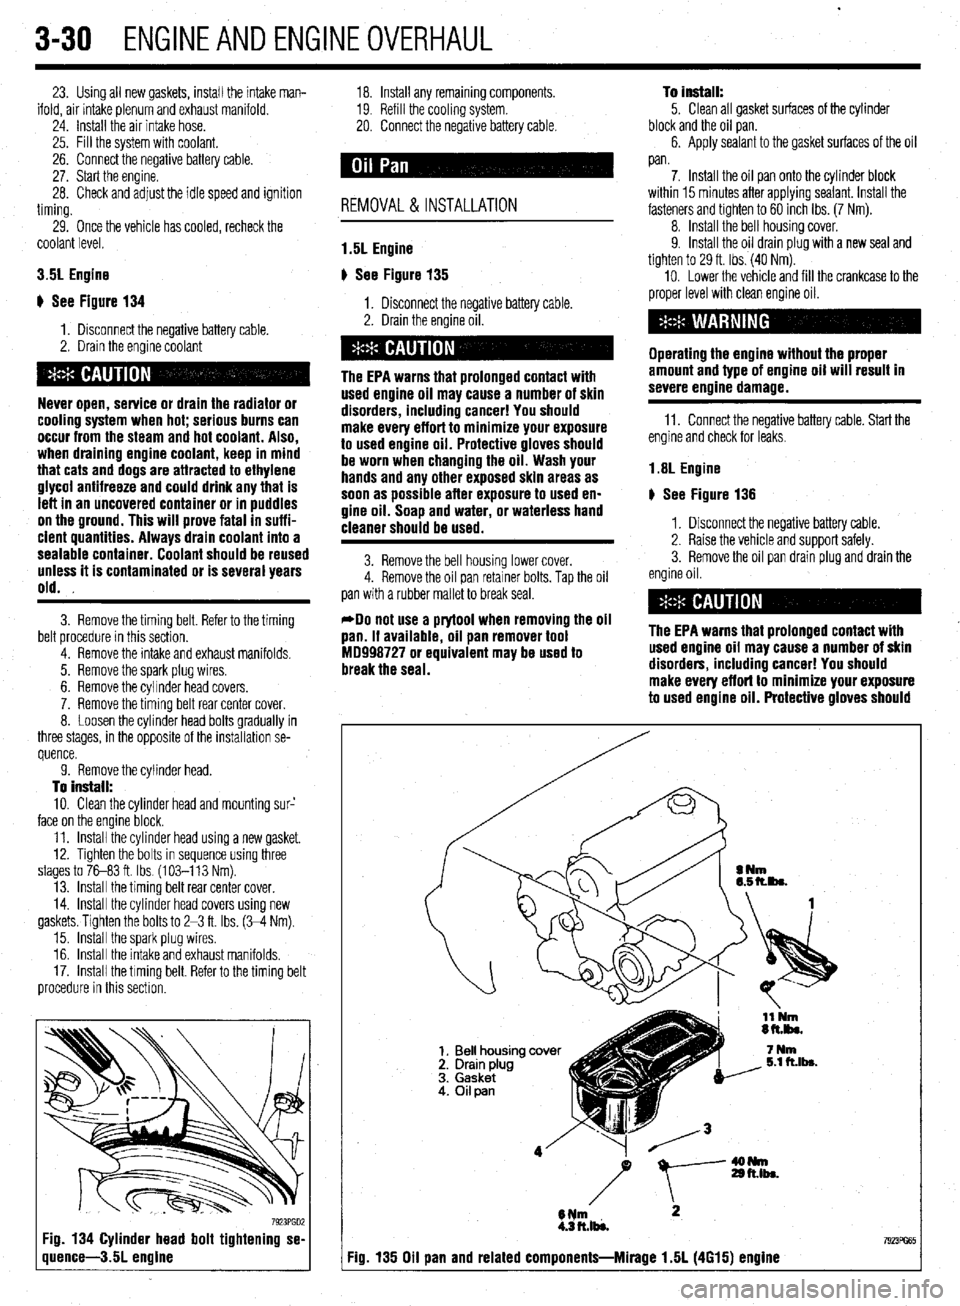
ti See Figure 134
1. Disconnect the negative battery cable.
2. Drain the engine coolant
Never open, service or drain the radiator or
cooling system when hot; serious burns can
occur from the steam and hot coolant. Also,
when draining engine coolant, keep in mind
that cats and dogs are attracted to ethylene
glycol antifreeze and could drink any that is
left in an uncovered container or in puddles
on the ground. This will prove fatal in suffi-
cient quantities. Always drain coolant into a
sealable container. Coolant should be reused
unless it is contaminated or is several years
old.
3. Remove the timing belt. Refer to the timing
belt procedure in this section.
4. Remove the intake and exhaust manifolds.
5. Remove the spark plug wires.
6. Remove the cylrnder head covers.
7. Remove the timing belt rear center cover.
8. Loosen the cylinder head bolts gradually in
three stages, in the opposite of the installation se-
quence.
9. Remove the cylinder head.
To install: 10. Clean the cylinder head and mounting sur-’
face on the engine block.
11. Install the cylinder head using a new gasket.
12. Tighten the bolts in sequence using three
stages to 76-83 ft. Ibs. (103-113 Nm).
13. Install the timing belt rear center cover.
14. Install the cylinder head covers using new
gaskets. Tighten the bolts to 2-3 ft. Ibs. (334 Nm).
15. Install the spark plug wires,
16. Install the intake and exhaust manifolds,
17. Install the timing belt. Refer to the timing belt
procedure in this section.
7923PGD2 Fig. 134 Cylinder head bolt tightening se-
quence-3.5L engine
18. Install any remaining components.
19. Refill the cooling system.
20. Connect the negative battery cable.
REMOVAL &INSTALLATION
1.5L Engine
p See Figure 135
1. Disconnect the negative battery cable.
2. Drain the engine oil.
The EPA warns that prolonged contact with
used engine oil may cause a number of skin
disorders, including cancer! You should
make every effort to minimize your exposure
to used engine oil. Protective gloves should
be worn when changing the oil. Wash your
hands and any other exposed skin areas as
soon as possible after exposure to used en-
gine oil. Soap and water, or waterless hand
cleaner should be used.
3. Remove the bell housing lower cover.
4. Remove the oil pan retainer bolts. Tap the oil
pan with a rubber mallet to break seal.
*Do not use a prytool when removing the oil
pan. If available, oil pan remover tool
MD998727 or equivalent may be used to
break the seal. To install:
5. Clean all gasket surfaces of the cylinder
block and the oil pan.
6. Apply sealant to the gasket surfaces of the oil
pan.
7. Install the oil pan onto the cylinder block
within 15 minutes after applying sealant. Install the
fasteners and tighten to 60 inch Ibs. (7 Nm).
8. Install the bell housing cover.
9. Install the oil drain plug with a new seal and
tighten to 29 ft. Ibs. (40 Nm).
10. Lower the vehicle and fill the crankcase to the
proper level with clean engine oil.
Operating the engine without the proper
amount and type of engine oil will result in
severe engine damage.
11. Connect the negative battery cable. Start the
engine and check for leaks.
1.8L Engine
# See Figure 136
1. Disconnect the negative battery cable.
2. Raise the vehicle and support safely.
3. Remove the oil pan drain plug and drain the
engine oil.
The EPA warns that prolonged contact with
used engine oil may cause a number of skin
disorders, including cancer! You should
make every effort to minimize your exposure
to used engine oil. Protective gloves should
I Fig. 135 Oil pan and related components-Mirage 1.5L (4615) engine
Page 92 of 408
ENGINEANDENGINEOVERHAUL 3-31
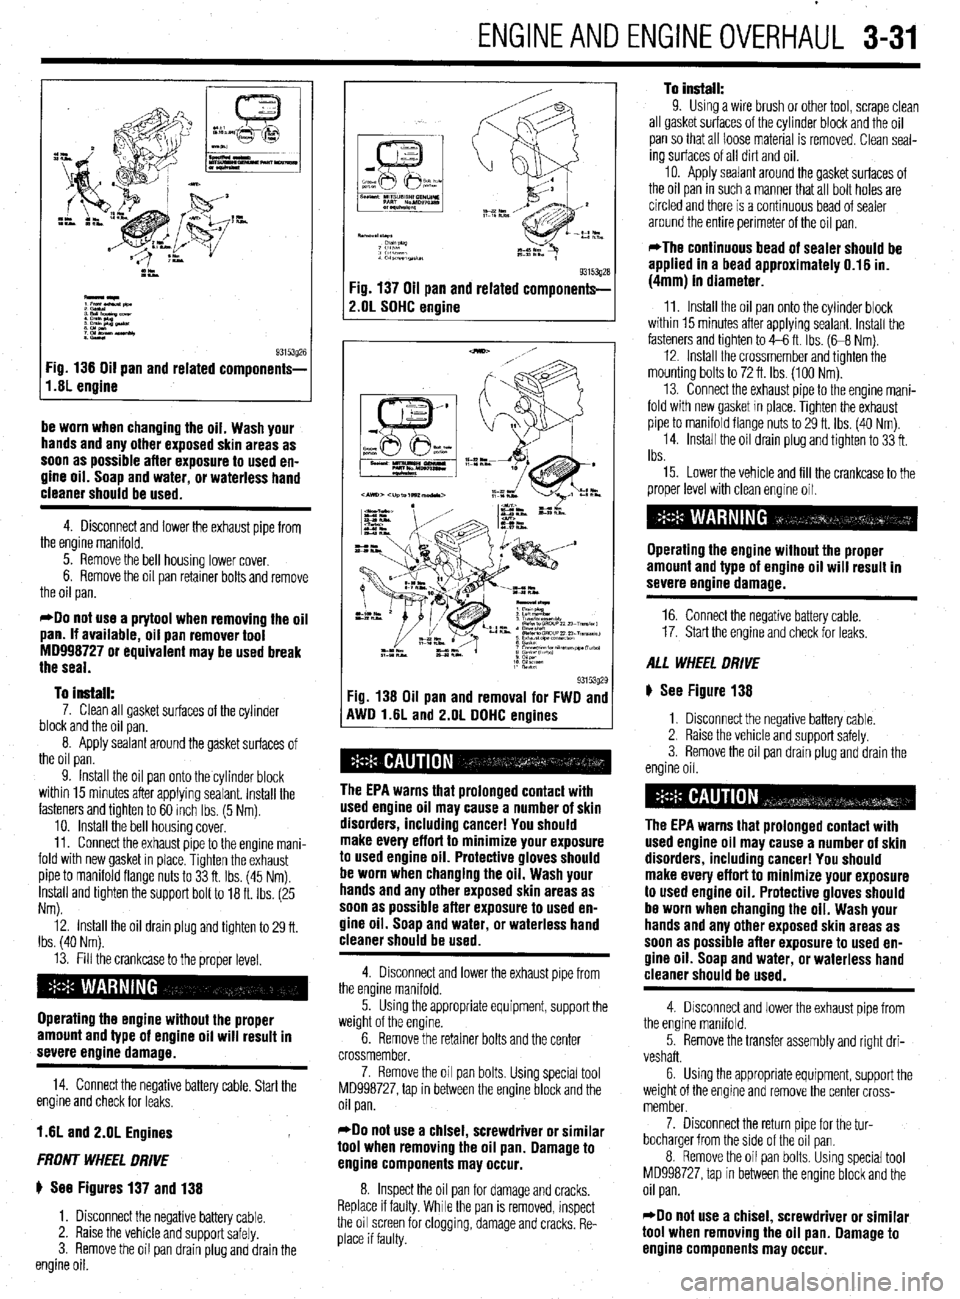
I,.s; engine g3i53g26
Fig 136 Oil pan and related components-
be worn when changing the oil. Wash your
hands and any other exposed skin areas as
soon as possible after exposure to used en-
gine oil. Soap and water, or waterless hand
cleaner should be used.
4. Disconnect and lower the exhaust pipe from
the engine manifold.
5. Remove the bell housing lower cover.
6. Remove the oil pan retainer bolts and remove
the oil pan.
*Do not use a prytool when removing the oil
pan. If available, oil pan remover tool
MD998727 or equivalent may be used break
the seal.
To install:
7. Clean all gasket surfaces of the cylinder
block and the oil pan.
8. Apply sealant around the gasket surfaces of
the oil pan.
9. Install the oil pan onto the cylinder block
within 15 minutes after applying sealant. Install the
fasteners and tighten to 60 inch Ibs. (5 Nm).
10. install the bell housing cover.
11. Connect the exhaust pipe to the engine mani-
fold with new gasket in place. Tighten the exhaust
pipe to manifold flange nuts to 33 ft. Ibs. (45 Nm).
Install and tighten the support bolt to 18 ft. Ibs. (25
Nm).
12. Install the oil drain plug and tighten to 29 ft.
Ibs. (40 Nm).
13. Fill the crankcase to the proper level.
Operating the engine without the proper
amount and type of engine oil will result in
severe engine damage.
14. Connect the negative battery cable. Start the
engine and check for leaks.
1.6L and 2.OL Engines
FRONT WHEEL DRIVE
ti See Figures 137 and 138
1. Disconnect the negative battery cable.
2. Raise the vehicle and support safely.
3. Remove the oil pan drain plug and drain the
engine oil.
93153gza Fig. 137 Oil pan and related components-
2.OL SOHC engine
93153g29 Fig. 138 Oil pan and removal for FWD and
AWD l.liL and 2.OL DDHC enoines
The EPA warns that prolonged contact with
used engine oil may cause a number of skin
disorders, including cancer! You should
make every effort to minimize your exposure
to used engine oil. Protective gloves should
be worn when changing the oil. Wash your
hands and any other exposed skin areas as
soon as possible after exposure to used en-
gine oil. Soap and water, or waterless hand
cleaner should be used.
4. Disconnect and lower the exhaust pipe from
the engine manifold.
5. Using the appropriate equipment, support the
weight of the engine.
6. Remove the retainer bolts and the center
crossmember,
7. Remove the oil pan bolts. Using special tool
MD998727, tap in between the engine block and the
oil pan.
*Do not use a chisel, screwdriver or similar
tool when removing the oil pan. Damage to
engine components may occur.
8. Inspect the oil pan for damage and cracks.
Replace if faulty. While the pan is removed, inspect
the oil screen for clogging, damage and cracks. Re-
place if faulty.
To install: 9. Using a wire brush or other tool, scrape clean
all gasket surfaces of the cylinder block and the oil
pan so that all loose material is removed. Clean seal-
ing surfaces of all dirt and oil.
10. Apply sealant around the gasket surfaces of
the oil pan in such a manner that all bolt holes are
circled and there is a continuous bead of sealer
around the entire perimeter of the oil pan.
*The continuous bead of sealer should be
applied in a bead approximately 0.16 in.
(4mm) in diameter.
11. Install the oil pan onto the cylinder block
within 15 minutes after applying sealant. Install the
fasteners and tighten to 4-6 ft. Ibs. (G8 Nm).
12. Install the crossmember and tighten the
mounting bolts to 72 ft. Ibs. (100 Nm).
13. Connect the exhaust pipe to the engine mani-
fold with new gasket In place. Tighten the exhaust
pipe to manifold flange nuts to 29 ft. Ibs. (40 Nm)
14. Install the oil drain plug and tighten to 33 ft.
Ibs.
15. Lower the vehicle and fill the crankcase to the
proper level with clean engine oil.
Operating the engine without the proper
amount and type of engine oil will result in
severe engine damage.
16. Connect the negative battery cable.
17. Start the engine and check for leaks.
ALL WHEEL DRIVE
ti See Figure 138
1. Disconnect the negative battery cable.
2. Raise the vehicle and support safely.
3. Remove the oil pan drain plug and drain the
engine oil.
The EPA warns that prolonged contact with
used engine oil may cause a number of skin
disorders, including cancer! You should
make every effort to minimize your exposure
to used engine oil. Protective gloves should
be worn when changing the oil. Wash your
hands and any other exposed skin areas as
soon as possible after exposure to used en-
gine oil. Soap and water, or waterless hand
cleaner should be used.
4. Disconnect and lower the exhaust pipe from
the engine manifold.
5. Remove the transfer assembly and right dri-
veshaft.
6. Using the appropriate equipment, support the
weight of the engine and remove the center cross-
member.
7. Disconnect the return pipe for the tur-
bocharger from the side of the oil pan.
8. Remove the oil pan bolts. Using special tool
MD998727, tap In between the engine block and the
oil pan.
*Do not use a chisel, screwdriver or similar
tool when removing the oil pan. Damage to
engine components may occur.
Page 93 of 408
.
3-32 ENGINEANDENGINEOVERHAUL
9. Inspect the oil pan for damage and cracks.
Replace if faulty, While the pan is removed, inspect
the oil screen for clogging, damage and cracks, Re-
place if faulty.
To install: 10. Using a wire brush or other tool, scrape clean
all gasket surfaces of the cylinder block and the oil
pan so that all loose material is removed. Clean seal-
ing surfaces of all dirt and oil.
11, Apply sealant around the gasket surfaces of
the oil pan in such a manner that all bolt holes are
circled and there is a continuous bead of sealer
around the entire perimeter of the oil pan.
*The continuous bead of sealer should be
applied in a bead approximately 0.16 in.
(4mm) in diameter.
12. Install the oil pan onto the cylinder block
within 15 minutes after applying sealant. Install the
fasteners and tighten to 4-6 ft. Ibs. (68 Nm).
13. Install the oil return pipe using a new gasket,
if removed. Tighten retainers to 5-7 ft. Ibs. (7-10
Nm).
14. Install the left member and tighten the forward
retainer bolts to 72 ft. Ibs. (100 Nm). Tighten the
rearward left member bolts to 58 ft. Ibs. (80 Nm).
15. Install the transfer assembly and right drive-
shaft.
16. Connect the exhaust pipe from the engine
manifold with new gasket in place. Tighten the ex-
haust pipe to manifold flange nuts to 29 ft. Ibs. (40
Nm).
17. Install the oil drain plug and tighten to 33 ft.
Ibs.
18. Lower the vehicle and fill the crankcase to the
proper level with clean engine oil.
Operating the engine without the proper
amount and type of engine oil will result in
severe enaine damage.
19. Connect the negative battery cable. Start the
engine and check for leaks.
2.4L Engine
) See Figure 139
1, Disconnect the negative battery cable. -
,(L.. K%
2 mM_
-Ip
t 8*t.almcwr
:y&pn
::Elm
93153g30 Fig. 139 Oil pan and related components-
2.4L engine
2. Remove the oil pan drain plug and drain the
engine oil.
The EPA warns that prolonged contact with
used engine oil may cause a number of skin
disorders, including cancer! You should
make every effort to minimize your exposure
to used engine oil. Protective gloves should
be worn when changing the oil. Wash your
hands and any other exposed skin areas as
soon as possible after exposure to used en-
gine oil. Soap and water, or waterless hand
cleaner should be used.
3. Remove the oil dipstick and tube assembly.
4. Detach the Heated Oxygen (HOaS) sensor
connector.
5. Remove the front exhaust pipe from the vehi-
cle.
6. Remove the bell housing cover.
7. Remove the oil pan retainer bolts. Using spe-
cial tool MD998727 or equivalent, tap in between the
engine block and the oil pan.
*Do not use a prytool when removing the oil
pan. Damage to engine components may oc-
cur.
To install:
8. Apply sealant around the gasket surfaces of
the oil pan.
9. Install the oil pan onto the cylinder block
within 15 minutes after applying sealant. Install the
fasteners and tighten to 6 ft. Ibs. (8 Nm).
10. Install the oil drain plug and tighten to 29 ft.
Ibs. (39 Nm).
11. Install the bell housing cover, and tighten the
mounting bolts to 7 ft. Ibs. (9 Nm).
12. Install the front exhaust pipe and tighten the
bolts at the catalytic converter to 36 ft. Ibs. (49 Nm).
Tighten the nuts at the exhaust manifold to 32 ft. Ibs.
(44 Nm).
13. Reconnect the HOPS sensor connector.
Operating the engine without the proper
amount and type of engine oil will result in
severe engine damage.
15. Connect the negative battery cable. Start the
engine and check for leaks.
3.OL Engines
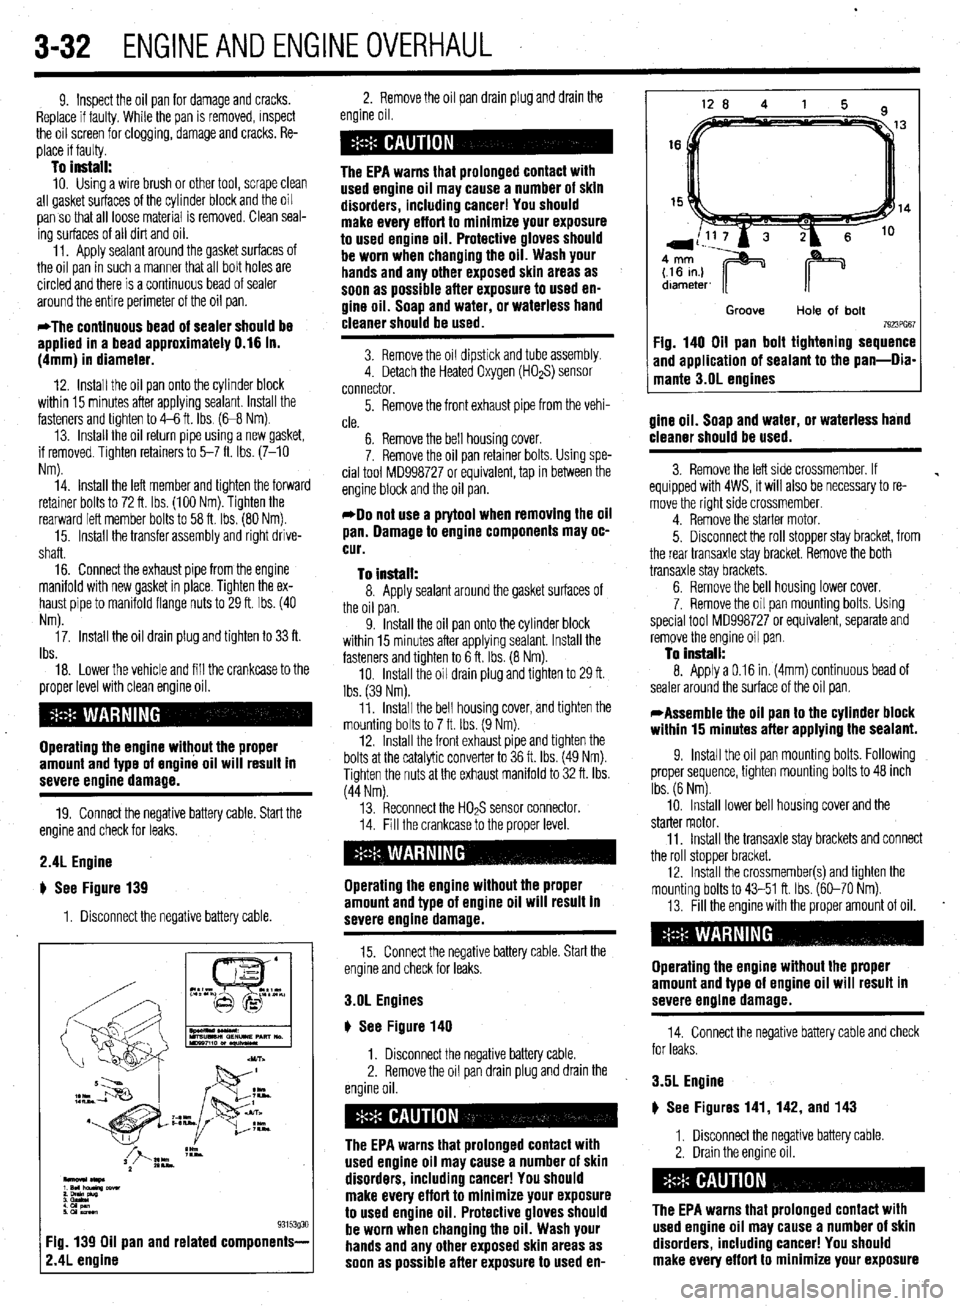
u See Figure 140
1. Disconnect the negative battery cable.
2. Remove the oil pan drain plug and drain the
The EPA warns that prolonged contact with
used engine oil may cause a number of skin
disorders, including cancer! You should
make every effort to minimize your exposure
to used engine oil. Protective gloves should
be worn when changing the oil. Wash your
hands and any other exposed skin areas as
soon as possible after exposure to used en-
Groove
Hole of bolt 7923PG67 Fig. 140 Oil pan bolt tightening sequence
and application of sealant to the pan-Dia-
mante 3.OL engines
gine oil. Soap and water, or waterless hand
cleaner should be used.
3. Remove the left side crossmember. If
equipped with 4WS, it will also be necessary to re-
move the right side crossmember.
4. Remove the starter motor.
5. Disconnect the roll stopper stay bracket, from
the rear transaxle stay bracket. Remove the both
transaxle stay brackets.
6. Remove the bell housing lower cover.
7. Remove the oil pan mounting bolts. Using
special tool MD998727 or equivalent, separate and
remove the engine oil pan.
To install: 8. Apply a 0.16 in. (4mm) continuous bead of
sealer around the surface of the oil pan.
*Assemble the oil pan to the cylinder block
within 15 minutes after applying the sealant.
9. Install the oil pan mounting bolts. Following
proper sequence, tighten mounting bolts to 48 inch
Ibs. (6 Nm).
10. Install lower bell housing cover and the
starter motor.
11, Install the transaxle stay brackets and connect
the roll stopper bracket.
12. Install the crossmember and tighten the
mounting bolts to 43-51 ft. Ibs. (60-70 Nm).
13. Fill the engine with the proper amount of oil.
.
Operating the engine without the proper
amount and type of engine oil will result in
severe engine damage.
14. Connect the negative battery cable and check
for leaks.
3.5L Engine
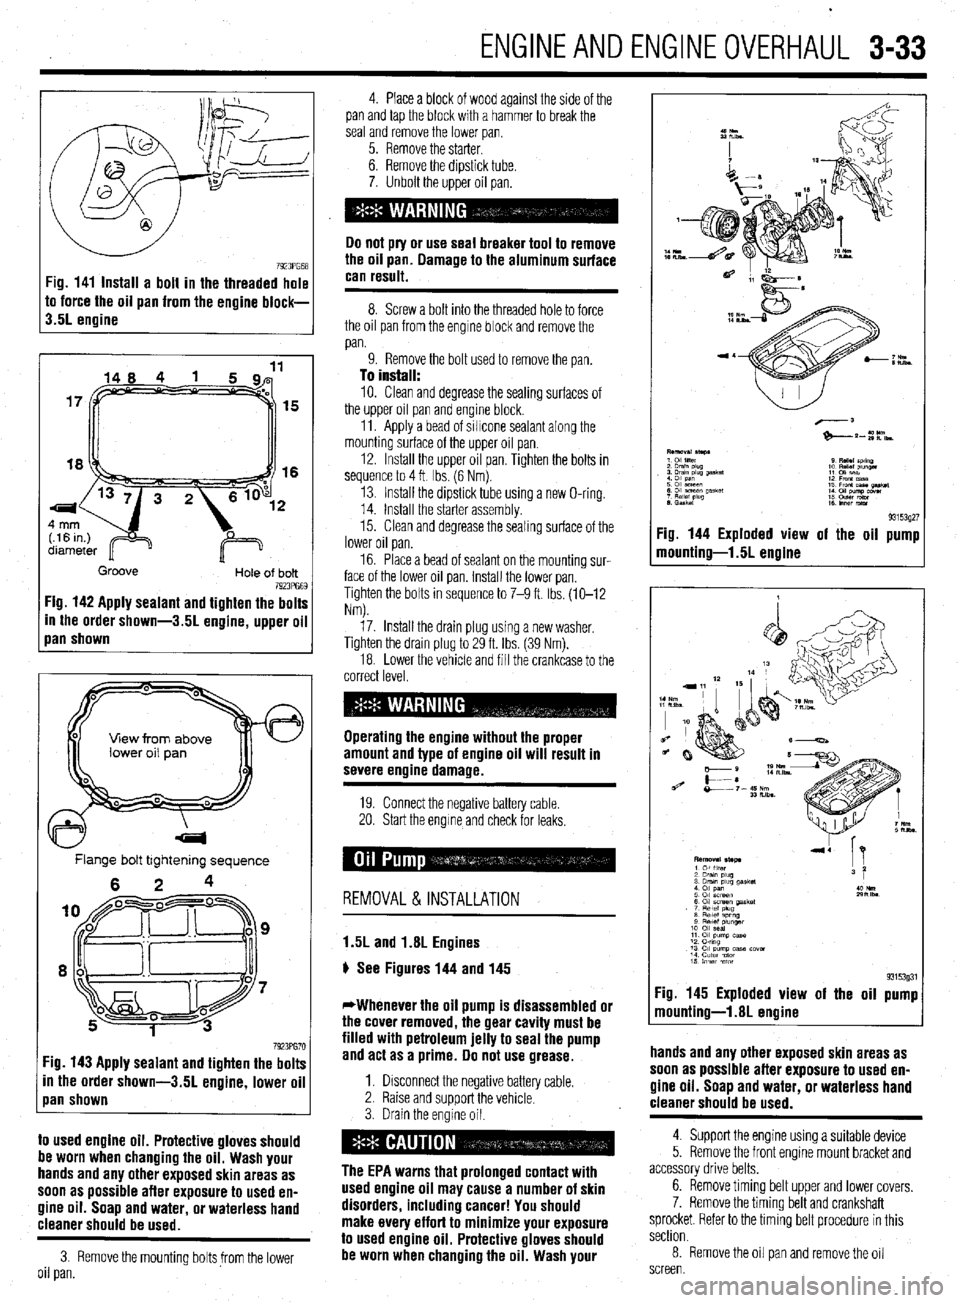
p See Figures 141, 142, and 143
1, Disconnect the negative battery cable.
2. Drain the engine oil.
The EPA warns that prolonged contact with
used engine oil may cause a number of skin
disorders, includina cancer! You should
make eve’ry effort to minimize your exposure
Page 94 of 408
ENGINEANDENGINEOVERHAUL 3-33
7923PG68 Fig. 141 Install a bolt in the threaded hole
to force the oil pan from the engine block-
3.5L engine
15
16
Groove
Hole of bolt 7923PG69 Fig. 142 Apply sealant and tighten the bolts
In the order shown-3.51 engine, upper oil
Ian shown
View from above
Flange bolt tightening sequence
6 2 4
7923PG70 :ig. 143 Apply sealant and tighten the bolts
in the order shown-3.51 engine, lower oil
pan shown
to used engine oil. Protective gloves should
be worn when changing the oil. Wash your
hands and any other exposed skin areas as
soon as possible after exposure to used en-
gine oil. Soap and water, or waterless hand
cleaner should be used.
3. Remove the mounting boltsfrom the lower
oil pan. 4. Place a block of wood against the side of the
pan and tap the block with a hammer to break the
seal and remove the lower pan.
5. Remove the starter.
6. Remove the dipstick tube.
7. Unbolt the upper oil pan.
Do not pry or use seal breaker tool to remove
the oil pan. Damage to the aluminum surface
can result.
8. Screw a bolt into the threaded hole to force
the oil pan from the engine block and remove the
pan.
9. Remove the bolt used to remove the pan.
To install:
10. Clean and degrease the sealing surfaces of
the upper oil pan and engine block.
11. Apply a bead of sillcone sealant along the
mounting surface of the upper oil pan.
12. Install the upper oil pan. Tighten the bolts in
sequence to 4 ft Ibs. (6 Nm).
13. Install the dipstick tube using a new O-ring.
14. Install the starter assembly.
15. Clean and degrease the sealing surface of the
lower oil pan.
16. Place a bead of sealant on the mounting sur-
face of the lower
oil pan. Install the lower pan.
Tighten the bolts in sequence to 7-9 ft. Ibs. (10-12
Nm).
17. Install the drain plug using a new washer,
Tighten the drain plug to 29 ft. Ibs (39 Nm).
18. Lower the vehicle and fill the crankcase to the
correct level.
Operating the engine without the proper
amount and type of engine oil will result in
severe engine damage.
19 Connect the negative battery cable.
20. Start the engrne and check for leaks,
REMOVAL & INSTALLATION
1.5L and 1.8L Engines
p See Figures 144 and 145
*Whenever the oil pump is disassembled or
the cover removed, the gear cavity must be
filled with petroleum jelly to seal the pump
and act as a prime. Do not use grease.
1. Drsconnect the negative battery cable.
2. Raise and support the vehicle.
3. Drain the engine oil.
The EPA warns that prolonged contact with
used engine oil may cause a number of skin
disorders, including cancer! You should
make every effort to minimize your exposure
to used engine oil. Protective gloves should
be worn when changing the oil. Wash your
93153927 Fig. 144 Exploded view of the oil pump
mounting-l .5L engine
93153931 Fig. 145 Exploded view of the oil pump
mounting-l.81 engine
hands and any other exposed skin areas as
soon as possible after exposure to used en-
gine oil. Soap and water, or waterless hand
. . . .
cleaner snoutd be used.
4. Support the engine using a suitable device
5. Remove the front engme mount bracket and
accessory drive belts.
6. Remove timing belt upper and lower covers.
7. Remove the timing belt and crankshaft
sprocket. Refer to the timing belt procedure in this
section.
8. Remove the oil pan and remove the oil
screen.
Page 95 of 408
3-34 ENGINEANDENGINEOVERHAUL
9. Remove the front cover mounting bolts. Note
the lengths of the mounting bolts as they are re-
moved for proper installation.
10. Remove the front case assembly and oil
pump assembly.
11. Remove the oil pump cover.
12. Remove the inner and outer gears from the
front case.
To install 13. Remove all gasket material from the mating
surfaces and clean all parts.
14. Thoroughly coat both oil pump gears with
clean engine oil and install them in the correct direc-
tion of rotation.
15. Install the pump cover and tighten the bolts to
84 inch Ibs. (10 Nm).
16. Coat the relief valve and spring with clean en-
gine oil. Install them and tighten the plug to 33 ft.
Ibs. (45 Nm).
17. Install a new front crankshaft seal and coat
the lips of the seal with clean engine oil.
18. Install the front case and oil pump assembly
to the engine block using a new gasket. Tighten the
bolts to loft. Ibs. (14 Nm)
19. Install the oil screen with new gasket. Torque
the screen bolts to 14 ft. Ibs. (19 Nm).
20. Install the oil pan.
21. Install the crankshaft sprocket and timing
belt. Refer to the timing belt procedure in this sec-
tion.
22. Fill the crankcase to the proper level.
Operating the engine without the proper
amount and type of engine oil will result in
severe enoine damaae.
23. Connect the negative battery cable.
1.6L, 2.OL and 2.4L Engines
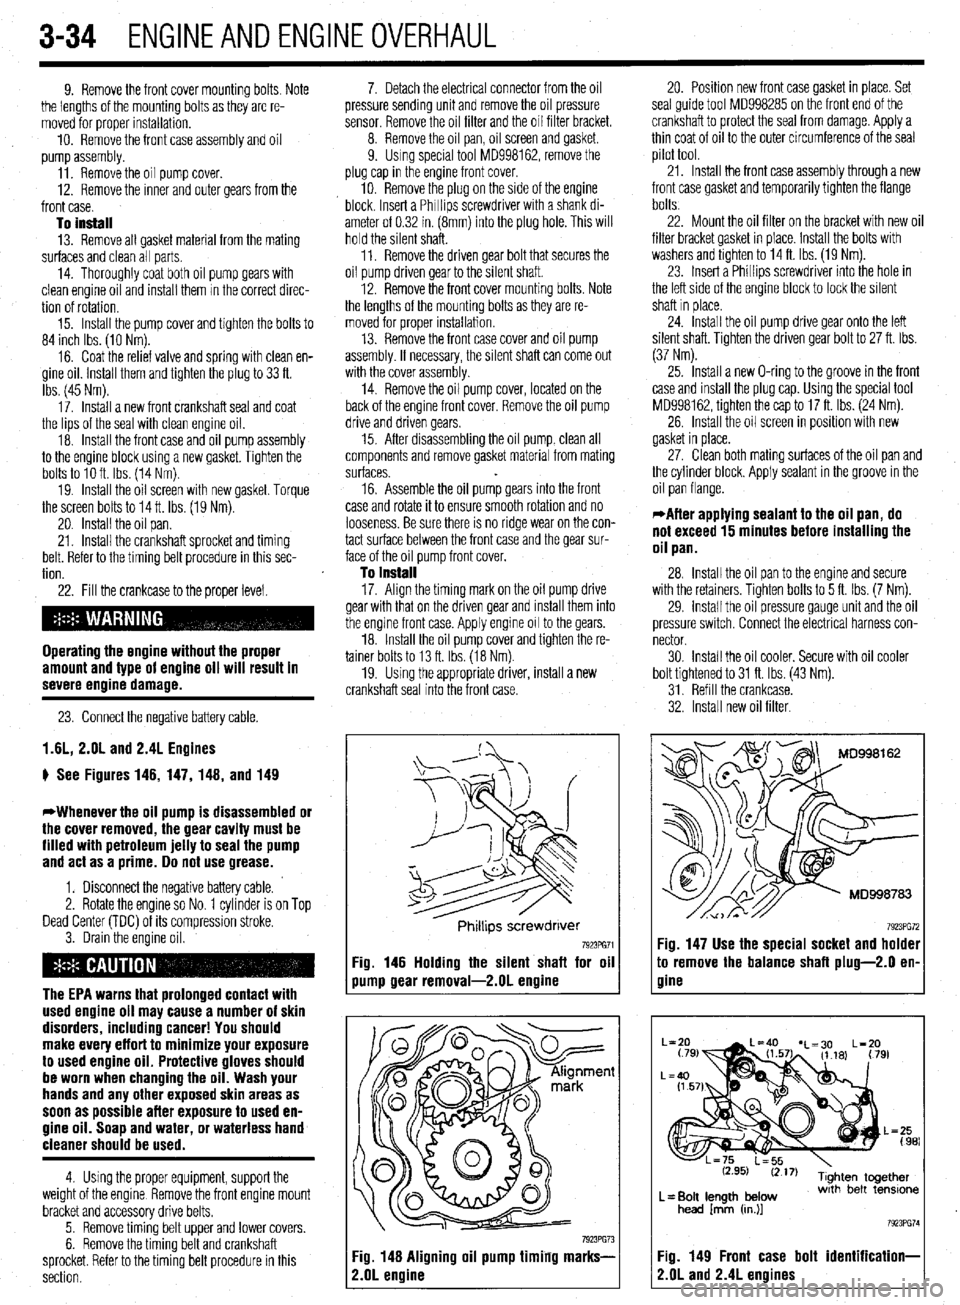
p See Figures 146, 147, 148, and 149
*Whenever the oil pump is disassembled or
the cover removed, the gear cavity must be
filled with petroleum jelly to seal the pump
and act as a prime. Do not use grease.
1. Disconnect the negative battery cable.
2. Rotate the engine so No. 1 cylinder is on Top
Dead Center (TDC) of its compression stroke.
3. Drain the engine oil.
The EPA warns that prolonged contact with
used engine oil may cause a number of skin
disorders, including cancer! You should
make every effort to minimize your exposure
to used engine oil. Protective gloves should
be worn when changing the oil. Wash your
hands and any other exposed skin areas as
soon as possible afler exposure to used en-
gine oil. Soap and water, or waterless hand
cleaner should be used.
4 Using the proper equipment, support the
weight of the engine Remove the front engine mount
bracket and accessory drive belts.
5 Remove timing belt upper and lower covers.
6. Remove the timing belt and crankshaft
sprocket. Refer to the timing belt procedure in this
section. 7. Detach the electrical connector from the oil
pressure sending unit and remove the oil pressure
sensor. Remove the oil filter and the oil filter bracket.
8. Remove the oil pan, oil screen and gasket.
9. Using special tool MD998162, remove the
plug cap in the engine front cover.
10. Remove the plug on the side of the engine
block. Insert a Phrllips screwdriver with a shank di-
ameter of 0.32 in. (8mm) into the plug hole. This will
hold the silent shaft.
11. Remove the driven gear bolt that secures the
oil pump driven gear to the silent shaft.
12. Remove the front cover mounting bolts. Note
the lengths of the mounting bolts as they are re-
moved for proper installation.
13. Remove the front case cover and oil pump
assembly. If necessary, the silent shaft can come out
with the cover assembly.
14. Remove the oil pump cover, located on the
back of the engine front cover. Remove the oil pump
drive and driven gears.
15. After disassembling the oil pump, clean all
components and remove gasket material from mating
surfaces.
16. Assemble the oil pump gears into the front
case and rotate it to ensure smooth rotation and no
looseness. Be sure there is no ridge wear on the con-
tact surface between the front case and the gear sur-
face of the oil pump front cover.
To install 17. Align the timing mark on the oil pump drive
gear with that on the driven gear and install them into
the engine front case. Apply engine 011 to the gears.
18. Install the oil pump cover and tighten the re-
tainer bolts to 13 ft. Ibs. (18 Nm).
19. Using the appropriate driver, install a new
crankshaft seal into the front case.
Phrllips screwdrrver
7923PG71 Fig. 146 Holding the silent shaft for oil
pump gear removal-2.01 engine
7923PG73 Fig. 148 Aligning oil pump timing marks-
2.OL ermine
20. Position new front case gasket in place. Set
seal guide tool MD998285 on the front end of the
crankshaft to protect the seal from damage. Apply a
thin coat of oil to the outer circumference of the seal
pilot tool.
21. Install the front case assembly through a new
front case gasket and temporarily tighten the flange
bolts.
22. Mount the oil filter on the bracket with new oil
filter bracket gasket in place. Install the bolts with
washers and tighten to 14 ft. Ibs. (19 Nm).
23. Insert a Phillips screwdriver into the hole in
the left side of the engine block to lock the silent
shaft in place.
24. Install the oil pump drive gear onto the left
silent shaft. Tighten the driven gear bolt to 27 ft. Ibs.
(37 Nm).
25. Install a new O-ring to the groove in the front
case and install the plug cap. Using the special tool
MD998162, tighten the cap to 17 ft. Ibs. (24 Nm).
26. Install the oil screen in position with new
gasket in place.
27. Clean both mating surfaces of the oil pan and
the cylinder block. Apply sealant In the groove in the
oil pan flange.
*After applying sealant to the oil pan, do
not exceed 15 minutes before installing the
oil pan.
28. Install the oil pan to the engine and secure
with the retainers. Tighten bolts to 5 ft. Ibs. (7 Nm).
29. install the oil pressure gauge unit and the oil
pressure switch. Connect the electrical harness con-
nector.
30. Install the oil cooler. Secure with oil cooler
bolt tightened to 31 ft. Ibs (43 Nm).
31. Refill the crankcase.
32. Install new oil filter.
7923PG72 Fig. 147 Use the special socket and holder
:o remove the balance shaft plug-2.0 en-
7ine
L= Bolt length below
head /mm (cn.)]
Fig. 149 Front case bolt identification-
?.OL and 2.4L engines
Page 98 of 408
ENGINEANDENGINEOVERHAUL 3-37
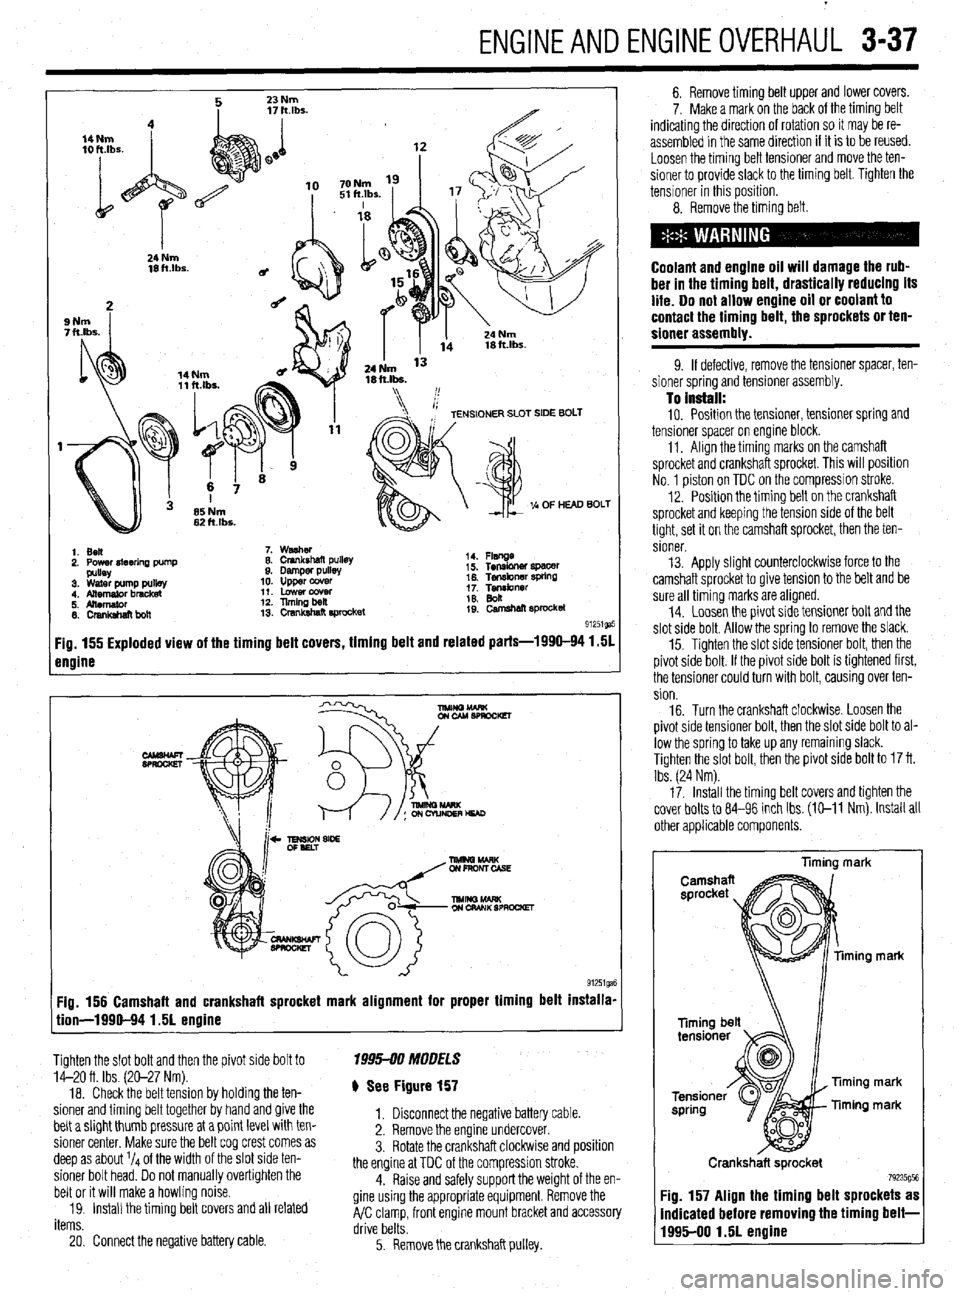
1. Ben
2. Power4teerlna Dump 7. washer
8. Crankshaft pullet
9. Damper pulls
10. upper ccwer
11. Lowercowr
12. llmingbeil
13. crsnkshat? E#ocket 14. Flsnge
i 5. Tensbner spacer
16. Tef~kner WkW
1; Tgibnrr
19: camehan sprocket
91251ga
Fig. 155 Exploded view of the timing belt covers, timing belt and related parts-1990-94 1.51
engine
Fig. 156 Camshaft and crankshaft sprocket mark alignment for proper timing belt installa-
tion-1990-94 1.51 engine
Tighten the slot bolt and then the pivot side bolt to
14-20 ft. Ibs. (20-27 Nm).
18. Check the belt tension by holding the ten-
sioner and timing belt together by hand and give the
belt a slight thumb pressure at a point level with ten-
sioner center. Make sure the belt cog crest comes as
deep as about l/4 of the width of the slot side ten-
sioner bolt head. Do not manually overtighten the
belt or it will make a howling noise.
19. Install the timing belt covers and all related
items. 1995-00 MOOFLS
) See Figure 157
1. Disconnect the negative battery cable.
2. Remove the engine undercover.
3. Rotate the crankshaft clockwlse and position
the engine at TDC of the compression stroke.
4. Raise and safely support the weight of the en-
gine using the appropriate equipment. Remove the
A/C clamp, front engine mount bracket and accessory
drive belts.
20. Connect the negative battery cable.
5. Remove the crankshaft pulley. 6. Remove timing belt upper and lower covers.
7. Make a mark on the back of the timing belt
indicating the direction of rotation so it may be re-
assembled in the same direction if it is to be reused.
Loosen the timing belt tensioner and move the ten-
sioner to provide slack to the timing belt. Tighten the
tensioner in this position.
8. Remove the timing belt.
Coolant and engine oil will damage the rub-
ber in the timing belt, drastically reducing its
life. Do not allow engine oil or coolant to
contact the timing belt, the sprockets or ten-
sioner assembly.
9. If defective, remove the tensioner spacer, ten-
sioner spring and tensioner assembly.
To install: 10. Position the tensioner, tensioner spring and
tensioner spacer on engine block.
11. Align the timing marks on the camshaft
sprocket and crankshaft sprocket. This will position
No. 1 piston on TDC on the compression stroke.
12. Position the timing belt on the crankshaft
sprocket and keeping the tension side of the belt
tight, set it on the camshaft sprocket, then the ten-
sioner.
13. Apply slight counterclockwise force to the
camshaft sprocket to give tension to the belt and be
sure all timing marks are aligned.
14. Loosen the pivot side tensioner bolt and the
slot side bolt. Allow the spring to remove the slack.
15. Tighten the slot side tensioner bolt, then the
pivot side bolt. If the pivot side bolt is tightened first,
the tensioner could turn with bolt, causing over ten-
sion.
16. Turn the crankshaft clockwise. Loosen the
pivot side tensioner bolt, then the slot side bolt to al-
low the spring to take up any remaining slack.
Tighten the slot bolt, then the pivot side bolt to 17 ft.
Ibs. (24 Nm).
17. Install the timing belt covers and tighten the
cover bolts to 84-96 inch Ibs. (E-11 Nm). Install all
other applicable components.
liming mark
ming mark
Timing mark
Timing mark
Crankshaft sprocket
79235g5t Fig. 157 Align the timing belt sprockets as
indicated before removing the timing belt-
1995-00 1.51 engine
Page 107 of 408
3-46 ENGINEANDENGINEOVERHAUL
29. Install the engine support bracket and secure
using mounting bolts in their original location. Lubri-
cate the reaming area of the reamer bolt and tighten
slowly.
30. Install the idler pulley.
31. Install the engine mount bracket. Remove the
engine support fixture.
32. Make sure all pieces of packing are posi-
tioned in the inner grooves of the upper cover and in-
stall.
33. Connect the brake fluid level sensor.
34. Install the crankshaft pulley. Tighten the bolt
to 130-137ft. Ibs. (180-190 Nm).
35. install the belt tensioner assembly and the
power steering belt.
36 install the air hose and pipe.
37 Install the alternator.
38. Install the cruise control actuator.
39. Install the engine undercover.
40. Connect the negative battery cable.
199546 MODELS
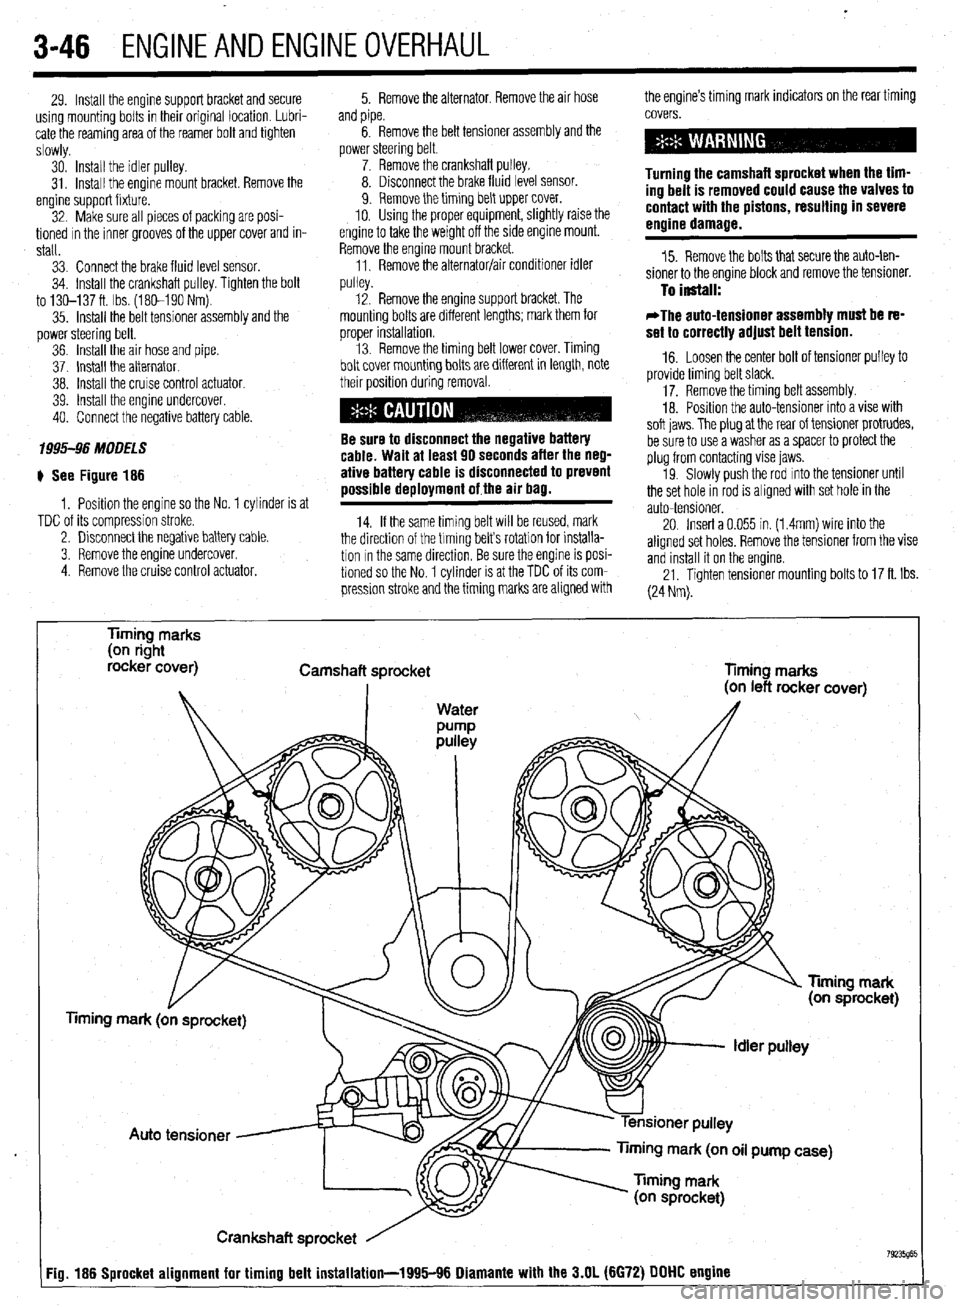
# See Figure 186
1, Position the engine so the No. 1 cylinder is at
TDC of its compression stroke.
2. Disconnect the negative battery cable.
3. Remove the engine undercover.
4 Remove the cruise control actuator. 5. Remove the alternator, Remove the air hose the engine’s timing mark indicators on the rear timing
and pipe.
6. Remove the belt tensioner assembly and the
power steering belt.
7. Remove the crankshaft pulley.
8. Disconnect the brake fluid level sensor.
9. Remove the timing belt upper cover.
10. Using the proper equipment, slightly raise the
engine to take the weight off the side engine mount.
Remove the engine mount bracket.
11, Remove the alternator/air conditioner idler
..,,ll^,. covers.
Turning the camshaft sprocket when the tim-
ing belt is removed could cause the valves to
contact with the pistons, resulting in severe
engine damage.
15. Remove the bolts that secure the auto-ten-
sioner to the engine block and remove the tensioner.
pu,ey. 12. Remove the engine support bracket. The To install:
mounting bolts are different lengths; mark them for
orooer installation. *The auto-tensioner assembly must be re-
set to correctlv adiust belt tension. , . 13. Remove the timing belt lower cover. Timing
bolt cover mounting bolts are different in length, note
their position during removal.
Be sure to disconnect the negative battery
cable. Wait at least 90 seconds after the neg-
ative battery cable is disconnected to prevent
possible deployment of the air bag.
14. If the same timing belt WIII be reused, mark
the direction of the trming belts rotation for installa-
tion In the same direction, Be sure the engine is posi-
tioned so the No. 1 cylinder is at the TDC of its com-
pression stroke and the timing marks are aligned with _ -
16. Loosen the center bolt of tensioner pulley to
provide timing belt slack.
17. Remove the timing belt assembly.
18. Posrtion the auto-tensioner into a vise with
soft iaws. The olua at the rear of tensioner protrudes,
be sure to usea v&her as a spacer to protect the
plug from contacting vise jaws.
19. Slowly push the rod mto the tensioner until
the set hole in rod is aligned with set hole in the
auto-tensioner.
20. Insert a 0.055 in. (1.4mm) wire into the
aligned set holes, Remove the tensioner from the vise
and install it on the engine.
21. Tighten tensioner mounting bolts to 17 ft. Ibs.
(24 Nm).
Timing marks
(on right
rocker cover)
Camshaft sprocket
Timing marks
mark (on oil pump case)
Crankshaft sprocket
Fig. 186 Sprocket alignment for timing belt installation-1995116 Diamante with the 3.N (6672) DDDD engine