2024 FORD F650/750 ignition
[x] Cancel search: ignitionPage 211 of 386

Protected ComponentRatingItem
Not used.—81
Upfitter switch (factorylocation for ignition power).5 A82
Upfitter switch (optionallocation for power at alltimes).
5 A83
Not used.—84
Not used.—85
Not used.—86
Not used.—87
Cargo lamps.10 A88
Urea tank heater.20 A89
Upfitter - B-pillar.40 A91
Not used.—93
Not used.—94
Stoplamps.20 A95Trailer tow stoplamps.
Urea line heater.20 A96
Not used.—97
Trailer tow battery charge.30 A98
Upfitter relay 2.40 A99
Urea valves.20 A100
Not used.—101
Not used.—102
Not used.—103
Not used.—104
Trailer tow stoplamp andturn relay.15 A105
Note:Spare fuse amperage may vary.
207
2024 F-650/750 (TBC) , enUSA, Edition date: 202210, First-PrintingFuses
Page 213 of 386

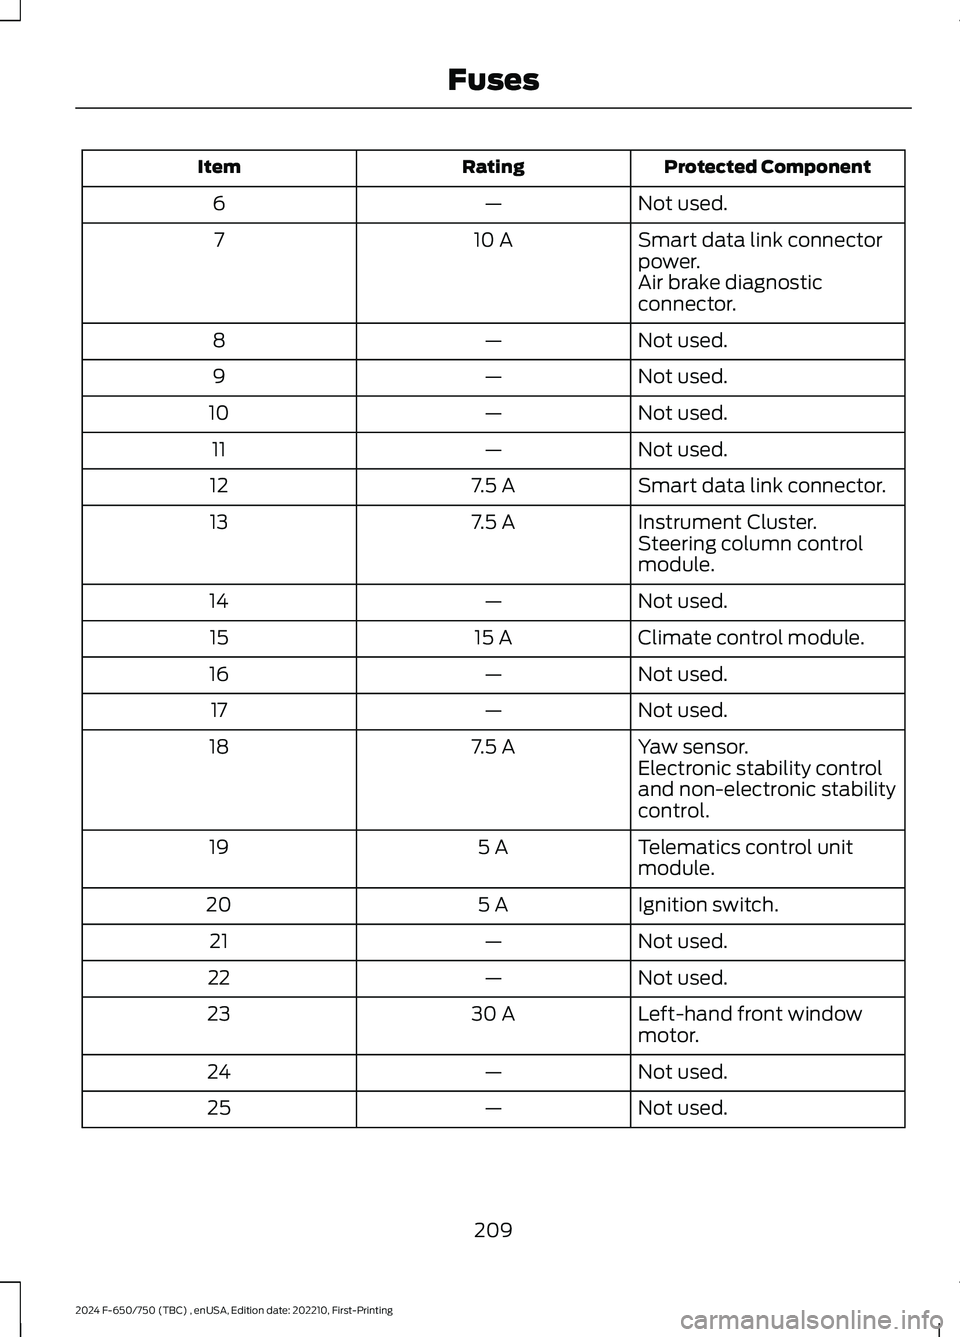
Protected ComponentRatingItem
Not used.—6
Smart data link connectorpower.10 A7
Air brake diagnosticconnector.
Not used.—8
Not used.—9
Not used.—10
Not used.—11
Smart data link connector.7.5 A12
Instrument Cluster.7.5 A13Steering column controlmodule.
Not used.—14
Climate control module.15 A15
Not used.—16
Not used.—17
Yaw sensor.7.5 A18Electronic stability controland non-electronic stabilitycontrol.
Telematics control unitmodule.5 A19
Ignition switch.5 A20
Not used.—21
Not used.—22
Left-hand front windowmotor.30 A23
Not used.—24
Not used.—25
209
2024 F-650/750 (TBC) , enUSA, Edition date: 202210, First-PrintingFuses
Page 226 of 386

GENERAL INFORMATION
WARNING: Making modificationsto various parts, components andsystems of the vehicle, such as brake andsteering systems, can adversely affectthe quality, reliability and operation ofyour vehicle and could result in propertydamage, personal injury or death. Suchmodifications must be avoided.
WARNING: Failure to properlyperform maintenance and servicingprocedures could result in vehicledamage, personal injury or death.
WARNING: Take care whenperforming any maintenance, systemcheck or service on your vehicle. Someof the materials may also be hazardousif used, serviced or handled improperlyand could result in property damage,personal injury or death.
If the owner or operator of the vehicle is askilled technician and intends onperforming the vehicle maintenance andservice, he is strongly urged to purchase aservice manual.
Always use care when performing vehiclemaintenance, repairs or system checks.Improper or incomplete service could resultin your vehicle not working properly whichmay result in personal injury or damage toyour vehicle or equipment. It is theoperator’s responsibility to see that yourvehicle receives proper care andmaintenance. If you have any questionsabout performing service, have the servicedone by a qualified technician.
To help you service your vehicle, weprovide scheduled maintenanceinformation which makes tracking routineservice easy. See ScheduledMaintenance (page 325).
If your vehicle requires professional service,an authorized dealer can provide thenecessary parts and service. Check yourwarranty information to find out whichparts and services are covered.
Use only recommended fuels, lubricants,fluids and service parts conforming tospecifications. Motorcraft® parts aredesigned and built to provide the bestperformance in your vehicle.
Servicing Guidelines
WARNING: The use of inferior partscan adversely affect the quality andreliability of your vehicle and could resultin property damage, personal injury ordeath.
When servicing your vehicle:
•Always wear safety glasses for eyeprotection.
•Always set the parking brake or chockthe wheels.
•Always use support stands, not a jack,when working under a raised vehicle.
•Always turn off the ignition unless aprocedure requires the engine to berunning.
•Always avoid contact with hot metalparts. Allow the components to coolbefore working with, or around, them.
•Always operate the engine in awell-ventilated area.
•Do not wear loose-fitting clothing,hanging jewelry, watches or rings.
•Do not smoke.
•Do not work on the brakes or the clutchunless you take the proper precautionsto avoid inhaling friction material dust.
222
2024 F-650/750 (TBC) , enUSA, Edition date: 202210, First-PrintingMaintenance
Page 227 of 386

Quality service parts are available throughan authorized dealer. If dealer parts are notused, make sure the replacement parts areof equivalent quality.
Working with the Engine Off
1.Set the parking brake and shift toneutral (N) or park (P).
2.Switch off the engine.
3.Block the wheels.
Working with the Engine On
WARNING: To reduce the risk ofvehicle damage and/or personal burninjuries, do not start your engine with theair cleaner removed and do not removeit while the engine is running.
1.Set the parking brake and shift toneutral (N) or park (P).
2.Block the wheels
Supporting Your Vehicle forService
WARNING: Do not use a jack whenworking under a vehicle. It may give way,causing the vehicle to fall and result inproperty damage, personal injury ordeath. Always use floor stands tosupport the vehicle.
Prepare your vehicle for service repairs bydoing the following:
1.Park your vehicle on a level, concretefloor.
2.Set the parking brake and block thewheels to prevent your vehicle frommoving.
3.Select a jack with a rated capacitysufficient to lift and hold up yourvehicle.
4.Raise your vehicle with the jack appliedto the axle(s). Do not use the bumperas a lifting point.
5.Support your vehicle with floor standsunder the axle(s). When servicing theaxle or the suspension, support yourvehicle with floor stands under theframe side-members, preferablybetween the axles.
OPENING AND CLOSING THE
HOOD
WARNING: Before opening thehood, fully apply the parking brake, shiftinto park (P) or neutral (N) and switchthe ignition off.
WARNING: Do not stand under thehood when you raise or lower it. Failureto follow this warning could result inserious personal injury or death.
WARNING: If the engine is runningwhile the hood is open, stay clear ofmoving engine components. Failure tofollow this warning could result in seriouspersonal injury or death.
223
2024 F-650/750 (TBC) , enUSA, Edition date: 202210, First-PrintingMaintenance
Page 232 of 386

Do not use supplemental engine oiladditives because they are unnecessaryand could lead to engine damage that thevehicle warranty may not cover.
1.Clean the area surrounding the engineoil filler cap before you remove it.
2.Remove the engine oil filler cap.
3.Add engine oil that meets ourspecifications. See Capacities andSpecifications (page 291).
4.Reinstall the engine oil filler cap. Turnit clockwise until you feel a strongresistance.
Note: Do not add oil further than themaximum mark. Oil levels above themaximum mark may cause engine damage.
Note:Immediately soak up any oil spillagewith an absorbent cloth.
Engine Oil Pressure Warning Lamp
WARNING: If it illuminates whenyou are driving do not continue yourjourney, even if the oil level is correct.Have your vehicle checked.
It illuminates when you switchthe ignition on.
If it illuminates when the engineis running this indicates a malfunction.Stop your vehicle as soon as it is safe todo so and switch the engine off. Check theengine oil level. If the oil level is sufficient,this indicates a system malfunction. Haveyour vehicle checked as soon as possible.
CHANGING THE ENGINE OIL
AND OIL FILTER
WARNING: Do not add engine oilwhen the engine is hot. Failure to followthis instruction could result in personalinjury.
Your vehicle has an Intelligent Oil LifeMonitor™ that calculates the proper oilchange service interval. When theinformation display indicates: OIL CHANGEREQUIRED, change the engine oil and oilfilter. See Information Displays (page71).
The engine oil filter protects your engineby filtering harmful, abrasive or sludgeparticles and particles significantly smallerthan most available will-fit filters. SeeMotorcraft Parts (page 293).
1.Unscrew the oil filter and oil pan drainplug and wait for the oil to drain.
2.Replace the filter.
3.Reinstall the oil pan drain plug.
4.Refill the engine with new oil. SeeEngine Oil Capacity andSpecification (page 299).
5.Reset the Intelligent Oil Life Monitor™.See Information Displays (page 71).
Engine Lubrication for SevereService Operation
The following conditions define severeoperation:
•Frequent or extended idling such asover 10 minutes per hour of normaldriving.
•Low-speed operation or stationary use.
•If the vehicle is operated in sustained,ambient temperatures below -9°F(-23°C) or above 100°F (38°C).
228
2024 F-650/750 (TBC) , enUSA, Edition date: 202210, First-PrintingMaintenanceE67022
Page 254 of 386

Run the tip of your fingers over the edge ofthe blade to check for roughness.
Clean the wiper blades with washer fluidor water applied with a soft sponge orcloth.
CHANGING THE WIPER
BLADES
You can manually move the wiper armswhen the ignition is off. This allows for easeof blade replacement and cleaning underthe blades.
1.Pull the wiper blade and arm awayfrom the glass.
2.Release the wiper blade lock (A) andseparate the wiper blade from thewiper arm.
3.Install in the reverse order.
Note:Make sure that the wiper blade locksinto place. Lower the wiper arm and bladeback on the windshield. The wiper arms willautomatically return to their normal positionwhen you turn the ignition on.
•Replace wiper blades at least once peryear for optimum performance.
•You can improve poor wiper quality bycleaning the wiper blades and thewindshield.
REMOVING A HEADLAMP
1.Remove the four bolts from theheadlamp assembly.
2.Pull the assembly straight outdisengaging one snap clip from thefender.
3.Disconnect the electrical connector bysqueezing the release tab and pushingthe connector forward, then pulling itrearward.
CHANGING A BULB
WARNING: Bulbs can become hot.Let the bulb cool down before removingit. Failure to do so could result inpersonal injury.
250
2024 F-650/750 (TBC) , enUSA, Edition date: 202210, First-PrintingMaintenanceE165804 AE165794 E163822
Page 255 of 386

Headlamp bulbs must be marked with anauthorized D.O.T. marking for NorthAmerica to make sure they have the properlamp performance, light brightness, lightpattern and safe visibility.
Install in the reverse order unless otherwisestated.
Headlamp Bulbs
1.Switch all of the lamps and the ignitionoff.
2.Remove the headlamp. SeeRemoving a Headlamp (page 250).
3.Release the clip and remove the bulb.
Note:Do not touch the bulb glass.
Note:If the bulb is accidentally touched, itshould be cleaned with rubbing alcoholbefore being used.
Front Clearance and IdentificationLamp (If Equipped)
1.Switch all of the lamps and the ignitionoff.
2.Remove the screw and lens from thelamp assembly.
3.Press the bulb in and turn the bulbcounterclockwise to remove it.
Brake Lamp, Rear Lamp, RearDirection Indicator, License PlateLamp and Reverse Lamp
1.Switch all of the lamps and the ignitionoff.
2.Remove the four screws and the lamplens from lamp assembly.
3.Remove the bulb by pulling it straightout.
CHANGING THE ENGINE-
MOUNTED AND DIESEL FUEL
CONDITIONER MODULE FUEL
FILTERS - 6.7L DIESEL
WARNING: Do not dispose of fuelin the household refuse or the publicsewage system. Use an authorized wastedisposal facility.
Your vehicle has two fuel filters. The firstfilter mounts on top of the engine on theleft-hand side. The second filter is insidethe diesel fuel conditioner module. Themodule is mounted between the inboardside of the fuel tank and the frame rail.
251
2024 F-650/750 (TBC) , enUSA, Edition date: 202210, First-PrintingMaintenanceE163825 E163828
Page 257 of 386

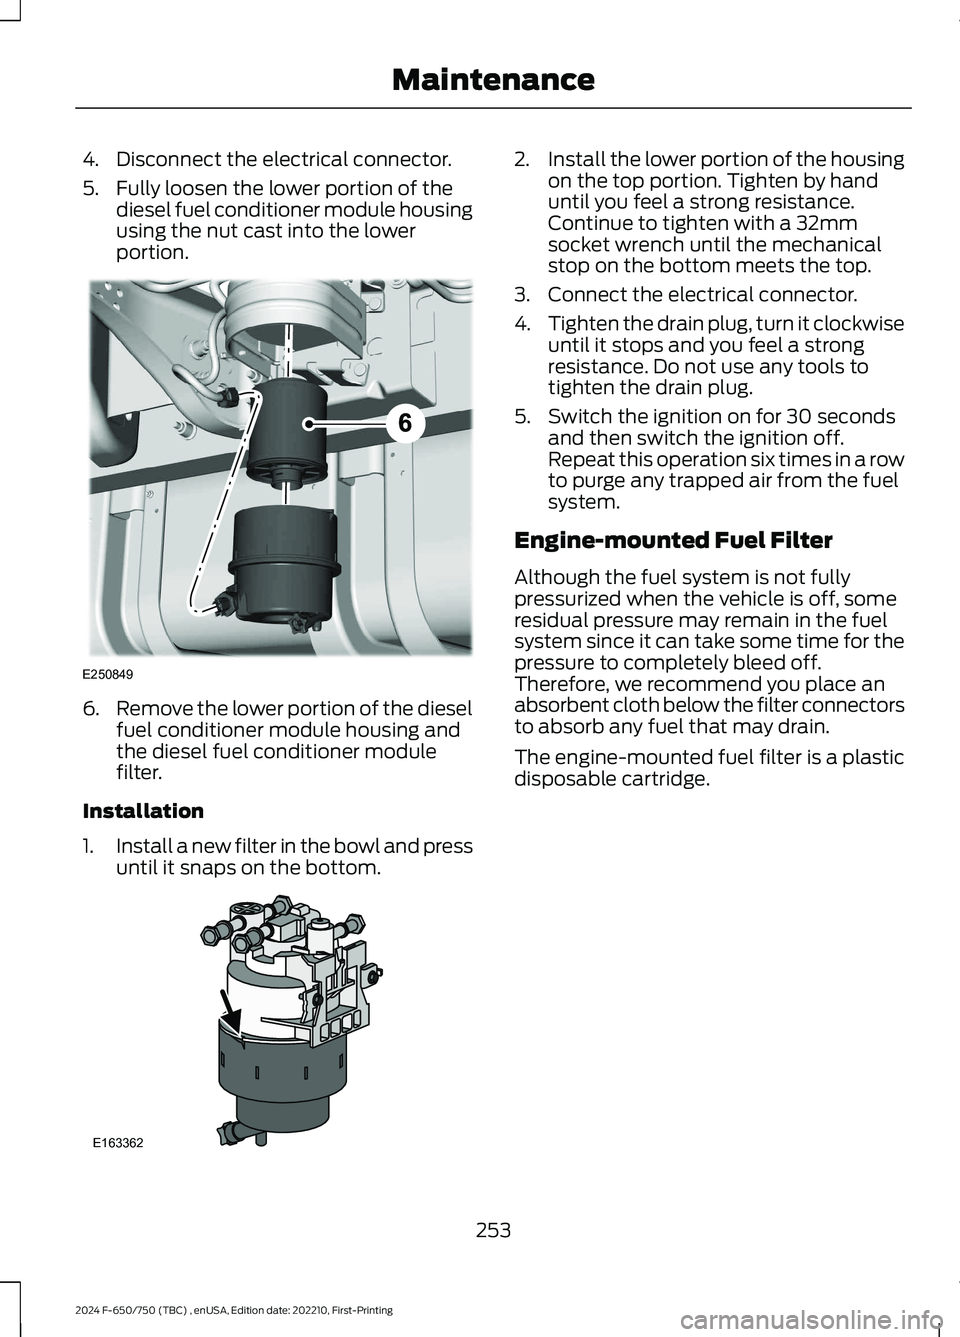
4.Disconnect the electrical connector.
5.Fully loosen the lower portion of thediesel fuel conditioner module housingusing the nut cast into the lowerportion.
6.Remove the lower portion of the dieselfuel conditioner module housing andthe diesel fuel conditioner modulefilter.
Installation
1.Install a new filter in the bowl and pressuntil it snaps on the bottom.
2.Install the lower portion of the housingon the top portion. Tighten by handuntil you feel a strong resistance.Continue to tighten with a 32mmsocket wrench until the mechanicalstop on the bottom meets the top.
3.Connect the electrical connector.
4.Tighten the drain plug, turn it clockwiseuntil it stops and you feel a strongresistance. Do not use any tools totighten the drain plug.
5.Switch the ignition on for 30 secondsand then switch the ignition off.Repeat this operation six times in a rowto purge any trapped air from the fuelsystem.
Engine-mounted Fuel Filter
Although the fuel system is not fullypressurized when the vehicle is off, someresidual pressure may remain in the fuelsystem since it can take some time for thepressure to completely bleed off.Therefore, we recommend you place anabsorbent cloth below the filter connectorsto absorb any fuel that may drain.
The engine-mounted fuel filter is a plasticdisposable cartridge.
253
2024 F-650/750 (TBC) , enUSA, Edition date: 202210, First-PrintingMaintenanceE250849 E163362