2024 FORD F650/750 reset
[x] Cancel search: resetPage 246 of 386
If the engine reaches a presetover-temperature condition, the engineswitches to alternating cylinder operation.Each disabled cylinder acts as an air pumpand cools the engine.
When this occurs, your vehicle stilloperates, however:
•Engine power is limited.
•The air conditioning system turns off.
Continued operation increases the enginetemperature, causing the engine tocompletely shut down. Your steering andbraking effort increases in this situation.
When the engine temperature cools, youcan re-start the engine. Have your vehiclechecked as soon as possible to minimizeengine damage.
When Fail-Safe Mode Is Activated
WARNING: Fail-safe mode is foruse during emergencies only. Operateyour vehicle in fail-safe mode only aslong as necessary to bring your vehicleto rest in a safe location and seekimmediate repairs. When in fail-safemode, your vehicle will have limitedpower, will not be able to maintainhigh-speed operation, and maycompletely shut down without warning,potentially losing engine power, powersteering assist, and power brake assist,which may increase the possibility of acrash resulting in serious injury.
WARNING: Do not remove thecoolant reservoir cap when the engine ison or the cooling system is hot. Wait 10minutes for the cooling system to cooldown. Cover the coolant reservoir capwith a thick cloth to prevent thepossibility of scalding and slowly removethe cap. Failure to follow this instructioncould result in personal injury.
Your vehicle has limited engine powerwhen in the fail-safe mode, drive yourvehicle with caution. Your vehicle does notmaintain high-speed operation and theengine may operate poorly.
Remember that the engine is capable ofshutting down to prevent engine damage.In this situation:
1.Pull off the road as soon as safelypossible and switch the engine off.
2.If you are a member of a roadsideassistance program, we recommendthat you contact your roadsideassistance service provider.
3.If this is not possible, wait a shortperiod for the engine to cool.
4.Check the coolant level. If the coolantlevel is at or below the minimum mark,add prediluted coolant immediately.
5.When the engine temperature cools,you can re-start the engine. Have yourvehicle checked as soon as possible tominimize engine damage.
Note: Driving your vehicle without repairincreases the chance of engine damage.
Engine Coolant TemperatureManagement (If Equipped)
WARNING: To reduce the risk ofcrash and injury, be prepared that thevehicle speed may reduce and thevehicle may not be able to acceleratewith full power until the coolanttemperature reduces.
If you tow a trailer with your vehicle, theengine may temporarily reach a highertemperature during severe operatingconditions, for example ascending a longor steep grade in high ambienttemperatures.
242
2024 F-650/750 (TBC) , enUSA, Edition date: 202210, First-PrintingMaintenance
Page 251 of 386

Note:Battery posts, terminals and relatedaccessories contain lead and leadcompounds. Wash hands after handling.
Note:Electrical or electronic accessoriesor components added to the vehicle by thedealer or the owner may adversely affectbattery performance and durability.
Your vehicle is equipped with a Motorcraftmaintenance-free battery which normallydoes not require additional water duringits life of service.
For longer, trouble-free operation, keep thetop of the battery clean and dry. Also,make certain the battery cables are alwaystightly fastened to the battery terminals.
If you see any corrosion on the battery orterminals, remove the cables from theterminals and clean with a wire brush. Youcan neutralize the acid with a solution ofbaking soda and water.
It is recommended that the negativebattery cable terminal be disconnectedfrom the battery if you plan to store yourvehicle for an extended period of time.
Because your vehicle’s engine iselectronically controlled by a computer,some control conditions are maintainedby power from the battery. When thebattery is disconnected or a new batteryis installed, the engine must relearn its idleand fuel trim strategy for optimumdriveability and performance. To begin thisprocess
1.With the vehicle at a complete stop,set the parking brake.
2.Put the gearshift in park (P) or neutral(N) and turn off all accessories.
3.Start the engine. Run the engine untilit reaches normal operatingtemperature.
4.Allow the engine to idle for at least oneminute.
5.Turn the air conditioning (if equipped)on and allow the engine to idle for atleast one minute.
6.Release the parking brake. With yourfoot on the brake pedal and with theair conditioning on, put the vehicle indrive (D) and allow the engine to idlefor at least one minute.
•If you do not allow the engine torelearn its idle trim, the idle qualityof your vehicle may be adverselyaffected until the idle trim iseventually relearned.
7.Drive the vehicle to complete therelearning process
•The vehicle may need to be driven10 mi (16 km) or more to relearn theidle and fuel trim strategy alongwith the ethanol content for flexiblefuel vehicles.
If the battery has been disconnected or anew battery has been installed, the clockand radio settings must be reset once thebattery is reconnected.
Always dispose of automotivebatteries in a responsible manner.Follow your local authorized standardsfor disposal. Call your local authorizedrecycling center to find out more aboutrecycling automotive batteries.
Battery Management System (IfEquipped)
The battery management system (BMS)monitors battery conditions and takesactions to extend battery life. If excessivebattery drain is detected, the system maytemporarily disable certain electricalfeatures to protect the battery. Thoseelectrical accessories affected include therear defrost, heated/cooled seats, climatecontrol fan, heated steering wheel, audioand navigation system. A message may beshown in the information displays to alert
247
2024 F-650/750 (TBC) , enUSA, Edition date: 202210, First-PrintingMaintenance
Page 261 of 386
as a stroke indicator to aid inadjustment checks. If the push rod isclean and the brakes are out ofadjustment, you can see the orangemarker protruding from the chamberwhen the brakes are applied.
•Checking the brake lining (every serviceinterval). When brake linings or blockswear within 0.063 in (1.6 mm) theymust be replaced.
•Periodic checking (every serviceinterval) of the air compressor filter.Check the filter minder and when theindicator is near or on the red linemarked Service, replace the filter andreset the service filter minder.
Do not back off or disconnect the frontbrakes so that they are less effective,letting the rear brakes do all the stoppingof your vehicle. Do not overlook the brakeson the trailer either. Brake condition on thetrailer is just as important as the tractor.Proper brake balance on trucks andtractor-trailers is essential for effectivebraking.
Once a year, inspect the entire brakesystem:
•Rubber components for deterioration.A qualified technician should inspectthese components and replace themas necessary. Replacement intervalsvary according to the severity andlength of vehicle service.
•Condition of brake drums, brakechambers and slack adjusters.
•System for air leaks.
•Hose or pipes for rust, damage anddeterioration.
•Operation of service and parkingbrakes.
Periodically inspect parts such as air brakechamber diaphragm, air compressor andair cleaner. Replace any parts if you canconsider them unserviceable.
Air Dryer
Climactic conditions affect performanceof desiccant or after-cooler type air dryers.You must establish a maintenanceschedule for each specific operation.
The use of an air dryer on a vehicle doesnot eliminate the need to drain the airreservoirs periodically.
Inspect for moisture in the air system byopening reservoirs, draincocks or valvesand checking for presence of water. Thepresence of small amounts of water dueto condensation is normal and is not anindication that the dryer is not functioningproperly.
Replace or rebuild the desiccant cartridgewhen you determine that the desiccant iscontaminated and does not have adequatewater absorption capacity. The desiccantchange interval may vary. A generalrecommendation is to replace thedesiccant every 12 months (yearly). Ifexperience has shown that extended orshortened life has resulted for a particularinstallation, then the yearly interval can beincreased or decreased accordingly.
Draining the Air Brake Reservoir
WARNING: Failure to drain airbrake reservoirs can result in a reductionor loss of braking ability due to fluidaccumulation in the reservoir and/orpossible freeze-up during cold weather.
Completely drain all the air brake reservoirsdaily by opening the draincock at the endsof the tanks. (Where accessible.Pull-chains are used when the drains areundercab or otherwise inaccessible.) Closethe draincock after draining. Manually drain
257
2024 F-650/750 (TBC) , enUSA, Edition date: 202210, First-PrintingMaintenance
Page 272 of 386
Cooling system
•Protect against freezing temperatures.
•When removing your vehicle fromstorage, check coolant fluid level.Confirm that there are no coolingsystem leaks and that fluid is at therecommended level.
Disconnecting Your 12 Volt Battery
•Check and recharge as necessary. Keepconnections clean.
•If storing your vehicle for more than 30days without recharging the battery,we recommend that you disconnectthe battery cables to maintain batterycharge for quick starting.
Note:It is necessary to reset memoryfeatures if you disconnect the batterycables.
Brakes
•Make sure the brakes and parking brakerelease fully.
Tires
•Maintain recommended air pressure.
Miscellaneous
•Make sure all linkages, cables, leversand pins under your vehicle are coveredwith grease to prevent rust.
•Move vehicles at least 25 ft (7.5 m)every 15 days to lubricate working partsand prevent corrosion.
Removing Vehicle From Storage
When your vehicle is ready to come out ofstorage, do the following:
•Wash your vehicle to remove any dirtor grease film build-up on windowsurfaces.
•Check windshield wipers for anydeterioration.
•Check under the hood for any foreignmaterial that may have collectedduring storage such as mice or squirrelnests.
•Check the exhaust for any foreignmaterial that may have collectedduring storage.
•Check tire pressures and set tireinflation per the Tire Label.
•Check brake pedal operation. Driveyour vehicle 15 ft (4.5 m) back andforth to remove rust build-up.
•Check fluid levels (including coolant,oil and gas) to make sure there are noleaks, and fluids are at recommendedlevels.
•If you remove the battery, clean thebattery cable ends and check fordamage.
Contact an authorized dealer if you haveany concerns or issues.
268
2024 F-650/750 (TBC) , enUSA, Edition date: 202210, First-PrintingVehicle Care
Page 320 of 386
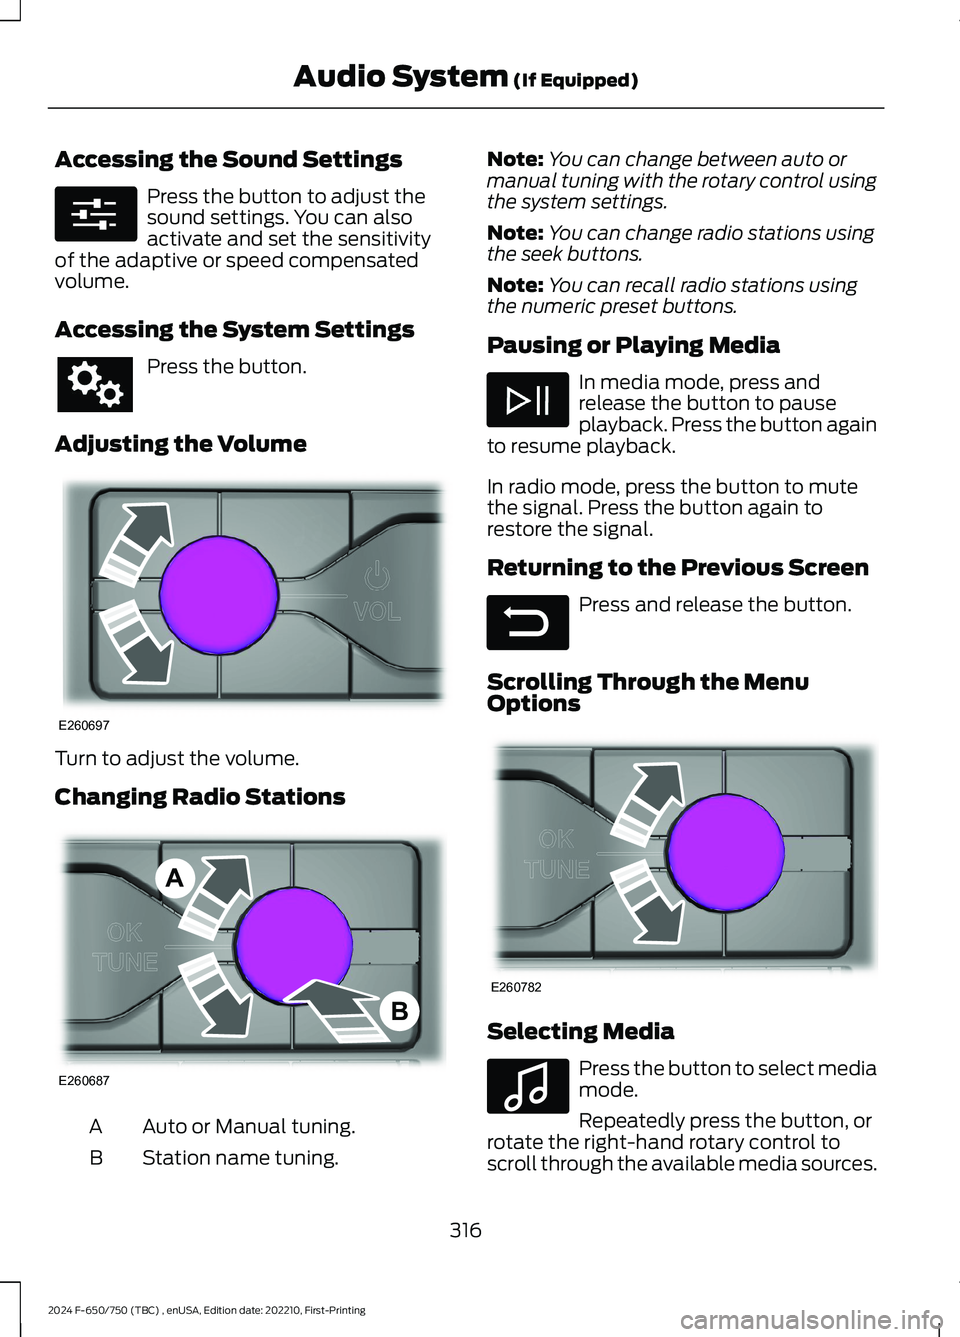
Accessing the Sound Settings
Press the button to adjust thesound settings. You can alsoactivate and set the sensitivityof the adaptive or speed compensatedvolume.
Accessing the System Settings
Press the button.
Adjusting the Volume
Turn to adjust the volume.
Changing Radio Stations
Auto or Manual tuning.A
Station name tuning.B
Note:You can change between auto ormanual tuning with the rotary control usingthe system settings.
Note:You can change radio stations usingthe seek buttons.
Note:You can recall radio stations usingthe numeric preset buttons.
Pausing or Playing Media
In media mode, press andrelease the button to pauseplayback. Press the button againto resume playback.
In radio mode, press the button to mutethe signal. Press the button again torestore the signal.
Returning to the Previous Screen
Press and release the button.
Scrolling Through the MenuOptions
Selecting Media
Press the button to select mediamode.
Repeatedly press the button, orrotate the right-hand rotary control toscroll through the available media sources.
316
2024 F-650/750 (TBC) , enUSA, Edition date: 202210, First-PrintingAudio System (If Equipped)E280315 E260697 E260687AB E281480 E260782 E100027
Page 321 of 386
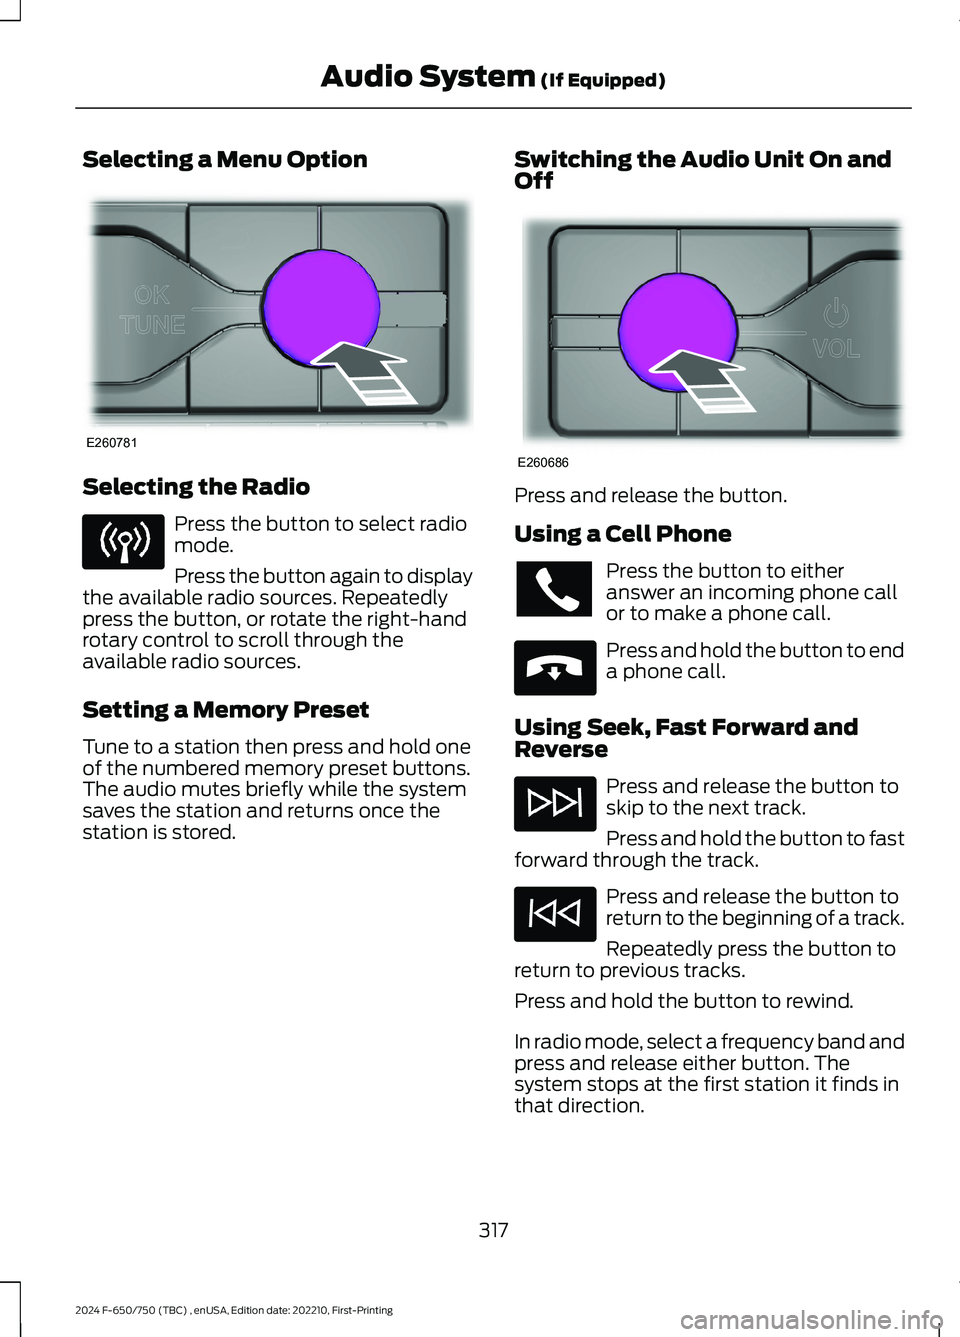
Selecting a Menu Option
Selecting the Radio
Press the button to select radiomode.
Press the button again to displaythe available radio sources. Repeatedlypress the button, or rotate the right-handrotary control to scroll through theavailable radio sources.
Setting a Memory Preset
Tune to a station then press and hold oneof the numbered memory preset buttons.The audio mutes briefly while the systemsaves the station and returns once thestation is stored.
Switching the Audio Unit On andOff
Press and release the button.
Using a Cell Phone
Press the button to eitheranswer an incoming phone callor to make a phone call.
Press and hold the button to enda phone call.
Using Seek, Fast Forward andReverse
Press and release the button toskip to the next track.
Press and hold the button to fastforward through the track.
Press and release the button toreturn to the beginning of a track.
Repeatedly press the button toreturn to previous tracks.
Press and hold the button to rewind.
In radio mode, select a frequency band andpress and release either button. Thesystem stops at the first station it finds inthat direction.
317
2024 F-650/750 (TBC) , enUSA, Edition date: 202210, First-PrintingAudio System (If Equipped)E260781 E260686 E265040
Page 330 of 386
Your vehicle can be driven in such a waythat dilutes and increases the level of oilby short trips that do not allow the engineto get to operating temperature, extendedidling, and low speed driving for longperiods of time.
A message appears in the instrumentcluster display when it is time for an oilchange. Make sure you perform the oilchange within two weeks or 500 mi(800 km) of the message appearing. Makesure you reset the Intelligent Oil-LifeMonitor after each oil change. SeeInstrument Cluster (page 64).
If your instrument cluster display resetsprematurely or becomes inoperative, youshould perform the oil change interval atsix months or 5,000 mi (8,000 km) fromyour last oil change. Never exceed one yearor 10,000 mi (16,000 km) between oilchange intervals for gas engines.
Never exceed one year or 15,000 mi(24,000 km) between oil change intervalsfor diesel engines.
Your vehicle is very sophisticated and builtwith multiple, complex, performancesystems. Every manufacturer developsthese systems using differentspecifications and performance features.That is why it is important to rely upon yourdealership to properly diagnose and repairyour vehicle.
Ford Motor Company has recommendedmaintenance intervals for various partsand component systems based uponengineering testing. Ford Motor Companyrelies upon this testing to determine themost appropriate mileage for replacementof oils and fluids to protect your vehicle atthe lowest overall cost to you andrecommends against maintenanceschedules that deviate from the scheduledmaintenance information.
We strongly recommend the use of onlygenuine Ford, Motorcraft orFord-authorized re-manufacturedreplacement parts engineered for yourvehicle.
Additives and Chemicals
This owner's manual and the FordWorkshop Manual list the recommendedadditives and chemicals for your vehicle.We do not recommend using chemicals oradditives not approved by us as part ofyour vehicle’s normal maintenance. Pleaseconsult your warranty information.
Oils, Fluids and Flushing
In many cases, fluid discoloration is anormal operating characteristic and, byitself, does not necessarily indicate aconcern or that the fluid needs to bechanged. However, a qualified expert, suchas the factory-trained technicians at yourdealership, should inspect discolored fluidsthat also show signs of overheating orforeign material contaminationimmediately.
Make sure to change your vehicle’s oils andfluids at the specified intervals or inconjunction with a repair. Flushing is aviable way to change fluid for many vehiclesub-systems during scheduledmaintenance. It is critical that systems areflushed only with new fluid that is the sameas that required to fill and operate thesystem or using a Ford-approved flushingchemical.
326
2024 F-650/750 (TBC) , enUSA, Edition date: 202210, First-PrintingScheduled Maintenance
Page 338 of 386
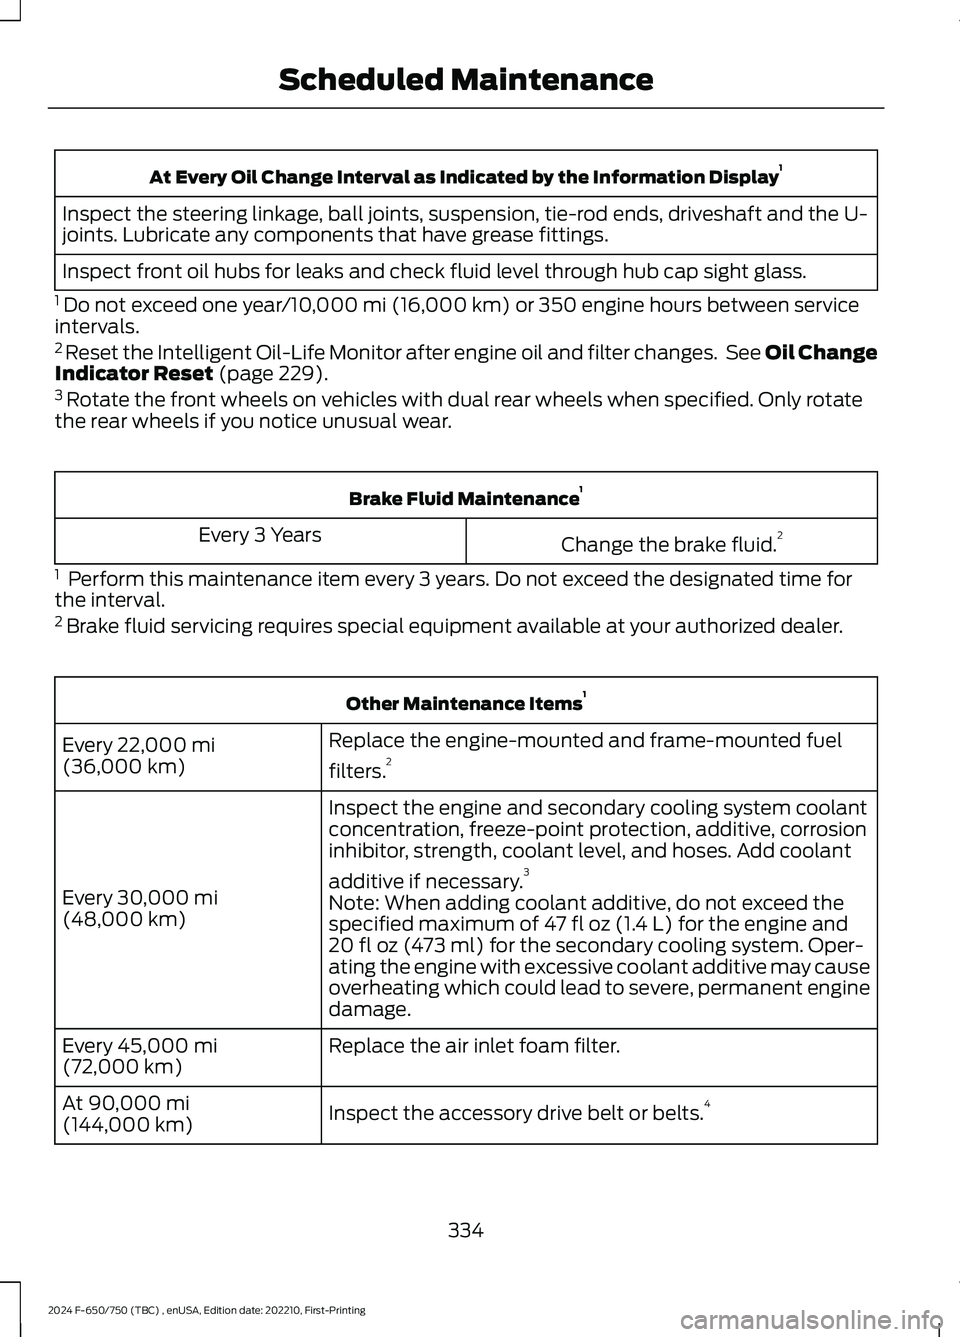
At Every Oil Change Interval as Indicated by the Information Display1
Inspect the steering linkage, ball joints, suspension, tie-rod ends, driveshaft and the U-joints. Lubricate any components that have grease fittings.
Inspect front oil hubs for leaks and check fluid level through hub cap sight glass.
1 Do not exceed one year/10,000 mi (16,000 km) or 350 engine hours between serviceintervals.2 Reset the Intelligent Oil-Life Monitor after engine oil and filter changes. See Oil ChangeIndicator Reset (page 229).3 Rotate the front wheels on vehicles with dual rear wheels when specified. Only rotatethe rear wheels if you notice unusual wear.
Brake Fluid Maintenance1
Change the brake fluid.2Every 3 Years
1 Perform this maintenance item every 3 years. Do not exceed the designated time forthe interval.2 Brake fluid servicing requires special equipment available at your authorized dealer.
Other Maintenance Items1
Replace the engine-mounted and frame-mounted fuel
filters.2Every 22,000 mi(36,000 km)
Inspect the engine and secondary cooling system coolantconcentration, freeze-point protection, additive, corrosioninhibitor, strength, coolant level, and hoses. Add coolant
additive if necessary.3
Every 30,000 mi(48,000 km)Note: When adding coolant additive, do not exceed thespecified maximum of 47 fl oz (1.4 L) for the engine and20 fl oz (473 ml) for the secondary cooling system. Oper-ating the engine with excessive coolant additive may causeoverheating which could lead to severe, permanent enginedamage.
Replace the air inlet foam filter.Every 45,000 mi(72,000 km)
Inspect the accessory drive belt or belts.4At 90,000 mi(144,000 km)
334
2024 F-650/750 (TBC) , enUSA, Edition date: 202210, First-PrintingScheduled Maintenance