2024 FORD F650/750 parking brake
[x] Cancel search: parking brakePage 144 of 386
If the system is disabled, normalbraking is still effective. If thebrake warning lamp illuminateswith the parking brake released, have thesystem checked immediately. It alsomomentarily illuminates when you switchthe ignition on to confirm the lamp isfunctional. If it does not illuminate whenyou switch the ignition on, or begins toflash at any time, have the systemchecked.
HINTS ON DRIVING WITH
ANTI-LOCK BRAKES
The anti-lock brake system does noteliminate the risks when:
•You drive too closely to the vehicle infront of you.
•Your vehicle is hydroplaning.
•You take corners too fast.
•The road surface is poor.
Note: If the system activates, the brakepedal could pulse and may travel further.Maintain pressure on the brake pedal. Youmay also hear a noise from the system. Thisis normal.
PARKING BRAKE
Hydraulic Brakes (If Equipped)
WARNING: Always set the parkingbrake and leave your vehicle with thetransmission in park (P).
WARNING: This control is forparking only. Do not leave the vehicleunattended after setting the parkingbrake without placing the transmissionin park (P). We recommend using wheelchocks for hilly or off-roadcircumstances.
WARNING: Unexpected andpossibly sudden vehicle movement mayoccur if you do not take theseprecautions.
WARNING: If the parking brake isfully released, but the brake warninglamp remains illuminated, the brakesmay not be working properly. Have yourvehicle checked as soon as possible.
Apply the parking brake whenever thevehicle is parked. To set the parking brake,pull the handle up until it snaps into thelocked position.
When the parking brake is out ofadjustment, seek service immediately.
The parking brake warning lampin the instrument clusterilluminates, and remainsilluminated (when you switch on theignition), until you release the parkingbrake.
140
2024 F-650/750 (TBC) , enUSA, Edition date: 202210, First-PrintingBrakesE209041 E208810 E210347
Page 145 of 386
Push the palm release lever (A) on theparking brake handle (B) and push downas far as possible to release the brake.Driving with the parking brake on causesthe brakes to wear out quickly and reducesfuel economy.
We recommend you not use the parkingbrake to stop a moving vehicle. However,if the normal brakes fail, you can use theparking brake to stop your vehicle in anemergency. Since the parking brake onlyapplies retardation to the rear wheels, thevehicle's stopping distance increasesgreatly and the handling of your vehicle isadversely affected.
Releasing Spring Manually
WARNING: Do not attempt todisassemble the parking brake airchamber under any circumstances asthis may cause serious injury.
WARNING: Block the wheels tohelp prevent the vehicle from moving.
WARNING: Unexpected andpossibly sudden vehicle movement mayoccur if you do not take theseprecautions.
If you release hydraulic pressure from thespring brake chamber, the power springapplies the brake. If the hydraulic pressurecan be re-established, you must releasethe spring brake in order to move yourvehicle.
Air Brakes (If Equipped)
WARNING: This control is forparking only. Do not leave the vehicleunattended after setting the parkingbrake without placing the transmissionin park (P). We recommend using wheelchocks for hilly or off-roadcircumstances.
If the service brakes fail to operate whileyour vehicle is moving, you can make anemergency stop with the parking brake.Since the parking brake only appliesstopping power to the rear wheels, yourvehicle’s stopping distance greatlyincreases and the handling of your vehicleis adversely affected. Make repairsimmediately to an inoperative air brakesystem circuit.
Pull the yellow, dash-mounted parkingbrake knob to apply the parking brake.
The parking brake lightilluminates and remainsilluminated (when you switchthe ignition to the on position) until yourelease the parking brake.
141
2024 F-650/750 (TBC) , enUSA, Edition date: 202210, First-PrintingBrakesE210341 E208810
Page 146 of 386
Releasing the Parking Brake
WARNING: When your vehicle isstationary, keep the brake pedal fullypressed when shifting gears. Failure tofollow this instruction could result inpersonal injury, death or propertydamage.
Note:Read and understand the followingsteps and perform them whenever youprepare to drive the vehicle.
Note:The parking brake does not disengageunless sufficient system air pressure isavailable.
1.Press and hold the service brake pedalwhile the engine is running.
2.Select the appropriate drive gear.
3.Push and hold the yellowdash-mounted parking brake knob untilthe parking brake light turns off, thenrelease.
Parking Brake Light Illumination Dueto Low Air Pressure
If the air pressure becomes too low at anytime during vehicle operation, the parkingbrake may apply and the parking brakelight turns on.
If the parking brake applies due to low airpressure, immediate service is required tothe parking brake system.
Releasing Spring Brake with AirPressure
The air system in all vehicles withspring-actuated rear wheel parking brakeshas a valve on the governor for connectionto an outside air supply. The valve lets yourecharge the system with air from anoutside source, releasing thespring-actuated parking brakes. Yourvehicle is now ready to tow in anemergency.
You can only use an outside air source ifthe protected system is in operatingcondition. If you cannot restore air pressurein the protected air system, you mustrelease the spring-actuated brakesmanually.
Releasing Spring Manually
Do not use impact wrenches as they maydamage the piston and prevent propercaging of the spring. Do not apply morethan 50 lb.ft (68 Nm) to the release boltnut.
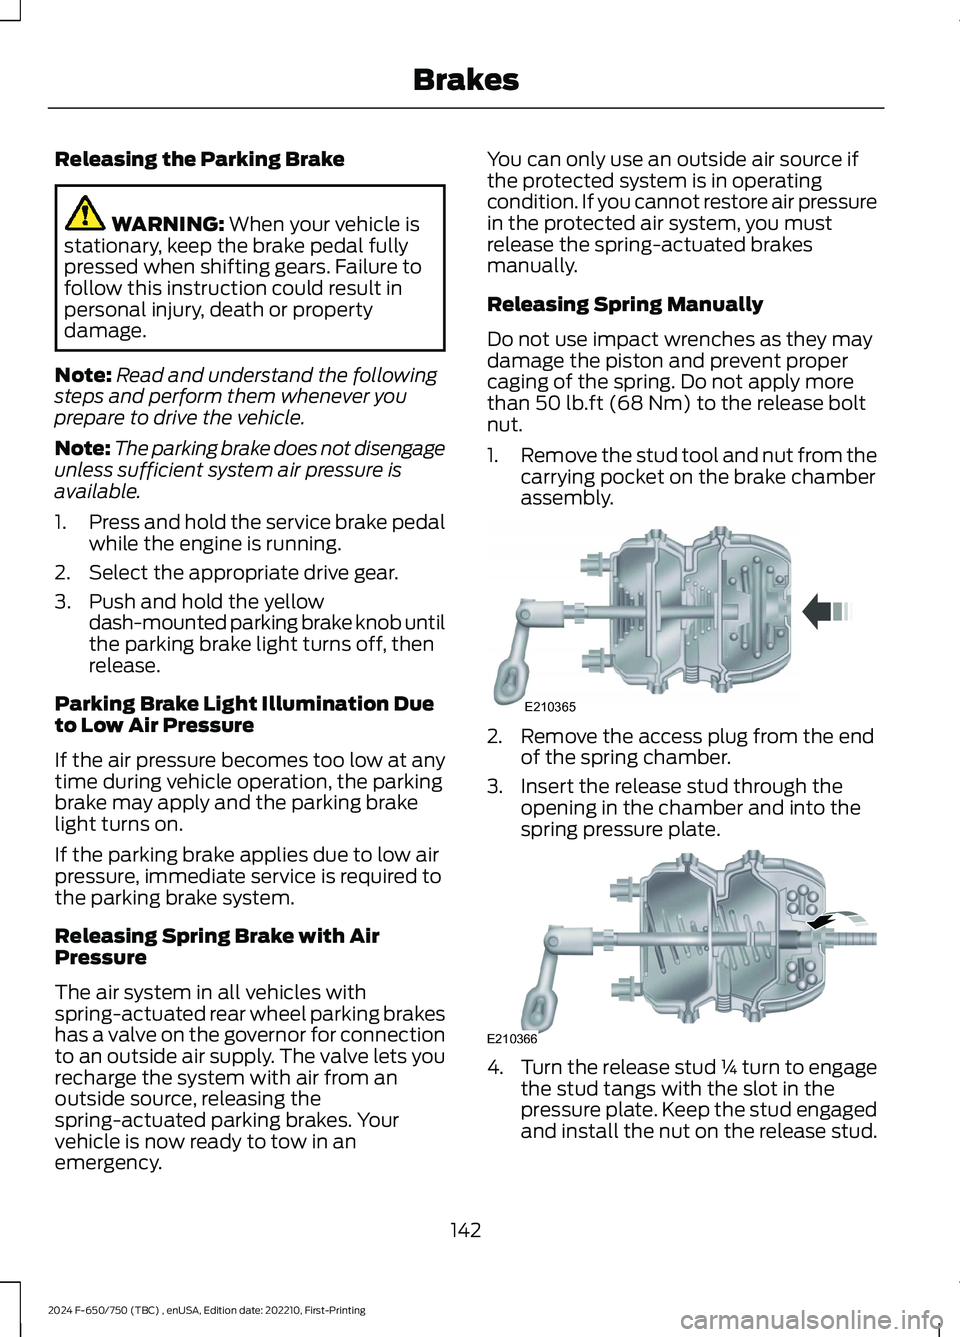
1.Remove the stud tool and nut from thecarrying pocket on the brake chamberassembly.
2.Remove the access plug from the endof the spring chamber.
3.Insert the release stud through theopening in the chamber and into thespring pressure plate.
4.Turn the release stud ¼ turn to engagethe stud tangs with the slot in thepressure plate. Keep the stud engagedand install the nut on the release stud.
142
2024 F-650/750 (TBC) , enUSA, Edition date: 202210, First-PrintingBrakesE210365 E210366
Page 147 of 386

5.Tighten the nut until the spring is fullycaged and brakes released. Do notloosen or remove the release stud andnut unless you completely assembleand securely clamp the brake chamber.
6.After restoring the air pressure,unscrew and remove the release studand install in the carrying pocket. Installthe access plug.
HILL START ASSIST -
VEHICLES WITH: HYDRAULIC
BRAKES
WARNING: The system does notreplace the parking brake. When youleave your vehicle, always apply theparking brake.
WARNING: You must remain inyour vehicle when the system turns on.At all times you are responsible forcontrolling your vehicle, supervising thesystem, and intervening if required.Failure to follow this instruction couldresult in the loss of control of yourvehicle, personal injury or death.
WARNING: The system will turnoff if a malfunction is apparent or if yourev the engine excessively. Failure to takecare may result in the loss of control ofyour vehicle, serious personal injury ordeath.
The system makes it easier to pull awaywhen your vehicle is on a slope withoutneeding to use the parking brake.
When the system is active, your vehicleremains stationary on the slope for two tothree seconds after you release the brakepedal. This allows time to move your footfrom the brake to the accelerator pedal.The brakes release when the engine has
developed sufficient torque to prevent yourvehicle from rolling down the slope. Thisis an advantage when pulling away on aslope, for example from a car park ramp,traffic lights or when reversing uphill intoa parking space.
When the vehicle is on a slope, the systemwill turn on automatically to preventvehicle rollback.
Note:There is no warning light to indicatethe system is either on or off.
Using Hill Start Assist
1.Press the brake pedal to bring yourvehicle to a complete standstill. Keepthe brake pedal pressed and shift intogear when facing uphill or reverse (R)when facing downhill.
2.If the sensors detect that your vehicleis on a slope, the system automaticallyactivates.
3.When you remove your foot from thebrake pedal, your vehicle remains onthe slope without rolling away forabout two to three seconds. This holdtime automatically extends if you arein the process of driving off.
4.Drive off in the normal manner. Thesystem releases the brakesautomatically.
Note:When you remove your foot from thebrake pedal and press the pedal again whenthe system is active, you will experiencesignificantly reduced brake pedal travel. Thisis normal.
Switching the System On and Off
Vehicles with Manual Transmission
You can switch this feature on or off in theinformation display. The systemremembers the last setting when you startyour vehicle.
143
2024 F-650/750 (TBC) , enUSA, Edition date: 202210, First-PrintingBrakes
Page 152 of 386
Trailer Air Supply and ParkingBrake Modular Controls (If Equipped)
The trailer air supply valve delivers air tothe trailer supply and automatically popsout, shutting off the trailer supply, ifpressure decreases to approximately 35 psi(249 kPa).
The parking brake controls the springbrakes on the tractor. When you pull theknob out, it causes the trailer supply valveto pop out, applying both the tractor andtrailer parking brakes. You canindependently release the trailer brakes bypushing only the trailer air supply valve in.
Initial Charge
With the air system completely discharged,both knobs (A and B) are out. When theair pressure reaches 70 psi (481 kPa), thetrailer air supply (A - red knob) may bepushed in and should stay in, charging thetrailer air system and releasing the trailerbrakes.
You can push in the parking brake (B -yellow knob) and supply air to the tractorspring brakes, releasing them.
148
2024 F-650/750 (TBC) , enUSA, Edition date: 202210, First-PrintingBrakesE210340AB12A320A E210341 E210342 E210343
Page 153 of 386
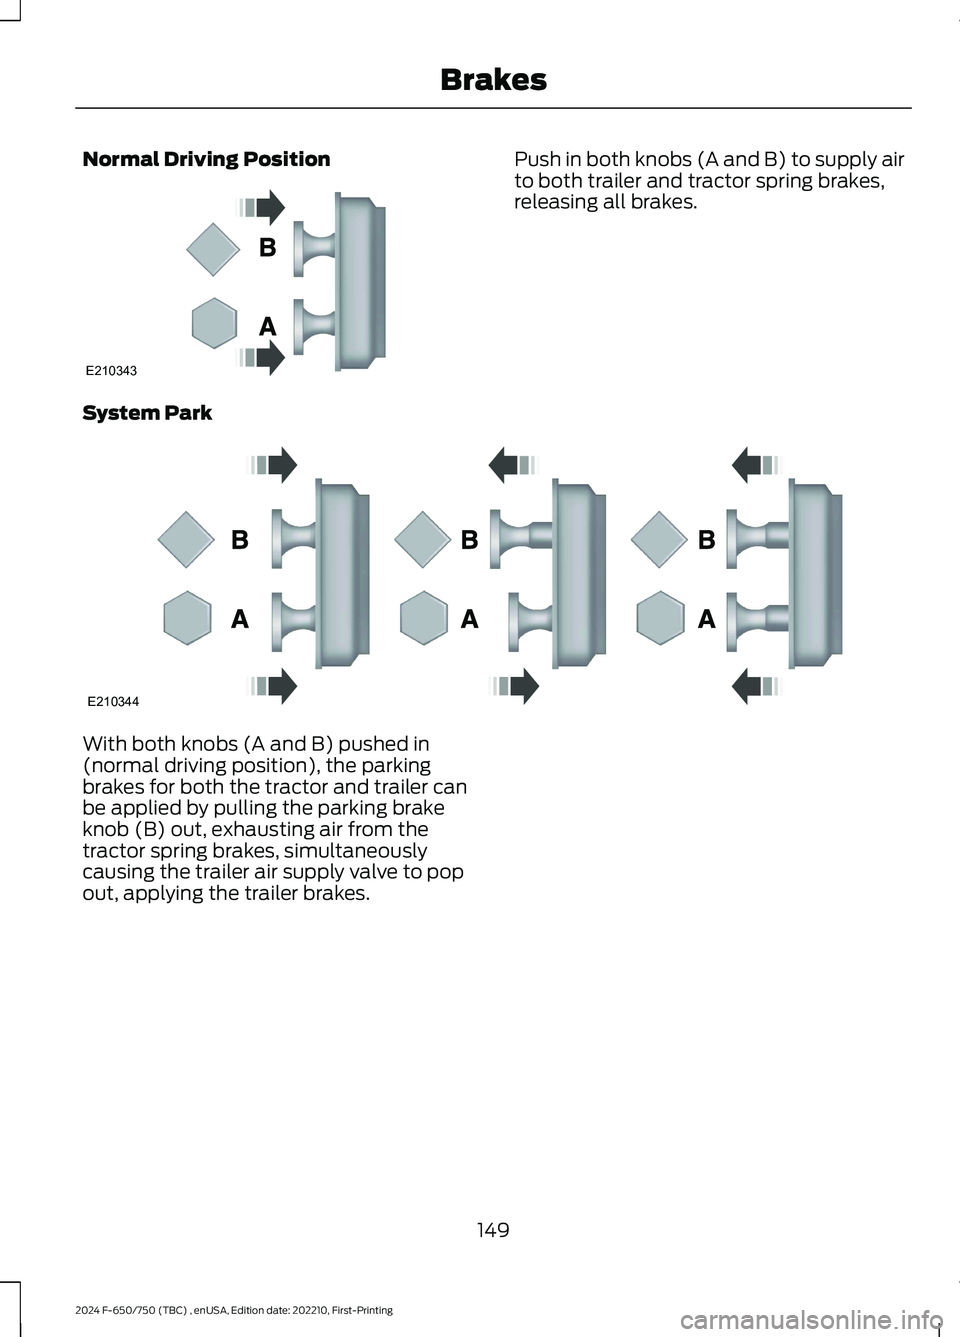
Normal Driving PositionPush in both knobs (A and B) to supply airto both trailer and tractor spring brakes,releasing all brakes.
System Park
With both knobs (A and B) pushed in(normal driving position), the parkingbrakes for both the tractor and trailer canbe applied by pulling the parking brakeknob (B) out, exhausting air from thetractor spring brakes, simultaneouslycausing the trailer air supply valve to popout, applying the trailer brakes.
149
2024 F-650/750 (TBC) , enUSA, Edition date: 202210, First-PrintingBrakesE210343 E210344
Page 154 of 386
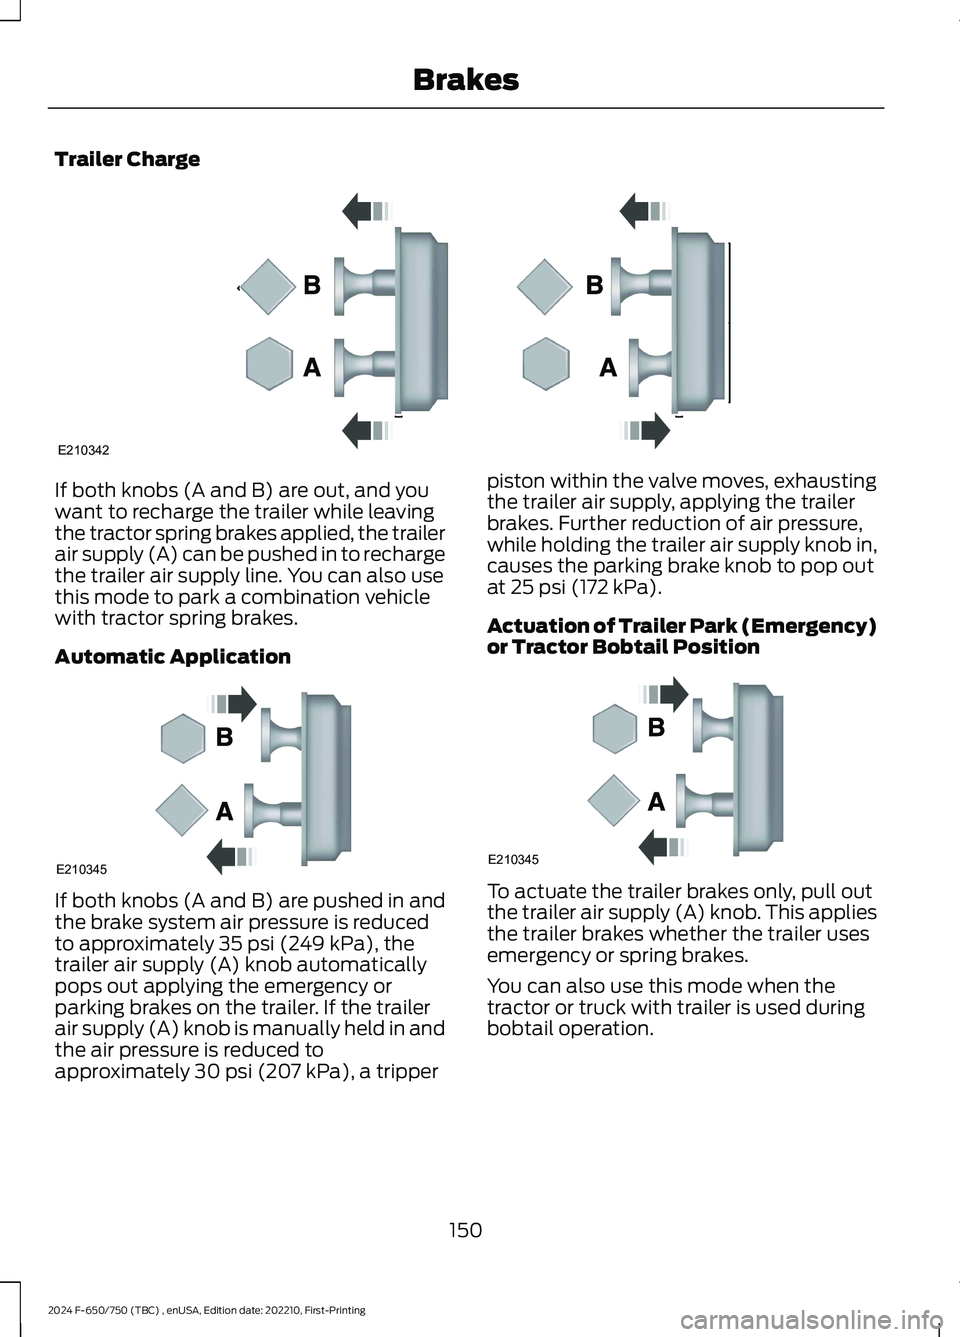
Trailer Charge
If both knobs (A and B) are out, and youwant to recharge the trailer while leavingthe tractor spring brakes applied, the trailerair supply (A) can be pushed in to rechargethe trailer air supply line. You can also usethis mode to park a combination vehiclewith tractor spring brakes.
Automatic Application
If both knobs (A and B) are pushed in andthe brake system air pressure is reducedto approximately 35 psi (249 kPa), thetrailer air supply (A) knob automaticallypops out applying the emergency orparking brakes on the trailer. If the trailerair supply (A) knob is manually held in andthe air pressure is reduced toapproximately 30 psi (207 kPa), a tripper
piston within the valve moves, exhaustingthe trailer air supply, applying the trailerbrakes. Further reduction of air pressure,while holding the trailer air supply knob in,causes the parking brake knob to pop outat 25 psi (172 kPa).
Actuation of Trailer Park (Emergency)or Tractor Bobtail Position
To actuate the trailer brakes only, pull outthe trailer air supply (A) knob. This appliesthe trailer brakes whether the trailer usesemergency or spring brakes.
You can also use this mode when thetractor or truck with trailer is used duringbobtail operation.
150
2024 F-650/750 (TBC) , enUSA, Edition date: 202210, First-PrintingBrakesE210342 E210345 E210345
Page 166 of 386
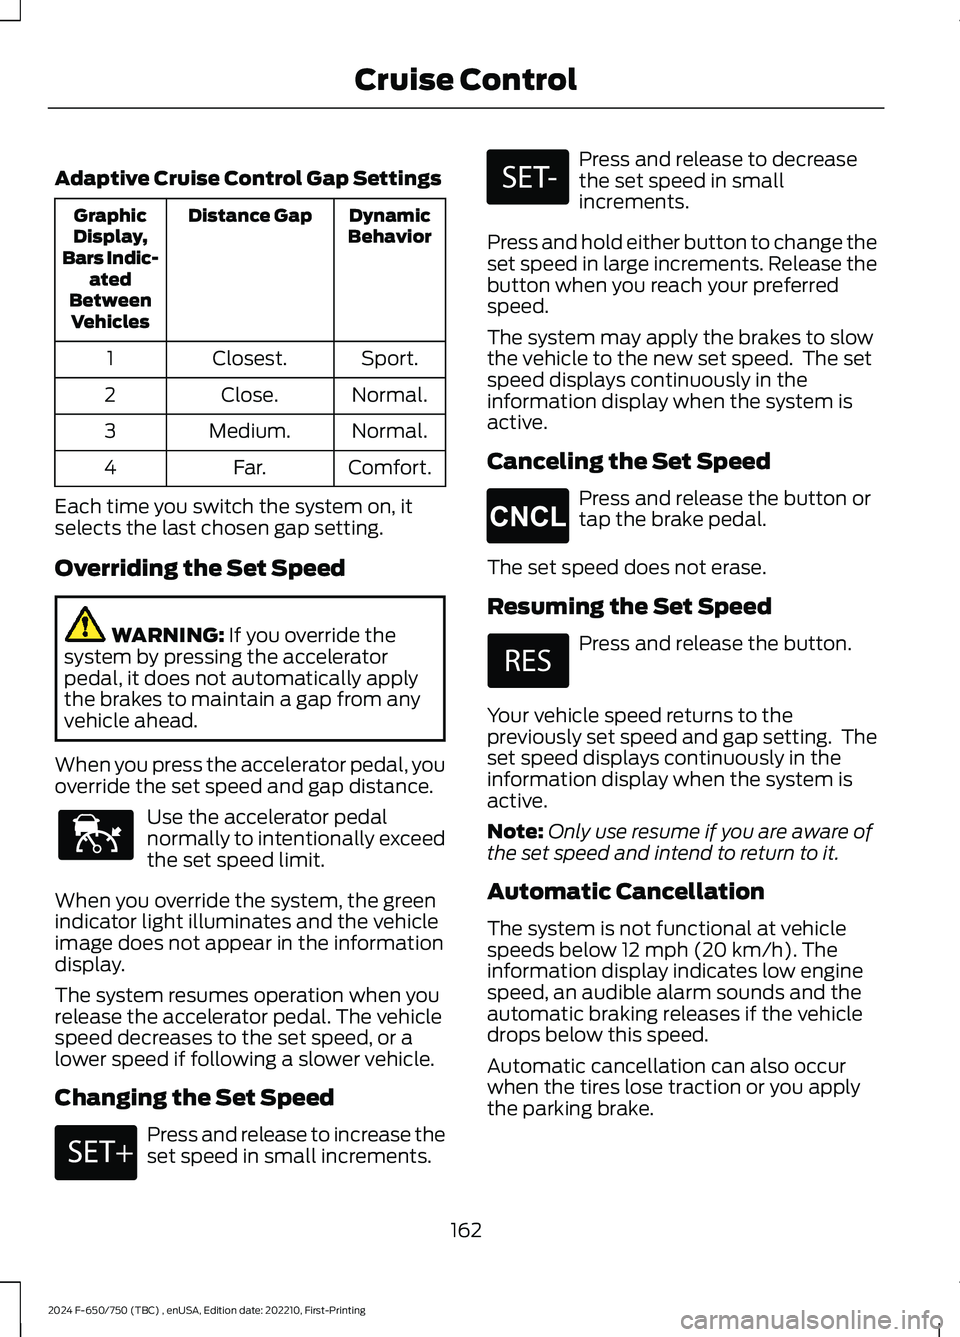
Adaptive Cruise Control Gap Settings
DynamicBehaviorDistance GapGraphicDisplay,Bars Indic-atedBetweenVehicles
Sport.Closest.1
Normal.Close.2
Normal.Medium.3
Comfort.Far.4
Each time you switch the system on, itselects the last chosen gap setting.
Overriding the Set Speed
WARNING: If you override thesystem by pressing the acceleratorpedal, it does not automatically applythe brakes to maintain a gap from anyvehicle ahead.
When you press the accelerator pedal, youoverride the set speed and gap distance.
Use the accelerator pedalnormally to intentionally exceedthe set speed limit.
When you override the system, the greenindicator light illuminates and the vehicleimage does not appear in the informationdisplay.
The system resumes operation when yourelease the accelerator pedal. The vehiclespeed decreases to the set speed, or alower speed if following a slower vehicle.
Changing the Set Speed
Press and release to increase theset speed in small increments.
Press and release to decreasethe set speed in smallincrements.
Press and hold either button to change theset speed in large increments. Release thebutton when you reach your preferredspeed.
The system may apply the brakes to slowthe vehicle to the new set speed. The setspeed displays continuously in theinformation display when the system isactive.
Canceling the Set Speed
Press and release the button ortap the brake pedal.
The set speed does not erase.
Resuming the Set Speed
Press and release the button.
Your vehicle speed returns to thepreviously set speed and gap setting. Theset speed displays continuously in theinformation display when the system isactive.
Note:Only use resume if you are aware ofthe set speed and intend to return to it.
Automatic Cancellation
The system is not functional at vehiclespeeds below 12 mph (20 km/h). Theinformation display indicates low enginespeed, an audible alarm sounds and theautomatic braking releases if the vehicledrops below this speed.
Automatic cancellation can also occurwhen the tires lose traction or you applythe parking brake.
162
2024 F-650/750 (TBC) , enUSA, Edition date: 202210, First-PrintingCruise ControlE144529 E246884 E246885 E265298