2024 FORD F650/750 instrument cluster
[x] Cancel search: instrument clusterPage 137 of 386
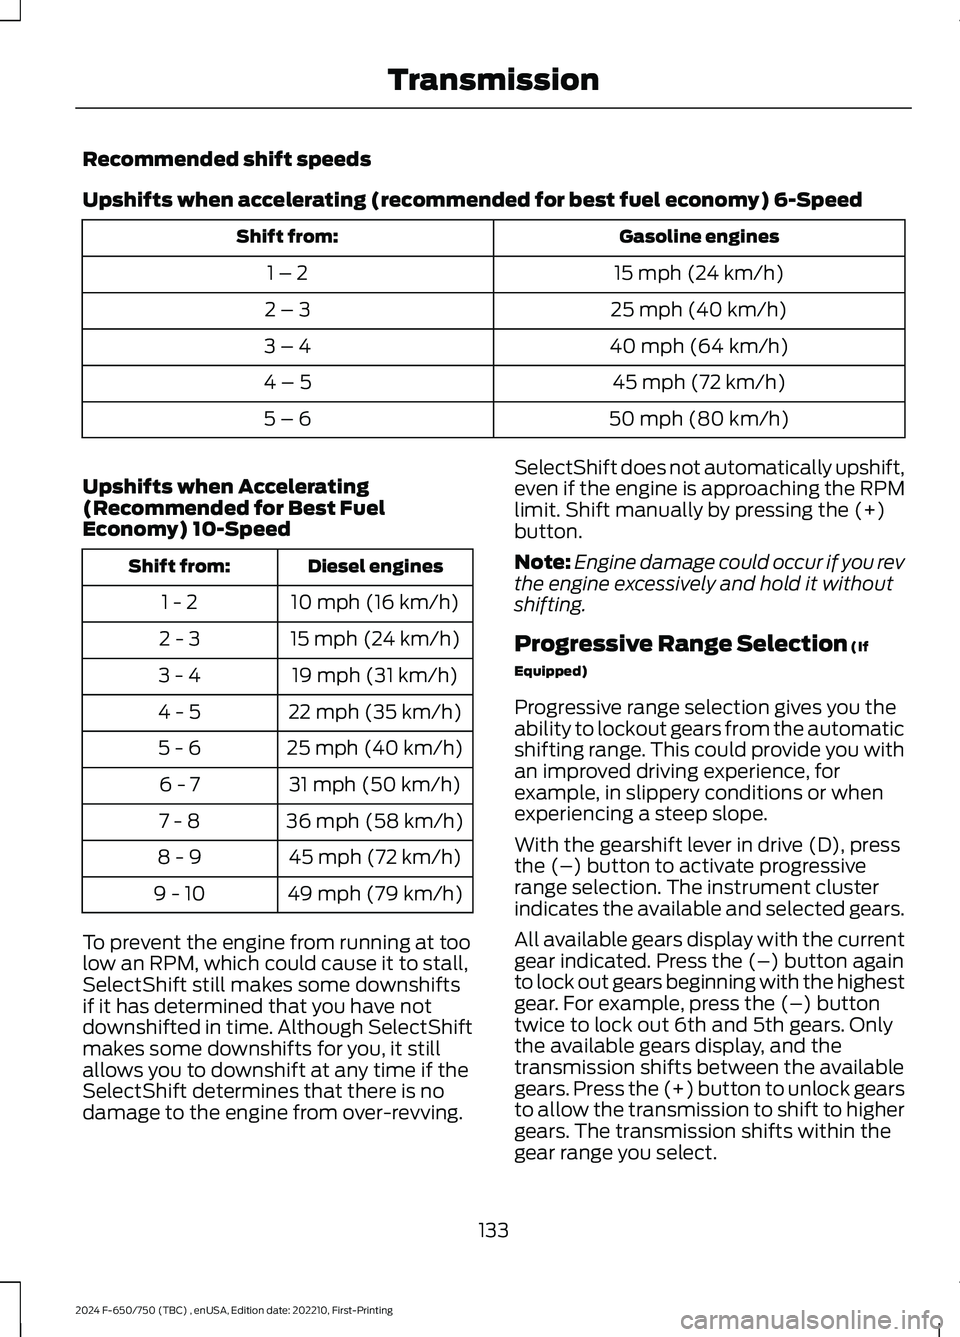
Recommended shift speeds
Upshifts when accelerating (recommended for best fuel economy) 6-Speed
Gasoline enginesShift from:
15 mph (24 km/h)1 – 2
25 mph (40 km/h)2 – 3
40 mph (64 km/h)3 – 4
45 mph (72 km/h)4 – 5
50 mph (80 km/h)5 – 6
Upshifts when Accelerating(Recommended for Best FuelEconomy) 10-Speed
Diesel enginesShift from:
10 mph (16 km/h)1 - 2
15 mph (24 km/h)2 - 3
19 mph (31 km/h)3 - 4
22 mph (35 km/h)4 - 5
25 mph (40 km/h)5 - 6
31 mph (50 km/h)6 - 7
36 mph (58 km/h)7 - 8
45 mph (72 km/h)8 - 9
49 mph (79 km/h)9 - 10
To prevent the engine from running at toolow an RPM, which could cause it to stall,SelectShift still makes some downshiftsif it has determined that you have notdownshifted in time. Although SelectShiftmakes some downshifts for you, it stillallows you to downshift at any time if theSelectShift determines that there is nodamage to the engine from over-revving.
SelectShift does not automatically upshift,even if the engine is approaching the RPMlimit. Shift manually by pressing the (+)button.
Note:Engine damage could occur if you revthe engine excessively and hold it withoutshifting.
Progressive Range Selection (If
Equipped)
Progressive range selection gives you theability to lockout gears from the automaticshifting range. This could provide you withan improved driving experience, forexample, in slippery conditions or whenexperiencing a steep slope.
With the gearshift lever in drive (D), pressthe (–) button to activate progressiverange selection. The instrument clusterindicates the available and selected gears.
All available gears display with the currentgear indicated. Press the (–) button againto lock out gears beginning with the highestgear. For example, press the (–) buttontwice to lock out 6th and 5th gears. Onlythe available gears display, and thetransmission shifts between the availablegears. Press the (+) button to unlock gearsto allow the transmission to shift to highergears. The transmission shifts within thegear range you select.
133
2024 F-650/750 (TBC) , enUSA, Edition date: 202210, First-PrintingTransmission
Page 144 of 386
If the system is disabled, normalbraking is still effective. If thebrake warning lamp illuminateswith the parking brake released, have thesystem checked immediately. It alsomomentarily illuminates when you switchthe ignition on to confirm the lamp isfunctional. If it does not illuminate whenyou switch the ignition on, or begins toflash at any time, have the systemchecked.
HINTS ON DRIVING WITH
ANTI-LOCK BRAKES
The anti-lock brake system does noteliminate the risks when:
•You drive too closely to the vehicle infront of you.
•Your vehicle is hydroplaning.
•You take corners too fast.
•The road surface is poor.
Note: If the system activates, the brakepedal could pulse and may travel further.Maintain pressure on the brake pedal. Youmay also hear a noise from the system. Thisis normal.
PARKING BRAKE
Hydraulic Brakes (If Equipped)
WARNING: Always set the parkingbrake and leave your vehicle with thetransmission in park (P).
WARNING: This control is forparking only. Do not leave the vehicleunattended after setting the parkingbrake without placing the transmissionin park (P). We recommend using wheelchocks for hilly or off-roadcircumstances.
WARNING: Unexpected andpossibly sudden vehicle movement mayoccur if you do not take theseprecautions.
WARNING: If the parking brake isfully released, but the brake warninglamp remains illuminated, the brakesmay not be working properly. Have yourvehicle checked as soon as possible.
Apply the parking brake whenever thevehicle is parked. To set the parking brake,pull the handle up until it snaps into thelocked position.
When the parking brake is out ofadjustment, seek service immediately.
The parking brake warning lampin the instrument clusterilluminates, and remainsilluminated (when you switch on theignition), until you release the parkingbrake.
140
2024 F-650/750 (TBC) , enUSA, Edition date: 202210, First-PrintingBrakesE209041 E208810 E210347
Page 150 of 386
Note:Installing an exhaust or auxiliarybrake does not necessarily protect theengine from exceeding the maximumgoverned speed. Use the primary brakes tomake sure the engine never exceeds themaximum governed speed under anycircumstance.
Note:Engine speed has a major influenceon limiting performance. When enginespeed stays at the maximum allowablelevel, the exhaust brake operates at peakperformance.
Note:Exhaust brakes operate effectivelywith automatic transmissions. However,performance varies with engine speed andthe gear selected by the transmission.
An exhaust brake is an auxiliary brakingsystem that assists, but does not replace,the primary brake system. It helps controlvehicle speed. It is not a vehicle-stoppingdevice.
Use the button on the instrument panel, incombination with the accelerator pedal,to maximize the use of the exhaust brakein the following conditions:
•Off-highway driving.
•Mountain driving.
•Heavy traffic.
•High-speed highway driving.
To switch the exhaust brake on, press thebutton. A light on the instrument clusterindicates the system is on. Press the buttonagain to switch it off.
While approaching a steep grade, makesure that the exhaust brake switch is on.The exhaust brake begins working as soonas you remove your foot from theaccelerator pedal.
Before descending a hill or steep grade,always select the proper gear. If you takethe transmission out of gear whiledescending, you may not be able to selectanother gear because of maximumgoverned RPM.
Make sure the engine speed does notexceed the maximum allowable engineRPM. Exceeding the maximum allowableengine RPM can result in damage to theengine. Apply the service brakes to reducethe engine RPM or make a slower descentby using a lower gear.
146
2024 F-650/750 (TBC) , enUSA, Edition date: 202210, First-PrintingBrakesE215226
Page 155 of 386
PRINCIPLE OF OPERATION
The traction control system helps avoiddrive wheel spin and loss of traction.
If your vehicle begins to slide, the systemapplies the brakes to individual wheelsand, when needed, reduces engine powerat the same time. If the wheels spin whenaccelerating on slippery or loose surfaces,the system reduces engine power in orderto increase traction.
USING TRACTION CONTROL -
VEHICLES WITH: AIR BRAKES
WARNING: Operating your vehiclewith the traction control disabled couldlead to an increased risk of loss of vehiclecontrol, vehicle rollover, personal injuryand death.
Press the TCS Off button on theinstrument panel to enable themud/snow mode.
This is beneficial when your vehicle is stuckin snow or on a slippery road surface. Thismode allows wheel spin to dig your vehicleout and allows you to rock your vehicle.
Press the switch again to select standardtraction control. The system automaticallyselects standard traction control at thenext ignition cycle.
System Indicator Light
Note:If the traction control light does notflash during a traction control event or staysilluminated, the system is not functioningproperly. Take your vehicle to an authorizeddealer for service.
During traction control operation, thetraction control light flashes rapidly andthe engine does not rev-up when you pressfurther on the accelerator. This is normaland is no reason for concern.
In mud/snow mode, the TCS OFF lightilluminates on the instrument cluster. If atraction event occurs in either mode, thestability and traction control light flashesrapidly.
USING TRACTION CONTROL -
VEHICLES WITH: HYDRAULIC
BRAKES
WARNING: Operating your vehiclewith the traction control disabled couldlead to an increased risk of loss of vehiclecontrol, vehicle rollover, personal injuryand death.
The system turns on each time you switchthe ignition on.
Use the traction control buttonon the instrument panel toswitch the system off or on.
If your vehicle is stuck in mud or snow,switching traction control off is beneficialas this allows the wheels to spin.
Press the button again to switch thetraction control system on.
System Indicator Light
Note:If the traction control light does notflash during a traction control event or stayson, the system is not operating. Have thesystem checked as soon as possible.
During a traction control event, the tractioncontrol light rapidly flashes. Pressingfurther on the accelerator does not causethe engine to rev higher. This is normal andis no reason for concern.
151
2024 F-650/750 (TBC) , enUSA, Edition date: 202210, First-PrintingTraction ControlE330660 E330660
Page 156 of 386
When the system turns the traction controloff, the OFF light illuminates on theinstrument cluster. If a traction eventoccurs in either mode, the stability andtraction control light rapidly flashes.
152
2024 F-650/750 (TBC) , enUSA, Edition date: 202210, First-PrintingTraction Control
Page 165 of 386
Following a Vehicle
WARNING: When following avehicle that is braking, your vehicle doesnot always decelerate quickly enough toavoid a crash without driver intervention.Apply the brakes when necessary. Failureto follow this instruction could result inpersonal injury or death.
WARNING: The system only warnsof vehicles detected by the radar sensor.In some cases there may be no warningor a delayed warning. Apply the brakeswhen necessary. Failure to follow thisinstruction could result in personal injuryor death.
Note:When you are following a vehicle andyou switch on a direction indicator, adaptivecruise control may provide a smalltemporary acceleration to help you pass.
Note:The brakes may emit noise whenapplied by the system.
When a vehicle ahead of you enters thesame lane or a slower vehicle is ahead inthe same lane, the vehicle speed adjuststo maintain a preset gap distance. Avehicle graphic illuminates in theinstrument cluster.
Your vehicle maintains a consistent gapfrom the vehicle ahead until any of thefollowing occur:
•The vehicle in front of you acceleratesto a speed above the set speed.
•The vehicle in front of you moves outof the lane you are in.
•Your vehicle speed falls below 12 mph(20 km/h).
•You set a new gap distance.
The system applies the brakes to slow yourvehicle to maintain a safe gap distancefrom the vehicle in front. The system onlyapplies limited braking. You can overridethe system by applying the brakes.
If the system determines that its maximumbraking level is not sufficient, an audiblewarning sounds, a message appears in theinformation display and an indicatorflashes when the system continues tobrake. Take immediate action.
Setting the Gap Distance
You can decrease or increase the distancebetween your vehicle and the vehicle infront by pressing the gap control.
Press and release to decreasethe gap distance.
Press and release to increase thegap distance.
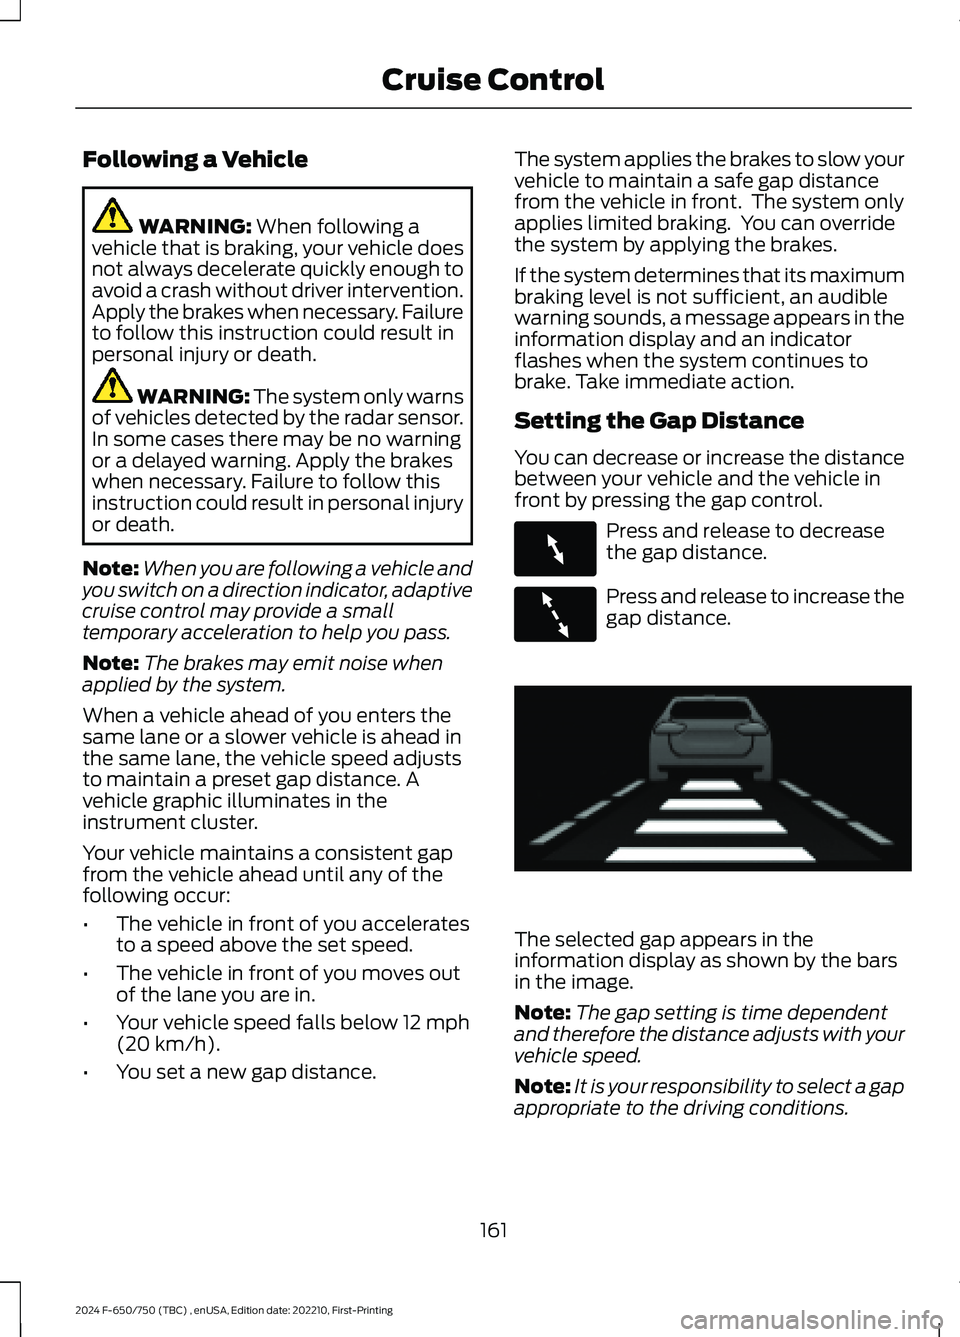
The selected gap appears in theinformation display as shown by the barsin the image.
Note:The gap setting is time dependentand therefore the distance adjusts with yourvehicle speed.
Note:It is your responsibility to select a gapappropriate to the driving conditions.
161
2024 F-650/750 (TBC) , enUSA, Edition date: 202210, First-PrintingCruise ControlE263697 E263696 E233874
Page 179 of 386
Brake support: Helps reduce the impactspeed by preparing the brakes for rapidbraking. The system does notautomatically apply the brakes. If you pressthe brake pedal, the system could applyadditional braking up to maximum brakingforce, even if you lightly press the brakepedal.
Active braking: May activate if the systemdetermines that a collision is imminent.The system may help the driver reduceimpact damage or avoid the crashcompletely.
Note:If you perceive pre-collision assistalerts as being too frequent, then you canreduce the alert sensitivity, though themanufacturer recommends using thehighest sensitivity setting where possible.Setting lower sensitivity would lead to fewerand later system warnings.
Distance Indication and Alert
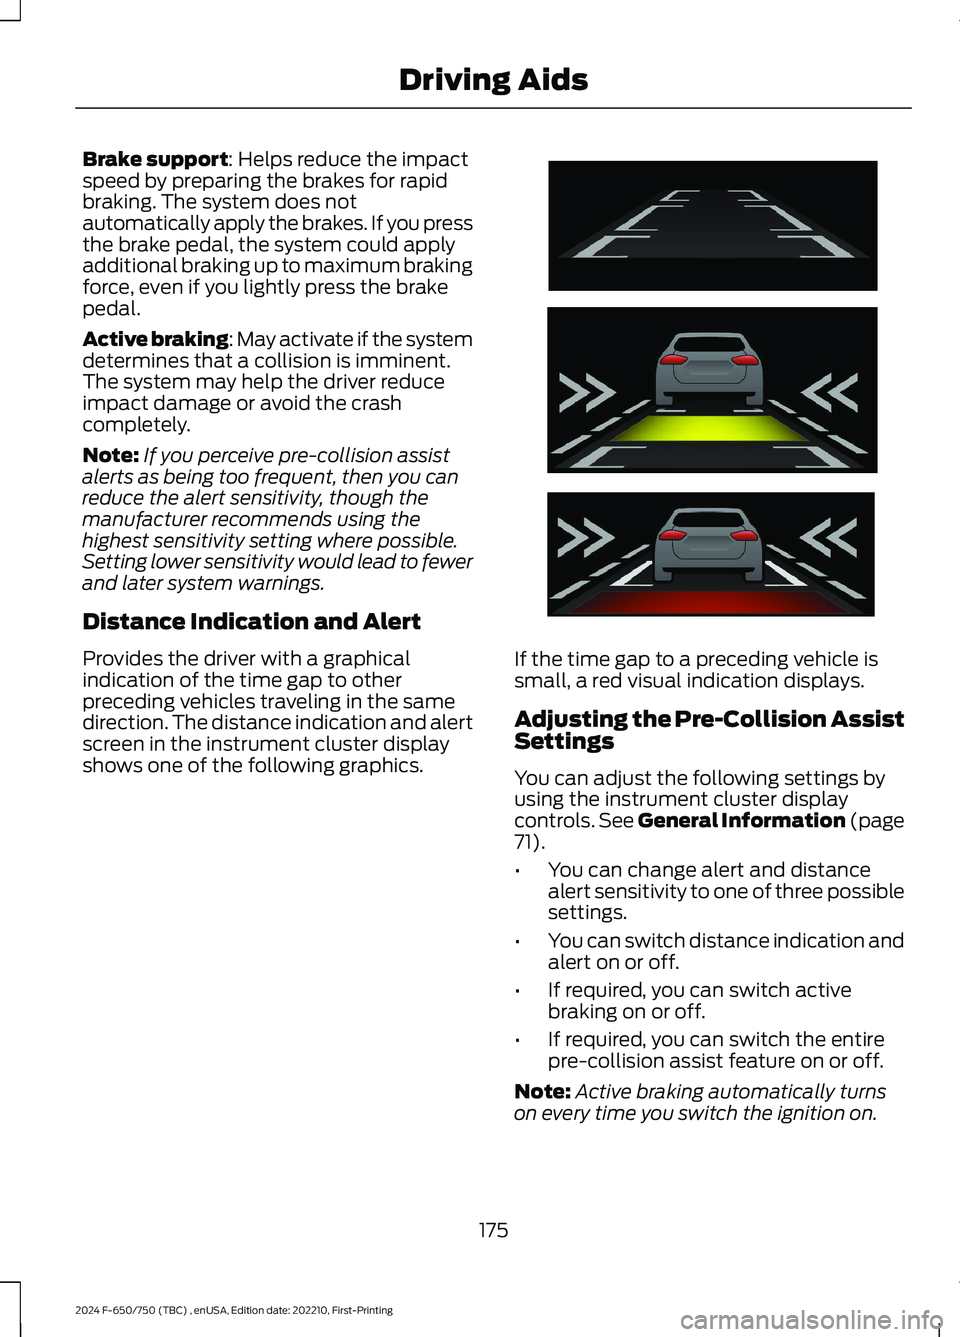
Provides the driver with a graphicalindication of the time gap to otherpreceding vehicles traveling in the samedirection. The distance indication and alertscreen in the instrument cluster displayshows one of the following graphics.
If the time gap to a preceding vehicle issmall, a red visual indication displays.
Adjusting the Pre-Collision AssistSettings
You can adjust the following settings byusing the instrument cluster displaycontrols. See General Information (page71).
•You can change alert and distancealert sensitivity to one of three possiblesettings.
•You can switch distance indication andalert on or off.
•If required, you can switch activebraking on or off.
•If required, you can switch the entirepre-collision assist feature on or off.
Note:Active braking automatically turnson every time you switch the ignition on.
175
2024 F-650/750 (TBC) , enUSA, Edition date: 202210, First-PrintingDriving AidsE254791
Page 180 of 386
Note:Switch the system off if you install asnowplow or similar object in such a waythat it may block the radar sensor. Yourvehicle remembers the selected settingacross key cycles.
Blocked Sensors
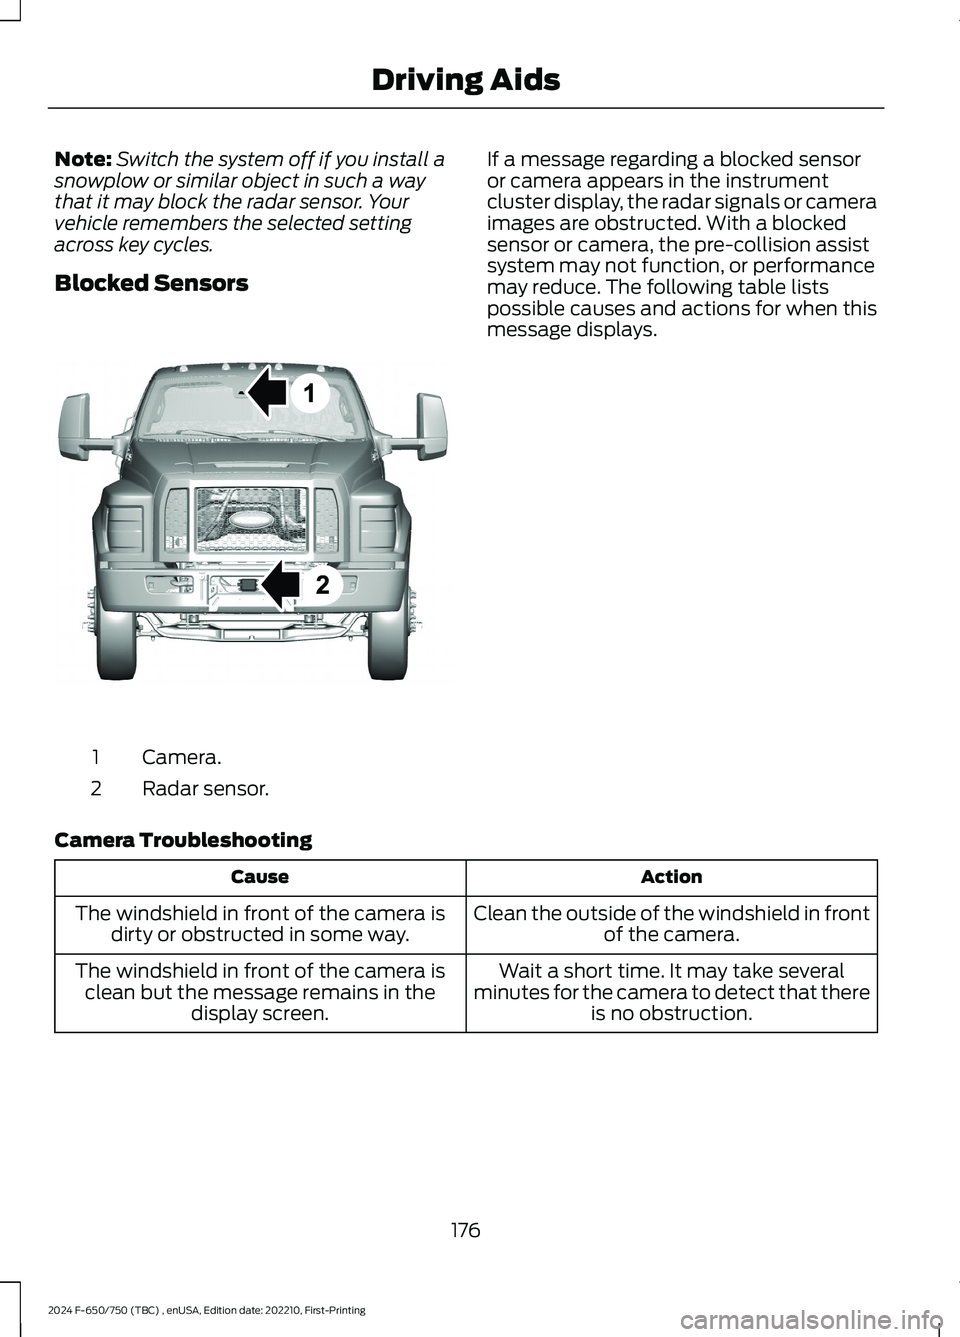
Camera.1
Radar sensor.2
If a message regarding a blocked sensoror camera appears in the instrumentcluster display, the radar signals or cameraimages are obstructed. With a blockedsensor or camera, the pre-collision assistsystem may not function, or performancemay reduce. The following table listspossible causes and actions for when thismessage displays.
Camera Troubleshooting
ActionCause
Clean the outside of the windshield in frontof the camera.The windshield in front of the camera isdirty or obstructed in some way.
Wait a short time. It may take severalminutes for the camera to detect that thereis no obstruction.
The windshield in front of the camera isclean but the message remains in thedisplay screen.
176
2024 F-650/750 (TBC) , enUSA, Edition date: 202210, First-PrintingDriving AidsE311873