2024 FORD F650/750 instrument cluster
[x] Cancel search: instrument clusterPage 72 of 386

Door Ajar
Displays when the ignition is onand any door is not completelyclosed.
Electronic Locking Differential (If
Equipped)
Illuminates when using theelectronic locking differential.
Engine Coolant Temperature
If it illuminates when your vehicleis moving, this indicates that theengine is overheating. Stop yourvehicle as soon as it is safe to do so andswitch the engine off. Have your vehiclechecked as soon as possible. See EngineCoolant Check (page 238).idk
Engine Oil Pressure
If it illuminates with the enginerunning, or when you are driving,this indicates a malfunction.Stop your vehicle as soon as it is safe todo so and switch off the engine. Check theengine oil level.
Note:Do not resume your journey if itilluminates despite the level being correct.Have the system checked as soon aspossible.
Exhaust Brake On (If Equipped)
The exhaust brake indicator lightilluminates when you switch theexhaust brake on.
Fasten Seatbelt
Illuminates and a tone soundsto remind you to fasten yourseatbelt.
High Beam
Illuminates when you switch onthe high beam headlamps. Itflashes when you use theheadlamp flasher.
Hydromax
If the light illuminates andremains on when the key is in theon position or the engine isrunning, this indicates inadequate hydraulicbooster pressure or reserve pump systemfailure. Stop the vehicle as soon aspossible and have your vehicle checked.
Low Fuel Level
Illuminates when the fuel levelis low or the fuel tank is nearlyempty. Refuel as soon aspossible.
Parking Brake Warning
Briefly illuminates when youswitch the ignition to the onposition, with the engine off. Italso illuminates when you apply theparking brake. If the park brake lamp doesnot illuminate at these times, seekimmediate service. Vehicles with the powerparking brake option: If the park brakewarning lamp begins to blink after settingthe parking brake, this may indicate afailure in the parking brake system. Havethe system checked as soon as possible.Driving extended distances with theparking brake engaged can cause brakefailure and the risk of personal injury.
Parking Lamps
Illuminates when you switch thelow beam headlamps or theparking lamps on.
68
2024 F-650/750 (TBC) , enUSA, Edition date: 202210, First-PrintingInstrument Cluster E163170 E103308 E67022 E171217 E71880 E67019 E146190 E208810 E71341
Page 73 of 386

Powertrain Malfunction/ReducedPower/Electronic Throttle Control
(If Equipped)
Illuminates in the event of apowertrain fault. Have yourvehicle checked as soon aspossible.
Service Engine Soon
If it illuminates when the engineis running, the on-boarddiagnostics system notifies youthat the emission control system requiresservice.
If it flashes, engine misfire may beoccurring. An increase in exhaust gastemperatures can damage the catalyticconverter or other vehicle components.Avoid heavy acceleration and decelerationand have your vehicle immediatelyserviced.
It illuminates when you switch the ignitionon prior to engine start to check the bulband to indicate whether your vehicle isready for Inspection and Maintenance(I/M) testing.
Normally, it illuminates until the engine iscranked and turns off if no malfunctionsare present. However, if after 15 secondsit flashes eight times, this indicates thatyour vehicle is not ready for inspection andmaintenance (I/M) testing.
See Catalytic Converter (page 118).
Stability Control Indicator (If Equipped)
Flashes during operation.
If it does not illuminate when you switchthe ignition on, or remains on when theengine is running, this indicates amalfunction. Have your vehicle checkedas soon as possible.
Traction Control Indicator
Flashes during a traction controlevent.
If it does not illuminate when you switchthe ignition on, or remains on when theengine is running, this indicates amalfunction. Have your vehicle checkedas soon as possible.
Traction Control System Off
Illuminates when you switch thesystem off.
Trailer Anti-Lock Brake System(ABS)
Briefly illuminates when youswitch on the ignition, and onlywhen you connect a PLC traileror a PLC diagnostic tool. If the light fails toilluminate, remains on after you start thevehicle or continues to flash, have thesystem immediately serviced.
Transmission Tow/Haul
Illuminates when you switch ontow/haul. If the light steadilyflashes, have the systemimmediately serviced, damage to thetransmission could occur.
Two Speed Axle (If Equipped)
The two speed axle indicatorcomes on when you switch thelow axle range on.
Wait to Start (If Equipped)
Illuminates when you switch theignition on as part of thepre-start system. Wait until thewait to start indicator turns off beforeattempting to start vehicle.
69
2024 F-650/750 (TBC) , enUSA, Edition date: 202210, First-PrintingInstrument Cluster E67028 E138639 E138639 E194301 E209040 E246592 E208809
Page 74 of 386

WARNING: Do not use startingfluid, for example ether, in the air intakesystem. Such fluid could causeimmediate explosive damage to theengine and possible personal injury.
Water in Fuel (If Equipped)
Illuminates when the fuelfilter/water separator has asignificant quantity of water init.
If the light illuminates when the engine isrunning, stop the vehicle as soon as safelypossible, shut off the engine, then drain thefuel filter/water separator.
Allowing water to stay in the system couldresult in extensive damage to, or failure of,the fuel injection system.
WARNING: Do not drain thewater-in-fuel separator while the engineis running. Failure to follow this warningmay result in fire, serious injury, death orproperty damage.
AUDIBLE WARNINGS AND
INDICATORS
Headlamps On Warning Chime
Sounds when you remove the key from theignition and open the driver's door and youhave left the headlamps or parking lampson.
Key in Ignition Warning Chime
Sounds when you open the driver's doorand you have left the key in the ignition.
Parking Brake On Warning Chime
Sounds when you have left the parkingbrake on and drive your vehicle. If thewarning chime remains on after you havereleased the parking brake, have thesystem checked by your authorized dealerimmediately.
70
2024 F-650/750 (TBC) , enUSA, Edition date: 202210, First-PrintingInstrument Cluster
Page 79 of 386

INFORMATION MESSAGES
Note: Not all messages will display or beavailable depending on your vehicle optionsand instrument cluster type. Theinformation display may abbreviate orshorten certain messages.
Press the OK button to acknowledge andremove some messages from theinformation display. The informationdisplay will automatically remove othermessages after a short period of time.
You need to confirm certain messagesbefore you can access the menus.
Adaptive Cruise Control
ActionMessage
The radar requires service and is preventingthe adaptive cruise control from engaging.Adaptive Cruise Malfunction
A condition exists such that the adaptivecruise cannot function properly.Adaptive Cruise Not Available
You have a blocked sensor due toinclement weather, ice, mud or water infront of the radar sensor. You can typicallyclean the sensor to resolve.
Adaptive Cruise Not Available SensorBlocked See Manual
The system has disabled the automaticbraking. Verify the system is on, if themessage continues to display have thesystem checked as soon as possible.
Normal Cruise Active Adaptive Braking Off
The radar requires service and is preventingthe adaptive cruise control from engaging.Front Sensor Not Aligned
75
2024 F-650/750 (TBC) , enUSA, Edition date: 202210, First-PrintingInformation DisplaysE184451
Page 119 of 386

1.When your vehicle has stopped, shiftinto neutral (N) or park (P).
2.Apply the parking brake and switch theignition off.
3.Turn the fuel filler capcounterclockwise and remove it.
4.Refuel your vehicle as required.
5.Replace the fuel filler cap, turn itclockwise until you feel a strongresistance.
If the fuel cap warning lamp or a warningmessage appears in the instrument cluster,you may not have installed the fuel fillercap correctly.
If the fuel cap warning lamp remains on,at the next opportunity, safely pull off ofthe road, remove the fuel filler cap, alignthe cap properly and reinstall it. The checkfuel cap warning lamp or warning messagemay not reset immediately. It may takeseveral driving cycles for the indicators toturn off. A driving cycle consists of anengine start-up (after four or more hourswith the engine off) followed by normalcity and highway driving.
FUEL CONSUMPTION
The advertised capacity is the maximumamount of fuel that you can add to the fueltank after running out of fuel. Included inthe advertised capacity is an emptyreserve. The empty reserve is anunspecified amount of fuel that remainsin the fuel tank when the fuel gaugeindicates empty.
Note:The amount of fuel in the emptyreserve varies and should not be relied uponto increase driving range.
Filling the Fuel Tank
For consistent results when refueling:
•Turn the ignition off before fueling; aninaccurate reading results if the engineis left running.
•Use the same fill rate(low-medium-high) each time the tankis filled.
•Allow no more than one automaticshut-off when refueling.
Results are most accurate when the fillingmethod is consistent.
Calculating Fuel Economy
Do not measure fuel economy during thefirst 1,000 mi (1,600 km) of driving (this isyour engine’s break-in period). A moreaccurate measurement is obtained after2,000 mi (3,200 km) to 3,000 mi(4,800 km). Also, fuel expense, frequencyof fill ups or fuel gauge readings are notaccurate ways to measure fuel economy.
1.Fill the fuel tank completely and recordthe initial odometer reading.
2.Each time you fill the fuel tank, recordthe amount of fuel added.
3.After at least three fill ups, fill the fueltank and record the current odometerreading.
4.Subtract your initial odometer readingfrom the current odometer reading.
To calculate L/100 km (liters per 100kilometers) fuel consumption, multiply theliters used by 100, then divide by kilometerstraveled. To calculate MPG (miles pergallon) fuel consumption, divide milestraveled by gallons used.
115
2024 F-650/750 (TBC) , enUSA, Edition date: 202210, First-PrintingFuel and Refueling
Page 134 of 386

AUTOMATIC TRANSMISSION
WARNING: Apply the parkingbrake, shift into park (P), switch theignition off and remove the key beforeyou leave your vehicle. Failure to followthis instruction could result in personalinjury or death.
WARNING: Do not apply the brakepedal and accelerator pedalsimultaneously. Applying both pedalssimultaneously for more than a fewseconds limits vehicle performance,which may result in difficulty maintainingspeed in traffic and could lead to seriousinjury.
Understanding the Shift Positionsof Your Automatic Transmission
6-Speed Transmissions
10-Speed Transmissions
Putting your vehicle in or out of gear:
1.Fully press the brake pedal.
2.Move the gearshift lever into thepreferred gear.
3.When you finish driving, come to acomplete stop.
4.Move the gearshift lever and securelylatch it in park (P) or neutral (N).
The instrument cluster displays the currentgear.
Park (P)
If your transmission has a park (P) position,this position locks the transmission andprevents the rear wheels from turning.
Reverse (R)
With the gearshift lever in reverse (R), yourvehicle moves backward. Always come toa complete stop before shifting into andout of reverse (R).
Neutral (N)
With the gearshift lever in neutral (N), youcan start your vehicle and it is free to roll.Hold the brake pedal down when in thisposition.
Drive (D)
Drive (D) is the normal driving position forthe best fuel economy. The overdrivefunction allows automatic upshifts anddownshifts through gears one through six.
Manual (M)
With the gearshift lever in manual (M), thedriver can change gears up or down aspreferred. By moving the gearshift leverfrom drive (D) to manual (M), you nowhave control of selecting the gear youprefer using the buttons on the shift lever.See Understanding Your SelectShiftAutomatic™ Transmission later in thissection.
130
2024 F-650/750 (TBC) , enUSA, Edition date: 202210, First-PrintingTransmissionE163183 E308145
Page 135 of 386

To return to normal drive (D) position,move the shift lever back from manual (M)to drive (D).
The transmission operates in gears onethrough six.
Second (2)
The transmission operates in second (2)gear only. Use second (2) gear to just starton slippery roads.
First (1)
•The transmission operates in first (1)gear only.
•Provides maximum engine braking.
•Allows upshifts by moving gearshiftlever.
•Does not downshift into first (1) gearat high speeds; allows for first (1) gearwhen vehicle reaches slower speeds.
Forced downshifts
•Allowed in drive (D) with the tow/haulfeature on or off.
•Press the accelerator to the floor.
•Allows transmission to select anappropriate gear.
Tow/Haul Mode
To activate tow/haul, press thebutton on the gearshift leveronce. The TOW HAUL indicatorilluminates in the instrument cluster.
The tow/haul feature:
•Delays upshifts to reduce the frequencyof transmission shifting.
•Provides engine braking in all forwardgears, which slows your vehicle andassists you in controlling your vehiclewhen descending a grade.
•Depending on driving and loadconditions, could downshift thetransmission to slow your vehicle andhelp control your vehicle speed whendescending a hill, without pressing theaccelerator pedal. Tapping the brakepedal downshifts the transmission toprovide additional braking, only if thedownshift does not cause an engineoverspeed condition.
The tow/haul feature improvestransmission operation when towing atrailer or a heavy load. All transmissiongear ranges are available when usingtow/haul.
Note:Under certain conditions, theautomatic tow/haul feature engages, andthe TOW HAUL indicator illuminateswithout pressing the tow/haul button.
To deactivate the tow/haul feature andreturn to normal driving mode, press thebutton on the gearshift lever twice. TheTOW HAUL indicator turns off. Tow/haulalso deactivates when you power downyour vehicle.
WARNING: Do not use tow/haulwhen the road surface is slippery. Failureto follow this instruction could result inthe loss of control of your vehicle.
WARNING: Do not use dieselengine exhaust braking when the roadsurface is slippery. Failure to follow thisinstruction could result in the loss ofcontrol of your vehicle.
131
2024 F-650/750 (TBC) , enUSA, Edition date: 202210, First-PrintingTransmissionE161509
Page 136 of 386

Understanding Your SelectShift™Automatic Transmission
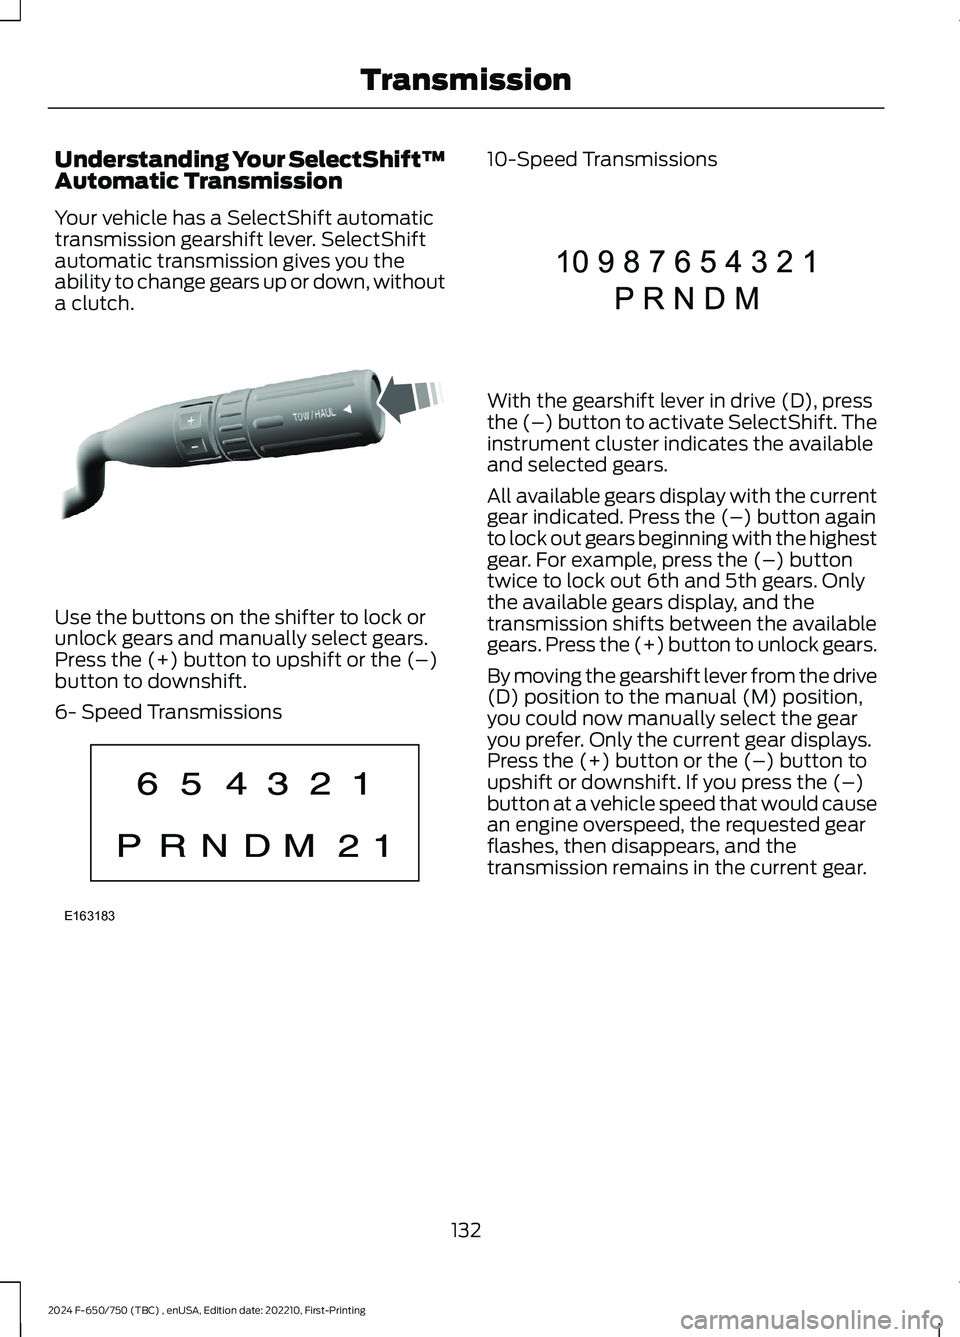
Your vehicle has a SelectShift automatictransmission gearshift lever. SelectShiftautomatic transmission gives you theability to change gears up or down, withouta clutch.
Use the buttons on the shifter to lock orunlock gears and manually select gears.Press the (+) button to upshift or the (–)button to downshift.
6- Speed Transmissions
10-Speed Transmissions
With the gearshift lever in drive (D), pressthe (–) button to activate SelectShift. Theinstrument cluster indicates the availableand selected gears.
All available gears display with the currentgear indicated. Press the (–) button againto lock out gears beginning with the highestgear. For example, press the (–) buttontwice to lock out 6th and 5th gears. Onlythe available gears display, and thetransmission shifts between the availablegears. Press the (+) button to unlock gears.
By moving the gearshift lever from the drive(D) position to the manual (M) position,you could now manually select the gearyou prefer. Only the current gear displays.Press the (+) button or the (–) button toupshift or downshift. If you press the (–)button at a vehicle speed that would causean engine overspeed, the requested gearflashes, then disappears, and thetransmission remains in the current gear.
132
2024 F-650/750 (TBC) , enUSA, Edition date: 202210, First-PrintingTransmissionE318028 E163183 E308145