2024 FORD F650/750 fuel cap
[x] Cancel search: fuel capPage 119 of 386

1.When your vehicle has stopped, shiftinto neutral (N) or park (P).
2.Apply the parking brake and switch theignition off.
3.Turn the fuel filler capcounterclockwise and remove it.
4.Refuel your vehicle as required.
5.Replace the fuel filler cap, turn itclockwise until you feel a strongresistance.
If the fuel cap warning lamp or a warningmessage appears in the instrument cluster,you may not have installed the fuel fillercap correctly.
If the fuel cap warning lamp remains on,at the next opportunity, safely pull off ofthe road, remove the fuel filler cap, alignthe cap properly and reinstall it. The checkfuel cap warning lamp or warning messagemay not reset immediately. It may takeseveral driving cycles for the indicators toturn off. A driving cycle consists of anengine start-up (after four or more hourswith the engine off) followed by normalcity and highway driving.
FUEL CONSUMPTION
The advertised capacity is the maximumamount of fuel that you can add to the fueltank after running out of fuel. Included inthe advertised capacity is an emptyreserve. The empty reserve is anunspecified amount of fuel that remainsin the fuel tank when the fuel gaugeindicates empty.
Note:The amount of fuel in the emptyreserve varies and should not be relied uponto increase driving range.
Filling the Fuel Tank
For consistent results when refueling:
•Turn the ignition off before fueling; aninaccurate reading results if the engineis left running.
•Use the same fill rate(low-medium-high) each time the tankis filled.
•Allow no more than one automaticshut-off when refueling.
Results are most accurate when the fillingmethod is consistent.
Calculating Fuel Economy
Do not measure fuel economy during thefirst 1,000 mi (1,600 km) of driving (this isyour engine’s break-in period). A moreaccurate measurement is obtained after2,000 mi (3,200 km) to 3,000 mi(4,800 km). Also, fuel expense, frequencyof fill ups or fuel gauge readings are notaccurate ways to measure fuel economy.
1.Fill the fuel tank completely and recordthe initial odometer reading.
2.Each time you fill the fuel tank, recordthe amount of fuel added.
3.After at least three fill ups, fill the fueltank and record the current odometerreading.
4.Subtract your initial odometer readingfrom the current odometer reading.
To calculate L/100 km (liters per 100kilometers) fuel consumption, multiply theliters used by 100, then divide by kilometerstraveled. To calculate MPG (miles pergallon) fuel consumption, divide milestraveled by gallons used.
115
2024 F-650/750 (TBC) , enUSA, Edition date: 202210, First-PrintingFuel and Refueling
Page 125 of 386
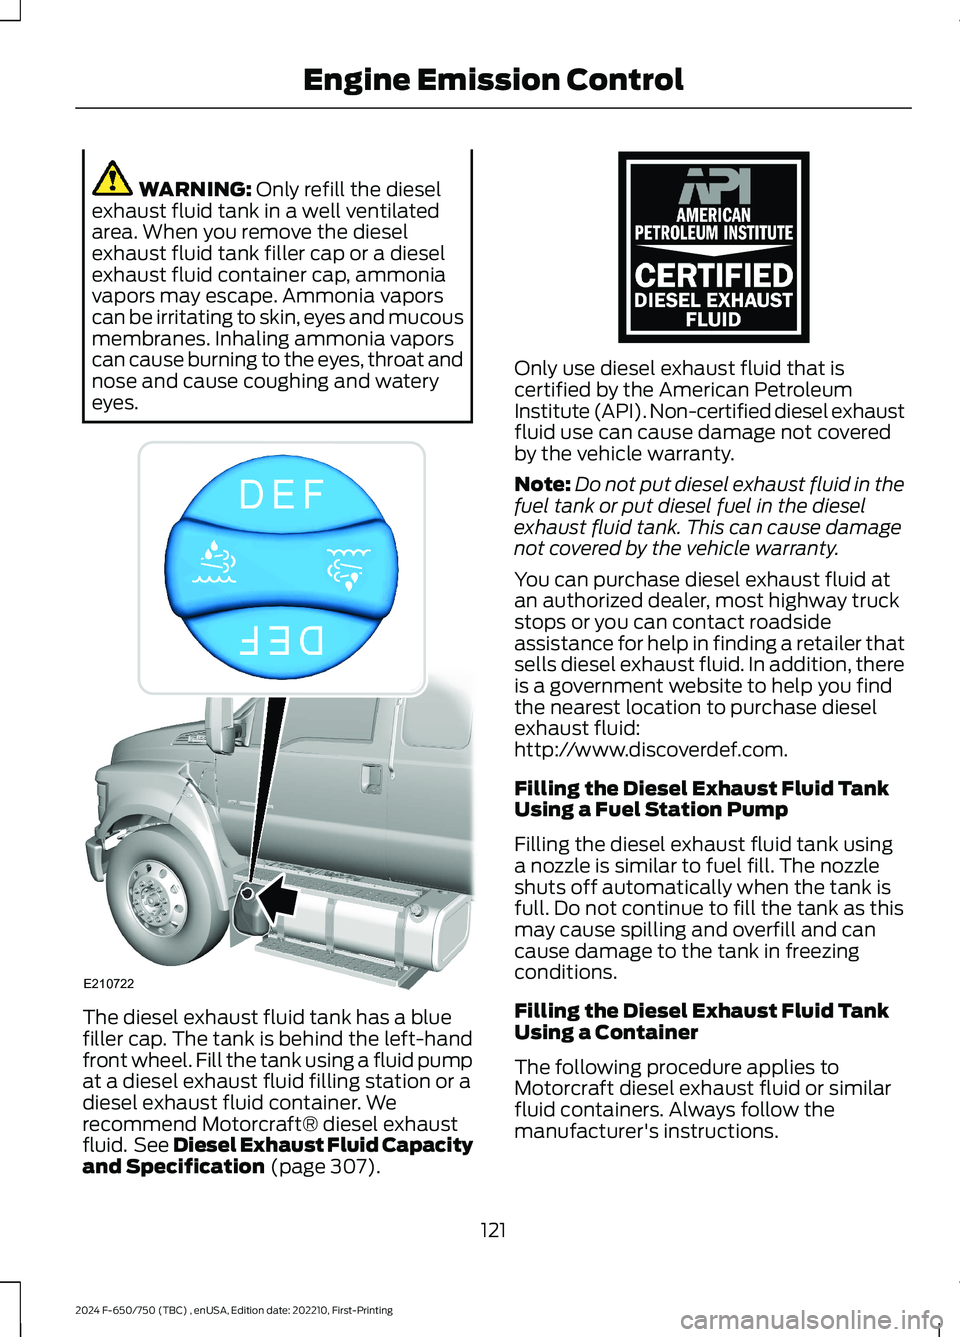
WARNING: Only refill the dieselexhaust fluid tank in a well ventilatedarea. When you remove the dieselexhaust fluid tank filler cap or a dieselexhaust fluid container cap, ammoniavapors may escape. Ammonia vaporscan be irritating to skin, eyes and mucousmembranes. Inhaling ammonia vaporscan cause burning to the eyes, throat andnose and cause coughing and wateryeyes.
The diesel exhaust fluid tank has a bluefiller cap. The tank is behind the left-handfront wheel. Fill the tank using a fluid pumpat a diesel exhaust fluid filling station or adiesel exhaust fluid container. Werecommend Motorcraft® diesel exhaustfluid. See Diesel Exhaust Fluid Capacityand Specification (page 307).
Only use diesel exhaust fluid that iscertified by the American PetroleumInstitute (API). Non-certified diesel exhaustfluid use can cause damage not coveredby the vehicle warranty.
Note:Do not put diesel exhaust fluid in thefuel tank or put diesel fuel in the dieselexhaust fluid tank. This can cause damagenot covered by the vehicle warranty.
You can purchase diesel exhaust fluid atan authorized dealer, most highway truckstops or you can contact roadsideassistance for help in finding a retailer thatsells diesel exhaust fluid. In addition, thereis a government website to help you findthe nearest location to purchase dieselexhaust fluid:http://www.discoverdef.com.
Filling the Diesel Exhaust Fluid TankUsing a Fuel Station Pump
Filling the diesel exhaust fluid tank usinga nozzle is similar to fuel fill. The nozzleshuts off automatically when the tank isfull. Do not continue to fill the tank as thismay cause spilling and overfill and cancause damage to the tank in freezingconditions.
Filling the Diesel Exhaust Fluid TankUsing a Container
The following procedure applies toMotorcraft diesel exhaust fluid or similarfluid containers. Always follow themanufacturer's instructions.
121
2024 F-650/750 (TBC) , enUSA, Edition date: 202210, First-PrintingEngine Emission ControlE210722 E163354
Page 128 of 386
•Do not dilute diesel exhaust fluid withwater or any other liquid.
•An ammonia odor may be smelledwhen the cap is removed or duringrefill. Refill diesel exhaust fluid in a wellventilated area.
Typical Diesel Exhaust Fluid UsageWhen Using the Power Take Off (PTO)
Continuous PTO use—Minimal PTO use
0–7,800 mi (0–12,550 km)
Contaminated Diesel ExhaustFluid or Inoperative SelectiveCatalytic Reduction System
Selective catalytic reduction systems aresensitive to contamination of the dieselexhaust fluid. Maintaining the purity of thefluid is important to avoid systemmalfunctions. Do not add fuel or anyadditive to the diesel exhaust fluid tank. Ifyou remove or drain the diesel exhaust fluidtank, do not use the same fluid to refill thetank. The system has a sensor to monitorfluid quality.
A warning lamp illuminates anda message appears in theinformation display if the systembecomes contaminated or inoperative.
Continued driving without replacing dieselexhaust fluid or having the selectivecatalytic reduction system repaired resultsin the following actions as required by theCalifornia Air Resources Board (CARB) andU.S. Environmental Protection Agency(EPA):
•Within a preset distance to empty,speed is limited upon vehicle restart.Prior to this occurring a messageappears in the information display.
•Further vehicle operation withoutreplacing contaminated diesel exhaustfluid causes the engine to enter anidle-only condition. This only occursupon vehicle refueling, vehicle idling inpark for 1 hour, or engine shutdown for10 minutes or more and is indicated bya message in the information displayindicating the required actions toresume normal operation.
Note:For vehicle speed limiting or idle-onlycondition, normal vehicle operation resumeswhen you repair the contaminated system.To service a contaminated or inoperativesystem, see an authorized dealer.
DIESEL PARTICULATE FILTER
Your vehicle has a diesel particulate filter.The diesel particulate filter is an inline filterin the exhaust system that reduces carbonemissions by trapping exhaust particlesbefore they reach the tailpipe. The dieselparticulate filter looks similar to atraditional exhaust catalyst, except larger,and is part of the exhaust system underyour vehicle. The filter couples to a dieseloxidation catalyst that reduces the amountof harmful exhaust emitted from thetailpipe. As soot gathers in the system, itbegins to restrict the filter. Periodically, youneed to clean the soot that gathers insidethe filter. You can clean the soot in twodifferent ways, passive regeneration andactive regeneration. Both methods occur
124
2024 F-650/750 (TBC) , enUSA, Edition date: 202210, First-PrintingEngine Emission ControlE163176
Page 193 of 386
DRIVING THROUGH WATER
WARNING: Do not drive throughflowing or deep water as you may losecontrol of your vehicle.
Note:Driving through standing water cancause vehicle damage.
Note:Engine damage can occur if waterenters the air filter.
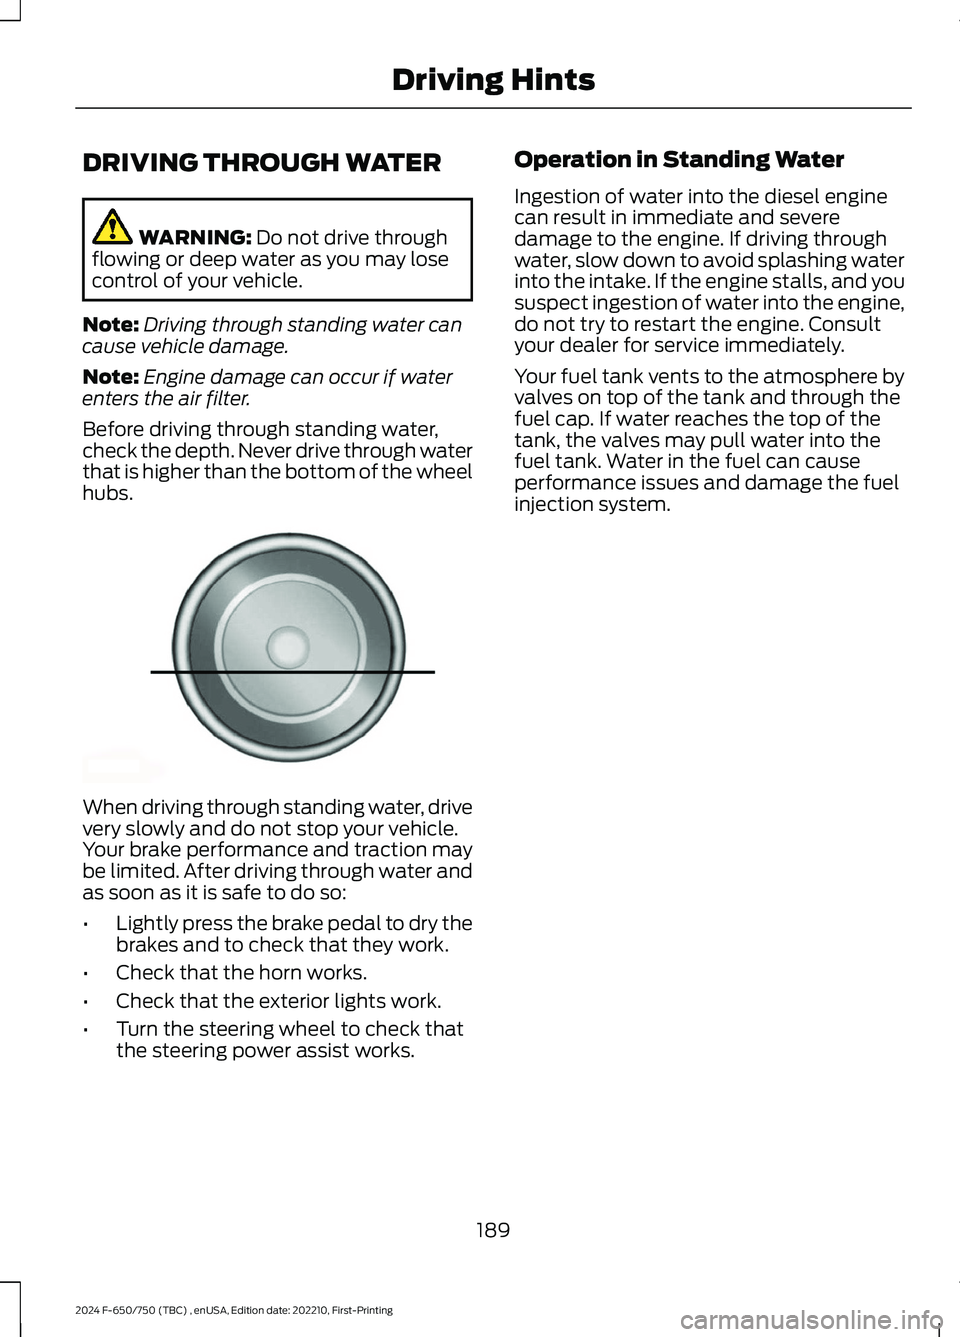
Before driving through standing water,check the depth. Never drive through waterthat is higher than the bottom of the wheelhubs.
When driving through standing water, drivevery slowly and do not stop your vehicle.Your brake performance and traction maybe limited. After driving through water andas soon as it is safe to do so:
•Lightly press the brake pedal to dry thebrakes and to check that they work.
•Check that the horn works.
•Check that the exterior lights work.
•Turn the steering wheel to check thatthe steering power assist works.
Operation in Standing Water
Ingestion of water into the diesel enginecan result in immediate and severedamage to the engine. If driving throughwater, slow down to avoid splashing waterinto the intake. If the engine stalls, and yoususpect ingestion of water into the engine,do not try to restart the engine. Consultyour dealer for service immediately.
Your fuel tank vents to the atmosphere byvalves on top of the tank and through thefuel cap. If water reaches the top of thetank, the valves may pull water into thefuel tank. Water in the fuel can causeperformance issues and damage the fuelinjection system.
189
2024 F-650/750 (TBC) , enUSA, Edition date: 202210, First-PrintingDriving HintsE176913
Page 221 of 386
Front brakes
Inspect for cracked, worn or frayed hoses, and that all coup-lings are secure.Hoses
Verify that there are no cracks or dents, and that the cham-bers are securely mounted.Brake chambers
Inspect for broken, loose or missing parts.Slack adjusters
Note: The angle between the push rod and adjuster armshould be approximately 90 degrees when the brakes areapplied. When pulled by hand, the push rod should not movemore than approximately 1 in (2.5 cm).
Verify that there are no cracks, dents, holes, and no loose ormissing bolts and that the brake linings are not worn,dangerously thin or contaminated by lubricant.
Drums
Front wheels
Inspect for damaged or bent rims. They should not havewelding repairs, and there should be no rust trails, whichindicate it is loose on the wheel.
Rims
Verify all lug nuts are present and not loose (look for rusttrails around the lug nuts). There should be no cracks radiatingfrom the lug bolt holes or distortion of the bolt holes.
Lug nuts
Inspect wheel hub oil seal for leaks and, if sight glass ifpresent, verify the oil level is adequate.Hub oil seals
Inspect for proper lubrication level if the hubcap has a trans-parent window. If the hubcap does not have a transparentwindow, remove the rubber fill-plug and inspect for properlevel.
Oil-lubricated frontwheel bearings
Fuel area
Verify the tank(s) and cap(s) are secure and that there areno leaks from the tank(s).Fuel tank(s)
Inspect for leaks from the tank(s).Leaks
217
2024 F-650/750 (TBC) , enUSA, Edition date: 202210, First-PrintingVehicle Inspection Guide
Page 229 of 386

UNDER HOOD OVERVIEW - 6.7L DIESEL
Engine compartment fuse box. See Fuses (page 202).A
Windshield washer fluid reservoir. See Washer Fluid Check (page 249).B
Secondary Cooling System Reservoir. See Engine Coolant Check (page 235).C
Engine coolant reservoir. See Engine Coolant Check (page 235).D
Secondary fuel filter. See Draining the Fuel Filter Water Trap (page 234).E
Engine oil separator. See Changing the Engine Oil and Oil Filter (page 228).F
Engine oil filler cap. See Engine Oil Check (page 227).G
Brake fluid reservoir. See Brake Fluid Check (page 245).H
Power steering fluid reservoir. See Power Steering Fluid Check (page 246).I
Air brake compressor. See Brake System Inspection (page 256).J
Engine oil dipstick. See Engine Oil Dipstick (page 227).K
Air cleaner assembly. See Changing the Engine Air Filter (page 230).L
225
2024 F-650/750 (TBC) , enUSA, Edition date: 202210, First-PrintingMaintenanceE389955
Page 233 of 386
•Frequent low-speed operation, orconsistent heavy traffic less than25 mph (40 km/h).
•Operating in severe dust conditions.
•Operating the vehicle off road.
•Towing a trailer over 1,000 mi(1,600 km).
•Sustained, high-speed driving at thegross vehicle weight rating.
•Use of fuels with sulfur content otherthan ultra-low sulfur diesel (ULSD).
•Use of high-sulfur diesel fuel.
Only use engine oil that meets ourspecifications. See Capacities andSpecifications (page 291).
OIL CHANGE INDICATOR
RESET
Base Cluster
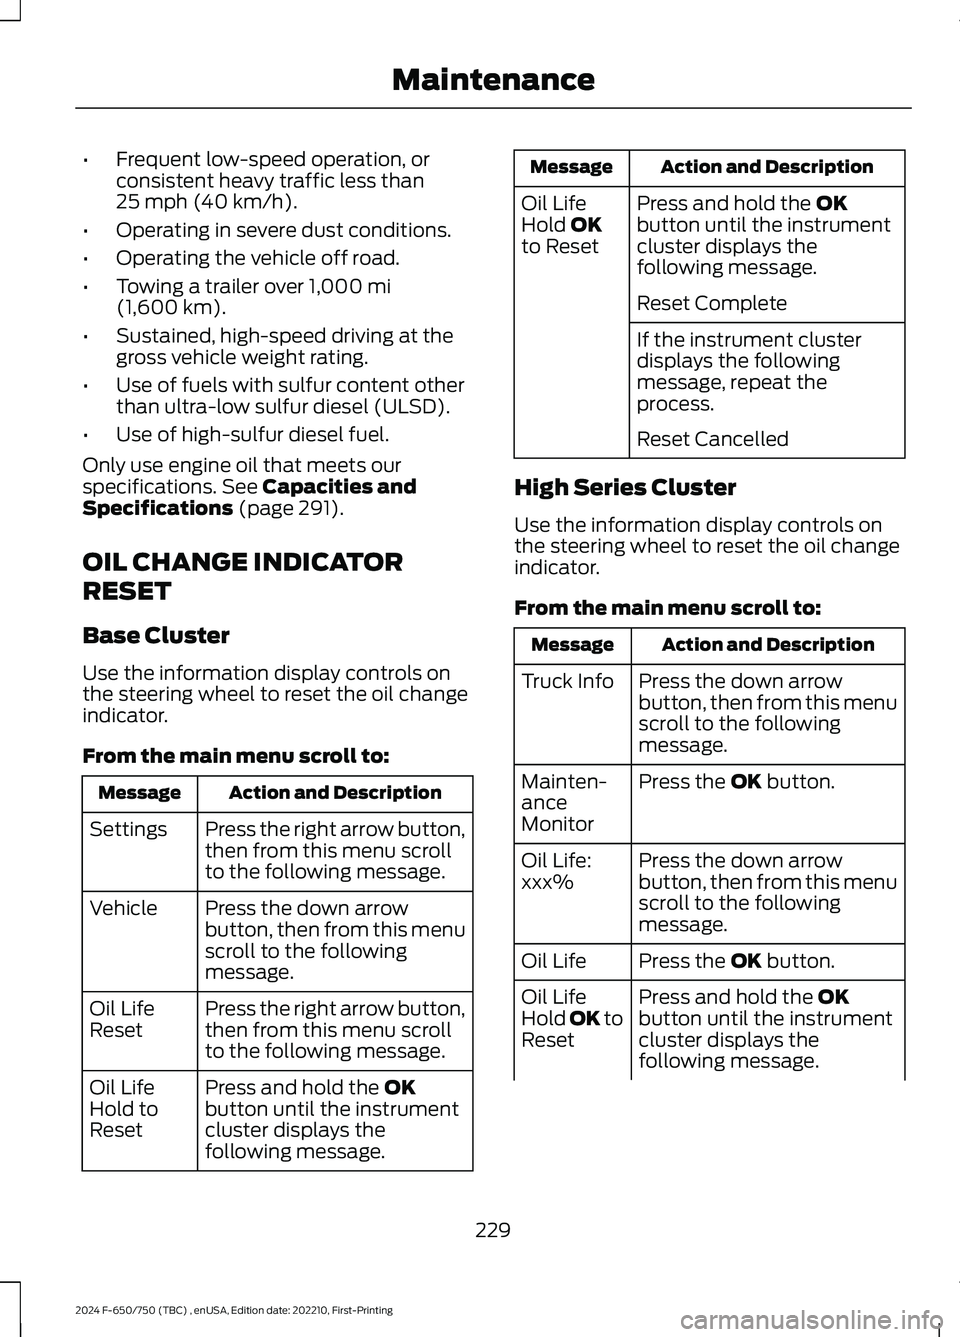
Use the information display controls onthe steering wheel to reset the oil changeindicator.
From the main menu scroll to:
Action and DescriptionMessage
Press the right arrow button,then from this menu scrollto the following message.
Settings
Press the down arrowbutton, then from this menuscroll to the followingmessage.
Vehicle
Press the right arrow button,then from this menu scrollto the following message.
Oil LifeReset
Press and hold the OKbutton until the instrumentcluster displays thefollowing message.
Oil LifeHold toReset
Action and DescriptionMessage
Press and hold the OKbutton until the instrumentcluster displays thefollowing message.
Oil LifeHold OKto Reset
Reset Complete
If the instrument clusterdisplays the followingmessage, repeat theprocess.
Reset Cancelled
High Series Cluster
Use the information display controls onthe steering wheel to reset the oil changeindicator.
From the main menu scroll to:
Action and DescriptionMessage
Press the down arrowbutton, then from this menuscroll to the followingmessage.
Truck Info
Press the OK button.Mainten-anceMonitor
Press the down arrowbutton, then from this menuscroll to the followingmessage.
Oil Life:xxx%
Press the OK button.Oil Life
Press and hold the OKbutton until the instrumentcluster displays thefollowing message.
Oil LifeHold OK toReset
229
2024 F-650/750 (TBC) , enUSA, Edition date: 202210, First-PrintingMaintenance
Page 239 of 386
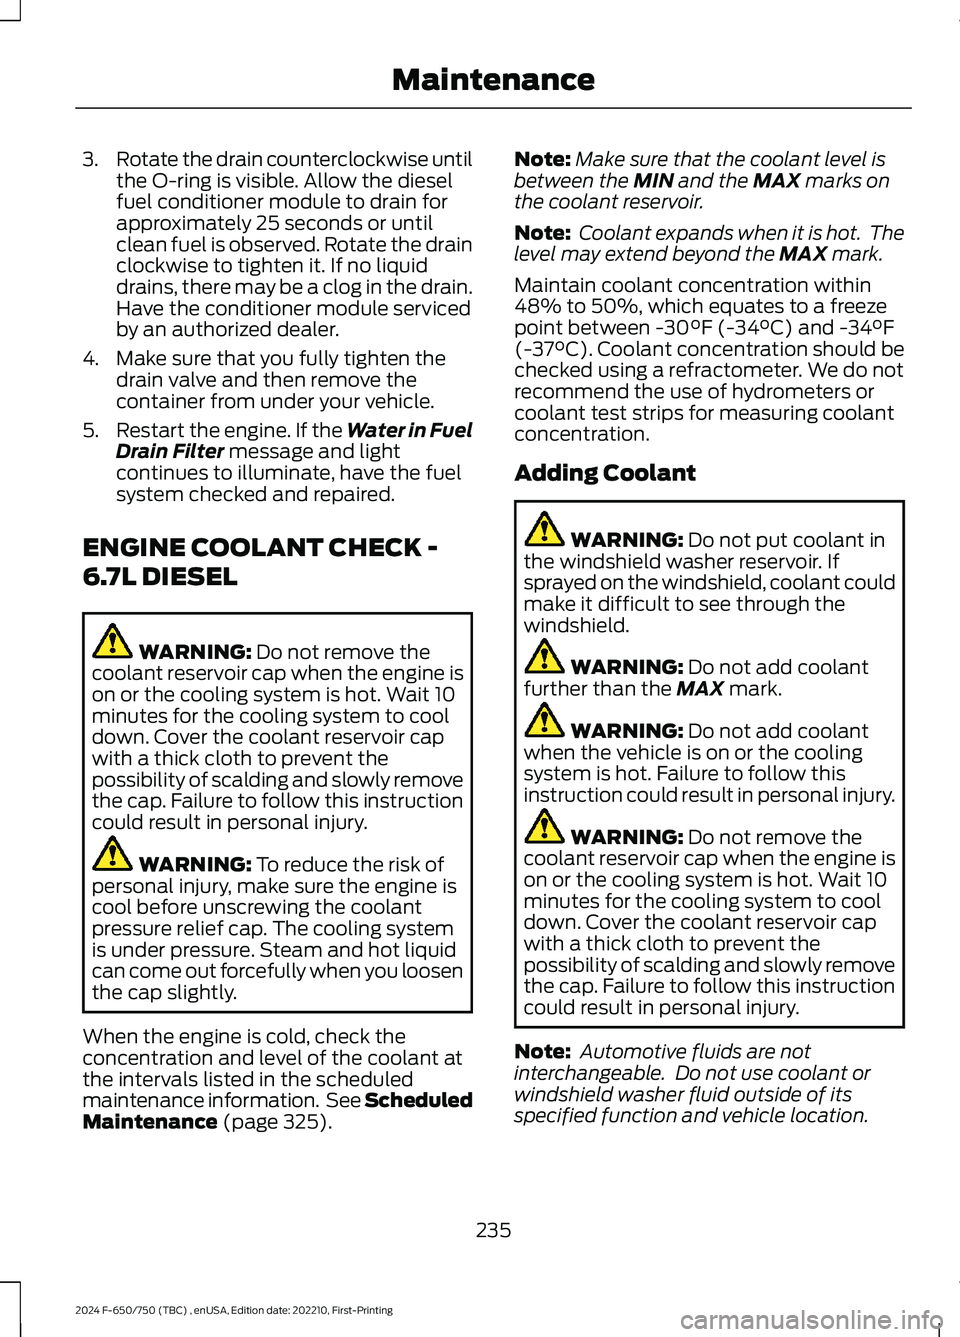
3.Rotate the drain counterclockwise untilthe O-ring is visible. Allow the dieselfuel conditioner module to drain forapproximately 25 seconds or untilclean fuel is observed. Rotate the drainclockwise to tighten it. If no liquiddrains, there may be a clog in the drain.Have the conditioner module servicedby an authorized dealer.
4.Make sure that you fully tighten thedrain valve and then remove thecontainer from under your vehicle.
5.Restart the engine. If the Water in FuelDrain Filter message and lightcontinues to illuminate, have the fuelsystem checked and repaired.
ENGINE COOLANT CHECK -
6.7L DIESEL
WARNING: Do not remove thecoolant reservoir cap when the engine ison or the cooling system is hot. Wait 10minutes for the cooling system to cooldown. Cover the coolant reservoir capwith a thick cloth to prevent thepossibility of scalding and slowly removethe cap. Failure to follow this instructioncould result in personal injury.
WARNING: To reduce the risk ofpersonal injury, make sure the engine iscool before unscrewing the coolantpressure relief cap. The cooling systemis under pressure. Steam and hot liquidcan come out forcefully when you loosenthe cap slightly.
When the engine is cold, check theconcentration and level of the coolant atthe intervals listed in the scheduledmaintenance information. See ScheduledMaintenance (page 325).
Note:Make sure that the coolant level isbetween the MIN and the MAX marks onthe coolant reservoir.
Note: Coolant expands when it is hot. Thelevel may extend beyond the MAX mark.
Maintain coolant concentration within48% to 50%, which equates to a freezepoint between -30°F (-34°C) and -34°F(-37°C). Coolant concentration should bechecked using a refractometer. We do notrecommend the use of hydrometers orcoolant test strips for measuring coolantconcentration.
Adding Coolant
WARNING: Do not put coolant inthe windshield washer reservoir. Ifsprayed on the windshield, coolant couldmake it difficult to see through thewindshield.
WARNING: Do not add coolantfurther than the MAX mark.
WARNING: Do not add coolantwhen the vehicle is on or the coolingsystem is hot. Failure to follow thisinstruction could result in personal injury.
WARNING: Do not remove thecoolant reservoir cap when the engine ison or the cooling system is hot. Wait 10minutes for the cooling system to cooldown. Cover the coolant reservoir capwith a thick cloth to prevent thepossibility of scalding and slowly removethe cap. Failure to follow this instructioncould result in personal injury.
Note: Automotive fluids are notinterchangeable. Do not use coolant orwindshield washer fluid outside of itsspecified function and vehicle location.
235
2024 F-650/750 (TBC) , enUSA, Edition date: 202210, First-PrintingMaintenance