2024 FORD F650/750 change wheel
[x] Cancel search: change wheelPage 159 of 386
•The stability control and tractioncontrol systems do not enhance yourvehicle's ability to maintain traction ofthe wheels.
If a driving condition activates either thestability control or the traction controlsystem you may experience the followingconditions:
•The stability and traction control lightflashes rapidly.
•Your vehicle slows down.
•Reduced engine power.
The stability control system has severalfeatures built into it to help you maintaincontrol of your vehicle:
Electronic Stability Control
The system enhances your vehicle’s abilityto prevent skids or lateral slides byapplying brakes to one or more of thewheels individually and, if necessary,reducing engine power.
Roll Stability Control
The system enhances your vehicle’s abilityto prevent rollovers by detecting yourvehicle’s motion and the rate at which itchanges by applying the brakes to one ormore wheels individually.
Traction Control
The system enhances your vehicle’s abilityto maintain traction of the wheels bydetecting and controlling wheel spin. SeeUsing Traction Control (page 151).
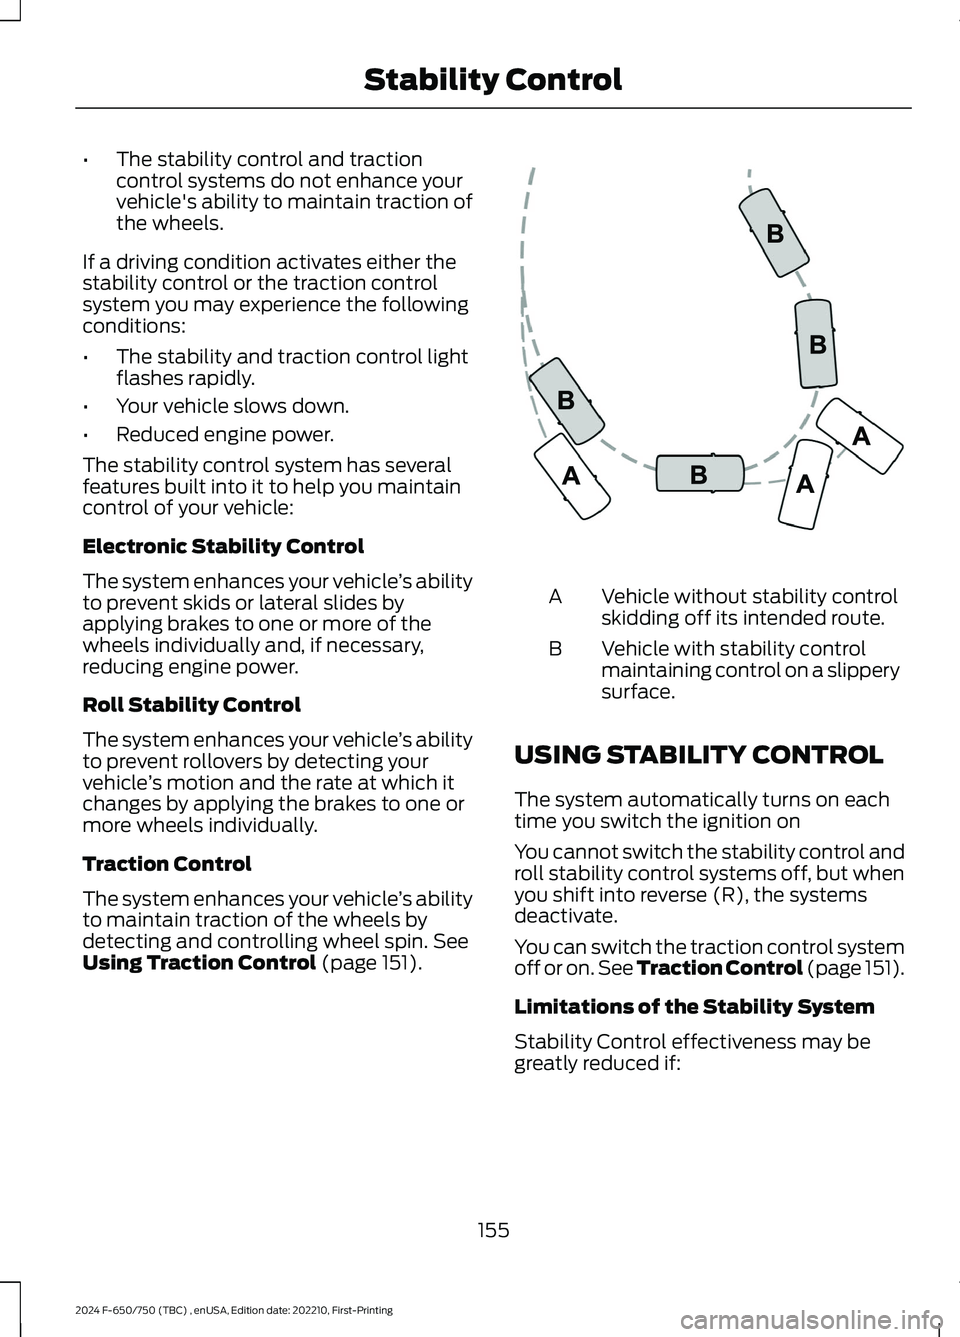
Vehicle without stability controlskidding off its intended route.A
Vehicle with stability controlmaintaining control on a slipperysurface.
B
USING STABILITY CONTROL
The system automatically turns on eachtime you switch the ignition on
You cannot switch the stability control androll stability control systems off, but whenyou shift into reverse (R), the systemsdeactivate.
You can switch the traction control systemoff or on. See Traction Control (page 151).
Limitations of the Stability System
Stability Control effectiveness may begreatly reduced if:
155
2024 F-650/750 (TBC) , enUSA, Edition date: 202210, First-PrintingStability ControlE72903
Page 160 of 386
•Your load shifts due to improperretention, accident damage or theinherently mobile nature of some loads,for example, hanging meat, liveanimals or partially laden tankers.
•Your vehicle or load has an unusuallyhigh or off-set center of gravity.
•Your brakes are not properly adjustedor maintained.
•One side of your vehicle drops off thepavement at an angle that is too greatto be counteracted by a reduction inspeed.
To Maximize the Effectiveness OfStability Control
•Make sure that the weight of your loadis evenly distributed, from front to back,side to side and you secure it properlyat all times.
•Exercise extreme caution at all timeswhile driving and avoid sharp turns,sudden steering inputs or abrupt lanechanges at high speeds, particularly if:
•Hauling loads that can shift.
•Your vehicle or load has a high oroff-set center of gravity whenloaded.
•You are towing doubles or triples.
Electronic Stability Control Usage withTractor/Trailer
The electronic stability control system isdesigned to work with trailer air brakesystems. We do not recommend its usewith any other trailer brake system.
Electronic Stability Control and Towingwith Non-tractor Trucks (Straight orKick-up Frame)
Non-tractor trucks (straight or kick-upframe) with air brake electronic stabilitycontrol, should not be used for towing anytype of trailer.
Chassis Modifications
Stability control is specifically calibratedand validated only for your vehicle'soriginal configuration. If you alter yourvehicle's chassis components, for example,a wheel base extension or reduction, tagaxle addition or removal, a major bodychange such as conversion of a tractor intoa truck. Ford Motor Company is notresponsible for the performance of thestability control system if you modify anymajor components such as axle,suspension or steering system.
156
2024 F-650/750 (TBC) , enUSA, Edition date: 202210, First-PrintingStability Control
Page 162 of 386
WHAT IS CRUISE CONTROL
Cruise control lets you maintain a setspeed without keeping your foot on theaccelerator pedal.
Requirements
Use cruise control when the vehicle speedis greater than 20 mph (30 km/h).
SWITCHING CRUISE CONTROL
ON AND OFF
WARNING: Do not use cruisecontrol on winding roads, in heavy trafficor when the road surface is slippery. Thiscould result in loss of vehicle control,serious injury or death.
The cruise controls are on the steeringwheel. See Cruise Control (page 52).
Switching Cruise Control On
Press the button.
Switching Cruise Control Off
Press the button when thesystem is in standby mode.
The system also turns off when you switchthe ignition off.
Note:The set speed erases when youswitch the system off.
SETTING THE CRUISE
CONTROL SPEED
WARNING: When you are goingdownhill, your vehicle speed couldincrease above the set speed. Thesystem does not apply the brakes.
Drive to the speed you prefer.
Press either button to set thecurrent speed.
Take your foot off the accelerator pedal.
Note:The indicator changes color in theinformation display.
Changing the Set Speed
Press and release the button toincrease the set speed in smallincrements.
Press and hold the button to accelerate.Release the button when you reach yourpreferred speed.
Press and release the button todecrease the set speed in smallincrements.
Press and hold the button to decelerate.Release the button when you reach yourpreferred speed.
Note: If you accelerate by pressing theaccelerator pedal, the set speed does notchange. When you release the acceleratorpedal, your vehicle returns to the speed thatyou previously set.
158
2024 F-650/750 (TBC) , enUSA, Edition date: 202210, First-PrintingCruise ControlE265296 E265297 E246884 E246885 E246884 E246885
Page 190 of 386

GENERAL DRIVING POINTS
General Information
•Accelerate smoothly and evenly. Rapidacceleration increases fuelconsumption without increasing engineperformance.
•When approaching a hill, press theaccelerator smoothly to start theincline at full power, and then shiftdown as needed to maintain vehiclespeed.
•When going down a hill, or long steepgrades, prevent overspeeding of theengine. Normally, choose the samegear to descend the hill that you use toascend the hill. The engine governorhas no control over engine speed whenit is being pushed by a loaded vehicle.
•Do not operate in a gear that permitsan engine speed more than themaximum governed speed or high-idleRPM (no load).
•Always shift to a lower gear at highaltitudes to prevent engine smoking.
Backing Up
WARNING: All vehicles have blindspots. To reduce the risk of severe injuryor property damage, never move yourvehicle to the side or rear or change laneswithout being sure your way is clear onboth sides and to your rear.
WARNING: To reduce the risk ofthe possibility of personal injury whilebacking up the vehicle, always be sureyour vehicle’s path is clear.
Before backing up your vehicle, be sure youcan do so safely. If anything behind the cablimits your view, do not rely on mirrorsalone to make sure that your intended pathis clear. If other people are in the vicinity,have someone standing well behind yourvehicle and outside of your intended path(visible through an exterior mirror) guideyou as you back up.
Although OSHA or some governmentalregulations may require the use of anelectrical or mechanical back up alarm towarn bystanders, such an alarm does notguarantee that the intended path is clear.When in doubt, get out of your vehicle andvisually check the intended path is clear.Back up slowly as to allow others time tomove, if necessary.
If you install an electrical back up alarm,connect it to the backup lamp circuit.
Parking
WARNING: When parking yourvehicle, do not leave the transmission ingear; if the key is in the on position andthe vehicle rolls, the engine could start.Failure to follow these instructions couldresult in an unattended vehicle moving,possibly causing personal injury orproperty damage.
Always use the parking brake. Whenparking on a grade, block the wheels andturn the front wheels to one side so that ifyour vehicle rolls, the front tires act againstthe curb to stop your vehicle. The frontwheels are more effective at stopping arolling vehicle than the rear wheels.
186
2024 F-650/750 (TBC) , enUSA, Edition date: 202210, First-PrintingDriving Hints
Page 217 of 386
VEHICLE INSPECTION
INFORMATION
To make sure your vehicle is ready tooperate, conduct a pre-trip inspection atthe beginning of each work period. Followthe steps listed in this section to verify aproper vehicle inspection procedure.
WARNING: Exercise great cautionwhen working on a vehicle equipped withan automatic fan clutch. The fan startsin motion only after the engine coolantreaches a predetermined temperatureor the refrigerant pressure (if equippedwith air conditioning) reaches apredetermined setting. The fan starts atthis point with no advance warning.Never reach near, or permit objects toprotrude into, the fan blade radius whilethe engine is running as this could resultin vehicle damage, personal injury ordeath.
WARNING: Do not operate thevehicle if any suspension conditionslisted in the following charts are evident.Loss of steering or suspension couldresult in property damage, personal injuryor death.
WARNING: If a wheel must bechanged, obtain expert tire service help.Mounting and un-mounting of tiresshould only be performed by a qualifiedtechnician using necessary safetyprocedures and equipment, otherwisethe result could be property damage,personal injury or death.
Note:Always make sure you apply theparking brake before starting the engine.
Engine compartment (with engine off)
Use the dipstick to verify the oil level is in the proper operatingrange. See Engine Oil Dipstick (page 227).Engine oil
Look through the plastic reservoir and verify the coolant levelis within the proper operating range. Do not remove thepressure cap until the coolant has cooled. See EngineCoolant Check (page 238).
Engine coolant
Verify that the fluid level is in the proper operating range. SeePower Steering Fluid Check (page 246).Power steering fluid
Remove the master cylinder caps and inspect the fluid level.See Brake Fluid Check (page 245).Brake fluid
213
2024 F-650/750 (TBC) , enUSA, Edition date: 202210, First-PrintingVehicle Inspection Guide
Page 233 of 386
•Frequent low-speed operation, orconsistent heavy traffic less than25 mph (40 km/h).
•Operating in severe dust conditions.
•Operating the vehicle off road.
•Towing a trailer over 1,000 mi(1,600 km).
•Sustained, high-speed driving at thegross vehicle weight rating.
•Use of fuels with sulfur content otherthan ultra-low sulfur diesel (ULSD).
•Use of high-sulfur diesel fuel.
Only use engine oil that meets ourspecifications. See Capacities andSpecifications (page 291).
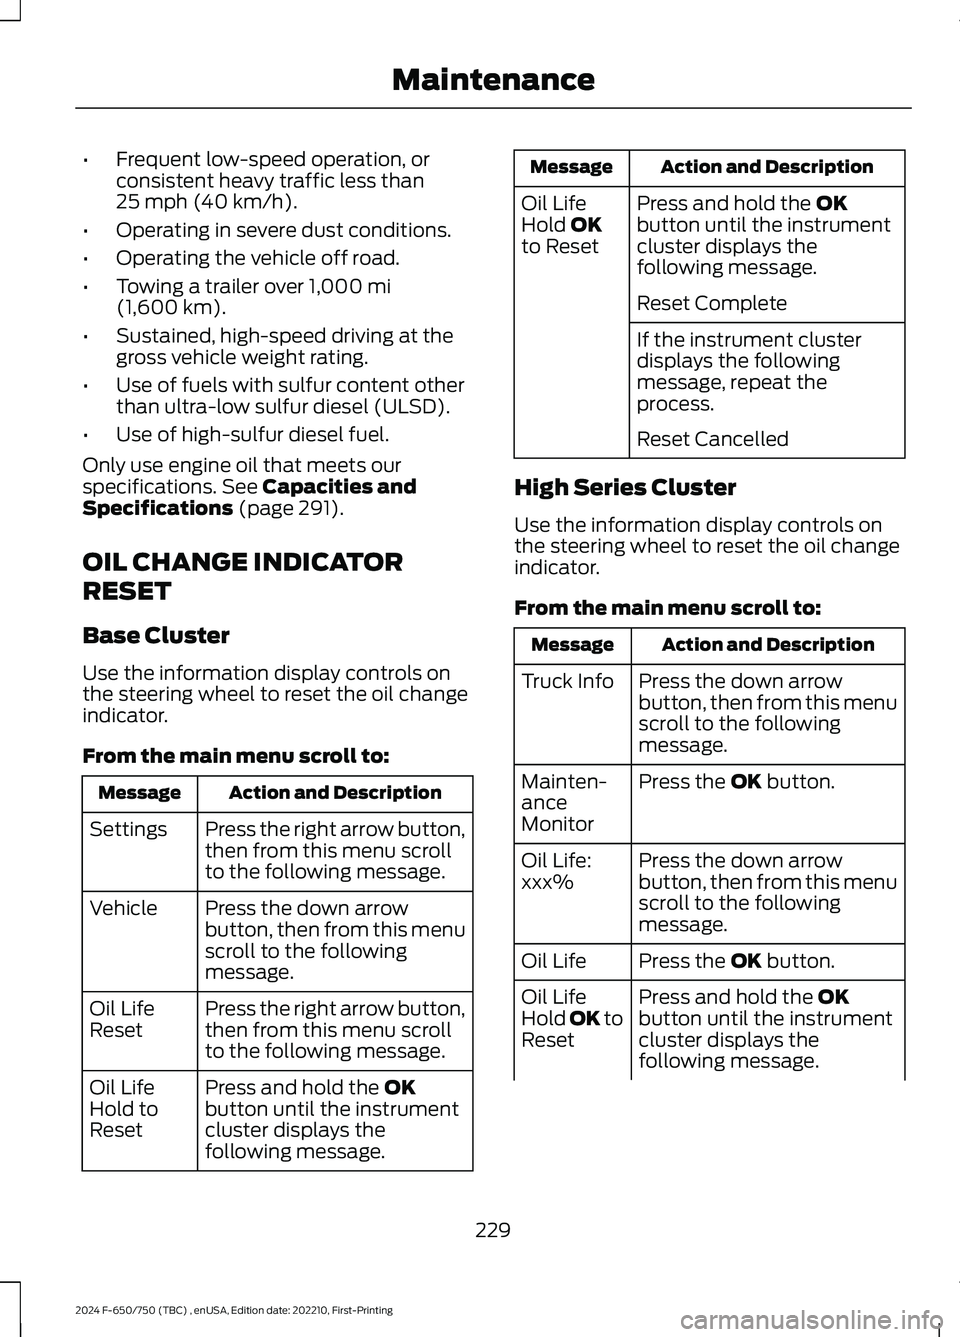
OIL CHANGE INDICATOR
RESET
Base Cluster
Use the information display controls onthe steering wheel to reset the oil changeindicator.
From the main menu scroll to:
Action and DescriptionMessage
Press the right arrow button,then from this menu scrollto the following message.
Settings
Press the down arrowbutton, then from this menuscroll to the followingmessage.
Vehicle
Press the right arrow button,then from this menu scrollto the following message.
Oil LifeReset
Press and hold the OKbutton until the instrumentcluster displays thefollowing message.
Oil LifeHold toReset
Action and DescriptionMessage
Press and hold the OKbutton until the instrumentcluster displays thefollowing message.
Oil LifeHold OKto Reset
Reset Complete
If the instrument clusterdisplays the followingmessage, repeat theprocess.
Reset Cancelled
High Series Cluster
Use the information display controls onthe steering wheel to reset the oil changeindicator.
From the main menu scroll to:
Action and DescriptionMessage
Press the down arrowbutton, then from this menuscroll to the followingmessage.
Truck Info
Press the OK button.Mainten-anceMonitor
Press the down arrowbutton, then from this menuscroll to the followingmessage.
Oil Life:xxx%
Press the OK button.Oil Life
Press and hold the OKbutton until the instrumentcluster displays thefollowing message.
Oil LifeHold OK toReset
229
2024 F-650/750 (TBC) , enUSA, Edition date: 202210, First-PrintingMaintenance
Page 271 of 386
3.Remove tar and grease with a bug andtar remover. We recommend that youuse Ford approved bug and tar removerif available.
4.Thoroughly rinse the wheels with waterafter cleaning.
If you intend on parking your vehicle for anextended period after cleaning the wheelswith a wheel cleaner, drive your vehicle fora few minutes before doing so. Thisreduces the risk of corrosion of the brakediscs, brake pads and linings.
Do not clean the wheels when they are hot.
Note: Some car washes could damagewheel rims and covers.
Note: Using non-recommended cleaners,harsh cleaning products, chrome wheelcleaners or abrasive materials coulddamage wheel rims, covers and bolts.
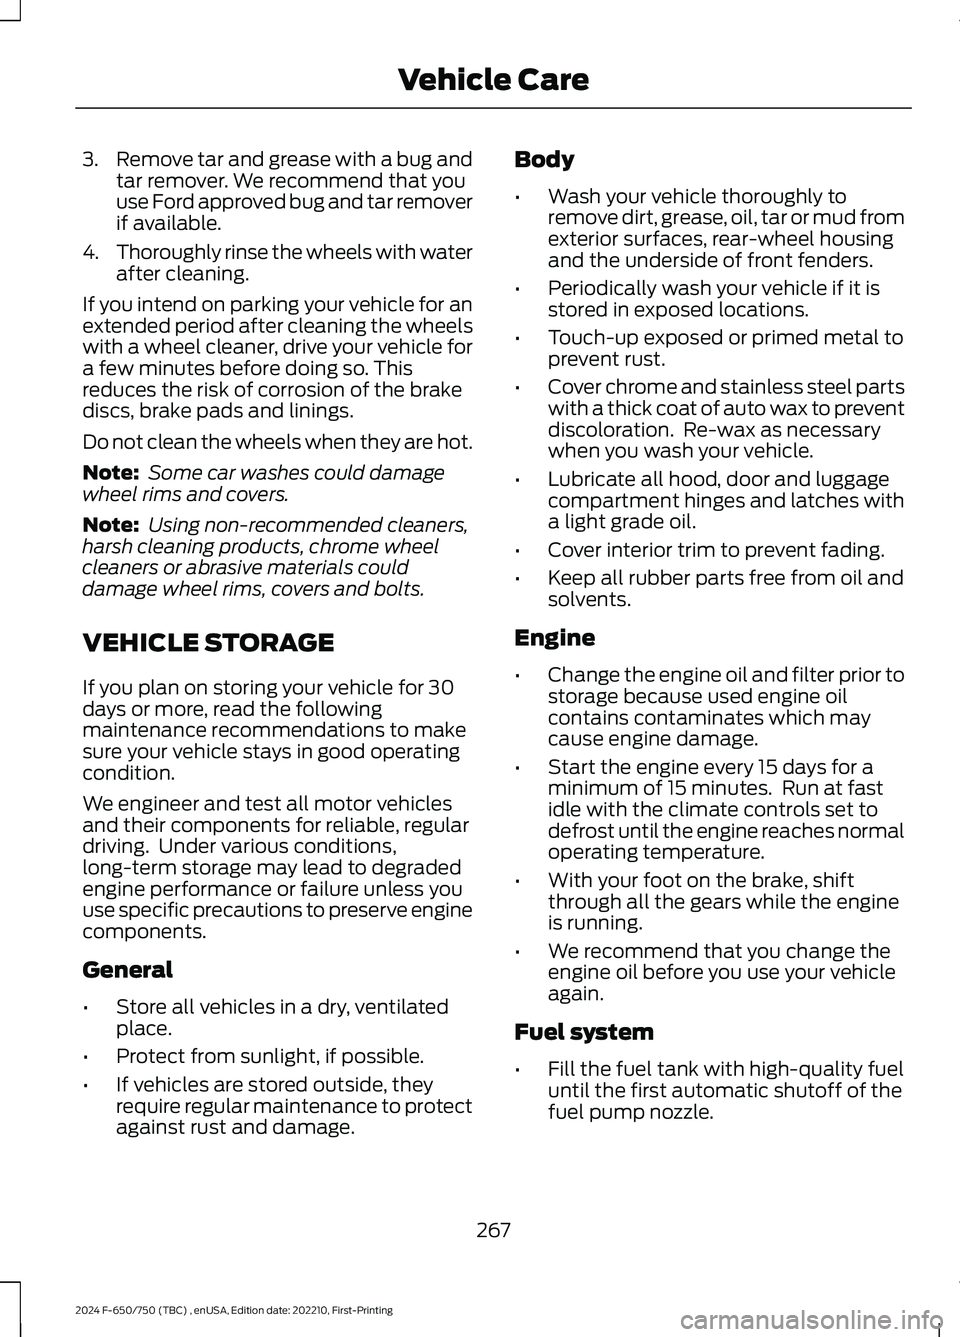
VEHICLE STORAGE
If you plan on storing your vehicle for 30days or more, read the followingmaintenance recommendations to makesure your vehicle stays in good operatingcondition.
We engineer and test all motor vehiclesand their components for reliable, regulardriving. Under various conditions,long-term storage may lead to degradedengine performance or failure unless youuse specific precautions to preserve enginecomponents.
General
•Store all vehicles in a dry, ventilatedplace.
•Protect from sunlight, if possible.
•If vehicles are stored outside, theyrequire regular maintenance to protectagainst rust and damage.
Body
•Wash your vehicle thoroughly toremove dirt, grease, oil, tar or mud fromexterior surfaces, rear-wheel housingand the underside of front fenders.
•Periodically wash your vehicle if it isstored in exposed locations.
•Touch-up exposed or primed metal toprevent rust.
•Cover chrome and stainless steel partswith a thick coat of auto wax to preventdiscoloration. Re-wax as necessarywhen you wash your vehicle.
•Lubricate all hood, door and luggagecompartment hinges and latches witha light grade oil.
•Cover interior trim to prevent fading.
•Keep all rubber parts free from oil andsolvents.
Engine
•Change the engine oil and filter prior tostorage because used engine oilcontains contaminates which maycause engine damage.
•Start the engine every 15 days for aminimum of 15 minutes. Run at fastidle with the climate controls set todefrost until the engine reaches normaloperating temperature.
•With your foot on the brake, shiftthrough all the gears while the engineis running.
•We recommend that you change theengine oil before you use your vehicleagain.
Fuel system
•Fill the fuel tank with high-quality fueluntil the first automatic shutoff of thefuel pump nozzle.
267
2024 F-650/750 (TBC) , enUSA, Edition date: 202210, First-PrintingVehicle Care
Page 274 of 386
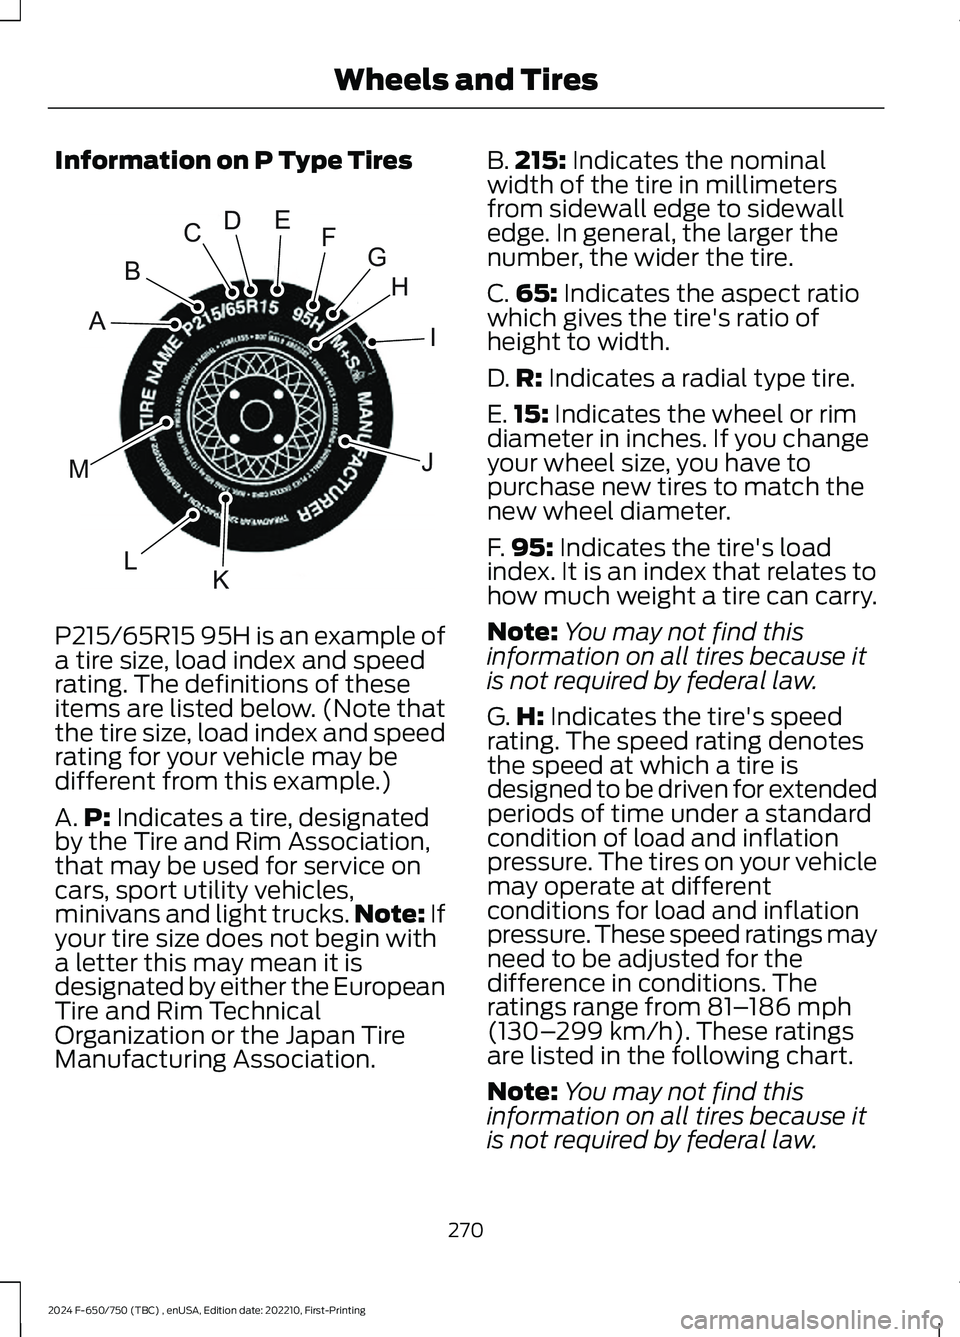
Information on P Type Tires
P215/65R15 95H is an example of
a tire size, load index and speedrating. The definitions of theseitems are listed below. (Note thatthe tire size, load index and speedrating for your vehicle may bedifferent from this example.)
A.P: Indicates a tire, designatedby the Tire and Rim Association,that may be used for service oncars, sport utility vehicles,minivans and light trucks.Note: Ifyour tire size does not begin witha letter this may mean it isdesignated by either the EuropeanTire and Rim TechnicalOrganization or the Japan TireManufacturing Association.
B.215: Indicates the nominalwidth of the tire in millimetersfrom sidewall edge to sidewalledge. In general, the larger thenumber, the wider the tire.
C.65: Indicates the aspect ratiowhich gives the tire's ratio ofheight to width.
D.R: Indicates a radial type tire.
E.15: Indicates the wheel or rimdiameter in inches. If you changeyour wheel size, you have topurchase new tires to match thenew wheel diameter.
F.95: Indicates the tire's loadindex. It is an index that relates tohow much weight a tire can carry.
Note:You may not find thisinformation on all tires because itis not required by federal law.
G.H: Indicates the tire's speedrating. The speed rating denotesthe speed at which a tire isdesigned to be driven for extendedperiods of time under a standardcondition of load and inflationpressure. The tires on your vehiclemay operate at differentconditions for load and inflationpressure. These speed ratings mayneed to be adjusted for thedifference in conditions. Theratings range from 81–186 mph(130–299 km/h). These ratingsare listed in the following chart.
Note:You may not find thisinformation on all tires because it
is not required by federal law.
270
2024 F-650/750 (TBC) , enUSA, Edition date: 202210, First-PrintingWheels and TiresHIJKLMABCDEFGE142543