2024 FORD F650/750 change wheel
[x] Cancel search: change wheelPage 278 of 386
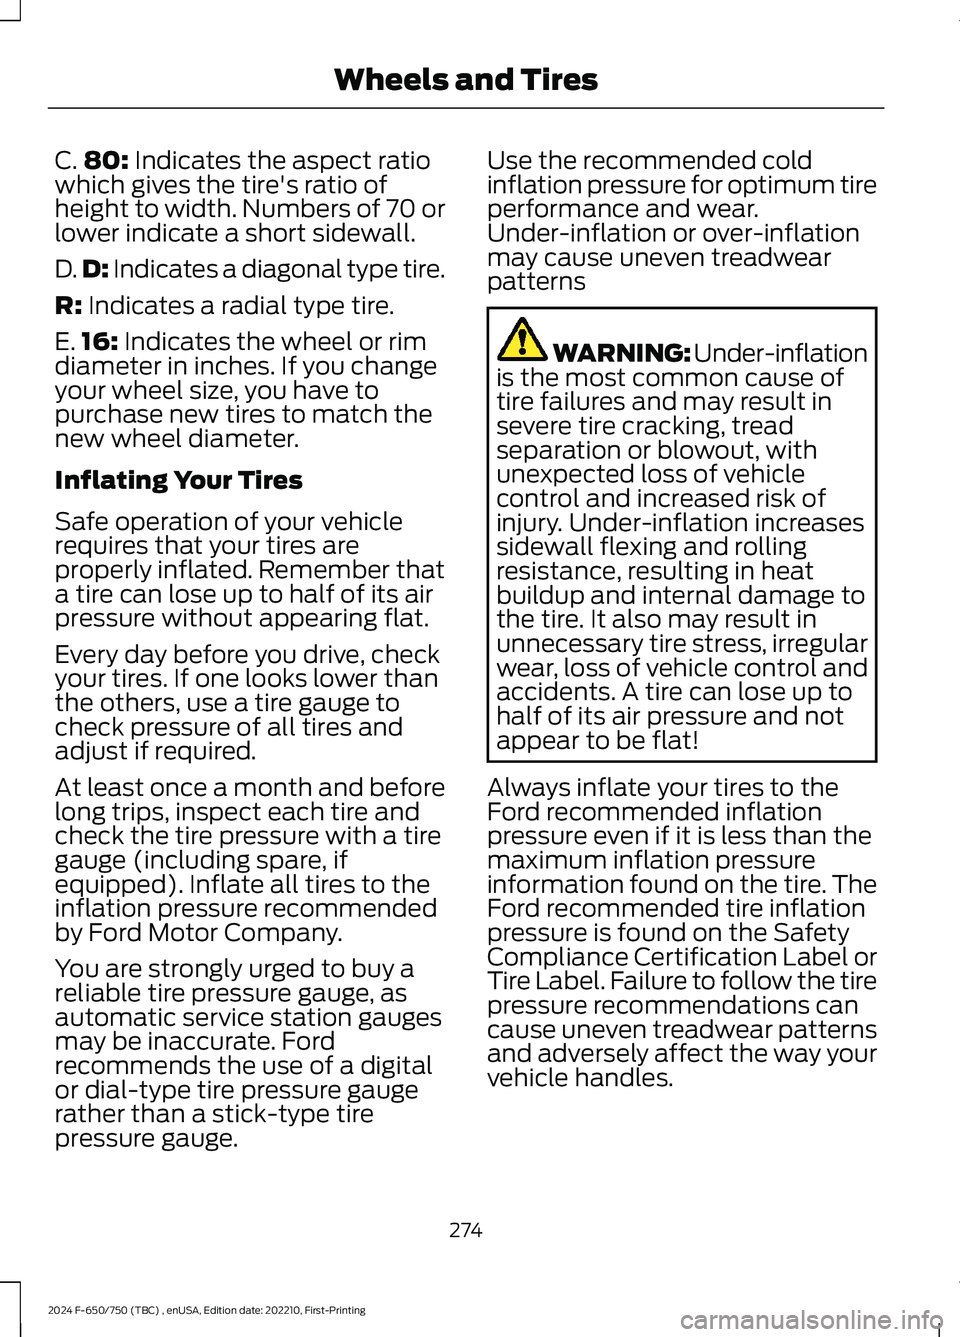
C.80: Indicates the aspect ratiowhich gives the tire's ratio ofheight to width. Numbers of 70 orlower indicate a short sidewall.
D.D: Indicates a diagonal type tire.
R: Indicates a radial type tire.
E.16: Indicates the wheel or rimdiameter in inches. If you changeyour wheel size, you have topurchase new tires to match thenew wheel diameter.
Inflating Your Tires
Safe operation of your vehiclerequires that your tires areproperly inflated. Remember thata tire can lose up to half of its airpressure without appearing flat.
Every day before you drive, check
your tires. If one looks lower thanthe others, use a tire gauge tocheck pressure of all tires andadjust if required.
At least once a month and beforelong trips, inspect each tire andcheck the tire pressure with a tiregauge (including spare, ifequipped). Inflate all tires to theinflation pressure recommendedby Ford Motor Company.
You are strongly urged to buy areliable tire pressure gauge, asautomatic service station gaugesmay be inaccurate. Fordrecommends the use of a digitalor dial-type tire pressure gaugerather than a stick-type tirepressure gauge.
Use the recommended coldinflation pressure for optimum tireperformance and wear.Under-inflation or over-inflationmay cause uneven treadwearpatterns
WARNING: Under-inflationis the most common cause oftire failures and may result insevere tire cracking, treadseparation or blowout, withunexpected loss of vehiclecontrol and increased risk ofinjury. Under-inflation increasessidewall flexing and rollingresistance, resulting in heatbuildup and internal damage tothe tire. It also may result inunnecessary tire stress, irregularwear, loss of vehicle control andaccidents. A tire can lose up tohalf of its air pressure and notappear to be flat!
Always inflate your tires to theFord recommended inflationpressure even if it is less than themaximum inflation pressureinformation found on the tire. TheFord recommended tire inflationpressure is found on the SafetyCompliance Certification Label orTire Label. Failure to follow the tirepressure recommendations cancause uneven treadwear patternsand adversely affect the way yourvehicle handles.
274
2024 F-650/750 (TBC) , enUSA, Edition date: 202210, First-PrintingWheels and Tires
Page 279 of 386
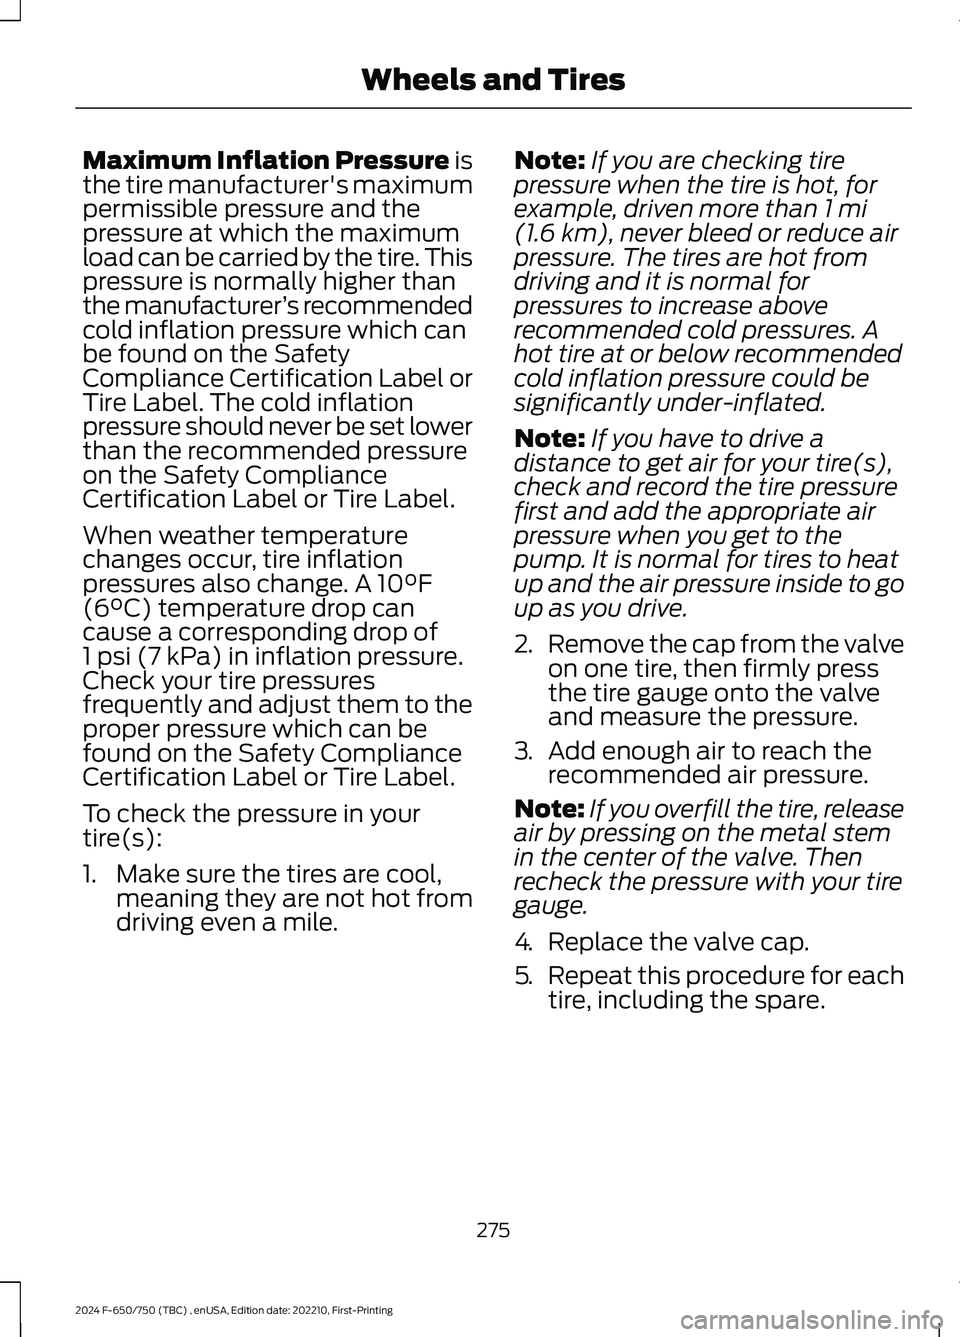
Maximum Inflation Pressure isthe tire manufacturer's maximumpermissible pressure and thepressure at which the maximumload can be carried by the tire. Thispressure is normally higher thanthe manufacturer’s recommendedcold inflation pressure which canbe found on the SafetyCompliance Certification Label orTire Label. The cold inflationpressure should never be set lowerthan the recommended pressureon the Safety ComplianceCertification Label or Tire Label.
When weather temperaturechanges occur, tire inflationpressures also change. A 10°F(6°C) temperature drop cancause a corresponding drop of1 psi (7 kPa) in inflation pressure.Check your tire pressuresfrequently and adjust them to theproper pressure which can befound on the Safety ComplianceCertification Label or Tire Label.
To check the pressure in yourtire(s):
1.Make sure the tires are cool,meaning they are not hot fromdriving even a mile.
Note:If you are checking tirepressure when the tire is hot, forexample, driven more than 1 mi(1.6 km), never bleed or reduce airpressure. The tires are hot fromdriving and it is normal forpressures to increase aboverecommended cold pressures. Ahot tire at or below recommendedcold inflation pressure could besignificantly under-inflated.
Note:If you have to drive adistance to get air for your tire(s),check and record the tire pressurefirst and add the appropriate airpressure when you get to thepump. It is normal for tires to heatup and the air pressure inside to goup as you drive.
2.Remove the cap from the valveon one tire, then firmly pressthe tire gauge onto the valveand measure the pressure.
3.Add enough air to reach therecommended air pressure.
Note:If you overfill the tire, releaseair by pressing on the metal stemin the center of the valve. Thenrecheck the pressure with your tiregauge.
4.Replace the valve cap.
5.Repeat this procedure for eachtire, including the spare.
275
2024 F-650/750 (TBC) , enUSA, Edition date: 202210, First-PrintingWheels and Tires
Page 291 of 386

Sometimes irregular tire wear canbe corrected by rotating the tires.
USING SNOW CHAINS
WARNING: Wheels and tires mustbe the same size, load index and speedrating as those originally fitted on thevehicle. Use of any other tire or wheelcan affect the safety and performanceof your vehicle. Additionally, the use ofnon-recommended tires and wheels cancause steering, suspension, axle, transfercase or power transfer unit failure.Follow the recommended tire inflationpressures found on the SafetyCompliance Certification label, or theTire Label on the B-Pillar or the edge ofthe driver door. Failure to follow thisinstruction could result in loss of vehiclecontrol, vehicle rollover, or personal injuryor death.
The tires on your vehicle have all-weathertreads to provide traction in rain and snow.However, in some climates, you may needto use snow tires and cables. If you needto use cables, it is recommended that steelwheels (of the same size andspecifications) be used, as cables may chipaluminum wheels.
Note:The suspension insulation andbumpers help prevent vehicle damage. Donot remove these components from yourvehicle when using snow tires and chains.
Follow these guidelines when using snowtires and chains:
•If possible, avoid fully loading yourvehicle.
•Install chains securely, verifying thatthe chains do not touch any wiring,brake lines or fuel lines.
•Drive cautiously. If you hear the chainsrub or bang against your vehicle, stopand retighten the chains. If this doesnot work, remove the chains to preventdamage to your vehicle.
•Remove the snow chains when theyare no longer needed. Do not use snowchains on dry roads.
Please contact your upfitter for approvedsnow chain types/sizes and otherrecommendations for snow chain use.
CHANGING A ROAD WHEEL
If you get a flat tire while driving, do notapply the brake heavily. Instead, graduallydecrease your speed. Hold the steeringwheel firmly and slowly move to a safeplace on the side of the road.
Tire Change Procedure
WARNING: To help prevent yourvehicle from moving when changing awheel, shift the transmission into park(P), set the parking brake and use anappropriate block or wheel chock tosecure the wheel diagonally opposite tothe wheel being changed. For example,when changing the front left wheel,place an appropriate block or wheelchock on the right rear wheel.
WARNING: Do not get under avehicle that is supported by a jack.
WARNING: Never place anythingbetween the vehicle jack and yourvehicle.
WARNING: Never place anythingbetween the vehicle jack and the ground.
287
2024 F-650/750 (TBC) , enUSA, Edition date: 202210, First-PrintingWheels and Tires
Page 292 of 386

WARNING: Do not attempt tochange a tire on the side of the vehicleclose to moving traffic. Pull far enoughoff the road to not obstruct the flow oftraffic and avoid the danger of being hitwhen operating the jack or changing thewheel.
Note:Passengers should not remain in thevehicle when the vehicle is being jacked.
Park on a level surface, set the parkingbrake and activate the hazard flashers.
1.Turn the engine off and block the wheelthat is diagonally opposite of the flattire using a wheel chock.
2.Loosen each wheel lug nut ½ turncounterclockwise, but do not removethem until the wheel is raised off theground.
3.Replace the flat tire with the spare tire,making sure the valve stem is facingoutward on all front and inboard rearwheels. If you are replacing theoutboard wheel, the valve stem mustbe facing inward. Reinstall the lug nutsuntil the wheel is snug against the hub.Do not fully tighten the lug nuts untilthe wheel has been lowered.
4.Lower the wheel and fully tighten thelug nuts in the order shown below. SeeTechnical Specifications (page 289).
5.Unblock the wheels.
8-lug nut torque sequence.
10-lug nut torque sequence.
288
2024 F-650/750 (TBC) , enUSA, Edition date: 202210, First-PrintingWheels and TiresE142551 13427658E161441 12345678910E169375
Page 335 of 386
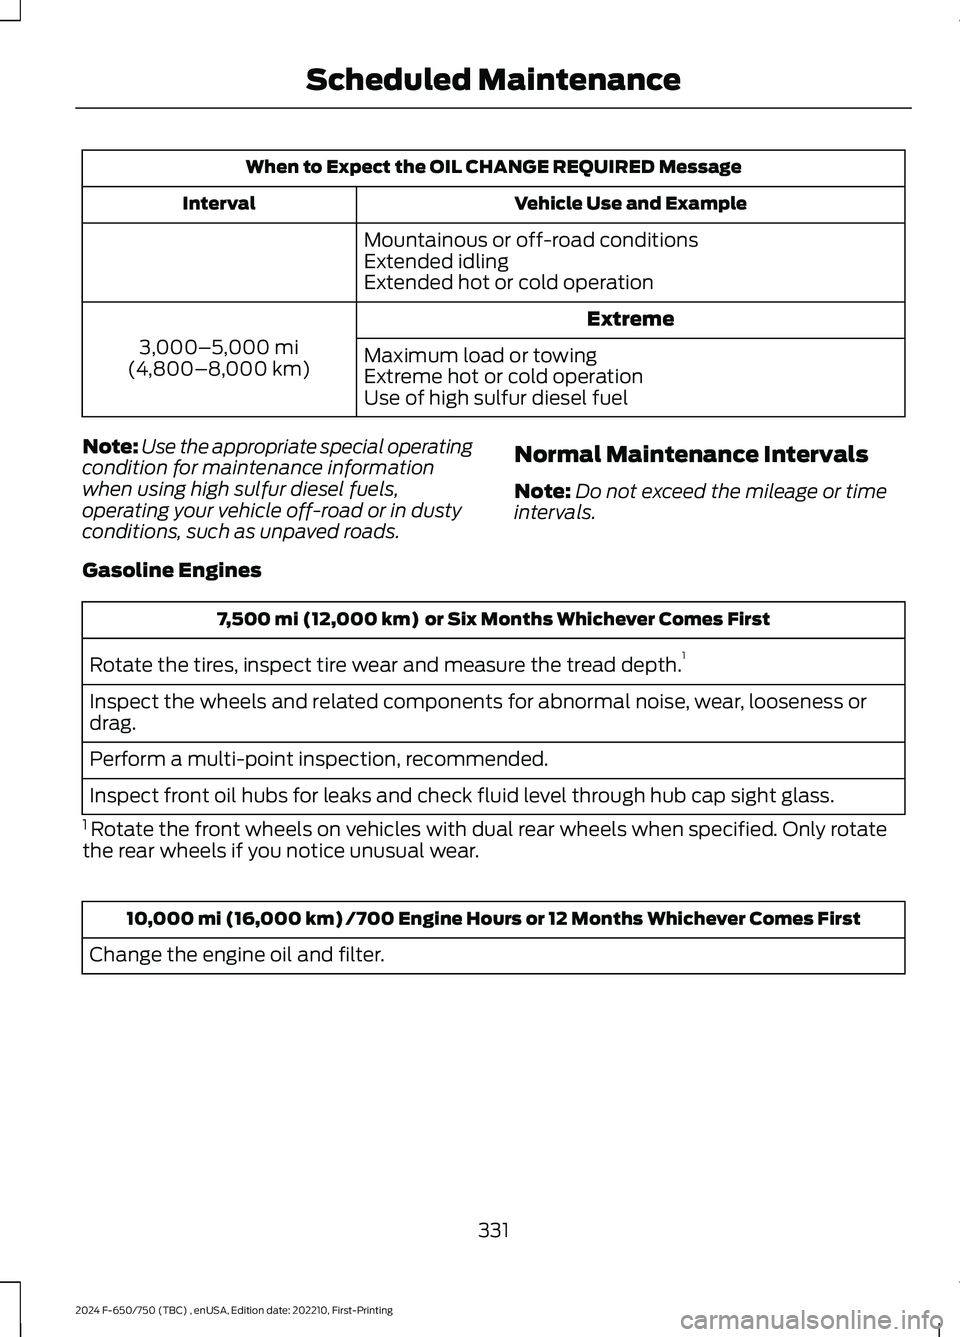
When to Expect the OIL CHANGE REQUIRED Message
Vehicle Use and ExampleInterval
Mountainous or off-road conditionsExtended idlingExtended hot or cold operation
Extreme
3,000–5,000 mi(4,800–8,000 km)Maximum load or towingExtreme hot or cold operationUse of high sulfur diesel fuel
Note:Use the appropriate special operatingcondition for maintenance informationwhen using high sulfur diesel fuels,operating your vehicle off-road or in dustyconditions, such as unpaved roads.
Normal Maintenance Intervals
Note:Do not exceed the mileage or timeintervals.
Gasoline Engines
7,500 mi (12,000 km) or Six Months Whichever Comes First
Rotate the tires, inspect tire wear and measure the tread depth.1
Inspect the wheels and related components for abnormal noise, wear, looseness ordrag.
Perform a multi-point inspection, recommended.
Inspect front oil hubs for leaks and check fluid level through hub cap sight glass.
1 Rotate the front wheels on vehicles with dual rear wheels when specified. Only rotatethe rear wheels if you notice unusual wear.
10,000 mi (16,000 km)/700 Engine Hours or 12 Months Whichever Comes First
Change the engine oil and filter.
331
2024 F-650/750 (TBC) , enUSA, Edition date: 202210, First-PrintingScheduled Maintenance
Page 336 of 386
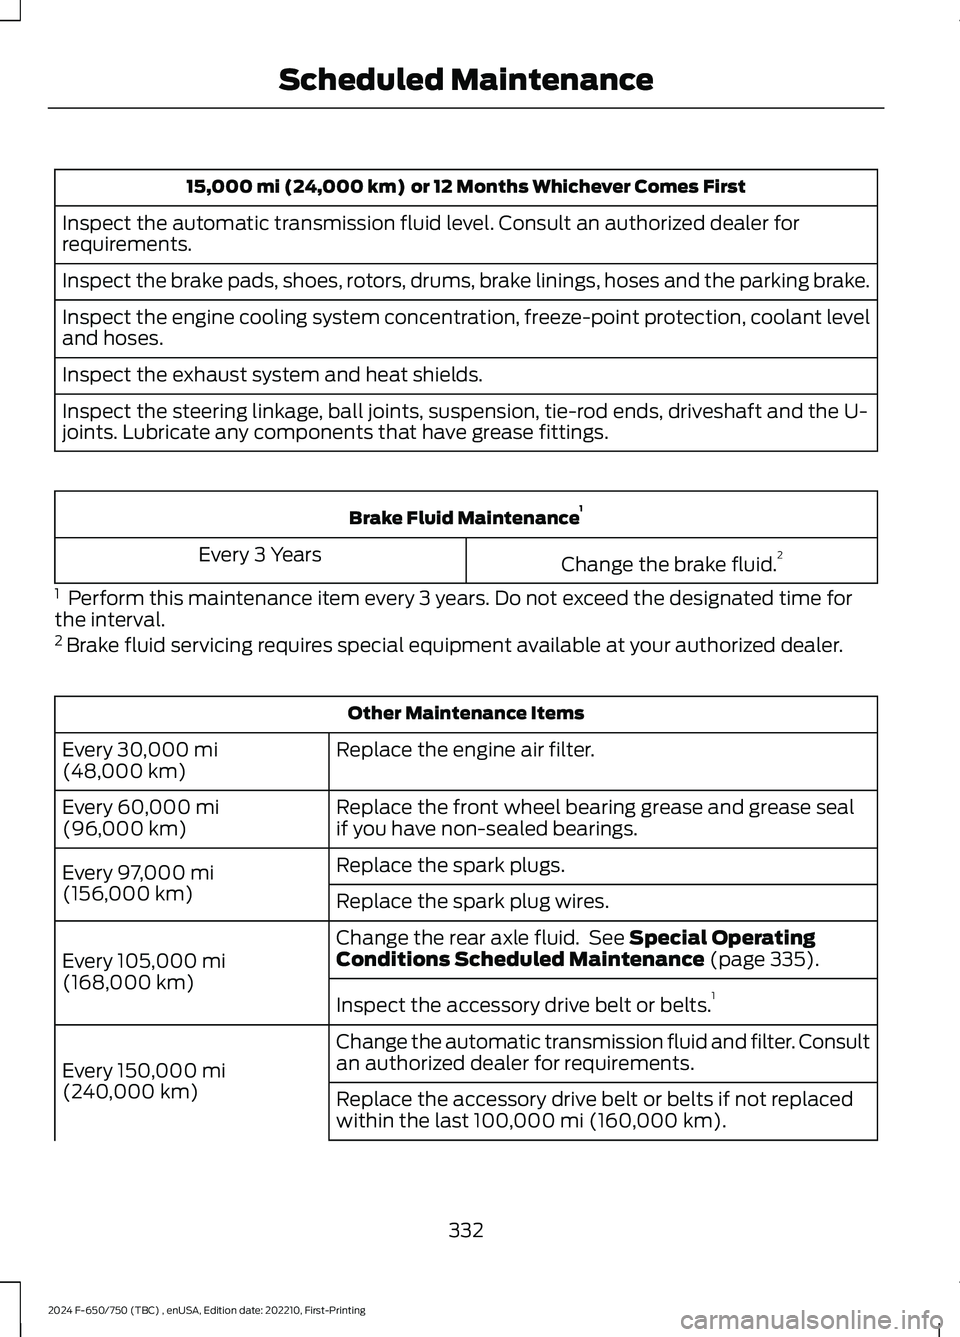
15,000 mi (24,000 km) or 12 Months Whichever Comes First
Inspect the automatic transmission fluid level. Consult an authorized dealer forrequirements.
Inspect the brake pads, shoes, rotors, drums, brake linings, hoses and the parking brake.
Inspect the engine cooling system concentration, freeze-point protection, coolant leveland hoses.
Inspect the exhaust system and heat shields.
Inspect the steering linkage, ball joints, suspension, tie-rod ends, driveshaft and the U-joints. Lubricate any components that have grease fittings.
Brake Fluid Maintenance1
Change the brake fluid.2Every 3 Years
1 Perform this maintenance item every 3 years. Do not exceed the designated time forthe interval.2 Brake fluid servicing requires special equipment available at your authorized dealer.
Other Maintenance Items
Replace the engine air filter.Every 30,000 mi(48,000 km)
Replace the front wheel bearing grease and grease sealif you have non-sealed bearings.Every 60,000 mi(96,000 km)
Replace the spark plugs.Every 97,000 mi(156,000 km)Replace the spark plug wires.
Change the rear axle fluid. See Special OperatingConditions Scheduled Maintenance (page 335).Every 105,000 mi(168,000 km)Inspect the accessory drive belt or belts.1
Change the automatic transmission fluid and filter. Consultan authorized dealer for requirements.Every 150,000 mi(240,000 km)Replace the accessory drive belt or belts if not replacedwithin the last 100,000 mi (160,000 km).
332
2024 F-650/750 (TBC) , enUSA, Edition date: 202210, First-PrintingScheduled Maintenance
Page 337 of 386
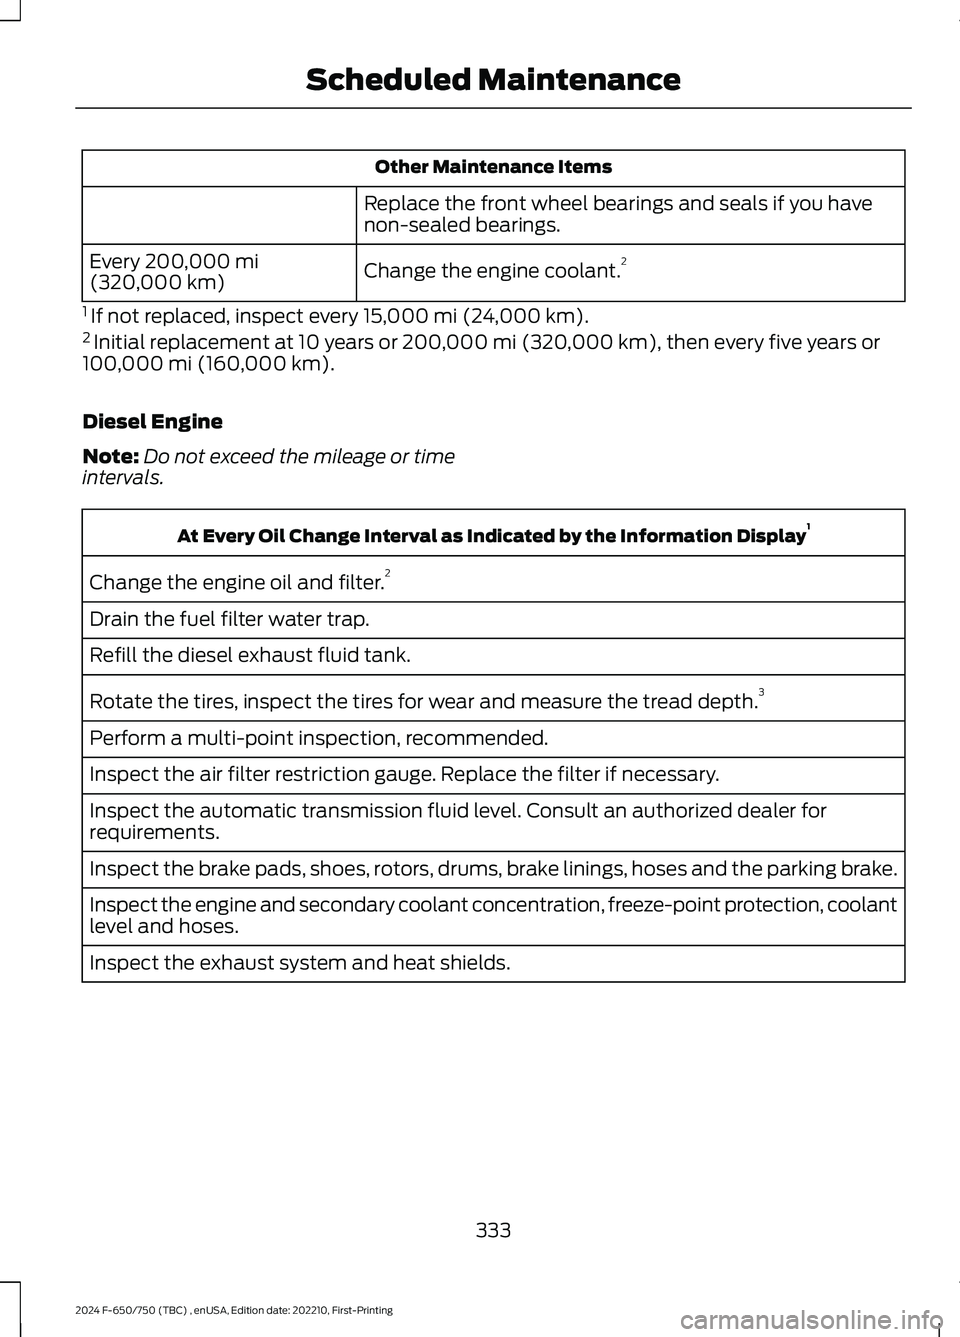
Other Maintenance Items
Replace the front wheel bearings and seals if you havenon-sealed bearings.
Change the engine coolant.2Every 200,000 mi(320,000 km)
1 If not replaced, inspect every 15,000 mi (24,000 km).2 Initial replacement at 10 years or 200,000 mi (320,000 km), then every five years or100,000 mi (160,000 km).
Diesel Engine
Note:Do not exceed the mileage or timeintervals.
At Every Oil Change Interval as Indicated by the Information Display1
Change the engine oil and filter.2
Drain the fuel filter water trap.
Refill the diesel exhaust fluid tank.
Rotate the tires, inspect the tires for wear and measure the tread depth.3
Perform a multi-point inspection, recommended.
Inspect the air filter restriction gauge. Replace the filter if necessary.
Inspect the automatic transmission fluid level. Consult an authorized dealer forrequirements.
Inspect the brake pads, shoes, rotors, drums, brake linings, hoses and the parking brake.
Inspect the engine and secondary coolant concentration, freeze-point protection, coolantlevel and hoses.
Inspect the exhaust system and heat shields.
333
2024 F-650/750 (TBC) , enUSA, Edition date: 202210, First-PrintingScheduled Maintenance
Page 338 of 386
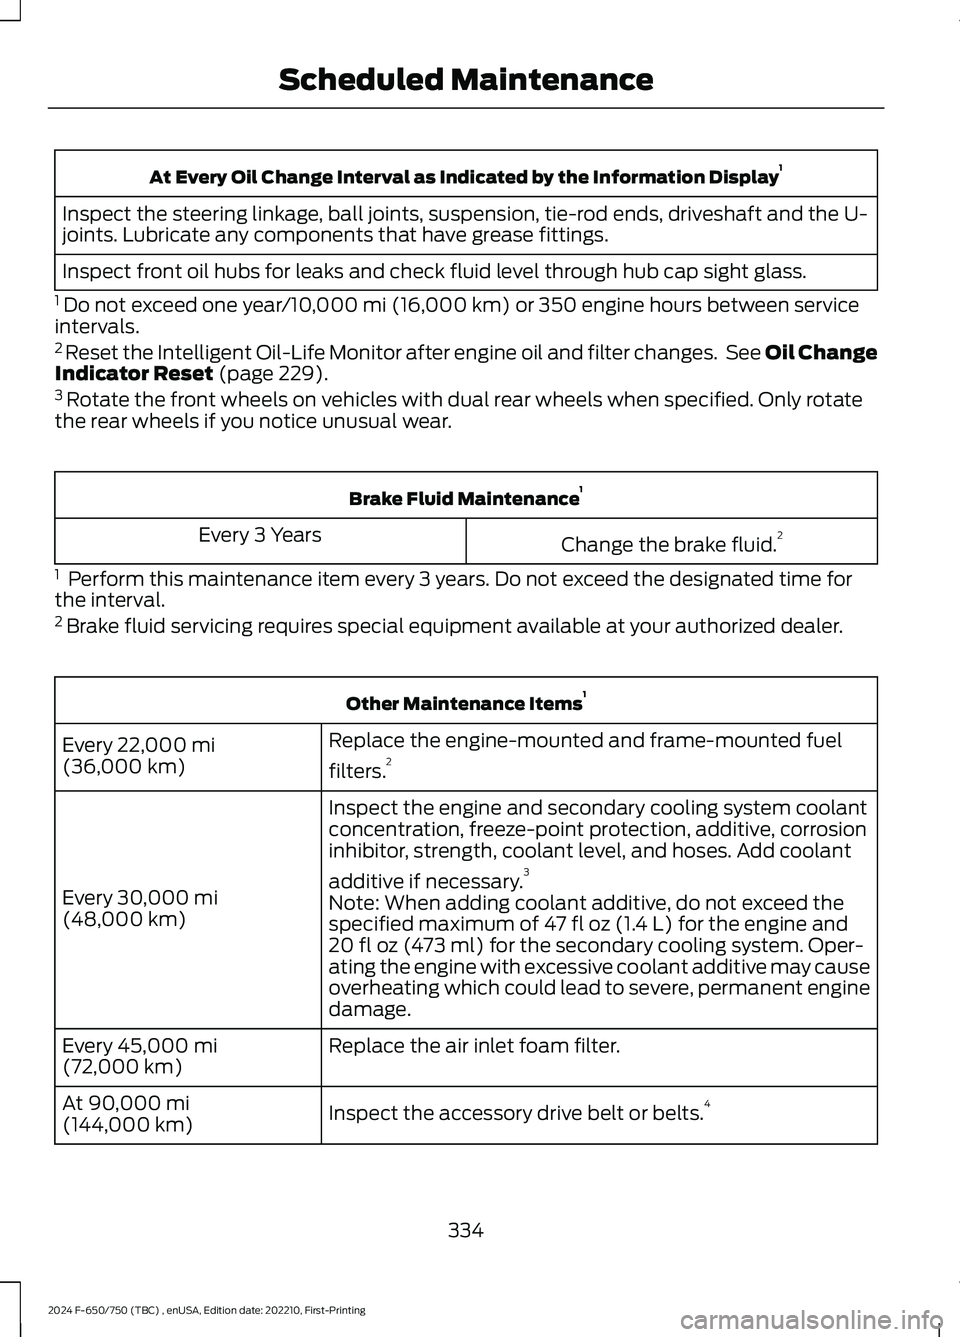
At Every Oil Change Interval as Indicated by the Information Display1
Inspect the steering linkage, ball joints, suspension, tie-rod ends, driveshaft and the U-joints. Lubricate any components that have grease fittings.
Inspect front oil hubs for leaks and check fluid level through hub cap sight glass.
1 Do not exceed one year/10,000 mi (16,000 km) or 350 engine hours between serviceintervals.2 Reset the Intelligent Oil-Life Monitor after engine oil and filter changes. See Oil ChangeIndicator Reset (page 229).3 Rotate the front wheels on vehicles with dual rear wheels when specified. Only rotatethe rear wheels if you notice unusual wear.
Brake Fluid Maintenance1
Change the brake fluid.2Every 3 Years
1 Perform this maintenance item every 3 years. Do not exceed the designated time forthe interval.2 Brake fluid servicing requires special equipment available at your authorized dealer.
Other Maintenance Items1
Replace the engine-mounted and frame-mounted fuel
filters.2Every 22,000 mi(36,000 km)
Inspect the engine and secondary cooling system coolantconcentration, freeze-point protection, additive, corrosioninhibitor, strength, coolant level, and hoses. Add coolant
additive if necessary.3
Every 30,000 mi(48,000 km)Note: When adding coolant additive, do not exceed thespecified maximum of 47 fl oz (1.4 L) for the engine and20 fl oz (473 ml) for the secondary cooling system. Oper-ating the engine with excessive coolant additive may causeoverheating which could lead to severe, permanent enginedamage.
Replace the air inlet foam filter.Every 45,000 mi(72,000 km)
Inspect the accessory drive belt or belts.4At 90,000 mi(144,000 km)
334
2024 F-650/750 (TBC) , enUSA, Edition date: 202210, First-PrintingScheduled Maintenance